
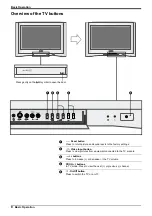


Advanced Operation
Advanced Operation
21
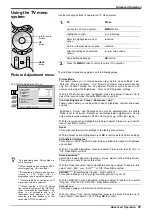
Using the TV menu
system
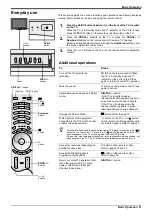
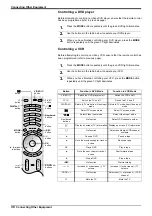
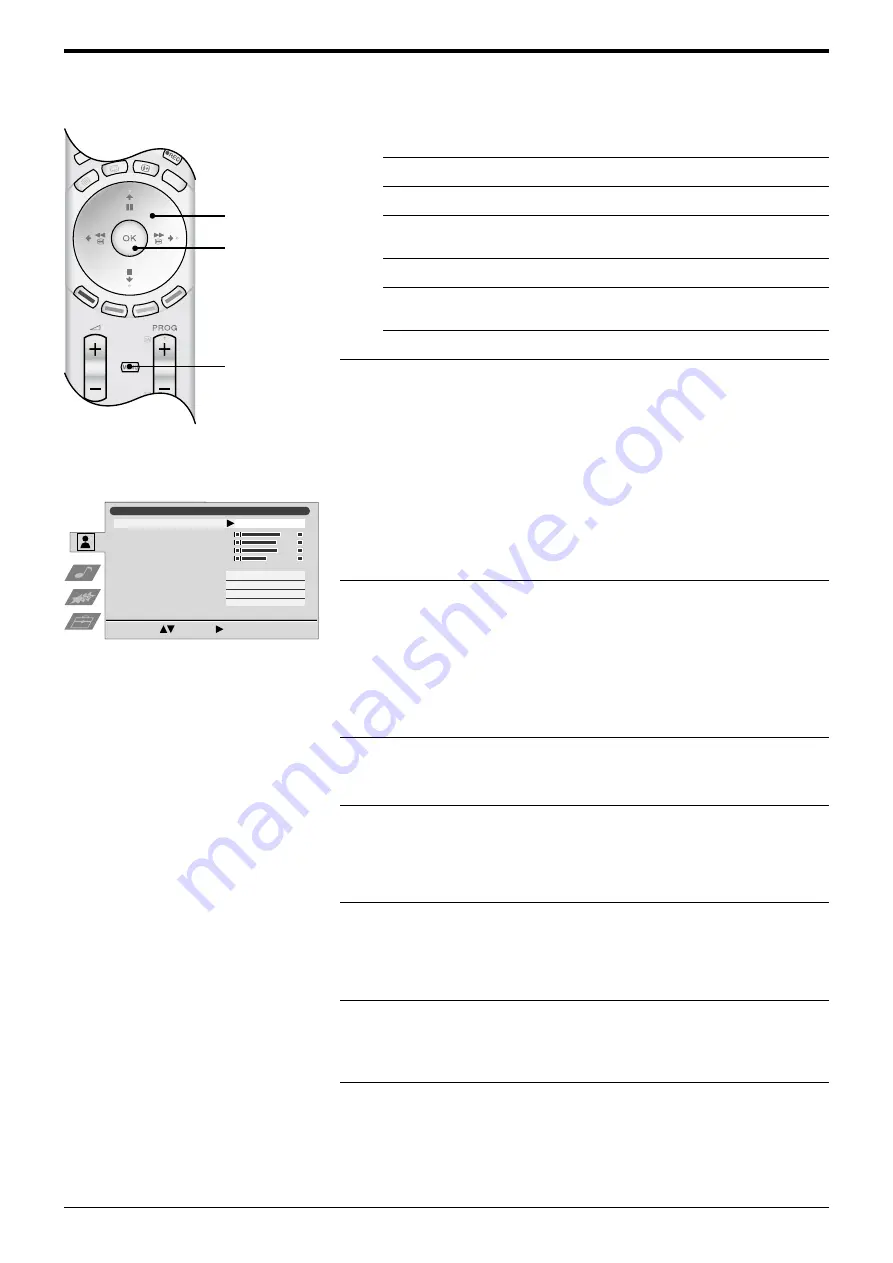
Use the following buttons to operate the TV menu system.
The individual menus are explained on the following pages.
Picture Adjustment menu
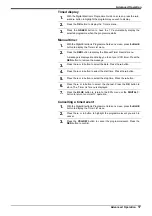
1.
To
Press
Access the TV menu system...
MENU button.
Highlight an option...
V
or
v
buttons.
Enter the highlighted menu or
option...
b
button.
Return to the last menu or option...
B
button.
Alter the settings of a selected
option...
V
,
v
,
B
or
b
buttons.
Store settings/changes...
OK button.
2.
Press the MENU button to return to normal TV operation.
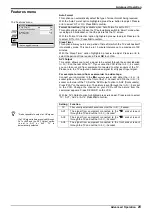
Picture Mode
This option allows you to choose between four picture mode settings, ‘Live’,
‘Personal’, ‘Movie’ and ‘Game’. ‘Live’, ‘Movie’ and ‘Game’ are preset modes and
only the ‘Contrast’ setting can be adjusted. ‘Personal’ mode however, also
allows you to adjust the ‘Brightness’, ‘Colour’ and ‘Sharpness’ settings.
With the ‘Picture Mode’ option highlighted, press
b
to adjust. Press
V
or
v
to
select the required mode. Press the OK button to confirm.
Contrast, Brightness*, Colour*, Sharpness*, Hue**
These options allow you to adjust the contrast, brightness, contrast, sharpness
and hue.
‘Brightness’, ‘Colour’ and ‘Sharpness’ can only be adjusted when the picture
‘Mode’ is set to ‘Personal’. ‘Sharpness’ is not adjustable in digital mode. ‘Hue’ is
only available when viewing an NTSC colour signal, e.g. USA video tapes.
With the required option highlighted, press
b
to adjust. Press
B
or
b
to set the
level. Press OK to confirm.
Reset
This option resets all picture settings to the factory preset levels.
With the ‘Reset’ option highlighted, press OK to restore default picture settings.
AI (Artificial Intelligence)
This option monitors the picture and limits any sudden increases in brightness
and contrast.
With the ‘AI’ option highlighted, press
b
to adjust. Press
V
or
v
to select ‘On’ or
‘Off’. Press OK to confirm.
Noise Reduction***
Sometimes a weak signal can result in a ‘snowy’ picture (called Picture Noise).
This option can help to reduce this effect.
With the ‘Noise Reduction’ option highlighted, press
b
to adjust. Press
V
or
v
to
select ‘High’, ‘Mid’, ‘Low’, ‘Auto’**** or ‘Off’. Press OK to confirm.
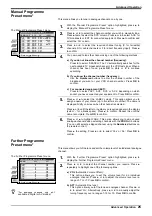
DRC-MF***** (Digital Reality Creation - Multi Function)
This option allows you to enjoy higher quality pictures on your TV.
With the ‘DRC-MF’ option highlighted, press
b
to adjust. Press
V
or
v
to select
‘Progres.’, ‘DRC1250’ or ‘DRC 100’. Press OK to confirm.
Colour Tone
This option allows you to alter the tint of the picture.
With the ‘Colour Tone’ option highlighted, press
b
to adjust. Press
V
or
v
to
select ‘Warm’, ‘Standard’ or ‘Cool’. Press OK to confirm.
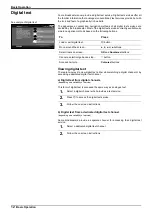
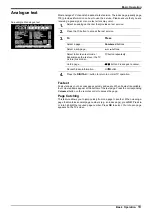
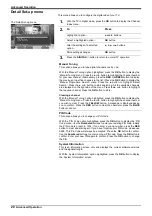
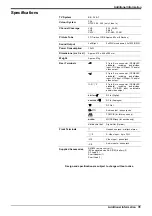
The ‘Picture Adjustment’ menu.
z
*Only adjustable when ‘Picture Mode’ is
set to ‘Personal’.
**Only available when viewing an NTSC
colour signal (e.g. US video tape).
***Not available in Digital mode or when
viewing a YUV signal (HD or
progressive) from external equipment.
****Not available when viewing any SD
signal from external equipment.
*****When viewing a HD YUV signal
from external equipment, the ‘DRC-MF’
option is replaced by ‘Input Signal’. This
option is not selectable and is for
information only, displaying the line
scanning rate and frequency of the
connected HD YUV equipment.
Picture Adjustment
Personal
Picture Mode
Contrast
Brightness
Colour
Sharpness
Reset
AI
Noise Reduction
DRC-MF
Colour Tone
On
Auto
DRC1250
Cool
Select:
Enter:
G
MO
DE
IN
DE
X
OK
button
MENU
button
V
,
v
,
B
, and
b
buttons


