background image


66

System Configuration Window


Ch
apt

er 3  Men

u

 Wind

o

w

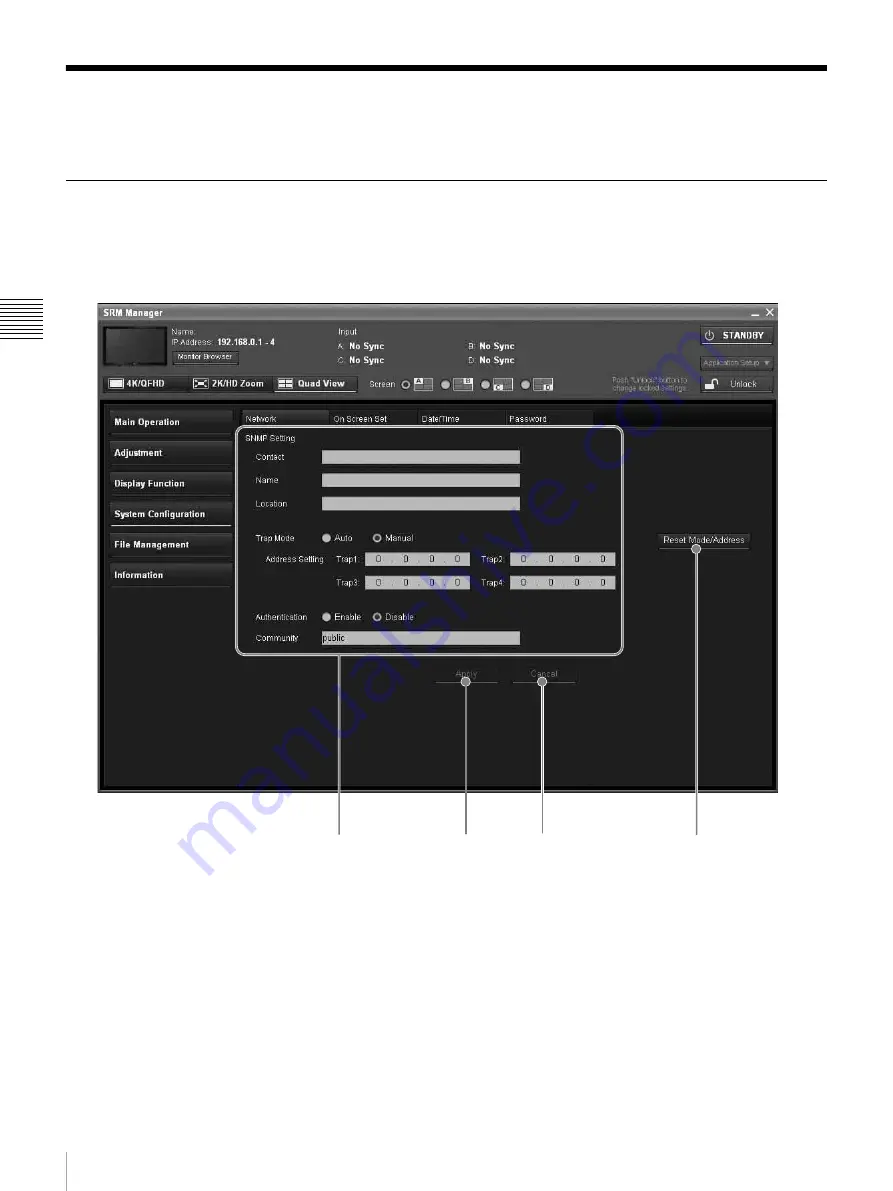
System Configuration Window

[ ]: default setting preset at the factory

Network Tab Window

This window is used to set the control function from the 
network.

a

SNMP Setting

Sets SNMP.
For the setting value, consult the network administrator.

Contact:

 Sets the information of the administrator (up to 

20 characters).

Name:

 Sets the information for the administration (device 

ID) (up to 20 characters).

Location:

 Sets the location information (up to 20 

characters).

Trap Mode:

 Sets the settings to send information 

manually or automatically (Auto or [Manual]).

Address Setting:

 Sets the IP address to send the 

information.
When Trap Mode is set to Manual, you can select this 
item.
When the item is selected, you can set the IP address 
of Trap1 to Trap4. [0 . 0 . 0 . 0]

Authentication:

 Sets whether or not to issue the 

authentication (Enable or [Disable]).

1

2

4

3

Содержание Trimaster SRM-L560

Страница 1: ...LCD VIDEO MONITOR Operating Instructions Before operating the unit please read this manual thoroughly and retain it for future reference SRM L560 4 155 648 12 1 2009 Sony Corporation ...

Страница 2: ... operation Do not block the ventilation slots at the top left and right side and rear panels Leave a space around the unit for ventilation Leave more than 15 cm of space in the rear of the unit to secure the operation area When the unit is installed on the desk or the like leave at least 15 cm of space in the rear Leaving 15 cm or more of space above the unit is recommended for service operation U...

Страница 3: ...4 Carrying the Monitor 15 About the Screen Mode 15 4K QFHD Mode 15 Quad View Mode 16 2K HD Zoom Mode 16 Screen Modes and Applicable Setting Values 16 Number of Signal Inputs in Single Screen Mode 17 Input Signal and Selectable Screen Mode 17 Installing an Input Adaptor 18 Installing an Input Adaptor 18 Connecting the Cable 21 Attaching the Hooks 29 Installing Application Software PC Application 29...

Страница 4: ...in Operation Window 44 Configurations Tab Window 44 Controls Tab Window 50 Adjustment Window 52 Picture Manual Tab Window 52 Color Temp Auto Tab Window 53 Color Temp Manual Tab Window 56 Display Function Window 59 User LUT Manager Tab Window 59 User Matrix Gamma Tab Window 60 Gamut Error Display Tab Window 61 Miscellaneous Tab Window 63 Internal Signal Tab Window 64 System Configuration Window 66 ...

Страница 5: ...e 84 Appendixes Specifications 85 Input Signals and Adjustable Setting Items 87 Available Signal Systems 93 Available Signal Formats 95 Aperture Modification Frequency 100 Picture Display Size 101 Picture Frame Display 104 Matrix Gamma Setting Table 105 Connection Combination Table When an SDI Signal Is Input 112 Format Input Setting Table 115 Scan Mode Image 117 Troubleshooting 121 Dimensions 127...

Страница 6: ...nd rear panels Leave a space around the unit for ventilation Leave more than 15 cm of space in the rear of the unit to secure the operation area When the unit is installed on the desk or the like leave at least 15 cm of space in the rear Leaving 15 cm or more of space above the unit is recommended for service operation Handling the LCD Screen The LCD panel fitted to this unit is manufactured with ...

Страница 7: ... monitoring ATC Air Traffic Control research and development video equipment development HD video production or GIS Geographic Information System where precise image reproduction or four screen display is required The SRM L560 features flat panel and TRIMASTER which is a new technology developed for three elements accurate color reproduction precision imaging and quality picture consistency that a...

Страница 8: ... function which maps the pixel of the signal to the panel on a one to one basis Using the shift function enables you to check every corner of the picture For the operation see Selecting the Native Scan Scan Mode on page 81 Aspect selectable function A squeezed and recorded signal is displayed with the correct aspect ratio You can select from 16 9 1 896 1 and 2 39 11 aspect ratio 1 When the aspect ...

Страница 9: ...atisfy the ON LINE signal specifications For use of the MONITOR OUT connector in 2K HD Zoom mode connect a coaxial cable less than 1 m 3 3 feet long For how to connect the cable see page 23 BKM 250TG 3G HD SD SDI Input Adaptor A decoder for serial digital component signals is built in Time code and audio level of the embedded audio signals superimposed on the SDI signals can be displayed Input out...

Страница 10: ...warning operation mode display by the lamp on page 10 b STATUS lamp The lamp may show the error warning or operation mode For details see Error warning operation mode display by the lamp on page 10 c OVER RANGE lamp Lights in orange when the picture is displayed in black detail mode or when the dynamic range of the following item is exceeded Contrast Contrast Flashes when the luminance is decrease...

Страница 11: ...emperature of the LCD panel is unusual Lights in orange Goes out Flashes in green The RGB sensor of the LED backlight part is unusual Goes out Lights in blue Flashes in green LED disconnection of the LED backlight part Lights in orange Flashes in blue Flashes in green The LED VF power voltage in the LED backlight part is unusual VF feedback range over Lights in orange Flashes in blue Flashes in re...

Страница 12: ...vice wiring that might have excessive voltage to this port Follow the instructions for this port The effective communication throughput may be affected by the network system d NETWORK switch LAN To connect to the network PEER TO PEER To connect to the LAN 10 100 connector of the PC in one to one connection Set the NETWORK switches on input blocks A to D of the monitor to the same setting Otherwise...

Страница 13: ... 118 1 8 inches in length h HDMI input connector Inputs the HDMI signal HDMI High Definition Multimedia Interface is an interface that supports both video and audio on a single digital connection allowing you to display high quality digital picture The HDMI specification supports HDCP High bandwidth Digital Content Protection a copy protection technology that incorporates coding technology for dig...

Страница 14: ... molecules with the backlight always lit For this reason in a dark place an LCD monitor screen shows very dim light leaks from the black image We recommend that you adjust the ambient light and use in an environment that does not degrade the reproduction of black Viewing angle The ideal viewing angle is within 5 degrees up down left right off the center of the monitor screen when the operator view...

Страница 15: ...tall the unit on a horizontal flat rack in such a manner that the rack will not become deformed or break About the Screen Mode You can select the mode from three screen modes according to the type of the input signal or monitoring use Input the signal with the specified connections page 21 Click the corresponding screen mode button page 42 to select the screen mode 4K QFHD Mode Select to confirm t...

Страница 16: ...for the DVI or HDMI signal input When interlaced signals are input from the four inputs A to D and combined to display one image a horizontal line may appear on the border of four divided screens owing to the process of I P conversion About the magnified screen When the BKM 250TG is used The screen A is magnified When the BKM 243HS or BKM 244CC is used You can select a screen to be magnified from ...

Страница 17: ...set Manual selection for Contrast Bright Chroma adjustments Main Operation Controls tab Contrast Bright Chroma manual adjustment values Main Operation Controls tab Color Temp adjustment values and related settings Adjustment Color Temp Auto tab and Color Temp Manual tab Adjustment values for Marker Preset data Main Operation Configurations tab Edit of Marker Preset Matrix and Gamma settings for Us...

Страница 18: ...ed combination of the connection Select the proper combination according to the system in use For details on combination patterns see Connection Combination Table When an SDI Signal Is Input on page 112 Installing an Input Adaptor Installing an Input Adaptor Each input adaptor can be installed in any input option slot on the side panel When you install the following input adaptor to this equipment...

Страница 19: ...ption slots 1 and 2 The input adaptors of different models cannot be used at the sama time To connect the input cables When the BKM 243HS or BKM 244CC input adaptors are used Input the Link A signal to option slot 1 and Link B signal to option slot 2 Connect the cables to the connectors with the same input number on the input adaptors installed in option slots 1 and 2 When the BKM 250TG input adap...

Страница 20: ... 1 and slot 2 To install the adaptors in slot 1 only Install the input adaptors of the same model in slot 1 for four screens To install the eight adaptors The four input adaptors to be installed in slot 1 and those in slot 2 should be of the same models respectively Screen A Screen B Screen C Screen D DVI D or HDMI input connectors and the position where the input adaptors are to be installed for ...

Страница 21: ...T 1 or INPUT 2 on the adaptor When the BKM 243HS or BKM 244CC is used To connect in Single link When four input adaptors are installed you can select the signal from two systems and when eight input adaptors are installed you can select from four systems Input signal 1 Input signal 2 Input signal 2 Input signal 1 A B OPTION 1 OPTION 1 OPTION 2 OPTION 2 INPUT 1 INPUT 2 MONITOR OUT INPUT 1 INPUT 2 M...

Страница 22: ...ed you can select from 16 systems A B OPTION 1 OPTION 1 OPTION 2 OPTION 2 INPUT 1 INPUT 2 MONITOR OUT INPUT 1 INPUT 2 MONITOR OUT INPUT 1 INPUT 2 MONITOR OUT INPUT 1 INPUT 2 MONITOR OUT C D OPTION 1 OPTION 1 OPTION 2 OPTION 2 INPUT 1 INPUT 2 MONITOR OUT INPUT 1 INPUT 2 MONITOR OUT INPUT 1 INPUT 2 MONITOR OUT INPUT 1 INPUT 2 MONITOR OUT Example when eight input adaptors are used Input signal 1 Inpu...

Страница 23: ...nal to be output from MONITOR OUT to INPUT 2 on the input adaptor installed in the same slot slot 1 or slot 2 of another input block To connect in Single link When four input adaptors are installed you can select the signal from four systems and when eight input adaptors are installed you can select from eight systems Note A B OPTION 1 OPTION 1 OPTION 2 OPTION 2 INPUT 1 INPUT 2 MONITOR OUT INPUT 1...

Страница 24: ...ONITOR OUT INPUT 1 INPUT 2 MONITOR OUT INPUT 1 INPUT 2 MONITOR OUT C D OPTION 1 OPTION 1 OPTION 2 OPTION 2 INPUT 1 INPUT 2 MONITOR OUT INPUT 1 INPUT 2 MONITOR OUT INPUT 1 INPUT 2 MONITOR OUT INPUT 1 INPUT 2 MONITOR OUT Example when eight input adaptors are used Input signal 1 Link A Input signal 2 Link A Input signal 3 Link B Input signal 4 Link B Input signal 1 Link B Input signal 2 Link B Input ...

Страница 25: ...elect the signal from two systems and when eight input adaptors are installed you can select from four systems A B OPTION 1 OPTION 1 OPTION 2 OPTION 2 INPUT 1 MONITOR OUT 1 INPUT 2 MONITOR OUT 2 INPUT 1 MONITOR OUT 1 INPUT 2 MONITOR OUT 2 INPUT 1 MONITOR OUT 1 INPUT 2 MONITOR OUT 2 INPUT 1 MONITOR OUT 1 INPUT 2 MONITOR OUT 2 C D OPTION 1 OPTION 1 OPTION 2 OPTION 2 INPUT 1 MONITOR OUT 1 INPUT 2 MON...

Страница 26: ...talled and an HD SDI Single link or Dual link or 3G SDI signal is input A B OPTION 1 OPTION 1 OPTION 2 OPTION 2 INPUT 1 MONITOR OUT 1 INPUT 2 MONITOR OUT 2 INPUT 1 MONITOR OUT 1 INPUT 2 MONITOR OUT 2 INPUT 1 MONITOR OUT 1 INPUT 2 MONITOR OUT 2 INPUT 1 MONITOR OUT 1 INPUT 2 MONITOR OUT 2 C D OPTION 1 OPTION 1 OPTION 2 OPTION 2 INPUT 1 MONITOR OUT 1 INPUT 2 MONITOR OUT 2 INPUT 1 MONITOR OUT 1 INPUT ...

Страница 27: ... 2 INPUT 1 INPUT 2 MONITOR OUT INPUT 1 INPUT 2 MONITOR OUT INPUT 1 INPUT 2 MONITOR OUT INPUT 1 INPUT 2 MONITOR OUT Example when eight input adaptors are used The INPUT 1 connectors on OPTION 1 and OPTION 2 are used for Dual link connection in 4K QFHD mode The INPUT 2 connectors on OPTION 1 and OPTION 2 are used for Single link connection in Quad View mode Input signal 1 Link A Input signal 2 HD SD...

Страница 28: ...OUT 1 INPUT 2 MONITOR OUT 2 INPUT 1 MONITOR OUT 1 INPUT 2 MONITOR OUT 2 INPUT 1 MONITOR OUT 1 INPUT 2 MONITOR OUT 2 INPUT 1 MONITOR OUT 1 INPUT 2 MONITOR OUT 2 Example when eight input adaptors are used The INPUT 1 and INPUT 2 connectors on OPTION 1 are used for Dual link connection in 4K QFHD mode The INPUT 1 connectors on OPTION 2 are used for Single link connection in Quad View mode The INPUT 2...

Страница 29: ...ate Edition Business Edition Windows 7 Ultimate Edition Professional Edition PC CPU Intel Celeron 1 GHz or more Memory 512 MB or more Windows XP 1 GB or more Windows Vista Windows 7 Display 1024 768 or higher Hi Color 16 bit or higher HDD Connected to a PC via the IDE port Usable memory with 700 MB or more OP drive CD ROM 8 or faster Browser Internet Explorer 6 0 or later Network 10BASE T 100BASE ...

Страница 30: ...M Manager in the index window The setup exe starts If setup exe does not start automatically double click setup exe in the root folder to start it manually 3 Follow the instructions in the window and click Execute The window for preparing the installation appears After a while the wizard of the SRM Manager appears 4 Click Next The License Agreement window appears 5 Read the license agreement click...

Страница 31: ...nager Click Start and select Programs Sony Monitor Utilities Sony Monitor Tools SRM Manager then Uninstall SRM Manager Then uninstall the SRM Manager according to the instructions shown on the display Connections of the Monitor and PC Connecting a Monitor 1 Turn off the MAIN POWER switch of the monitor 2 Connect the LAN 10 100 connector of the monitor and the LAN 10 100 connector of the PC using a...

Страница 32: ...onitor referring to Configuring the Network page 34 1 Turn off the MAIN POWER switch of the monitor 2 Connect to the network using a 10BASE T 100BASE TX cable not supplied We recommend to use an optional switching hub with auto selection function of a straight cross cable AUTO MDI MDI X To connect multiple monitors network configuration of the monitors is required Before setting the NETWORK switch...

Страница 33: ... Monitor Press the MAIN POWER switch on the side panel to turn on the power When you turn on the monitor for the first time after purchasing it the Select Area screen is displayed Select the area where you intend to use this monitor For selecting the area see page 37 The warm up time is more than 30 minutes approximately To turn off the monitor Press the MAIN POWER switch on the side panel to turn...

Страница 34: ...k 255 255 255 0 Network Configuration for the Monitor Perform the network configuration for the monitor using a Web browser The name can be set for an individual monitor using a Web browser You can also optionally set a password for the network configuration of the monitor page 35 We recommend configuring the network when a single monitor is connected to the PC For the connection between the monit...

Страница 35: ...ng it will be deleted before transmission to the SRM L560 3 Click the Submit button When the configuration is completed the message Operation has been succeeded appears Wait until the message appears after clicking the Submit button To change the password Set the network password 1 Click the Password button The password setup window appears 2 Enter the current password in the Old Password text box...

Страница 36: ...l No Serial number of the monitor IP Address IP address of the monitor For setting up Monitor Name and IP Address see page 34 b Connect Connects the selected monitor to the PC for controlling the monitor c Cancel Closes the window without connecting Note when starting the SRM Manager When the Operating System of the PC is blocked with the Windows firewall or any commercially available firewall sof...

Страница 37: ...ssia Middle East Middle East Asia Except Japan NTSC Area Asia Except Japan NTSC Area Asia Except Japan PAL Area Asia Except Japan PAL Area Japan Japan Customers who will use this monitor in the shaded areas shown in the map below should select Asia Except Japan NTSC Area Other customers should select Asia Except Japan PAL Area 3 Select the color temp and set the value Color Temp Color Gamut Emulat...

Страница 38: ...he monitor display the white signal and leave it in this state for more than 30 minutes About monitor adjustment The monitor is used as a measuring instrument and is required to faithfully reproduce the input signal To measure the signal accurately the monitor must be calibrated correctly using a reference signal To calibrate adjust the following items in sequence 1 Chroma adjustment You can save ...

Страница 39: ...e 53 of the Adjustment window and adjust the color temperature Manual adjustment 1 Select Color Temp Manual tab window page 56 of the Adjustment window 2 Select Start Adjustment 3 Adjust the color as desired with the Current xy values or of R G B 4 Click Apply The adjusted data is confirmed Brightness Contrast Adjustment As an image on a color video monitor is seen differently according to the amb...

Страница 40: ...icture Preset D Cine is selected in Picture Preset of the Configurations tab window of the Main Operation window 5 As the brightness and contrast adjustments affect each other repeat the adjustments of steps 3 and 4 When the contrast of the monitor is adjusted the luminance of the backlight is adjusted for a picture of luminance 40 cd m2 or higher and the contrast is adjusted by the signal level f...

Страница 41: ...Programs Sony Monitor Utilities then SRM Manager The initial screen of SRM Manager is displayed 3 Click the Monitor Browser button The Monitor Browser window of SRM Manager is displayed 4 Select the monitor you want to operate and click Connect The menu window is displayed Monitor Browser Connect Cancel Monitor Name Model Name SRM L560 Serial No 2000000 IP Address 192 168 0 1 192 168 0 4 ...

Страница 42: ...al such as 4K or QFHD as one image by combining each input signal from the four inputs A to D Zoom mode Magnifies and displays the picture of the input signal selected from inputs A to D To select the signal to be magnified click the radio button displayed when the BKM 243HS or BKM 244CC is used To magnify the A signal To magnify the B signal To magnify the C signal 2 1 3 6 7 4 5 A B C D ...

Страница 43: ...specified in the Password tab window page 70 or cancels the authentication mode Displays when the password has not been authenticated When you click this button the Password Required window is displayed Enter Password To enter a password OK To perform the password authentication Cancel To cancel without performing the password authentication Displays when the password has been authenticated When y...

Страница 44: ...pending on the screen mode Combo box 1 3G HD SDI Auto Sets the signal format automatically according to the Sampling Structure Bit Depth Picture and transport scanning method information for the Payload ID of SMPTE 352M standard superimposed on the input signals and the result of the signal judgment by the monitor when the BKM 250TG is installed You can confirm the Payload ID information and the s...

Страница 45: ...n select from D93 D65 D61 D56 D Cine User Color Temp 1 to User Color Temp 5 When D Cine is selected the color temperature is set to x 0 314 and y 0 351 in the CIE chromaticity coordinate When D93 D65 D61 D56 or D Cine data is changed they are displayed as D93 D65 D61 D56 or D Cine For the XYZ format signal You can select from D Cine XYZ or User Color Temp XYZ 1 to User Color Temp XYZ 5 When D Cine...

Страница 46: ... the F23 with the 100 level of the monitor for confirmation S LOG Full Log gamma available with the F23 Select to fit the full dynamic range of the F23 in the 100 level of the monitor for confirmation As 2 6 RGB is the setting for 2048 1080 RGB format the input signal of any other format is not displayed correctly When you select xvYCC set Emulation page 47 to L560 Native in Color Gamut of the Con...

Страница 47: ...ints of the three primary colors provided by SMPTE RP431 2 are not covered in full User LUT Sets the user data to apply to the Emulation setting If the user data are not prepared you cannot set User LUT You can select from User 1 User LUT 1 file name to User 5 User LUT 5 file name no setting Based On Displays the color gamut used as the basis of user data When the basic color gamut is not set in t...

Страница 48: ...40 to 1080 dot 384 Mode Sets the shape of the area marker 1 You can select from Shape A Shape B or Shape C The size of the area is as follows depending on the settings of Area Size Aspect Mode and aspect ratio of the picture Example Area Size 80 Aspect Mode 16 9 or 2 39 1 With 16 9 With 2 39 1 Line Sets the thickness of the area marker 1 You can select from Thick thick or Thin thin Color Sets the ...

Страница 49: ...or the HDMI signal Full 0 black to 255 8bit 1023 10bit 4095 12bit white level Limit 16 8bit 64 10bit 256 12bit black level to 235 8bit 940 10bit 3760 12bit white level HDMI Auto Sets the manual or automatic setting for the quantization range of the HDMI signal On Select to set the quantization range automatically according to the input signal Off Select to use the quantization range set in HDMI Fi...

Страница 50: ...e aspect ratio of the picture The selectable values differ according to the input signal You can select from 16 9 4 3 2 39 1 or 1 896 1 Scan Sets the scan mode of the picture Normal Normal scan Under 3 under scan Over Mask of 5 over scan portion in the normal scan The scan mode is not selectable in the following cases When the input signal has no sync signal When the internal signal is displayed W...

Страница 51: ...s not displayed in the following cases When the input signal has no sync signal When the internal signal is displayed When Format is set to DVI Computer When the HDMI computer signal is input When H Delay V Delay is set to on Mono Cut Sets to display the picture in monochrome mode or cut the R G B signal Mono Sets whether or not to display the picture in monochrome mode on or off R Cut Off Sets wh...

Страница 52: ...set 1 Picture Preset 2 Picture Preset 3 Picture Preset 4 Picture Preset 5 and Picture Preset D Cine in Picture Preset of the Configurations tab window of the Main Operation window For information about the Configurations tab window of the Main Operation window see page 44 Contrast Sets the contrast Sets to 0 to 2500 1000 for Picture Preset 1 to Picture Preset 5 480 for Picture Preset D Cine Bright...

Страница 53: ...emperature probe not supplied a Destination The color temperature data to be used is displayed Except for the XYZ format signal When D93 D65 D61 D56 or D Cine data is changed they are displayed as D93 D65 D61 D56 or D Cine To change the color temperature data to be adjusted select D93 D65 D61 D56 D Cine User Color Temp 1 User Color Temp 2 User Color Temp 3 User Color Temp 4 or User Color Temp 5 in...

Страница 54: ...and cause an error If an adjustment error occurs change Target Luminance and perform the automatic adjustment again c Probe Selects the probe to be used for automatic adjustment of the color temperature CA 210 Select when Konica Minolta CA 210 is used PM 5639 06 Select when DK Technologies PM 5639 06 is used Eye One Pro Select when X Rite Eye One Pro is used The cable to connect the probe and the ...

Страница 55: ...to Off select Target Luminance and enter the value of the luminance cd m2 when the 100 white signal is input 3Select the probe to be used in Probe 4Click Start Adjustment When the probe is attached on the center of the display automatic adjustment starts and In progress is displayed during adjusting It may take some time until the automatic adjustment is completed First connect the probe and then ...

Страница 56: ...ow of the Main Operation window For the XYZ format signal When D Cine XYZ data is changed it is displayed as D Cine XYZ To change the color temperature data to be adjusted select D Cine XYZ User Color Temp XYZ 1 User Color Temp XYZ 2 User Color Temp XYZ 3 User Color Temp XYZ 4 or User Color Temp XYZ 5 in Color Temp of the Configurations tab window of the Main Operation window For information about...

Страница 57: ... in Picture Adjustment of the Controls tab window of the Main Operation window Picture Manual is displayed For information about the Main Operation window see page 44 b Start Adjustment Click to display the color temperature adjustment window Destination Displays the color temperature data to be adjusted Original Value Displays the default setting to be adjusted Input Signal Displays the signal to...

Страница 58: ...ndow of the Main Operation window When Contrast is adjusted in Picture Adjustment of the Controls tab window of the Main Operation window Picture Manual is displayed For information about the Main Operation window see page 44 Cancel Click to cancel the adjustment The adjustment data is cleared and the setting returns to the previous value Apply Click to confirm the adjustment c Restore Factory Dat...

Страница 59: ...leted b Upload When the button is clicked the window to select the file is displayed Select the file existing in the PC and load it to the user data User LUT 1 to User LUT 5 After converting the LUT data output from Grading Tool of another vendor to LUT data in the Sony unique format convert the LUT data again with the conversion tool so that it can be read by the monitor To obtain the Sony unique...

Страница 60: ... Matrix of SMPTE 240M standards The internal fixed value is applied to the transmission matrix of the RGB format and XYZ format b Gamma Sets the transmission gamma 2 2 Transmission gamma 2 2 2 6 RGB Transmission gamma 2 6 for the RGB format 2 6 XYZ Transmission gamma 2 6 for the XYZ format xvYCC Transmission gamma of IEC 61966 2 4 standards xvYCC S LOG Standard Log gamma available with the Sony F2...

Страница 61: ...r Display Tab Window This window is used to set the gamut error display The gamut error display function is effective when 3G HD SDI except 2048 1080 RGB and XYZ or HDMI the quantization range is Limit signal is input The gamut error display function does not work in the following cases When the input signal has no sync signal When the internal signal is displayed When H Delay V Delay is set to on...

Страница 62: ... B 0 to 1023 20 R 0 to 1023 20 SDI YCbCr 12bit When two BKM 243HS or BKM 244CC are installed in the OPTION 1 and 2 option slots or the BKM 250TG is installed you can select this item Upper Limit upper limit Y 0 to 4095 3935 Cb 0 to 4095 4019 Cr 0 to 4095 4019 Lower Limit lower limit Y 0 to 4095 80 Cb 0 to 4095 77 Cr 0 to 4095 77 SDI RGB 12bit When two BKM 243HS or BKM 244CC are installed in the OP...

Страница 63: ...for the zebra pattern is changed Zebra Pattern of Black Detail of the Miscellaneous tab window is also set to the same setting value Line Sets the direction of the pattern Diagonal Type1 Right descending Diagonal Type2 Left descending Modulation Sets the amplitude of the pattern display Set to 1 to 50 16 Miscellaneous Tab Window This window is used to set the black detail mode and the synchronizat...

Страница 64: ...he display mode is 4K QFHD When displaying in 4K QFHD mode all the input signals from the inputs A to D should be genlocked to synchronize with one another Normally set Force Sync Lock to Off When the input signals are not genlocked and the image is disturbed set Force Sync Lock to On The disturbance of the image may be decreased Internal Signal Tab Window This window is used to set the internal s...

Страница 65: ...ndow When the XYZ or DVI Computer format signal or the HDMI computer signal is input the internal signal cannot be displayed Pictures from internal signals of the same type are displayed on four divided screens in 4K QFHD or 2K HD Zoom mode Notes ...

Страница 66: ...r up to 20 characters Name Sets the information for the administration device ID up to 20 characters Location Sets the location information up to 20 characters Trap Mode Sets the settings to send information manually or automatically Auto or Manual Address Setting Sets the IP address to send the information When Trap Mode is set to Manual you can select this item When the item is selected you can ...

Страница 67: ...he changed setting d Reset Mode Address Resets the settings to send information manually or automatically and the IP address to the default setting On Screen Set Tab Window This window is used to set the closed caption display a Closed Caption Sets whether or not to display closed caption signal On Off When the BKM 244CC is installed you can select the item The setting is effective for the input s...

Страница 68: ...on Sets the display position of the audio level meter You can select from Bottom bottom or Top top The display position is fixed when 4K QFHD mode is selected Transparency Sets the transparency of the background You can select from Black black or Half translucent Peak Hold Sets the peak hold mode Off The peak hold is not performed Auto The peak hold continues about 1 second and is released automat...

Страница 69: ...set in the PC b Date and time setting buttons The date and time set on the PC is displayed when Sync with PC Clock is checked When it is not checked you can set any date and time Year Sets the year Month Sets the month Day Sets the day Hour Sets the hour in 24 hour display Minute Sets the minute Second Sets the second c Apply Confirms the settings d Cancel Cancels the set data 2 3 4 1 ...

Страница 70: ...o apply the password setting Main Operation Applies the password to the Main Operation window Adjustment Applies the password to the Adjustment window Display Function Applies the password to the Display Function window System Configuration Applies the password to the System Configuration window File Management Applies the password to the File Management b Apply Confirms the settings c Cancel Canc...

Страница 71: ...System Configuration Window Chapter 3 Menu Window Re Enter Password Enters the same password as one in Enter New Password to confirm Apply Confirms the changed password Cancel Cancels the changed password ...

Страница 72: ...the PC a Comment Enters the comment when the setting data is saved up to 20 characters Usable alphanumeric characters and symbols Alphanumeric characters A to Z a to z and 0 to 9 Symbols space _ A space cannot be used as the first character If a space is entered at the beginning it will be deleted before transmission to the SRM L560 b Save File Click to save the setting data 1 2 Note ...

Страница 73: ...nitor From Local PC Select to copy the data from the local PC Select File Click to select the file File Name Displays the selected file name Comment Displays the comment of the selected file b Step 2 Select Categories Check the item to be copied 1 2 3 Item Settings to be copied Copy destination Level 1 display Level 2 display Picture Preset Adjustment values of picture adjustment preset data Adjus...

Страница 74: ...ab window System Setting of Peak White Control on off Main Operation Controls tab window Aperture modification value Setting of Gamut Error Display tab window On Off Display Function Gamut Error Display tab window Display setting of gamut error Display setting of clipped portions in black detail mode Display Function Miscellaneous tab window Setting of Force Sync Lock On Off Setting of Closed Capt...

Страница 75: ...e data from the local PC Select File Click to select the file File Name Displays the selected file name Comment Displays the comment of the selected file This Monitor Select the data of the current monitor b Step 2 Select Preset Sets the category and preset data Set the combo box 1 left and combo box 2 right Combo box 1 Select the category to be copied 1 2 3 4 Category Settings to be copied Copy d...

Страница 76: ...r Matrix Gamma category is selected You can select from User Matrix Gamma 1 to User Matrix Gamma 5 When Marker Preset category is selected You can select from Marker 1 to Marker 5 c Step 3 Select Destination Select the preset data of the copy destination When User Matrix Gamma is selected in Step 2 you can select from User Matrix Gamma 1 to User Matrix Gamma 5 When Marker Preset is selected in Ste...

Страница 77: ...he monitor information a Model Name Displays the model name of the monitor b Serial No Displays the serial number of the monitor c Software Version Displays software version of the monitor d Operation Time Displays operation time hours in total of the monitor e Backlight Time Displays brighten time hours in total of the monitor backlight 1 2 3 4 5 ...

Страница 78: ...s installed 3G SDI When the BKM 250TG is installed Unknown When a non compliant input adaptor is installed When no input adaptor is installed Model Name Displays the model name of the input adaptor Serial No Displays the serial number of the input adaptor SDI Payload ID Status Displays the information of the Payload ID data superimposed on the SDI signal and the status of the current monitor This ...

Страница 79: ...t Depth 10 12 I PsF P Displays Interlace PsF or Progressive Close Closes the SDI Payload ID Status window c HDMI Displays the HDMI information of screen A HDMI Status When the button is clicked the HDMI Status window is displayed Pixel Encoding Information of the pixel encoding RGB 4 4 4 YCbCr 4 2 2 YCbCr 4 4 4 Color Depth Information of the color depth 8bit 10bit 12bit Matrix Gamma Information of...

Страница 80: ... Window The displayed items are the same as those in the Screen A tab window page 78 Screen D Tab Window This window is used to view the information of screen D The displayed items are the same as those in the Screen A tab window page 78 ...

Страница 81: ...be switched in the following cases When the input signal has no sync signal When the internal signal is displayed When Native Scan is set to on Displaying the Picture in Black Detail Mode Black detail mode display function You can reduce to dull black color by backlight leaking and precisely assess any parts with low color gradation You can decrease the black level up to 40 of the normal display 1...

Страница 82: ...age 47 of the Configurations tab window of the Main Operation window 4 Set the marker to be displayed for the preset data set in step 3 using the Edit button page 47 in Marker Preset of the Configurations tab window of the Main Operation window To display all the markers simultaneously If you set Marker page 51 to on in the Controls tab window of the Main Operation window all the markers set to on...

Страница 83: ...o set the display position Set in Position Bottom Displays at the bottom of the window Top Displays at the top of the window The display position is fixed when 4K QFHD mode is selected To set the transparency of the background Set in Transparency Black Sets the background in black Half Sets the background in translucence To set the peak hold Select in Peak Hold Off The peak hold does not function ...

Страница 84: ...ndow To set the type of time code Set in VITC LTC VITC Sets to VITC LTC Sets to LTC To set the display position for time code Select in Position Top Left To display at the top left of the screen Top Center To display at the top center of the screen Top Right To display at the top right of the screen Bottom Left To display at the bottom left of the screen Bottom Center To display at the bottom cent...

Страница 85: ...le Signal Systems page 93 and Available Signal Formats page 95 PC input DVI D 4 HDCP correspondence Signal format Refer to DVI D page 98 of Available Signal Formats HDMI HDMITM 4 HDCP correspondence Deep Color correspondence Signal format Refer to HDMI page 99 of Available Signal Formats Control OPTION A Mini DIN 8 pin female 1 OPTION B USB Type A type 1 LAN 10BASE T 100BASE TX RJ 45 1 OPTION C D ...

Страница 86: ...each 1 CD ROM 1 Using the CD ROM Manual 1 Optional accessories BKM 243HS HD D1 SDI Input Adaptor with serial number 2108355 or later BKM 244CC HD SD SDI Closed Caption Adaptor BKM 250TG 3G HD SD SDI Input Adaptor BKM 243HS This equipment may not meet the requirement for the electromagnetic interference standard or work correctly or you may not be satisfied with the performance if an input adaptor ...

Страница 87: ...ct Marker Area Marker 1 Area Marker 2 Mono a a a a a R Off a a a a a G Off a a a a a B Off a a a a a Blue Only a a a a a Chroma Up a a k Black Detail b c a a a a a a Contrast b a a a a a a Bright b a a a a a Chroma b a a k Aperture Peak White Control a a a a a Adjustment Contrast b a a a a a a Bright b a a a a a Chroma b a a k Color Temp Auto b a a a a i Color Temp Manual b a a a l a a l a l Gamut...

Страница 88: ...ens e Can be set when an SDI signal is input from the BKM 250TG f Display position fixed g Fixed to 16 9 for 720P input signals h Excludes 640 480 60P input signals Fixed to 16 9 for 1280 720 50P and 60P signals i Does not function when the HDMI computer signal is input j Functions when HDMI Auto page 49 in Screen Aspect is set to Off k Functions only when a YCbCr signal is input l Not adjustable ...

Страница 89: ... e a a a a a n Aspect Marker a a a a a n Area Marker 1 a a a a a n Area Marker 2 a a a a a n Mono a a a a a R Off a a a a a G Off a a a a a B Off a a a a a Blue Only a a a a a Chroma Up a a q Black Detail a f g a a a a a a Contrast f a a a a a a Bright f a a a a a Chroma f a a q Aperture h a a a a a Peak White Control a a a a a Adjustment Contrast a f a a a a a a Bright a f a a a a a Chroma a f a ...

Страница 90: ...ee Aperture Modification Frequency page 100 i Can be set when the SDI signal is input from the BKM 244CC j Can be set when the SDI signal is input from the BKM 250TG k Functions when an interlace signal is input If 1080i interlace signal is input and the format is set to 1080PsF film cadence processing is not done Set the signal to 1080I Even if the item is set to 2 3 or 2 3 3 2 it is automaticall...

Страница 91: ...mp a a a Picture Preset a a a Aspect a j a j a Scan Native Scan a a a a H Delay V Delay H Shift 2048 Shift b a a 4096 Shift Marker Aspect Marker Area Marker 1 Area Marker 2 Mono a a R Off a a G Off a a B Off a a Blue Only a a Chroma Up a Black Detail c d a a a Contrast c a a a Bright c a a Chroma c a Aperture e a a a Peak White Control a a Adjustment Contrast c a a a Bright c a a Chroma c a Color ...

Страница 92: ...mode immediately after the monitor starts or the screen mode input signal or closed caption setting etc is changed h Can be set when the SDI signal is input from the BKM 250TG i Functions when an interlace signal is input If 1080i interlace signal is input and the format is set to 1080PsF film cadence processing is not done Set the signal to 1080I Even if the item is set to 2 3 or 2 3 3 2 it is au...

Страница 93: ...M 1080 25P 2 39 1 1920 1080 30P 1125 1080 30 Progressive 16 9 SMPTE 274M 1080 30P 2 39 1 1920 1080 29 97P 1125 1080 30 1 001 Progressive 16 9 SMPTE 274M 1080 30P 1080 29 97Pa 2 39 1 1920 1080 50i 1125 1080 25 2 1 Interlace 16 9 SMPTE 274M 1080 50I 2 39 1 1920 1080 60i 1125 1080 30 2 1 Interlace 16 9 SMPTE 274M 1080 60I 2 39 1 1920 1080 59 94i 1125 1080 30 1 001 2 1 Interlace 16 9 SMPTE 274M 1080 6...

Страница 94: ...HDMI input signal see HDMI page 99 of Available Signal Formats 1280 720 60P 750 720 60 Progressive 16 9 SMPTE 296M 720 60P 1280 720 59 94P 750 720 60 1 001 Progressive 16 9 SMPTE 296M 720 60P 720 59 94Pa 2048 1080 24PsF 1125 1080 24 Progressive 1 896 1 2048 1080 24PsF 2 39 1 2048 1080 23 98PsF 1125 1080 24 1 001 Progressive 1 896 1 2048 1080 24PsF 2048 1080 23 98PsFa 2 39 1 2048 1080 24P 1125 1080...

Страница 95: ... 1920 1080 30a PsF a a SMPTE 292M Dual link 4 4 4 YCbCr 10bit a 2 a SMPTE 372M RGB 10bit YCbCr 12bit RGB 12bit Single link 4 2 2 YCbCr 10bit 1920 1080 24a P a a SMPTE 292M Dual link 4 4 4 YCbCr 10bit a 2 a SMPTE 372M RGB 10bit YCbCr 12bit RGB 12bit Single link 4 2 2 YCbCr 10bit 1920 1080 25P a a SMPTE 292M Dual link 4 4 4 YCbCr 10bit a 2 a SMPTE 372M RGB 10bit YCbCr 12bit RGB 12bit Single link 4 2...

Страница 96: ... link 4 4 4 RGB 10bitb 2048 1080 24a P a 2 a 12bitb XYZ 12bit 3G SDI Single link 4 4 4 YCbCr 10bit 1920 1080 24a PsF v SMPTE 425 AB 4 4 4 RGB 10bit 4 4 4 YCbCr 12bit 4 4 4 RGB 12bit Single link 4 4 4 YCbCr 10bit 1920 1080 25PsF v SMPTE 425 AB 4 4 4 RGB 10bit 4 4 4 YCbCr 12bit 4 4 4 RGB 12bit Single link 4 4 4 YCbCr 10bit 1920 1080 30a PsF v SMPTE 425 AB 4 4 4 RGB 10bit 4 4 4 YCbCr 12bit 4 4 4 RGB ...

Страница 97: ...YCbCr 10bit 1920 1080 50P a SMPTE 425 AB Single link 4 2 2 YCbCr 10bit 1920 1080 60a P a SMPTE 425 AB Single link 4 4 4 YCbCr 10bit 1280 720 24a P v SMPTE 425 AB 4 4 4 RGB 10bit Single link 4 4 4 YCbCr 10bit 1280 720 25P v SMPTE 425 AB 4 4 4 RGB 10bit Single link 4 4 4 YCbCr 10bit 1280 720 30a P v SMPTE 425 AB 4 4 4 RGB 10bit Single link 4 4 4 YCbCr 10bit 1280 720 50P v SMPTE 425 AB 4 4 4 RGB 10bi...

Страница 98: ... 60a P 25 200a 4 3 CEA 861 Single link 4 4 4 RGB 8bit 720 480 60a P 27 027a 4 3 16 9 Single link 4 4 4 RGB 8bit 1280 720 60a P 74 250a 16 9 Single link 4 4 4 RGB 8bit 1920 1080 60a i 74 250a 16 9 CEA 861 2 39 1 Single link 4 4 4 RGB 8bit 720 1440 c 480 60a i 27 027a 4 3 16 9 CEA 861 Single link 4 4 4 RGB 8bit 720 576 50P 27 000 4 3 16 9 Single link 4 4 4 RGB 8bit 1280 720 50P 74 250 16 9 Single li...

Страница 99: ...equency MHz Aspect ratio Standard HDMI RGB 4 4 4 8 10 12bitb YCbCr 4 4 4 8 10 12bitb YCbCr 4 2 2 12bitb 640 480 60a P 25 200a 4 3 CEA 861 720 480 60a P 27 027a 4 3 16 9 1280 720 60a P 74 250a 16 9 1920 1080 60a i 74 250a 16 9 CEA 861 2 39 1 720 1440 c 480 60a i 27 027a 4 3 16 9 CEA 861 720 576 50P 27 000 4 3 16 9 1280 720 50P 74 250 16 9 1920 1080 50i 74 250 16 9 CEA 861 2 39 1 720 1440 c 576 50i ...

Страница 100: ...080 24a P 25 MHz 1080 50i 25PsF 25 MHz 1080 25P 25 MHz 1080 60a i 30a PsF 25 MHz 1080 30a P 25 MHz 720 24a P 25 MHz 720 25P 25 MHz 720 30a P 25 MHz 720 50P 25 MHz 720 60a P 25 MHz 2048 1080 24a PsF 25 MHz 2048 1080 24a P 25 MHz 1080 50P 50 MHz 1080 60a P 50 MHz DVI video HDMI 640 480 60a P 10 MHz 720 480 60a P 10 MHz 1280 720 60a P 25 MHz 1920 1080 60a i 25 MHz 720 1440 b 480 60a i 5 MHz 720 576 5...

Страница 101: ...9 2 39 1 1920 803 1862 779 1829 765 1920 1080 25P 16 9 1920 1080 1920 1080 1862 1048 1829 1029 2 39 1 1920 803 1862 779 1829 765 1920 1080 30a P 16 9 1920 1080 1920 1080 1862 1048 1829 1029 2 39 1 1920 803 1862 779 1829 765 1920 1080 50i 16 9 1920 1080 1920 1080 1862 1048 1829 1029 2 39 1 1920 803 1862 779 1829 765 1920 1080 60a i 16 9 1920 1080 1920 1080 1862 1048 1829 1029 2 39 1 1920 803 1862 7...

Страница 102: ...39 1 1920 803 1862 779 1829 765 1920 1080 50P 16 9 1920 1080 1920 1080 1862 1048 1829 1029 2 39 1 1920 803 1862 779 1829 765 1920 1080 24a P 16 9 1920 1080 1920 1080 1862 1048 1829 1029 2 39 1 1920 803 1862 779 1829 765 1920 1080 25P 16 9 1920 1080 1920 1080 1862 1048 1829 1029 2 39 1 1920 803 1862 779 1829 765 1920 1080 30a P 16 9 1920 1080 1920 1080 1862 1048 1829 1029 2 39 1 1920 803 1862 779 1...

Страница 103: ...1920 1080 1920 1080 1862 1048 1829 1029 2 39 1 1920 803 1862 779 1829 765 1920 1080 24a P 16 9 1920 1080 1920 1080 1862 1048 1829 1029 2 39 1 1920 803 1862 779 1829 765 1920 1080 25P 16 9 1920 1080 1920 1080 1862 1048 1829 1029 2 39 1 1920 803 1862 779 1829 765 1920 1080 30a P 16 9 1920 1080 1920 1080 1862 1048 1829 1029 2 39 1 1920 803 1862 779 1829 765 800 600 60P SVGA 4 3 800 600 1024 768 60P X...

Страница 104: ... 720 60a P 60a 2048 1080 24a PsF 48a 2048 1080 24a P 48a Signal system Display frame rate Hz DVI video 640 480 60a P 60a 720 480 60a P 60a 1280 720 60a P 60a 1920 1080 60a i 60a 720 1440 b 480 60a i 60a 720 576 50P 50 1280 720 50P 50 1920 1080 50i 50 720 1440 b 576 50i 50 1920 1080 60a P 60a 1920 1080 50P 50 1920 1080 24a P 48a 1920 1080 25P 50 1920 1080 30a P 60a DVI computer fH 28 68 kHz fV 48 6...

Страница 105: ...it 1920 1080 24a PsF HD a A B Dual link 4 4 4 YCbCr 10bit a RGBb 10bit a YCbCr 12bit a RGBb 12bit a Single link 4 2 2 YCbCr 10bit 1920 1080 25PsF a Dual link 4 4 4 YCbCr 10bit a RGBb 10bit a YCbCr 12bit a RGBb 12bit a Single link 4 2 2 YCbCr 10bit 1920 1080 30a PsF a Dual link 4 4 4 YCbCr 10bit a RGBb 10bit a YCbCr 12bit a RGBb 12bit a Single link 4 2 2 YCbCr 10bit 1920 1080 24a P a Dual link 4 4 ...

Страница 106: ... RGBb 10bitc 2048 1080 24a PsF DC 2048 1080 RGB a 12bitc a XYZb 12bit DC 2048 1080 XYZ a Dual link 4 4 4 RGBb 10bitc 2048 1080 24a P DC 2048 1080 RGB a 12bitc a XYZb 12bit DC 2048 1080 XYZ a 3G SDI Single link 4 4 4 YCbCr 10bit 1920 1080 24a PsF HD a A B 4 4 4 RGBb 10bit a 4 4 4 YCbCr 12bit a 4 4 4 RGBb 12bit a Single link 4 4 4 YCbCr 10bit 1920 1080 25PsF a 4 4 4 RGBb 10bit a 4 4 4 YCbCr 12bit a ...

Страница 107: ... 4 YCbCr 12bit a 4 4 4 RGBb 12bit a Single link 4 2 2 YCbCr 10bit 1920 1080 50P a Single link 4 2 2 YCbCr 10bit 1920 1080 60a P a Single link 4 4 4 YCbCr 10bit 1280 720 24a P a 4 4 4 RGBb 10bit Single link 4 4 4 YCbCr 10bit 1280 720 25P a 4 4 4 RGBb 10bit Single link 4 4 4 YCbCr 10bit 1280 720 30a P a 4 4 4 RGBb 10bit Single link 4 4 4 YCbCr 10bit 1280 720 50P a 4 4 4 RGBb 10bit Single link 4 4 4 ...

Страница 108: ... 2 M ITU 709 G 2 6 RGB M ITU 709 G 2 6 XYZ M ITU 709 G xv YCC M ITU 601 G xv YCC M G DVI video Single link 4 4 4 RGBb 8bit 640 480 60a P d Single link 4 4 4 RGBb 8bit 720 480 60a P Single link 4 4 4 RGBb 8bit 1280 720 60a P HD a A B Single link 4 4 4 RGBb 8bit 1920 1080 60a i a Single link 4 4 4 RGBb 8bit 720 1440 c 480 60a i d Single link 4 4 4 RGBb 8bit 720 576 50P Single link 4 4 4 RGBb 8bit 12...

Страница 109: ...e same pixel twice d Internally fixed not changeable M ITU601 G 2 2 a Selectable default setting Blank column The signal is selectable but the display may not be correct depending on the input signal Not selectable A 1 ITU709 2 ITU601 3 SMPTE240M Selectable from above 1 to 3 B 1 2 2 2 2 6 RGB 3 2 6 XYZ 4 xvYCC 5 S LOG Standard 6 S LOG Full Selectable from above 1 to 6 ...

Страница 110: ...ITU601 3 SMPTE240M Selectable from above 1 to 3 B 1 2 2 2 2 6 RGB 3 2 6 XYZ Signal format Signal system Matrix Gamma Matrix Gamma data setting area ITU R BT 709 ITU R BT 601 SMPTE 240M D Cine RGB D Cine XYZ xvYCC 709 xvYCC 601 User1 User5 M ITU 709 G 2 2 M ITU 601 G 2 2 M SMPTE 240M G 2 2 M ITU 709 G 2 6 RGB M ITU 709 G 2 6 XYZ M ITU 709 G xv YCC M ITU 601 G xv YCC M G HDMI 4 4 4 RGBb 8 10 12bit 4...

Страница 111: ...111 Matrix Gamma Setting Table Appendixes 4 xvYCC 5 S LOG Standard 6 S LOG Full Selectable from above 1 to 6 ...

Страница 112: ...r of signals that can be input 4K QFHD Dual link 2 1 1 1 1 1 1 1 1 1 1 1 Single link 0 2 1 1 0 0 0 0 0 0 0 0 2K HD Zoom Dual link 0 0 0 0 1 0 0 0 0 0 0 0 Single link 0 0 1 0 0 2 1 0 0 0 0 0 Quad Viewa Dual link 0 0 0 0 0 0 0 4 3 2 1 0 Single link 0 0 0 4 0 0 4 0 2 4 6 8 Total 2 3 3 6 2 3 6 5 6 7 8 9 Screen mode Connection Number of signals that can be input 4K QFHD Dual link 0 0 0 0 0 0 0 0 0 0 0 ...

Страница 113: ...0 0 0 0 0 Single link 4 3 2 2 2 2 2 2 1 1 1 1 1 1 2K HD Zoom Dual link 0 0 0 0 0 0 0 0 0 0 0 0 0 0 Single link 0 0 4 0 0 0 0 0 4 0 0 0 0 0 Quad Viewa Dual link 0 0 0 4 3 2 1 0 0 4 3 2 1 0 Single link 0 4 0 0 2 4 6 8 4 4 6 8 10 12 Total 4 7 6 6 7 8 9 10 9 9 10 11 12 13 Screen mode Connection Number of signals that can be input 4K QFHD Dual link 0 0 0 0 0 0 0 0 0 0 0 0 Single link 0 0 0 0 0 0 0 0 0 ...

Страница 114: ...in Quad View mode includes the number of signals to be displayed in 2K HD Zoom mode Example When the number of input signals to be displayed in 2K HD Zoom is four and those to be displayed in Quad View mode is eight the actual number of input signals available for display in Quad View mode becomes 12 in total Note Screen mode Connection Number of signals that can be input 4K QFHD Dual link 0 0 0 0...

Страница 115: ... Option 1 BKM 250TG Input 1 2 a 4 4 4 YCbCr 10bit 4 4 4 RGB 10bit 4 4 4 YCbCr 12bit Option 2 BKM 250TG Input 1 2 a 4 4 4 RGB 12bit 4 4 4 XYZ 12bit BKM 243HS HD SDI 4 2 2 YCbCr 10bit Option 1 BKM 243HS Input 1 a Option 1 BKM 243HS Input 2 a Option 2 BKM 243HS Input 1 a Option 2 BKM 243HS Input 2 a BKM 243HS OPTION 1 2 Dual link HD SDI 4 2 2 YCbCr 10bit Option 1 2 BKM 243HS Input 1 a a 4 4 4 YCbCr 1...

Страница 116: ...tion 1 BKM 250TG Input 1 a Option 1 BKM 250TG Input 2 a Option 2 BKM 250TG Input 1 a Option 2 BKM 250TG Input 2 a Dual link HD SDI 4 2 2 YCbCr 10bit Option 1 BKM 250TG Input 1 2 a 4 4 4 YCbCr 10bit 4 4 4 RGB 10bit 4 4 4 YCbCr 12bit Option 2 BKM 250TG Input 1 2 a 4 4 4 RGB 12bit 4 4 4 XYZ 12bit BKM 243HS HD SDI 4 2 2 YCbCr 10bit Option 1 BKM 243HS a Option 2 BKM 243HS a BKM 243HS OPTION 1 2 Dual li...

Страница 117: ...ols tab window of the Main Operation window For setting of Aspect see Screen Aspect page 49 in More Settings in the Configurations tab window of the Main Operation window or Aspect page 50 in the Controls tab window Panel size in 4K QFHD mode 3840 2160 Scan mode Input signal system and scan mode image Native Scan Native Scan Normal Scan Aspect 16 9 1 896 1a a When a 4096 2160 signal is input Aspec...

Страница 118: ...ect 16 9 1 896 1a a When a 2048 1080 signal is input Aspect 2 39 1 Aspect 4 3 1920 1080 2048 1080 1280 720 720 576 720 487 Displayed by shifting the picture in 2048 Shift of the Controls tab window of the Main Operation window 1920 1080 1280 720 2048 1080 720 576 720 487 1440 576 1440 487 1440 483 1920 1080 2048 1080 720 576 720 487 1440 576 1440 487 1440 483 ...

Страница 119: ... Aspect 2 39 1 Aspect 4 3 Scan mode Input signal system and scan mode image 1920 1080 1280 720 2048 1080 720 576 720 487 1440 576 1440 487 1440 483 1920 1080 2048 1080 720 576 720 487 1440 576 1440 487 1440 483 1920 1080 1280 720 2048 1080 720 576 720 487 1440 576 1440 487 1440 483 5 mask portion 2048 1080 1920 1080 5 mask portion 720 576 720 487 1440 576 1440 487 1440 483 5 mask portion ...

Страница 120: ...2 39 1 Aspect 4 3 1920 1080a 1280 720a 2048 1080a 720 576 720 487 Displayed by shifting the picture in 2048 Shift of the Controls tab window of the Main Operation window a Magnified by twice for 2048 1080 or 1920 1080 input signal and magnified by three times for 1280 720 input signal 1920 1080 1280 720 2048 1080 720 576 720 487 1440 576 1440 487 1440 483 1920 1080 2048 1080 720 576 720 487 1440 5...

Страница 121: ...ting consult your network administrator The browser is not set correctly If the browser uses a proxy server change the proxy server setting to Access the Internet without using a proxy server Multiple network connections are used on the PC at the same time Close all network connections other than connection to the monitor reboot the PC then connect to the monitor via the network again The Windows ...

Страница 122: ...r V delay The markers are not displayed when H Delay or V Delay is set to on The selected picture cannot be magnified accurately in 2K HD Zoom mode The signal source is not connected by the method corresponding to the input adaptor used Connect the signal source correctly page 21 An error message is displayed when 2K HD Zoom is selected or the screen to be magnified is changed in 2K HD Zoom mode F...

Страница 123: ...31 One of the four IP addresses used for the monitor is set to the same as that for the connected PC Any of the four IP addresses used for the monitor are set to the same as those used for the devices connected via the network Change the IP address of the monitor in the Network setup window of a web browser page 34 Change the IP addresses of the devices that are the same as those of the monitor co...

Страница 124: ...or the firewall setting The port is not unblocked in the firewall setting Unblock the SRM Manager in the firewall setting Refer to the operating instructions supplied with the firewall software used Unblock TCP port number 53484 in the firewall setting A dialog box with the message Already connected to another SRM Manager is displayed The monitor you are to connect with your PC is operated by SRM ...

Страница 125: ... turn it on The cable connection between the monitor from which the data are to be copied and the PC is not correct Check that the cable is connected correctly If not connect it correctly page 31 Any of the four IP addresses used for the monitor from which the data are to be copied are set to the same as those used for the devices connected via a network Change the IP address of the monitor in the...

Страница 126: ...rn it on The cable connection between the monitor and PC is not correct Check that the cable is connected correctly If not connect it correctly page 31 Any of the four IP addresses used for the monitor are set to the same as those used for the devices connected via a network Change the IP address of the monitor in the Network setup window of a Web browser page 34 Change the IP addresses of the dev...

Страница 127: ...hes Rear b When using this hole use a screw which can be inserted into the monitor to a depth of 6 to 10 mm 1 4 to 13 32 inches Bottom 1352 3 53 1 4 420 2 16 5 8 420 16 5 8 824 3 32 1 2 60 23 8 760 30 1232 48 5 8 90 5 3 5 8 90 3 5 8 2 M4a ø55 2 1 4 750 29 5 8 45 2 1 13 16 196 1 7 3 4 46 5 1 7 8 343 3 13 5 8 1 5 1 16 640 2 25 1 4 420 16 5 8 2 M5b 64 2 5 8 154 8 6 1 8 92 5 3 3 4 ...

Страница 128: ...ub 9 pin connector Connection cable for color temperature adjustment supplied Connection cable for Konica Minolta CA 210 probe 1 2 3 4 5 6 7 8 1 2 3 6 8 5 Color of cable core Red White Black Yellow Blue Green Brown Gray Shield Pin number Mini DIN 8 pin connector male Cover CD RXD TXD DTR GND DSR RTS CTS GND 1 2 3 4 5 6 7 8 9 N C N C RTS GND N C TXD 5V RXD 1 2 3 4 5 6 7 8 1 2 3 6 8 5 5 1 6 9 D sub ...

Страница 129: ...temperature adjustment supplied CD RXD TXD DTR GND DSR RTS CTS GND 1 2 3 4 5 6 7 8 9 N C N C RTS GND N C TXD 5V RXD 1 2 3 4 5 6 7 8 1 2 3 6 8 5 1 5 9 6 PC USB D sub 9 pin connector female optional Signal Pin number Mini DIN 8 pin connector male Signal Pin number Connect the probe USByRS 232C conversion cable commercially available Besides the connecting cable an external PC is required When the PC...

Страница 130: ...rations tab window Aspect Marker 47 Main Operation Configurations tab window Audio CH 68 System Configuration On Screen Set tab window Audio Level Meter 68 System Configuration On Screen Set tab window Authentication 66 System Configuration Network tab window B B Cut Off 51 Main Operation Controls tab window Backlight Time 77 Information Common tab window Bit Depth 79 Information Screen A tab wind...

Страница 131: ...ment Color Temp Auto tab window 56 Adjustment Color Temp Manual tab window 57 Adjustment Color Temp Manual tab window Display Function 59 Display Function window Display Mode 51 Main Operation Controls tab window DVI HDMI Computer 46 Main Operation Configurations tab window E Edit 47 Main Operation Configurations tab window Emulation 47 Main Operation Configurations tab window Enter New Password 7...

Страница 132: ... Miscellaneous 63 Display Function Miscellaneous tab window Model Name 77 Information Common tab window Modulation 63 Display Function Gamut Error Display tab window 64 Display Function Miscellaneous tab window Mono Cut 51 Main Operation Controls tab window Mono 51 Main Operation Controls tab window More Settings 49 Main Operation Configurations tab window N Name 66 System Configuration Network ta...

Страница 133: ... 72 File Management Save System File tab window Save System File 72 File Management Save System File tab window Scan 50 Main Operation Controls tab window Screen A 78 Information Screen A tab window Screen Aspect 49 Main Operation Configurations tab window Screen B 79 Information Screen B tab window Screen C 79 Information Screen C tab window Screen D 80 Information Screen D tab window SDI Payload...

Страница 134: ...onfiguration On Screen Set tab window U Upload 59 Display Function User LUT Manager tab window User LUT 47 Main Operation Configurations tab window User LUT Manager 59 Display Function User LUT Manager tab window User Matrix Gamma 60 Display Function User Matrix Gamma tab window Y YCbCr 51 Main Operation Controls tab window Z Zebra Pattern 63 Display Function Gamut Error Display tab window 64 Disp...

Страница 135: ...sta Internet Explorer and the Windows logo are either trademarks or registered trademarks of Microsoft Corporation in the United States and or other countries Intel and Intel Celeron are trademarks or registered trademarks of Intel Corporation in the United States and or other countries All other company names and product names mentioned here may be the trademarks or registered trademarks of their...

Страница 136: ...Sony Corporation ...

Отзывы: