background image

50

Specifications

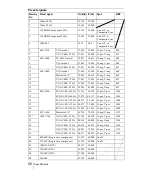
Preset signals

Memory 
No.

Preset signal

fH (kHz) fV (Hz)

Sync

SIZE

1

Video 60 Hz

15.734

59.940

2

Video 50 Hz

15.625

50.000

3

15k RGB/Component 60 Hz

15.734

59.940

S on G/Y or 
Composite Sync

4

15k RGB/Component 50 Hz

15.625

50.000

S on G/Y or 
Composite Sync

5

1080/60I

33.75

60.0

S on G/Y or 
Composite Sync

6

640 

×

 350

VGA mode 1

31.469

70.086

H-pos, V-neg

800

7


VGA VESA 85 Hz 

37.861

85.080

H-pos, V-neg

832

8

640 

×

 400

PC-9801 Normal

24.823

56.416

H-neg, V-neg

848

9

VGA mode 2

31.469

70.086

H-neg, V-pos

800

10

VGA VESA 85 Hz

37.861

85.080

H-neg, V-pos

832

11

640 

×

 480

VGA mode 3

31.469

59.940

H-neg, V-neg

800

12

Macintosh 13"

35.000

66.667

H-neg, V-neg

864

13

VGA VESA 72 Hz

37.861

72.809

H-neg, V-neg

832

14

VGA VESA 75 Hz

37.500

75.000

H-neg V-neg

840

15

VGA VESA 85 Hz

43.269

85.008

H-neg V-neg

832

16

800 

×

 600

SVGA VESA 56 Hz 35.156

56.250

H-pos, V-pos

1024

17

SVGA VESA 60 Hz 37.879

60.317

H-pos, V-pos

1056

18

SVGA VESA 72 Hz 48.077

72.188

H-pos, V-pos

1040

19

SVGA VESA 75 Hz 46.875

75.000

H-pos, V-pos

1056

20

SVGA VESA 85 Hz 53.674

85.061

H-pos, V-pos

1048

21

832 

×

 624

Macintosh 16"

49.724

74.550

H-neg, V-neg

1152

22*

1024 

×

 768

XGA VESA 43 Hz

35.524

86.958

H-pos, V-pos

1264

23

XGA VESA 60 Hz

48.363

60.004

H-neg V-neg

1344

24

XGA VESA 70 Hz

56.476

69.955

H-neg V-neg

1328

25

XGA VESA 75 Hz

60.023

75.029

H-pos, V-pos

1312

26

XGA VESA 85 Hz

68.677

84.997

H-pos, V-pos

1150

43

480/60P (Progressive component)

31.470

60.000

Son G

44

575/50P (Progressive component)

31.250

50.000

Son G

45

1080/50I (DTV)

28.130

50.000

47

720/60P (DTV)

45.000

60.000

48

720/50P (DTV)

37.500

50.000

50

546/60P

33.750

60.000

Содержание Superlite VPL-DS100

Страница 1: ... 2003 Sony Corporation 4 101 719 11 1 Data Projector Operating Instructions VPL DS100 ...

Страница 2: ...ential installation This equipment generates uses and can radiate radio frequency energy and if not installed and used in accordance with the instructions may cause harmful interference to radio communications However there is no guarantee that interference will not occur in a particular installation If this equipment does cause harmful interference to radio or television reception which can be de...

Страница 3: ...klanten in Nederland Gooi de batterij niet weg maar lever deze in als klein chemisch afval KCA The socket outlet should be installed near the equipment and be easily accessible CAUTION RISK OF EXPLOSION IF BATTERY IS REPLACED BY AN INCORRECT TYPE DISPOSE OF USED BATTERIES ACCORDING TO THE INSTRUCTIONS ...

Страница 4: ...4 ...

Страница 5: ...ector 17 Connecting with a Computer 17 Connecting with a VCR or 15k RGB Component Equipment 19 Selecting the Menu Language 21 Projecting 23 Effective Tools for Your Presentation 28 Adjustments and Settings Using the Menu Using the MENU 30 The PICTURE SETTING Menu 32 The INPUT SETTING Menu 33 The SET SETTING Menu 35 The MENU SETTING Menu 36 The INSTALL SETTING Menu 37 The INFORMATION Menu 38 Mainte...

Страница 6: ...ecommended Use a cover over fluorescent lamps to avoid lowering the contrast ratio Cover any windows that face the screen with opaque draperies It is desirable to install the projector in a room where floor and walls are not of light reflecting material If the floor and walls are of reflecting material it is recommended that the carpet and wall paper be changed to a dark color On preventing intern...

Страница 7: ...piece of paper Highly heated and humid Avoid installing the unit in a location where the temperature or humidity is very high or temperature is very low To avoid moisture condensation do not install the unit in a location where the temperature may rise rapidly Very dusty Avoid installing the unit in a location where there is a lot of dust otherwise the air filter will be obstructed The dust blocki...

Страница 8: ...AC power cord and all other connecting cables and store the supplied accessories in a pocket of the soft case When using a screen with an uneven surface stripes pattern may rarely appear on the screen depending on the distance between the screen and the projector or the zooming magnifications This is not a malfunction of the projector Features High brightness high picture quality High brightness A...

Страница 9: ...the image and the FREEZE key for keeping the image projected even if the equipment is disconnected High portability Light weight small size simple design This projector has been miniaturized to approx 2 8 kg 6 lb 3 oz in weight and B5 file size Its simple yet sophisticated design fits comfortably in your office Security lock By setting a password you can enable the security lock to function for th...

Страница 10: ...ir Filter on page 41 8 Ventilation holes intake 9 Powered tilt adjuster 0 Indicators POWER SAVING Lights up when the projector is in power saving mode When Power Saving in the SET SETTING menu is set to ON the projector goes into power saving mode if no signal is input for 10 minutes Although the lamp goes out the cooling fan keeps running The power saving mode is canceled when a signal is input o...

Страница 11: ... on the screen or press and hold the key for about two seconds For details on steps for turning off the power see To turn off the power on page 27 2 ON STANDBY indicator located around the I 1 key Lights up or flashes under the following conditions Lights in red when a AC power cord is plugged into a wall outlet Once in standby mode you can turn on the projector with the I 1 key Lights in green wh...

Страница 12: ...t Adjust the height of the projector as follows 1 Press the I 1 key The lens protector opens and the poweredtiltadjusterrisesautomatically The adjuster stops at its previously adjusted position 2 Press f or F of the TILT key to adjust the tilt of the projector You may press the D KEYSTONE key on the Remote Commander to display the Tilt menu and adjust the tilt using the v V b B keys Be careful not...

Страница 13: ...ideo input connector Connect to external video equipment such as a VCR VIDEO phono type Connects to the composite video output of video equipment S VIDEO mini DIN 4 pin Connects to the S video output Y C video output of video equipment 3 AUDIO stereo minijack connector When listening to sound output from the computer connect to the audio output of the computer When listening to sound output from t...

Страница 14: ...l Alignment key Adjusts a picture clearest automatically while a signal is input from a computer Used when Smart APA in the SET SETTING menu is set to Off Normally set to On 9 D KEYSTONE key Used to adjust the tilt of the projector or the trapezoidal distortion of the image manually Each time you press this key the Tilt menu and the V Keystone menu is displayed alternately Use the arrow key v V b ...

Страница 15: ...y consult a doctor Notes on Remote Commander operation Make sure that nothing obstructs the infrared beam between the Remote Commander and the remote control detector on the projector Direct the Remote Commander toward the remote control detector The operation range is limited The shorter the distance between the Remote Commander and the remote control detector is the wider the angle within which ...

Страница 16: ...here may be a slight difference between the actual value and the design value shown in the table above When using the projector by suspending it from the ceilling consult with qualified Sony personel fee charged Unit m feet Screen size inches 40 60 80 100 120 150 Minimum Distance 1 1 3 6 1 7 5 6 2 3 7 5 2 9 9 5 3 5 11 5 4 4 14 4 Maximum Distance 1 4 4 6 2 1 6 9 2 8 9 2 3 5 11 5 4 2 13 8 5 3 17 4 N...

Страница 17: ...nual The projector accepts VGA SVGA XGA signals However we recommend that you set the output mode of your computer to SVGA mode for the external monitor If you set your computer such as a notebook type to output the signal to both your computer s display and the external monitor the picture of the external monitor may not appear properly Set your computer to output the signal to only the external ...

Страница 18: ... Macintosh computer equipped with video output connector of a type having two rows of pins use a commercially available plug adaptor INPUT A S VIDEO VIDEO AUDIO to audio output Left side HD D sub 15 pin cable supplied Stereo audio connecting cable not supplied a to monitor output Computer a Use a no resistance cable ...

Страница 19: ... VCR or 15k RGB Component Equipment AUDIO AUDIO INPUT A S VIDEO VIDEO Stereo audio connecting cable not supplied a VCR to S video output Left side toaudio output Video cable not supplied or S Video cable not supplied to video output a Use a no resistance cable AUDIO AUDIO INPUT A S VIDEO VIDEO Left side Stereo audio connecting cable not supplied a SMF 402 Signal Cable not supplied HD D sub 15 pin ...

Страница 20: ...ccording to the input signal When you connect the unit to 15k RGB or component video equipment select video GBR or component with the Input A Signal Sel setting in the SET SETTING menu Use the composite sync signal when you input the external sync signal from 15k RGB component equipment Notes ...

Страница 21: ...he factory setting is English To change the menu language proceed as follows 1 Plug the AC power cord into a wall outlet 2 Press the I 1 key to turn on the projector 3 Press the MENU key The menu appears The menu presently selected is shown as a yellow button INPUT MENU PUSH ENTER TILT Remote control detector PICTURE SETTING Picture Mode Standard Adjust Picture Volume 30 Input A ...

Страница 22: ...d menu appears 5 Press the v or V key to select Language then press the B or ENTER key 6 Press the v V b or B key to select a language then press the ENTER key The menu changes to the selected language To clear the menu Press the MENU key The menu disappears automatically if a key is not pressed for one minute Input A A Input A ...

Страница 23: ...t Auto setup starts The lens protector opens and the powered tilt adjuster rises and stops at the previously adjusted position 3 Turn on the equipment connected to the projector Depending on the type of your computer for example a notebook or an all in one LCD type you may have to switch the computer to output to the projector by pressing certain keys e g etc or by changing your computer s setting...

Страница 24: ... Remote Commander to display the Tilt menu and adjust the tilt using the v V b B keys For details on the TILT adjustment key see How to use the powered tilt adjuster on page 12 When you adjust the powered tilt adjuster with the TILT key the automatic keystone adjustment is performed at the same time If you do not want to perform the automatic keystone adjustment set the V Keystone menu to Manual S...

Страница 25: ...stone correction correction of trapezoidal distortion Set V Keystone in the INSTALL SETTING menu to Manual Smart APA Auto Pixel Alignment Set Smart APA in the SET SETTING menu to Off Auto Input Search Set Auto Input Search in the SET SETTING menu to Off For details on the menu operations see Using the MENU on page 30 To adjust the volume The volume can be adjusted in the on screen menu See Volume ...

Страница 26: ...becomes effective The screen for entering the password is displayed when the power is turned on the next time Enter new password key Power on cannot be performed without the password Use Cancel Other key Re enter new password key Be sure to remember this password Use Cancel Other key Tilt V Keystone Auto Image Flip Off Background Blue Lamp Mode Standard High Altitude Mode Off Security Lock Off INS...

Страница 27: ...rm that you want to turn off the power A message disappears if you press any key except the I 1 key or if you do not press any key for five seconds 2 Press the I 1 key again The powered tilt adjuster is put away in the projector and the lens protector closes The ON STANDBY indicator flashes in green and the fan continues to run for about 90 seconds to reduce the internal heat Also the ON STANDBY i...

Страница 28: ...the point on the image you want to enlarge Use the arrow key M m to move the icon 3 Press the D ZOOM key again The image where the icon is located is enlarged The enlargement ratio is displayed on the screen for a few seconds By pressing the key repeatedly the image size increases ratio of enlargement max 4 times Use the arrow key M m to scroll the enlarged image To return the image back to its or...

Страница 29: ...rojecting To freeze the image projected Freeze function Press the FREEZE key Freeze appears when the key is pressed This function works when a signal from a computer is input To restore the original screen press the FREEZE key again ...

Страница 30: ...ut Shows Auto or the Color System setting in the SET SETTING menu 1 Press the MENU key The menu appears The menu presently selected is shown as a yellow button 2 Use the v or V key to select a menu then press the B or ENTER key The selected menu appears 3 Select an item Use the v or V key to select the item then press the B or ENTER key The setting items are displayed in a pop up menu or in a sub ...

Страница 31: ... not pressed for one minute To reset items that have been adjusted Press the RESET key on the Remote Commander Complete appears on the screen and the settings appearing on the screen are reset to their factory preset values Items that can be reset are Contrast Brightness Color Hue and Sharpness in the Adjust Picture menu Dot Phase H Size and Shift in the Adjust Signal menu About the memory of the ...

Страница 32: ...n the RGB signal is input Contrast Adjusts the picture contrast The higher the setting the greater the contrast between a dark portion and a bright portion of the picture The lower the setting the lower the contrast Brightness Adjusts the picture brightness The higher the setting the brighter the picture The lower the setting the darker the picture Color Adjusts color intensity The higher the sett...

Страница 33: ...r reddish The INPUT SETTING Menu The INPUT SETTING menu is used to adjust the input signal Items that cannot be adjusted depending on the input signal are not displayed in the menu For details on the unadjustable items see page 49 When the video signal is input When the RGB signal is input Wide Mode Sets the aspect ratio of the picture When inputting 16 9 squeezed signal from equipment such as a D...

Страница 34: ...the screen size The picture will lose some clarity Off Displays the picture while matching one pixel of input picture element to that of the LCD The picture will be clear but the picture size will be smaller When SVGA or XGA signal is input this item will not be displayed Note on selecting the wide mode Note that if the projector is used for profit or for public viewing modifying the original pict...

Страница 35: ...PA it will not be readjusted even when the cable is disconnected and connected again or the input channel is changed You can adjust the picture by pressing APA key on the Remote Commander even if the Smart APA set to On Off The APA functions when you press the APA key on the Remote Commander 1 The APA Auto Pixel Alignment automatically adjusts Dot Phase H Size and Shift in the INPUT SETTING menu f...

Страница 36: ...rojector lights when the projector is on Normally this setting is On If you want complete darkness or if the illuminated logo is a distraction change this setting to Off The MENU SETTING Menu The MENU SETTING menu is used for changing the settings of the projector Status on screen display Sets up the on screen display On Shows all of the on screen displays Off Turns off the on screen displays exce...

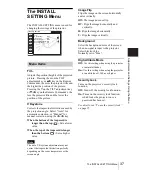
Страница 37: ...r value The auto V Keystone adjustment may not correct the trapezoidal distortion perfectly depending on the room temperature or the screen angle Image Flip Flips the image on the screen horizontally and or vertically Off The image does not flip HV Flips the image horizontally and vertically H Flips the image horizontally V Flips the image vertically Background Select the background color of the s...

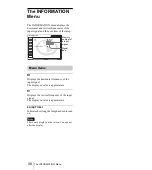
Страница 38: ...ncy of the input signal The displayed value is approximate fV Displays the vertical frequency of the input signal The displayed value is approximate Lamp Timer Indicates how long the lamp has been turned on These only display on the screen You cannot alter the display Menu Items Note Input A fH 48 47kHz fV 60 00Hz No 23 1024x768 Lamp Timer 0H INFORMATION Memory number of a input signal Signal type...

Страница 39: ...ast an hour for the lamp to cool If the lamp breaks consult with qualified Sony personnel Pull out the lamp by holding the handle If you touch the lamp you may be burned or injured When removing the lamp make sure it remains horizontal then pull straight up Do not tilt the lamp If you pull out the lamp while tilted and if the lamp breaks the pieces may scatter causing injury 1 Place a protective s...

Страница 40: ...than five seconds each RESET b B ENTER Be sure to use the LMP E180 Projector Lamp for replacement If you use lamps other than LMP E180 the projector may cause a malfunction Be sure to turn off the projector and unplug the power cord before replacing the lamp Do not put your hands into the lamp replacement spot or not fall any liquid or object into it to avoid electrical shock or fire Disposal the ...

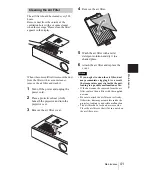
Страница 41: ...4 Remove the air filter 5 Wash the air filter with a mild detergent solution and dry it in a shaded place 6 Attach the air filter and replace the cover If you neglect to clean the air filter dust may accumulate clogging it As a result the temperature may rise inside the unit leading to a possible malfunction or fire If the dust cannot be removed from the air filter replace the air filter with the ...

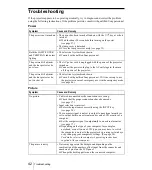
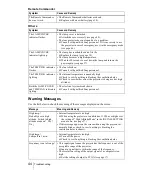
Страница 42: ...s down c Consult with qualified Sony personnel If it is necessary to use the projector in case of emergency use it in the emergency mode see page 46 Symptom Cause and Remedy No picture Cable is disconnected or the connections are wrong c Check that the proper connections have been made see page 17 Input selection is incorrect c Select the input source correctly using the INPUT key see page 24 The ...

Страница 43: ...Contrast or brightness has not been adjusted properly c Adjust the contrast or brightness in the Adjust Picture menu properly see page 32 The lamp has burnt or dims c Replace the lamp with a new one see page 39 The picture is not clear Picture is out of focus c Adjust the focus see page 24 Condensation has occurred on the lens c Leave the projector for about two hours with the power on The image e...

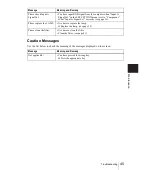
Страница 44: ...is unusually high c Check to see if anything is blocking the ventilation holes c Check to see whether or not the projector is being used at high altitudes Both the LAMP COVER and TEMP FAN indicators light up The electrical system breaks down c Consult with qualified Sony personnel Message Meaning and Remedy High temp Probably use in high altitude Switch to high altitude mode on Yes R No r Internal...

Страница 45: ...n Input A Signal Sel in the SET SETTING menu is set to Component c Set Input A Signal Sel correctly see page 36 Please replace the LAMP It is time to replace the lamp c Replace the lamp see page 39 Please clean the filter It is time to clean the filter Clean the filter see page 41 Message Meaning and Remedy Not applicable You have pressed the wrong key c Press the appropriate key Message Meaning a...

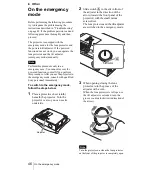
Страница 46: ... you use the projector in the emergency mode consult with qualified Sony personnel immediately To switch to the emergency mode follow the steps below 1 Place a protective sheet cloth beneath the projector Turn the projector over so you can see its underside 2 Slide switch A in the slit in front of the adjuster in the direction of the arrow toward the front panel of the projector with the small min...

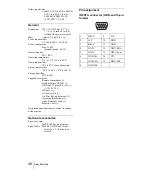
Страница 47: ...fV 85 Hz Applicable video signals 15 kHz RGB Component 50 60 Hz Progressive Component 50 60 Hz DTV 480 60I 575 50I 1080 60I 480 60P 575 50P 1080 50I 720 60P 720 50P 540 60P Composite video Y C video Speaker Monaural speaker system 40 20 mm 1 5 8 13 16 inches max 1 W Input Output Video input VIDEO phono type Composite video 1 Vp p 2 dB sync negative 75 ohms terminated S VIDEO Y C mini DIN 4 pin typ...

Страница 48: ...ge temperature 20 C to 60 C 4 F to 140 F Storage humidity 10 to 90 Supplied accessories Remote Commander 1 Lithium battery CR2025 1 HD D sub 15 pin cable 2 m 1 1 791 992 21 Soft case 1 AC power cord 1 Air filter for replacement 1 Operating Instructions 1 Quick Reference Card 1 Security Label 1 Design and specifications are subject to change without notice Optional accessories Projector Lamp LMP E1...

Страница 49: ... except black and white signal z z Hue z except black and whitesignal NTSC 3 58 4 43 only z z Sharpness z z z Gamma Mode z preset memory no 3 4 only z Color Temp z z z z Volume z z z z Item Input signal Video or S video Y C Com ponent Video GBR Com puter Dot Phase z H Size z except preset memory no 3 4 z except preset memory no 3 4 z Shift z except preset memory no 3 4 z except preset memory no 3 ...

Страница 50: ... neg V neg 832 14 VGA VESA 75 Hz 37 500 75 000 H neg V neg 840 15 VGA VESA 85 Hz 43 269 85 008 H neg V neg 832 16 800 600 SVGA VESA 56 Hz 35 156 56 250 H pos V pos 1024 17 SVGA VESA 60 Hz 37 879 60 317 H pos V pos 1056 18 SVGA VESA 72 Hz 48 077 72 188 H pos V pos 1040 19 SVGA VESA 75 Hz 46 875 75 000 H pos V pos 1056 20 SVGA VESA 85 Hz 53 674 85 061 H pos V pos 1048 21 832 624 Macintosh 16 49 724 ...

Страница 51: ...an appropriate rating plug which is applied to local regulations Notes The United States Canada Continental Europe UK Ireland Australia New Zealand Japan Plug type VM0233 290B YP 12A COX 07 1 YP332 Connector type VM0089 386A YC 13B COX 02 VM0310B YC 13 Cord type SJT SJT H05VV F H05VV F N13237 CO 228 VCTF Rated Voltage Current 10A 125V 10A 125V 10A 250V 10A 250V 10A 250V 7A 125V Safety approval UL ...

Страница 52: ... clearing the menu display 31 INFORMATION Menu 38 INPUT SETTING menu 33 INSTALL SETTING menu 37 MENU SETTING menu 36 PICTURE SETTING menu 32 SET SETTING menu 35 using the menu 30 Menu Color 36 Menu Position 36 Message caution 45 warning 44 O Optional accessories 48 P Picture Mode 32 Pin assignment 48 Power turn on 23 Power Saving 10 36 Powered tilt adjuster 12 Precautions 6 R Remote Commander 13 l...

Отзывы: