83
US
Oth
e
r Op
eratio
ns
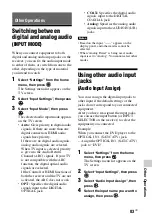
Switching between
digital and analog audio
(INPUT MODE)
When you connect equipment to both
digital and analog audio input jacks on the
receiver, you can fix the audio input mode
to either of them, or switch from one to the
other, depending on the type of material
you intend to watch.
1
Select “Settings” from the home
menu, then press
.
The Settings menu list appears on the
TV screen.
2
Select “Input Settings”, then press
.
3
Select “Input Mode”, then press
.
The selected audio input mode appears
on the TV screen.
•
Auto:
Gives priority to digital audio
signals. If there are more than one
digital connection, HDMI audio
signals have priority.
If there are no digital audio signals,
analog audio signals are selected.
When TV input is selected, priority
is given to the Audio Return
Channel (ARC) signals. If your TV
is not compatible with the ARC
function, the digital optical audio
signals are selected.
If the Control for HDMI functions of
both the receiver and the TV are not
activated, the ARC does not work.
•
OPT:
Specifies the digital audio
signals input to the DIGITAL
OPTICAL jack.
•
COAX:
Specifies the digital audio
signals input to the DIGITAL
COAXIAL jack.
•
Analog:
Specifies the analog audio
signals input to the AUDIO IN (L/R)
jacks.
• Based on the input, “------” appears on the
display panel, and other modes cannot be
selected.
• When “Analog Direct” is being used, audio
input is set to “Analog”. You cannot select other
modes.
Using other audio input
jacks
(Audio Input Assign)
You can reassign the digital input jacks to
other input if the default settings of the
jacks do not correspond to your connected
equipment.
After you have reassigned the input jacks,
you can use the input button (or INPUT
SELECTOR on the receiver) to select the
equipment you connected.
Example:
When you connect the DVD player to the
OPTICAL IN 1 (SAT/CATV) jack.
– Assign the OPTICAL IN 1 (SAT/CATV)
jack to “DVD”.
1
Select “Settings” from the home
menu, then press
.
The Settings menu list appears on the
TV screen.
2
Select “Input Settings”, then press
.
3
Select “Audio Input Assign”, then
press
.
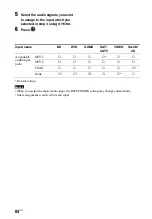
4
Select the input name you want to
assign, then press
.
Other Operations
Notes
Содержание STR-DN840
Страница 1: ...4 454 467 13 1 STR DN840 Multi Channel AV Receiver Operating Instructions ...
Страница 138: ......
Страница 139: ......
Страница 140: ... 2013 Sony Corporation Printed in Malaysia 4 454 467 13 1 ...

