background image

Display Settings / Date Settings

27

Chap

ter
 3

  Ba
sic

 Men

u Op

er

at

ions

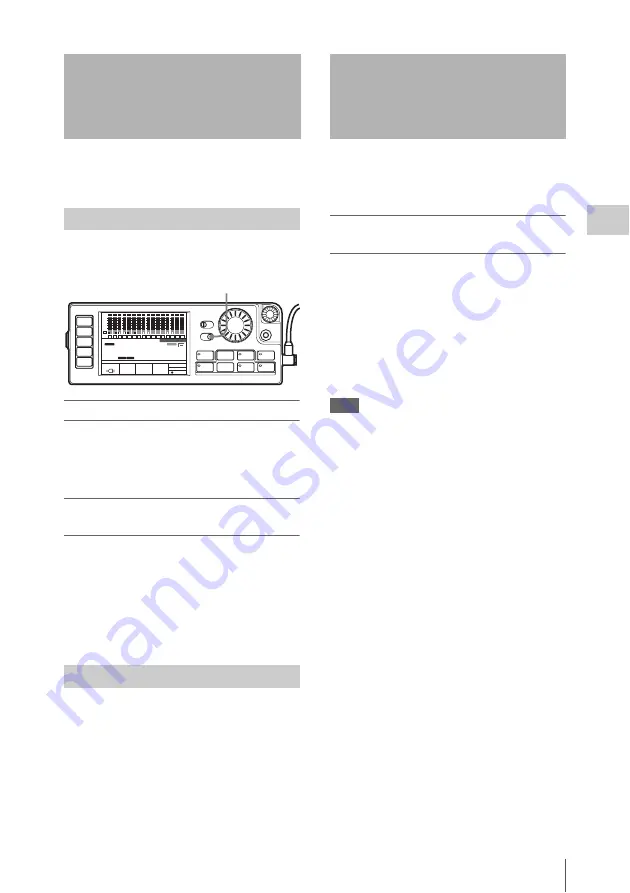
You can make settings for backlight use in dark 
locations, screen saver, etc.

Setting the LIGHT switch to ON turns the 
backlight on.

Adjusting the backlight brightness

Access the SYSTEM Setup menu and select LCD 
> BRIGHT 

(see page 59)

. The Backlight 

Brightness window appears, letting you adjust the 
setting.

Turning the backlight off after a period of 
inactivity

Access the SYSTEM Setup and select LCD > 
LIGHT OFF 

(see page 59)

. The Backlight Off 

Timer window appears, letting you adjust the 
backlight activation duration. The setting range is 
5 seconds to 5 minutes. To disable automatic 
backlight deactivation, select “Disable.”

Default setting:

 Disable

Access the SYSTEM Setup menu and select LCD 
>SAVER 

(see page 59)

. The Screen Saver 

window appears, letting you adjust the wait 
interval until the screen saver is activated. The 
setting range is 1 minute to 1 hour. To disable the 
screen saver, select “Disable.”

Default setting:

 Disable

Display the System menu and select OTHERS 
>SET DATE menu to set the date and time of the 
unit.

To set the date and time (OTHERS >SET 
DATE menu)

1

Display the System menu, and then 
select and confirm “OTHERS” 

t


select and confirm “SET DATE.”

2

Set the year, month, day, local time, and 
UTC (Coordinated Universal Time) 
offset (e.g., +9:00 for Japan), and then 
select and confirm [SET].

Note

Time information is recorded to SRMemory cards in 
UTC format and is displayed using the offset value as its 
base.

Display Settings

Using the Backlight

Using the Screen Saver

HOME

TC

VIDEO

AUDIO

SYSTEM

EJECT

STOP

PLAY

KEY INHI

BACK

OFF

ON

LIGHT

OFF

ON

REC

FUNC

REW

F FWD

PAUSE

x

Z

z

B

m

X

M

ADJUST

SELECT/ENTER

SDI

EMP

1

L R

SDI

EMP

2

L R

SDI

EMP

3

L R

SDI

EMP

4

L R

SDI

EMP

5

L R

SDI

EMP

6

L R

SDI

EMP

7

L R

SDI

EMP

8

L R

SDI

EMP

9

L R

SDI

EMP

10

L R

SDI

EMP

11

L R

SDI

EMP

12

L R

dB

0

-10
-20
-30
-60

TCG

REMAIN

5min


LOCAL

EE

 17:11

STOP

RECINHI

KEYINHI

00

H

00

M

00

S

00

F

EE

16.5V

SDI

EMP

13

L R

SDI

EMP

14

L R

SDI

EMP

15

L R

SDI

EMP

16

L R

SR-R4:CAM

23.98P

F65RAW

F65RAW-SQ

ENCODE

IN DLY:

TC

AU

MK: --:--:--:--

FILENAME:(NEXT)A001C001_120530RT

LIGHT switch

Date Settings

Содержание SRMASTER SR-R4

Страница 1: ...SR R4 SY 4 412 781 05 2 Sony Corporation Printed on recycled paper Printed in Japan 2012 9 32 2011 PORTABLE MEMORY RECORDER SR R4 CONTROL PANEL SRK CP1 OPERATION MANUAL English 1st Edition Revised 4 ...

Страница 2: ...d as a CLASS 1 LASER PRODUCT Laser Diode Properties Wavelength 850 nm Emission duration Pulse modulation Laser output power 4 mW channel max Standard IEC60825 1 2007 Egenskaber for laserdiode Bølgelængde 850 nm Strålingsvarighed Pulsmodulering Afgivet lasereffekt 4 mW kanal maks Standard IEC60825 1 2007 Laserdiod Egenskaper Våglängd 850 nm Strålningens varaktighet Pulsmodulation Lasereffekt 4 mW k...

Страница 3: ...mful interference and 2 this device must accept any interference received including interference that may cause undesired operation For the customers in Canada This Class A digital apparatus complies with Canadian ICES 003 For the customers in Europe This product with the CE marking complies with the EMC Directive issued by the Commission of the European Community Compliance with this directive im...

Страница 4: ...il numérique de la classe A est conforme à la norme NMB 003 du Canada Pour les clients en Europe Ce produit portant la marque CE est conforme à la Directive sur la compatibilité électromagnétique EMC émise par la Commission de la Communauté européenne La conformité à cette directive implique la conformité aux normes européennes suivantes EN55103 1 Interférences électromagnétiques émission EN55103 ...

Страница 5: ...uck von Ohrhörern und Kopfhörern kann Gehörschäden verursachen Um dieses Produkt sicher zu verwenden vermeiden Sie längeres Hören bei sehr hohen Schalldruckpegeln Dieser Tragbarer HD Speicherrecorder ist als LASERPRODUKT DER KLASSE 1 eingestuft Daten der Laserdiode Wellenlänge 850 nm Emissionsdauer Pulsmodulation Laser Ausgangsleistung 4 mW Kanal max Standard IEC60825 1 2007 Für Kunden in Europa D...

Страница 6: ...an Der autorisierte Repräsentant für EMV und Produktsicherheit ist Sony Deutschland GmbH Hedelfinger Strasse 61 70327 Stuttgart Deutschland Bei jeglichen Angelegenheiten in Bezug auf Kundendienst oder Garantie wenden Sie sich bitte an die in den separaten Kundendienst oder Garantiedokumenten aufgeführten Anschriften ...

Страница 7: ...g the Backlight 27 Using the Screen Saver 27 Date Settings 27 Chapter 4 Recording and Playback Recording Preparations and Operations 28 Setting the Audio Signals 28 Setting the Recording Levels 29 Setting the Time Code and User Bits 30 Recording 32 Playback Preparations and Operations 33 Making Settings Related to Audio Monitor Signals 33 Adjusting Playback Audio Levels 33 Selecting the Time Data ...

Страница 8: ... About Error Messages 65 About Warning Messages 66 Warning System 69 Troubleshooting 71 About Recording Playback Formats 74 Lip Sync Correction 75 Video Signal Delay Durations in Relation to Audio Inputs 75 Automatic File Name Configuration in Response to Changes in SRMemory Cards and Settings 76 During Normal Operation 76 When an SRMemory Card with Different Camera ID and Reel Number Information ...

Страница 9: ... frames are supported for F65RAW HFR recording The following figure shows a system configured around the SR R4 Chapter 1 Overview Features System Configuration Example HOME TC VIDEO AUDIO SYSTEM EJECT STOP PLAY KEY INHI ADJUST BACK SELECT ENTER OFF ON LIGHT OFF ON REC FUNC REW F FWD PAUSE x Z z B m X M SDI EMP 1 L R SDI EMP 2 L R SDI EMP 3 L R SDI EMP 4 L R SDI EMP 5 L R SDI EMP 6 L R SDI EMP 7 L ...

Страница 10: ...el of the input audio LINE For line input MIC For microphone input MIC 48V ON For input from microphones with external power supply 2 EARPHONES jack stereo mini jack and LEVEL knob Adjusts the audio level A warning alarm tone is also output via this jack when an error is detected 3 TC IN time code input connector BNC Connect to the time code output connector of an external device such as a time co...

Страница 11: ...ctor page 17 8 CTRL PANEL Control Panel connector page 16 9 AUX OUT connector for future use 1 Power switch page 21 Setting the switch to the side turns power on and setting the switch to the 1 side turns power off 2 Cable clamp page 16 3 Fan Note Do not block the ventilation openings Otherwise internal heat buildup can lead to a risk of fire and damage to the unit Rear and Right Side View 1 3 2 ...

Страница 12: ...es the operation of the Record Play buttons 11 EJECT button and indicator page 23 12 Memory Stick slot page 77 Note on faulty pixels on the LCD panel The LCD panel fitted to this unit is manufactured with high precision technology giving a functioning pixel ratio of at least 99 99 Thus a very small proportion of pixels maybe stuck either always off black always on red green or blue or flashing In ...

Страница 13: ... LOCAL EE 17 11 STOP RECINHI KEYINHI 00H 00M 00S 00F EE 16 5V SDI EMP 13 L R SDI EMP 14 L R SDI EMP 15 L R SDI EMP 16 L R SR R4 CAM 23 98P F65RAW F65RAW SQ ENCODE IN DLY TC AU MK FILENAME NEXT A001C001_120530RT IN DLY TC AU IN DLY TC AU 1 2 4 10 3 5 6 7 8 9 11 11 Sections 6 to 9 change to the condition shown as 11 below when the HOME button is pressed while holding down the FUNC button SR R4 CAM W...

Страница 14: ... simultaneously the signal formats are displayed from top to bottom in system encoding or in playback file output recording date duration sequence To switch display to portrait mode Press the HOME button while holding down the FUNC and BACK buttons to switch the display to portrait mode rotate display 90 to the left To return to landscape mode press the HOME button again while holding down the FUN...

Страница 15: ...bracket supplied with the Control Panel SRK CP1 Option to the unit and connect the unit and the control panel with the control panel cable 1 Attach the CP bracket supplied with the control panel to the right side of the unit 2 Slide the control panel into the CP bracket Chapter 2 Preparation Work Flow Mount control panel on unit page 15 Connect F65 page 17 Turn power on page 21 Insert SRMemory car...

Страница 16: ...at the bottom of the cord does not extend beyond the bottom of the SR R4 If the SR R4 cannot be docked on the F65 refer to the above and check the cord bundle again Note Always turn off the power supply for the unit before disconnecting the control panel cable and removing the control panel To remove the control panel Grasp the underside of the CP bracket and push it in the B direction to release ...

Страница 17: ...ironment relatively free from dust etc 1 Remove the connector cap from the CAMERA connector of the unit Tip Store the connector cap in a safe location so that you do not lose it 2 Align and connect the CAMERA connector of the unit with the F65 connector 1 Align the base of the unit with the base of the F65 as shown in the diagram 2 Align the CAMERA connector of the unit with the F65 dock connector...

Страница 18: ...oved from the CAMERA connector attached to the docking screws Removing the Unit from the F65 1 Press down firmly on the point shown in the diagram and loosen the docking screws 2 Remove the unit by lifting it When lifting hold the unit as close as possible to the F65 and pull it up Note Do not push on the ventilation openings 3 Attach the connector cap to the CAMERA connector of the unit Connector...

Страница 19: ...racket Attach the larger outside bracket to an F65 with a mechanical shutter or the smaller outside bracket to an F65 without a mechanical shutter 2 Attach the CP Bracket to the outside bracket 3 Slide the control panel into the CP bracket 4 Use the supplied control panel cable to connect the unit and the control panel 5 Use the cable clamp as shown to fix the cable Note Always turn off the power ...

Страница 20: ... the control panel out To attach the battery pack the following options must be installed using the BKP spacer supplied with the unit BKP L551 battery pack adapter power supply for accessories BKW R4 battery pack adapter power supply for the F65 Note Power cannot be supplied directly to the unit from the battery pack 1 Remove the top cover of the unit Attach the Battery Pack ...

Страница 21: ... power supply while the SR R4 is turned on Tip If power switch is turned off while an SRMemory card is mounted the unit will not power down immediately to protect the data on the card The SRMemory card will be unmounted first and then the unit powers down Checking the power voltage The indication at the bottom left of the control panel display serves to verify the battery status or the voltage of ...

Страница 22: ...the SYSTEM Setup menu allows you to set the battery voltages which trigger the NEAR END and END warnings see page 60 When AC power is selected The connector symbol is shown Supported SRMemory cards For details on SRMemory cards supported by the unit see SR R4 Supported Formats and Maximum Recording Times Approximate page 82 To insert the SRMemory card 1 Press the lid open close button to open the ...

Страница 23: ...t to remove the SRMemory card Write protecting the card In order to prevent inadvertent erasure of recorded content you can slide the write protect switch to WP When the card is inserted in the SR R4 in this condition the indication REC INHI appears and recording is not possible To re enable recording on this card return the write protect switch to the original condition SRMemory cards are sold al...

Страница 24: ...nu If the selected item is a command the command is executed Chapter 3 Basic Menu Operations Menu Overview TC Setup Serves for making time code settings AUDIO Setup Serves for making audio signal related settings SYSTEM Setup Serves for making system settings Buttons Used for Menu Operations HOME TC VIDEO AUDIO SYSTEM EJECT STOP PLAY KEY INHI BACK OFF ON LIGHT OFF ON REC FUNC REW F FWD PAUSE x Z z...

Страница 25: ...STEM Setup menu is set to Map the KEYMAP settings apply see page 59 TCG Setting Main DF NDF UBG SRC 12H 24H DF TCG 24H T C S e t u p TIMER SEL TIMER RESET TIMER PRESET TCR SEL TCG MODE RUN MODE TCG SET OTHERS LTC TC PRST R RUN SR R4 CAM TCR 00 00 00 00 STOP Submenu window 24H 12H 12H 24H MODE TCG Setting Main DF NDF UBG SRC 12H 24H DF TCG 24H T C S e t u p TIMER SEL TIMER RESET TIMER PRESET TCR SE...

Страница 26: ...ET The settings complete message is shown and the HOME screen appears again Note If you changed RAW HD in 2 of step 2 POWER ON OFF F65 appears Turn the power switch on the F65 off and then on again Signal Format Settings Selecting the Signal Format Raw Hd S Y S T E M S e t u p SR R4 CAM TCG 00 00 00 00 STOP System Format RAW HD FRAME TC HD 1080 23PsF FILE LIST SYSTEM FORMAT PB FUNCTION LCD KEY MAP...

Страница 27: ...isable Default setting Disable Display the System menu and select OTHERS SET DATE menu to set the date and time of the unit To set the date and time OTHERS SET DATE menu 1 Display the System menu and then select and confirm OTHERS t select and confirm SET DATE 2 Set the year month day local time and UTC Coordinated Universal Time offset e g 9 00 for Japan and then select and confirm SET Note Time ...

Страница 28: ...cord SYSTEM FORMAT in the SYSTEM Setup menu page 26 Select the audio signals to record INPUT SEL in the AUDIO Setup menu page 28 Set the audio signals to monitor PHONE SEL in the AUDIO Setup menu page 29 Set the display range of the audio level meters METER TYPE in the AUDIO Setup menu page 30 Set the recording levels REC LEVEL in the AUDIO Setup menu page 30 Adjust the levels of audio signals out...

Страница 29: ...ursor to and confirm END To set the mixing mode for audio signals Display the AUDIO Setup menu and then 1 select and confirm MIX MODE t2 select and confirm the mixing mode ADD Simple addition RMS Geometric mean Average Simple average Use the AUDIO Setup menu to make settings related to the recording levels Press the AUDIO button to display the AUDIO Setup menu The recording levels can be checked w...

Страница 30: ...o decrease the level To reset the setting Rotate the SELECT ENTER dial to move the cursor to RESET and then press the dial When you want to change the setting Move the cursor to and confirm UNI 4 Set the recording level of each of the other channels in the same way 5 When you have finished making the settings move the cursor to and confirm END Use the TC Setup menu to make settings related to the ...

Страница 31: ... SET OTHERS LTC TC PRST R RUN SR R4 CAM TCR 00 00 00 00 STOP TIMER Mode Select Time Code User Bit Timer 1 Timer 2 1 TIMER SEL 2 Time data Menu item Time code TCG MODE PRST An arbitrary time code can be set R RUN F RUN and DF NDF can be set to an arbitrary value in the menu RGN In accordance with the time code input via the TC IN connector Menu item User bits TCG SET UBG SOURCE TCG MODE TCG PRST Ar...

Страница 32: ...e code generators of multiple recorders Display the TC Setup menu and then set TCG MODE to RGN For details see To select the time code to record page 31 Note External synchronization is not possible in Select FPS format To record the user bits By setting user bits you can record up to eight hexadecimal digits of information date time etc To set an arbitrary value and then record user bits 1 Set th...

Страница 33: ... the level of audio output via the EARPHONES jack Rotate the LEVEL knob The playback audio level can be set for each channel in PB LEVEL of the AUDIO Setup menu The setting procedure is the same as in steps 2 and 3 of To set the recording levels page 30 Note The playback audio level cannot be adjusted during recording To set the display range of the audio level meters See To set the display range ...

Страница 34: ...the knob and the speed at which it is turned The playback state will remain in shuttle mode even if you release the FUNC button and the ADJUST knob During the REC PAUSE or STOP state if you press the STOP button while holding down the FUNC button or if the duration specified with the SYSTEM POWER STBY OFF setting elapses the unit will enter Standby Off mode Under the Disable default setting the un...

Страница 35: ... REVIEW REC button and indicator To start recording press the PLAY button while holding down this button The indicator is lit during recording If pressed during Standby Off mode while recording is stopped the unit enters Standby On mode If you press this button during playback or during a search the system enters E E mode 1 and you can monitor the E E signal 2 output from the F65 Sets a MARK IN po...

Страница 36: ...the next file Tip The SYSTEM Setup menu PB FUNCTION NEXT PREV setting determines whether MARK IN points are included in this function see page 58 Executes a forward direction search With each press the search speed changes in the order of x2 t x5 t x8 t x16 t x32 t x2 If a search is interrupted by another operation the next search is performed at the speed in effect at the time of the interruption...

Страница 37: ...K IN point Display the HOME screen and while a valid MARK IN point set and active press the PAUSE button while holding down the FUNC button The file opens at the currently active MARK IN point The state in which the file is opened is determined by the FUNC MODE setting of PB FUNCTION in the SYSTEM Setup menu Opening a MARK IN point from the File list window You can view MARK IN points set in each ...

Страница 38: ...n the SYSTEM Setup menu allows you to perform operations such as displaying a list of the files recorded to the SRMemory card displaying detailed information performing file operations deleting and renaming and playing back files 1 Display the SYSTEM Setup menu and then 1 select and confirm FILE LIST t2 select and confirm FILE LIST The File list window appears FILE LIST Operations Displaying a Fil...

Страница 39: ...sition is displayed File Name File name Date Recording date and time Start TC The time code of the starting frame of the file Duration Number of frames in file Format Recording data format type Folder Name Folder name Display when the SRMemory card contains no files Display during recording When recording starts a new file with a red icon to indicate recording is in progress is added to the list W...

Страница 40: ...utton to return to the file list Note Locked files cannot be deleted To lock a file You can lock individual files to prevent accidental deletion Select and confirm PROTECT to display the confirmation screen When you select OK and then press the SELECT ENTER dial while holding down the FUNC button the file is locked and a lock icon appears Locked files cannot be deleted To unlock a file select the ...

Страница 41: ...e ADJUST knob while holding down the FUNC button to move to the Mark In Point display Notes In the Mark In Point display use the ADJUST knob to move up and down through files and the SELECT ENTER dial to move left and right through MARK IN points The MARK IN points will be displayed in the order in which they were set If three points are set in a single file the oldest points will be deleted when ...

Страница 42: ...s contact a Sony service representative What is the target frame frequency Normally the frame frequency of recorded material is determined before shooting for example it is usually set to 24 Hz for movies and 29 97 Hz or 25 Hz for TV programming and then the recorded material is played back at that frame frequency after shooting In SR Motion the pre determined number of frames of recorded material...

Страница 43: ...ion at 24 60 0 4 times normal playback speed If you set the format for recording in accordance with the target frame frequency system frequency at playback the time code can continuously advance during playback Playback of the recorded file in F65RAW 23 98P format is possible Shooting F65RAW S59 94p 60 FPS F65 Unit Target frame frequency 23 98P Time code 24F Recording F65RAW S59P 23P 60 FPS System...

Страница 44: ...ame frequency To obtain quick motion effects shoot with undercranking To obtain slow motion effects shoot with overcranking Example When the target frame frequency is 23 98P To obtain quick motion effects Set shooting frames to 1 to 23 FPS To obtain slow motion effects Set shooting frames to 25 to 60 FPS Setting shooting frames to 60 FPS results in playback in slow motion at 0 4 times normal playb...

Страница 45: ...frames and instead advances from the 0 to 23 frames of the target frame frequency If 1 second is recorded with these settings beginning from the 00 second 00 frame the time code advances quickly from the second 00 frames 00 to 23 and then continues to advance as second 01 frames 00 to 23 and finally as second 02 frames 00 to 11 at which point a total of 60 frames have been recorded see the followi...

Страница 46: ...ecorded in 1 second is indicated as FPS frames per second The number of frames can be set in 1 FPS increments within the range of 1 to 60 FPS 1 to 120 FPS for F65RAW HFR SR Motion Operation Flow Connect the unit to the camera Set the target frame frequency playback time code Select the system format to use during shooting Select the SR Motion mode function Set the number of frames to shoot FPS Sho...

Страница 47: ...ive frames in which no signal is recorded This unit extracts and stores only effective frames and records them to an SRMemory card When the recorded file is played back at 24P a slow motion effect of 0 48 times normal playback speed is obtained 10 1 2 3 4 5 6 7 8 9 50 48 49 50 FPS NV 1 2 3 4 5 6 NV 7 8 9 10 NV 48 49 50 60P 1 2 3 4 5 6 7 8 9 10 48 49 50 1 2 3 4 22 23 24 Format S59P 23P SELECT FPS O...

Страница 48: ...then press the SELECT ENTER dial while holding down the FUNC button again the following screen appears If you press the HOME button while holding down the FUNC button in this state the signal format display at the bottom of the screen changes to the SR Motion display allowing you to check the setting for the number of frames to shoot S Y S T E M S e t u p SR R4 CAM TCG 00 00 00 00 STOP System Form...

Страница 49: ...ing the motion effects Press the PLAY button after shooting to play the last recorded file Simple playback allows you to check recorded video in fewer steps than normal playback However it does not allow you to check the slow or quick motion effects Every forth frame will be played back during F65RAW HFR S119P S120 playback Jog playback and MARK IN will also occur for every fourth frame To turn Se...

Страница 50: ... the SRMemory card The next file that is created will be named B002C004_XXXXXXXX In this case the camera ID setting for the control panel will change to B and the reel number setting will change to 002 NEXT file name also blinks in the operation status and warning indicator if the camera ID and reel number differ from those of the control panel If a blank SRMemory card is inserted the reel number ...

Страница 51: ... data becomes 00 00 00 00 time code or 00 00 00 00 user bits Notes The values read by the time code reader cannot be reset Time data cannot be reset when the time code generator is locked to external time codes or to values read by the time code reader TIMER PRESET Selects the type of time data to preset to an arbitrary value TCG TC Time code generated by the time code generator TCG UBIT User bits...

Страница 52: ...m Drop frame mode NDF Non Drop Frm Non drop frame mode Note This settings is valid only when TCG MODE is set to PRST UBG SOURCE Selects the source time code of user bits TCG TCG Source Same source time code as that of the time code generator INT Internal Time code generated by the time code generator Arbitrary user bits can be set regardless of the setting of TCG see page 32 12H 24H Selects the TI...

Страница 53: ...ts LTC LTC UB Records the time to LTC user bits RT SET Sets the current time RT SRC Selects the method in which the current time is recorded to the user bits RTC RTC Records the current time configured in the RT REC and RT SET settings Select this under normal circumstances DATE DATE Records the current time of the unit s internal clock i e the time displayed on the control panel and the status in...

Страница 54: ...to track 9 Same settings as TRACK1 OFF TRACK10 Selects the signal to assign to track 10 Same settings as TRACK1 OFF TRACK11 Selects the signal to assign to track 11 Same settings as TRACK1 OFF TRACK12 Selects the signal to assign to track 12 Same settings as TRACK1 OFF TRACK13 Selects the signal to assign to track 13 Same settings as TRACK1 OFF TRACK14 Selects the signal to assign to track 14 Same...

Страница 55: ...ding audio signal phase setting ANALOG Sets whether or not to add a delay to the ANALOG audio input OFF OFF Does not add delay ON ON Adds delay AUX IN Sets whether or not to add a delay to the AUX IN audio input OFF OFF Does not add delay ON ON Adds delay INPUT DELAY Sets the delay length for items set to be delayed 0 NO DELAY Does not add delay 1 1F Delay Records the audio signal with a delay of ...

Страница 56: ...mat for file names CAMERA Camera Uses CAMERA format file names AwwwCxxx_yyyyyyzz A Camera ID www Reel number Cxxx Shot number yyyyyy Recording date year month day zz Random characters The camera ID and reel number are set in subsequent menus CAMERA ID Sets the camera ID for when saving using CAMERA format file names A to Z Note Depending on the SRMemory card inserted in the unit the CAMERA ID sett...

Страница 57: ...ncy of 25 Hz field frequency of 50 Hz 29P PsF 29 97P PsF Frame frequency of 29 97 Hz field frequency of 59 94 Hz 50P 50P Frame frequency of 50 Hz 59P 59P Frame frequency of 59 94 Hz For details see Using the Select FPS function page 48 SIGNAL Sets the sampling format for HD recording 422 422 4 2 2 Y Cb Cr 444 444 4 4 4 R G B For details see About Recording Playback Formats page 74 SELECT FPS Selec...

Страница 58: ... ON On Enables repeat playback Tip The range for repeat playback is determined by the PB CONTINUE setting REC REVIEW During REC PAUSE this specifies the REC REVIEW playback range for when the ASSIGN button is pressed on the F65 or when the PLAY button is pressed on the control panel while holding down the FUNC button ALL All Plays back the last recorded file from beginning to end 5SEC 5sec Plays b...

Страница 59: ...r after a set time DIS Disable Does not use the screensaver 1min 1min Starts the screensaver after 1 minute 3min 3min Starts the screensaver after 3 minutes 5min 5min Starts the screensaver after 5 minutes 10min 10min Starts the screensaver after 10 minutes 20min 20min Starts the screensaver after 20 minutes 30min 30min Starts the screensaver after 30 minutes 1hour 1hour Starts the screensaver aft...

Страница 60: ...saving mode after 2 minutes 5min 5min Enters power saving mode after 5 minutes 10min 10min Enters power saving mode after 10 minutes 20min 20min Enters power saving mode after 20 minutes 40min 40min Enters power saving mode after 40 minutes 60min 60min Enters power saving mode after 60 minutes DIS Disable Does not enter power saving mode BATTERY Settings related to the remaining battery power indi...

Страница 61: ...witch is WP formatting cannot be performed Note Formatting will erase all data recorded on the SRMemory card OTHERS SOFT VERSION Displays the version of each software installed on the unit HOURS METER Display various count values using the digital hours meter total since the start of use of the unit or total during a certain period SYSTEM System operation time LID LOCK Number of lock plunger opera...

Страница 62: ... available Pure alcohol 99 5 or higher 1 Remove the unit from the F65 If the unit is not mounted on the F65 remove the CAMERA connector cap 2 Press point 1 on the CAMERA connector using your finger or other object to open the protective shutter and expose the optical contacts 3 Once the shutter opening jig is attached open the shutter and check that you can see the optical contacts 4 Dip an optica...

Страница 63: ...65RAW HFR format HD SStP 4 2 2 format Sampling frequency Y 74 25 MHz Cb Cr 37 125 MHz Quantization 10 bits Compression MPEG4 SStP HD SStP 4 4 4 format Sampling frequency RGB 74 25 MHz Quantization 10 bits 12 bits Compression MPEG4 SStP Audio Digital audio signal format channels 1 to 16 Sampling frequency 48 kHz synchronized with video Quantization 24 bits Headroom 20 dB Analog audio input A D quan...

Страница 64: ...onal Accessories Control Panel SRK CP1 SRMemory card SR 256S15 256S55 256 GB SR 512S25 512S55 512 GB SR 1TS25 1TS55 1 TB Battery pack adapter BKP L551 BKW R4 Notes Always make a test recording and verify that it was recorded successfully SONY WILL NOT BE LIABLE FOR DAMAGES OF ANY KIND INCLUDING BUT NOT LIMITED TO COMPENSATION OR REIMBURSEMENT ON ACCOUNT OF FAILURE OF THIS UNIT OR ITS RECORDING MED...

Страница 65: ...13 L R SDI EMP 14 L R SDI EMP 15 L R SDI EMP 16 L R LOCAL EE 21 46 TCR REMAIN 10min PLAY LOCK LTC INTRP DF EXT LK KEYINHI VTR OOOOO 16 5V 23 98P F65RAW STANDARD ENCODE RECINHI 00H 00M 00S 00F FILENAME NEXT A001C001_120530RT MK IN DLY TC AU FILENAME NEXT A001C001_120530RT ERROR E010 E010 FAN STOP FAN STOP FAN Stopped 1 Error s 2 Warning s Popup window displaying error message E010 FAN STOP fan stop...

Страница 66: ...lem E059 AV READ ERROR Detected an audio video playback error due to interface or memory problem E05A WRITE FAIL OW Detected an access error when recording an AV file to the SRMemory card Proper recording is not possible The power may have been turned off before unmounting of the card was complete E05B CANNOT REC MEDIA Detected an error in the unrecorded areas of the SRMemory card E05F WP OFF TO M...

Страница 67: ...ME A file name containing prohibited characters was received Rename the file W01A TASK STUCK Transmission for a portion of a multitask may have failed W01F PLAYER MODE Recording is not possible in the current state W022 AUDIO PLL UNLOCK The audio clock is not locked to the reference video signal W024 INTERNAL FRM NG Internal Frm interruption could not be processed properly W02F LOST LOCK Detected ...

Страница 68: ...l from the CAMERA connector is low Clean the connector W079 CAM OPT NG The received optical level from the CAMERA connector is extremely low Clean the connector W07C CAM CRC NG Detected a CRC error in the received optical signal data from the CAMERA connector W07E REC RATE OVER The SRMemory card cannot record in the current format Use a faster SRMemory card W07F CAM UNLOCK The input video signal f...

Страница 69: ...cluding Servo lock lost during recording below Operation continues Check the warning message and resolve the condition a b Servo lock lost during recording Recording continues but results may invalid Check the input signal An error occurred Operation continues or stops depending on the type of error Check the error message and resolve the condition Alternatively contact a Sony service representati...

Страница 70: ...ounting in progress The power cannot be turned off Do not turn off the power switch until the processing is complete a Output only during recording b Flashes during recording c You can use the battery level external power indication on the display to check the state of the battery see page 14 22 Warning tones 1 beeps second 4 beeps second Continuous tone Alarm tones 1 beeps second 4 beeps second C...

Страница 71: ...ta Whenever you insert an SRMemory card that requires salvaging or turn on the unit with such a card inserted a popup message asking whether you want to perform salvaging will appear Recording and playback are disabled for SRMemory cards that require salvaging When you format an SRMemory card the memory card will be ready for use immediately However any previously recorded data will be lost To res...

Страница 72: ...eck the monitor settings Try turning it off and on again Problem Cause Countermeasures No sound Level meter indication is flashing and input is disabled Set up input device correctly to supply an AUX audio signal Mode was switched To prevent noise and damage to audio monitor equipment audio is muted off when switching modes Non Audio setting No audio is output when Non Audio mode is selected A whi...

Страница 73: ... Adjust the limiter taking into take account the inrush current when powering on and when switching modes Cannot record SRMemory card is write protected Return the write protect switch to the original position Power to other equipment does not come on Power switch of other equipment is not on Turn power switch of other equipment on ...

Страница 74: ... HFR SR HQ 12 bit SR SQ SR Lite ON F65RAW S60 24 25 a S59 23 29 a F65RAW HFR 1 S120 24 25 a 1 S119 23 29 a 1 HD 1920 1080 4 4 4 S60 24 25 a a S59 23 29 a a HD 1920 1080 4 2 2 S60 24 25 a a S59 23 29 a a Select FPS setting Signal Frame TC target frame frequency ENCODE F65RAW SQ Lite F65RAW HFR SR HQ 12 bit SR SQ SR Lite OFF F65RAW 23 98 a 24 a 25 a 29 97 a 50 a 59 94 a F65RAW HFR 2 23 98 a 2 24 a 2...

Страница 75: ... factory default setting for the input delay duration of the audio signal or time code is 1 frame If necessary you can change the delay duration in 1 frame increments The delay durations for the video signal from the F65 to the unit are as follows The delay setting for the recorded audio signal can be configured with INPUT DELAY in the AUDIO Setup menu see page 55 The delay setting for the recorde...

Страница 76: ...to D001C002 D001C003 etc in sequence 4 Remove the SRMemory card and insert another blank SRMemory card i e a recently formatted card or a card on which all the files were deleted ALL DEL The reel number automatically changes to 002 and D002C001_XXXXXXXX blinks under FILENAME NEXT 5 Record When you record the FILENAME display will stop blinking and display steadily FILENAME NEXT will change to D002...

Страница 77: ...ting information For example if a file named F001C005_XXXXXXXX exists on the SRMemory card the name of the file recorded next will be F001C006_XXXXXXXX The unit supports the storing and recalling of the following data on a Memory Stick Supported Memory Stick types The SR R4 supports Memory Stick media up to 128 MB capacity and Memory Stick PRO media up to 8 GB capacity Note on data read write spee...

Страница 78: ...ns Do not attach anything other than the supplied label to the Memory Stick labeling position Attach the label so that it does not stick out beyond the labeling position Carry and store the Memory Stick in its case Do not touch the connector of the Memory Stick with anything including your finger or metallic objects Do not strike bend or drop the Memory Stick Do not disassemble or modify the Memor...

Страница 79: ...NY OTHER USE ADDITIONAL INFORMATION INCLUDING THAT RELATING TO PROMOTIONAL INTERNAL AND COMMERCIAL USES AND LICENSING MAY BE OBTAINED FROM MPEG LA LLC SEE HTTP WWW MPEGLA COM MPEG LA is offering licenses for i manufacturing sales of any storage media storing MPEG 4 Visual video information ii distribution broadcasting of MPEG 4 Visual video information in any manner such as online video distributi...

Страница 80: ...10 EJECT button 10 12 Encoding format indication 14 Error messages 65 F FILE LIST 38 56 File list 38 File system format 23 FORMAT 57 I INPUT SEL 54 K KEY INHI 59 KEY INHI switch 12 KEYMAP 59 L LCD 59 LEVEL knob 10 LID LOCK indicator 10 Lid open close button 10 LIGHT switch 12 M Menu 24 51 AUDIO Setup menu 54 operation 24 SYSTEM Setup menu 56 TC Setup menu 51 Menu selection buttons 12 METER TYPE 55...

Страница 81: ...Signal format indication 14 Signal format settings 26 Specifications 63 SR Motion 42 SRMemory card 22 insert 22 remove 23 SRMemory card remaining capacity indication 14 SRMemory card slot 10 SYSTEM Setup menu 56 T Tally indicator 10 TC IN connector 10 TC OUT connector 10 TC Setup menu 51 TCG MODE 51 TCG SET 52 TCR SEL 51 Time code 30 Time data 33 TIMER PRESET 51 TIMER RESET 51 TIMER SEL 51 Trouble...

Страница 82: ...9 97p 20 40 81 20 40 81 50p 12 24 49 59 94p 10 20 41 S59p 23p 2 25 51 102 S59p 29p 2 20 40 81 S60p 24p 2 25 51 102 S60p 25p 2 24 49 98 F65RAW SQ 23 98p 24p 30 60 15 30 60 25p 29 58 14 29 58 29 97p 24 48 12 24 48 50p 7 14 29 59 94p 6 12 24 S59p 23p 2 15 30 60 S59p 29p 2 12 24 48 S60p 24p 2 15 30 60 S60p 25p 2 14 29 58 F65RAW HFR Linear 16 bit F65RAW HFR S119P 23P 2 30 61 122 S119P 29P 2 24 49 98 S1...

Страница 83: ...9 29 97PsF S59P 29PsF 114 228 457 114 228 457 50p 72 144 289 72 144 280 59 94p 60 120 241 60 120 241 SR SQ 23 98PsF 24PsF S59P 23PsF S60P 24PsF 77 155 311 77 155 311 25PsF S60P 25PsF 74 149 298 74 149 298 29 97PsF S59P 29PsF 62 124 248 62 124 248 50p 38 76 153 38 76 153 59 94p 31 63 128 31 64 128 4 4 4 10 bit SR SQ 23 98PsF 24PsF S59P 23PsF S60P 24PsF 77 155 311 77 155 311 25PsF S60P 25PsF 74 149 ...

Страница 84: ...SR R4 Supported Formats and Maximum Recording Times Approximate 84 ...

Страница 85: ... for use by the purchasers of the equipment described in this manual Sony Corporation expressly prohibits the duplication of any portion of this manual or the use thereof for any purpose other than the operation or maintenance of the equipment described in this manual without the express written permission of Sony Corporation ...

Отзывы: