background image

B

a

sic

 Op

er
atio

ns

25

US

Playing discs

Tip

• To make a video timer reservation during DVD playback, we recommend performing the 

operations under “Quick Timer Recording” (page 81).

Notes

• You can change the screen type using the “SCREEN SETUP” menu (see “Screen Setup” on 

page 46).

• Stop VIDEO playback while playing back a disc.
• If you play a DVD or VIDEO CD that has scratches, the player may stop playback at the 

point of the scratch.

• Playback of play lists longer than 10 hours recorded in VR mode is not guaranteed.
• When 10 hours have passed, the counter in the display window returns to “0:00” and the 

count starts over again.

• The disc that has been recorded in another unit or PC may not be able to be played back 

depending on the recording software’s specifications.

• The player cannot play a disc that has been recorded in another unit and incorrectly finalized 

(page 8).

3

Press 

H

PLAY.

The disc tray closes and the 
DVD player starts playback.
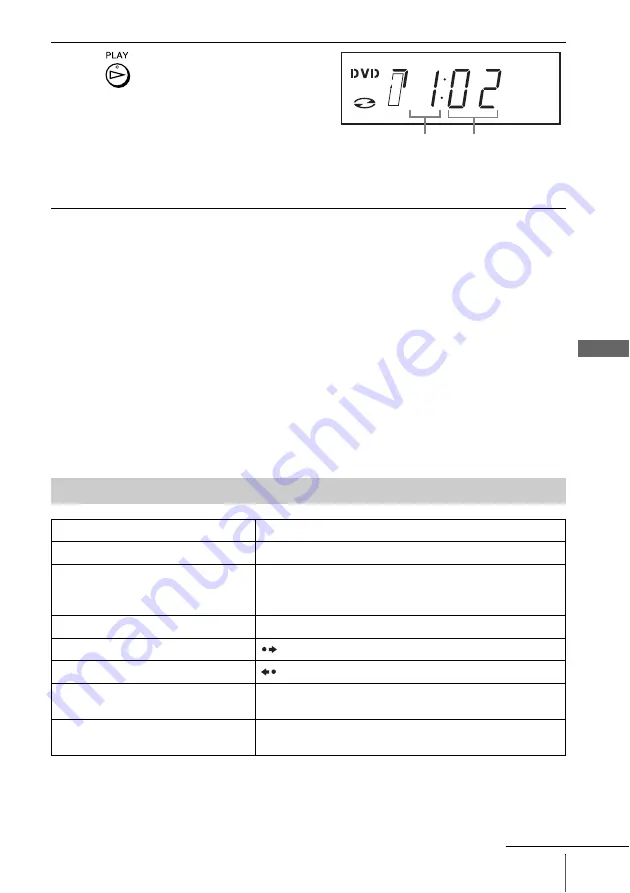
The display window shows the 
playback time

*

Depending on the disc, a menu 
may appear on the TV screen. 
For DVDs, see page 55. For VIDEO CDs, see page 79.

* “– – – –” appears when no disc is loaded.

Additional operations

To

Press

Stop play

x

STOP

Pause play

X

PAUSE

If you pause the DVD player for more than 5 minutes, the 
DVD player will automatically stop.

Resume play after pause

H

PLAY

Go to the next frame in pause mode

SKIP

Go to the previous frame in pause mode

REPLAY

Go to the next chapter, track, or scene in 
continuous play mode

>

 NEXT on the remote or 

M

 on the unit

Go back to the previous chapter, track, 
or scene in continuous play mode

.

 PREV on the remote or 

m

 on the unit

Hour

Minute

continued

Содержание SLV-D281P

Страница 1: ...y questions about your Sony DVD VCR you may call Sony Customer Information Center at 1 800 VHS SONY 847 7669 For all other Sony product questions please call Sony Customer Information Center at 1 800 222 SONY 7669 Or write to Sony Customer Information Center 12451 Gateway Boulevard Ft Myers FL 33913 SLV D281P 2007 Sony Corporation US ES ...

Страница 2: ...evice pursuant to Part 15 of the FCC Rules These limits are designed to provide reasonable protection against harmful interference in a residential installation This equipment generates uses and can radiate radio frequency energy and if not installed and used in accordance with the instructions may cause harmful interference to radio communications However there is no guarantee that interference w...

Страница 3: ...moisture may condense on the lenses inside the player and cause damage to the video head tape and the optical block Should this occur the player may not operate properly When you first install the player or when you move it from a cold to a warm location remove the disc and tape and leave the player turned on for about three hours before operating the player On adjusting volume Do not turn up the ...

Страница 4: ...ther A grounding type plug has two blades and a third grounding prong The wide blade or the third prong are provided for your safety If the provided plug does not fit into your outlet consult an electrician for replacement of the obsolete outlet 10 Protect the power cord from being walked on or pinched particularly at plugs convenience receptacles and the point where they exit from the apparatus 1...

Страница 5: ...vanced Hookups for the DVD Player 21 Component Video hookup 22 A V Receiver hookup Basic Operations 24 Playing discs 28 Guide to the on screen display 31 Playing a tape 35 Recording from a connected equipment 38 Recording from a connected equipment using the timer 41 Checking changing canceling timer settings 43 Locking the DVD VCR Child Lock DVD Settings and Adjustments 44 Audio Setup 46 Screen S...

Страница 6: ...the sound 67 Virtual surround setting 69 Playing an MP3 audio track 75 Playing JPEG image files 79 Playing VIDEO CDs with PBC ON OFF Functions VCR Additional Operations 81 Quick Timer Recording 82 Searching using various functions 84 Editing with another VCR Additional Information 86 Changing menu options 88 Troubleshooting 93 Glossary 95 Specifications 96 Index to parts and controls 100 DVD Audio...

Страница 7: ...s and folders on CD ROMs defined by ISO International Organization for Standardization The player can play DVD ROMs DVD RWs DVD Rs DVD RWs DVD Rs recorded in the following formats MP3 audio tracks and JPEG image files of format conforming to ISO 9660 Level 1 Level 2 or its extended format Joliet 8 cm DVD RW DVD RW and DVD R recorded with a DVD Video camera Icon Meaning Functions available for DVD ...

Страница 8: ... player due to the recording quality or physical condition of the disc or the characteristics of the recording device and authoring software The disc will not play if it has not been correctly finalized For more information refer to the operating instructions for the recording device Note that some playback functions may not work with some DVD RWs DVD Rs even if they have been correctly finalized ...

Страница 9: ...two sided disc product which mates DVD recorded material on one side with digital audio material on the other side However since the audio material side does not conform to the Compact Disc CD standard playback on this product is not guaranteed Note on DualDiscs ...

Страница 10: ...g Started Step 1 Unpacking Check that you have received the following items with the DVD VCR Note The supplied remote commander is for the exclusive use of this DVD VCR Remote commander Audio video cord Size AA R6 batteries ...

Страница 11: ...Inserting the batteries Insert two size AA R6 batteries by matching the and on the batteries to the diagram inside the battery compartment Insert the negative end first then push in and down until the positive end clicks into position Reattach the cover after inserting the batteries continued ...

Страница 12: ...sensor to direct light from the sun or lighting apparatus Doing so may cause a malfunction Using the remote commander You can use this remote commander to operate this DVD VCR and a Sony TV Buttons on the remote commander marked with an orange dot can be used to operate your Sony TV If the TV does not have the symbol near the remote sensor this remote commander will not operate the TV To operate S...

Страница 13: ...forms the following To control the DVD VCR reset TV DVD VIDEO switch to DVD VIDEO Controlling TVs with the remote commander Buttons Operations 1 Turns a Sony TV on or off VOL Adjusts the volume of a Sony TV CH Selects the channel on a Sony TV Number buttons and ENTER Selects the channel on a Sony TV MUTING Mutes a Sony TV equipped with the muting function TV VIDEO Switches a Sony TV s input source...

Страница 14: ...you have been using your VCR connected to an antenna connect this DVD VCR to your VCR using an audio video cord In this way you will be able to watch and record TV programs The DVD VCR cannot record programs if you have a cable box without audio video outputs cable with no cable box antenna only no cable TV In this case consult your contracted or nearest CATV provider Notes You cannot connect your...

Страница 15: ... a true hometheater experiences If you want to record cable TV programs complete these connections first and then go to the following pages for cable hookups Note When the connected TV has only monaural sound input jack connect to just the LINE OUT AUDIO L white and VIDEO input jacks Do not connect the AUDIO R red jack Connecting to your TV Signal flow Audio video cord supplied TV DVD VCR to LINE ...

Страница 16: ... cable box or satellite receiver LINE IN 1 Tip You can also connect a cable box or satellite receiver using the LINE 2 IN jacks on the front panel page 84 Note The DVD VCR cannot record programs if you have a cable box without audio video outputs cable with no cable box antenna only no cable TV Connecting a cable box or satellite receiver to LINE IN 1 Signal flow Antenna cable not supplied to ante...

Страница 17: ...mpleted hookup After you have completed hookup plug the DVD VCR into an AC outlet If you connect additional equipment to this DVD VCR page 21 22 be sure to connect the power cord only after all connections are complete DVD VCR AC power cord to AC outlet ...

Страница 18: ...reen Set TV DVD VIDEO switch to DVD VIDEO on the remote If the DVD player is in play mode you cannot display the setup menu Stop the DVD playback 1 Press SET UP then press V v to select OPTION and press ENTER 2 Press V v to select Language then press ENTER The LANGUAGE IDIOMA LANGUE menu appears 3 Press V v to select the desired language English Spanish or French then press ENTER 4 Press SET UP to...

Страница 19: ...DEO switch to DVD VIDEO on the remote If the DVD player is in play mode you cannot display the setup menu Stop the DVD playback 1 Press SET UP then press V v to select OPTION and press ENTER 2 Press V v to select Clock Set Adjust then press ENTER The CLOCK SET ADJUST menu appears 3 Set the hour minutes month day and year in sequence by pressing B b to select the item to be set and press V v to sel...

Страница 20: ...the clock Note The clock display appears in the display window when VIDEO mode is selected with no tape inserted or when the DVD VCR is turned off 4 Press ENTER to confirm the setting 5 Press SET UP to exit the menu ...

Страница 21: ...INE OUT AUDIO L R jacks or DIGITAL AUDIO OUT COAXIAL jacks on the right side of the DVD VCR when you use Component Video hookup See page 22 for audio connections If your TV accepts progressive 480p format signals you must use this connection and then set Progressive to On in the SCREEN SETUP menu For details see To set the Progressive setting page 48 Note The connection using COMPONENT VIDEO OUT j...

Страница 22: ...ns supplied with the connected components Note The connection using LINE OUT AUDIO L R or DIGITAL AUDIO OUT COAXIAL jacks is only for the DVD player The signal from the VCR will not be output Front R Front L Subwoofer Signal flow Rear L AV amplifier receiver with a decoder Center Rear R Stereo audio cord not supplied Speakers red white Speakers to audio input white red to LINE OUT L R AUDIO to coa...

Страница 23: ... Use this connection if your AV amplifier receiver has a Dolby 1 Digital or DTS 2 decoder and a digital input jack You can enjoy the surround effect of Dolby Digital 5 1ch or DTS 5 1ch 1 Manufactured under license from Dolby Laboratories Dolby and the double D symbol are trademarks of Dolby Laboratories 2 DTS and DTS Digital Out are registered trademarks of DTS Inc Note After you have completed th...

Страница 24: ...tions supplied with your disc Before you start Turn on the DVD VCR and your TV Set the TV to video input so that the signal from the player appears on the TV screen 1 Press SELECT DVD to control the DVD player 2 Press Z to open the disc tray and place a disc on the disc tray Z H PLAY X PAUSE x STOP m M y SELECT DVD with the playback side facing down ...

Страница 25: ...ing on the recording software s specifications The player cannot play a disc that has been recorded in another unit and incorrectly finalized page 8 3 Press H PLAY The disc tray closes and the DVD player starts playback The display window shows the playback time Depending on the disc a menu may appear on the TV screen For DVDs see page 55 For VIDEO CDs see page 79 appears when no disc is loaded Ad...

Страница 26: ...es as follows each time you press the button on the remote or depending on how long you press the button on the unit DVD fast forward PLAY t 1 4 N 1 t 1M t 2M t 3M t 4M t 5M t 6M fast reverse PLAY t 1m t 2m t 3m t 4m t 5m t 6m CD MP3 and VIDEO CD fast forward PLAY t 1M t 2M t 3M fast reverse PLAY t 1m t 2m t 3m When you find the point you want press H PLAY Watch slow motion in continuous play mode...

Страница 27: ... audio system the consumer should take proper precautions when the analog stereo jacks of the DVD player are connected to an amplification system To enjoy DTS Digital Surround playback an external 5 1 channel decoder system must be connected to the digital jack of the DVD player Set the sound to Stereo using the AUDIO button when you play DTS sound tracks on a CD page 65 Do not play DTS sound trac...

Страница 28: ...ge on page 100 for the abbreviation of the language Note You cannot select disc information items when the disc is stopped You can check disc information during playback The displayed contents differ according to the type of disc being played Before you start Set TV DVD VIDEO switch to DVD VIDEO on the remote DISPLAY V v B b ENTER O RETURN Number buttons Type of disc Current title track number Cur...

Страница 29: ... v during playback to select the desired item 2 Press B b to change the item 3 Press ENTER to start playback 4 Press DISPLAY or O RETURN to turn off the menu 1 Press V v during playback to select the counter position icon 2 Enter the desired elapsed playing time of the current title track using the number buttons 3 Press ENTER to start playback 4 Press DISPLAY or O RETURN to turn off the menu Indi...

Страница 30: ... watch a movie Cinema 1 or Cinema 2 is recommended 1 Press V v during playback to select the Custom AV Mode icon 2 Press B b to change the setting Setting Video Setting Audio Setting Dynamic 2 Produces a more dynamic picture than Dynamic 1 by further increasing the picture contrast and the color intensity Full modulated sound with even clearer treble and bass than Dynamic 1 Dynamic 1 Produces a bo...

Страница 31: ...IDEO switch to DVD VIDEO on the remote 1 Press SELECT VIDEO to control the VCR player 2 Insert a tape The VCR starts playing automatically if you insert a tape with its safety tab removed 3 Press H PLAY The display window shows the playback time When the tape reaches the end it will rewind automatically Z DISPLAY H PLAY X PAUSE x STOP 1 TRACKING CLEAR m M y SELECT VIDEO AUDIO Hour Minute continued...

Страница 32: ...t forward hold down M During rewind hold down m Play at high speed During playback briefly press M or m The tape continues to play at 5 times normal speed During playback hold down M or m The tape continues to play at 5 times normal speed When you release the button normal playback resumes Play in slow motion During pause press y Play frame by frame During pause press SKIP Replay the previous scen...

Страница 33: ...counting when it comes to a portion with no recording When 10 hours have passed the counter in the display window returns to 0 00 and the count starts over again No sound is output during playback at various speeds The picture may show noise when playing at high speed in reverse While playing a tape you can display the setup menu but the remote commander s function switches to DVD automatically Pr...

Страница 34: ...y adjust the tracking Press TRACKING to display the tracking meter The distortion should disappear as you press one of the two tracking buttons To resume automatic tracking adjustment eject the tape and reinsert it Note The auto tracking adjustment cannot be guaranteed to work with tapes recorded in the LP mode on other VCRs Adjusting the picture tracking Tracking meter ...

Страница 35: ...x or sattelite receiver Set the TV to video input so that the signal from the player appears on the TV screen Set TV DVD VIDEO switch to DVD VIDEO on the remote Make sure the tape is longer than the total recording time 1 Press SELECT VIDEO to control the VCR 2 Insert a tape with its safety tab in place 3 Press INPUT SELECT to select a source connected to the LINE IN 1 or LINE 2 IN jacks L1 or L2 ...

Страница 36: ...e length of a tape set Tape Length in the VIDEO FUNCTION SETUP menu correctly page 86 Maximum Recording Time 4 Press SP EP to select the tape speed SP or EP EP Extended Play provides recording time three times as long as SP Standard Play However SP produces better picture and audio quality 5 Press z REC to start recording REC appears in the display window While recording leave the connected cable ...

Страница 37: ... watch TV while recording you can turn off the TV Notes The remaining tape length may not be indicated accurately for short tapes such as T 20 or T 30 or tapes recorded in LP mode It may take up to one minute for the VCR to calculate and display the remaining tape length after you press DISPLAY You cannot record a DVD directly to a VCR tape using your DVD VCR 1 Press SELECT DVD to control the DVD ...

Страница 38: ...s set to the correct time Turn on the DVD VCR TV and your cable box or sattelite reciever Set the TV to video input so that the signal from the player appears on the TV screen Set TV DVD VIDEO switch to DVD VIDEO on the remote Insert a tape with its safety tab in place Make sure the tape is longer than the total recording time If the DVD player is in play mode you cannot display the setup menu Sto...

Страница 39: ...source connected to the LINE IN 1 or LINE 2 IN jacks press INPUT SELECT or V v to display L1 or L2 in the L1 L2 position To record the same program every day or the same day every week press v while the date is flashing For details see Daily weekly recording on page 39 To use the Auto Tape Speed function press v to display Auto in the SPEED position For details see To use the Auto Tape Speed funct...

Страница 40: ...ange or cancel the timer setting see Checking changing canceling timer settings on page 41 If the indicator appears this means that the VCR is currently recording this program You can also do the following tasks while the VCR is recording Reset the counter page 33 Display tape information on the TV screen page 36 You can also display the timer programming menu by first pressing SET UP then V v to ...

Страница 41: ...hat the signal from the player appears on the TV screen Set TV DVD VIDEO switch to DVD VIDEO on the remote Insert a tape with its safety tab in place Make sure the tape is longer than the total recording time If the DVD player is in play mode you cannot display the setup menu Stop the DVD playback 1 Press SELECT VIDEO to control the VCR 2 Press TIMER The timer programming menu appears TIMER CLEAR ...

Страница 42: ...he timer settings overlap You can also display the timer programming menu by first pressing SET UP then V v to select PROGRAM and pressing ENTER in step 2 3 Press V v to select setting you want to change or cancel To change the setting press B b to select the item you want to change and press V v to change it Then press O RETURN to confirm the setting To cancel the setting press CLEAR 4 Press O RE...

Страница 43: ...e DVD VCR turns off and the indicator remains lit if there is a timer setting The DVD VCR will not work except for timer recordings To unlock the DVD VCR Hold down 1 POWER on the unit until LOC disappears from the display window The DVD VCR is unlocked and turns on To stop timer recording while the DVD VCR is locked press x The recording stops and the DVD VCR is unlocked Note The DVD VCR will be u...

Страница 44: ... conditions Before you start Set TV DVD VIDEO switch to DVD VIDEO on the remote 1 Press SET UP when the DVD player is in stop mode then press V v to select DVD then press ENTER 2 Press V v to select Audio Setup then press ENTER 3 Press V v to select the setup item from the displayed list Dolby Digital DTS or Audio DRC V v B b ENTER SET UP ...

Страница 45: ... does not conform to the selected audio signal a loud noise or no sound will come out from the speakers affecting your ears or causing the speakers to be damaged Noise may occur in the LinearPCM double speed audio This is not a malfunction 4 Press B b to select an item 5 Press SET UP to exit the menu D PCM Select this when the player is connected to an audio component lacking a built in Dolby Digi...

Страница 46: ... VIDEO switch to DVD VIDEO on the remote 1 Press SET UP when the DVD player is in stop mode then press V v to select DVD then press ENTER 2 Press V v to select Screen Setup then press ENTER 3 Press V v to select the setup item from the displayed list TV Type or Y Pb Pr Black Level To set the Progressive setting see page 48 V v B b ENTER SET UP O RETURN ...

Страница 47: ...elected automatically instead of 4 3 Pan Scan or vice versa 4 Press B b to select an item 5 Press SET UP to exit the menu 4 3 Letter Box Select this when you connect a 4 3 screen TV Displays a wide picture with bands on the upper and lower portions of the screen 4 3 Pan Scan Select this when you connect a 4 3 screen TV Automatically displays the wide picture on the entire screen and cuts off the p...

Страница 48: ...Follow the instructions appearing on the screen 1 Ensure your TV is 480p Progressive Scan capable 2 Connect with Component Video Output jacks red green blue connections For details see the connection B on page 21 3 Press B b to select OK to test your video signal 4 If video signal appears OK video connection is complete Press ENTER The PROGRESSIVE indicator on the unit lights up in orange If pictu...

Страница 49: ...LECT DVD and then press X on the unit continuously for 5 seconds or more when the DVD VCR is in stop mode Note If you select progressive signal when you connect the DVD player to a TV that cannot accept the signal in progressive format the image quality will deteriorate In this case set Progressive to Off 5 Press SET UP to exit the menu ...

Страница 50: ...ou start Set TV DVD VIDEO switch to DVD VIDEO on the remote 1 Press SET UP when the DVD player is in stop mode then press V v to select DVD and press ENTER 2 Press V v to select Language Setup then press ENTER The LANGUAGE SET UP menu appears 3 Press V v to select the language setup item from the displayed list DVD Menu Audio or Subtitle Then press ENTER V v B b ENTER SET UP ...

Страница 51: ...ake priority over the DVD SETUP settings and not all the functions described may work 4 Press V v to select the desired language then press ENTER DVD MENU LANGUAGE You can select the desired language for the disc s menu AUDIO LANGUAGE Switches the language of the sound track When you select Original the language given priority in the disc is selected SUBTITLE LANGUAGE Switches the language of the ...

Страница 52: ... level such as the age of the users The Parental Control function allows you to set a playback limitation level Before you start Set TV DVD VIDEO switch to DVD VIDEO on the remote 1 Press SET UP when the DVD player is in stop mode then press V v to select DVD and press ENTER 2 Press V v to select Parental Setup then press ENTER Number buttons SET UP H PLAY V v B b ENTER ...

Страница 53: ...lready registered a password The display for entering the password appears Enter a 4 digit password using the number buttons After registering a password if you set Use Password to No PASSWORD CHECK screen will not appear 4 Press V v to select Rating Level then press ENTER 5 Press V v to select the level you want then press ENTER The options are as follows Level 8 Adult y Level 7 y Level 6 y Level...

Страница 54: ... OPTION SETUP menu and all items in the DVD SETUP menu are returned to the default setting 1 Select Change Password in step 4 on page 53 The display for entering a new password appears 2 Enter a new 4 digit password using the number buttons The display for confirming the password appears 3 Re enter the new password 1 Insert the disc then press H PLAY The display for entering your password appears ...

Страница 55: ...the title you want using the TOP MENU button When you play DVD VIDEOs that allow you to select items such as the language for the subtitles and the language for the sound select these items using the MENU button Before you start Set TV DVD VIDEO switch to DVD VIDEO on the remote 1 Press TOP MENU or MENU The disc s menu appears on the TV screen The contents of the menu vary from disc to disc 2 Pres...

Страница 56: ...till mode To zoom into a JPEG image see Playing JPEG image files on page 75 Before you start Set TV DVD VIDEO switch to DVD VIDEO on the remote 1 Press ZOOM appears 2 Press V v B b to move to the position where you want to zoom in 3 Press ENTER repeatedly to change the magnification Each time you press the button the magnification changes as shown below 2 t 4 t 2 t normal magnification ZOOM V v B ...

Страница 57: ...nge the viewing angle Before you start Set TV DVD VIDEO switch to DVD VIDEO on the remote 1 Press ANGLE during playback The angle number appears on the display The number after the slash indicates the total number of angles 2 Press B b repeatedly to select the angle number The scene changes to the selected angle You can also select the angle number using the number buttons ANGLE B b Number buttons...

Страница 58: ...p To confirm whether the angles of the current scene can be changed press DISPLAY twice when playing DVDs Note Depending on the DVD VIDEO you may not be able to change the angles even if multi angles are recorded on the DVD VIDEO ...

Страница 59: ...n them on and off whenever you want while playing a DVD 1 Press SELECT DVD to control the DVD player 2 Press SUBTITLE during playback 3 Press B b repeatedly to select the language Depending on the DVD the choice of language varies Refer to DVD Audio Subtitle Language on page 100 for the abbreviation of the language SUBTITLE V v B b SELECT DVD continued ...

Страница 60: ... off the subtitles Select Off in step 4 Note Depending on the DVD you may not be able to change the subtitles even if multilingual subtitles are recorded on it You also may not be able to turn them off 4 Press V v repeatedly to select On ...

Страница 61: ... disc to create your own program You can program up to 20 tracks To program MP3 audio tracks see page 71 Before you start Set TV DVD VIDEO switch to DVD VIDEO on the remote Note The play mode is canceled when you open the disc tray the player enters standby mode by pressing 1 Creating your own program Program play 1 Press SELECT DVD to control the DVD player 2 Press REPEAT when the DVD player is i...

Страница 62: ... programmed track numbers are displayed in the selected order 6 Press H PLAY to start program play Program play starts When the program ends you can restart the same program again by pressing H PLAY 1 Follow steps 1 to 3 of Creating your own program Program play 2 Press v repeatedly to select Clear last track then press ENTER Each time you press the button the last programmed number is canceled Yo...

Страница 63: ... see page 72 To return to normal play Press CLEAR until Off appears at the upper left top of the TV screen during shuffle play Tip Shuffle play will stop when all the tracks are played back Note You cannot repeat play while in shuffle play Playing in random order Shuffle play 1 Press SELECT DVD to control the DVD player 2 Press REPEAT when the DVD player is in stop mode 3 Press B b to select SHUFF...

Страница 64: ... VIDEO CDs with PBC ON OFF Functions on page 79 You cannot repeat play while in program play or shuffle play Playing repeatedly Repeat play 1 Press SELECT DVD to control the DVD player 2 Press REPEAT during playback 3 Press REPEAT or B b repeatedly to select the item to be repeated When playing a DVD Chapter repeats the current chapter Title repeats the current title on a disc When playing a VIDEO...

Страница 65: ... the vocals on the right channel and the instruments on the left channel you can hear the instruments from both speakers by selecting the left channel 1 Press AUDIO during playback 2 Press B b repeatedly to select the desired language audio setting When playing a DVD Depending on the DVD the choice of language varies Refer to DVD Audio Subtitle Language on page 100 for the abbreviation of the lang...

Страница 66: ... make the connection using DIGITAL AUDIO OUT COAXIAL page 22 When you play a DVD with DTS sound tracks set DTS to On in AUDIO SETUP menu page 44 If you set DTS audio output you cannot select surround setting page 67 You cannot perform playback quickly or slowly with sound when DTS audio output is set page 27 ...

Страница 67: ...ound sound effects by using sound imaging to create virtual rear speakers from the sound of the front speakers without using actual rear speakers 1 Press SURROUND during playback 2 Press B b repeatedly to select Surround1 Surround2 Surround3 Surround effect increases as shown below SURROUND B b TV TV TV Surround1 Surround2 Surround3 Virtual speaker continued ...

Страница 68: ...difficult to hear When you activate the surround effect turn off the surround setting of the connected TV or amplifier receiver Make sure that your listening position is between and at an equal distance from your speakers and that the speakers are located in similar surroundings You cannot perform playback quickly or slowly with sound when a virtual surround effect is set page 27 ...

Страница 69: ... VIDEO on the remote 1 Press SELECT DVD to control the DVD player 2 Press Z and place a DATA CD or DATA DVD on the disc tray then press Z to close the tray When you load a DATA CD or DATA DVD which contains MP3 audio tracks and JPEG image files Select a Media Type menu appears If you load a DATA CD or DATA DVD which contains only MP3 audio files the MP3 display appears Then you can skip step 3 V v...

Страница 70: ...ous display Press O RETURN To return to the Select a Media Type menu Press x STOP twice then press TOP MENU 3 Press V v to select MP3 then press ENTER The first track starts playing Press x STOP if necessary 4 Press O RETURN then press V v to select the desired directory in the left column then press ENTER 5 Press V v to select the desired track in the right column then press ENTER The selected tr...

Страница 71: ...hile in program play or shuffle play To program MP3 audio tracks 1 Press x STOP twice then press REPEAT 2 Press B b to select PROGRAM then press ENTER 3 Press V v to select the desired directory in the left column then press ENTER 4 Press V v to select the track you want to program then press ENTER 5 To program other tracks repeat step 4 The programmed tracks are displayed in the selected order Pr...

Страница 72: ... 1 Level 2 or Joliet format for the player to recognize the tracks or files You can also play DATA CDs or DATA DVDs recorded in Multi Session or Multi Border see Note on Multi Session Border discs on page 72 Refer to the instructions supplied with the CD R CD RW DVD R DVD RW drives and the recording software not supplied for details on the recording format Note on Multi Session Border discs If MP3...

Страница 73: ...nt specifications may result in loud noise sound skipping or speaker damage Depending on the disc contents playback may take some time to start The Playback order of MP3 audio tracks The playback order of albums and tracks recorded on a DATA CD or DATA DVD is as follows Structure of disc contents When you insert a DATA CD or DATA DVD and press H PLAY the numbered tracks are played sequentially fro...

Страница 74: ... the DATA CD or DATA DVD the playback order may differ from the illustration above No more than 250 albums can be recognized A total of up to 999 files can be recognized for discs that contain both MP3 and JPEG files Files are recognized in the order that they were recorded For example if 990 JPEG files are recorded then 100 MP3 files are recorded the 990 JPEG files recorded first and only the fir...

Страница 75: ... remote 1 Press SELECT DVD to control the DVD player 2 Press Z and place a DATA CD or DATA DVD on the disc tray then press Z to close the tray When you load a DATA CD or DATA DVD which contains MP3 audio tracks and JPEG image files Select a Media Type menu appears If you load a DATA CD or DATA DVD which contains only JPEG image files the Album display appears Then you can skip step 3 V v B b ENTER...

Страница 76: ...s ENTER The selected image number appears in the display window 2 To display the next previous image press To play the Slide show 1 Press H PLAY You can also play the Slide show using the menu on the selected image For details see To enjoy the Slide show on page 77 2 Press B b to select the desired playing speed on the Interval menu then press ENTER Slide show starts from the selected image 1 Pres...

Страница 77: ... in the image during Slide show If you select in the rotated image display the images in the Album display will not be rotated But if you start the slide show the images will be rotated Correct the rotation in the menu 1 Press V v B b to select an image in the Album display then press ENTER 2 Press B b to select then press ENTER appears 3 Press V v B b to move to the position where you want to zoo...

Страница 78: ... JPEG files recorded first and only the first 9 MP3 files can be recognized Note on Multi Session Border discs If JPEG image files are recorded in the first session border the player will also play JPEG image files in other session border If audio tracks and images in Music CD format or Video CD format are recorded in the first session border only the first session border will be played back Tip I...

Страница 79: ... operations interactively PBC playback follows a selection menu displayed on your TV screen Before you start Set TV DVD VIDEO switch to DVD VIDEO on the remote 1 Press MENU to select PBC ON The menu for your selection appears 2 Press V v to select the item number you want You can also use the number buttons to select the item number and track V v ENTER Number buttons O RETURN MENU continued ...

Страница 80: ...still pictures such as a menu To return to PBC ON press MENU to select PBC ON Note Depending on the VIDEO CD Press ENTER in step 3 may appear as Press SELECT in the instructions supplied with the disc In this case press H PLAY 3 Press ENTER 4 Follow the instructions in the menu for interactive operations Refer to the instructions supplied with the disc as the operating procedure may differ dependi...

Страница 81: ...top while recording Press x STOP Note You cannot display the current tape time in the display window when setting the recording duration time After you have started recording you can have the VCR stop recording automatically after a specified duration 1 While recording press z REC 2 Press z REC repeatedly to set the duration time Each press advances the time as follows The tape counter decreases m...

Страница 82: ...tomatically marks the tape with an index signal at the point where each recording begins You can easily find a specific point using various search functions 1 Press SELECT VIDEO to control the VCR 2 Insert an indexed tape into the VCR 3 Press SEARCH SEARCH V v B b H PLAY SELECT VIDEO ...

Страница 83: ...then plays back for about five seconds 2 Press H PLAY to view the program If you do not press H PLAY the VCR automatically searches for the next index mark or until it reaches the end of the tape Go to 0 00 00 To search for the counter 0 00 00 point Press V The VCR starts searching and automatically stops at the 0 00 00 point To mark a point on the tape that you want to find later press CLEAR to r...

Страница 84: ...right channel If you connected this VCR to both the LINE IN and LINE OUT jacks of the other VCR select the input correctly to prevent a humming noise You can use the LINE IN 1 jacks for editing If the other VCR is a monaural type the sound is recorded only on the channel whose jack is connected to the audio plug To record on both right and left channels connect the audio plugs to the AUDIO L R jac...

Страница 85: ...R and the TV and set it to the video channel Press INPUT SELECT to display L1 or L2 in the display window Press SP EP to select the tape speed SP or EP 1 Insert a source tape with its safety tab removed into the other playback VCR Search for the point to start playback and set it to playback pause 2 Insert a tape into this recording VCR Search for the point to start recording and press X 3 Press z...

Страница 86: ...nd auto repeat settings Normally the default settings are used Change these settings if necessary Before you start Set TV DVD VIDEO switch to DVD VIDEO on the remote 1 Press SET UP when the DVD player is in stop mode 2 Press V v to select OPTION or VIDEO and press ENTER The OPTION SETUP menu or VIDEO FUNCTION SETUP menu appears SET UP V v B b ENTER ...

Страница 87: ...te the Auto Power Off function 1Hr 2Hr to turn the DVD VCR off automatically if no signal is received and you do not press any of the buttons during this time Menu option Set this option to Tape Length T 120 when using a T 120 or shorter length tape T 160 when using a T 160 length tape T 180 when using a T 180 or longer length tape Auto Play On to start playback automatically when you insert a tap...

Страница 88: ... is disconnected from the wall outlet Reset the clock and timer Others The remote commander does not function Make sure you are pointing the remote commander at the remote sensor on the DVD VCR Replace all the batteries in the remote commander with new ones if they are weak Make sure the TV DVD VIDEO switch is set correctly Select DVD or VIDEO mode correctly with the SELECT DVD VIDEO button Button...

Страница 89: ...oes not start buttons on the remote and unit does not function Make sure the TV DVD VIDEO switch is set correctly Select DVD or VIDEO mode correctly with the SELECT DVD VIDEO button Even though you set the aspect ratio in TV Type of the SCREEN SETUP menu the picture does not fill the screen The aspect ratio of the disc is fixed on your DVD There is no picture from your VCR connected to the LINE IN...

Страница 90: ...The JPEG image file does not have the extension JPG or JPEG The data is not formatted in JPEG even though it has the extension JPG or JPEG The title of the MP3 audio album track or JPEG image album file is not correctly displayed The player can only display numbers and alphabet Other characters are displayed as asterisks The disc does not start playing from the beginning Program play shuffle play ...

Страница 91: ...ing LINE OUT Yellow White Red jacks page 15 The Playback does not start buttons on the remote and unit does not function Make sure the TV DVD VIDEO switch is set correctly Select DVD or VIDEO mode correctly with the SELECT DVD VIDEO button The picture is not clear Adjust the tracking with the TRACKING buttons The video heads are dirty see On cleaning the video heads page 3 Clean the video heads us...

Страница 92: ...he tape is not at its end Timer recording The timer does not operate Check that the clock is set Make sure a tape has been inserted Check that the safety tab has not been removed Make sure the tape is not at its end Make sure a program has been set for timer recording Make sure your timer settings are past the current time Check that the cable box or satellite receiver is turned on The clock stops...

Страница 93: ...tle deterioration is realized because all channel data processing is digital DVD page 7 A disc that contains up to 8 hours of moving pictures even though its diameter is the same as a CD The data capacity of a single layer and single sided DVD is 4 7 GB Giga Byte which is 7 times that of a CD The data capacity of a double layer and single sided DVD is 8 5 GB a single layer and double sided DVD is ...

Страница 94: ...e even numbered lines of an image and the odd numbered field shows the odd numbered lines of an image Progressive format pages 21 and 48 Compared to the Interlace format that alternately shows every other line of an image field to create one frame the Progressive format shows the entire image at once as a single frame This means that while the Interlace format can show 30 frames 60 fields in one s...

Страница 95: ...al 1 Vp p 75 ohms unbalanced sync negative AUDIO OUT phono jacks 2 Standard output 327 mVrms Load impedance 47 kilohms Output impedance less than 10 kilohms DIGITAL OUT COAXIAL phono jack Output signal 0 5 Vp p 75 ohms COMPONENT VIDEO OUT Y Pb Pr Phono jack Y 1 0 Vp p Pb Pr 0 7 Vp p 75 ohms Timer section Clock Quartz locked Timer indication 12 hour cycle Timer setting 8 programs max General Power ...

Страница 96: ...button 24 26 D Tape compartment 31 E A eject button 32 F z REC record button 36 G m rewind M fast forward button 26 32 H x stop button 25 32 I X pause button 25 32 J H play button 25 31 K SELECT DVD VIDEO buttons 12 L Remote sensor 12 M PROGRESSIVE indicator 48 N TRACKING buttons 34 O LINE 2 IN VIDEO AUDIO L MONO R jacks 84 TRACKING button have a tactile dot Use the tactile dot as a reference ...

Страница 97: ... indicator 36 D VIDEO indicator 31 E Tape indicator 31 F Timer indicator 39 G Disc indicator 25 Rear panel DVD player and VCR A AC power cord 14 17 B LINE IN 1 VIDEO AUDIO L R jacks 84 C LINE OUT VIDEO AUDIO L R jacks 15 DVD player only D LINE OUT AUDIO L R jacks 21 E COMPONENT VIDEO OUT Pr Pb Y jacks 21 F DIGITAL AUDIO OUT COAXIAL jack 23 continued ...

Страница 98: ...on 25 K REPLAY button 25 L X PAUSE button 25 M H PLAY button 25 N V v B b buttons 18 ENTER button 18 O DISPLAY button 29 P TOP MENU button 55 Q 1 on standby switch 13 27 R VOL volume buttons 13 S ZOOM button 56 T ENTER button 18 U REPEAT button 61 V SURROUND button 67 W m M y buttons 25 X PREV previous NEXT button 25 Y x STOP button 25 Z O RETURN button 28 wj MENU button 55 Number 5 AUDIO and H PL...

Страница 99: ...tton 36 L z REC record button 36 M X PAUSE button 32 N H PLAY button 31 O V v B b buttons 18 ENTER button 18 P DISPLAY button 33 Q 1 on standby switch 13 32 R CH channel TRACKING buttons 13 34 S VOL volume buttons 13 T ENTER button 18 U MUTING button 13 V SEARCH button 82 W TV VIDEO button 13 X INPUT SELECT button 35 Y m rewind M fast forward y slow buttons 32 Z SHUTTLE button 32 wj x STOP button ...

Страница 100: ...oatian CZE Czech DAN Danish DEU German ENG English ESP Spanish FIN Finish FRA French GRE Greek HUN Hungarian IDN Indonesian IND Hindi ISL Icelandic ITA Italian IWR Hebrew JPN Japanese KOR Korean MAL Malay NLD Dutch NOR Norwegian POL Polish POR Portuguese RUS Russian SVE Swedish THA Thai TUR Turkish VIE Vietnamese ZAF Afrikaans ...

Страница 101: ...MP3 7 69 P Parental Control 52 PBC Playback control 79 Picture adjustment 34 Playback at various speeds 26 32 frame by frame 32 MP3 audio track 69 program play 61 repeat play 64 shuffle play 63 shuttle play 32 slow motion 26 32 VIDEO CDs 79 Playback quickly or slowly with sound 27 Program play 61 Progressive 94 R Recording saving 37 Repeat play 64 Resume Play 27 S Safety tab 37 Searching at variou...

Страница 102: ...a Videograbadora DVD Para ver detalles consulte el manual de instrucciones en inglés Procedimientos iniciales 3 Conexiones básicas 7 Selección del idioma 8 Ajuste del reloj Operaciones básicas 9 Reproducción de discos 11 Reproducción de cintas 13 Grabación de un equipo conectado ...

Страница 103: ...rabadora conectada a una antena conecte esta Videograbadora DVD a su videograbadora utilizando un cable de audio vídeo De esta forma podrá ver y grabar programas de TV La Videograbadora DVD no podrá grabar programas si usted tiene un decodificador de cable sin salidas de audio vídeo cable sin decodificador de cable solamente antena no TV por cable En este caso consulte con el proveedor CATV que ha...

Страница 104: ...nes y después vaya a las páginas siguientes para ver las conexiones de TV por cable Nota Cuando el televisor conectado solamente tenga toma de entrada de sonido monofónico conecte solamente a las tomas de entrada LINE OUT AUDIO L blanca y VIDEO No conecte la toma AUDIO R roja Conexión a su televisor Flujo de señales Cable de audio video suministrado Televisor Videograbadora DVD a LINE OUT ...

Страница 105: ...l LINE IN 1 Sugerencia También puede conectar un decodificador de cable o receptor satelital utilizando las tomas LINE 2 IN del panel delantero Nota La Videograbadora DVD no podrá grabar programas si usted tiene un decodificador de cable sin salidas de audio vídeo cable sin decodificador de cable solamente antena no TV por cable Conexión de un decodificador de cable o receptor satelital a LINE IN ...

Страница 106: ...nexiones básicas Después de haber completado la conexión Después de haber completado la conexión enchufe la Videograbadora DVD en una toma de CA Cable de alimentación de ca a la toma de ca Videograbadora DVD ...

Страница 107: ...roductor Si el reproductor de DVD está en el modo de reproducción no podrá visualizar el menú de ajustes Pare la reproducción de DVD Utilice el mando a distancia para realizar las siguientes funciones 1 Pulse SET UP después pulse V v para seleccionar OPTION y pulse ENTER 2 Pulse V v para seleccionar Language después pulse ENTER Aparecerá el menú LANGUAGE IDIOMA LANGUE 3 Pulse V v para seleccionar ...

Страница 108: ... temporizador deberá ajustar el reloj exactamente Cuando se seleccione el modo VIDEO sin haber insertado una cinta o cuando la Videograbadora DVD esté apagada aparecerá la visualización del reloj en el visualizador 1 Pulse SET UP después pulse V v para seleccionar OPTION y pulse ENTER 2 Pulse V v para seleccionar Ajuste de la hora después pulse ENTER Aparecerá el menú AJUSTE DE LA HORA 3 Ajuste la...

Страница 109: ...rayado La reproducción de listas de reproducción de duración superior a 10 horas grabadas en el modo VR no está garantizada Una vez transcurridas 10 horas el contador en el visualizador retorna a 0 00 y vuelve a comenzar la cuenta Dependiendo de las especificaciones del software de grabación es posible que el disco que haya sido grabado en otra unidad o PC no pueda ser reproducido El reproductor n...

Страница 110: ...el mando a distancia o M en la unidad Volver al capítulo tema o escena anterior en el modo de reproducción continua PREV en el mando a distancia o m en la unidad Localizar un punto rápidamente m o M en el mando a distancia o mantenga pulsado m o M en la unidad La velocidad de reproducción cambia de la forma siguiente cada vez que se pulsa el botón en el mando a distancia o dependiendo del tiempo q...

Страница 111: ...d quitada 3 Pulse H PLAY El visualizador mostrará el tiempo de reproducción Cuando la cinta llegue al final se rebobinará automáticamente Operaciones adicionales Para Pulse Detener la reproducción x STOP Hacer pausas durante la reproducción X PAUSE Si hace una pausa en la videograbadora de más de 5 min minuto la videograbadora reanudará automáticamente la reproducción Reanudar la reproducción desp...

Страница 112: ... Durante la reproducción mantenga pulsado M o m La cinta continuará reproduciéndose a una velocidad 5 veces mayor que la reproducción normal Al dejar de pulsar el botón se reanuda la reproducción normal Reproducción a cámara lenta Durante la pausa pulse y Reproducción fotograma a fotograma Durante la pausa pulse SKIP Reproducción de la escena anterior en el modo de reproducción continua Reproducci...

Страница 113: ... Para detener la grabación Pulse x STOP Notas No es posible grabar un DVD directamente a una cinta Videograbadora utilizando su Videograbadora DVD 1 Pulse SELECT VIDEO para controlar la videograbadora 2 Inserte una cinta provista de lengüeta de seguridad 3 Pulse INPUT SELECT para seleccionar una fuente conectada a las tomas LINE IN 1 o LINE 2 IN Aparecerá L1 o L2 en el visualizador 4 Pulse SP EP p...

Страница 114: ......

Страница 115: ......

Страница 116: ...Sony Corporation Printed in China AK68 01308A ...

Отзывы: