background image

3-854-213-

14

 (1)

Remote Control Unit

© 2004 Sony Corporation

RM-BR300

Operating Instructions


__________________________________

GB

Mode d’emploi

________________________________________

FR

Manual de instrucciones

_________________________________

ES

Gebrauchsanweisung

__________________________________

DE

3854213140

Содержание RM-BR300 - Remote Control Unit

Страница 1: ... RM BR300 Operating Instructions __________________________________ GB Mode d emploi ________________________________________ FR Manual de instrucciones _________________________________ ES Gebrauchsanweisung __________________________________ DE 3854213140 ...

Страница 2: ...icular installation If this equipment does cause harmful interference to radio or television reception which can be determined by turning the equipment off and on the user is encouraged to try to correct the interference by one or more of the following measures Reorient or relocate the receiving antenna Increase the separation between the equipment and receiver Connect the equipment into an outlet...

Страница 3: ...ultiple Cameras Equipped with VISCA RS 422 Connector 11 Connecting the BRU 300 300P Optical Multiplex Unit 12 Connecting a Video Switcher 13 Turning on the Power 13 Storing the Camera Settings in Memory Presetting Feature 14 Setting the Speed of the Camera Moving to a Preset Position BRC 300 300P BRC H700 and BRC Z700 only 15 Using the Function Stored in the Memory of the RM BR300 15 Setting a Lim...

Страница 4: ...amera EVI D100 D100P Color Video Camera EVI D70 D70P Color Video Camera EVI D30 D30P Color Video Camera SNC RZ30N RZ30P Network Camera Notes The operable functions are limited to those that the camera is equipped with This manual mainly explains the functions of the unit for the BRC 300 300P camera When another camera is connected refer to the Operating Instructions supplied with the connected cam...

Страница 5: ...according to the exposure mode selected on the camera For details see Functions of the VALUE and BRIGHT controls on page 5 When the white balance adjustment mode is selected with the MODE button with the B indicator lit This control adjusts the B GAIN blue gain except the EVI D30 D30P When the BRC H700 or BRC Z700 camera is connected the function of the control with the B indicator lit varies acco...

Страница 6: ...of the POSITION buttons and the current camera settings are stored in the memory of the camera corresponding to the pressed POSITION button J PANEL LIGHT button Press this button to illuminate all the POSITION buttons and CAMERA buttons Press the button again to turn off the illumination K BACK LIGHT button When the FULL AUTO exposure mode is selected on the camera press this button to enable the ...

Страница 7: ...on Yellow green The camera is in standby mode Off No camera is connected Hold down this button and press CAMERA button 1 to 7 to turn on off the power of the camera corresponding to the pressed button S CAMERA buttons Press one of the buttons to select the camera from among those connected The selected CAMERA button lights in blue T POSITION buttons You can store various camera settings such as th...

Страница 8: ...amera address selected with this unit is short circuited against the connected switcher and the tally lamp of the selected camera lights wh DC IN 12V connector Connect the supplied AC power adaptor wj DIP switches bottom Switch 1 RS 232C RS 422 selector Set to ON for RS 422 or OFF for RS 232C Switch 2 Communication baud rate selector Set to ON for 38 400bps or OFF for 9 600bps Switch 3 BRIGHT cont...

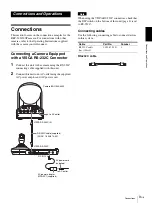
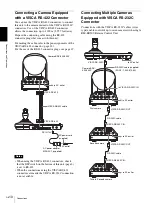
Страница 9: ...n AC outlet using the supplied AC power adaptor and AC power cord Note When using the VISCA RS 232C connectors check that the DIP switch on the bottom of this unit page 8 is set to RS 232C Connecting cables Use the following connecting cable to connect devices in this system RS 232C cable EXT SYNC IN IR SELECT 75 1 2 3 OFF ON IN VISCA RS 232C OUT VISCA RS 422 1 2 3 4 5 6 7 8 9 DC IN 12V R VIDEO S ...

Страница 10: ...ple Cameras Equipped with VISCA RS 232C Connector Connections with the VISCA RS 232C cables cross type enable control of up to seven cameras with a single RM BR300 Remote Control Unit to AC outlet VISCA RS 422 cable VISCA RS 422 VISCA RS 422 DC IN 12V AC power cord supplied to AC outlet AC power adaptor MPA AC1 supplied Camera BRC 300 300P EXT SYNC IN IR SELECT 75 1 2 3 OFF ON IN VISCA RS 232C OUT...

Страница 11: ...llows the connection up to 1 200 m 3 937 feet away Prepare the connecting cable using the RS 422 connector plug that comes with this unit For making the cable refer to the pin assignments of the VISCA RS 422 connector page 18 For the use of the RS 422 connector plugs see page 19 For the wiring diagram of VISCA RS 422 connection refer to the Operating Instructions supplied with the BRC 300 300P Not...

Страница 12: ...CA FUNCTION switch on the rear of the Optical Multiplex Unit and the DIP switch on the bottom of this unit page 8 are set to RS 232C or RS 422 correctly EXT SYNC IN IR SELECT 75 1 2 3 OFF ON IN VISCA RS 232C OUT VISCA RS 422 1 2 3 4 5 6 7 8 9 DC IN 12V R VIDEO S VIDEO to AC outlet AC power cord supplied with the BRU 300 300P CCFC M100 Optical Fiber Cable VISCA RS 232C IN to AC outlet BRU 300 300P ...

Страница 13: ...wer you want to turn on off When you turn the power off using this unit the POWER lamp turns off and the STANDBY lamp lights on the camera MODE VISCA 1 9 1 9 RS 422 ON OFF TALLY CONTACT RS 232C CONTACT TALLY TALLY CONTACT DC IN 12V EXT SYNC IN IR SELECT 75 1 2 3 OFF ON IN VISCA RS 232C OUT VISCA RS 422 1 2 3 4 5 6 7 8 9 DC IN 12V R VIDEO S VIDEO EXT SYNC IN IR SELECT 75 1 2 3 OFF ON IN VISCA RS 23...

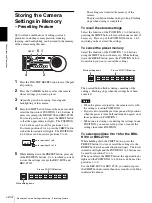
Страница 14: ... memory Select the function of the POSITION 1 to 8 buttons using the SHIFT button if necessary While holding down the RESET button press the POSITION button from which you want to cancel the settings The pressed button flashes during canceling of the settings Flashing stops when the settings have been canceled Notes When the power is turned on the camera starts with the settings stored in POSITION...

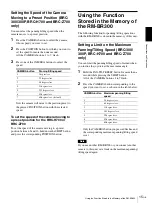
Страница 15: ...of the RM BR300 The following function for panning tilting operations with the RM BR300 is stored in the memory of this unit Setting a Limit on the Maximum Panning Tilting Speed BRC 300 300P BRC H700 and BRC Z700 only You can limit the panning tilting speed obtained when you incline the joystick at the maximum angle 1 Hold the PAN TILT RESET button for more than a second while pressing the SHIFT b...

Страница 16: ...as far as it will go The camera cannot be operated with the unit The connection using the VISCA RS 422 connectors is not correctly made Check that the connection to the VISCA RS 422 connectors is correctly made and the RS 422 cable is properly connected VISCA control setting is not correct Select the proper setting RS 232C or RS 422 with the DIP switch on the unit page 8 The communication baud rat...

Страница 17: ...connecting cable 1 RS 422 connector plug 2 Operating Instructions 1 Design and specifications are subject to change without notice Dimensions Note Always verify that the unit is operating properly before use SONY WILL NOT BE LIABLE FOR DAMAGES OF ANY KIND INCLUDING BUT NOT LIMITED TO COMPENSATION OR REIMBURSEMENT ON ACCOUNT OF THE LOSS OF PRESENT OR PROSPECTIVE PROFITS DUE TO FAILURE OF THIS UNIT ...

Страница 18: ...ug 9 pin Pin No Function 1 No Connection 2 No Connection 3 TXD IN 4 GND 5 RXD IN 6 GND 7 No Connection 8 No Connection Pin No Function 1 No Connection 2 No Connection 3 No Connection 4 No Connection 5 GND 6 RXD IN 7 RXD IN 8 TXD IN 9 TXD IN RS 232C VISCA 1 9 RS 422 Pin No Function 1 CAMERA1 2 CAMERA2 3 CAMERA3 4 CAMERA4 5 CAMERA5 6 CAMERA6 7 CAMERA7 8 GND 9 GND 1 9 TALLY CONTACT ...

Страница 19: ...e screw for that wire using a flat head screwdriver 3 Insert the VISCA RS 422 connector plug into the VISCA RS 422 connector Notes In order to stabilize the voltage level of the signal connect both ends to GND When the connections using the VISCA RS 422 connectors are made the VISCA RS 232C connection is not available The maximum connection distance with the VISCA RS 422 connection is approximatel...

Страница 20: ...t équipement pour le déconnecter du secteur Veillez à ce que la prise de courant se trouve près de l équipement et qu elle soit facilement accessible En cas de fonctionnement anormal débranchez la fiche secteur IMPORTANT La plaque signalétique se situe sous l appareil ATTENTION Des champs électromagnétiques à des fréquences spécifiques peuvent avoir une incidence sur l image de cet appareil Pour l...

Страница 21: ...usieurs caméras dotées d un connecteur VISCA RS 422 12 Raccordement du module multiplex optique BRU 300 300P 13 Raccordement d un sélecteur vidéo 14 Mise sous tension 14 Mémorisation des paramètres de la caméra Fonction de mémorisation 15 Mémorisation de la vitesse de déplacement de la caméra sur une position prédéfinie BRC 300 300P BRC H700 et BRC Z700 seulement 16 Utilisation de la fonction mémo...

Страница 22: ...300P 3CCD Color Video Camera BRC H700 HD 3CCD Color Video Camera BRC Z700 HD 3CMOS Color Video Camera EVI D100 D100P Color Video Camera EVI D70 D70P Color Video Camera EVI D30 D30P Color Video Camera SNC RZ30N RZ30P Network Camera Remarques Les fonctions utilisables se limitent à celles dont est dotée la caméra Ce manuel décrit principalement les fonctions du pupitre pour la caméra BRC 300 300P Lo...

Страница 23: ...IGHT est allumé la fonction du bouton diffère selon le mode d exposition sélectionné sur la caméra Pour plus d informations voir Fonctions des boutons VALUE et BRIGHT à la page 5 Lorsque vous avez sélectionné le mode de réglage de la balance des blancs avec la touche MODE avec le témoin B allumé Ce bouton permet de régler B GAIN gain du bleu sauf pour l EVI D30 D30P Lorsque la caméra BRC H700 ou B...

Страница 24: ... l une des touches POSITION La mémoire de la caméra correspondant à la touche POSITION enfoncée est réinitialisée aux conditions prédéfinies en usine Lorsque plusieurs caméras sont connectées vous pouvez spécifier les adresses de caméra en maintenant cette touche enfoncée et en appuyant sur la touche POWER I Touche PRESET Tout en maintenant cette touche enfoncée appuyez sur l une des touches POSIT...

Страница 25: ...ra est préréglée pour se tourner vers la droite lorsque vous inclinez la manette de commande vers la droite Tout en maintenant cette touche enfoncée appuyez sur la touche POSITION 2 REV pour inverser la direction de panoramique par rapport au sens vers lequel vous inclinez la manette de commande Pour ramener la direction à l état initial appuyez sur la touche POSITION 1 STD tout en maintenant cett...

Страница 26: ...méra s allume CONTACT La sortie de contact correspondant à l adresse de la caméra sélectionnée avec ce pupitre est court circuitée contre le sélecteur vidéo connecté CONTACT TALLY La sortie de contact correspondant à l adresse de caméra sélectionnée avec ce pupitre est court circuitée contre le sélecteur vidéo connecté et le témoin de signalisation de la caméra sélectionnée s allume wh Connecteur ...

Страница 27: ...nnecté Les fonctions des autres pièces sont les mêmes pour tous les modèles de caméra a disponible non disponible Pièces BRC 300 300P BRC H700 BRC Z700 EVI D100 D100P EVI D70 D70P EVI D30 D30P SNC RZ30N RZ30P B Bouton VALUE R a a a a C Bouton BRIGHT B a a a a G Touche ONE PUSH AF a a a a L Touche PAN TILT RESET a a a a N Touche MENU a a a a R Touche POWER a a a a S Touches CAMERA a a a a W Connect...

Страница 28: ...imentation fournis Remarque Lorsque vous utilisez les connecteurs VISCA RS 232C assurez vous que le commutateur DIP au dessous de ce pupitre page 8 se trouve sur RS 232C Câbles de raccordement Utilisez le câble de raccordement suivant pour raccorder les périphériques de cette chaîne Câble RS 232C EXT SYNC IN IR SELECT 75 1 2 3 OFF ON IN VISCA RS 232C OUT VISCA RS 422 1 2 3 4 5 6 7 8 9 DC IN 12V R ...

Страница 29: ...rdement de plusieurs caméras dotées d un connecteur VISCA RS 232C Le raccordement avec des câbles VISCA RS 232C type croisé permet de commander jusqu à sept caméras avec un seul pupitre de télécommande RM BR300 vers prise de courant Câble VISCA RS 422 VISCA RS 422 VISCA RS 422 DC IN 12V Cordon d alimentation secteur fourni vers prise de courant Adaptateursecteur MPA AC1 fourni Caméra BRC 300 300P ...

Страница 30: ...usieurs caméras Ceci permet un raccordement sur une distance maximale de 1 200 m 3 937 pieds Préparez le câble de raccordement en utilisant la fiche de connexion RS 422 fournie avec ce pupitre Pour la préparation du câble reportez vous au brochage du connecteur VISCA RS 422 page 20 Pour l utilisation des fiches de connexion RS 422 voir page 21 Pour le schéma de câblage de la connexion VISCA RS 422...

Страница 31: ...ON à l arrière du module multiplex optique et le commutateur DIP au dessous de ce pupitre page 8 se trouvent respectivement sur RS 232C ou RS 422 EXT SYNC IN IR SELECT 75 1 2 3 OFF ON IN VISCA RS 232C OUT VISCA RS 422 1 2 3 4 5 6 7 8 9 DC IN 12V R VIDEO S VIDEO vers prise de courant Cordon d alimentation secteur fourni avec le BRU 300 300P Câble à fibres optiques CCFC M100 VISCA RS 232C IN vers pr...

Страница 32: ...z sur la touche CAMERA correspondant à la caméra que vous désirez mettre sous hors tension Lorsque vous coupez l alimentation à l aide de ce pupitre le témoin POWER s éteint et le témoin STANDBY s allume sur la caméra MODE VISCA 1 9 1 9 RS 422 ON OFF TALLY CONTACT RS 232C CONTACT TALLY TALLY CONTACT DC IN 12V EXT SYNC IN IR SELECT 75 1 2 3 OFF ON IN VISCA RS 232C OUT VISCA RS 422 1 2 3 4 5 6 7 8 9...

Страница 33: ...émorisation Le clignotement cesse lorsque la mémorisation est terminée Pour rappeler les paramètres mémorisés Sélectionnez la fonction des touches POSITION 1 à 8 en appuyant sur la touche SHIFT pendant plus d une seconde si nécessaire Appuyez sur la touche POSITION 1 à 8 sur laquelle ont été mémorisés les paramètres Effacement de la mémoire Sélectionnez la fonction des touches POSITION 1 à 8 à l a...

Страница 34: ... H700 et BRC Z700 seulement Vous pouvez sélectionner la vitesse de panoramique inclinaison lors du déplacement de la caméra sur une position prédéfinie 1 Appuyez sur la touche CAMERA pour sélectionner la caméra dont vous désirez spécifier la vitesse 2 Appuyez sur la touche POSITION sur laquelle vous désirez mémoriser la vitesse pendant plus d une seconde Toutes les touches CAMERA 1 à 7 clignotent ...

Страница 35: ... TILT RESET enfoncée pendant plus d une seconde tout en appuyant sur la touche SHIFT Toutes les touches CAMERA 1 à 7 clignotent 2 Appuyez sur la touche CAMERA correspondant à la vitesse que vous désirez régler comme indiqué dans le tableau ci dessous Seule la touche CAMERA que vous avez enfoncée clignote et la vitesse de panoramique inclinaison maximum correspondante est réglée Remarque Si vous ut...

Страница 36: ...eut pas être commandée depuis le pupitre Le raccordement à l aide des connecteurs VISCA RS 422 n est pas correctement effectué Assurez vous que le raccordement aux connecteurs VISCA RS 422 est correctement effectué et que le câble RS 422 est correctement branché L option de commande VISCA sélectionnée est incorrecte Sélectionnez le paramètre RS 232C ou RS 422 correcte avec le commutateur DIP au de...

Страница 37: ...de connexion RS 422 2 Mode d emploi 1 La conception et les spécifications sont susceptibles d être modifiées sans préavis Dimensions Remarque Vérifiez toujours que l appareil fonctionne correctement avant l utilisation Sony n assumera pas de responsabilité pour les dommages de quelque sorte qu ils soient incluant mais ne se limitant pas à la compensation ou au remboursement à cause de la perte de ...

Страница 38: ...de broche Fonction 1 Pas de connexion 2 Pas de connexion 3 TXD IN 4 GND 5 RXD IN 6 GND 7 Pas de connexion 8 Pas de connexion N de broche Fonction 1 Pas de connexion 2 Pas de connexion 3 Pas de connexion 4 Pas de connexion 5 GND 6 RXD IN 7 RXD IN 8 TXD IN 9 TXD IN RS 232C VISCA 1 9 RS 422 N de broche Fonction 1 CAMERA1 2 CAMERA2 3 CAMERA3 4 CAMERA4 5 CAMERA5 6 CAMERA6 7 CAMERA7 8 GND 9 GND 1 9 TALL...

Страница 39: ...l aide d un tournevis à lame plate 3 Insérez la fiche de connexion VISCA RS 422 dans le connecteur VISCA RS 422 Remarques Pour stabiliser le niveau de tension du signal raccordez les deux extrémités à la terre GND Lorsque les raccordements sont effectués à l aide des connecteurs VISCA RS 422 la connexion VISCA RS 232C n est pas disponible La distance de raccordement maximale avec la connexion VISC...

Страница 40: ... de este equipo Por favor asegúrese de que la toma de corriente esté instalada cerca del equipo y que sea fácilmente accesible En caso de operaciones anormales desconecte la clavija de conexión a la red IMPORTANTE La placa de características está situada en la parte inferior ATENCIÓN Los campos electromagnéticos en las frecuencias específicas pueden influir sobre la imagen de esta unidad Para los ...

Страница 41: ...exión de la unidad de multiplexación óptica BRU 300 300P 13 Conexión de un conmutador de vídeo 14 Encendido de la alimentación 14 Almacenamiento de los ajustes de la cámara en la memoria Función de preajuste 15 Ajuste de la velocidad del movimiento de la cámara a una posición predeterminada BRC 300 300P BRC H700 y BRC Z700 solamente 16 Uso de la función almacenada en la memoria del RM BR300 17 Aju...

Страница 42: ...eo Camera BRC Z700 HD 3CMOS Color Video Camera EVI D100 D100P Color Video Camera EVI D70 D70P Color Video Camera EVI D30 D30P Color Video Camera SNC RZ30N RZ30P Network Camera Notas Las funciones operables están limitadas a aquellas con las que está equipada la cámara Este manual explica principalmente las funciones de la unidad para la cámara BRC 300 300P Si hay otra cámara conectada consulte el ...

Страница 43: ...a función del control variará de acuerdo con el modo de exposición seleccionado en la cámara Para más detalles consulte Funciones de los controles VALUE y BRIGHT en página 5 Cuando se seleccione el modo de ajuste del balance del blanco con el botón MODE con el indicador B encendido Este control ajusta el B GAIN ganancia de azul excepto la EVI D30 D30P Cuando se conecta la cámara BRC H700 o BRC Z70...

Страница 44: ...ido de fábrica Cuando haya conectadas múltiples cámaras las direcciones de cámaras se ajustarán manteniendo pulsado este botón y pulsando el botón POWER I Botón PRESET Mantenga pulsado este botón y pulse uno de los botones POSITION y la configuración actual de la cámara se almacenará en la memoria de la cámara correspondiente al botón POSITION pulsado J Botón PANEL LIGHT Pulse este botón para ilum...

Страница 45: ...el botón POSITION 2 REV para invertir la dirección de movimiento horizontal en la dirección de inclinación de la palanca de control Para restablecer la dirección mantenga pulsado este botón y pulse el botón POSITION 1 STD R Botón POWER Pulse este botón para encender el botón es CAMERA correspondiente al estado de la cámara s conectada Azul La alimentación de la cámara está activada Amarillo verde ...

Страница 46: ...a cámara CONTACT La salida de contacto correspondiente a la dirección de la cámara seleccionada con esta unidad está cortocircuitada con el conmutador conectado CONTACT TALLY La salida de contacto correspondiente a la dirección de la cámara seleccionada con esta unidad se cortocircuita con el conmutador conectado y la luz indicadora de la cámara seleccionada se enciende wh Conector DC IN 12V Conec...

Страница 47: ... conectada Las funciones de las demás partes son las mismas para todos los modelos de cámara a disponible no disponible Partes BRC 300 300P BRC H700 BRC Z700 EVI D100 D100P EVI D70 D70P EVI D30 D30P SNC RZ30N RZ30P B Control VALUE R a a a a C Control BRIGHT B a a a a G Botón ONE PUSH AF a a a a L Botón PAN TILT RESET a a a a N Botón MENU a a a a R Botón POWER a a a a S Botones CAMERA a a a a W Con...

Страница 48: ... cable de alimentación de CA suministrados Nota Cuando utilice los conectores VISCA RS 232C compruebe que el interruptor DIP de la parte inferior de esta unidad página 8 esté ajustado a RS 232C Cables de conexión Utilice los siguientes cables de conexión para conectar dispositivos a este sistema Cable RS 232C EXT SYNC IN IR SELECT 75 1 2 3 OFF ON IN VISCA RS 232C OUT VISCA RS 422 1 2 3 4 5 6 7 8 9...

Страница 49: ...onexión de múltiples cámaras equipadas con conector VISCA RS 232C Las conexiones con los cables VISCA RS 232C tipo cruzado permiten controlar hasta siete cámaras con una sola unidad de mando a distancia RM BR300 a toma de CA Cable VISCA RS 422 VISCA RS 422 VISCA RS 422 DC IN 12V Cable de alimentaciónde CA suministrado a toma de CA Adaptador de alimentación de CA MPA AC1 suministrado Cámara BRC 300...

Страница 50: ...tiples cámaras Esto permite la conexión en una distancia hasta 1 200 m 3 937 pies Prepare el cable de conexión utilizando la clavija de conector RS 422 que vienen con esta unidad Para hacer el cable consulte las asignaciones de terminales del conector VISCA RS 422 página 20 Para utilizar las clavijas de conexión RS 422 consulte página 21 Para ver el diagrama de cableado de conexión de VISCA RS 422...

Страница 51: ...ON de la parte trasera de la unidad de multiplexación óptica y el interruptor DIP de la parte inferior de esta unidad página 8 estén ajustados a RS 232C o RS 422 correctamente EXT SYNC IN IR SELECT 75 1 2 3 OFF ON IN VISCA RS 232C OUT VISCA RS 422 1 2 3 4 5 6 7 8 9 DC IN 12V R VIDEO S VIDEO a toma de CA Cable de alimentación de CA suministrado con la BRU 300 300P Cable de fibra óptica CCFC M100 VI...

Страница 52: ... mantiene pulsado el botón POWER pulse el botón CAMERA correspondiente a la cámara que desea encender apagar Cuando desconecte la alimentación utilizando esta unidad se apagará el indicador POWER y se encenderá el indicador STANDBY de la cámara MODE VISCA 1 9 1 9 RS 422 ON OFF TALLY CONTACT RS 232C CONTACT TALLY TALLY CONTACT DC IN 12V EXT SYNC IN IR SELECT 75 1 2 3 OFF ON IN VISCA RS 232C OUT VIS...

Страница 53: ...ón pulsado parpadeará durante el almacenamiento El parpadeo cesará cuando se haya completado el almacenamiento Para reactivar los ajustes almacenados Seleccione la función de los botones POSITION 1 a 8 pulsando el botón SHIFT durante más de un segundo si es necesario Pulse cualquiera de los botones POSITION de 1 a 8 donde haya almacenado los ajustes Para cancelar la memoria preajustada Seleccione ...

Страница 54: ... solamente Usted podrá seleccionar la velocidad de movimiento horizontal y vertical cuando la cámara se mueva a una posición predeterminada 1 Pulse el botón CAMERA para seleccionar la cámara cuya velocidad quiera ajustar 2 Pulse el botón POSITION para el que quiera ajustar la velocidad durante más de un segundo Parpadearán todos los botones CAMERA 1 a 7 3 Pulse uno de los botones CAMERA para selec...

Страница 55: ...a pulsado el botón PAN TILT RESET durante más de un segundo mientras pulsa el botón SHIFT Todos los botones 1 a 7 de CAMERA parpadean 2 Pulse el botón CAMERA correspondiente a la velocidad que desea establecer como se muestra en la tabla de abajo Sólo parpadea el botón CAMERA que usted pulsa y se establece la velocidad máxima del movimiento horizontal vertical correspondiente Nota Si usa otro RM B...

Страница 56: ...irmemente y hasta el fondo La cámara no se puede operar con la unidad La conexión mediante los conectores VISCA RS 422 no se ha realizado correctamente Compruebe que la conexión a los conectores VISCA RS 422 se ha realizado correctamente y que el cable RS 422 está correctamente conectado El ajuste de control VISCA no es correcto Seleccione el ajuste apropiado RS 232C o RS 422 con el interruptor DI...

Страница 57: ...limentación de CA 1 Cable de conexión RS 232C 1 Clavija de conexión RS 422 2 Manual de instrucciones 1 El diseño y las especificaciones pueden modificarse sin previo aviso Dimensiones Nota Verifique siempre que esta unidad funciona correctamente antes de utilizarlo SONY NO SE HACE RESPONSIBLE POR DAÑOS DE NINGÚN TIPO INCLUYENDO PERO NO LIMITADO A LA COMPENSACIÓN O PAGO POR LA PÉRDIDA DE GANANCIAS ...

Страница 58: ...nector 9 terminales Número de terminal Función 1 Sin conexión 2 Sin conexión 3 TXD IN 4 GND 5 RXD IN 6 GND 7 Sin conexión 8 Sin conexión Número de terminal Función 1 Sin conexión 2 Sin conexión 3 Sin conexión 4 Sin conexión 5 GND 6 RXD IN 7 RXD IN 8 TXD IN 9 TXD IN RS 232C VISCA 1 9 RS 422 Número de terminal Función 1 CAMERA1 2 CAMERA2 3 CAMERA3 4 CAMERA4 5 CAMERA5 6 CAMERA6 7 CAMERA7 8 GND 9 GND ...

Страница 59: ...rnillo de ese cable utilizando un destornillador de cabeza plana 3 Inserte la clavija de conector VISCA RS 422 en el conector VISCA RS 422 Notas Para estabilizar el nivel de tensión de la señal conecte ambos extremos a GND Cuando se realicen las conexiones mediante los conectores VISCA RS 422 el conector VISCA RS 232C no estará disponible La distancia máxima de conexión con el conector VISCA RS 42...

Страница 60: ...quelle verwendet werden Bitte stellen Sie sicher dass eine Netzsteckdose in der Nähe des Geräts installiert und leicht zugänglich ist Ziehen Sie im Falle eines anormalen Betriebs den Netzstecker ab WICHTIG Das Namensschild befindet sich auf der Unterseite des Gerätes ACHTUNG Das bei bestimmten Frequenzen abgegebene elektromagnetische Feld kann das Bild dieses Geräts beeinflussen Für Kunden in Euro...

Страница 61: ...s mit VISCA RS 422 Buchse 12 Anschluss der Optischen Multiplexeinheit BRU 300 300P 13 Anschluss eines Videomischers 14 Einschalten 14 Speichern der Kameraeinstellungen Vorwahlfunktion 15 Einstellen der Bewegungsgeschwindigkeit der Kamera zu einer Vorwahlposition nur BRC 300 300P BRC H700 und BRC Z700 16 Verwendung der im Modell RM BR300 gespeicherten Funktion 17 Begrenzung der maximalen Schwenk Ne...

Страница 62: ...D70P Color Video Camera EVI D30 D30P Color Video Camera SNC RZ30N RZ30P Network Camera Hinweise Die nutzbaren Funktionen hängen von der Ausstattung der Kamera ab Diese Anleitung erläutert hauptsächlich die Funktionen der Einheit für die Kamera BRC 300 300P Wenn eine andere Kamera angeschlossen wird schlagen Sie bezüglich der verfügbaren Funktionen in der Bedienungsanleitung der angeschlossenen Kam...

Страница 63: ...amera gewählten Belichtungsmodus ab Einzelheiten unter Funktionen der Regler VALUE und BRIGHT auf Seite 5 Wenn der Weißabgleicheinstellmodus mit der Taste MODE gewählt wird bei leuchtender Anzeige B Dieser Regler dient zum Einstellen des Werts für B GAIN Blauverstärkung außer EVI D30 D30P Wenn die Kamera BRC H700 oder BRC Z700 angeschlossen ist hängt die Funktion des Reglers bei leuchtender Anzeig...

Страница 64: ...drückt halten um die Kameraadressen einzustellen I Taste PRESET Wenn Sie eine der Tasten POSITION drücken während Sie diese Taste gedrückt halten werden die aktuellen Kameraeinstellungen in dem Speicher der Kamera welcher der gedrückten Taste POSITION entspricht gespeichert J Taste PANEL LIGHT Drücken Sie diese Taste um alle Tasten POSITION und CAMERA zu beleuchten Drücken Sie die Taste erneut um ...

Страница 65: ...d Sie diese Taste gedrückt halten um die Schwenkrichtung auf die Richtung umzukehren in der Sie den Joystick drücken Um die Richtung zurückzustellen drücken Sie die Taste POSITION 1 STD während Sie diese Taste gedrückt halten R Taste POWER Drücken Sie diese Taste um die Tasten CAMERA die dem Status der angeschlossenen Kameras entsprechen zum Aufleuchten zu bringen Blau Die Stromversorgung der Kame...

Страница 66: ...f CONTACT Der Kontakt Ausgang welcher der mit dieser Fernbedienungseinheit gewählten Kameraadresse entspricht wird gegen den angeschlossenen Mischer kurzgeschlossen CONTACT TALLY Der Kontakt Ausgang welcher der mit dieser Fernbedienungseinheit gewählten Kameraadresse entspricht wird gegen den angeschlossenen Mischer kurzgeschlossen und die Kamerakontrolllampe der gewählten Kamera leuchtet auf wh B...

Страница 67: ... ab Die Funktionen der übrigen Teile sind für alle Kameramodelle gleich a verfügbar nicht verfügbar Teile BRC 300 300P BRC H700 BRC Z700 EVI D100 D100P EVI D70 D70P EVI D30 D30P SNC RZ30N RZ30P B Regler VALUE R a a a a C Regler BRIGHT B a a a a G Taste ONE PUSH AF a a a a L Taste PAN TILT RESET a a a a N Taste MENU a a a a R Taste POWER a a a a S Tasten CAMERA a a a a W Buchse VISCA RS 422 a a ...

Страница 68: ...zkabel an eine Netzsteckdose an Hinweis Wenn Sie die VISCA RS 232C Buchsen verwenden wollen vergewissern Sie sich dass der DIP Schalter an der Unterseite dieses Geräts Seite 8 auf RS 232C eingestellt ist Verbindungskabel Verwenden Sie das folgende Verbindungskabel zum Anschluss von Geräten in diesem System RS 232C Kabel EXT SYNC IN IR SELECT 75 1 2 3 OFF ON IN VISCA RS 232C OUT VISCA RS 422 1 2 3 ...

Страница 69: ...gbar Anschluss mehrerer Kameras mit VISCA RS 232C Buchse Verbindungen mit den VISCA RS 232C Kabeln Kreuzkabel ermöglichen die Steuerung von bis zu sieben Kameras mit einer einzigen Fernbedienungseinheit RM BR300 an eine Netzsteckdose VISCA RS 422 Kabel VISCA RS 422 VISCA RS 422 DC IN 12V Netzkabel mitgeliefert an eine Netzsteckdose Netzgerät MPA AC1 mitgeliefert Kamera BRC 300 300P EXT SYNC IN IR ...

Страница 70: ... die Steuerung mehrerer Kameras Dabei kann das Verbindungskabel bis zu 1 200 m lang sein Stecken Sie die mit diesem Gerät gelieferten RS 422 Anschlussstecker auf das Verbindungskabel Nehmen Sie zur Anfertigung des Kabels auf die Stiftbelegung der VISCA RS 422 Buchse Bezug Seite 20 Angaben zum Gebrauch der RS 422 Anschlussstecker finden Sie auf Seite 21 Der Stromlaufplan der VISCA RS 422 Verbindung...

Страница 71: ...ss der Schalter VISCA FUNCTION an der Rückseite der Optischen Multiplexeinheit und der DIP Schalter an der Unterseite dieses Geräts Seite 8 korrekt auf RS 232C bzw RS 422 eingestellt sind EXT SYNC IN IR SELECT 75 1 2 3 OFF ON IN VISCA RS 232C OUT VISCA RS 422 1 2 3 4 5 6 7 8 9 DC IN 12V R VIDEO S VIDEO an eine Netzsteckdose Netzkabel mit BRU 300 300P geliefert Lichtleiterkabel CCFC M100 VISCA RS 2...

Страница 72: ...hrend Sie die Taste POWER gedrückt halten drücken Sie die Taste CAMERA die der ein auszuschaltenden Kamera entspricht Wird die Kamera mit diesem Gerät ausgeschaltet erlischt die Lampe POWER und die Lampe STANDBY an der Kamera leuchtet auf MODE VISCA 1 9 1 9 RS 422 ON OFF TALLY CONTACT RS 232C CONTACT TALLY TALLY CONTACT DC IN 12V EXT SYNC IN IR SELECT 75 1 2 3 OFF ON IN VISCA RS 232C OUT VISCA RS ...

Страница 73: ...enn der Speichervorgang beendet ist hört das Blinken auf So rufen Sie die gespeicherte Einstellung ab Wählen Sie gegebenenfalls die Funktion der Tasten POSITION 1 bis 8 indem Sie die Taste SHIFT länger als eine Sekunde drücken Drücken Sie eine der Tasten POSITION 1 bis 8 unter der Sie die Einstellungen gespeichert haben So löschen Sie einen Vorwahlspeicher Wählen Sie gegebenenfalls die Funktion de...

Страница 74: ...ahlposition nur BRC 300 300P BRC H700 und BRC Z700 Sie können die Schwenk Neigegeschwindigkeit der Kamera wählen wenn sie sich zu einer Vorwahlposition bewegt 1 Drücken Sie die Taste CAMERA zur Wahl der Kamera deren Geschwindigkeit Sie einstellen wollen 2 Halten Sie die Taste POSITION für die Sie die Geschwindigkeit einstellen wollen länger als eine Sekunde gedrückt Alle Tasten CAMERA 1 bis 7 blin...

Страница 75: ...en Sie die Taste PAN TILT RESET länger als eine Sekunde gedrückt während Sie die Taste SHIFT drücken Alle Tasten CAMERA 1 bis 7 blinken 2 Drücken Sie die Taste CAMERA die der einzustellenden Geschwindigkeit entspricht wie in der nachstehenden Tabelle gezeigt Nur die gedrückte Taste CAMERA blinkt und die entsprechende maximale Schwenk Neigegeschwindigkeit wird eingestellt Hinweis Falls Sie eine and...

Страница 76: ...g ein Die Kamera lässt sich nicht mit dem Gerät bedienen Der Anschluss an die VISCA RS 422 Buchsen wurde nicht korrekt ausgeführt Vergewissern Sie sich dass der Anschluss an die VISCA RS 422 Buchsen korrekt ausgeführt wurde und dass das RS 422 Kabel richtig angeschlossen ist Die VISCA Steuereinstellung ist nicht korrekt Wählen Sie die korrekte Einstellung RS 232C oder RS 422 mit dem DIP Schalter a...

Страница 77: ...ussstecker 2 Bedienungsanleitung 1 Änderungen die dem technischen Fortschritt dienen bleiben vorbehalten Abmessungen Hinweis Bestätigen Sie vor dem Gebrauch immer dass das Gerät richtig arbeitet SONY KANN KEINE HAFTUNG FÜR SCHÄDEN JEDER ART EINSCHLIESSLICH ABER NICHT BEGRENZT AUF KOMPENSATION ODER ERSTATTUNG AUFGRUND VON VERLUST VON AKTUELLEN ODER ERWARTETEN PROFITEN DURCH FEHLFUNKTION DIESES GERÄ...

Страница 78: ...g Stift Nr Funktion 1 Kein Anschluss 2 Kein Anschluss 3 TXD IN 4 GND 5 RXD IN 6 GND 7 Kein Anschluss 8 Kein Anschluss Stift Nr Funktion 1 Kein Anschluss 2 Kein Anschluss 3 Kein Anschluss 4 Kein Anschluss 5 GND 6 RXD IN 7 RXD IN 8 TXD IN 9 TXD IN RS 232C VISCA 1 9 RS 422 Stift Nr Funktion 1 CAMERA1 2 CAMERA2 3 CAMERA3 4 CAMERA4 5 CAMERA5 6 CAMERA6 7 CAMERA7 8 GND 9 GND 1 9 TALLY CONTACT ...

Страница 79: ...d ziehen Sie die Schraube für diesen Draht mit einem Flachschraubenzieher an 3 Führen Sie den VISCA RS 422 Anschlussstecker in die VISCA RS 422 Buchse ein Hinweise Um den Spannungspegel des Signals zu stabilisieren sind beide Enden mit Masse GND zu verbinden Wenn die Verbindung über die VISCA RS 422 Buchsen hergestellt wird ist die VISCA RS 232C Verbindung nicht verfügbar Die maximale Länge der VI...

Страница 80: ...Sony Corporation Printed on recycled paper using VOC Volatile Organic Compound free vegetable oil based ink Printed in Japan ...

Отзывы: