background image

48

Recording Without the 
Timer

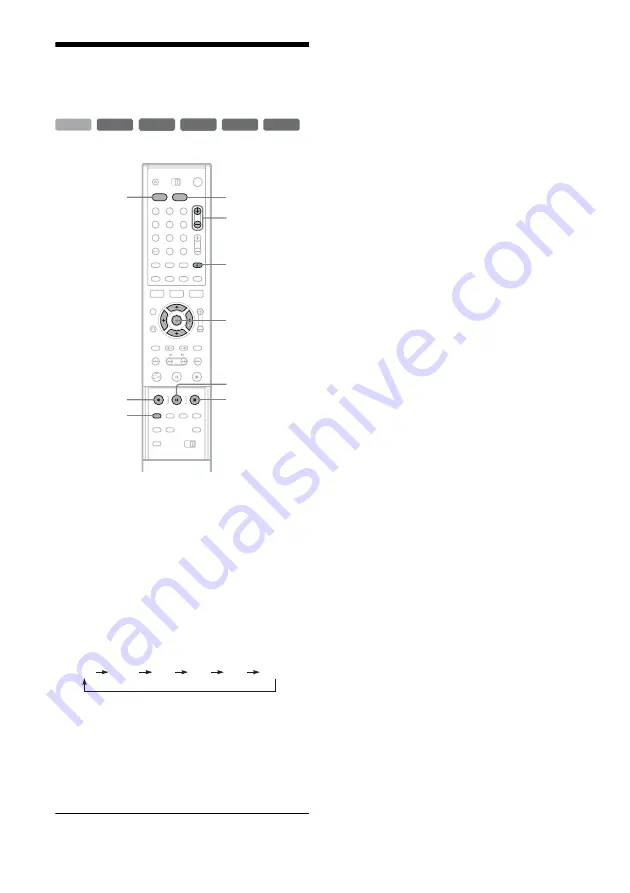
1

Press HDD or DVD to select a media.

When you selected DVD, insert a recordable 
DVD.

2

Press PROG +/– to select the programme 
position or input source you want to 
record.

3

Press REC MODE repeatedly to select the 
recording mode.

Each time you press the button, the display 
changes on the TV screen as follows:

For more details about the recording mode, 
see page 41.

4

Press 

z

 REC.

Recording starts.
Recording continues until you stop the 
recording or the disc is full.

To stop recording

Press 

REC STOP located beneath the remote 

control cover. Note that it may take a few seconds 
for recording to stop.

To pause recording

Press 

X

 REC PAUSE located beneath the remote 

control cover. To restart recording, press the 
button again.

To watch another TV programme while 
recording

If your TV is connected to the LINE 1-TV jack, set 
your TV to the TV input using the TV/DVD 
button and select the programme you want to 
watch. If your TV is connected to the LINE 2 OUT 
or COMPONENT VIDEO OUT jacks, set the TV 
to TV input using the 

t

 (TV/video) button 

(page 20).

TV Direct Rec

If you use the SMARTLINK connection, you can 
easily record what you are watching on your TV.
When the TV is turned on or in standby mode, 
press 

z

 REC. The recorder automatically turns on 

and starts recording what you are watching on the 
TV. “TV” appears in the front panel display. You 
cannot turn off the TV or change the programme 
position during TV Direct Rec. To turn off the 
function, set “TV Direct Rec” to “Off” in Features 
Setup (page 93).

About the Teletext function

Some broadcasts systems ensure a Teletext 
service* in which the complete programmes and 
their data (title, date, channel, recording start time 
etc.) are stored day by day. When recording a 
programme, the recorder automatically takes the 
programme name from the Teletext pages and 
stores it as the title name. For details, see “TV 
Guide Page” (page 93).
Note that the Teletext information will not appear 
on your TV screen. To view the Teletext 
information on your TV screen, press TV/DVD on 
the remote to switch the input source to your TV.

* not available in some areas

-RW

VR

-RW

VR

+

RW

-

R

+

R

-RW

Video

+

R

HDD

1

2

3

4

5

6

7

8

9

0

z

 REC

REC MODE

x

 REC 

STOP

X

 REC 

PAUSE

<

/

M

/

m

/

,

ENTER

PROG +/–

t

 (TV/video), 

TV/DVD

DVD

HDD

HQ

SP

LP

EP

HSP

SLP

Содержание RDR-HX1000

Страница 1: ...2 103 583 E1 3 2004 Sony Corporation DVD Recorder Operating Instructions RDR HX900 HX1000 ...

Страница 2: ...binet unplug the recorder and have it checked by qualified personnel before operating it any further On power sources The recorder is not disconnected from the AC power source mains as long as it is connected to the wall outlet even if the recorder itself has been turned off If you are not going to use the recorder for a long time be sure to disconnect the recorder from the wall outlet To disconne...

Страница 3: ...elevision transmitter and or programme owner This product incorporates copyright protection technology that is protected by U S patents and other intellectual property rights Use of this copyright protection technology must be authorized by Macrovision and is intended for home and other limited viewing uses only unless otherwise authorized by Macrovision Reverse engineering or disassembly is prohi...

Страница 4: ...r 29 Guide to Displays 32 Using the On Screen Menus 32 Using the Title List 33 Using the Disc Info Screen disc settings 35 Checking the Play Information and Playing Time 38 How to Enter Characters 40 Recording 41 Before Recording 41 Timer Recording Standard ShowView 42 Checking Changing Cancelling Timer Settings Timer List 46 Recording Without the Timer 48 Recording From Connected Equipment With a...

Страница 5: ...ial Reception and Language Settings Settings 84 Video Settings Video 89 Audio Settings Audio 91 Recording and Parental Control Settings Features 93 Disc and Remote Control Settings Factory Settings Options 96 Easy Setup Resetting the Recorder 98 Additional Information 99 Troubleshooting 99 Self diagnosis Function When letters numbers appear in the display 104 Notes About This Recorder 104 Specific...

Страница 6: ...while recording another Simultaneous Rec and Play If you are using a DVD RW VR mode or the HDD you can watch a previously recorded programme while recording another programme on the same disc page 60 1 5 4 7GB Sort Date Title Number My Movies TITLE LIST ORIGINAL 1 AAB 13 00 14 00 Wed 5 9 13 00 1H00M SP 2 DEF 20 00 21 00 Fri 17 9 20 00 1H00M SLP 3 AAB 9 00 9 30 Sat 25 9 9 00 0H30M EP 4 GHI 20 00 20...

Страница 7: ...pies of your favourite titles for safekeeping by dubbing them to a DVD or make a copy of your friend s recordings by dubbing them to the HDD page 72 Automatic dubbing of DV tapes DV Dubbing DV t HDD DVD Connect your digital video camera to the DV IN jack and automatically dub the entire contents or just selected scenes to a DVD disc page 77 A list of recordable and playable discs is on page 8 Orig...

Страница 8: ...t free up disc space Compatibility with other DVD players finalizing Playable only on VR mode compatible players finalization unnecessary Playable on most DVD players finalization necessary page 37 Playable on DVD RW compatible players automatically finalized Playable on most DVD players finalization necessary page 37 Playable on most DVD R compatible players finalization necessary page 37 Format ...

Страница 9: ...o No No Recording Features Editing Features Rewrite page 41 Auto Chapter page 93 Manual Chapter page 68 Record 16 9 sizes page 49 Change title name page 65 Delete title page 66 A B Erase page 66 Playlist page 68 Discs that cannot be recorded on 4x speed compatible DVD RWs Ver 1 2 4x DVD RWs Ver 1 0 DVD RWs that are not 2 4x speed compatible Dual layer discs 8 cm discs continued ...

Страница 10: ...erent region code page 11 z Hint This DVD recorder can play 8 cm CDs and 8 cm DVDs as well Discs such as movies that can be purchased or rented VIDEO CDs or CD Rs CD RWs in VIDEO CD Super VIDEO CD format Music CDs or CD Rs CD RWs in music CD format that can be purchased CD ROMs CD Rs CD RWs created on a PC or similar device in music format containing MP3 audio tracks Icon used in this manual Disc ...

Страница 11: ...s Please be aware that among those discs there are some that do not conform to the CD standard and may not be playable by this product Notes Some DVD RWs DVD Rs DVD RWs DVD Rs or CD RWs CD Rs cannot be played on this recorder due to the recording quality or physical condition of the disc or the characteristics of the recording device and authoring software The disc will not play if it has not been...

Страница 12: ...ructions supplied with the components to be connected You cannot connect this recorder to a TV that does not have a SCART or video input jack Be sure to disconnect the mains lead of each component before connecting Step 1 Unpacking Check that you have the following items Audio video cord pinplug 3 y pinplug 3 1 Mains lead 1 Aerial cable 1 Remote commander remote 1 R6 size AA batteries 2 ...

Страница 13: ...onnect it to AERIAL IN on the rear panel of the recorder 2 Connect AERIAL OUT of the recorder to the aerial input of your TV using the supplied aerial cable AERIAL IN LINE 4 IN DIGITAL OUT COAXIAL OPTICAL PCM DTS MPEG DOLBY DIGITAL COMPONENT VIDEO OUT VIDEO S VIDEO AUDIO R L LINE 2 OUT VIDEO S VIDEO AUDIO R L Y PB CB PR CR AC IN OUT LINE 1 TV LINE 3 DECODER AERIAL IN OUT DVD recorder TV to AERIAL ...

Страница 14: ... VIDEO PR CR PB CB Y COMPONENT VIDEO IN AERIAL IN LINE 4 IN DIGITAL OUT COAXIAL OPTICAL PCM DTS MPEG DOLBY DIGITAL COMPONENT VIDEO OUT VIDEO S VIDEO AUDIO R L LINE 2 OUT VIDEO S VIDEO AUDIO R L Y PB CB PR CR AC IN OUT LINE 1 TV LINE 3 DECODER C B D A Audio video cord supplied Component video cord not supplied yellow TV projector or AV amplifier receiver TV projector or AV amplifier receiver green ...

Страница 15: ...button page 16 When playing wide screen images Some recorded images may not fit your TV screen To change the aspect ratio see page 89 If you are connecting to a VCR Connect your VCR to the LINE 3 DECODER jack on the recorder page 26 Notes When you connect the recorder to your TV via the SCART jacks the TV s input source is set to the recorder automatically when you start playback If necessary pres...

Страница 16: ...LINK features are not available for devices connected via the DVD recorder s LINE 3 DECODER jack Not all TVs respond to the functions above Using the PROGRESSIVE button By using the PROGRESSIVE button on the remote you can select the signal format in which the recorder outputs video signals interlace or progressive Connect the recorder using the COMPONENT VIDEO OUT jacks pattern D on page 15 and s...

Страница 17: ...AL PCM DTS MPEG DOLBY DIGITAL COMPONENT VIDEO OUT VIDEO S VIDEO AUDIO R L LINE 2 OUT VIDEO S VIDEO AUDIO R L Y PB CB PR CR AC IN OUT LINE 1 TV LINE 3 DECODER VIDEO AUDIO INPUT L R B A DIGITAL OUT COAXIAL OPTICAL PCM DTS MPEG DOLBY DIGITAL LINE 2 OUT VIDEO S VIDEO AUDIO R L AV amplifier receiver with a decoder red TV projector or AV amplifier receiver Audio video cord supplied Signal flow Coaxial d...

Страница 18: ...input jack use this connection Connect using a coaxial or optical digital cord not supplied Surround effect Dolby Digital 5 1ch DTS 5 1ch MPEG audio 5 1ch 1 Manufactured under license from Dolby Laboratories Dolby Pro Logic and the double D symbol are trademarks of Dolby Laboratories 2 DTS and DTS Digital Out are trademarks of Digital Theater Systems Inc Notes After you have completed connection B...

Страница 19: ...nside the battery compartment When using the remote point it at the remote sensor on the recorder Notes If the supplied remote interferes your other Sony DVD recorder or player change the command mode number for this recorder page 21 Use the batteries correctly to avoid possible leakage and corrosion Do not touch the liquid with bare hands should leakage occur Observe the following Do not use a ne...

Страница 20: ...ches between the recorder and the last input source selected on the TV Point your remote at the recorder when using this button The button works even if the TV DVD switch is set to DVD When you connect the recorder to the TV via the SCART jacks the input source for the TV is set to the recorder automatically when you start playback To watch another source press the TV DVD button to switch the TV s...

Страница 21: ...you find the one that works with your AV amplifier receiver If you have a Sony DVD player or more than one Sony DVD recorder If the supplied remote interferes with your other Sony DVD recorder or player set the command mode number for this recorder and the supplied remote to one that differs from the other Sony DVD recorder or player The default command mode setting for this recorder and the suppl...

Страница 22: ...our recorder Settings are made in the following order m m m m m m 1 Turn on the TV 2 Press 1 The recorder turns on Settings Video Audio Features Options Easy Setup Format DVD HDD Bilingual Rec DVD Bilingual Rec Dimmer Auto Display Command Mode Factory Setup VR Main Main Normal On DVD3 SETUP Settings Video Audio Features Options Easy Setup Format DVD HDD Bilingual Rec DVD Bilingual Rec Dimmer Auto ...

Страница 23: ...ed TV complies with SMARTLINK the Preset Download function automatically starts If the Preset Download function does not work or if you made a connection other than A the Auto Tuner Preset function automatically starts searching for all of the receivable channels and presets them To set the channels manually see page 84 9 After the download or search is complete the Clock function automatically st...

Страница 24: ...p 12 you cannot select RGB and that if you select Yes in step 14 you cannot select S Video If you select S Video or RGB SMARTLINK will be deactivated 17Press ENTER The Setup Display for selecting the type of jack used to connect to your amplifier receiver appears 18Select the type of jack if any you are using to connect to an amplifier receiver and press ENTER If you did not connect an AV amplifie...

Страница 25: ... when Finish appears Easy Setup is finished All connections and setup operations are complete To return to the previous step Press O RETURN z Hints If your AV amplifier receiver has an MPEG audio decoder set MPEG to MPEG page 92 If you want to run Easy Setup again select Easy Setup in the Setup Display page 98 Note To record TV programmes using the timer you must set the clock accurately Audio Con...

Страница 26: ...receive a clear image on your TV screen Be sure to connect your VCR to the DVD recorder and your TV in the order shown below To watch video tapes watch the tapes through a second line input on your TV The SMARTLINK features are not available for devices connected via the DVD recorder s LINE 3 DECODER jack When you record to a VCR from this DVD recorder do not switch the input source to TV by press...

Страница 27: ...ng an S video cord Do not connect the output jack of this recorder to another equipment s input jack with the other equipment s output jack connected to the input jack of this recorder Noise feedback may result Do not connect more than one type of video cord between the recorder and your TV at the same time AERIAL IN LINE 4 IN DIGITAL OUT COAXIAL OPTICAL PCM DTS MPEG DOLBY DIGITAL COMPONENT VIDEO ...

Страница 28: ...From Connected Equipment With a Timer Synchro Rec page 51 Set Line3 Input of Scart Setting in Video Setup page 90 according to the specifications of your satellite tuner See your satellite tuner s instructions for more information If you are using a B Sky B tuner be sure to connect the tuner s VCR SCART jack to the LINE 3 DECODER jack Then set Line3 Input of Scart Setting according to the specific...

Страница 29: ...ng the decoder Connecting a decoder AERIAL IN LINE 4 IN DIGITAL OUT COAXIAL OPTICAL PCM DTS MPEG DOLBY DIGITAL COMPONENT VIDEO OUT VIDEO S VIDEO AUDIO R L LINE 2 OUT VIDEO S VIDEO AUDIO R L Y PB CB PR CR AC IN OUT LINE 1 TV LINE 3 DECODER TV Aerial cable supplied SCART cord not supplied PAY TV Canal Plus decoder to AERIAL OUT to i LINE 3 DECODER DVD recorder to AERIAL IN to SCART input SCART cord ...

Страница 30: ...programme position 1 2 3 4 5 6 7 8 9 0 SYSTEM MENU O RETURN PROG M m ENTER Settings Video Audio Features Options Easy Setup Channel Setting Channel List Clock Language SETUP Settings Video Audio Features Options Easy Setup SETUP TV Type Pause Mode Component Out Progressive Mode Screen Saver Scart Setting Line4 Input 16 9 Auto Off Auto On Video Video Scart Setting Line1 Output Line3 Input Line3 Out...

Страница 31: ...in step 5 above you will not be able to select L3 because Line 3 will become a dedicated line for the decoder If you disconnect the recorder s mains lead you will not be able to view the signals from the connected decoder Settings Channel Setting Prog 6 System Normal CATV Channel Set Station Name PAY TV CANAL Audio BG Normal C1 ARD On NICAM BG DK I L Settings Channel Setting Prog 6 System Normal C...

Страница 32: ...dubbing direction before dubbing F SETUP page 83 Turns on the Setup Display which allows you to set up the recorder to suit your preferences Sub menu The sub menu appears when you select an item from a list menu e g a title from the Title List menu and press ENTER The sub menu displays options applicable only to the selected item The displayed options differ depending on the situation and disc typ...

Страница 33: ... 1 Press HDD or DVD If you select DVD press Z open close and place a DVD on the disc tray Press Z again to close the disc tray Wait until LOAD disappears from the front panel display 2 Press TITLE LIST To show the list in greater detail zoom press ZOOM 1 AAB 13 00 14 00 2 DEF 20 00 21 00 3 AAB 9 00 9 30 4 GHI 20 00 20 30 5 DEF 20 00 20 30 6 L3 21 00 21 30 7 L3 21 00 21 30 8 GHI 10 00 10 30 15 9 17...

Страница 34: ...ont panel display when Playlist is selected For details see Edit options for DVD RWs VR mode page 64 To change the title order Sort Press while the Title List menu is turned on to move the cursor to the Sort column Press M m to select the item and press ENTER To change a title thumbnail picture Thumbnail HDD DVD RW in VR mode only You can select a favourite scene for the thumbnail picture shown in...

Страница 35: ...ter editing the title thumbnail picture may change to the first scene of the recording title After dubbing the title thumbnail picture set on the source recording is cancelled Using the Disc Info Screen disc settings With the Disc Information display you can check the disc type and remaining disc space Also you can perform operations such as formatting and finalizing page 36 1 Press HDD or DVD If ...

Страница 36: ... an option and press ENTER Disc Name DVD only Labels a DVD Enter the disc name in the Input Disc Name display page 40 Protect Disc DVD RW in VR mode only Protects all titles on the disc To cancel the protection select Don t Protect Erase All HDD DVD RW DVD RW only Erases all titles on the disc except the protected titles Format HDD DVD RW DVD RW only Erases all contents of the disc to make a blank...

Страница 37: ...ve the disc has already been finalized Notes Depending on the condition of the disc recording or the DVD equipment discs may not play even if the discs are finalized The recorder may not be able to finalize the disc if it was recorded on another recorder Discs are automatically finalized when removed from the recorder However you may need to finalize the disc for certain DVD equipment or if the re...

Страница 38: ... 5 1 ch Display 2 Example When playing a DVD RW VR mode A Disc type 2 format page 8 B Title type Original or Playlist page 64 C Play mode D Recording mode page 41 E Playing status bar 3 F Title number chapter number 1 page 61 Track number for CDs VIDEO CDs without PBC scene number for VIDEO CDs with PBC track number album number 1 for DATA CDs G CD text album name appears when text is recorded on ...

Страница 39: ...display Press TIME TEXT repeatedly The displays differ depending on the disc type or playing status Front panel display Example When playing a DVD Example When dubbing a DVD Example When playing a CD Notes The recorder can only display the first level of a CD s text such as the disc name The letters or symbols that cannot be displayed are replaced with Playing time of MP3 audio tracks may not be d...

Страница 40: ...and 2 to enter the remaining characters To erase a character move the cursor to the right of the character at the input row Select Back and press ENTER To insert a character move the cursor to the right of the point where you want to insert the character Select the character and press ENTER To erase all of the characters select Clear All and press ENTER 4 Select Finish and press ENTER To cancel th...

Страница 41: ...odes HQ recording mode HQ records pictures in higher quality than HQ on the HDD Set HQ Setting in Features Setup to HQ page 96 Maximum recording time is 34 hours for RDR HX1000 or 21 hours for RDR HX900 HQ appears in the display Note Situations below may cause slight inaccuracies with the recording time Recording a programme with poor reception or a programme or video source of low picture quality...

Страница 42: ...rd signal the recorder continues to record but only a blank grey coloured screen will be recorded The recorded disc can be played only on CPRM compatible equipment page 8 Timer Recording Standard ShowView You can set the timer for a total of eight programmes up to one month in advance There are two methods to set the timer the standard method and ShowView method Standard Set the date time and prog...

Страница 43: ...before the timer recording starts To stop recording during timer recording Open the remote s cover and press x REC STOP Note that it may take a few seconds for the recorder to stop recording About the PDC VPS function PDC VPS signals are transmitted with TV programmes in some broadcast systems These signals ensure that timer recordings are made regardless of any broadcast delays early starts or br...

Страница 44: ... be made To record a satellite programme turn on the satellite tuner and select the satellite programme you want to record Leave the satellite tuner turned on until the recorder finishes recording If you connect equipment with a timer function you can use the Synchro Rec function page 51 Even if the timer is set for the same daily or weekly programme the timer recording cannot be made if it overla...

Страница 45: ...hts up on the front panel and the recorder is ready to start recording To stop recording during timer recording Open the remote s cover and press x REC STOP Note that it may take a few seconds for the recorder to stop recording If the timer settings overlap See page 44 To extend the recording duration time while recording See page 44 To confirm change or cancel timer recording See Checking Changin...

Страница 46: ...TER Modify Changes the timer setting Select an item using and adjust using M m For the PDC VPS or Update functions select Details and change the settings page 43 Select OK and press ENTER Erase Erases the timer setting Select OK and press ENTER Check Overlap Checks for overlapped settings Select Close to return to the Timer List To change or cancel the setting repeat steps 3 and 4 above RWVR RWVid...

Страница 47: ... set to On for one or more timer recordings the start times may change in the event of a broadcast delay or early start Even if the timer is set timer recordings cannot be made while recording a programme that has priority Even if the timer is set for the same daily or weekly programme the timer recording cannot be made if it overlaps with a programme that has priority will appear next to the over...

Страница 48: ...V input using the t TV video button page 20 TV Direct Rec If you use the SMARTLINK connection you can easily record what you are watching on your TV When the TV is turned on or in standby mode press z REC The recorder automatically turns on and starts recording what you are watching on the TV TV appears in the front panel display You cannot turn off the TV or change the programme position during T...

Страница 49: ...does not turn off Even if you turn off the recorder during recording the recorder continues to record until the time counter runs out Note that the Quick Timer function does not work if TV Direct Rec is set to On in Features Setup page 93 To cancel the Quick Timer Press z REC repeatedly until the counter appears in the front panel display The recorder returns to normal recording mode Adjusting the...

Страница 50: ...c Video Equalizer Contrast weak 3 0 3 strong Brightness dark 3 0 3 bright Colour light 3 0 3 deep Repeat steps 2 and 3 to adjust any other items Notes If one programme contains two picture sizes the selected size is recorded However if the 16 9 signal cannot be recorded as 16 9 it is recorded as 4 3 When playing a 16 9 size picture recorded as 4 3 The image is fixed to 4 3 letter box regardless of...

Страница 51: ...utomatically starts recording when it receives an input signal from the connected equipment The recorder stops recording when the connected equipment turns off To stop recording Press x REC STOP or SYNCHRO REC To cancel Synchro Rec Press SYNCHRO REC The SYNCHRO REC indicator on the recorder turns off Notes The recorder starts recording only after detecting the video signal from the connected equip...

Страница 52: ...vice To connect a VCR or similar device see Connecting a VCR or Similar Device page 26 Use the DV IN jack on the front panel if the equipment has a DV output jack i LINK jack 1 Press HDD or DVD If you select DVD insert a recordable DVD 2 Press INPUT SELECT to select an input source according to the connection you made The front panel display changes as follows 7 00 8 00 9 00 10 00 First programme ...

Страница 53: ...ause 7 At the same time press X REC PAUSE on this recorder and the pause or play button on the connected equipment Recording starts To stop recording press x REC STOP on this recorder If you connect a digital video camera with a DV IN jack See DV Dubbing DV t HDD DVD page 77 for an explanation of how to record from the DV IN jack z Hint You can adjust the settings for the recording picture before ...

Страница 54: ...hen Press SELECT appears The PBC function of Super VCDs does not work with this recorder Super VCDs are played in continuous play mode only To stop playback Press x To resume playback from the point where you stopped Resume Play When you press H again after you stop playback the recorder resumes playback from the point where you pressed x To start from the beginning press TOOLS select Play Beginni...

Страница 55: ...e remote LOCKED appears in the front panel display The Z open close button does not work while the Child Lock is set To unlock the disc tray press O RETURN ENTER and then 1 on the remote again when the recorder is in standby mode One Touch Play If you use the SMARTLINK connection you can easily start playing When the TV is turned on or in standby mode press H The recorder automatically turns on an...

Страница 56: ...language Selects the main or sub sound Selects stereo or monaural audio tracks subtitle Selects a subtitle language when pressed repeatedly angle Selects an angle when pressed repeatedly If various angles multi angles for a scene are recorded on the disc appears in the front panel display 1 2 3 4 5 6 7 8 9 0 Z X m M H SUR PROGRESSIVE DVD RWVR HDD CD DATA CD VCD RWVR DVD VCD CD DATA CD HDD DVD DVD ...

Страница 57: ...witches the type of video output signal to interlace or progressive format page 16 instant replay instant advance Replays the scene briefly fast forwards the scene previous next Goes to the beginning of the previous next title chapter scene track All discs fast reverse fast forward Fast reverses fast forwards the disc when pressed during playback Search speed changes as follows fast reverse fast f...

Страница 58: ...und playback an external 5 1 channel decoder system must be connected to the digital jack of the recorder Set the sound to Stereo using the audio button when you play DTS sound tracks on a CD page 56 Notes on playing DVDs with a DTS sound track DTS audio signals are output only through the DIGITAL OUT COAXIAL or OPTICAL jack When you play a DVD with DTS sound tracks set DTS to On in Audio Setup pa...

Страница 59: ...in the title may become more apparent In this case it is recommended that you use the BNR function with the DVE function If the condition still does not improve set the DVE level to 1 or Off Adjusting the sound quality 1 Press TOOLS during playback The TOOLS menu appears 2 Select Audio Settings and press ENTER 3 Select an item and press ENTER Surround TVS DVD VIDEO only Selects one of the surround...

Страница 60: ...gramme while recording programmes Playback continues even if a timer recording starts Use this function as follows While recording to the HDD Play another title on the HDD Play a previously recorded programme on a DVD by pressing DVD While recording to a DVD Play a previously recorded programme on the HDD by pressing HDD While recording to a DVD RW VR mode 1 Play another title on the same DVD RW V...

Страница 61: ...les and tracks are assigned individual numbers select the title or track by entering its number You can also search for a scene using the time code 1 Press TOOLS during playback The TOOLS menu appears 2 Select a search method and press ENTER Title Search for DVDs Chapter Search for HDD DVDs Track Search for CDs DATA CDs Search for VIDEO CDs Album Search for DATA CDs Time Search for HDD DVDs Search...

Страница 62: ...rder See Playback order of MP3 audio tracks below About MP3 audio tracks MP3 is audio compression technology that satisfies certain ISO MPEG regulations You can play back DATA CDs CD ROMs CD Rs CD RWs recorded in MP3 MPEG1 Audio Layer 3 format However the discs must be recorded according to ISO9660 Level 1 Level 2 or Joliet format for the recorder to recognize the tracks You can also play discs re...

Страница 63: ...ration Proceeding to the next or another album may take some time The recorder may not be able to play some DATA CDs created in the Packet Write format The recorder will play any data with the extension MP3 even if they are not in MP3 format Playing this data may generate a loud noise which could damage your speaker system The recorder does not conform to audio tracks in MP3PRO format The playback...

Страница 64: ...D RW VR mode editing either the original recording called the original or the playback information created from the original called a Playlist Since each is different in nature and offers different merits read the following and select the one that better suits your needs To edit original titles Edits made to the original titles are final If you plan to retain an unaltered original recording create...

Страница 65: ...that the disc s control information is full erase unnecessary titles Editing a Title This section explains the basic edit functions Note that editing is irreversible To edit a DVD RW VR mode without changing the original recordings create a Playlist title page 68 Note When editing a DVD R DVD R or DVD RW Video mode finish all editing before finalizing the disc You cannot edit a finalized disc 1 Pr...

Страница 66: ...r setting point B appears 3 Select point B by pressing m M and press ENTER The display asks for confirmation To reset either point A or B select Change A or Change B and go to step 2 or 3 4 Select OK and press ENTER The scene is erased and the display asks whether to erase another scene To continue select Yes and repeat from step 2 To finish select No z Hint A chapter mark is inserted after the sc...

Страница 67: ... and press TITLE LIST 2 Press TOOLS and select Disc Map and press ENTER The Disc Map appears To check the open space select the space by pressing When b or B appears on either side of the screen you can scroll sideways by pressing 3 Select a title by pressing and press ENTER The display for selecting titles to be erased appears To cancel the selection press ENTER again When the title is protected ...

Страница 68: ... combines with the previous chapter Notes If a message appears and indicates that no more chapter marks can be added you may not be able to record or edit When dubbing any chapter marks you enter will be erased Creating and Editing a Playlist Playlist edit allows you to edit or re edit without changing the actual recordings A Playlist title can contain up to 50 scenes For details see Edit options ...

Страница 69: ...background 9 Select the OUT point by pressing m M and press ENTER The display asks for confirmation To reset the IN or OUT point select Change IN or Change OUT and repeat step 8 or 9 To view the selected scene select Preview 10Select OK and ENTER The selected section is captured as a scene and the display asks whether you want to continue To continue select More and repeat the steps above To captu...

Страница 70: ...itle List Playlist 1 Press TITLE LIST to turn on the Title List Playlist menu If the Title List Original menu appears press TOOLS and select Playlist 2 Select Number in the Sort column and press ENTER The titles are sorted in order of title number 3 Select a title and press ENTER The sub menu appears 4 Select Move and press ENTER 5 Select a new location for the title by pressing M m and press ENTE...

Страница 71: ... of the selections select Reset All 5 Select OK and press ENTER The list of titles to be combined appears To change the selection select Change and go to step 3 6 Select OK and press ENTER The display for selecting a title name from among the selected titles appears To enter a new name select Enter Text and follow the explanations on page 40 7 Select a name and press ENTER The titles are combined ...

Страница 72: ...om HDD to DVD RW or DVD R the picture size is always 4 3 When dubbed from HDD to DVD RW VR mode the originally recorded picture size is retained z Hints You can dub a Playlist title on a DVD RW VR mode as an original title on the HDD When dubbed from a DVD to the HDD the picture size and the sound types originally recorded are retained Notes The recorder may not function as described depending on ...

Страница 73: ...possible Dynamic VBR Dubbing About VBR VBR Variable Bit Rate is an effective method of allocating a suitable bit amount per second Fine detail pictures or dynamically moving pictures are assigned a larger amount while static pictures are assigned less for optimum picture quality z Hint When you dub an edited title using the Rec Mode Conversion Dubbing method pauses between scenes are smoothed out ...

Страница 74: ...wing display appears after step 8 Select Auto Dub mode and press ENTER to start dubbing To manually select another dubbing mode select Reset and go to step 7 To stop dubbing Press TOOLS to turn on the TOOLS menu Or while the Title List menu is displayed press ENTER to display the sub menu Select Stop Dubbing and press ENTER When asked for confirmation select Yes and press ENTER z Hints If disc spa...

Страница 75: ...s To re select titles select Change and go to step 6 of Dubbing Multiple Titles Dub Selected Titles above To have the recorder adjust the dubbing mode so all of the selected titles fit in select Auto Mode A Total size of the selected titles B Direction of dubbing C Available space on the disc to be dubbed approximate D Information about the title to be dubbed title name original recording mode dub...

Страница 76: ...If disc space is insufficient for the selected dubbing mode the following display appears after step 8 of Dubbing Maltiple Titles page 75 Select Auto Dub mode and press ENTER If you have selected only one title select OK To stop dubbing Press TOOLS to turn on the TOOLS menu Select Stop Dubbing and press ENTER When asked for confirmation select Yes and press ENTER z Hints You can turn off the recor...

Страница 77: ...ecord or edit from a DV format tape Operation is straightforward because the recorder will fast forward and rewind the tape for you you do not need to operate your digital video camera Do the following to start using the DV Edit functions of this recorder See the instruction manual supplied with the digital video camera as well before connecting Notes The DV IN jack is for input only It will not o...

Страница 78: ...gital video camera You are ready to start dubbing Select one of the dubbing methods on the following pages z Hints You can turn off the recorder during dubbing The recorder completes dubbing even after being turned off You can adjust the settings for the recording picture before recording See Adjusting the recording picture quality and size page 49 Notes You cannot connect more than one piece of d...

Страница 79: ...DV IN jack page 77 and press ONE TOUCH DUBBING on the remote The recorder rewinds the tape and then starts recording the tape contents When the recording is finished the recorder rewinds the tape in the digital video camera To stop during recording Open the remote s cover and press x REC STOP Note that it may take a few seconds for the recorder to stop recording z Hints If you set Finalize Disc to...

Страница 80: ...r a DVD RW VR mode and the HDD every shooting on the tape and each selected scene becomes a chapter on the disc Auto Scene Chaptering function For other discs the recorder divides the title in either 6 or 15 minute intervals according to the setting in Auto Chapter in Features Setup 1 Follow steps 1 to 5 of Preparing for recording using the DV IN jack page 77 and press SYSTEM MENU 2 Select DV EDIT...

Страница 81: ...ing scenes select the scene you want to edit and press ENTER The sub menu appears Move Changes the scene order Follow the explanations on the screen to change the order by pressing M m and ENTER Erase Erases the scene When asked for confirmation select OK Preview Plays the selected scene Change IN Changes the start of the scene Repeat from step 4 Change OUT Changes the end of the scene Repeat from...

Страница 82: ... s cover and press x REC STOP Note that it may take a few seconds for the recorder to stop recording Notes The disc may not be recorded as programmed if the tape s time code is not sequential or there are blanks between the recordings on the tape In this case see Recording From Connected Equipment Without a Timer page 52 The start and end points of a program may be different from what you have set...

Страница 83: ... want to set up and press ENTER Available options for the item appear Example TV Type Some items display a dialogue box that provides further detailed settings Example The following dialogue box appears when Parental Control in Features Setup is selected 1 2 3 4 5 6 7 8 9 0 M m ENTER SYSTEM MENU SYSTEM MENU TITLE LIST TIMER TIMER LIST DV EDIT DUBBING SETUP SETUP Settings Video Audio Features Optio...

Страница 84: ... picture is distorted the wrong tuner system may have been preset during Easy Setup Set the correct tuner system manually in the steps below 1 Follow steps 1 to 3 of Using the Setup Displays page 83 to select Settings in the Setup Display 2 Select Channel Setting and press ENTER 3 Press PROG to select the programme position Settings Video Audio Features Options Easy Setup SETUP TV Type Pause Mode ...

Страница 85: ...rom step 3 BG Select this when in West European countries except those listed in Receivable channels page 86 DK Select this when in East European countries I Select this when in Great Britain Ireland L Select this when in France Settings Channel Setting Prog 8 System Normal CATV Channel Set Station Name PAY TV CANAL Audio BG Normal C1 ARD On NICAM BG DK I L Settings Channel Setting Prog 8 System N...

Страница 86: ...ATV L France F2 F10 VHF F21 F69 UHF B Q CATV S21 S41 HYPER Corresp onding channel Channel Set number Receivable Frequency range MHz B S01 116 75 124 75 C S02 124 75 132 75 D S03 132 75 140 75 D S04 140 75 148 75 E S05 148 75 156 75 F S06 156 75 164 75 F S07 164 75 172 75 G S08 172 75 180 75 H S09 180 75 188 75 H S10 188 75 196 75 I S11 196 75 204 75 J S12 204 75 212 75 J S13 212 75 220 75 K S14 22...

Страница 87: ...select the row containing the programme position you want to change or disable To change press ENTER and go to step 4 To disable press CLEAR and go to step 6 The disabled positions will be skipped when you press PROG To display other pages for programme positions 7 to 99 press M m repeatedly 4 Press M m until the selected channel row moves to the desired programme position The selected channel is ...

Страница 88: ... m to set the day and press Set the month year hour and minutes in sequence Press to select the item to be set then press M m to set the numbers The day of the week is set automatically To change the numbers press to return to the item to be changed and press M m 7 Press ENTER to start the clock Language OSD On Screen Display Switches the display language on the screen DVD Menu DVD VIDEO only Swit...

Страница 89: ...rder to a monitor or projector via only the COMPONENT VIDEO OUT jacks do not select Off If you select Off in this case the picture may not appear 16 9 Select this when connecting to a wide screen TV or TV with a wide mode function 4 3 Letter Box Select this when connecting to a 4 3 screen TV Displays a wide picture with bands on the upper and lower portions of the screen 4 3 Pan Scan Select this w...

Страница 90: ... items below according to the combination of jacks and methods that you are going to use Line1 Output Selects a method of outputting video signals for the LINE 1 TV jack Notes If your TV does not accept S video or RGB signals no picture appears on the TV screen even if you select S Video or RGB See the instructions supplied with your TV You cannot select RGB when Component Out above is set to On S...

Страница 91: ...Downmix DVDs only Switches the method for mixing down to two channels when you play a DVD which has rear sound elements channels or is recorded in Dolby Digital format For details on the rear signal components see Checking the Play Information and Playing Time page 38 This function affects the output of the following jacks LINE 2 OUT AUDIO L R jacks LINE 1 TV jack LINE 3 DECODER jack DIGITAL OUT O...

Страница 92: ...position When you select On see To set the digital output signal for further settings Off The influence of the digital circuit upon the analogue circuit is minimal D PCM Select this when the recorder is connected to an audio component lacking a built in Dolby Digital decoder You can select whether the signals conform to Dolby Surround Pro Logic or not by making adjustments to the Downmix item in A...

Страница 93: ...n recording a programme the recorder automatically takes the programme name from the Teletext pages and stores it as the title name The TV guide page numbers depend entirely on the broadcast itself and may be subject to change If so you may have to set those TV guide page numbers manually in the TV Guide Page menu Not available in some areas 1 After step 3 above select TV Guide Page and press or E...

Страница 94: ...his function may not work correctly with programmes broadcast from some stations If the broadcast system updates the Teletext information at the moment recording starts the title label may not correspond to the recorded programme In this case you may have to manually enter the correct title page 65 Parental Control DVD VIDEO only Playback of some DVD VIDEOs can be limited according to a predetermi...

Страница 95: ...otes If you forget your password you will have to reset it by selecting Parental Control under Factory Setup in Options Setup page 97 When you play discs which do not have the Parental Control function playback cannot be limited on this recorder Depending on the disc you may be asked to change the Parental Control level while playing the disc In this case enter your password then change the level ...

Страница 96: ...3 Select Options and press ENTER The Options Setup appears with the following options The default settings are underlined Format DVD DVD RW only The recorder automatically starts formatting in VR mode or Video mode whichever is selected below when a new unformatted DVD RW is inserted Auto Automatically finalizes the disc following One Touch Dubbing Manual Allows you to finalize the disc manually P...

Страница 97: ...of your previous settings will be lost 1 After step 3 above select Factory Setup and press or ENTER The display for selecting a group of settings appears 2 Select the group of settings you want to return to default from Settings Video Audio Features Options Parental Control and All and press or ENTER 3 Select Start and press ENTER The selected settings return to their default settings 4 Press ENTE...

Страница 98: ...ss SYSTEM MENU while the recorder is in stop mode 2 Select SETUP and press ENTER 3 Select Easy Setup and press ENTER 4 Press ENTER 5 Select Start and press ENTER 6 Follow the instructions for Easy Setup page 22 from step 5 Settings Video Audio Features Options Easy Setup Easy Setup SETUP ...

Страница 99: ...r TV is compatible with progressive format 525p 625p signals the image may be affected when you set the recorder to progressive format In this case press PROGRESSIVE so that the PROGRESSIVE indicator turns off and the recorder is set to normal interlace format You are playing a DVD recorded in a colour system that is different from your TV Noises may appear in the pictures recorded on the HDD whic...

Страница 100: ...AXIAL jacks check the Audio Setup settings page 91 Sound distortion occurs Set Audio ATT in Audio Setup to On page 91 Sound is noisy When playing a CD with DTS sound tracks noise will come from the LINE 2 OUT AUDIO L R jacks LINE 1 TV jack or LINE 3 DECODER jack page 58 The sound volume is low The sound volume is low on some DVDs The sound volume may improve if you set Audio DRC in Audio Setup to ...

Страница 101: ...on the TV screen page 56 The DVD VIDEO prohibits changing angles Try changing the angle using the DVD VIDEO s menu The angles cannot be changed for the titles recorded on this recorder The MP3 audio tracks do not play The MP3 audio tracks are not recorded in a format that the recorder can play page 62 Recording Timer recording Editing The programme position cannot be changed from the channel you a...

Страница 102: ...cording standby mode Press SYNCHRO REC to have the recorder stand by for recording Make sure the SYNCHRO REC indicator lights up on the front panel page 51 The recorder is connected to the TV output jack of the connected equipment Synchro Recording does not complete The timer setting for the connected equipment overlapped the recorder s timer setting page 52 There was a power failure during the re...

Страница 103: ... from the front panel display HDD ERROR appears in the front panel display The hard disk error occurred Press down 1 on the recorder for ten seconds to restart the recorder If this does not resolve the problem format the recorder s HDD by pressing down the HDD button on the recorder for more than ten seconds until WELCOME appears in the front panel display Note that all the contents recorded on th...

Страница 104: ...tened with a mild detergent solution Do not use any type of abrasive pad scouring powder or solvent such as alcohol or benzine About repairing the hard disk drive It may be necessary to access data stored on the hard disk for testing purposes there is no intention to copy or store the data titles or any other information If replacement or initialization format is required the hard disk will be for...

Страница 105: ...1 to B69 F21 to F69 CATV S01 to S05 S1 to S20 France B to Q HYPER S21 to S41 The above channel coverage merely ensures the channel reception within these ranges It does not guarantee the ability to receive signals in all circumstances Video reception Frequency synthesizer system Audio reception Split carrier system Aerial out 75 ohm asymmetrical aerial socket Timer Clock Quartz locked Timer indica...

Страница 106: ...is section describes the i LINK standard and its features What is i LINK i LINK is a digital serial interface for handling digital video digital audio and other data in two directions between equipment having the i LINK jack and for controlling other equipment i LINK compatible equipment can be connected by a single i LINK cable Possible applications are operations and data transactions with vario...

Страница 107: ...r megabits per second or the amount of data that can be sent or received in one second For example a baud rate of 100 Mbps means that 100 megabits of data can be sent in one second i LINK functions on this recorder For details on how to dub when this recorder is connected to other video equipment having DV jacks see page 77 The DV jack on this recorder can only input DVC SD signals It cannot outpu...

Страница 108: ...C indicator 42 SYNCHRO REC indicator 51 E remote sensor 19 F A open close button 42 G H play button 54 X pause button 56 x stop button 54 H z REC button 48 X REC PAUSE button 48 x REC STOP button 48 I M m ENTER button 22 J SYSTEM MENU button 32 TOOLS button 33 K O RETURN button 33 L previous next buttons 56 M PROGRAM buttons 48 N REC MODE button 41 O INPUT SELECT button 52 77 P DVD button indicato...

Страница 109: ... angle button 56 G TIMER button 42 44 H SYSTEM MENU button 32 TITLE LIST button 33 54 65 TOOLS button 33 I CURSOR MODE button 33 J O RETURN button 33 K TOP MENU button 54 L previous next buttons 56 M z REC button 48 X REC PAUSE button 48 x REC STOP button 48 N REC MODE button 41 O SYNCHRO REC button 51 P PROGRESSIVE button 16 Q ONE TOUCH DUBBING button 79 R 1 on standby button 22 S PROG programme ...

Страница 110: ...C angle indicator 56 D PLAYLIST indicator 34 E Audio signal indicators 38 F STEREO BILINGUAL indicators 41 G NICAM indicator 41 H TV indicator 48 I Displays the following 39 Playing time remaining time Current title chapter track index number Recording time recording mode Clock Programme position TV Direct Rec indication 48 TV appears in the right most two digits J SMARTLINK indicator 15 K PROGRES...

Страница 111: ... LINE 2 OUT S VIDEO jack 14 G LINE 2 OUT AUDIO L R VIDEO jacks 14 17 H DIGITAL OUT COAXIAL OPTICAL jacks 17 I LINE 4 IN S VIDEO jack 27 J LINE 4 IN AUDIO L R VIDEO jacks 27 AERIAL IN LINE 4 IN DIGITAL OUT COAXIAL OPTICAL PCM DTS MPEG DOLBY DIGITAL COMPONENT VIDEO OUT VIDEO S VIDEO AUDIO R L LINE 2 OUT VIDEO S VIDEO AUDIO R L Y PB CB PR CR AC IN OUT LINE 1 TV LINE 3 DECODER ...

Страница 112: ...ontents can be recorded only once to a DVD R and will have the same format as a DVD VIDEO DVD RW page 8 A DVD RW read plus RW is a recordable and rewritable disc DVD RWs use a recording format that is comparable to the DVD VIDEO format DVD R page 8 A DVD R is a recordable disc that is the same size as a DVD VIDEO Contents can be recorded only once to a DVD R and will have the same format as a DVD ...

Страница 113: ...4 Titles actually recorded on a DVD RW VR mode Erasing original titles frees up disc space Playlist page 64 Playback information created from the actual recordings on a DVD RW VR mode A Playlist leaves the original titles as they are and contains only the information needed to control playback A Playlist title takes up very little disc space Progressive format page 16 Compared to the Interlace for...

Страница 114: ...anese 1287 Georgian 1297 Kazakh 1298 Greenlandic 1299 Cambodian 1300 Kannada 1301 Korean 1305 Kashmiri 1307 Kurdish 1311 Kirghiz 1313 Latin 1326 Lingala 1327 Laothian 1332 Lithuanian 1334 Latvian Lettish 1345 Malagasy 1347 Maori 1349 Macedonian 1350 Malayalam 1352 Mongolian 1353 Moldavian 1356 Marathi 1357 Malay 1358 Maltese 1363 Burmese 1365 Nauru 1369 Nepali 1376 Dutch 1379 Norwegian 1393 Occita...

Страница 115: ...ngs Timer List 46 Child Lock 55 Cleaning discs 104 Clock 23 88 Colour 50 58 Colour System 96 Colour systems 106 Combine 71 Command Mode 22 97 Component Out 89 Component video input 15 COMPONENT VIDEO OUT 14 Connecting 14 the aerial cable 13 the audio cords 17 the video cords 14 Contrast 50 58 Controlling TVs with the remote 20 Copy control signals 42 Copy protection 112 Copy Free 42 Copy Never 42 ...

Страница 116: ...uage 23 88 Setup Display 83 Sub menu 32 System Menu 32 TOOLS menu 33 Options 96 Original 34 64 113 P Page mode 34 Parental Control 55 94 Parts and controls 108 Pause Mode 89 PAY TV 29 PAY TV CANAL 87 PB Video Equalizer 58 PBC 54 PDC 43 Picture quality 49 58 Picture size 49 Play Beginning 54 Play mode 38 Playable discs 10 Playback 10 38 54 57 fast forward 57 fast reverse 57 Freeze Frame 56 instant ...

Страница 117: ...c 51 System 85 System Menu 32 83 T Teletext 48 93 Thumbnail picture 34 Time Search 61 TIME TEXT 39 TIMER 43 Timer List 46 Timer recording check change cancel 46 manual setting 42 Rec Mode Adjust 43 ShowView 44 Synchro Rec 51 Title 38 113 TITLE LIST 54 Title List 33 54 Sort 34 Thumbnail 34 Zoom 33 Title Name 66 Title number 38 Title Search 61 TOOLS menu 33 TOP MENU 54 Track 113 Track Search 61 Trou...

Страница 118: ......

Страница 119: ......

Страница 120: ...Sony Corporation Printed in Hungary Printed on 100 recycled paper 2 103 583 11 3 ...

Отзывы: