background image

8

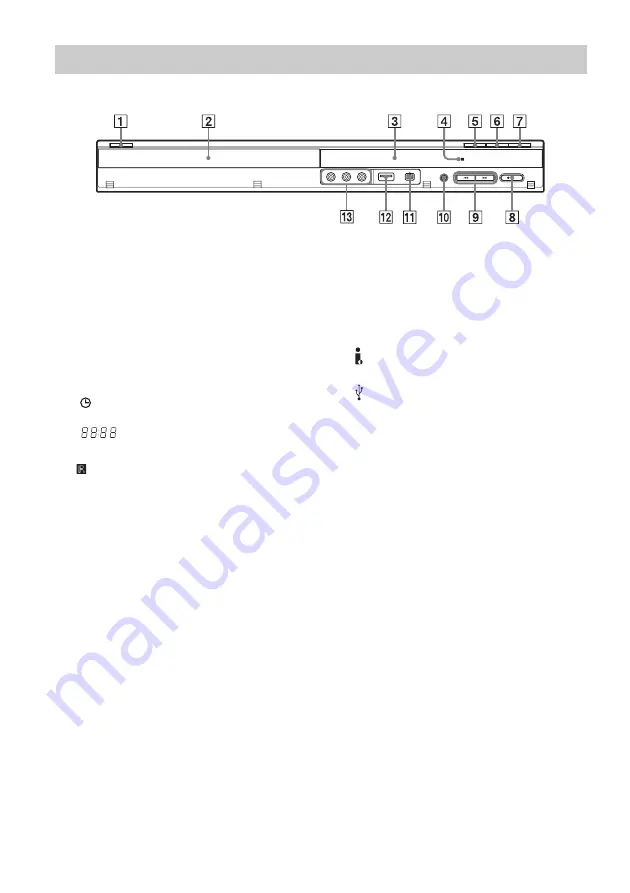
A

[

/

1

 (on/standby) (18)

Turns the recorder on or off.

B

Disc tray (26)

C

Front panel display

Shows the current status of the recorder.
REC: Indicates when recording is in progress.
TV: Indicates when the recorder is in TV 
tuner mode.
PM: Indicates afternoon.

: Indicates when the recorder is in timer 

recording or a timer recording is programmed.

: Shows the current status of the 

recorder (clock, channel, etc.).

D

 (remote sensor) (16)

E

Z

 (open/close) (26)

Opens or closes the disc tray.

F

N

 (play) (42, 48, 50)

The 

N

 button has a tactile dot

*

.

G

x

 (stop) (42, 48, 50)

H

z

REC (39)

I

.

/

>

 (previous/next) (44)

J

RESOLUTION button (13)

Selects the resolution according to your TV.

K

 DV IN jack (59)

Connect a DV camcorder to this jack.

L

 USB jack (type A) (24)

Connect a USB device to this jack.

M

LINE 2 IN (VIDEO/L(MONO) AUDIO R) 
jacks (21)

Connect a VCR or similar recording device to 
these jacks.

* Use the tactile dot as a reference when operating the 

recorder.

Front panel

Содержание RDR-GX257

Страница 1: ...3 876 081 12 1 2008 Sony Corporation DVD Recorder Operating Instructions RDR GX257 ...

Страница 2: ...ient or relocate the receiving antenna Increase the separation between the equipment and receiver Connect the equipment into an outlet on a circuit different from that to which the receiver is connected Consult the dealer or an experienced radio TV technician for help Precaution Install this system so that the mains lead the power cord can be unplugged from the wall socket immediately in the event...

Страница 3: ... safety purpose of the polarized or grounding type plug A polarized plug has two blades with one wider than the other A grounding type plug has two blades and a third grounding prong The wide blade or the third prong are provided for your safety If the provided plug does not fit into your outlet consult an electrician for replacement of the obsolete outlet 10 Protect the power cord from being walk...

Страница 4: ...d Formatting a Disc 26 Recording a Program to a Disc 27 Viewing the Recorded Program Title List 28 Checking the Playback Information and Playing Time 30 Changing the Name of a Recorded Program Title Input 31 Labeling and Protecting a Disc 32 Playing a DVD on Other Equipment Finalize 33 Recording 35 Before Recording 35 Timer Recording From Connected Equipment 36 Checking Changing Canceling Timer Se...

Страница 5: ...s General 63 Language Settings 64 Audio Settings 65 Parental Control Settings Lock 66 Recording Settings Video 67 Disc Settings 68 Resetting the Recorder Factory Set 69 Additional Information 70 Troubleshooting 70 Recordable and Playable Discs 74 Playable Discs 76 Language Code List 78 Area Code List 78 Notes About This Recorder 79 Notes on MP3 Audio Tracks JPEG Image Files and i Link 80 Specifica...

Страница 6: ...disc information H PREV previous NEXT next 44 49 REPLAY c C ADVANCE 44 m M search slow 44 H PLAY 42 48 50 X PAUSE 44 49 50 x STOP 42 48 50 The H PLAY button has a tactile dot I z REC 39 x REC STOP 36 39 CHAPTER MARK 56 Creates chapters within a title REC MODE 27 35 39 Selects the recording mode J TV 1 on standby 16 TV INPUT input select 16 TV VOL volume 16 TV CH channel 16 The CH button has a tact...

Страница 7: ...lideshow PLAY MODE 46 49 ZOOM 45 Zooms an image during playback or pause mode N AUDIO 44 The AUDIO button has a tactile dot O Number buttons 46 The number 5 button has a tactile dot P Z OPEN CLOSE 26 Opens or closes the disc tray Use the tactile dot as a reference when operating the recorder continued ...

Страница 8: ...tatus of the recorder clock channel etc D remote sensor 16 E Z open close 26 Opens or closes the disc tray F N play 42 48 50 The N button has a tactile dot G x stop 42 48 50 H z REC 39 I previous next 44 J RESOLUTION button 13 Selects the resolution according to your TV K DV IN jack 59 Connect a DV camcorder to this jack L USB jack type A 24 Connect a USB device to this jack M LINE 2 IN VIDEO L MO...

Страница 9: ... OUT high definition multimedia interface out jack 12 F LINE OUT VIDEO AUDIO L R jacks 12 14 G AUDIO OUT L R jacks 14 H DIGITAL OUT COAXIAL jack 14 Rear panel Y PB PR COAXIAL VIDEO VIDEO R L AUDIO R L AUDIO R L AUDIO PCM DTS MPEG DOLBY DIGITAL VIDEO OUT LINE 1 IN COMPONENT AC IN AUDIO OUT DIGITAL OUT LINE OUT HDMI OUT SET TOP BOX CONTROL ...

Страница 10: ...connect the recorder to a tuner that has audio video output jacks If you have been using your VCR connected to an antenna connect this recorder to your VCR using an audio video cord In this way you will be able to record TV programs You cannot record on this recorder if you have a cable box or satellite receiver without audio video outputs cable with no cable box antenna only no cable TV In the ca...

Страница 11: ... Place the set top box controller near the remote sensor on the cable box satellite receiver Connecting a cable box satellite receiver and set top box controller VIDEO R L AUDIO LINE 1 IN AC IN HDMI OUT Y PB PR COAXIAL VIDEO R L AUDIO R L AUDIO PCM DTS MPEG DOLBY DIGITAL VIDEO OUT COMPONENT AUDIO OUT DIGITAL OUT LINE OUT SET TOP BOX CONTROL SET TOP BOX CONTROL VIDEO R L AUDIO LINE 1 IN to LINE 1 I...

Страница 12: ...UDIO LINE 1 IN AC IN HDMI OUT Y PB PR COAXIAL VIDEO R L AUDIO R L AUDIO PCM DTS MPEG DOLBY DIGITAL VIDEO OUT COMPONENT AUDIO OUT DIGITAL OUT LINE OUT SET TOP BOX CONTROL B A C Video cord supplied Component video cord not supplied TV projector or audio component TV projector or audio component green TV projector or audio component red blue Signal flow to COMPONENT VIDEO OUT to LINE OUT VIDEO DVD re...

Страница 13: ...ded images may not fit your TV screen To change the picture size see page 63 If you are connecting to a VCR Connect your VCR to the LINE 2 IN jacks on the recorder page 21 b Notes Do not connect more than one type of video cord between the recorder and your TV at the same time Do not make connections A and C at the same time Consumers should note that not all High Definition television sets are fu...

Страница 14: ...omponent s two speakers for sound z Hint For correct speaker location refer to the operating instructions supplied with the connected components VIDEO R L AUDIO LINE 1 IN AC IN HDMI OUT Y PB PR COAXIAL VIDEO R L AUDIO R L AUDIO PCM DTS MPEG DOLBY DIGITAL VIDEO OUT COMPONENT AUDIO OUT DIGITAL OUT LINE OUT SET TOP BOX CONTROL A B VIDEO R L AUDIO LINE OUT HDMI OUT COAXIAL PCM DTS MPEG DOLBY DIGITAL D...

Страница 15: ...udio component using an HDMI cord you will need to do one of the following Connect the audio component to the TV with the HDMI cord or Connect the recorder to the TV with a component video cord Step 4 Connecting the Mains Lead Power Cord Connect the supplied mains lead the power cord to the AC IN terminal of the recorder Then plug the recorder and TV mains leads AC power cords into the AC outlet A...

Страница 16: ...y liquid inside the battery compartment and insert new batteries Do not expose the remote sensor marked on the front panel to strong light such as direct sunlight or a lighting apparatus The recorder may not respond to the remote When you replace the batteries of the remote the code number and Command Mode may be reset to the default setting Set the appropriate code number and Command Mode again Y...

Страница 17: ...ed command mode appears on the front panel display 4 Hold down the remote s ENTER and 1 2 or 3 of the number buttons corresponding to the command mode selected in step 3 for more than three seconds Manufacturer Code number Sony 01 default Hitachi 02 LG Goldstar NEC 04 Mitsubishi MGA 13 Panasonic 19 Philips 21 Pioneer 16 RCA 10 Samsung 20 Sharp 18 Toshiba 07 Buttons Operations TV 1 Turns your TV on...

Страница 18: ... that the signal from the recorder appears on your TV screen The LANGUAGE display appears 2 Select a language for the on screen displays using M m and press ENTER The Clock Setting display appears 3 Set the date year and time using M m and press ENTER to start the clock You can also use the number buttons 4 When the Initial Setup is completed select Exit and press ENTER If you use the cable box sa...

Страница 19: ...R key Selects whether you need to press the ENTER button each time after entering the channel number Key Speed Selects the speed to send commands to the cable box satellite receiver Test Checks that the control works correctly see below 1 Select Test in step 8 above and press ENTER 2 Check the overall connection and press ENTER 3 Check that the cable box satellite receiver is turned on and press E...

Страница 20: ...corder contact your cable or satellite company to see if they can provide you with a compatible cable box or satellite receiver To fix the set top box controller to your cable box satellite receiver Once you have confirmed that the set top box controller controls your cable box or satellite receiver affix it in place 1 Attach the supplied double sided tape to the set top box controller Remove the ...

Страница 21: ... DV output jack i LINK jack page 59 See also the operating instructions supplied with the connected equipment Connect a VCR or similar recording device to the LINE 2 IN jacks of this recorder z Hint When the connected equipment outputs only monaural sound use audio cords that distribute monaural sounds to left right channels not supplied Connecting to the LINE 2 IN jacks OUTPUT AUDIO L R VIDEO VCR...

Страница 22: ...er signals via the VCR you may not receive a clear image on your TV screen Be sure to connect your VCR to the DVD digital video disc recorder and your TV in the order shown below To watch video tapes watch the tapes through a second line input on your TV To watch the connected VCR or similar device s pictures through the recorder while the recorder is in standby mode set Power Save to Off default ...

Страница 23: ...If you disconnect the recorder s mains lead the power cord you will not be able to view the signals from the connected tuner VIDEO R L AUDIO LINE 1 IN AC IN HDMI OUT Y PB PR COAXIAL VIDEO R L AUDIO R L AUDIO PCM DTS MPEG DOLBY DIGITAL VIDEO OUT COMPONENT AUDIO OUT DIGITAL OUT LINE OUT SET TOP BOX CONTROL AUDIO OUTPUT L R VIDEO AUDIO INPUT L R VIDEO VIDEO R L AUDIO LINE 1 IN VIDEO R L AUDIO LINE OU...

Страница 24: ...or details about playing the inserted USB memory see Playing from the USB memory on page 43 b Notes This recorder supports only USB memory with FAT16 or FAT32 format USB memory that requires additional program installation when you have connected it to a PC is not supported This recorder is compatible with USB memory that supports USB 1 1 Some USB memory may not work with this recorder USB memory ...

Страница 25: ...D DATA CD or USB memory Music Displays the Music Jukebox on DATA DVD DATA CD or USB memory You can select JPEG image files or MP3 audio tracks on a DATA CD DATA DVD or USB memory Select a file type and press ENTER Then select a media type Disc or USB Timer Record page 36 Displays the Timer List Used to set a new timer recording for a disc as well as change or cancel timer recordings you set Setup ...

Страница 26: ...ired For a DVD RW the recorder automatically formats in Video mode To format in VR mode see Reformatting a disc below z Hint For a formatted disc you can use the disc after REAd disappears from the front panel display in step 5 above You can erase all contents of a disc to create a blank disc To format a new DVD RW in VR mode reformat the disc 1 Insert a disc 2 Press SYSTEM MENU to turn on the Sys...

Страница 27: ...e 5 Press REC MODE repeatedly to select the recording mode Each time you press the button the display changes on the TV screen as follows For details about the recording mode see page 35 6 Press z REC Recording starts and REC red appears in the front panel display Recording continues until you stop the recording or the disc is full Leave the cable box satellite receiver turned on and do not change...

Страница 28: ... available for a Playlist title 3 Select a title and press ENTER The sub menu appears with options applicable to the selected title The options displayed differ depending on the situation and disc type If you want to turn off the sub menu and re select other title press O RETURN 4 Select Play and press ENTER Playback starts from the selected title on the disc To play a title including hidden chapt...

Страница 29: ... from the sub menu which appears when you select a chapter and press ENTER A Title information B Chapter s thumbnail picture Press to select the previous next chapter If more than six chapters are listed press M m to display chapters on the previous next pages row by row To return to the Title List Select a chapter and press ENTER Select Title List from the sub menu and press ENTER z Hint After re...

Страница 30: ...ly or audio channel page 44 Subtitle Selected subtitle page 44 Angle Selected angle total number of angles page 44 Sound Selected sound mode Select 3D SUR to enjoy virtual surround sound effects created from the front left and right speakers b Notes If no button is pressed for ten seconds the playback information display will turn off Playing time of MP3 audio tracks may not be displayed correctly...

Страница 31: ...r type box on the display press M m To move the cursor to the left or right within the input row select b or B and press ENTER To erase a character move the cursor to the right of the character in the input row Select Erase and press ENTER 5 Move to the character type box and press to select a character type You can select English Latin Capital English Latin Lowercase or Symbol The character palet...

Страница 32: ... Press the number 3 button followed by the number 0 button 2 Select OK and press ENTER Labeling and Protecting a Disc A disc is automatically labeled as its disc type You can change the disc name up to 21 characters 1 Insert a disc 2 Press SYSTEM MENU to turn on the System Menu 3 Select Setup and press ENTER The Setup display appears 4 Select Disc and press 5 Select Input Disc Name and press 6 Whi...

Страница 33: ...nt Before finalizing check the differences between the disc types in the table below Differences between the disc types Protecting a Disc RWVR Format DVD Finalize Input Disc Name Protect Disc PBC Off On Discs are automatically finalized when removed from the recorder However you may need to finalize the disc for certain DVD equipment or if the recording time is short You can edit or record on the ...

Страница 34: ...ssage appears unfinalize the disc by selecting Unfinalize in step 6 above z Hint You can check whether the disc has been finalized or not If you cannot select Finalize in step 6 above the disc has already been finalized b Notes The time required for finalizing depends on the disc type recording time or the number of titles recorded on the disc Depending on the condition of the disc recording or th...

Страница 35: ...DE repeatedly to switch the recording modes Note that the recording time in the following table is an approximate guide b Notes Situations below may cause slight inaccuracies with the recording time Recording a program with poor reception or a program or video source of low picture quality Recording on a disc that has already been edited Recording only a still picture or just sound The available r...

Страница 36: ...hannel Selects the channel When using the cable box satellite receiver control select the channel using M m or the number buttons When not using the cable box satellite receiver control select OFF by pressing CLEAR Be sure to select the channel on the connected cable box satellite receiver s side before the timer recording starts If you make a mistake select the item and change the setting 6 Press...

Страница 37: ...am the timer recording cannot be made if it overlaps with a program that has priority Duplicate Date will appear for the overlapped setting in the Timer List Check the priority order of the settings page 38 Even if the timer is set timer recordings cannot be made while recording a program that has priority The Rec Mode Adjust function only works with a timer recording It does not function with Qui...

Страница 38: ... in the Timer List the program that starts first has priority and the second program starts recording only after the first program has finished When the recordings start at the same time The program that is set first has priority In this example timer setting A is set after B so the first part of timer setting A will not be recorded When the end time of one recording and the start time of another ...

Страница 39: ...and select the program you want to watch z Hint If you do not want to watch TV while recording you can turn off the TV b Notes After pressing z REC it may take a short while to start recording You cannot change the recording mode while recording or during recording pause If there is a power failure the program you are recording may be erased You cannot change the input source during recording You ...

Страница 40: ... page 67 z Hints You can create chapters manually when playing a DVD RW DVD RW VR mode or DVD R page 56 When recording in ULP mode chapter marks are inserted at 10 minute intervals You can use the Title List to make a new recording over a title previously recorded on the disc For details about the Title List see page 28 1 Insert a DVD RW 2 Select the input source L1 and select the channel on the c...

Страница 41: ...changes as follows 4 Insert the source tape into the connected equipment and set to playback pause 5 Press z REC on this recorder and the pause or play button on the connected equipment at the same time Recording starts To stop recording press x REC STOP on this recorder If you connect a digital video camera with a DV IN jack See DV Dubbing page 59 for an explanation of how to record from the DV I...

Страница 42: ... in step 5 For details about hidden chapters see page 56 To select a chapter from the Chapter List DVD RW DVD RW DVD R and DVD R only 1 Select Search from the sub menu in step 5 above and press 2 Select Chapter and press ENTER The Chapter List of the selected title appears For details about the Chapter List see page 29 3 Select the chapter you want to play and press ENTER The sub menu appears 4 Se...

Страница 43: ...tle List to Original or Playlist you edit the title after stopping playback you change the settings on the recorder you make a recording you disconnect the mains lead the power cord z Hint For DVD VIDEOs the recorder stores the stop point even if you open the disc tray or turn off the recorder To play restricted DVDs Parental Control If you play a restricted DVD the message Playback limited by Par...

Страница 44: ...track All discs fast reverse fast forward Fast reverses fast forwards the disc when repeatedly pressed during playback Search speed changes as follows Fast forward M1 t M2 t M3 t M4 t M5 Fast reverse n reverse play t m1 t m2 t m3 t m4 t m5 All discs not available for VIDEO CDs 1 2 3 4 5 6 7 8 9 0 Z OPEN CLOSE X PAUSE m M PREV NEXT REPLAY c C ADVANCE H PLAY M m ENTER ZOOM CLEAR SUBTITLE AUDIO ANGLE...

Страница 45: ...eed changes as follows Forward slow 1 t 2 t 3 t 4 Reverse slow 1 t 2 t 3 t 4 All discs not available for VIDEO CDs REPLAY ADVANCE Replays the scene briefly fast forwards the scene when pressed during playback freeze frame Plays one frame at a time when pressed in pause mode not available for DVD R DL discs AUDIO Selects one of the audio tracks recorded on the disc when pressed repeatedly Selects t...

Страница 46: ...CDs excessive noise will be heard from the LINE OUT AUDIO L R AUDIO OUT L R jacks To avoid possible damage to the audio system the user should take proper precautions when the LINE OUT AUDIO L R AUDIO OUT L R jacks of the recorder are connected to an amplification system To enjoy DTS Digital Surround playback an external DTS decoder system must be connected to the DIGITAL OUT COAXIAL jack of the r...

Страница 47: ...the disc in memory and play immediately whenever you want Up to six markings can be set To mark a scene During playback press MARKER when you find a scene you want to mark The marker number appears on the TV screen To search for the marked scene 1 Press SEARCH The marker search display appears 2 Press M m to select the desired scene and press ENTER Playback starts from the marked scene you selecte...

Страница 48: ...an also select the track number by pressing the number buttons in step 4 above Press M m to go to the next previous page of the list If you press O RETURN playback stops and the list menu disappears To turn on the list menu again press TITLE LIST Press DISPLAY to show detailed information for the selected track Note on playing DTS sound tracks on a CD When playing DTS encoded CDs excessive noise w...

Страница 49: ...When you reach the ending point point B press ENTER A B appears and the recorder starts repeating this specific portion To return to normal playback press PLAY MODE repeatedly to select Off Playback options Buttons Operations Z OPEN CLOSE Stops playing and opens the disc tray X PAUSE Pauses playback PREV NEXT Goes to the beginning of the current or next track m M fast reverse fast forward not avai...

Страница 50: ... the image Each press rotates the image clockwise or counterclockwise by 90 degrees To view the previous or next image Press PREV NEXT or To return to the list menu Press x STOP z Hints Press M m to go to the next previous page of the list Press O RETURN to turn off the list menu To turn on the list menu press TITLE LIST Press ENTER or DISPLAY to turn on off the button guide at the bottom of the s...

Страница 51: ... mode the disc s available capacity may not display correctly The recorder displays only the available capacity after the last title on the disc For DVD RWs VR mode you can edit a Playlist while retaining original titles actual recordings on the disc A Playlist is a group of Playlist titles created from the original title for editing purposes When you create a Playlist only the control information...

Страница 52: ...en selecting a title for editing always note the above differences between the Video mode original title edit and Playlist title edit Erasing and Editing Titles This section explains the basic edit functions common to Video mode titles original titles and Playlist titles Note that editing on Video mode and original titles is irreversible as they are the actual recordings on the disc If you want to...

Страница 53: ...es and press ENTER For DVD RWs Video mode and DVD Rs select Title in step 1 2 Select Title Name and press ENTER The display for entering characters appears Follow the explanations of Changing the Name of a Recorded Program Title Input page 31 z Hint You can label or re label DVDs page 32 1 Select Erase in step 3 of Erasing and Editing Titles and press ENTER The display asks for confirmation 2 Sele...

Страница 54: ...e steps above and select Unprotect 1 Select Edit in step 3 of Erasing and Editing Titles and press ENTER 2 Select Divide and press ENTER The display for setting the dividing point appears 3 Press H PLAY and search for the point you want to divide by pressing x STOP X PAUSE and m M 4 Press ENTER at the 1st dividing point The 1st point is set To reset the point select Cancel and repeat from step 3 5...

Страница 55: ...diting to a title by using the Chapter List menu that displays title contents by chapter 1 Press TITLE LIST to turn on the Title List When editing a DVD RW VR mode press TITLE LIST repeatedly to switch the Title List Original and Title List Playlist if necessary 2 Select a title and press ENTER The sub menu appears 3 Select Search and press ENTER 4 Select Chapter and press ENTER The Chapter List m...

Страница 56: ... DVD R is hidden show the chapter in the Title List before combining See Hiding a chapter page 56 You can skip playing chapters without deleting from the disc Select Hide in step 6 of Editing a Title by Chapter and press ENTER The chapter is displayed shaded in the Chapter List menu To play the title without skipping hidden chapters Select a title in the Title List and press ENTER Select Full Play...

Страница 57: ...st title The picture may pause when an edited scene is played 1 Press TITLE LIST to turn on the Title List Original Press TITLE LIST again if the Title List Playlist appears 2 Select a title and press ENTER The sub menu appears Search Displays the search options Chapter Displays the Chapter List Original When you want to add an original chapter as a Playlist title select this and press ENTER After...

Страница 58: ... the Title List Playlist Press TITLE LIST again if the Title List Original appears 2 Select a title and press ENTER The sub menu appears 3 Select Search and press ENTER 4 Select Chapter and press ENTER The Chapter List menu appears with the title contents 5 Select a chapter and press ENTER The sub menu appears 6 Select Move and press ENTER 7 Select a new location in the Chapter List and press ENTE...

Страница 59: ...era does not work with this recorder Connect the camera to the LINE IN jack and follow the instructions of Recording From a VCR or Similar Device page 41 the input signal is not in DVC SD format Do not connect a MICRO MV format digital video camera even if it has an i LINK jack the images on the tape contain copy protection signals which limit recording If you want to play the disc on other DVD eq...

Страница 60: ...ntil REAd disappears from the front panel display For details on how to insert and format a new disc see Inserting and Formatting a Disc page 26 3 Insert the source DV Digital8 format tape into your digital video camera For the recorder to record or edit your digital video camera must be turned on and set to video playback mode 4 Press INPUT on the remote repeatedly to select dV The selected input...

Страница 61: ... using another device or another recorder of the same model You cannot record date time or the contents of the cassette memory onto the disc When dubbing from a DV Digital8 format tape by way of the DV IN jack the recorder starts recording about five seconds after the tape starts playing If you dub a DV Digital8 format tape that has been edited on a PC using the DV IN jack any audio recorded on th...

Страница 62: ... Setup Display appears 3 Press M m to select the option you want to set up and press 4 Press M m to select the item you want to set up and press Available options for the item appear Example TV Type 5 Press M m to select the item you want to set up and press ENTER to conform Some items require additional settings To turn off the Setup Display Press O RETURN 1 2 3 4 5 6 7 8 9 0 M m ENTER SYSTEM MEN...

Страница 63: ...omatically instead of 4 3 Pan Scan or vice versa When connecting to the HDMI OUT jack with output resolution 720p 1080i or 1080p the setting is fixed to 16 9 Power Save Selects whether to turn off the front panel display when the power is off Year 2008 Time 12 00 AM Date 12 4 TV Type Power Save Factory Set Clock Setting Year 2008 Time 12 00 AM Date 12 4 TV Type Power Save Factory Set Clock Setting...

Страница 64: ...ches the language for the DVD menu Disc Audio DVD VIDEO only Switches the language of the sound track Disc Subtitle DVD VIDEO only Switches the language of the subtitles recorded on the disc b Note If you select a language in Disc Menu Disc Subtitle or Disc Audio that is not recorded on the DVD VIDEO one of the recorded languages will be automatically selected Original Selects the language given p...

Страница 65: ...acks If the HDMI OUT jack is connected to equipment not compatible with 96 kHz signals select 96kHz 48kHz Audio DRC Dynamic Range Control Dolby Digital DVDs only Makes the sound clear when the volume is turned down when playing a DVD that conforms to Audio DRC This affects the output from the following jacks AUDIO OUT L R jacks LINE OUT VIDEO AUDIO L R jacks Dolby Digital PCM Select this when the ...

Страница 66: ... the number buttons 3 Select the level and press ENTER The lower the level the stricter the limitation If you select Off the Parental Control function does not activate Set Password Changes or deletes the password for the Parental Control function 1 Select Set Password and press If you have not entered a password the display for entering a new password appears Enter a four digit password using the...

Страница 67: ...his recorder Depending on the disc you may be asked to change the Parental Control level while playing the disc In this case enter your password then change the level Recording Settings Video The Video setup allows you to adjust recording and set top box settings Select Video in the Setup Display To use the display see Using the Setup Displays page 62 The default settings are underlined Disc Recor...

Страница 68: ...ings The Disc setup contains disc related items such as disc protection and labeling Select Disc in the Setup Display To use the display see Using the Setup Displays page 62 The default settings are underlined Format DVD You can manually re format a DVD RW or DVD RW disc to make a blank disc See page 26 for details Finalize Finalizing makes discs playable on other DVD equipment See page 33 for det...

Страница 69: ...tings in the Lock setup remain unaffected 1 Press SYSTEM MENU to turn on the System Menu 2 Select Setup and press ENTER 3 Select General and press 4 Select Factory Set and press 5 Press ENTER while SET is selected The display asks for confirmation 6 Select OK and press ENTER Initial Setup starts see page 18 SET TV Type Power Save Factory Set Clock Setting ...

Страница 70: ...and close the disc tray Then press the RESOLUTION button on the recorder to switch the signals You are playing a disc recorded in a color system that is different from your TV The channel on the cable box satellite receiver has been changed The set top box controller is connected and Set Top Box Control is set to On Check the Set Top Box Control settings in the Video setup page 19 The picture from...

Страница 71: ...e moisture evaporates If the disc was recorded on another recorder and was not finalized page 33 the recorder cannot play the disc Cancel the rating function or change the rating level page 66 The recorder does not start playback from the beginning Resume play was activated page 43 You have inserted a disc whose Title menu or DVD menu automatically appears on the TV screen when it is first inserte...

Страница 72: ...ed page 19 Recording does not stop immediately after you press x REC STOP It will take a few seconds for the recorder to input disc data before recording can stop On screen instructions may appear after pressing x REC STOP In the case follow the on screen instructions Timer recording is not complete or did not start from the beginning There was a power failure before or during recording Reset the ...

Страница 73: ...Make sure that the USB memory is securely connected to the recorder page 24 Check that the USB memory is not damaged The recorder does not operate properly Restart the recorder Press down 1 on the recorder for more than five seconds until the recorder turns off If a disc is still in the recorder press Z OPEN CLOSE and remove the disc When static electricity etc causes the recorder to operate abnor...

Страница 74: ...D RW VR mode Format in VR mode page 26 Playable only on VR mode compatible players finalization necessary page 33 Video mode Format in Video mode page 26 Playable on most DVD players finalization necessary page 33 DVD R Automatically formatted in VR mode DVD R VIDEO Playable on most DVD players finalization necessary page 33 DVD R Video mode Automatically formatted in Video mode page 26 Playable o...

Страница 75: ... time required for recording even with high speed discs It is recommended that you use discs with For Video printed on their packaging You cannot add new recordings to DVD Rs DVD Rs or DVD RWs Video mode that contain recordings made on other DVD equipment In some cases you may not be able to add new recordings to DVD RWs that contain recordings made on other DVD equipment If you do add a new recor...

Страница 76: ... operations of DVD VIDEOs VIDEO CDs Some playback operations of DVD VIDEOs VIDEO CDs may be intentionally set by software producers Since this recorder plays DVD VIDEOs VIDEO CDs according to the disc contents the software producers designed some playback features may not be available Refer to the instructions supplied with the DVD VIDEOs VIDEO CDs Type Disc Logo Icon used in this manual Character...

Страница 77: ...uct which mates DVD recorded material on one side with digital audio material on the other side However since the audio material side does not conform to the Compact Disc CD standard playback on this product is not guaranteed b Notes Some DVD RWs DVD Rs DVD RWs DVD Rs DVD RAMs or CD RWs CD Rs cannot be played on this recorder due to the recording quality or physical condition of the disc or the ch...

Страница 78: ...5 Samoan 8377 Sanskrit 8365 Scots Gaelic 7168 Serbian 8382 Serbo Croatian 8372 Shona 8378 Sindhi 8368 Singhalese 8373 Slovak 8375 Slovenian 8376 Spanish 6983 Sundanese 8385 Swahili 8387 Swedish 8386 Tagalog 8476 Tajik 8471 Tamil 8465 Telugu 8469 Thai 8472 Tonga 8479 Turkish 8482 Turkmen 8475 Twi 8487 Ukrainian 8575 Urdu 8582 Uzbek 8590 Vietnamese 8673 Volapük 8679 Welsh 6789 Wolof 8779 Xhosa 8872 ...

Страница 79: ...ol or benzine On cleaning discs disc lens cleaners Do not use cleaning discs or disc lens cleaners including wet or spray types These may cause the recorder to malfunction Notes about the discs To keep the disc clean handle the disc by its edge Do not touch the surface Dust fingerprints or scratches on the disc may cause it to malfunction Do not expose the disc to direct sunlight or heat sources s...

Страница 80: ...th the extension jpeg or jpg z Hint Since a disc with many trees takes longer to start playback it is recommended that you create albums with no more than two trees b Notes The recorder will play any data with the extension mp3 jpeg or jpg even if they are not in MP3 or JPEG Playing these data may generate a loud noise which could damage your speaker system Depending on the disc normal playback ma...

Страница 81: ...le equipment having two or more i LINK jacks DV jacks refer to the instruction manual of the equipment to be connected i LINK and are trademarks Specifications System Laser Semiconductor laser Timer Clock Quartz locked Timer indication 12 hour cycle digital Video recording format MPEG 2 Audio recording format applicable bit rate Dolby Digital 2 ch 256 kbps in HQ and SP mode 192 kbps in LP and EP m...

Страница 82: ...82 Supplied accessories Power cord 1 Video cord 1 Audio cord 1 Remote commander remote 1 Size AA R6 batteries 2 Set top box controller 1 Specifications and design are subject to change without notice ...

Страница 83: ...56 D DATA CD 76 DATA DVD 76 DIGITAL OUT COAXIAL 14 Digital video camera 59 Disc Record Mode 67 Disc space 51 Disc types 74 76 DISPLAY 30 Display Setup Display 62 Divide 54 Dolby Digital 14 65 DTS 14 65 DV Dubbing 59 DV IN 59 DV Input 61 67 DVD VIDEO 76 DVD R 74 DVD RW 74 DVD R 74 DVD RAM 76 DVD RW 51 74 E Edit 32 53 Editing 51 Enter characters 31 Erase 53 56 F Factory Set 69 File 50 Finalize 34 68...

Страница 84: ... 74 recording mode 35 67 recording time 35 while watching another program 39 Region code 77 Remote 6 16 Repeat Play 46 49 Resetting the recorder 69 Resume Play 43 S Search 29 Searching fast forward 44 49 fast reverse 44 49 locating the beginning of the title chapter track 44 Set Password 66 Set top box controller 11 20 Set Top Box Control 19 68 Setup Display 62 Show 55 56 Slide show 50 Stereo 1 67...

Отзывы: