background image

131

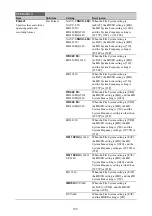
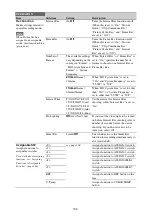
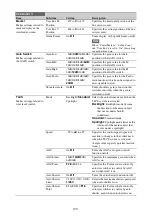
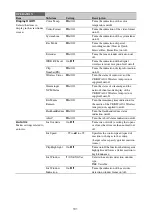
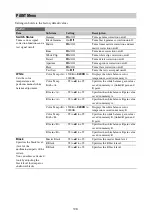
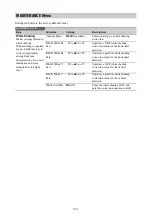
Display On/Off

Selects the items to 
display in the viewfinder 
screen.

Color Temp

On

/Off

Turns the indication of the color 
temperature on/off.

Video Format

On

/Off

Turns the indication of the video format 
on/off.

System Line

On

/Off

Turns the indication of the system lines 
on/off.

Rec Mode

On

/Off

Turns the indication of special 
recording modes (Slow & Quick, 
Interval Rec, Frame Rec) on/off.

Extender

On

/Off

Turns the lens extender indication on/
off.

WRR RF Level

On/

Off

Turns the indication of the digital 
wireless receiver reception level on/off.

Clip 
Number(PB)

On

/Off

Turns the indication of clip information 
on/off.

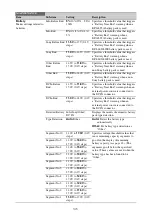
Wireless Status

On

/Off

Turn the status of radio wave of the 
CBK-WA101 Wireless Adapter (not 
supplied) on/off.

Streaming&
NCM Status

On

/Off

Turn the status of streaming and the 
network client mode display of the 
CBK-WA101 Wireless Adapter (not 
supplied) on/off.

Ext Media 
Remain

On

/Off

Turn the remaining time indication for 
the media of the CBK-WA101 Wireless 
Adapter (not supplied) on/off.

FlashbandReduce

On

/Off

Turn the flashband reduce status 
indication on/off.

ALAC

On

/Off

Turn the ALAC status indication on/off.

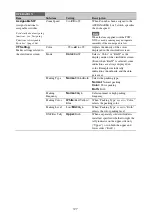
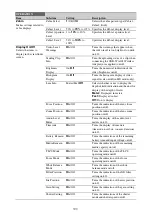
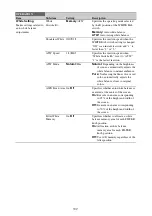
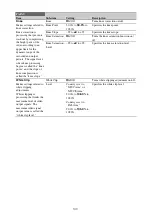
Auto Iris

Makes settings related to 
auto iris.

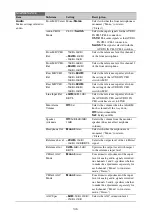
Iris Override

On/

Off

Turns iris override (a setting that opens 
or closes the iris more than normal) on/
off.

Iris Speed

–99 to 

±0

 to +99 

Specifies the control speed (speed of 
reaction to changes in the video). 
(Larger values specify quicker reaction 
times.)

Clip High light

On/

Off

Turns on/off the function that disregards 
highlights and forces a flatter reaction to 
high luminance.

Iris Window

1

/2/3/4/5/6/Var

Selects the auto iris detection window 
type.

Var:

 Variable

Iris Window 
Indication

On/

Off

Turns the indication of the auto iris 
detection window frame on/off.

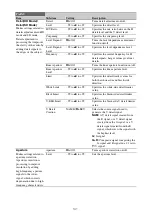
OPERATION

Item

Sub-item

Setting

Description

Содержание PXW-X320

Страница 1: ...4 573 712 12 1 2015 Sony Corporation Solid State Memory Camcorder Operating Instructions Before operating the unit please read this manual thoroughly and retain it for future reference PXW X320 ...

Страница 2: ...ewfinder Position 31 Adjusting the Viewfinder Angle 32 Lifting Up the Viewfinder Barrel and Eyepiece 32 Adjusting the Viewfinder Focus and Screen 33 Using the BKW 401 Viewfinder Rotation Bracket 34 Attaching a 5 inch Electronic Viewfinder 35 Setting the Area of Use 36 Setting the Date Time of the Internal Clock 36 Mounting and Adjusting the Supplied Lens 37 Adjusting the Flange Focal Length 37 Pre...

Страница 3: ...peed 53 Setting Auto Iris 55 Zooming 56 Switching between Zoom Modes 56 Using Manual Zoom 56 Using Servo Zoom 56 Adjusting the Focus 57 Adjusting in Full MF Mode 57 Adjusting in MF Mode 57 Adjusting in AF Mode 57 Using Macro Mode 57 Adjusting the Audio Level 58 Manually Adjusting the Audio Levels of the Audio Inputs from the AUDIO IN CH 1 CH 2 Connectors 58 Manually Adjusting the Audio Level of th...

Страница 4: ...B750 71 Functions That Can Be Controlled from the RM B170 B750 72 Functions That Can Be Controlled from the RCP 1001 1501 79 Connecting the Camcorder to Devices using the IFU WLM3 USB Wireless LAN Module 81 Connecting the IFU WLM3 81 Connecting by Wireless LAN using the IFU WLM3 81 Using the Web Menu 83 Transferring Planning Metadata 83 Operating the Camcorder Remotely 84 Connecting the Camcorder ...

Страница 5: ... Defining Shot Mark Names in Planning Metadata 99 Chapter 5 Clip Operations Clip Playback 101 Thumbnail Screen 101 Playing Clips 102 Using Thumbnails to Search Inside Clips 103 Thumbnail Operations 104 THUMBNAIL Menu Configuration 104 Basic THUMBNAIL Menu Operations 106 Changing the Thumbnail Screen Type 106 Displaying Clip Properties 107 Adding Deleting a Flag UDF exFAT Modes 108 Adding Deleting ...

Страница 6: ...ed to the ASSIGN 1 and 3 Switches the ASSIGNABLE 4 and 5 Switches and the COLOR TEMP Button 165 Functions That Can Be Assigned to the RET Button on the Lens 167 Adjusting PMW 320 Image Quality 169 Chapter 7 Saving and Loading User Setting Data Saving and Loading Settings 170 Saving Settings Data 170 Loading Settings Data 171 Resetting a File after Changing Its Contents 172 Saving and Loading Scene...

Страница 7: ... USB Media Thumbnail Screen 184 Configuring a Shooting and Recording System 185 Tally and Call indication 185 Chapter 9 Maintenance Testing the Camcorder 186 Maintenance 186 Cleaning the Viewfinder 186 Note about the Battery Terminal 186 Error Warning System 187 Error Indication 187 Warning Indication 188 Appendix Important Notes on Operation 195 Exchanging the Battery of the Internal Clock 197 Ou...

Страница 8: ...ts 208 Lens 209 Supplied Accessories 209 Related Equipment 209 Peripheral Devices and Accessories 212 About License 213 MPEG 4 AVC Patent Portfolio License 213 About Bitmap Fonts 213 About OpenSSL 214 About JQuery Sizzle js 216 Index 218 ...

Страница 9: ...Unless this setting is made the camcorder will not operate For details of these settings see Setting the Area of Use page 36 Note Before attaching removing optional components or accessories to from the PXW X320 referred to as the camcorder be sure to turn the power of the camcorder off Foreword Before Using This Unit ...

Страница 10: ...1 862 UHF Synthesized Diversity Tuner maximum 0 5 A Note Do not connect any equipment other than the UHF synthesized diversity tuner e Battery attachment shoe Attach a BP L80S Battery Pack Alternatively you can attach an AC DN2B DN10 AC Adaptor to operate the camcorder on AC power supply For details see Preparing a Power Supply page 30 Note For your safety and to ensure proper operation of the cam...

Страница 11: ...4 l LIGHT video light connector 2 pin female A video light with a maximum power consumption of 50 W such as the Anton Bauer Ultralight 2 or equivalent can be connected see page 43 m Lens cable clamp n MIC IN microphone input 48 V connector XLR type 5 pin female The power 48 V is supplied via this connector o LENS connector 12 pin Note When connecting or disconnecting the lens cable to this connect...

Страница 12: ...ion For details see Adjusting the White Balance page 50 d MENU knob Changes the item selection or a setting within the menu see page 115 e AUTO W B BAL automatic white black balance adjustment switch WHITE Adjust the white balance automatically If the WHITE BAL switch see page 14 is set to A or B the white balance setting is stored in the corresponding memory If the WHITE BAL switch is set to PRST...

Страница 13: ...arphones When the knob is turned to the minimum position no sound can be heard e MONITOR audio monitor selection switches By means of combinations of the two switches you can select audio that you want to hear through the built in speaker or earphones Position of lower switch CH 1 2 Position of lower switch CH 3 4 a By connecting stereo headphones to the EARPHONE jack you can hear the audio in ste...

Страница 14: ...is adjusted automatically for varying lighting conditions j MENU ON OFF switch This switch is used to display the menu on the viewfinder screen or the test signal screen Each time the switch is pushed down the menu screen is turned on and off The function of this switch is the same as that of the MENU button in the thumbnail screen operations section k STATUS ON SEL OFF menu display on page select...

Страница 15: ... 4 t 15 t 24 with each press of the button The indicator lights during high speed playback in the reverse direction h PLAY PAUSE button and indicator Press this button during playback to pause outputting a still image At this time the indicator flashes at a rate of once per second Pressing the F REV or F FWD button during playback or pause starts high speed playback in the forward or reverse direc...

Страница 16: ...e etc For details see Setting Time Data page 59 This button returns to the previous screen when pressed during thumbnail screen display expand thumbnail screen display or shot mark thumbnail screen display p DISPLAY switch This cycles the data displayed in the time counter display in the monochrome LCD panel through the sequence COUNTER TC and U BIT see page 20 COUNTER Display the elapsed recordin...

Страница 17: ...l Thumbnail display of all frames marked with essence marks Shot Mark1 Thumbnail display of the frames marked with Shot Mark 1 Shot Mark2 Thumbnail display of the frames marked with Shot Mark 2 You can also select Shot Mark 0 and Shot Mark 3 to Shot Mark 9 If you have recorded clips by using planning metadata that defined names for Shot Mark 0 to Shot Mark 9 the defined names are displayed instead...

Страница 18: ...s LAN Module or USB flash drive When connecting the CBK WA101 or IFU WLM3 You can connect the camcorder and device via wireless LAN connection When connecting a USB flash drive You can record store or load the following data Planning metadata see page 97 Setting data file see page 170 Note Use this connector only for connecting the CBK WA101 IFU WLM3 USB flash drive or USB media Do not connect and...

Страница 19: ...on the setting of OPERATION Input Output Output i LINK in the setup menu n TC OUT timecode output connector BNC type To lock the timecode of an external VTR to the timecode of this camcorder connect this connector to the external VTR s timecode input connector Rear a TALLY back tally indicators red Light up during recording They will not light if the TALLY switch is set to OFF These indicators als...

Страница 20: ... is provided for protecting the cables connected to the connectors on the rear panel By loosening the screws which retain the cover to the bottom of the camcorder you can adjust the position of the cover depending on the size and shape of the microphone or audio cable plugs After adjusting the position tighten the screws to secure the cover h AUDIO OUT connector XLR type 5 pin male Outputs the aud...

Страница 21: ...nts indicating the remaining capacity of recording media in the slots h Remaining battery capacity indicator Shows bar segments indicating the remaining battery capacity a PUSH AF auto focus button When the focus adjustment is in the manual mode by pressing this button you can use the auto focus for an instantaneous adjustment to the subject When the button is pressed the auto focus operates until...

Страница 22: ...in Connecting an optional zoom servo controller allows remote control of zooming j PUSH AUTO button When the IRIS switch is in the M position for manual adjustment press this button for an instantaneous auto adjustment The iris is automatically adjusted while the button is held down k IRIS switch A auto The iris is adjusted automatically M manual Adjust the iris with the iris ring l Power zoom lev...

Страница 23: ...required by the situation g Tally indicator Lights up when recording is started by a press of the REC START button on this camcorder the VTR button on the lens or the VTR button on the remote control unit When an abnormality occurs the tally indicator flashes to indicate a warning h PEAKING control Turning this knob clockwise adjusts the picture sharpness and makes focusing easier This control has...

Страница 24: ...switch is set to ON the items for which an ON setting was made with OPERATION Super Impose in the setup menu or with related switches are displayed at the top and bottom of the screen Not only these indications are displayed on the viewfinder screen but a menu setting enables them to be output as video signals Screen display item name suffixes The symbols M A and D beside screen item names have th...

Страница 25: ...ode operation status indicator g Wireless receiver reception level When a wireless receiver is installed in the camcorder W appears together with the following four segment reception level indicators for each of the channels 1 to 4 that can be used by the receiver In normal situation The number of white segments indicates the strength of the signal level Muting for an analog receiver or error rate...

Страница 26: ...ect ratio 16 9 or 4 3 can also be displayed when the recording format is set to DVCAM o Depth of field indicator when the serial lens is mounted M A Error warning indicator A bar indicates the depth of field The display unit is meters or feet as selected on OPERATION Display On Off Lens Info in the setup menu An error or warning message is displayed here depending on the situation Under this area ...

Страница 27: ...nnected i LINK device e Video level indicator M Suitable ND filter indicator Clip uploading status indicator M An indication is displayed together with an appropriate ND filter position number when the light level of the subject is too high or too low Indicates the status for clip uploading when an optional CBK WA101 Wireless Adapter is connected f Timecode M Caution message M Indicates the elapse...

Страница 28: ...For details see Setting the Electronic Shutter page 53 r Audio level meters M Indicate the audio levels of channel 1 and channel 2 s Remaining media capacity M Indicates the recording time remaining for each of the media loaded in the slots The available time for recording with the current video format recording bit rate is calculated according to the remaining space of each media and indicated in...

Страница 29: ...U knob to select the setting 6 Press the MENU knob again to apply the setting Note Operation may vary depending on the target item selection 1 ss ss All segments are lit white Target item See White balance COLOR TEMP setting page 51 TLCS mode setting page 27 Shutter speed or number of accumulated frames setting for the electronic shutter page 54 Slow Quick Motion frame rate setting page 94 Item Co...

Страница 30: ...detach the battery pack pull the battery pack up by holding the release button in Note The battery pack operating time depends on the frequency of use of the battery pack and the ambient temperature when used Before use charge the battery pack with a charger suitable for each battery For details on the battery charging procedure refer to the battery charger operation manual Note on using the batte...

Страница 31: ... viewfinder left to right positioning ring 2 attach the viewfinder to the viewfinder fitting shoe and 3 tighten the viewfinder left to right positioning ring 2 Couple the viewfinder connector to the VF connector 26 pin Detaching the viewfinder You can detach the viewfinder by following the attaching procedure in reverse order But there is an additional action to take when detaching the viewfinder ...

Страница 32: ...wfinder or its mirrored image by lifting up the viewfinder barrel or the eyepiece This section describes how to lift up the viewfinder barrel and detach it The eyepiece can also be lifted up and detached in the same way To raise up the viewfinder barrel Push the clip on the bottom to release and flip up the viewfinder barrel It locks at the 120 degree position Normally use it in the locked positio...

Страница 33: ...played in the viewfinder horizontally To adjust the viewfinder focus Turn the diopter adjustment ring until the viewfinder image is sharpest You can also attach a commercially available protection filter close up lens etc that is 52 mm in diameter To adjust the viewfinder screen Adjust the brightness contrast and peaking of the viewfinder screen with the controls shown below Outlines Adjust using ...

Страница 34: ... positioning knobs and then pull the viewfinder slide assembly forward 2 Using a 2 5 mm diameter hexagonal wrench detach the viewfinder slide assembly 3 Attach the BKW 401 with the supplied bolts 4 Adjust the front to back position so that the arm of the BKW 401 does not touch the handle when it is raised Using the BKW 401 Viewfinder Rotation Bracket Bolts with hexagonal hole Viewfinder slide asse...

Страница 35: ...act a Sony sales or service representative Note It is not possible to use the supplied viewfinder and a 5 inch viewfinder at the same time Remove the cover of the grip and attach the shoe and stopper screw of the Accessory Shoe Kit Attaching a 5 inch Electronic Viewfinder VF cable Guide plate Fixing ring Shoe a Stopper screw a a Supplied with the Accessory Shoe Kit ...

Страница 36: ...ons page 115 5 Turn the MENU knob to select Finish then press the MENU knob The camcorder is now ready for use You can set or change the date and time of the internal clock The date and time set are reflected in the timecode For menu operations see Basic Setup Menu Operations page 115 1 Select MAINTENANCE Clock Set Date Time in the setup menu 2 Press the MENU knob The Date Time setting window appe...

Страница 37: ... in the following diagram If you have attached an aberration correction lens The aberration correction function is activated automatically Starting the camcorder with an aberration correction lens may require more time than normally because of data loading at start up The lens supplied with the camcorder is an aberration correction lens Contact a Sony service representative for information about o...

Страница 38: ...ength adjustment starts During adjustment The message AUTO FB Adjust EXECUTING appears on the viewfinder screen If the adjustment completes correctly The message on the viewfinder screen changes to Auto FB Adjust OK If the flange focal length adjustment does not complete correctly Check the subject and lighting conditions and repeat the adjustment When using a non auto focus lens 1 Set the iris to...

Страница 39: ...2 Close the microphone holder 3 Tighten the screw On how to perform this operation refer to the operation manual for the microphone 3 Plug the microphone cable into the MIC IN connector then set the AUDIO IN switch for the channel on which you want to record the audio from this microphone to FRONT 4 Secure the microphone cable with the cable clamp Preparing the Audio Input System Connecting a Micr...

Страница 40: ...rnal power supply 48V Set the AUDIO IN CH1 CH2 switch for the channel to which the microphone is connected to REAR 4 Switch the input level to match the sensitivity of the microphone used Switch the input level by changing the setting of MAINTENANCE Audio Rear MIC CH1 CH2 Ref in the setup menu factory default setting is 60 dB For details see page 146 Notes If the input level on the camcorder is no...

Страница 41: ... 1999 908 B is required to fit the WRR 862 For details contact a Sony sales or service representative To fit the DWR S02D or WRR 855S 1 Remove the four fixing screws holding the cover of the portable tuner receiver housing slot located in the rear of the camcorder to remove the cover 2 Insert the DWR S02D or WRR 855S into the housing slot and fasten the four fixing screws 3 Set the AUDIO IN select...

Страница 42: ...the lever in the direction of the arrow Note The tripod adaptor pin may remain in the engaged position even after the camcorder is removed If this happens press the red button and move the lever as shown above until the pin returns to the stowed position If the pin remains in the engaged position you will not be able to mount the camcorder on the tripod adaptor Tripod Mounting Slide the camcorder ...

Страница 43: ...n of over 50 W The brightness or color temperature of the light will change when the voltage supplied through the DC IN connector or from the battery pack is under 12 V To attach the video light Fit the video light to the accessory fitting shoe on the camcorder grip and connect the video light cable to the LIGHT connector Note The accessory fitting shoe on the camcorder is of the 1 4 inch tapped h...

Страница 44: ...ng with the camcorder on your shoulder 1 Raise the lever in the center of the shoulder pad to unlock the shoulder pad 2 Slide the shoulder pad backward or forward until it is in the most convenient position 3 Bring down the lever to lock the shoulder pad in the selected position Adjusting the Shoulder Pad Position Shoulder pad ...

Страница 45: ...0i HD422 50 1920 50i 29 97P HD422 50 1920 29 97P 25P HD422 50 1920 25P 23 98P HD422 50 1920 23 98P HD420 HQ1920 59 94i HD420 HQ 1920 59 94i 1920 1080 50i HD420 HQ 1920 50i 29 97P HD420 HQ 1920 29 97P 25P HD420 HQ 1920 25P 23 98P HD420 HQ 1920 23 98P HD420 HQ1440 59 94i HD420 HQ 1440 59 94i 1440 1080 50i HD420 HQ 1440 50i 29 97P HD420 HQ 1440 29 97P 25P HD420 HQ 1440 25P 23 98P HD420 HQ 1440 23 98P...

Страница 46: ...at System Frequency a HD 1080 XAVC I 59 94i XAVC I 1920 59 94i 1920 1080 50i XAVC I 1920 50i 29 97P XAVC I 1920 29 97P 25P XAVC I 1920 25P 23 98P XAVC I 1920 23 98P XAVC L50 59 94i XAVC L50 1920 59 94i 1920 1080 50i XAVC L50 1920 50i 29 97P XAVC L50 1920 29 97P 25P XAVC L50 1920 25P 23 98P XAVC L50 1920 23 98P XVAC L35 59 94i XAVC L35 1920 59 94i 1920 1080 50i XAVC L35 1920 50i 29 97P XAVC L35 192...

Страница 47: ...440 23 98P 720 XAVC I 59 94P XAVC I 1280 59 94P 1280 720 50P XAVC I 1280 50P XAVC L50 59 94P XAVC L50 1280 59 94P 1280 720 50P XAVC L50 1280 50P HD422 50 59 94P HD422 50 1280 59 94P 1280 720 50P HD422 50 1280 50P 29 97P HD422 50 1280 29 97P 25P HD422 50 1280 25P 23 98P HD422 50 1280 23 98P HD420 HQ1280 59 94P HD420 HQ 1280 59 94P 1280 720 50P HD420 HQ 1280 50P 23 98P HD420 HQ 1280 23 98P b SD IMX5...

Страница 48: ...nob 3 Turn the MENU knob to change the setting and press the knob A confirmation message appears 4 Select Execute to execute or select Cancel to cancel and then press the MENU knob Setting items of OPERATION Format Video format recording format system frequency Frame size HD SD HD System Line Rec Format System Frequency a HD 1080 HQ 1920 59 94i HQ 1920 59 94i 1920 1080 50i HQ 1920 50i 29 97P HQ 19...

Страница 49: ...hanged greatly When the GAIN selector L M H Turbo values have been changed with OPERATION Gain Switch in the setup menu White balance adjustment Always readjust the white balance when the lighting conditions change In automatic black balance mode adjustments are performed in the following order black set and black balance Manual black balance adjustment can be selected from the setup menu Note Aut...

Страница 50: ...tor to suit the lighting conditions as follows 3 Place a white test card under the same lighting conditions as for the subject to be shot and zoom up to it Alternatively any white object such as a cloth or a wall can be used The absolute minimum white area is as follows Note Make sure there are not bright spots in the rectangle 4 Adjust the lens iris Manually adjusted lens set the iris to an appro...

Страница 51: ...ck the position of the WHITE BAL switch A or B Note If the WHITE BAL switch is set to position B OPERATION White Setting White Switch B must be set to Memory in the setup menu 3 When the camcorder s status or settings are displayed on the viewfinder screen turn the MENU knob 4 Turn the MENU knob to select the color temperature setting page 26 in the viewfinder screen 5 Press the MENU knob The sett...

Страница 52: ...TRICAL CC to an assignable switch see page 164 White balance memory Values stored in memory are held until the white balance is next adjusted even when the camcorder power is turned off The camcorder has two white balance memories A and B You can automatically save adjustment values for each ND filter in the memory that corresponds to the WHITE BAL switch setting A or B The camcorder has four buil...

Страница 53: ... off or change the number of accumulated frames when the number of accumulated frames is set to 16 32 or 64 Notes When the automatic iris is used the iris opens wider as the shutter speed increases thus reducing the depth of field The selectable shutter speeds vary depending on the current system frequency To switch between Speed mode and Angle mode 1 Select OPERATION Shutter Shutter Select in the...

Страница 54: ... frames To set the shutter speed in SLS mode 1 Set OPERATION Shutter Slow Shutter in the setup menu to On see page 133 2 Select the desired number of accumulated frames with OPERATION Shutter SLS Frames in the setup menu To set the shutter speed using the Direct menu You can set the shutter speed using the Direct menu when the Direct menu is enabled For details about basic operation and settings o...

Страница 55: ...her open 0 25 to 1 increments of 0 25 About 0 25 to 1 stop further close Also you can set the area where light detection occurs To change the reference value 1 Set OPERATION Auto Iris Iris Override in the setup menu to On see page 131 2 Set the MENU ON OFF switch to OFF 3 Turn the MENU knob to change the reference value Note Be sure to confirm that the current shutter mode is not ECS An indicator ...

Страница 56: ...close too much leaving the overall image dark or the highlights may be blown out In such cases setting the highlight clip function on reduces the luminance range avoiding problems from the automatic iris correction Set OPERATION Auto Iris Clip High Light in the setup menu to On Set the ZOOM switch to SERVO servo zoom or MANU manual zoom Turn the zoom ring Operate the power zoom lever The current l...

Страница 57: ...the focus mode becomes MF mode in which focus adjustments are manual but auto focus is available only when necessary Using the focus ring Focus by turning the focus ring while viewing the viewfinder The distance indications on the ring are invalid in MF mode One push auto focus Press the PUSH AF button Auto focus is enabled temporarily One push auto focus ends when the subject is brought into focu...

Страница 58: ...recording level see page 147 Rear2 WRR Level Channel 2 recording level see page 148 Note When you have operation of the LEVEL CH1 CH2 knobs and MIC LEVEL control linked together if the MIC LEVEL control is set to 0 the audio signals on channels 1 and 2 cannot be recorded Check the position of the MIC LEVEL control before adjusting the LEVEL CH1 CH2 knobs 1 Set either or both of the AUDIO IN switch...

Страница 59: ...Set the DISPLAY switch to TC 2 Set the PRESET REGEN CLOCK switch to PRESET 3 Set the F RUN SET R RUN switch to SET The first leftmost digit of timecode flashes 4 Use the up and down arrow buttons to change values and use the left and right arrow buttons to move the flashing digit Repeat until all digits are set To reset the timecode value to 00 00 00 00 Press the RESET RETURN button 5 Set the F RU...

Страница 60: ...he F RUN SET R RUN switch to SET The first leftmost digit flashes 3 Use the up and down arrow buttons to change values and use the left and right arrow buttons to move the flashing digit Repeat until all digits are set To reset the user bit data to 00 00 00 00 Press the RESET RETURN button 4 Set the F RUN SET R RUN switch to F RUN or R RUN corresponding to the desired operating mode for the timeco...

Страница 61: ... until the sync generator stabilizes before recording If the frequency of the reference video signal is not the same as the system frequency of the camcorder the camcorder cannot be correctly genlocked In such a case the internal timecode is not correctly synchronized with the external timecode User bit settings during timecode synchronization When the timecode is synchronized only the time data i...

Страница 62: ...erter setting HD mode only ASSIGN SWITCH REMOTE status screen This screen displays the names of functions assigned to assignable switches and the Wi Fi remote control status BATTERY MEDIA status screen Battery The remaining battery capacity Charge Count The number of times the battery has been charged Media A Media B Remaining capacity of media Remaining recording time Approximate writable lifetim...

Страница 63: ...Note Data integrity cannot be guaranteed if you power the camcorder off or remove a memory card while the card is being accessed Doing so may corrupt all data recorded on the card Always make sure that the ACCESS lamp is lit green or not lit before you power the camcorder off or remove a memory card When SxS memory cards are loaded in both slot A and slot B you can press the SLOT SELECT button to ...

Страница 64: ...mat SxS memory cards for use on this camcorder The formats of cards formatted on other devices are not recognized as valid formats making it necessary to format them again on this camcorder You can check the remaining capacity of the SxS memory cards loaded in the two slots by checking the recording media remaining capacity display in the viewfinder The camcorder calculates the remaining recording...

Страница 65: ...In some cases some clips can be restored while others cannot The restored clips can be played normally If the message Could not Restore Some Clips keeps appearing after repeated attempts at restoration it may be possible to restore the SxS memory card with the following procedure 1 Use the camcorder s copy function see page 108 or the supplied application software see page 180 to copy the required...

Страница 66: ...ed File System is displayed on the viewfinder screen Format the XQD memory card as instructed below To format initialize a memory card Specify the slot on OPERATION Format Media in the setup menu then select Execute On a confirmation message select Execute again An in progress message and status bar are displayed and the access lamp lights in orange When formatting is completed a completion messag...

Страница 67: ...ion message is displayed when you mount the SD card For an SD card that was formatted with another system unsupported by this camcorder the message Unsupported File System is displayed on the viewfinder screen Format the SD card as instructed below To format initialize a memory card Select Media A slot A or Media B slot B on OPERATION Format Media in the setup menu and select Execute During execut...

Страница 68: ...ears on the viewfinder screen 3 Turn the MENU knob to select Execute and press the knob During execution a progress indication appears When formatting is completed the message Format USB Memory Done is displayed The MSSONY PRO XDCAM MEMDISC folder and the General Sony Planning folder are automatically created in the drive If the format operation fails A format operation may fail because the USB fl...

Страница 69: ...ch OUTPUT DCC switch Buttons and switches to which the Turbo Gain function has been assigned including the ASSIGN 1 3 switches the ASSIGNABLE 4 switch the COLOR TEMP button and the ASSIGNABLE 5 switch REC START button the VTR button on the lens and buttons and switches to which the function has been assigned using OPERATION Assignable SW in the setup menu including the ASSIGN 1 3 switches the ASSI...

Страница 70: ...hus the camcorder will return to the settings that were in effect before the remote control unit was connected 1 Absolute value rotational controls The data corresponding to the angular position of controls is output Rotational controls for which the data corresponding to the amount of their rotation is output are called relative value controls 2 Absolute value switches Like toggle switches or sli...

Страница 71: ...itch to MENU The camcorder menus can be displayed on a video monitor connected to the MONITOR connector of the RM B170 2 Select and set the menu items using the MENU SELECT knob and the CANCEL ENTER switch 3 When the settings are completed set the DISPLAY switch to ON or OFF to exit the menu For details on operations of the RM B170 refer to the Operation Manual of the RM B170 1 Press and light the...

Страница 72: ...12 18 24dB Sets the master gain Yes Yes Bars Bars On Off Turns color bar output on or off Yes Yes Shutter Step Shutter Setting On Off Turns the step shutter function on or off Yes Yes Step Shutter Speed Sets the step shutter speed Yes Yes ECS Setting On Off Turns ECS on or off Yes Yes ECS Frequency Selects the ECS frequency Yes Yes SLS Setting On Off Turns SLS on or off Yes Yes No a SLS Speed Sets...

Страница 73: ...rder menu Yes Yes Cancel Preset Cancel Preset Yes Yes Select Set Select Up Down Set Yes Yes Panel Active Panel Active On Off Enables On or disables Off panel operations Yes Yes Standard Standard On Off Selects standard mode Yes Yes ND Filter ND Filter Display only Turns the display of ND filter settings on or off The settings cannot be changed only displayed No No CC Filter CC Filter A B C D Selec...

Страница 74: ...r black level Yes Yes R Black 99 to 0 to 99 Specifies the R black level Yes Yes B Black 99 to 0 to 99 Specifies the B black level Yes Yes Flare Flare On Off Turns flare correction on off Yes Yes b R Flare 99 to 0 to 99 Sets the R flare correction level Yes Yes G Flare 99 to 0 to 99 Sets the G flare correction level Yes b Yes b B Flare 99 to 0 to 99 Sets the B flare correction level Yes Yes Gamma G...

Страница 75: ...etail SD mode Detail On Off Turns detail adjustment on or off Yes Yes b Level 99 to 0 to 99 Specifies the detail level Yes Yes H V Ratio 99 to 0 to 99 Specifies the mix ratio between the H detail level and the V detail level Yes b Yes b Crispening 99 to 0 to 99 Specifies the crispening level Yes b Yes b Level Depend On Off Turns the level dependence adjustment function on off Yes b Yes b Level Dep...

Страница 76: ...trix correction function on or off Yes b Yes b Preset Matrix On Off Turns the preset matrix function on or off Yes b Yes b Preset Select 1 2 3 4 5 6 Selects a preset matrix 1 SMPTE 240M equivalent 2 ITU 709 equivalent 3 SMPTE WIDE equivalent 4 NTSC equivalent 5 EBU equivalent 6 ITU 601 equivalent Yes b Yes b User Matrix On Off Turns the user matrix function on or off Yes b Yes b User Matrix R G 99...

Страница 77: ...he V modulation level of R signal Yes b Yes b G V Modulation 99 to 0 to 99 Specifies the V modulation level of G signal Yes b Yes b B V Modulation 99 to 0 to 99 Specifies the V modulation level of B signal Yes b Yes b Low Key Sat Low Key Sat On Off Turns low key saturation correction on or off Yes b Yes b Level 99 to 0 to 99 Specifies the saturation of colors in low luminance areas Yes b Yes b Noi...

Страница 78: ...cel Loads a scene file execute using Execute Yes b Yes b Scene Store Execute Cancel Saves a scene file execute using Execute Yes b Yes b Reference Reference Store Execute Cancel Stores the current settings of reference file items in the reference file that is maintained in internal memory execute using Execute Yes b Yes b Shot Mark Shot Mark1 Set a Shot Mark1 Yes No Shot Mark2 Set a Shot Mark2 Yes...

Страница 79: ... Start Stop Starts execution of auto white balance adjustment Stops execution if in progress Yes ATW On Off Turns ATW on or off Yes 5600K On Off Turns color temperature conversion on or off Yes Black ABB Start Stop Starts execution of auto black balance adjustment Stops execution if in progress Yes Iris Iris Mode Auto Manual Selects the iris mode Yes Iris Level 99 to 0 to 99 Adjusts the level of t...

Страница 80: ... on or off Yes White R Gain A 99 to 0 to 99 Specifies the white balance R gain value saved in memory A Yes B Gain A 99 to 0 to 99 Specifies the white balance B gain value saved in memory A Yes R Gain B 99 to 0 to 99 Specifies the white balance R gain value saved in memory B Yes B Gain B 99 to 0 to 99 Specifies the white balance B gain value saved in memory B Yes Black Master Black 99 to 0 to 99 Sp...

Страница 81: ...d hoc mode you can make a peer to peer Wi Fi connection between a device and a camcorder In infrastructure mode you can make Wi Fi connections between a device and multiple camcorders via a wireless LAN access point building a LAN To configure network settings Change settings under MAINTENANCE Network Setting in the setup menu as required a The IP address determined by DHCP server is displayed her...

Страница 82: ...he Wireless Mode column the IEEE802 11 standard of the established connection appears 802 11b 802 11g or 802 11n It is also possible to access the camcorder from a device by first starting a wireless LAN connection on the camcorder To terminate the connection Terminate the connection on the device To revert to the default settings reset If you have trouble making a connection or you want to start ...

Страница 83: ...the camcorder remotely see page 84 Note The configuration of items displayed in the Web menu varies depending on the browser you are using To display the Web menu 1 Launch a web browser on the device and navigate to http camcorder s IP address setting of MAINTENANCE Network Setting IP Address in the setup menu Example when the IP address is 192 168 1 10 Type http 192 168 1 10 in the address bar If...

Страница 84: ...the focus zoom setting value displayed on the Wi Fi remote control continues to be 0 Even when a lens controllable from the Wi Fi remote control is mounted on the camcorder zoom control from the remote control is not possible if the servo function for the zoom operation is disabled on the lens When a remote control unit is connected to the camcorder s REMOTE connector and the white balance memory ...

Страница 85: ...h the ad hoc mode For details refer to the operating instructions supplied with the smartphone tablet You can connect a device such as a computer smartphone or tablet collectively referred to as device to the camcorder over a wireless LAN connection by attaching an optional CBK WA101 Wireless Adapter The following operations are supported between the camcorder and devices connected by wireless LAN...

Страница 86: ...contact a Sony service representative Also refer to the Operating Instructions of the optional CBK WA101 Wireless Adapter Partial transfer of a proxy file You can transfer a cutout part of a file by specifying In and Out points in the proxy file You can also transfer the cutout parts of multiple files using the Storyboard Notes The created clip has margins of up to 15 frames added to both ends of ...

Страница 87: ...s the camcorder switches automatically to the second card when the first card becomes full 3 Set the camcorder s POWER switch see page 10 to ON 4 Make the following settings Marker display On see page 128 Iris Auto see page 55 Zoom Auto see page 56 Camera output Select the picture currently being shot camera picture and turn the DCC function on see page 14 Timecode advance mode F RUN Free Run or R...

Страница 88: ...ndby mode When the Rec Review function is assigned to the RET button on the lens you can also conduct a review by using the RET button 11 Repeat steps 9 and 10 to continue recording With each repetition another clip is created on the memory card Notes You cannot resume recording for about one second after stopping recording The maximum number of clips that can be recorded on one memory card is 600...

Страница 89: ...OT SELECT button see page 19 to select the active slot It is not possible to switch between memory cards during playback To stop playback Press the STOP button Playback stops and the camcorder enters E E mode Press the THUMBNAIL button Playback stops and a thumbnail screen see page 101 appears in the viewfinder Playback also stops and the timecode screen appears in the viewfinder when you start re...

Страница 90: ...electing picture cache mode and setting the picture cache time Before recording in picture cache mode you need to perform the Picture Cache Rec and P Cache Rec Time settings in the OPERATION menu see page 125 You can also select picture cache mode by using an assignable switch to which the Picture Cache function has been assigned see page 164 The picture cache time determines how far in advance yo...

Страница 91: ... i LINK HDV output and play a clip that was recorded in picture cache mode two or more frames with the same picture and timecode may follow on each other i LINK output is possible during picture cache recording However the picture cache time is limited If power is lost during recording If you set the camcorder s POWER switch to OFF the camcorder is powered off automatically after a few seconds dur...

Страница 92: ... alternatively at the position of the REC indication The TALLY indicators and the tally indicator on the front panel of the viewfinder light as they do during normal recording If you are using the pre lighting function the video light comes on before recording starts Limitations during recording The i LINK HDV DV connector cannot be used Regardless of the setting of the F RUN SET R RUN switch the ...

Страница 93: ... of the F RUN SET R RUN switch the advance mode of the internal timecode generator is always R RUN Audio cannot be recorded Recording review is not possible If you press the SLOT SELECT button the camcorder completes recording of the specified number of frames creates a clip and switches to the other media Genlock is not possible If power is lost during recording If you set the camcorder s POWER s...

Страница 94: ...n The TALLY indicators and the tally indicator on the front panel of the viewfinder light as they do during normal recording Limitations during recording The i LINK HDV DV connector cannot be used Regardless of the setting of the F RUN SET R RUN switch the advance mode of the internal timecode generator is always R RUN Audio cannot be recorded when the recording and playback frame rates differ Rec...

Страница 95: ...and the CONT indication lights up Note Stop the recording after the recording continues for two or more seconds To exit Clip Continuous Rec mode With the camcorder in recording standby mode set OPERATION Rec Function Clip Continuous Rec in the setup menu to Off Limitations during recording A single continuous clip cannot be created if you perform one of the following operations while the camcorder...

Страница 96: ... cannot be used when recording simultaneously to both slots The freeze mix function allows you to temporarily overlap a still image freeze picture from a clip shot in HD mode onto the current camera picture This makes it easier to frame the shot Note The freeze mix function is not available in the following cases When the recording format is SP 1440 23 98P When the video formats of the recorded pi...

Страница 97: ...ns recorded in an XML file Example of a planning metadata file You can shoot using clip names and shot mark names defined in advance in a planning metadata file The camcorder can display clip names and shot mark names defined in the following languages English Chinese German French 1 Italian Spanish Dutch 1 Portuguese Swedish Norwegian Danish Finnish 1 1 Some characters may be displayed in a simil...

Страница 98: ...4 or less all of the planning metadata files may not appear if the directory where they are located on the USB flash driver General Sony Planning contains 512 or more files 2 Turn the MENU knob to select a file to load and press the knob To display detailed information in planning metadata After loading planning metadata into the camcorder you can check the detailed information that it contains su...

Страница 99: ...en select Plan Each time that you record a clip the camcorder automatically generates a name consisting of the clip name defined in the planning metadata file with the addition of an underbar _ and a four digit serial number 0001 to 9999 Examples Typhoon_Strikes_Tokyo_0001 Typhoon_Strikes_Tokyo_0002 Notes When the serial number reaches to 9999 it returns to 0001 with the next recording operation W...

Страница 100: ...etaspname _ShotMark6 sp content 3 Metaspname _ShotMark7 sp content 3 Metaspname _ShotMark8 sp content 3 Metaspname _ShotMark9 sp content 3 Metaspname _ShotMark0 sp content 3 Properties 3 PlanningMetadata 3 Note When you create a definition file enter each statement as a single line with a CRLF only after the last character in the statement line and do not enter spaces except where specified except...

Страница 101: ...n a clip has been marked with an OK mark The clip information on the cursor location is displayed at the bottom of the screen a Index picture UDF exFAT FAT HD mode When a clip is recorded its first frame is set automatically as the index picture You can change the index picture to any frame see page 111 If the clip is locked or the OK mark is on the clip the lock mark appears FAT SD mode When a cl...

Страница 102: ... the OK mark is added to the clip i File format Indicates the file format of the selected clip MXF MP4 AVI File format does not indicate when in UDF HD mode j Clip duration k Timecode This is the timecode of the index picture Note Normal thumbnail screens display SD clips only or HD clips only even if the SxS memory card contains clips in both formats You can select the format to display by select...

Страница 103: ...otes Shot marks cannot be recorded when the SxS memory card is write protected Shot marks cannot be added at the first frame of each clip or last frame of the last clip Expand thumbnail screen Shot mark thumbnail screen HD mode only Like the normal thumbnail screen and the OK clip thumbnail screen these screens allow you to select clip thumbnails see page 102 and to start clip playback see page 10...

Страница 104: ...l Displays the normal thumbnail screen All Clip Thumbnail Displays the all clips thumbnail screen see page 106 Set Shot Mark Add Shot Mark1 In the expand thumbnail screen or the essence mark thumbnail screen adds a Shot Mark1 mark see page 111 Delete Shot Mark1 In the expand thumbnail screen or the essence mark thumbnail screen deletes a Shot Mark1 mark see page 111 Add Shot Mark2 In the expand th...

Страница 105: ... Displays the NG clip thumbnail screen KP Keep Displays the KP clip thumbnail screen None Displays a None clip clip which has not been marked OK NG or KP thumbnail screen Lock All Clips Protects all clips displayed Unlock All Clips Unlocks all clips displayed Copy All All Clips Batch copies groups of clips files see page 108 General Files All Clips General Files Delete All Clips Execute Cancel Del...

Страница 106: ...ng on the state of the camcorder when the menu was displayed To hide the clip properties screen Do one of the following Press the RESET RETURN button This returns to the THUMBNAIL menu Press the THUMBNAIL button The camcorder enters E E mode and the camera picture appears Press the PLAY PAUSE button Playback from the selected clip starts To display OK clip thumbnails HD mode only When the normal t...

Страница 107: ...e number of component clips appears after the clip name e Lock mark UDF exFAT and FAT HD mode only This appears when the clip is marked with an OK mark or protected f OK NG KP mark UDF exFAT and FAT HD mode only UDF exFAT When an OK NG or KP flag is added to the selected clip the corresponding mark is added to the clip FAT When an OK mark is added to the selected clip the OK mark is added to the c...

Страница 108: ...5 4 If the parenthetical numbers 1 to 9 already exist at the copy destination it is not possible to copy any more clips under that name A message appears if there is not enough free capacity at the copy destination SxS memory card Exchange the card for one with more free capacity When multiple clips are recorded in a source SxS memory card it may not be possible to copy all clips to the end Depend...

Страница 109: ...xist on the SxS memory card only clips in the currently selected mode are deleted In HD mode clips with OK marks are not deleted even when a deletion is executed for a group of clips that includes them To cancel the deletion Press the RESET RETURN button The expand thumbnail screen allows you to search inside clips by using thumbnails see page 103 to change index pictures see page 111 and to add a...

Страница 110: ... divided into 12 is further divided into 12 for 12 12 144 divisions You can repeat the same operation to increase the number of divisions To return to the previous division level Press the EXPAND button with the SHIFT button held down or select THUMBNAIL Thumbnail View Back Expansion The expand thumbnail screen returns to the previous division level You can search for shot marks in clips see page ...

Страница 111: ...use as the index picture and then select THUMBNAIL Set Index Picture The properties screen of the selected frame appears and a confirmation message appears below the image 2 Select Execute and press the MENU knob Note Even if you set the index picture to a frame that is not the first frame of a clip playback of that clip from a thumbnail screen always begins at the first frame 1 Select the thumbna...

Страница 112: ...112 Note When there is not enough remaining capacity on the SxS memory cards to store the divided clips a message appears to inform you that there is not enough capacity ...

Страница 113: ...used only when a thumbnail screen see page 101 is displayed It is disabled when no thumbnail screen is displayed Ma MAINTENANCE menu Settings related to audio and timecode see page 144 Fi FILE menu Settings related to file operations see page 159 See page 118 for the organization of the USER MENU CUSTOMIZE menu See THUMBNAIL Menu Configuration page 104 for the organization of the THUMBNAIL menu US...

Страница 114: ...re Skin Detail Matrix Multi Matrix V Modulation Low Key Sat Noise Suppress MAINTENANCE White Shading Battery Audio WRR Setting Timecode Essence Mark Camera Config Preset White White Filter Auto Iris2 Flicker Reduce Genlock ND Comp Lens Trigger Mode Network Setting Wi Fi Setting Clock set Language Hours Meter Direct Menu Menu Scroll USB Set Version FILE User All Scene Reference Lens Import ...

Страница 115: ...aximum of seven lines You can scroll through menus with more than seven lines by moving the cursor up and down Triangles appear at the upper right and lower right of the menu item selection area to indicate that a menu is scrollable 3 Turn the MENU knob or press the J or j button to move the cursor to the item that you want to set and then confirm by pressing the MENU knob or the SET button The su...

Страница 116: ...set by entering text When you select one of these items the text entry area is highlighted with SET displayed to the right 1 Turn the MENU knob or press the J or j button to select a character and then confirm by pressing the MENU knob or the SET button The cursor moves to the next position To return to the previous position push the MENU CANCEL PRST ESCAPE switch down to the ESCAPE side 2 Select ...

Страница 117: ... the setup menu Notes When you press and hold the MENU knob and press the MENU ON OFF switch down Camera Config User Menu Only changes to User Menu with Lock If you press the MENU ON OFF switch down without pressing the MENU knob or you press the MENU button to display the menu Camera Config User Menu with Lock is not displayed 3 Select Off then press the MENU knob The viewfinder screen display sw...

Страница 118: ...ault one of which must always be present allowing you to add up to 19 new items The USER MENU CUSTOMIZE menu has the following organization Note The same item or sub item cannot be registered twice Also the name of the item or sub item cannot be changed To restore the USER menu to factory default state Set USER MENU CUSTOMIZE Customize Reset in the setup menu to Execute and press the MENU knob Men...

Страница 119: ...then press the MENU knob 3 Select Ins SubItem R or Ins SubItem r then press the MENU knob Ins SubItem R Inserts a sub item above the selected item Ins SubItem r Inserts a sub item below the selected item A list of the items that can be added is displayed 4 Select the item you want to add then press the MENU knob A list of the sub items that can be added is displayed 5 Select the sub item you want ...

Страница 120: ...y factory default and cannot be deleted 1 Display the USER MENU CUSTOMIZE menu The currently registered menu items are displayed 2 Select the item you want to delete then press the MENU knob 3 Set Edit Item to Del Item The selected item is deleted Deleting a sub item Note User Menu Only in Camera Config is registered by factory default and cannot be deleted 1 Display the USER MENU CUSTOMIZE menu T...

Страница 121: ...D System Line is set to 1080 and Country is set to other than PAL Area 59 94P 29 97P 23 98P When HD SD is set to HD HD System Line is set to 720 and Country is set to other than PAL Area 59 94i 29 97P When HD SD is set to SD and Country is set to other than PAL Area 50i 25P When HD SD is set to HD HD System Line is set to 1080 and Country is set to PAL Area When HD SD is set to SD and Country is s...

Страница 122: ...m setting is UDF the HD SD setting is HD and the HD System Line setting is 1080 HD422 50 HD420 HQ1280 When the File System setting is UDF the HD SD setting is HD the HD System Line setting is 720 and the System Frequency setting is other than 29 97P or 25P HD422 50 When the File System setting is UDF the HD SD setting is HD the HD System Line setting is 720 and the System Frequency setting is 29 9...

Страница 123: ... or pulldown output Pull Down when the video format is in the following modes UDF HD mode HD22 50 1080 23 98P HD420 HQ1920 1080 23 98P HD420 HQ1440 1080 23 98P exFAT HD mode XAVC I 1080 23 98P XAVC L50 1080 23 98P XAVC L35 1080 23 98P HD22 50 1080 23 98P HD420 HQ1920 1080 23 98P HD420 HQ1440 1080 23 98P FAT mode HQ 1920 1080 23 98P HQ 1440 1080 23 98P Source Select Camera i LINK Selects whether to...

Страница 124: ...wide ID signal Auto Add and output a wide ID signal when the Down Converter setting is Squeeze Super Impose Makes settings related to superimposed text and markers Super VF Display On Off When Input Output SDI HDMI Out Super or Video Out Super is set to On superimpose text information on the output from the HD SD SDI OUT connector HDMI connector and VIDEO OUT connector as specified On or Off for e...

Страница 125: ... When HD System Line is set to 1080 When Format Country is set to other than PAL Area in UDF exFAT mode or in FAT mode 1 to 30 31 to 60 When Format Country is set to PAL Area in UDF exFAT mode 1 to 25 26 to 50 When HD System Line is set to 720 Clip Continuous Rec On Off Turns the Clip Continuous Rec function on off When this is set to On Slow Quick Picture Cache Rec Interval Rec and Frame Rec are ...

Страница 126: ...r System Frequency is set to other than 59 94P or 50P Interval Time 1 2 3 4 5 6 7 8 9 10 15 20 30 40 50 sec 1 2 3 4 5 6 7 8 9 10 15 20 30 40 50 min 1 2 3 4 6 12 24 hour Set the interval for Interval Rec shooting when Interval Rec is set to On Pre Lighting Off 2sec 5sec 10sec If you want the video light to be turned on before Interval Rec shooting select a number of seconds before the start of shoo...

Страница 127: ...y mode of the viewfinder screen Even when B W is selected some indications are always displayed in color Examples include tally indications thumbnails and the skin gate area Peaking Type Normal Color Both Selects the peaking type Normal Normal peaking Color Color peaking Both Both Peaking Frequency Normal High Selects normal or high peaking frequency Peaking Color White Red Yellow Blue When Peakin...

Страница 128: ...nge Aspect Marker Line Mask Off When an aspect marker is to be displayed selects the display method Select Off if you do not want to display the marker Line Show as white lines Mask Display by lowering the video signal level of areas outside the marker range Aspect Select 4 3 13 9 14 9 15 9 1 66 1 1 85 1 2 35 1 2 4 1 Selects the aspect ratio of the marker Aspect Mask 0 to 30 to 90 10 steps When As...

Страница 129: ...thly when the gain is switched on off TLCS Makes settings related to total level control Mode Backlight Standard Spotlight Selects the auto iris mode used when the TLCS system is activated Backlight Backlight mode lessens the blackout of the main subject that occurs under backlit conditions Standard Standard mode Spotlight Spotlight mode lessens the whiteout of the main subject that occurs under a...

Страница 130: ... of field Meter Displayed in meters Feet Displayed in feet Off Do not display Focus Position On Off Turns the indication of the lens focus position on off Zoom Position On Off Turns the indication of the lens zoom position on off Audio Level Meter On Off Turns the display of the audio level meters on off Timecode On Off Turns the display of time data timecode user bits counter duration on off Batt...

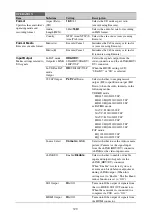
Страница 131: ...the network client mode display of the CBK WA101 Wireless Adapter not supplied on off Ext Media Remain On Off Turn the remaining time indication for the media of the CBK WA101 Wireless Adapter not supplied on off FlashbandReduce On Off Turn the flashband reduce status indication on off ALAC On Off Turn the ALAC status indication on off Auto Iris Makes settings related to auto iris Iris Override On...

Страница 132: ... on the brightness of scenes automatically adjusts the white balance to natural ambience Pure Not leaving the blue color or red color automatically adjusts the white balance closer to original colors AWB Fixed Area On Off Specifies whether auto white balance is executed at the center of the screen On Execute in an area corresponding to 25 of the height and width of the screen Off Execute in an are...

Страница 133: ...s larger for higher offset color temperatures Adjust while viewing the actual video Warm Cool Balance B 99 to 0 to 99 Specifies a more precise color temperature for use when satisfactory video cannot be obtained with the Warm Cool B setting Offset White ATW On Off When this item is set to On the offset value adjusted here is added to the ATW white balance value Warm Cool ATW Approximate color temp...

Страница 134: ...riod symbol Clips with names in which the first character is cannot be viewed on the application software for computers Auto Naming In Fat mode Title Plan In UDF exFAT mode C Title Plan Selects the clip naming format C XDCAM standard name In UDF exFAT mode Title Name specified by Title Prefix Plan Name specified in planning metadata if no name is specified in planning metadata the name specified b...

Страница 135: ... Changes the character at the cursor position to a space INS Inserts a space at the cursor position DEL Deletes the character at the cursor position T Moves the cursor to the left t Moves the cursor to the right ESC Cancels the change and return to the normal menu END Executes the change and return to the normal menu Title prefix area one line An area to enter the title To set titles 1 Turn the ME...

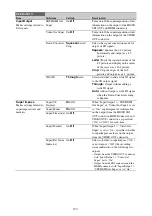
Страница 136: ... planning metadata files stored in the slot B SxS memory card and select a file to execute the load Load USB UDF exFAT mode Execute Cancel Executes load of planning metadata from the USB flash drive connected to the external device connector Select Execute to show the list of the planning metadata files stored in the USB flash drive and select a file to execute the load Properties Execute Cancel D...

Страница 137: ... Rec is set to On i LINK I O is set to Enable and Slow Shutter is set to On Setting On Off Turns the flashband reduce function on off Note When the flashband reduce function is set to on off video and audio may be distorted and noise may appear momentarily OPERATION Item Sub item Setting Description ...

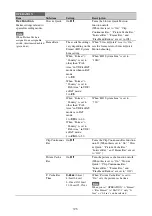
Страница 138: ...saved in memory A Color Temp BAL A 99 to 0 to 99 Specifies the white balance gain values saved in memory A linked R gain and B gain R Gain A 99 to 0 to 99 Specifies the white balance R gain value saved in memory A B Gain A 99 to 0 to 99 Specifies the white balance B gain value saved in memory A Color Temp B 1500K to 3200K to 50000K Displays the white balance color temperature saved in memory B Col...

Страница 139: ...to 0 to 99 Specifies the B gamma level Gamma Select The available settings vary depending on the setting in Gamma Category see Description Select the gamma table to use in gamma correction When Gamma Category is STD 1 DVW DVW camcorder equivalent 2 4 5 4 5 gain 3 3 5 3 5 gain 4 240M SMPTE 240M equivalent 5 R709 ITU R709 equivalent default setting 6 5 0 5 0 gain When Gamma Category is HG 1 3250 Con...

Страница 140: ...point Knee Slope 99 to 0 to 99 Specifies the knee slope Knee Saturation On Off Turns the knee saturation function on off Knee Saturation Level 99 to 0 to 99 Specifies the knee saturation level White Clip Makes settings related to white clipping adjustments White clipping is processing that limits the maximum level of video output signals The maximum video signal output value is called the white cl...

Страница 141: ...9 to 0 to 99 Specifies the detail limiter values for both the white side and black side direction White Limit 99 to 0 to 99 Specifies the white side detail limiter value Black Limit 99 to 0 to 99 Specifies the black side detail limiter value V BLK Limit 99 to 0 to 99 Specifies the black side V detail limiter value V Detail Creation NAM G R G Y Selects the source signal used to generate the V detai...

Страница 142: ... correction Matrix correction allows you to adjust the color and vividness of the video Depending on the effect you want you can select one from among a number of preset matrixes which define different parameter sets Or you can select a user matrix with your own parameters Matrix On Off Turns the matrix correction function on off Preset Matrix On Off Turns the preset matrix function on off Preset ...

Страница 143: ...ading V modulation shading corrects vertical imbalances in sensitivity arising from the relationship between a lens and prism V Modulation On Off Turns V modulation shading on off Master V Modulation 99 to 0 to 99 Specifies the master V modulation level R V Modulation 99 to 0 to 99 Specifies the V modulation level of R signals G V Modulation 99 to 0 to 99 Specifies the V modulation level of G sign...

Страница 144: ...lects the target of white shading correction R G B White H Saw 99 to 0 to 99 Specifies a SAW white shading correction value for the horizontal direction R G B White H Para 99 to 0 to 99 Specifies a parabola white shading correction value for the horizontal direction R G B White V Saw 99 to 0 to 99 Specifies a SAW white shading correction value for the vertical direction R G B White V Para 99 to 0 ...

Страница 145: ...g when an external power source is connected to the DC IN connector DC In End 11 0V to 14 0V 0 1V steps Specifies a threshold value that triggers a Battery End warning when an external power source is connected to the DC IN connector Detected Battery Info Sony Other DC IN Displays the results of automatic battery pack type detection Type Detection Auto Other Auto Detect the battery type automatica...

Страница 146: ...IN CH1 and AUDIO IN CH2 switches are set to LINE Min Alarm Volume Off Set Selects the volume when the ALARM knob is turned all the way down Off Almost inaudible Set Fairly audible Speaker Attenuate Off 3dB 6dB 9dB 12dB Selects the volume from the monitor speaker does not affect earphone volume Headphone Out Mono Stereo Selects whether the earphones are monaural Mono or stereo Stereo Reference Leve...

Страница 147: ...ecording input audio from the front microphone on channel 1 selects the knob that adjusts the audio level Side1 The LEVEL knob left on the side panel Front The MIC LEVEL control on the front panel Front Side1 Adjust with both the LEVEL knob left and the MIC LEVEL control MIC CH2 Level Side2 Front Front Side2 For recording input audio from the front microphone on channel 2 selects the knob that adj...

Страница 148: ...control Audio CH3 Level Side3 Front Front Side3 Selects the knob that adjusts the level of audio recorded on channel 3 Side3 The LEVEL knob on the side panel Front The MIC LEVEL control on the front panel Front Side3 Adjust with both the LEVEL knob and the MIC LEVEL control Audio CH4 Level Side4 Front Front Side4 Selects the knob that adjusts the level of audio recorded on channel 4 Side4 The LEVE...

Страница 149: ...isplays whether the input level of the transmitter whose signals are being received on the channel selected by WRR CH Select is set to microphone Mic or line Line TX ATT Level Sets the ATT level of the transmitter whose signals are being received on the channel selected by WRR CH Select The setting range varies depending on the transmitter TX LCF Freq Sets the low cut filter frequency of the trans...

Страница 150: ...ESET button is pressed Duration Reset each time that recording is started Essence Mark Makes settings related to shot marks and clip index picture thumbnails Ret Shot Mark 1 On Off Specify whether to input Shot Mark1 marks using the RET button on the lens Ret Shot Mark 2 On Off Specify whether to input Shot Mark2 marks using the RET button on the lens Index Picture Pos 0sec to 10sec in 1 sec steps...

Страница 151: ...tion on the viewfinder screen G Tally Indicate by the green tally indicator on the viewfinder screen R Tally Indicates by the recording mode operation status indication on the viewfinder screen Note When SDI Rec Control is set to Para Rec Chara is set automatically and this item is grayed out Match Clip Name On Off Sets whether to add the clip name information to the SDI output ALAC AUTO OFF Sets ...

Страница 152: ...16 RM Common Memory On Off Selects whether to share On or not share Off settings between times when a remote control unit is connected and times when the camcorder is used locally RM Rec Start RM CAM PARA For times when a remote control unit is connected selects whether recording start stop buttons are enabled on the camcorder or the remote control unit RM Remote control unit CAM Camcorder PARA Bo...

Страница 153: ...erature for when electrical CC filters are assigned to ND filters ND FLT C Temp 2 4 3200K 4300K 5600K 6300K Selects the color temperature for when electrical CC filters are assigned to ND filters Electrical CC A 3200K 4300K 5600K 6300K Selects the color temperature for when the electrical CC filter switching function is assigned to an assignable switch Electrical CC B 3200K 4300K 5600K 6300K Selec...

Страница 154: ...speed speed of reaction to changes in the video Larger values specify quicker reaction times Clip High Light On Off Turns on off the function that disregards highlights and forces a flatter reaction to high luminance Flicker Reduce Makes settings related to flicker reduction Reduces the flicker that can occur when a subject is shot under a light source with a periodically varying brightness such a...

Страница 155: ...s and external devices Network Setting a Makes settings for network connection Notes The IFU WLM3 USB Wireless LAN Module is required This item is not available when using the CBK WA101 Wireless Adapter This item is disabled grayed out during recording and play For details about wireless LAN connection see Connecting the Camcorder to Devices using the IFU WLM3 USB Wireless LAN Module page 81 DHCP ...

Страница 156: ...PA2 Wi Fi Protected Access 2 authentication when Network Type is set to Infra Encryption Disable WEP TKIP AES Selects whether to apply data encryption and the type of data encryption Disable Do not apply data encryption WEP Apply WEP Wired Equivalent Privacy when Authentication is set to Open or Shared TKIP Apply TKIP Temporal Key Integrity Protocol when Authentication is set to WPA or WPA2 AES Ap...

Страница 157: ... hour format 12H or the 24 hour format 24H for display of times Date Mode YYMMDD MMDDYY DDMMYY Selects the display format for dates YYMMDD Year Month Day MMDDYY Month Day Year DDMMYY Day Month Year Language Selects the language for menus and messages Language English Japanese Chinese Spanish Portuguese Russian Indonesian Selects the language for menus and messages English To display in English Jap...

Страница 158: ... Formats USB media exFAT Format USB media for copying clips FAT32 Format USB flash drive for writing planning metadata UDF exFAT mode Copy To USB A to USB B to USB A B to USB Copies SxS memory card clips to USB media Note Available only when the thumbnail screen is displayed Copy From USB USB to A USB to B Copies USB media clips to SxS memory card Note Available only when the thumbnail screen is d...

Страница 159: ...er Load USB UDF exFAT mode Loads a user file saved on a USB flash drive execute using Execute User Save USB UDF exFAT mode Saves current USER menu organization settings and white balance data to a user file on a USB flash drive execute using Execute File ID Assigns a name to a user file Names can be up to 16 characters in length Recall User Preset Execute Cancel Returns the settings of menu items ...

Страница 160: ...sh drive execute using Execute File ID Assigns a name to a file Names can be up to 16 characters in length All Preset Execute Cancel Return all items to their preset values execute using Execute Store All Preset Execute Cancel Store the current settings of all items as the preset values execute using Execute Clear All Preset Execute Cancel Clear the preset values of all items execute using Execute...

Страница 161: ...ncel Stores a file to a USB flash drive execute using Execute File ID Assigns a name to a file Names can be up to 16 characters in length Reference Makes settings related to reference file operations Reference Store Execute Cancel Stores the current settings of reference file items in the reference file that is maintained in internal memory execute using Execute Reference Clear Execute Cancel Clea...

Страница 162: ...set Execute Cancel Clears a file execute using Execute Lens Auto Recall Off On Serial Number When the installed lens supports serial communication specifies whether to automatically load that reference file Off Do not use this function On Load the reference for the model name and reflect the contents of the file Serial Number For lenses that support serial number communication load the lens file t...

Страница 163: ...a B white balance compensation value in the lens file Shading Ch Sel Red Green Blue Selects the white shading compensation target L R G B H Saw 99 to 0 to 99 Sets a horizontal SAW white shading compensation value in the lens file L R G B H Para 99 to 0 to 99 Sets a horizontal parabola white shading compensation value in the lens file L R G B V Saw 99 to 0 to 99 Sets a vertical SAW white shading co...

Страница 164: ...e ASSIGN 0 Switch Assignable SW setting Function State when camcorder is next powered on Off No assignment Marker Turns the display of all markers on off Setting retained ATW Hold Hold the white balance setting in the ATW auto tracking white balance mode Picture Cache Turn the picture cache function on off Setting retained Freeze Mix Execute the freeze mix function Focus Mag Turn the focus magnifi...

Страница 165: ... Switches the ASSIGNABLE 4 and 5 Switches and the COLOR TEMP Button Assignable SW setting Function State when camcorder is next powered on Off No assignment Front Mic Switch between stereo On and monaural Off when a stereo microphone is connected Setting retained Marker Turns the display of all markers on off Setting retained Last Clip Delete Delete the most recently recorded clip ATW Turn ATW aut...

Страница 166: ...optional CBK CE01 is installed and a camera adaptor and camera control unit are connected Return Video2 Display return video signals during operating the system when the optional CBK CE01 is installed and a camera adaptor is connected Return Video3 Display return video signals during operating the system when the optional CBK CE01 is installed and a camera adaptor is connected Return Video4 Displa...

Страница 167: ...l CBK CE01 50 Pin Interface and Digital Extender is installed Setting not retained Flashband Reduce Turn the flashband reduce function on off Setting not retained Quick Backup Back up all the clips in the selected SxS card to a USB media Setting not retained USB Thumbnail Display the thumbnail screen of a USB media Setting not retained Functions That Can Be Assigned to the RET Button on the Lens A...

Страница 168: ...r played Setting not retained OK Mark Add or delete an OK mark Focus Mag Turn the focus magnification function on off Setting not retained Flashband Reduce Turn the flashband reduce function on off Setting not retained Quick Backup Back up all the clips in the selected SxS card to a USB media Setting not retained USB Thumbnail Display the thumbnail screen of a USB media Setting not retained Assign...

Страница 169: ...following menu settings Adjusting PMW 320 Image Quality Menu item Sub item Setting HD SD PAINT Matrix User Matrix R G 65 65 User Matrix R B 24 24 User Matrix G R 20 20 User Matrix G B 25 25 User Matrix B R 11 11 User Matrix B G 28 28 PAINT Detail HD Mode Detail SD Mode Level 10 0 ...

Страница 170: ...t are set when you execute FILE Scene Standard in the setup menu You can save one reference file in the camcorder s internal memory and one on an SxS memory card or USB flash drive in UDF exFAT mode Lens files Lens files save the setting data used to compensate for lens characteristics such as flare white shading white balance and center markers You can save up to 32 lens files in the camcorder s ...

Страница 171: ...he data will be saved under this name Note When you load a file from an SxS memory card or USB flash drive UDF exFAT modes the data saved in the camcorder s internal memory is overwritten For details about menu operations see Basic Setup Menu Operations page 115 1 Select FILE All in the setup menu 2 Select All Load SxS Execute When loading from a USB flash drive UDF exFAT modes select All Load USB...

Страница 172: ...erations see Basic Setup Menu Operations page 115 1 Select FILE Scene in the setup menu To assign a name to the data before saving it Assign a name before proceeding to step 2 For details see To assign names to files page 171 2 Select Scene Store SxS Execute When saving to internal memory select Scene Store Mem Execute When saving to a USB flash drive UDF exFAT modes select Scene Store USB Execute...

Страница 173: ...mory select Scene Recall Mem Execute When loading from a USB flash drive UDF exFAT modes select Scene Recall USB Execute 3 Press the MENU knob A list box of scene files appears File numbers where No File is displayed are empty file numbers File numbers with a file name or a date and time are the number of files that already contain data 4 Select the desired file number and then press the MENU knob...

Страница 174: ...nob To cancel the save select Cancel and then press the MENU knob If you selected Lens Store SxS in step 2 the ACCESS lamp lights when you execute the save in blue on the right side panel and in orange in the card slot section When the data has been saved to the SxS memory card a completion message appears and the ACCESS lamp goes out If saving to internal memory or a USB flash drive the ACCESS la...

Страница 175: ...serial number when the lens supports communication of the serial number If the lens does not support communication of the serial number both settings load the lens file that corresponds to the model name You can save the USER menu setup status menu organization and settings and current white balance data as a user file Insert an SxS memory card into a memory card slot then proceed as follows For d...

Страница 176: ...tails about menu operations see Basic Setup Menu Operations page 115 1 Select FILE User in the setup menu 2 Select User Load SxS Execute When loading from a USB flash drive UDF exFAT modes select User Load USB Execute 3 Press the MENU knob A user file list box appears File numbers where No File is displayed are empty file numbers File numbers with a file name or a date and time are the number of f...

Страница 177: ...cted Regardless of whether the signal is HD or SD the same status information and menus can be displayed on the external monitor as those on the viewfinder screen Note SD signals down converted for output have the following restrictions Images of 50P 50i 25P are output as PAL signals those of 59 94P 59 94i 29 97P are output as NTSC signals and those of 23 98P are output as 2 3 pulled down NTSC sig...

Страница 178: ...ched with the analog composite signal setting for the VIDEO OUT connector To input camcorder output audio to an external device such as a monitor or VTR or other recording device connect the audio output of the AUDIO OUT connector to the audio input of that external device For connection use a BNC cable not supplied i LINK HDV DV connector The i LINK HDV DV connector supports HDV and DV input outp...

Страница 179: ...corder they are acknowledged as two independent extended drives by the computer Notes When connecting the USB cable to the computer be careful to check the form and direction of the PC connector The camcorder does not work on the bus power from a computer Use a separate power supply Connection is not possible when transferring part of an original file page 86 using the function of the optional CBK...

Страница 180: ...is camcorder To remove an SxS memory card On Windows 1 Click on the icon of Safely Remove Hardware on the task bar of the computer 2 Select Safely remove SxS Memory Card Drive X from the displayed menu 3 Check that the Safe To Remove Hardware message appears then remove the card On Macintosh Drag the SxS memory card icon on the desktop to Trash If the SxS memory card icon is located in the Finder ...

Страница 181: ...uring i LINK connections The picture being shot with this camcorder is output as an HDV or DV stream via the i LINK HDV DV connector It can be recorded on a connected HDV or DVCAM recorder in synchronization with a recording start stop operation on this camcorder 1 Perform the preparatory settings of the camcorder Set OPERATION Input Output Output i LINK in the setup menu see page 123 to HD HDV or...

Страница 182: ...the nonlinear editing software refer to the operation manual of the software The HDV stream input from a device connected via the i LINK HDV DV connector can be recorded on an SxS memory card in this camcorder The timecodes superimposed on the i LINK input are recorded regardless of the settings of the camcorder Note DV streams cannot be recorded 1 Set the external signal to a format that can be r...

Страница 183: ... memory cards to USB media Copy clips recorded on SxS memory cards to USB media by selecting USB Set Copy To USB in the MAINTENANCE menu when the thumbnail screen is displayed The copy destination folder is specified using USB Set Select Folder in the MAINTENANCE menu If no folder is selected a new folder is created and files are copied to it The name of the new folder uses the recording date of t...

Страница 184: ...ard thumbnail screen although with the following differences Functions that are not available Adding and deleting shot marks Adding and deleting OK NG KP flags and OK marks Setting index pictures Splitting clips Dropped frames and other issues may occur when playing back clips recorded on USB media THUMBNAIL menu Displaying the USB Media Thumbnail Screen Item Function Clip Properties Displays the ...

Страница 185: ...ta via communication LED indicator of DXF Character display in the viewfinder Tally Green Tally Call from CA Call from otherthan CA REC TALLY LED GREEN TAKE TALLY LED z red indicator z green indicator CALL indicator OFF OFF OFF OFF OFF OFF No display No display No display OFF OFF OFF ON ON OFF z red No display CALL red OFF OFF ON OFF OFF OFF No display No display CALL red OFF OFF ON ON ON OFF z re...

Страница 186: ...lower to clean the lens the LCD screen and mirror inside the viewfinder barrel Note Never use organic solvents such as thinners The battery terminal of this unit the connector for battery packs and AC adaptors is a consumable part Power may not be supplied to the unit properly if the pins of the battery terminal are bent or deformed by shock or vibrations or if they become corroded due to prolonge...

Страница 187: ...on and the battery indicator is represented by graphic symbols as follows Continuous 1 flash s 4 flash s The warning sounds are represented by graphic symbols as follows Continuous beep 1 beep s Error Warning System A WARNING indicator Warning sound Tally REC Battery remaining B C D E Problem Operation in the recorder module Solution Error Indication E WARNING indicator Warning sound Tally REC Bat...

Страница 188: ...ording stops Replace it with another Battery Near End WARNING indicator Warning sound Tally REC Battery remaining Problem Operation in the recorder module Solution The battery power will be exhausted soon Recording continues Charge the battery pack at the earliest opportunity Battery End WARNING indicator Warning sound Tally REC Battery remaining Problem Operation in the recorder module Solution T...

Страница 189: ...er module Solution You cannot use both an i LINK connection and an IFU WLM3 connection at the same time Recording continues Turn off the power and disconnect either the i LINK or IFU WLM3 Record Only Media A 1 WARNING indicator Warning sound Tally REC Battery remaining Problem Operation in the recorder module Solution Recording to media A 1 only 2 slot Simul Rec mode Recording continues Recording ...

Страница 190: ...to xx xx WARNING indicator Warning sound Tally REC Battery remaining Problem Operation in the recorder module Solution The maximum number of clips for 1 memory card is reached so copying cannot continue xx xx indicates the completed copy operations Replace it with another card Media Error Media A 1 Needs to be Restored WARNING indicator Warning sound Tally REC Battery remaining Problem Operation i...

Страница 191: ...aining Problem Operation in the recorder module Solution The external signal input via the i LINK connection cannot be recorded as the Video Format setting is different from the signal format of the external input signal Recording stops Change settings of OPERATION Format in the setup menu to match it to that of the external signal Copy Protected Input Cannot Record WARNING indicator Warning sound...

Страница 192: ... 2 Battery Near End WARNING indicator Warning sound Tally REC Battery remaining Problem Operation in the recorder module Solution The battery power of the connected HDD will be exhausted soon Recording continues Replace it with another at the earliest opportunity HDD A 2 Battery End WARNING indicator Warning sound Tally REC Battery remaining Problem Operation in the recorder module Solution The ba...

Страница 193: ...ry remaining Problem Operation in the recorder module Solution Will switch to other slot soon Recording continues Make sure that a memory card is loaded in the other slot No Clip WARNING indicator Warning sound Tally REC Battery remaining Problem Operation in the recorder module Solution There is no clip to be displayed Recording continues No OK Clip WARNING indicator Warning sound Tally REC Batte...

Страница 194: ...perating instructions of the memory card Unsupported Clip Included Cannot Use Media A 1 WARNING indicator Warning sound Tally REC Battery remaining Problem Operation in the recorder module Solution The inserted memory card contains clips recorded in a format that is not supported by this camcorder The card in slot A cannot be used with this camcorder Different Media is Inserted Cannot Use Media A ...

Страница 195: ...s with the camcorder contact a Sony service representative Use and storage locations Store in a level ventilated place Avoid using or storing the camcorder in the following places In excessive heat or cold operating temperature range of 0 C to 40 C 32 F to 104 F Remember that in summer in warm climates the temperature inside a car with the windows closed can easily exceed 50 C 122 F In damp or dus...

Страница 196: ...he white flecks especially tend to be seen in the following cases when operating at a high environmental temperature when you have raised the master gain sensitivity when operating in Slow Shutter mode The problem may be alleviated by executing automatic black balance adjustment Aliasing When fine patterns stripes or lines are shot they may appear jagged or flicker Flicker If recording is made und...

Страница 197: ...fragmented disabling proper recording storage In such a case make a backup of clips in the medium then perform formatting of the medium using OPERATION Format Media see page 123 in the setup menu The camcorder s internal clock is powered by a lithium battery If the message BackUp Battery End appears in the viewfinder this battery must be exchanged Contact a Sony service representative Exchanging t...

Страница 198: ... 59 94i HD422 1920 59 94i HD420 HQ1920 59 94i HD420 HQ1440 59 94i HQ1920 59 94i HQ1440 59 94i SP1440 59 94i 1920 1080 59 94i 720 480 59 94i XAVC I 1920 29 97P XAVC L50 1920 29 97P XAVC L35 1920 29 97P HD422 1920 29 97P HD420 HQ1920 29 97P HD420 HQ1440 29 97P HQ1920 29 97P HQ1440 29 97P 1920 1080 29 97PsF 720 480 29 97PsF XAVC I 1920 23 98P XAVC L50 1920 23 98P XAVC L35 1920 23 98P HD422 1920 23 98...

Страница 199: ...1920 50i HD420 HQ1920 50i HD420 HQ1440 50i HQ1920 50i HQ1440 50i SP1440 50i 1920 1080 50i 720 576 50i XAVC I 1920 25P XAVC L50 1920 25P XAVC L35 1920 25P HD422 1920 25P HD420 HQ1920 25P HD420 HQ1440 25P HQ1920 25P HQ 1440 25P 1920 1080 25PsF 720 576 25PsF XAVC I 1280 50P XAVC L50 1280 50P HD422 1280 50P HD420 HQ1280 50P 1280 720 50P 720 576 50i HD422 1280 25P HD420 HQ1280 25P 720 576 25PsF HQ1280 ...

Страница 200: ...e When you set OPERATION Format File System to UDF and exFAT in the setup menu no signal is output from the i LINK HDV DV connector IMX 608 25P DVCAM 480 25P DVCAM 25P 720 576 25PsF When recording Format of the OPERATION menu When playing back Video format of the played video clip Output format Input Output setting of the OPERATION menu HD HDV SD HDV SD DV HQ1920 59 94i HQ1440 59 94i Input output ...

Страница 201: ...ot possible DV 720 576 25PsF HQ1280 50P Input output is not possible DV 720 576 50i Converted from P to i HQ1280 25P Input output is not possible DV 720 576 25PsF DVCAM 50i DV 720 576 50i DVCAM 25P DV 720 576 50i When recording Format of the OPERATION menu When playing back Video format of the played video clip Output format Input Output setting of the OPERATION menu HD HDV SD HDV SD DV ...

Страница 202: ... OPERATION Format in the setup menu SDI outputs to the camera adaptor System format of the camera adaptor and camera control unit Operation restrictions to the camcorder Genlock Return video display XAVC I 1920 59 94i XAVC L50 1920 59 94i XAVC L35 1920 59 94i XAVC L25 1920 59 94i HD422 1920 59 94i HQ1920 59 94i 1920 1080 59 94i 1920 1080 59 94i Available Available HQ1440 59 94i SP1440 59 94i XAVC ...

Страница 203: ... HQ1440 25P XAVC I 1280 59 94P XAVC L50 1280 59 94P HD422 1280 59 94P HQ1280 59 94P 1280 720 59 94P 1280 720 59 94P Available Available XAVC I 1280 50P XAVC L50 1280 50P HD422 1280 50P HQ1280 50P 1280 720 50P 1280 720 50P Available Available Settings of Rec Format and System Frequency under OPERATION Format in the setup menu SDI outputs to the camera adaptor System format of the camera adaptor and...

Страница 204: ...eneral Power requirements 12 V DC Power consumption Approx 25 W Main unit camcorder LCD viewfinder auto focus lens microphone Power source for HD recording 12 V DC Approx 30 W Main unit camcorder LCD viewfinder auto focus lens microphone CBK WA101 Wireless Adapter Power source for recording 12 V DC Notes Do not use a video light with power consumption of over 50 W When connecting a device to the D...

Страница 205: ... GB Approx 120 minutes When using SBS 32G1A 32 GB Approx 60 minutes XAVC L35 mode When using SBP 128B 128 GB Approx 340 minutes When using SBS 64G1A SBP 64B 64 GB Approx 170 minutes When using SBS 32G1A 32 GB Approx 85 minutes XAVC L25 mode When using SBP 128B 128 GB Approx 440 minutes When using SBS 64G1A SBP 64B 64 GB Approx 220 minutes When using SBS 32G1A 32 GB Approx 110 minutes HD 422 50 SD ...

Страница 206: ... XAVC I mode CBG 112 Mbps max MPEG 4 AVC H 264 1920 1080 59 94i 50i 29 97p 25p 23 98p 1280 720 59 94p 50p XAVC L50 mode MPEG 4 AVC H 264 50Mbps VBR 1920 1080 59 94i 50i 29 97p 25p 23 98p 1280 720 59 94p 50p XAVC L35 mode MPEG 4 AVC H 264 35Mbps VBR 1920 1080 59 94i 50i 29 97p 25p 23 98p XAVC L25 mode MPEG 4 AVC H 264 25Mbps VBR 1920 1080 59 94i 50i HD 422 50 mode MPEG 2 422 HL 50Mbps CBR 1920 1080...

Страница 207: ...F Continuous operation time Approx 194 min with the BP L80S Mass Main body only 3 4 kg 7 lb 7 9 oz Dimensions See page 210 Supplied accessories See page 209 Camera Imaging element 1 2 inch type CMOS Effective picture elements 1920 H 1080 V Format 3 chip RGB Optical system F1 6 prism system Built in filters 1 Clear 2 1 4ND 3 1 16ND 4 1 64ND Sensitivity F11 1920 1080 59 94i F12 1920 1080 50i Minimum...

Страница 208: ...nputs Outputs Inputs Audio input XLR type 3 pin female 2 Line Mic Mic 48 V selectable 60 dBu 4 dBu 0 dBu 0 775 Vrms Microphone input XLR type 5 pin female 60 dBu GENLOCK input BNC type 1 1 0 Vp p 75 ohms unbalanced Timecode input BNC type 1 0 5 V to 18 Vp p 10 kilohms Outputs Video output BNC type 1 HD Y or analog composite HDMI Type A 19 pin 1 SDI output BNC type 2 HD SDI SD SDI selectable Audio ...

Страница 209: ... Viewfinder 1 Shoulder strap 1 Stereo microphone 1 Windscreen 1 Cold shoe kit 1 set Lens mount cap Flangeback focal distance adjustment chart Auto focus lens 1 Before Using this Unit 1 Operating Instructions CD ROM 1 Related Equipment AC adaptor AC DN10 DN2B Battery pack BP L80S Battery charger BC L160 L500 L70 Lens 1 2 inch type bayonet mount lenses only Viewfinder DXF 20W C50WA CBK VF02 Viewfind...

Страница 210: ...SB wireless LAN module IFU WLM3 MEAD SD02 for SDHC SDXC card QDA EX1 for XQD memory card SxS memory card SxS PRO series SxS PRO series SxS 1 series Microphone ECM 678 674 673 680S Microphone holder CAC 12 Wireless microphone DWR S02D WRR 855S 860C 861 862 Tripod adaptor VCT 14 U14 Video light UC D200A PROTECH Ultralight Anton Bauer Pad CBK SP01 Soft Type Shoulder Pad Hard carrying case LC H300 Sof...

Страница 211: ... LIMITED TO COMPENSATION OR REIMBURSEMENT ON ACCOUNT OF FAILURE OF THIS UNIT OR ITS RECORDING MEDIA EXTERNAL STORAGE SYSTEMS OR ANY OTHER MEDIA OR STORAGE SYSTEMS TO RECORD CONTENT OF ANY TYPE Always verify that the unit is operating properly before use SONY WILL NOT BE LIABLE FOR DAMAGES OF ANY KIND INCLUDING BUT NOT LIMITED TO COMPENSATION OR REIMBURSEMENT ON ACCOUNT OF THE LOSS OF PRESENT OR PR...

Страница 212: ...1 RCP 1000 1500 1530 Remote Control Unit VCT 14 U14 Tripod adaptor AC DN10 DN2B AC Adaptor WRR 855S 860C 861 862 UHF Synthesized Tuner Unit DWR S02D Digital Wireless Receiver BC L160 Battery Charger BC L160 Battery Charger BC L70 Battery Charger BP L80S Battery Pack SxS memory card DXF C50WA Viewfinder MEAD SD02 Media Adaptor CBK CE01 50 Pin Interface and Digital Extender CA FB70 TX70 HD Camera Ad...

Страница 213: ...ECODE AVC VIDEO THAT WAS ENCODED BY A CONSUMER ENGAGED IN A PERSONAL ACTIVITY AND OR WAS OBTAINED FROM A VIDEO PROVIDER LICENSED TO PROVIDE AVC VIDEO NO LICENSE IS GRANTED OR SHALL BE IMPLIED FOR ANY OTHER USE ADDITIONAL INFORMATION MAY BE OBTAINED FROM MPEG LA L L C SEE HTTP WWW MPEGLA COM This product uses RICOH Bitmap Fonts produced and sold by Ricoh Company Ltd About License MPEG 4 AVC Patent ...

Страница 214: ...OpenSSL Toolkit http www openssl org 4 The names OpenSSL Toolkit and OpenSSL Project must not be used to endorse or promote products derived from this software without prior written permission For written permission please contact openssl core openssl org 5 Products derived from this software may not be called OpenSSL nor may OpenSSL appear in their names without prior written permission of the Op...

Страница 215: ...der is Tim Hudson tjh cryptsoft com Copyright remains Eric Young s and as such any Copyright notices in the code are not to be removed If this package is used in a product Eric Young should be given attribution as the author of the parts of the library used This can be in the form of a textual message at program startup or in documentation online or textual provided with the package Redistribution...

Страница 216: ...hanged i e this code cannot simply be copied and put under another distribution licence including the GNU Public Licence This product uses the following software released under MIT License jQuery JavaScript Library v1 7 2 http jquery com Copyright 2011 John Resig Sizzle js http sizzlejs com Copyright 2011 The Dojo Foundation Date Wed Mar 21 12 46 34 2012 0700 MIT License Permission is hereby grant...

Страница 217: ... COPYRIGHT HOLDERS BE LIABLE FOR ANY CLAIM DAMAGES OR OTHER LIABILITY WHETHER IN AN ACTION OF CONTRACT TORT OR OTHERWISE ARISING FROM OUT OF OR IN CONNECTION WITH THE SOFTWARE OR THE USE OR OTHER DEALINGS IN THE SOFTWARE ...

Страница 218: ...s 17 Auto focus lens 21 AUTO W B BAL switch 12 B BACKLIGHT button 16 Battery changing 197 Battery pack 30 attachment shoe 10 remaining capacity 21 26 voltage display 26 BKW 401 34 Black balance adjusting 49 BRIGHT control 23 Brightness adjustment 23 Brightness level indicator 27 C Camera adaptor 10 Clip batch copy 108 batch delete 109 copying 108 cue up 103 defining names 98 deleting 89 109 dividi...

Страница 219: ...h 17 Filter indicator 28 FILTER selector 12 Flange focal length adjusting 37 button 22 Focus 57 mode indicator 27 position indicator 25 ring 22 FOCUS switch 21 Formatting initializing 64 Frame Rec function 92 Framing 96 Freeze mix function 96 G GAIN selector 13 Gain value indicator 28 GENLOCK IN connector 19 Green tally indicator 25 H HD SD SDI OUT connector 20 178 HDMI output connector 19 178 His...

Страница 220: ...mber of system lines 26 O OK mark setting 90 OK NG KP marks 107 Operation status indicator 25 i LINK connection device 27 OUTPUT DCC switch 14 P PC connector 18 Peaking adjustment 23 PEAKING control 23 Peripheral devices 212 Picture Cache Rec function 90 Planning metadata 97 PLAY PAUSE button indicator 15 102 Power supply 30 POWER switch 10 PRESET REGEN CLOCK switch 17 PREV button 15 PUSH AF butto...

Страница 221: ... 92 Switch cover 14 SxS device driver software 179 SxS memory card 63 ejecting 63 exchanging 64 formatting 64 loading 63 remaining capacity 64 restoring 65 switching 63 SxS memory card slots 18 EJECT button 18 slot cover 18 SLOT SELECT button 19 T TALLY indicator 19 Tally indicator 23 TALLY switch 20 23 TC IN connector 19 TC OUT connector 19 Testing 186 Thumbnail indicator 16 operations 104 THUMBN...

Страница 222: ...itioning knob 11 left to right positioning ring 11 lifting up the barrel and eyepiece 32 positioning lever 11 rotation bracket 34 screen display 24 Voltage display 26 VTR button 23 W WARNING indicator 15 Warning system 187 WHITE BAL switch 14 White balance adjusting 50 memory indicator 28 Wi Fi remote control 84 Wireless receiver reception level 25 Z Zebra pattern 23 ZEBRA switch 23 Zoom 56 contro...

Страница 223: ......
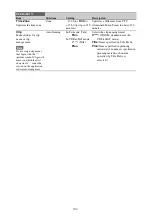
Отзывы: