English
1
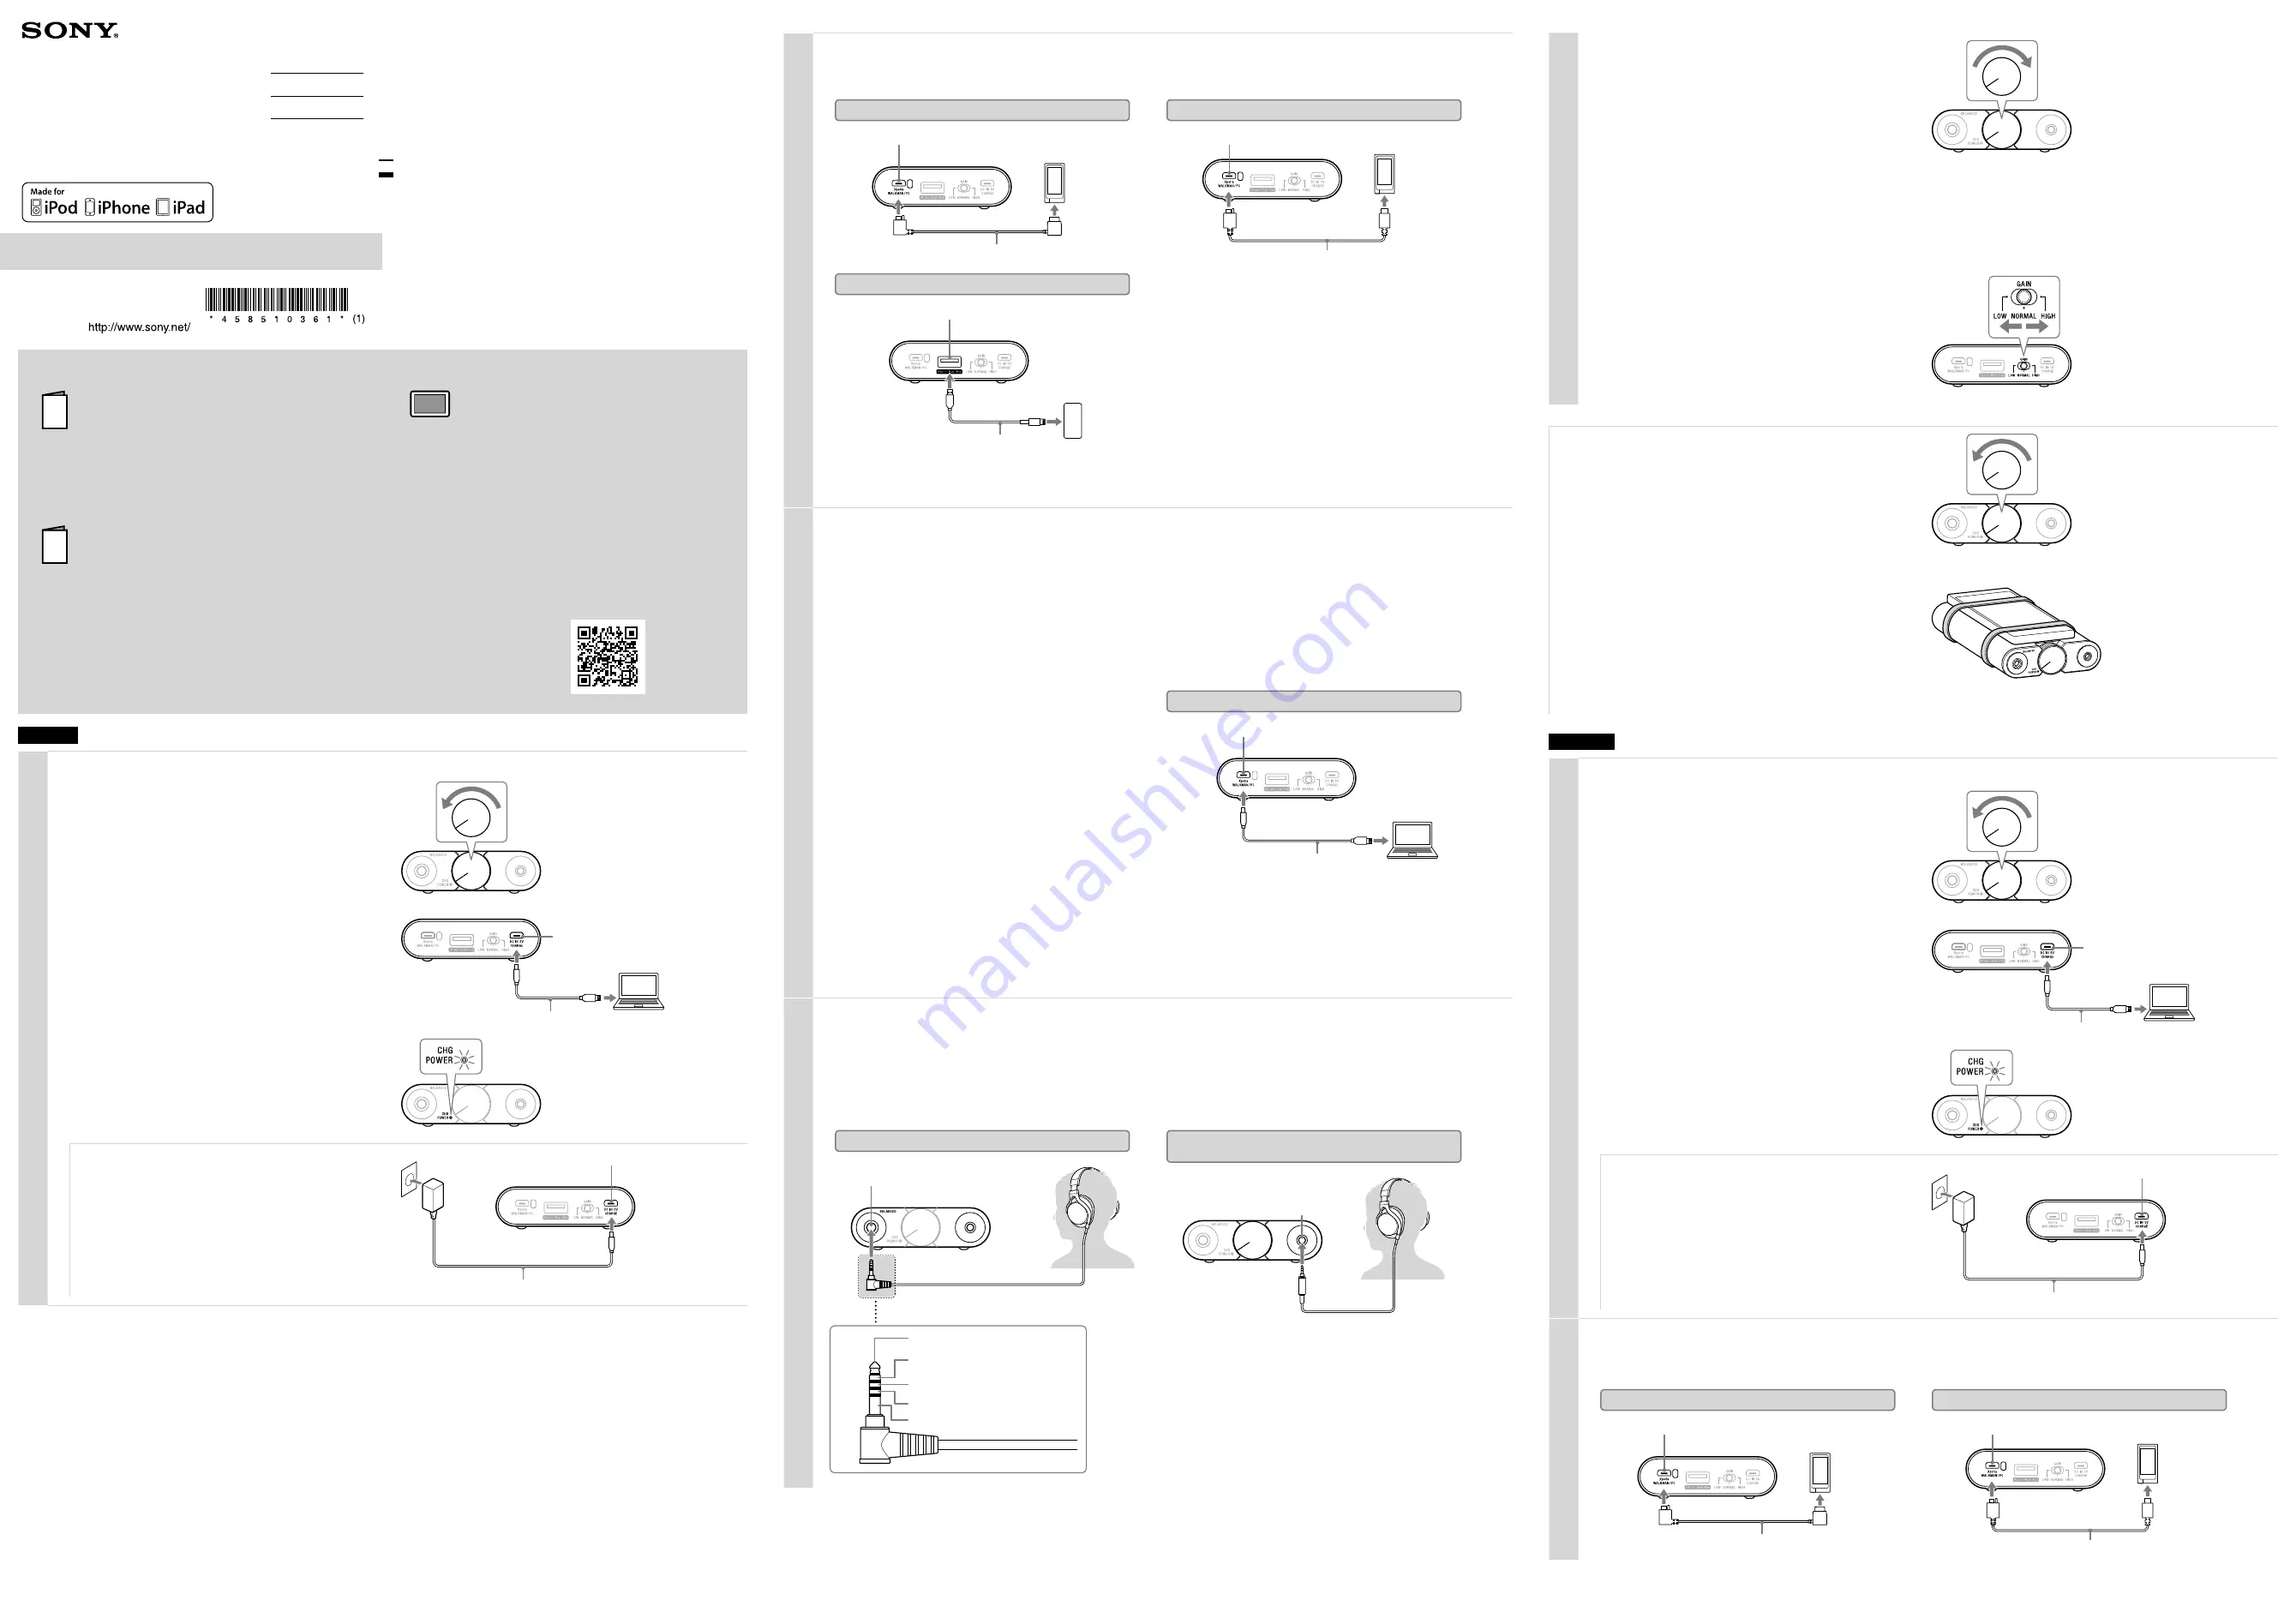
Charging the unit
Rotate the power/volume knob counterclockwise until it clicks
to turn off the unit.
Front of the unit
Connect your booted computer to the DC IN 5V / CHARGE port
(for charging only) of the unit using the micro-USB cable
(supplied).
The CHG POWER indicator lights up in red.
Charging is completed in about 8 hours. The indicator turns off when
the battery is completely charged.
If the battery is not charging properly, the CHG POWER indicator
flashes in red.
Note
The unit cannot be charged if the computer is connected to the Xperia/
WALKMAN/PC port of the unit.
Rear of the unit
Computer
Micro-USB cable (supplied)
DC IN 5V / CHARGE port (for charging only)
Front of the unit
To charge the battery from an AC outlet
Charging is completed in about 5 hours when connected to an AC
outlet using a USB AC adaptor (5V/1.5A or more, commercially-
available).
Charging via other types of adaptors is not covered by the warranty.
Hint
You can use a USB AC adaptor (5V/1.5A or more, commercially-
available) to charge the WALKMAN® via the unit. Connect the
WALKMAN® to the unit using the digital cable for WALKMAN®
(supplied).
For details concerning connection, refer to step 2.
USB AC adaptor
(commercially-available)
DC IN 5V / CHARGE port (for charging only)
Micro-USB cable (supplied)
Rear of the unit
2
Connecting the audio device to the unit
Connecting the digital output supported WALKMAN®/Xperia™ or iPhone/iPad/iPod
For details concerning computer connection, refer to “Connecting a computer”
Digital output supported WALKMAN®
Digital cable for WALKMAN® (supplied)
Rear of the unit
Xperia/WALKMAN/PC port
WALKMAN®
Xperia
Xperia/WALKMAN/PC port
Digital cable for Xperia (supplied)
Rear of the unit
Xperia
iPhone/iPad/iPod
iPhone/iPad/iPod port
USB cable supplied with
iPhone/iPad/iPod
Rear of the unit
iPhone
iPad
iPod
Note
When multiple devices are connected to the unit simultaneously, the Xperia/WALKMAN/PC port has priority.
Connecting a computer
For Windows, download and install the driver software for
Windows computers, “Sony USB Device Driver,” to the
computer.
(For Mac, there is no need to install a driver.)
Download and install the High-Resolution Audio player
software “Hi-Res Audio Player.”
To download “Sony USB Device Driver” and “Hi-Res Audio Player,” visit
the following website:
http://www.sony-asia.com/support
For details on installing, refer to the website.
Connect the computer to the unit.
The unit needs to be connected to your Windows computer at a certain
point while installing the driver software.
In this case, connect the Windows computer to the Xperia/WALKMAN/
PC port of the unit using the micro-USB cable (supplied).
The DC IN 5V / CHARGE port cannot be used to connect a computer to
play music.
Computer
Rear of the unit
Micro-USB cable (supplied)
Computer
Xperia/WALKMAN/PC port
Set the sound device settings of your computer.
For Windows 10/Windows 8/8.1
Press and hold the [Windows] and [X] keys to display the menu, select [Control Panel], [Hardware and Sound], [Sound], [Playback] tab, select [Sony PHA-2A] for the
playback device, then click [Set default].
For Windows 7
Click the [Start] menu, select [Control Panel], [Hardware and Sound], [Sound], [Playback] tab, select [Sony PHA-2A] for the playback device, then click [Set default].
For Mac
Click the [Apple] menu, select [System Preferences], [Sound], [Output] tab, then select [PHA-2A] for [Select a device for sound output].
3
Listening to music with the headphones
Connect the headphones to the unit.
Notes
•
When using headphones with a standard 3-pole stereo mini plug, do not connect anything to the headphone jack (Balanced standard). Otherwise, no sound is
produced from the headphone jack (stereo mini).
•
If headphones with a standard 3-pole stereo mini plug are connected to the headphone jack (Balanced standard), no proper sound is produced; connect them to
the headphone jack (stereo mini).
To connect balanced connection compatible headphones
Headphone jack (Balanced standard)
5-pole balanced standard plug
L +
R +
L -
R -
Unused
Front of the unit
To connect the headphones with a standard 3-pole
stereo mini plug
Front of the unit
Headphone jack (stereo mini)
Rotate the power/volume knob clockwise to turn on the unit.
Rotate it more to adjust the volume.
The CHG POWER indicator flashes several times, then stays lit.
Note
A relay is incorporated in the internal circuit of the unit, therefore it
makes a relay switching sound when the unit is turned on/off and the
internal circuit is switched to another state.
Front of the unit
Play back the connected audio device.
When playing High-Resolution Audio format data on your computer with the unit, use “Hi-Res Audio Player.”
For details on installing “Hi-Res Audio Player,” visit the following site at
http://www.sony-asia.com/support
Adjust the volume.
Adjust the volume by the power/volume knob.
•
When the volume is low:
turn off the unit, set the GAIN select switch
to HIGH, then turn on the unit. The GAIN select switch changes the
maximum volume of the power/volume knob to one of three levels
(LOW, NORMAL, and HIGH). In normal use, the setting should be
NORMAL.
Rear of the unit
After using the unit
Rotate the power/volume knob counterclockwise until it clicks to turn off the
unit.
Front of the unit
How to use the silicone belts
You can fasten a connected device to the unit using the silicone belts (supplied).
Place the protection sheet (supplied) between the unit and the connected device
to avoid scratching.
Mount the connected device on the unit.
Bind the unit and the connected device using the silicone belt
with its wider part placed under the bottom of the unit.
For details on how to use the silicon belt and the protection sheet, refer to the
Help Guide.
繁體中文
1
為本機充電
逆時針旋轉電源/音量旋鈕直到發出喀嗒聲以關閉本機電源。
本機正面
使用Micro-USB電纜(附件)將開啟的電腦連接至本機的
DC IN 5V / CHARGE連接埠(僅供充電)。
CHG POWER指示燈亮起紅燈。
充電在約8小時後完成。當電池完成充電時,指示燈熄滅。
如果電池未適當充電,CHG POWER指示燈會閃爍紅燈。
註
如果電腦連接至本機的Xperia/WALKMAN/PC連接埠,本機無法充電。
本機背面
電腦
Micro-USB電纜(附件)
DC IN 5V / CHARGE連接埠(僅限充電)
本機正面
從AC電源插座對電池充電
使用USB交流電源供應器(5V/1.5A或以上,市售)連接至AC電源插座時,
充電在約5小時後完成。
透過其他類型的電源供應器充電不在保固範圍內。
提示
您可以使用USB交流電源供應器(5V/1.5A或以上,市售)透過本機對
WALKMAN
®
充電。使用WALKMAN
®
專用數位電纜(附件)將WALKMAN
®
連接至
本機。
如需有關連接的詳細資訊,請參閱步驟2。
USB交流電源供應器
(市售)
DC IN 5V / CHARGE連接埠(僅限充電)
Micro-USB電纜(附件)
本機背面
2
將音訊裝置連接至本機
連接支援數位輸出的WALKMAN
®
/Xperia
™
或iPhone/iPad/iPod
有關電腦連接的詳細資訊,請參閱“連接電腦”
支援數位輸出的WALKMAN
®
WALKMAN
®
專用數位電纜(附件)
本機背面
Xperia/WALKMAN/PC連接埠
WALKMAN
®
Xperia
Xperia/WALKMAN/PC連接埠
Xperia專用數位電纜(附件)
本機背面
Xperia
iPhone/iPad/iPod
iPhone/iPad/iPod連接埠
iPhone/iPad/iPod隨附的
USB連接線
本機背面
iPhone
iPad
iPod
註
同時將多台裝置連接至本機時,Xperia/WALKMAN/PC連接埠具有優先權。
連接電腦
對於Windows,下載並安裝適用於Windows電腦的驅動程式軟
體“Sony USB Device Driver”至電腦。
(對於Mac,不需要安裝驅動程式。)
下載並安裝高解析度音訊播放器軟體“Hi-Res Audio Player”。
若要下載“Sony USB Device Driver”和“Hi-Res Audio Player”,請造
訪下列網站:
http://www.sony-asia.com/support
如需安裝的詳細資訊,請參閱網站。
將電腦連接至本機。
安裝驅動程式軟體期間的某個特定時間點需要將本機連接到Windows電腦。
此時,請使用Micro-USB電纜(附件)將Windows電腦連接至本機的Xperia/
WALKMAN/PC連接埠。
無法使用DC IN 5V / CHARGE連接埠連接電腦以播放音樂。
電腦
本機背面
Micro-USB電纜(附件)
電腦
Xperia/WALKMAN/PC連接埠
設置電腦的聲音裝置設定。
如果使用Windows 10/Windows 8/8.1
按住[Windows]和[X]鍵以顯示選單,選擇[控制台]、[硬體和音效]、[音效]、[播放]標籤,選擇[Sony PHA-2A]作為播放裝置,然後按一下[設定預設值]。
如果使用Windows 7
按一下[開始]選單,選擇[控制台]、[硬體和音效]、[聲音]、[播放]標籤,選擇[Sony PHA-2A]作為播放裝置,然後按一下[設為預設值]。
如果使用Mac
按一下[Apple]選單,選擇[系統偏好設定]、[聲音]、[輸出]標籤,然後將[選擇聲音輸出裝置]選擇為[PHA-2A]。
3
以耳機聆聽音樂
將耳機連接到本機。
註
•
使用有標準3芯立體聲迷你插頭的耳機時,請勿將任何設備連接到耳機插孔(平衡標準)。否則耳機插孔(立體聲迷你)不會發出聲音。
•
如果有標準3芯立體聲迷你插頭的耳機連接到耳機插孔(平衡標準),不會發出適當的聲音;請連接到耳機插孔(立體聲迷你)。
連接平衡連接相容的耳機
耳機插孔(平衡標準)
5芯平衡標準插頭
L +
R +
L -
R -
未使用
本機正面
連接有標準3芯立體聲迷你插頭的耳機
本機正面
耳機插孔(立體聲迷你)
順時針旋轉電源/音量旋鈕以開啟本機電源。
進一步旋轉可調節音量。
CHG POWER指示燈閃爍數次,然後維持亮起。
註
本機內部電路採用繼電器,因此當本機開啟/關閉以及內部電路切換到其他
狀態時,會發出繼電器切換聲。
本機正面
播放連接的音訊裝置。
以本機播放電腦上的高解析度音訊格式資料時,請使用“Hi-Res Audio Player”。
如需安裝“Hi-Res Audio Player”的詳細資訊,請參閱以下網址:
http://www.sony-asia.com/support
調整音量。
用電源/音量旋鈕調整音量。
•
音量低時:
請關閉本機電源,將GAIN選擇開關設定為HIGH,然後開啟本機
的電源。GAIN選擇開關可將電源/音量旋鈕的最大音量變更為三個等級之
一(LOW、NORMAL和HIGH)。一般使用時,設定應為NORMAL。
本機背面
結束使用本機後
逆時針旋轉電源/音量旋鈕直到發出喀嗒聲以關閉本機電源。
本機正面
如何使用矽膠帶
可以使用矽膠帶(附件)將連接裝置緊固到本機。
請將保護片(附件)置於本機和連接裝置之間,以防刮傷。
將連接裝置安裝在本機上。
將矽膠帶的較寬部分置於本機底部下方,綑綁本機和連接裝置。
有關矽膠帶和保護片使用方式的詳細資訊,請參閱說明指南。
©2016 Sony Corporation
Printed in Malaysia
Manuals supplied/
隨附的手冊
隨附以下3本手冊。
/
부속된 설명서
The 3 following manuals are included./
隨附的手冊
隨附以下3本手冊。
/
다음과 같은 설명서 3가지가 포함되어 있습니다.
Operating Instructions (this document)
Provides you with instructions on how to connect the unit with
devices and basic operations.
使用說明書(本文件)
提供有關如何連接本機與各裝置的指示和基本操作。
사용 설명서(본 문서)
기기를 장치와 연결하는 방법과 기본적인 작동법이 나와 있습니다.
Reference Guide (exhibit document)
Provides you with precautions and product specifications.
參考指南(附件文件)
提供注意事項和產品規格。
참고 설명서(별첨 문서)
주의사항과 제품 주요 제원이 나와 있습니다.
Help Guide (web manual)
Read the Help Guide on your computer or smartphone, when you
want to know how to use the unit in greater detail. The Help Guide
also contains a troubleshooting guide which provides you with
remedies for the problems you might encounter.
說明指南(網路手冊)
請在電腦或智慧型手機上閱讀說明指南以獲得有關如何更好地使用本機
的詳細資訊。說明指南也包含故障排除指南,提供可能遇到的問題的解
決方法。
도움말 안내(웹 설명서)
기기 사용 방법에 대한 자세한 내용이 필요한 경우 컴퓨터 또는 스마트폰에서 도움말
안내를 읽어 보십시오. 도움말 안내에는 당면한 문제에 대한 해결책을 제시하는 문제
해결 가이드도 들어 있습니다.
URL:
http://rd1.sony.net/help/mdr/pha-2a/h_zz/
Two-dimensional code:
二維碼:
2차원 코드:
Portable Headphone Amplifier
Operating Instructions
使用說明書
사용 설명서
PHA-2A
4-585-103-
61
(1)


