14
Front Panel
Chap
te
r 2
Name
s
an
d
F
u
nc
tio
n
s
o
f Pa
rt
s
j
PAGE/HOME button
When pressed alone, this functions as the PAGE (page
switching) button. When pressed together with the SHIFT
button, functions as the HOME button.
PAGE button:
Displays the function menu, if it is not
already visible. (The most recently displayed page of
the function menu appears.)
HOME button:
When pressed with the function menu
visible, returns to the HOME page of the function
menu.
6
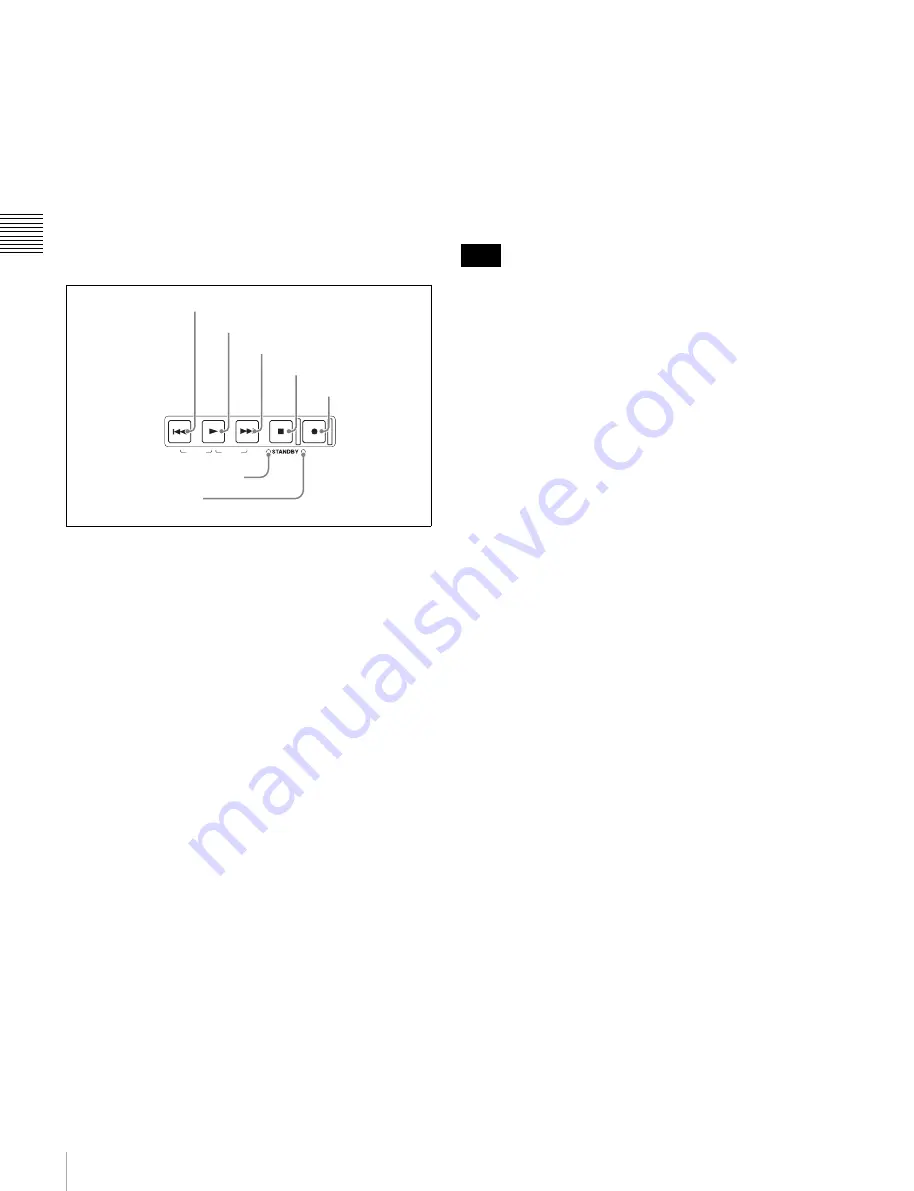
Recording and playback control section
a
PREV (previous) button
Press this button, turning it on, to show the first frame of
the current clip. When the first frame of a clip is shown,
pressing this button jumps to the beginning of the previous
clip.
1)
This button is also used together with other buttons
for the following operations.
Reverse direction high-speed search:
Hold down the
PLAY button, and press this button. A high-speed
search in the reverse direction is carried out.
Displaying the first frame of the first clip:
Hold down
the SHIFT button, and press this button.
1) When setup menu item 153 FIND MODE is set to “clip & rec start mark”,
this button jumps to the frame where the previous Rec Start essence mark
is set and displays the video of that frame.
b
PLAY button
To start playback, press this button, turning it on.
When this button is pressed during recording, recording
stops and the unit enters stop mode. If you do not want to
stop recording when this button is pressed, set setup menu
item 145 MODE KEY ENABLE DURING RECORDING
to “stop”.
c
NEXT button
Press this button, turning it on, to jump to the next clip, and
show the first frame.
2)
This button is also used together
with other buttons for the following operations.
Forward direction high-speed search:
Hold down the
PLAY button, and press this button. A high-speed
search in the forward direction is carried out.
Displaying the last frame of the last clip:
Hold down the
SHIFT button, and press this button.
2) When setup menu item 153 FIND MODE is set to “clip & rec start mark”,
this button jumps to the frame where the next Rec Start essence mark is set
and displays the video of that frame.
d
STOP button
To stop recording or playback, press this button, turning it
on. The frame at the stop point is displayed.
This button flashes when setup menu item 105
REFERENCE SYSTEM ALARM is set to “on” and the
correct reference video input signal (as specified by OUT
REF on the HOME page of the function menu) is not being
input.
e
REC (record) button
To start recording, hold down this button, and press the
PLAY button. The recording takes place on an unrecorded
part of the disc.
To stop recording, press the STOP button.
To monitor in EE mode
You can press this button when in stop mode to monitor
input signals in EE mode. The button lights when pressed.
Press the STOP button to return to the original video.
You can also press this button during playback and
searches to view EE mode for as long as the button is held
down.
f
REC INHI (recording inhibit) indicator
This lights in the following cases.
• When a disc with recording inhibited is loaded.
• When the format of the recorded part of the disc does not
match the system frequency settings of the unit.
g
STANDBY indicator
Lights when the unit is put into disc stop mode. After a
certain time passes in a disc stop mode, the unit
automatically enters standby state and the indicator goes
off.
You can specify the time until the unit enters standby state
with setup menu item 501 STILL TIMER.
TOP
F REV
END
REC INHI
F FWD
PREV
PLAY
S
TOP
NEXT
REC
1
PREV button
2
PLAY button
3
NEXT button
4
STOP button
5
REC button
7
STANDBY indicator
6
REC INHI indicator
Note


