USO
RESTRITO
Signal Output Settings (Output Menu)
619
Ch
a
p
te
r 20
S
wi
tc
h
e
r S
e
tu
p
(S
wi
tc
h
e
r)
•
Press the arrow keys to scroll the reverse video cursor.
•
Turn the knob.
Knob
Parameter
Adjustment
Setting values
1
Output No Output connector
number selection
1 to 48
The selected output signal appears in reverse video.
Adjusting the video clip
To adjust the clip value for each of the output signals from
the Output 1 to 48 connectors, use the following
procedure.
1
In the Switcher >Output menu, press [Video Clip].
The Video Clip menu appears.
The status area shows the output connectors and
assigned signals, and the white clip, dark clip, and
chrominance clip values.
2
Adjust the following parameters.
Knob
Parameter
Adjustment
Setting values
2
White Clip Luminance
signal white clip
value
90.00 to 109.02
3
Dark Clip
Luminance
signal dark clip
value
–6.85 to +10.00
4
Chroma
Clip
Chrominance
signal clip value
90.00 to 113.17
To set the values to the default values, press [Default].
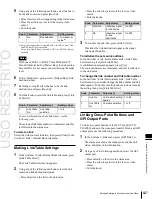
Making vertical blanking interval
adjustment and through mode settings
1
In the Switcher >Output menu, press [V Blank/
Through].
The V Blank/Through menu appears.
The status area shows the output connectors and the
assigned signals, the vertical blanking interval, and the
through mode Enable/Disable status.
2
Press [V Blank Mask].
3
Adjust the parameter.
Knob
Parameter
Adjustment
Setting values
2
Mask End Final value for
vertical blanking
interval
See note a)
below
a)
Depending on the signal format, the adjustment range varies as
follows.
480i: 10 to 19
576i: 6 to 22
1080i/1080PsF: 7 to 20
720P: 7 to 25
1080P: 15 to 41
To return the values to their defaults, press [Default].
4
To enable the through mode, press [Through Mode],
setting it to Enable.
The through mode can be applied to the following
outputs.
•
Aux 1 to 48 outputs
•
Program outputs of the M/E and PGM/PST rows
•
Clean outputs of the M/E and PGM/PST rows
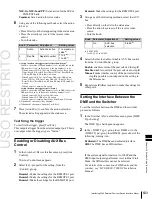
Making safe title settings
1
In the Switcher >Output menu, press [Safe Title].
The Safe Title menu appears.
The status area shows the output connectors and the
assigned signals, with the box 1, box 2, cross, and grid
states.
2
To enable the safe title on/off setting made in the Misc
menu, press [Safe Title], turning it on.
3
Carry out either of the following operations.
To display a box:
Press [Box1] or [Box2], turning it
on.
In this case, carry out the following steps
4
and
5
.
To display a cross:
Press [Cross], turning it on.
To display a grid:
Press [Grid], turning it on.
In this case, carry out the following steps
4
and
5
.
4
When you selected [Box1] or [Box2] in step
3
, adjust the
following parameters.
Knob
Parameter
Adjustment
Setting values
2
Box Size
Box size
50.00 to 100.00
3
Luminance Display
brightness
0.00 to
100.00
a)
a)
Adjustable for Box2
When in step
3
you selected [Grid], in the <Grid Size>
group, select one of the following.
80.00%:
Set the grid size to 80% of the screen frame
85.00%:
Set the grid size to 85% of the screen frame
90.00%:
Set the grid size to 90% of the screen frame
100.00%:
Set the grid size to the full-screen size
(100% of the screen frame)
5
When in step
3
you selected [Box1] or [Box2], in the
<Box1 Adjust> or <Box2 Adjust> group, select the
screen aspect ratio (16:9/14:9/4:3).
When in step
3
you selected [Grid], in the <Grid
Adjust> group, select the screen aspect ratio (16:9/
4:3).
Содержание MVS-8000X SystemMVS-7000X System
Страница 358: ...USO RESTRITO 358 Wipe Pattern List Appendix Volume 1 Enhanced Wipes Rotary Wipes ...
Страница 360: ...USO RESTRITO Random Diamond DustWipes 360 1 w pe PaternLO ...
Страница 362: ...USO RESTRITO 362 DME Wipe Pattern List Appendix Volume 1 Door 2D trans 3D trans ...
Страница 363: ...USO RESTRITO DME Wipe Pattern List 363 Appendix Volume 1 Flip tumble Frame in out Picture in picture ...
Страница 364: ...USO RESTRITO 364 DME Wipe Pattern List Appendix Volume 1 Page turn Page roll ...
Страница 365: ...USO RESTRITO DME Wipe Pattern List 365 Appendix Volume 1 Mirror Sphere Character trail Wave Ripple Split slide ...
Страница 367: ...USO RESTRITO DME Wipe Pattern List 367 Appendix Volume 1 Squeeze 3D trans Picture in picture Page turn ...
Страница 376: ...USO RESTRITO 376 Menu Tree Appendix Volume 1 Frame Memory Menu FRAME MEM button Color Bkgd Menu COLOR BKGD button ...
Страница 377: ...USO RESTRITO Menu Tree 377 Appendix Volume 1 AUX Menu AUX button CCR Menu CCR button ...
Страница 379: ...USO RESTRITO Menu Tree 379 Appendix Volume 1 DME Menu DME button ...
Страница 380: ...USO RESTRITO 380 Menu Tree Appendix Volume 1 Global Effect Menu GLB EFF button Router Menu Device Menu DEV button ...
Страница 381: ...USO RESTRITO Menu Tree 381 Appendix Volume 1 Macro Menu MCRO button ...
Страница 382: ...USO RESTRITO 382 Menu Tree Appendix Volume 1 Key Frame Menu KEY FRAME button ...
Страница 383: ...USO RESTRITO Menu Tree 383 Appendix Volume 1 Effect Menu EFF button ...
Страница 384: ...USO RESTRITO 384 Menu Tree Appendix Volume 1 Snapshot Menu SNAPSHOT button ...
Страница 385: ...USO RESTRITO Menu Tree 385 Appendix Volume 1 Shotbox Menu SHOTBOX button ...
Страница 386: ...USO RESTRITO 386 Menu Tree Appendix Volume 1 File Menu FILE button ...
Страница 388: ...USO RESTRITO 388 Menu Tree Appendix Volume 1 ENG SETUP button to previous page topages after 390 to next page ...
Страница 389: ...USO RESTRITO Menu Tree 389 Appendix Volume 1 ENG SETUP button to page 387 to previous pages to following pages ...
Страница 390: ...USO RESTRITO 390 Menu Tree Appendix Volume 1 ENG SETUP button to previous pages to next page a MVS 7000X only ...
Страница 391: ...USO RESTRITO Menu Tree 391 Appendix Volume 1 ENG SETUP button to previous pages ...
Страница 392: ...USO RESTRITO 392 Menu Tree Appendix Volume 1 User Setup Menu USER SETUP button Diagnostic Menu DIAG button ...
Страница 413: ...USO RESTRITO MVS 8000X System MVS 7000X System SY 4 470 637 01 1 Sony Corporation 2013 ...
Страница 706: ...USO RESTRITO MVS 8000X System MVS 7000X System SY 4 470 637 01 1 Sony Corporation 2013 ...


