USO
RESTRITO
612
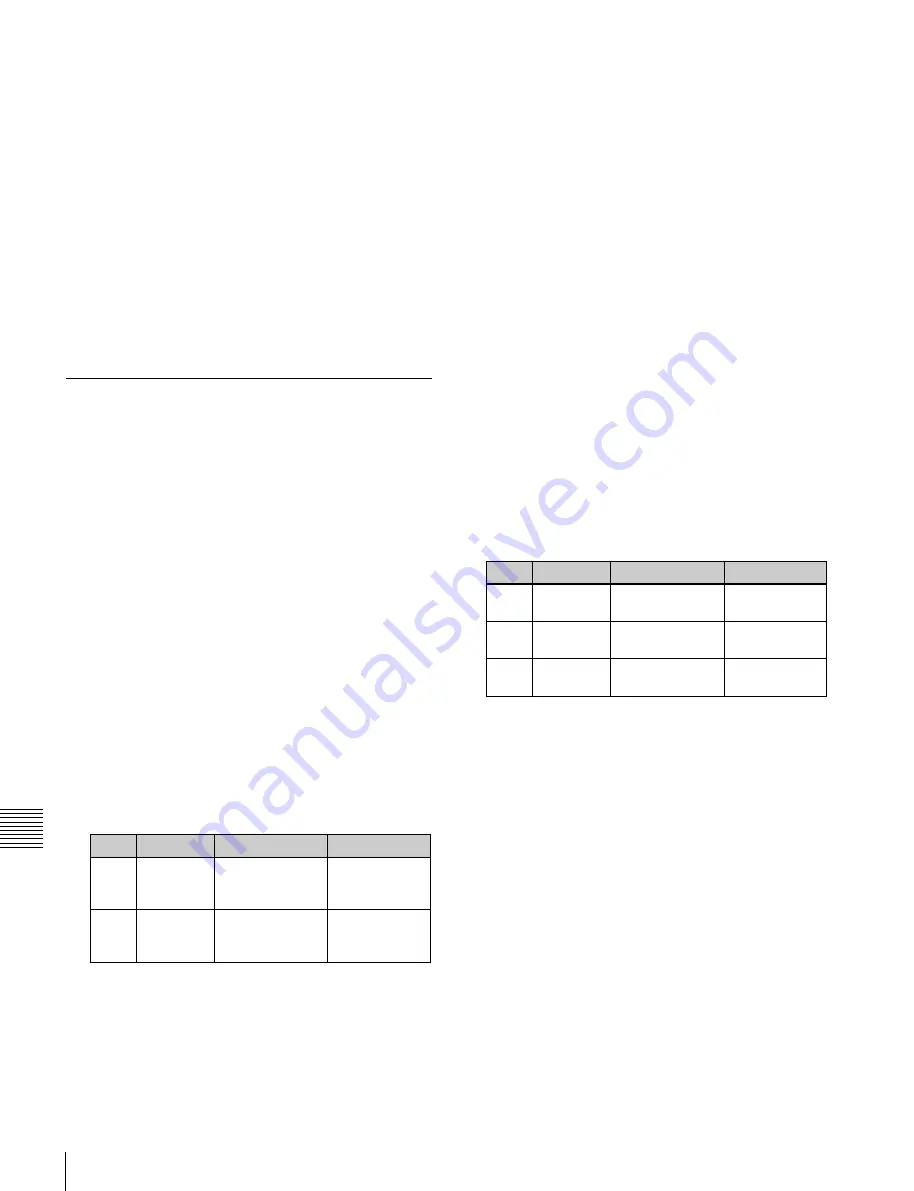
Settings for Switcher Configuration (Config Menu)
Ch
a
p
te
r 20
S
wi
tc
h
e
r S
e
tu
p
(S
wi
tc
h
e
r)
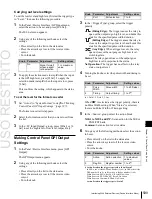
The DME Config menu appears.
2
Using either of the following methods, select the M/E
or PGM/PST bank for which you want to set a DME
channel assignment.
•
Press directly on the list in the status area.
•
Press the arrow keys to scroll the reverse video
cursor.
3
In the <DME Channel> group, press one of the [Ch1]
to [Ch8] buttons turning it on to select the channel
which you want to assign to the bank selected in step
2
.
4
Repeat steps
2
and
3
to assign DME channels to other
banks.
To set 4:3 video material to have side flags
applied automatically
You can make a setting so that when a signal with aspect
ratio set to 4:3 is selected in the cross-point control block,
side flags are automatically applied.
To do so, in the Switcher >Config >Side Flags menu press
[Auto Side Flags]. Pressing this button toggles the setting
on and off.
This setting applies to all of the M/E and PGM/PST banks.
To set to crop to 4:3 when a DME wipe is executed
When side flags are enabled, you can automatically crop
an image as set to be a 4:3 image when executing a DME
wipe.
To do so, in the Switcher >Config >Side Flags menu press
[Auto Crop]. Pressing this button toggles the setting on and
off.
This setting applies to all of the M/E and PGM/PST banks.
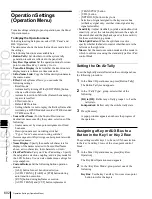
Setting the Side Flag Video Material
and Operation
Make settings relating to the video material (4:3 aspect
ratio) for applying side flags.
For details of side flag operations, see “Side Flag
Settings” in Chapter 10 (Volume 1).
Setting the aspect ratio (4:3/16:9)
1
In the Switcher >Config menu, press [Side Flags].
The Side Flags menu appears.
The status area lists the video/key pair numbers, video
signal source names, and aspect ratio settings (16:9/
4:3).
2
Using any of the following methods, select the pair
number for which you want to make the setting.
•
Press directly on the list in the status area.
•
Use the arrow keys to scroll the reverse video cursor.
•
Turn the knobs.
Knob
Parameter
Adjustment
Setting values
1
V/K Pair No Selection of a V/
K pair by its
number in the list
1 to 300
2
Num
Selection of
number of V/K
pairs in the list
1 to 300
•
To select all of the pair numbers, press [ALL].
3
In the <Aspect> group, press [4:3].
If you select [16:9], no side flags are applied.
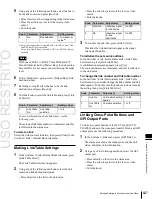
Adjusting the width of the side flags
You can adjust the width of the side flags.
1
In the Switcher >Config >Side Flags menu, press
[Width].
2
Adjust the following parameters.
Knob
Parameter
Adjustment
Setting values
3
Left
Width of left side
flag
–100.00 to
+100.00
4
Right
Width of right
side flag
–100.00 to
+100.00
5
All
Width of both
side flags
Left value
shown
Displaying the menu for enabling/disabling
the side flags
In the Switcher >Config >Side Flags menu, press [Misc
>Enbl >Side Flags].
Displaying the menu for assigning the side
flags on/off function to a cross-point
button
In the Switcher >Config >Side Flags menu, press [Side
Flags Button Assign].
Содержание MVS-8000X SystemMVS-7000X System
Страница 358: ...USO RESTRITO 358 Wipe Pattern List Appendix Volume 1 Enhanced Wipes Rotary Wipes ...
Страница 360: ...USO RESTRITO Random Diamond DustWipes 360 1 w pe PaternLO ...
Страница 362: ...USO RESTRITO 362 DME Wipe Pattern List Appendix Volume 1 Door 2D trans 3D trans ...
Страница 363: ...USO RESTRITO DME Wipe Pattern List 363 Appendix Volume 1 Flip tumble Frame in out Picture in picture ...
Страница 364: ...USO RESTRITO 364 DME Wipe Pattern List Appendix Volume 1 Page turn Page roll ...
Страница 365: ...USO RESTRITO DME Wipe Pattern List 365 Appendix Volume 1 Mirror Sphere Character trail Wave Ripple Split slide ...
Страница 367: ...USO RESTRITO DME Wipe Pattern List 367 Appendix Volume 1 Squeeze 3D trans Picture in picture Page turn ...
Страница 376: ...USO RESTRITO 376 Menu Tree Appendix Volume 1 Frame Memory Menu FRAME MEM button Color Bkgd Menu COLOR BKGD button ...
Страница 377: ...USO RESTRITO Menu Tree 377 Appendix Volume 1 AUX Menu AUX button CCR Menu CCR button ...
Страница 379: ...USO RESTRITO Menu Tree 379 Appendix Volume 1 DME Menu DME button ...
Страница 380: ...USO RESTRITO 380 Menu Tree Appendix Volume 1 Global Effect Menu GLB EFF button Router Menu Device Menu DEV button ...
Страница 381: ...USO RESTRITO Menu Tree 381 Appendix Volume 1 Macro Menu MCRO button ...
Страница 382: ...USO RESTRITO 382 Menu Tree Appendix Volume 1 Key Frame Menu KEY FRAME button ...
Страница 383: ...USO RESTRITO Menu Tree 383 Appendix Volume 1 Effect Menu EFF button ...
Страница 384: ...USO RESTRITO 384 Menu Tree Appendix Volume 1 Snapshot Menu SNAPSHOT button ...
Страница 385: ...USO RESTRITO Menu Tree 385 Appendix Volume 1 Shotbox Menu SHOTBOX button ...
Страница 386: ...USO RESTRITO 386 Menu Tree Appendix Volume 1 File Menu FILE button ...
Страница 388: ...USO RESTRITO 388 Menu Tree Appendix Volume 1 ENG SETUP button to previous page topages after 390 to next page ...
Страница 389: ...USO RESTRITO Menu Tree 389 Appendix Volume 1 ENG SETUP button to page 387 to previous pages to following pages ...
Страница 390: ...USO RESTRITO 390 Menu Tree Appendix Volume 1 ENG SETUP button to previous pages to next page a MVS 7000X only ...
Страница 391: ...USO RESTRITO Menu Tree 391 Appendix Volume 1 ENG SETUP button to previous pages ...
Страница 392: ...USO RESTRITO 392 Menu Tree Appendix Volume 1 User Setup Menu USER SETUP button Diagnostic Menu DIAG button ...
Страница 413: ...USO RESTRITO MVS 8000X System MVS 7000X System SY 4 470 637 01 1 Sony Corporation 2013 ...
Страница 706: ...USO RESTRITO MVS 8000X System MVS 7000X System SY 4 470 637 01 1 Sony Corporation 2013 ...


