USO
RESTRITO
Interfacing With External Devices (Device Interface Menu)
597
Ch
a
p
te
r 19
Co
n
tr
o
l P
a
n
e
l S
e
tu
p
(P
a
n
e
l)
A keyboard window appears.
3
Enter a name of not more than eight characters, and
press [Enter].
The name you have set is reflected in the status area
and on the memory recall button in the utility/shotbox
control block.
Assigning a Function to the Key 2
Row Cross-Point Buttons
You can assign a function to the key 2 row cross-point
buttons of each of the M/E-1 to M/E-5, or PGM/PST
banks, and use them in the same way as the buttons in the
utility/shotbox control block.
1
In the Panel >Prefs/Utility menu, press [Key2/4 Bus
Button Assign].
The Key2/4 Bus Button Assign menu appears. The
cross-point settings for the key 2 row appear.
2
“Assigning a Function to a Memory Recall
Button in the Utility/Shotbox Control Block” (page
to make the assignment. Note, however, the
following differences.
•
The bank setting of knob 1 is from 1 to 5.
•
The adjustment range of knob 2 is from 1 to the
number of cross-point buttons.
•
The character string for a button name is a maximum
of four characters.
For details of executing a utility/shotbox function with the
key 2 row, see “Executing a Shotbox Function With the
Key 2 Row Cross-Point Buttons” (page 494) and
“Executing Utilities With the Cross-Point Buttons in the
Key 2 Row” (page 488).
Interfacing With External
Devices (Device Interface
Menu)
To carry out setup relating to connections with external
devices, display the Panel >Device Interface menu.
To display the Device Interface menu
In the Engineering Setup menu, select VF2 ‘Panel’ and
HF5 ‘Device Interface.’
The following functions are available here.
•
GPI Input:
Set the GPI input ports and trigger type, and
make the action settings.
•
GPI Output:
Set the GPI output ports and trigger type,
and make the action settings.
•
P-Bus Control:
Set the control mode for P-Bus devices.
•
DCU Serial Port Assign:
Assign the devices (disk
recorder/VTR/Extended VTR) connected to a DCU and
accessible from the control panel to the [DEV1] to
[DEV12] buttons which become operative when you
press the [DEV] button on the device control block. For
a disk recorder or Extended VTR, you can also make
settings relating to sharing of file lists. Further, you can
make settings for devices (disk recorder/VTR/Extended
VTR) operable from an editing keyboard.
•
Editor Port Assign:
When the BZS-8050 license is
valid, make settings for the SCU editor panel port.
•
Aux Bus Override Mode:
Set the operating mode when
“Aux ? O’ride Src ??” is selected as the GPI input action.
Making Control Panel GPI Input
Settings
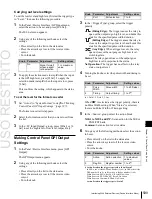
1
In the Panel >Device Interface menu, press [GPI
Input].
The GPI Input menu appears.
2
Using any of the following methods, select the
settings.
•
Press directly on the list in the status area.
•
Press the arrow keys to scroll the reverse video
cursor.
•
Turn the knob.
Knob
Parameter
Adjustment
Setting values
1
Port
Port selection
1 to 8
3
In the <Trigger Type> group, select the trigger type.
(Rising Edge):
Apply the trigger on a rising
edge of an input pulse.
Содержание MVS-8000X SystemMVS-7000X System
Страница 358: ...USO RESTRITO 358 Wipe Pattern List Appendix Volume 1 Enhanced Wipes Rotary Wipes ...
Страница 360: ...USO RESTRITO Random Diamond DustWipes 360 1 w pe PaternLO ...
Страница 362: ...USO RESTRITO 362 DME Wipe Pattern List Appendix Volume 1 Door 2D trans 3D trans ...
Страница 363: ...USO RESTRITO DME Wipe Pattern List 363 Appendix Volume 1 Flip tumble Frame in out Picture in picture ...
Страница 364: ...USO RESTRITO 364 DME Wipe Pattern List Appendix Volume 1 Page turn Page roll ...
Страница 365: ...USO RESTRITO DME Wipe Pattern List 365 Appendix Volume 1 Mirror Sphere Character trail Wave Ripple Split slide ...
Страница 367: ...USO RESTRITO DME Wipe Pattern List 367 Appendix Volume 1 Squeeze 3D trans Picture in picture Page turn ...
Страница 376: ...USO RESTRITO 376 Menu Tree Appendix Volume 1 Frame Memory Menu FRAME MEM button Color Bkgd Menu COLOR BKGD button ...
Страница 377: ...USO RESTRITO Menu Tree 377 Appendix Volume 1 AUX Menu AUX button CCR Menu CCR button ...
Страница 379: ...USO RESTRITO Menu Tree 379 Appendix Volume 1 DME Menu DME button ...
Страница 380: ...USO RESTRITO 380 Menu Tree Appendix Volume 1 Global Effect Menu GLB EFF button Router Menu Device Menu DEV button ...
Страница 381: ...USO RESTRITO Menu Tree 381 Appendix Volume 1 Macro Menu MCRO button ...
Страница 382: ...USO RESTRITO 382 Menu Tree Appendix Volume 1 Key Frame Menu KEY FRAME button ...
Страница 383: ...USO RESTRITO Menu Tree 383 Appendix Volume 1 Effect Menu EFF button ...
Страница 384: ...USO RESTRITO 384 Menu Tree Appendix Volume 1 Snapshot Menu SNAPSHOT button ...
Страница 385: ...USO RESTRITO Menu Tree 385 Appendix Volume 1 Shotbox Menu SHOTBOX button ...
Страница 386: ...USO RESTRITO 386 Menu Tree Appendix Volume 1 File Menu FILE button ...
Страница 388: ...USO RESTRITO 388 Menu Tree Appendix Volume 1 ENG SETUP button to previous page topages after 390 to next page ...
Страница 389: ...USO RESTRITO Menu Tree 389 Appendix Volume 1 ENG SETUP button to page 387 to previous pages to following pages ...
Страница 390: ...USO RESTRITO 390 Menu Tree Appendix Volume 1 ENG SETUP button to previous pages to next page a MVS 7000X only ...
Страница 391: ...USO RESTRITO Menu Tree 391 Appendix Volume 1 ENG SETUP button to previous pages ...
Страница 392: ...USO RESTRITO 392 Menu Tree Appendix Volume 1 User Setup Menu USER SETUP button Diagnostic Menu DIAG button ...
Страница 413: ...USO RESTRITO MVS 8000X System MVS 7000X System SY 4 470 637 01 1 Sony Corporation 2013 ...
Страница 706: ...USO RESTRITO MVS 8000X System MVS 7000X System SY 4 470 637 01 1 Sony Corporation 2013 ...


