background image

MHS-TS22

1-3

1-3.  WATER-PROOF INSPECTION TOOL

1-3-1. Water-proof Inspection Tool

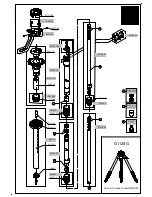
There are two types of the air-leak tester, hand pump type and compressor type. Use either between two types.

VACUUM PAD
J-6082-734-2

HAND VACUUM PUMP
J-6082-734-1

Vacuum pad and hand vacuum pump are parts for
repair, and they are included in air-leak tester.

AIR-LEAK TESTER (COMPRESSOR TYPE)
J-6082-733-A

AIR-LEAK TESTER (HAND PUMP TYPE)
J-6082-734-A

Note :

A

Check the unit status.

   EIs the unit deformed?

   EIs any foreign object present in the water-stopping area?

   EIs the waterproof packing deformed?

   EIs any scratch or crack present on exterior parts?

   EIs there any trance of immersion?

No

OK

Yes

(See page 1-2)

Yes

Clean the waterproof packing.

Unrepairable

Remove foreign object from the 

water-stopping area, replace exterior 

parts/waterproof parts, etc.

When the unit cannot be repaired, 

take individual measures.

(Conforming to warranty provisions/area 

judgment)

(Note 2) 

Judge whether the unit is repairable or not based on the repair standard 

at each depot.

Repairable?

(Note 2)

No

Normal repair

Judge by Air-leak test

NG

Check waterproof 

parts.

END

Yes

Replace waterproof parts.

Ask the customer 

about whether to replace 

waterproof parts.

(Note 1)

No

(Note 1) 

Explain the necessity of replacing waterproof parts to the customer.
When approval is gained from the customer, replace waterproof parts.

Содержание MHS-TS22

Страница 1: ...US Model 1 1 WATER PROOF DUST PROOF AND SHOCK PROOF 1 2 SERVICING FLOW 1 3 WATER PROOF INSPECTION TOOL 1 4 AIR LEAK TEST 1 5 PERIODIC MAINTENANCE 1 6 METHOD FOR COPYING OR ERASING THE DATA IN INTERNAL MEMORY 1 7 REGARDING FUSE 9 834 658 12 MHS TS22 Internal memory ON BOARD Internal memory ON BOARD Ver Date History Contents S M Rev issued 1 0 2012 02 Official Release 1 1 2012 06 Revised 1 A1 12 107...

Страница 2: ...URITÉ DE FONCTIONNEMENT NE REM PLACER CES COMPOSANTS QUE PAR DES PIÈCES SONY DONT LES NUMÉROS SONT DONNÉS DANS CE MANUEL OU DANS LES SUPPLÉMENTS PUBLIÉS PAR SONY SAFETY CHECK OUT After correcting the original service problem perform the following safety checks before releasing the set to the customer Caution Danger of explosion if battery is incorrectly replaced Replace only with the same or equiv...

Страница 3: ...a under near water Do not subject the camera to shock such as from jumping into water Do not open and close the multi connector cover while under near water This camera sinks in water Place your hand through the wrist strap to prevent the camera from sinking Faint white circular spots may appear in underwater flash photos due to reflections off of floating objects This is not a malfunction Set Und...

Страница 4: ...lamping certainly 1 2 SERVICING FLOW This repair flow is an example and is not compulsory Modify this flow as needed according to the repair standard and other necessary documents for each area To maintain the waterproof performance of this unit annual replacement charged of the waterproof packing is recom mended in the user s manual and other documents START Within one year from purchase No Was a...

Страница 5: ... any scratch or crack present on exterior parts EIs there any trance of immersion No OK Yes See page 1 2 Yes Clean the waterproof packing Unrepairable Remove foreign object from the water stopping area replace exterior parts waterproof parts etc When the unit cannot be repaired take individual measures Conforming to warranty provisions area judgment Note 2 Judge whether the unit is repairable or n...

Страница 6: ...nector 2 Remove the side mounted screw set the two dry cell batteries type 9V DC power supply can be use in place of the dry cell batteries DC12 V to 24 V 1 3 4 Operation of Pressure Indicator Perform the setting Focus mode 40 0 kPa 1 Press the MODE button for 3 seconds or more 2 Press the MODE button at 1 time 3 Press the button and select the Foc mode 4 Press the MODE button at 1 time 5 Press th...

Страница 7: ... leak under the condition with vibration 4 Wait 120 seconds with keeping the pressure at near 5 0 kPa 5 Wait 30 seconds with setting air switch to close and write the indicated value 6 In addition leave for 2 minutes and check the pressure changes value is satisfied the following value by comparing between the written indicated value and indicated value Specification value 0 45 kPa or less OK 0 46...

Страница 8: ...m pad Cover the microphone hole so as not to damage the Microphone Sheet Cover the microphone hole surely e g with using Microphone Sealing Rubber 4 429 171 01 Expand the suction time for 60 seconds and perform the measurement again 2 Check the cabinet condition and then perform the measurement again 3 If there is no improvement symptom replace the front cover sub assy and rear cover LCD assy and ...

Страница 9: ...ent Method for Copying the Data in Internal Memory Method for Formatting the Internal Memory Format Formats the internal memory 1 Tap MENU t Format t OK Note that formatting permanently erases all data Note When the AutoPlay Wizard appears after making a USB connection between the came and a computer click Open folder to view files t OK t DCIM or MP_ROOT t copy the desired images to the computer T...

Страница 10: ... on the set Color Indication of Appearance Parts Example SILVER Cabinet s Color Silver Parts Color The components identified by mark 0 or dotted line with mark 0 are critical for safety Replace only with part number specified Les composants identifiés par une marque 0 sont critiques pour la sécurité Ne les remplacer que par une pièce portant le numéro spécifié When indicating parts by reference nu...

Страница 11: ... It is possible that a wire is snapped When installing a connector do not press down at wire of connector It is possible that a wire is snapped Do not apply excessive load to the gilded flexible board Cut and remove the part of gilt which comes off at the point Be careful or some pieces of gilt may be left inside Cut and remove the part of gilt which comes off at the point Be careful or some piece...

Страница 12: ..._SUS S3 4 422 224 01 TP_1 7_3 5_A0 3_D3_SUS 1 Remove to numerical order 1 to 9 in the left figure 9 S1 X 2 S3 X 4 S2 X 1 6 Back View Front View Right View S1 S3 S2 Half release the claws and maintain the state Arrows in the figure show directions for releasing claws by pressing the Front Cover Sub Assy to warp it Claw of Front Cover Sub Assy Front Cover Sub Assy Rear Cover LCD Assy Claw of Rear Co...

Страница 13: ... S7 4 422 230 01 TP_1 4_2 2_A0 3_D2 5_B S8 4 422 228 01 M_1 7_4 5_A0 4_D2 5_CR S9 4 422 210 01 SCREW USB TERMINAL SHAFT S10 4 422 229 01 TP_1 4_2 6_A0 3_D2 5_B S11 4 422 221 01 TP_1 4_2 1_A0 3_D2 5_SUS S12 4 432 485 01 M_1 4_2_A0 3_D2 5_SUS LOCK Note DISASSEMBLY 1 Remove to numerical order 1 to 6 in the left figure 5 S7 X 3 6 S11 X 3 Front View S6 Soldering Position 3 Front View S7 Left View S11 2...

Страница 14: ...CESSORIES 901 902 903 Ref No Part No Description 901 4 277 105 01 USB connection support cable 902 2 050 981 01 Wrist strap 903 4 416 997 11 Instruction Manual ENGLISH 903 4 416 997 21 Instruction Manual FRENCH SPANISH ...

Страница 15: ...er Microphone Videolight Board Videolight Board Speaker Microphone Route the harnesses Assembly 3 The Method of assembling of the USB Terminal Assy USB Terminal Spring USB Terminal Assy USB Connector USB Terminal Assy USB Terminal Spring USB Terminal Spring Wall Ditch USB Terminal Shaft Screw USB Terminal Shaft Projection The changed portions from Ver 1 0 are shown in blue Ver 1 1 2012 06 ...

Страница 16: ...EEPROM 128K eMMC 4GB NAND I F SIO I F USB Connector HDMI Connector LCD Panel 2 7 16 9 VD1 I F HDMI 1 3 USB 2 0 I2S IDC I F DDR I F JTAG JTAG I F SSIO I F GPIO I F Speaker Internal Mono MIC I2C I F I2C I F Power KEY Photo KEY Audio CODEC ML26121 Gyro EWTS9P Gyro EWTS9P Tilt Sensor TS1003 USB Charge SMB232 Power Block LD7242 Touch Panel TP SP811C GPIO AD Battery SP70B ...

Отзывы: