background image

masterpage:Right

filename[D:\MVC-CD1000 kaihan\3062473121\3062473121MVCCD1000UC\02GB-

MVCCD1000UC\10add.fm]

Ad
dition

al
in

fo

rma

tion

67

model name1[MVC-CD1000]

[3-062-473-12(1)]

Notes

Do not remove the disc while reading or
writing data.

Data may be damaged if:
— You remove the disc or turn off the

power while reading or writing data.

— You use the camera in a location subject

to the effects of static electricity or
noise.

Do not attach any material on the surface
of a disc. This causes a nonuniform
rotating speed and this may cause a
malfunction of the camera.

You can write only on the label surface of a
disc. When you write, use only a felt-tip
marker and do not touch it until it is in dry
state, and do not heat it. Do not use a
sharp-pointed tool, such as a ballpoint pen.

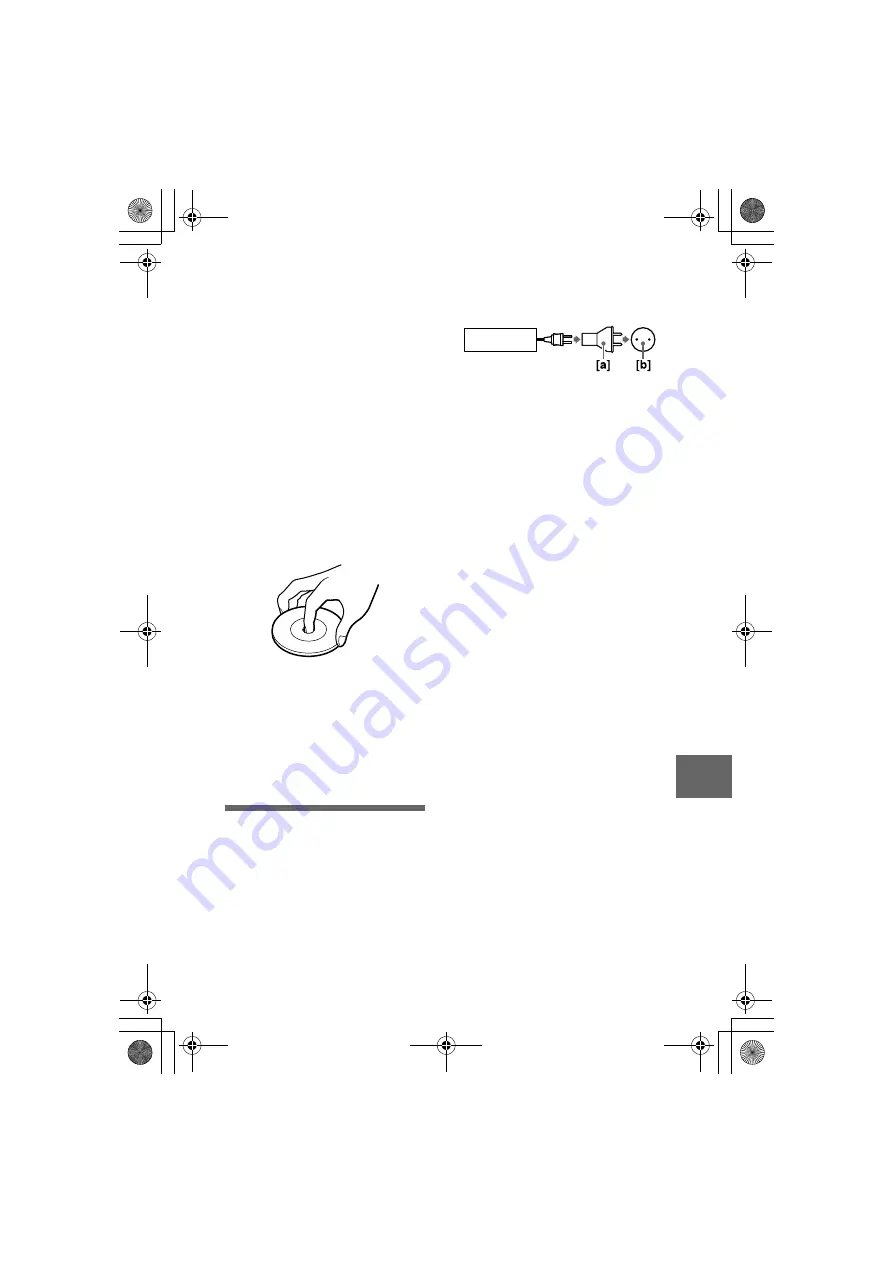
Hold a disc at the edges while pressing the
center hole lightly. Do not touch the blue
side of a disc.

When you carry or store a disc, put it in its
case.

Do not strike, bend or drop a disc.

Do not rub the edge of a disc.

If you play back the disc on which any
image has not been recorded using a CD-
ROM drive, the CD-ROM drive may
malfunction or the disc may be scratched.

Using your camera
abroad

Power sources

You can use your camera in any
country or area with the supplied
battery charger within 100 V to 240 V
AC, 50/60 Hz. Use a commercially
available AC plug adaptor

[a]

, if

necessary, depending on the design of
the wall outlet (mains)

[b]

.

Watching the playback picture on
TV

If you want to view the playback
picture on a TV, you need a TV having
a video input jack and a video
connecting cable.
The color system of the TV must be
the same as that of your digital still
camera. TV color systems differ from
country to country. Check the
following list:

NTSC system countries

Bahama Islands, Bolivia, Canada,
Central America, Chile, Columbia,
Ecuador, Jamaica, Japan, Korea,
Mexico, Peru, Surinam, Taiwan, the
Philippines, the U.S.A., Venezuela, etc.

PAL system countries

Australia, Austria, Belgium, China,
Denmark, Finland, Germany, Great
Britain, Holland, Hong Kong, Italy,
Kuwait, Malaysia, New Zealand,
Norway, Portugal, Singapore, Spain,
Sweden, Switzerland, Thailand, etc.

PAL-M system country

Brazil

PAL-N system countries

Argentina, Paraguay, Uruguay

SECAM system countries

Bulgaria, Czech Republic, France,
Guiana, Hungary, Iran, Iraq, Monaco,
Poland, Russia, Slovak Republic,
Ukraine, etc.

AC-L10A/L10B/L10C

01cov.book Page 67 Wednesday, July 19, 2000 10:33 AM

Содержание Mavica MVC-CD1000

Страница 1: ...he unit please read this manual thoroughly and retain it for future reference Owner s Record The model and serial numbers are located on the bottom Record the serial number in the space provided below Refer to these numbers whenever you call upon your Sony dealer regarding this product Model No MVC CD1000 Serial No ________________________ 2000 Sony Corporation MVC CD1000 010cov fm Page 1 Wednesda...

Страница 2: ...not installed and used in accordance with the instructions may cause harmful interference to radio communications However there is no guarantee that interference will not occur in a particular installation If this equipment does cause harmful interference to radio or television reception which can be determined by turning the equipment off and on the user is encouraged to try to correct the interf...

Страница 3: ...lithium ion battery CAUTION TO PREVENT ELECTRIC SHOCK DO NOT USE THIS POLARIZED AC PLUG WITH AN EXTENSION CORD RECEPTACLE OR OTHER OUTLET UNLESS THE BLADES CAN BE FULLY INSERTED TO PREVENT BLADE EXPOSURE A moulded plug complying with BS 1363 is fitted to this equipment for your safety and convenience Should the fuse in the plug supplied need to be replaced a 5 AMP fuse approved by ASTA or BSI to B...

Страница 4: ...such materials may be contrary to the provision of the copyright laws Do not shake or strike the camera In addition to malfunctions and inability to record images this may render the discs unusable or image data breakdown damage or loss may occur LCD screen viewfinder and lens The LCD screen and viewfinder are manufactured using high precision technology However there may be some tiny black points...

Страница 5: ...ording images in macro 50 Focusing manually 50 Using the PROGRAM AE function 51 Using the Spot light metering function 52 Adjusting the exposure EXPOSURE 53 Adjusting the white balance WHITE BALANCE 53 Recording the date and time on the still image DATE TIME 54 Enjoying picture effects PICTURE EFFECT 55 B Various playback Playing back six images at once INDEX 56 Enlarging a part of the still image...

Страница 6: ...r 20 F Photocell window for flash Do not block while recording G Focus ring 50 H Lens I DIGITAL I O jack 34 J PROGRAM AE button 51 K WHITE BALANCE button 53 L Accessory shoe M OPEN FLASH button 22 N One push white balance button 53 O External flash jack P Disc cover OPEN lever 15 Q Lens cap supplied R STEADY SHOT ON OFF switch 21 S FOCUS AUTO MANUAL switch 50 T A V OUT MONO jack 59 Audio output is...

Страница 7: ... ACCESS lamp 18 Do not shake or strike the camera while the ACCESS lamp is lit N PLAY STILL MOVIE selector 40 O DC IN jack 9 11 P POWER ON OFF CHG lamp 9 Q POWER switch 12 R LCD ON OFF button 19 S Battery cover PUSH button bottom surface 8 T Tripod receptacle bottom surface Use a tripod with a screw length of less than 7 32 inch 6 5 mm You will be unable to firmly secure the camera to tripods havi...

Страница 8: ...op the battery pack when removing it What is InfoLITHIUM InfoLITHIUM is a lithium ion battery pack which can exchange information such as battery consumption with compatible video equipment InfoLITHIUM L series battery packs have the mark InfoLITHIUM is a trademark of Sony Corporation 1 Open the battery cover Slide the battery cover in the direction of the arrow while pressing the PUSH button 2 In...

Страница 9: ...operating environment 1 Insert the battery pack into your camera 2 Open the DC IN cover and connect the DC connecting plug to the DC IN jack of your camera with the v mark facing up 3 Connect the power cord mains lead to the AC power adaptor and then to a wall outlet mains The POWER ON OFF CHG lamp amber above the control button lights up when charging begins When the POWER ON OFF CHG lamp goes of...

Страница 10: ...t about 7 second intervals MOVIE mode recording Approximate time that can be recorded with a fully charged battery pack at a temperature of 77 F 25 C and 160 112 image size Numbers in parentheses indicate the time when you use a normally charged battery pack Notes The battery life and number of images will be decreased when using at low temperature using the flash turning the power on off frequent...

Страница 11: ...ion Do not expose the battery pack to water Using the AC power adaptor Using a car battery Use Sony DC adaptor charger 1 Open the DC IN cover and connect the DC connecting plug to the DC IN jack of your camera with the v mark facing up 2 Connect the power cord mains lead to the AC power adaptor and then to a wall outlet mains 2 1 AC L10A L10B L10C AC power adaptor Power cord mains lead to a wall o...

Страница 12: ... control button The menu bar appears on the LCD screen or on the viewfinder 3 Select SETUP with B B B B on the control button then press the center x 4 Select CLOCK SET with v V on the control button then press the center x 1 Control button POWER ON OFF CHG lamp SELECT OK MENU BAR OFF DELETE INDEX FILE SETUP TOOL LCD BRIGHT BEEP CLOCK SET VIDEO OUT LANGUAGE SELECT CLOSE DELETE INDEX FILE SETUP TOO...

Страница 13: ... The item to be set is indicated with v V 7 Set the numeric value with v V on the control button then press the center x to enter it After entering the number v V moves to the next item If you selected D M Y in step 5 set the time on a 24 hour cycle 8 Select ENTER with B on the control button then press the center x at the desired moment to begin clock movement The date and time are entered 2000 1...

Страница 14: ...g the lock tab to the left slide down the disc cover OPEN lever Open the disc cover by your hand after the cover is unlocked 2 Place a disc with the blue side down Push down the center of the disc until it clicks When installing do not push with too much force and do not touch the pickup lens 3 Close the disc cover 1 2 Disc cover OPEN lever Lock tab Push here Disc Pickup lens 01cov book Page 14 We...

Страница 15: ...de down the disc cover OPEN lever and open the disc cover after the cover is unlocked Then remove the disc as illustrated below Notes Before removing the disc be sure to check that the disc is not rotating Do not open the disc cover while the ACCESS lamp is lit Otherwise the recorded image may be damaged or the disc may become unusable Removing the disc 01cov book Page 15 Wednesday July 19 2000 10...

Страница 16: ... on the control button The menu bar appears on the LCD screen or on the viewfinder 2 Select FILE with B on the control button then press the center x 3 Select DISC TOOL with v on the control button then press the center x 1 6 Control button SELECT OK MENU BAR OFF DELETE INDEX FILE SETUP TOOL PROTECT SLIDE SHOW PRINT MARK ROTATE DISC TOOL SELECT CLOSE DELETE INDEX FILE SETUP TOOL PROTECT SLIDE SHOW...

Страница 17: ...ed will remain on the disc 4 Select INITIALIZE with v on the control button then press the center x 5 Select OK with v on the control button then press the center x PLACE ON LEVEL SURFACE appears on the LCD screen or on the viewfinder Be sure to avoid any vibration during the initialization in step 6 6 Select OK with v on the control button then press the center x Initialization starts PROTECT SLI...

Страница 18: ... See page 47 1 Set the PLAY STILL MOVIE selector to STILL 2 Press and hold the shutter button halfway down and check the image While the AE lock indicator z green is flashing the image is frozen however the image is not yet recorded When the camera finishes the automatic adjustments the AE lock indicator z lights up and the camera is ready for recording To cancel the recording release the shutter ...

Страница 19: ...ed off when your face is not near the viewfinder Press LCD ON OFF to turn off the LCD screen The battery life will be longer Notes You cannot turn off the LCD screen when the demonstration is being executed page 46 When both the LCD screen and viewfinder displays are turned off only the following will operate LCD ON OFF button POWER switch the PLAY STILL MOVIE selector FOCUS AUTO MANUAL switch STE...

Страница 20: ...the center x However even if you delete images the disc remaining space does not increase If you cannot get a sharp focus on a close subject Slide the zoom lever to the W side and move closer to the subject until the focus is sharp Minimum focal distance to the subject W side About 9 7 8 inches 25 cm or more T side About 31 1 2 inches 80 cm or more To record even closer subjects see page 50 Digita...

Страница 21: ...o ON The SteadyShot indicator appears on the LCD screen or on the viewfinder Notes The SteadyShot function will not correct excessive camera shake If you use a wide conversion lens optional this lens may influence the SteadyShot function Press DISPLAY to turn on off the indicators on the LCD screen or on the viewfinder See page 75 for a detailed description of the indicators Notes You cannot turn ...

Страница 22: ...he flash automatically strobes when the surroundings become dark When you change the flash mode press Flash repeatedly so that the flash mode indicator appears on the LCD screen or on the viewfinder This setting can be set only when the flash is popped up Set the PLAY STILL MOVIE selector to STILL Each time you press the button the indicator changes as follows No indication t t t t No indication A...

Страница 23: ...in flash and an external strobe at the same time The indicator appears when the flash is not popped up under situations that you should use the flash Auto red eye reduction may not produce the desired red eye reduction effects depending on individual differences the distance to the subject if the subject does not see the pre strobe or other conditions In addition red eye reduction effects are also...

Страница 24: ... down REC appears on the LCD screen or on the viewfinder and the image and sound are recorded on the disc The recording lamp lights up during recording If you press the shutter button momentarily The image and sound are recorded for 5 seconds The recording time can be set to 10 or 15 seconds with REC TIME SET in the menu settings page 44 If you hold the shutter button down The image and sound are ...

Страница 25: ...s 1 Set the PLAY STILL MOVIE selector to PLAY The last recorded image still or moving appears on the LCD screen or on the viewfinder 2 Press v on the control button to display the menu bar on the LCD screen or on the viewfinder 3 Select the desired still image with the control button Press v V b B on the control button to select b B on the LCD screen or on the viewfinder then press b B b To displa...

Страница 26: ...es are displayed one size smaller than still images Press v V b B on the control button to select b B on the LCD screen or on the viewfinder then press b B b To display the preceding image B To display the next image 4 Select the B playback button on the LCD screen or on the viewfinder with v on the control button then press the center x The moving image and sound are played back During playback B...

Страница 27: ...ol button and play back the image and sound by pressing the center x When you press the center x during playback playback is paused Moving images recorded with the image of 320 HQ The images are displayed over the entire screen in steps 3 and 4 Press VOLUME to adjust the volume Press DISPLAY to turn on off the indicators on the LCD screen or on the viewfinder See page 76 for a detailed description...

Страница 28: ... RW drive page 37 You do not need to finalize the disc You have to install the software DirectCD included in the supplied CD ROM For Macintosh users Viewing images with a CD ROM drive page 37 Finalize the disc beforehand page 29 You have to install the driver Adaptec UDF Volume Access included in the supplied CD ROM Notes on using your personal computer Software Data recorded with your camera is s...

Страница 29: ...alization before viewing images on a CD ROM drive A disc that has not been executed the finalization cannot be read with CD ROM drives What is finalization The finalization is required to view images on a CD ROM drive You can record new images on the finalized disc if you execute the initialization on it again You have to execute the finalization to view new images on a CD ROM drive Each time you ...

Страница 30: ... Select FINALIZE with v on the control button then press the center x 5 Select OK with v on the control button then press the center x PLACE ON LEVEL SURFACE appears on the LCD screen or on the viewfinder Be sure to avoid any vibration during the finalization 6 Select OK with v on the control button then press the center x Finalization starts and the disc remaining indicator changes from to PROTEC...

Страница 31: ... cm CD adaptor 1 Slide the disc into the inner groove and under two of the tabs on the inner circle of adaptor in the numbered order 2 Pull the third tab out away from the disc and the disc will slip into place Release the third tab and the disc will be held firmly in place 1 2 Printed side of the disc The other blue side is recordable side Printed side of the adaptor SONY is printed on this side ...

Страница 32: ...um 200 MHz or faster The USB connector must be provided as standard ActiveMovie DirectShow must be installed to play back moving pictures Notes Operations are not guaranteed if you connect two or more USB equipment to a single personal computer at the same time except for the USB keyboard and mouse which are provided as standard or when using a hub Depending on the type of USB equipment that is us...

Страница 33: ...upplied USB cable and CD ROMs Installing the USB driver Before connecting your camera to your personal computer install the USB driver to the computer The USB driver is contained in the supplied CD ROM SPVD 001 For Windows 98 users 1 Start up your personal computer and insert the disc into the CD ROM drive of your personal computer 2 Open My Computer and double click the drive recognizing the came...

Страница 34: ...our camera PC MODE appears on the LCD screen or on the viewfinder of your camera and the camera is set to communication standby mode Your personal computer recognizes the camera and the Windows 98 Add Hardware Wizard starts 5 Follow the on screen messages to specify the CD ROM drive and install the USB driver 1 Check that the Add Hardware Wizard is displayed then click Next 1 2 to the USB connecto...

Страница 35: ...ws 98 users 2 Select the option Search for the best driver for your device Recommended in the window then click Next 3 Check that the option CD ROM is selected then click Next 4 After the location of the driver is searched click Next File copy starts 5 After Windows has finished installing the software that your new hardware device requires is displayed click Finish The Add Hardware Wizard starts ...

Страница 36: ...or the detailed folder and file name see Image file storage destinations and image file names page 39 Copying a file to the hard disk of your personal computer before viewing is recommended If you play back the file directly from the disc the image and sound may break off When these file names are described in capital letters to distinguish the small letter l and the number 1 these are shown as fo...

Страница 37: ...acintosh environment Macintosh computer with the Mac OS 8 5 1 8 6 9 0 standard installation However note that the update to Mac OS 9 0 should be used for the following models iMac with the Mac OS 8 6 standard installation and a slot loading type CD ROM drive iBook or G4 with the Mac OS 8 6 standard installation QuickTime 3 2 or newer must be installed to play back moving pictures Note Operations a...

Страница 38: ... window opened in step 3 to System Folder folder in the window opened in step 4 drag and drop 6 When Put these items into the Extensions folder appears click OK 7 Restart your personal computer 1 Start up your personal computer and insert the disc into the CD ROM drive of your personal computer 2 Double click the disc folder 3 Double click the desired data file 01cov book Page 38 Wednesday July 19...

Страница 39: ... An uncompressed image file recorded in TIFF mode and its corresponding image file An image file recorded in VOICE mode and its corresponding audio file Folder File Meaning 100msdcf DSC0ssss JPG Still image file recorded normally Still image file recorded in E MAIL mode page 48 Still image file recorded in VOICE mode page 48 TXT0ssss GIF Still image file recorded in TEXT mode page 49 Imcif100 DSC0...

Страница 40: ...our camera to record or to play back and edit images Set the selector as follows before starting to operate your camera How to use the control button The control button is used to select the buttons images and menus displayed on the LCD screen or on the viewfinder of your camera and modify the settings The operation methods that are frequently used for Advanced operations are described below PLAY ...

Страница 41: ...he viewfinder 1 Press v V b B on the control button to select the item you want to set or the image you want to display The color of the selected item or the frame of the selected image changes from blue to yellow 2 Press the center x to enter the item Repeat steps 1 and 2 to execute each function SELECT OK MENU BAR OFF DELETE INDEX FILE SETUP TOOL Press v to display the menu bar on the LCD screen...

Страница 42: ...s according to the position of the PLAY STILL MOVIE selector 2 Select the desired item with v V b B on the control button then press the center x The color of the selected item changes from blue to yellow and when you press the center x the settings that can be set for its item are displayed 3 Select the desired setting with v V b B on the control button then press the center x 1 3 PLAY STILL MOVI...

Страница 43: ...E Menu settings Item Setting Description PLAY STILL MOVIE selector P EFFECT SOLARIZE B W SEPIA NEG ART xOFF Sets the image special effects page 55 MOVIE STILL DATE TIME DAY TIME Sets whether to insert the date and time into the image page 54 STILL DATE xOFF Item 1 Item 2 Setting Description PLAY STILL MOVIE selector DISC TOOL INITIALIZE OK Initializes a disc page 14 MOVIE STILL PLAY CANCEL Cancels...

Страница 44: ...le number that starts from 0001 each time the disc is changed IMAGE SIZE x1600 1200 1600 3 2 1024 768 640 480 Selects the image size when recording still images STILL 320 HQ 320 240 x160 112 Selects the MPEG image size or quality when recording moving images MOVIE REC MODE TIFF Records a TIFF uncompressed file in addition to the JPEG format STILL TEXT Records a GIF file in black and white VOICE Re...

Страница 45: ... images PROTECT ON Protects images against accidental erasure page 60 PLAY xOFF Releases protection of images Item Setting Description PLAY STILL MOVIE selector DIGITAL ZOOM xON Uses digital zoom STILL OFF Does not use digital zoom SHARPNESS 2 to 2 Adjusts the sharpness of the image The indicator appears except when the setting is 0 STILL FLASH LEVEL HIGH Makes the flash level higher than normal S...

Страница 46: ...in MOVIE STILL VIDEO OUT NTSC Sets the video output signal to NTSC mode e g Japan the USA MOVIE STILL PLAY PAL Sets the video output signal to PAL mode e g Europe LANGUAGE xENGLISH Displays the menu items in English MOVIE STILL PLAY JPN Displays the menu items in Japanese CLOCK SET Sets the date and time page 12 MOVIE STILL PLAY BEEP SHUTTER Turns off the beep only The shutter sound is heard when ...

Страница 47: ...ining space does not increase The number of images recordable on a disc may decrease depending on conditions 1 Set the PLAY STILL MOVIE selector to MOVIE or STILL 2 Select FILE and then IMAGE SIZE from the menu 3 Select the desired image size Still image sizes 1600 1200 1600 3 2 1024 768 640 480 The image is recorded in the ratio of three to two to fit the printing paper size Moving image sizes 32...

Страница 48: ...e To return to normal recording mode Select NORMAL in step 2 1 Set the PLAY STILL MOVIE selector to STILL 2 Select FILE REC MODE and then E MAIL from the menu 3 Record the image Image size Number of images 1600 1200 Approx 140 1600 3 2 Approx 150 1024 768 Approx 300 640 480 Approx 730 2 1 3 1 Set the PLAY STILL MOVIE selector to STILL 2 Select FILE REC MODE and then VOICE from the menu 3 Record th...

Страница 49: ...TIFF format uncompressed and JPEG format compressed The number of images that you can record on a disc in TIFF mode To return to normal recording mode Select NORMAL in step 2 Notes JPEG images are recorded in the image size selected by the IMAGE SIZE menu TIFF images are recorded in 1600 1200 size other than when 1600 3 2 is selected Writing data takes more time than in normal recording It will ta...

Страница 50: ...et the FOCUS AUTO MANUAL switch to AUTO 3 Press macro The macro indicator appears on the LCD screen or on the viewfinder With the zoom lever set to the W side you can shoot a subject that is about 13 16 inch 2 cm away from the lens surface in macro mode 2 1 3 1 Set the PLAY STILL MOVIE selector to MOVIE or STILL 2 Set the FOCUS AUTO MANUAL switch to MANUAL The 9 manual focus indicator appears on t...

Страница 51: ...on Using the PROGRAM AE function 1 Set the PLAY STILL MOVIE selector to MOVIE or STILL 2 Press PROGRAM AE repeatedly to select the desired PROGRAM AE mode Aperture priority mode For making the subject stand out against an unclear background or providing a larger in focus range Press PROGRAM AE repeatedly to select an aperture value in 9 steps from F2 8 to F11 Shutter speed priority mode For record...

Страница 52: ...Shutter speed priority mode the setting value indicator on the LCD screen or on the viewfinder flashes when you press the shutter button In this case reset the value If you select a slow shutter speed in Twilight plus mode or select Shutter speed priority mode the image may not be clear Using the Spot light metering function Select this mode when there is backlight or when there is strong contrast...

Страница 53: ...STILL 2 Select CAMERA and then EXPOSURE from the menu 3 Select the desired exposure value Adjust the exposure value while checking the brightness of the background You can select values ranging from 2 0 EV to 2 0 EV in steps of 1 3 EV 2 3 1 1 Set the PLAY STILL MOVIE selector to MOVIE or STILL 2 Press WHITE BALANCE repeatedly to select the desired white balance setting IN DOOR n Places where the l...

Страница 54: ...alance is not set Quick flashing white balance is being adjusted after you pressed Lit steady white balance has been set If the indicator keeps flashing even when you press record in automatic white balance mode Recording the date and time on the still image DATE TIME 1 Set the PLAY STILL MOVIE selector to STILL 2 Select EFFECT and then DATE TIME from the menu 3 Select the date and time DAY TIME I...

Страница 55: ... STILL MOVIE selector to MOVIE or STILL 2 Select EFFECT and then P EFFECT from the menu Select the desired mode SOLARIZE The light contrast is clearer and the picture looks like an illustration B W The picture is monochrome black and white SEPIA The picture is sepia toned like an old photograph NEG ART The color and brightness of the picture are reversed as in a negative OFF Does not use the pictu...

Страница 56: ...DEX screen 1 Set the PLAY STILL MOVIE selector to PLAY 2 Select INDEX on the LCD screen or on the viewfinder Six images are displayed at once index screen The following marks are displayed on each image according to the image type and settings Moving image file Voice memo file E mail file Print mark Protect mark TEXT TEXT file TIFF TIFF mark No mark Normal recording no settings 2 1 2 0 0 0 7 4 1 2...

Страница 57: ...tion on moving images TEXT mode images or uncompressed images Zoom scaling is up to 5 regardless of the original image size The quality of enlarged images may be deteriorated The original data is left even if you enlarge the image The enlarged image is recorded as the newest file If you trim an image the disc space will be decrease If the disc space is not sufficient you may not be able to trim an...

Страница 58: ... in order SLIDE SHOW This function is useful for checking the recorded images or for presentations etc To cancel the slide show Select CANCEL in step 2 or 3 1 Set the PLAY STILL MOVIE selector to PLAY 2 Display the image to rotate 3 Select FILE and then ROTATE from the menu 4 Rotate the image clockwise or counterclockwise then select RETURN 2 3 4 1 1 Set the PLAY STILL MOVIE selector to PLAY 2 Sel...

Страница 59: ...ven if it takes more than 20 minutes Viewing images on a TV screen You can view images recorded onto a disc on a TV Note You cannot use a TV that has an antenna aerial connector only 1 Connect the A V connecting cable to the A V OUT MONO jack of your camera and to the audio video input jacks of the TV If your TV has stereo type input jacks connect the audio plug of the A V connecting cable to the ...

Страница 60: ...ace is not sufficient you may not be able to protect an image In single mode 1 Set the PLAY STILL MOVIE selector to PLAY then display the image to be protected 2 Select FILE PROTECT and then ON from the menu The displayed image is protected and the indicator appears In INDEX mode 1 Set the PLAY STILL MOVIE selector to PLAY then display the INDEX screen 2 Select FILE PROTECT and then ALL or SELECT ...

Страница 61: ...f an image is the same as the number of the selected image that image also will be deleted In single mode 1 Set the PLAY STILL MOVIE selector to PLAY then display the image to be deleted 2 Select DELETE and then OK from the menu The image is deleted In INDEX mode 1 Set the PLAY STILL MOVIE selector to PLAY then display the INDEX screen 2 Select DELETE and then ALL or SELECT from the menu 2 3 1 3 W...

Страница 62: ...a This mark is convenient when you have images printed at a shop that conforms with the DPOF Digital Print Order Format standard To remove the print mark Select OFF in step 2 1 Set the PLAY STILL MOVIE selector to PLAY then display the image of which you want to change the size 2 Select TOOL and then RESIZE from the menu 3 Select the desired size 1600 1200 1024 768 640 480 The resized image is rec...

Страница 63: ...mages are removed Notes You cannot mark a print mark on moving images or TEXT mode images If you mark an image recorded in TIFF mode with a print mark only the uncompressed image is printed and the JPEG image recorded at the same time is not printed If you mark an image with a print mark the disc space will decrease If the disc space is not sufficient you may not mark an image with a print mark 4 ...

Страница 64: ...the casing After using your camera at the seashore or other dusty locations Clean your camera carefully Otherwise the salty air may corrode the metal fittings or dust may enter the inside of your camera causing a malfunction Your camera is designed for use between the temperatures of 32 F to 104 F 0 C to 40 C Recording in extremely cold or hot places that exceed this range is not recommended If th...

Страница 65: ... cord mains lead and may cause fire or electrical shock Prevent metallic objects from coming into contact with the metal parts of the connecting section If this happens a short may occur and the unit may be damaged Always keep metal contacts clean Do not disassemble the unit Do not apply mechanical shock or drop the unit While the unit is in use particularly during charging keep it away from AM re...

Страница 66: ...amera with the power turned off for more than 24 hours Or install the fully charged battery pack in your camera and leave your camera with the power turned off for more than 24 hours If any problem occurs unplug your camera and contact your nearest Sony dealer On discs Be sure to use only 8 cm CD Rs You cannot read or write data on other type discs that does not correspond to this camera Do not cl...

Страница 67: ...ve may malfunction or the disc may be scratched Using your camera abroad Power sources You can use your camera in any country or area with the supplied battery charger within 100 V to 240 V AC 50 60 Hz Use a commercially available AC plug adaptor a if necessary depending on the design of the wall outlet mains b Watching the playback picture on TV If you want to view the playback picture on a TV yo...

Страница 68: ...w The indicator appears t Charge the battery pack page 9 The AC power adaptor is not connected securely t Connect it securely to the DC IN jack and a wall outlet mains page 9 11 The malfunction occurs inside the camera t Turn off the power and turn on after one minute then check that the camera works properly Your camera cannot record images The PLAY STILL MOVIE selector is set to PLAY t Set it to...

Страница 69: ... battery life is short You are recording playing back images under extremely cold temperatures The battery pack is not charged enough t Charge the battery pack fully The battery pack is dead t Replace the battery pack with a new one The indication of the battery remaining time is not proper You are using the camera for many hours under extremely hot or cold temperatures The battery pack is dead t ...

Страница 70: ... cannot delete an image The disc has not been initialized t Initialize the disc page 14 The disc remaining capacity is not sufficient t This is not a malfunction The image is protected t Cancel the protection page 60 The power turns off suddenly With the PLAY STILL MOVIE selector set to STILL or MOVIE if you do not operate the camera for about three minutes while the power is on the camera turns o...

Страница 71: ...amera The camera is turned off t Turn on the camera The battery level is low t Use the AC power adaptor page 11 The USB cable is not connected firmly t Disconnect the USB cable and connect it again firmly Make sure that PC MODE is displayed on the LCD screen or on the viewfinder page 34 The USB connectors on your personal computer are connected to other equipment besides the keyboard the mouse and...

Страница 72: ... not enough to operate other than executing the finalization NOT INITIALIZED Since the disc has not been initialized the camera cannot record any image on the disc ALREADY INITIALIZED It is not necessary to execute the initialization the disc was initialized ALREADY FINALIZED It is not necessary to execute the finalization the disc was finalized NO FILE No image has been recorded on the disc FILE ...

Страница 73: ...e camera If you are unable to rectify the problem even if you try corrective actions a few times contact your Sony dealer or local authorized Sony service facility Code Cause and or Corrective Action C 32 ss There is trouble with the disc drive tTurn the power off and on again C 13 ss A disc not compatible with this camera is inserted tChange the disc page 14 E 61 ss E 91 ss A camera malfunction t...

Страница 74: ...anel TFT Thin Film Transistor active matrix drive Total number of dots 180 000 800 225 dots General Application Sony battery pack NP F550 Power requirements 8 4 V Power consumption During shooting 4 9 W When using the LCD screen 4 5 W When using the viewfinder Operation temperature 32 F to 104 F 0 C to 40 C Storage temperature 4 F to 140 F 20 C to 60 C Maximum dimensions 5 1 2 5 1 4 8 3 8 in 137 1...

Страница 75: ...indicator L AE lock indicator Focus lock indicator M Recording mode indicator N Image size indicator O Number of recorded images P Remaining disc capacity indicator This indicator changes to after executing the finalization Q Recording time indicator R Self diagnosis function indicator Recording time indicator S Self timer indicator T Spot light metering indicator U Menu bar and guide menu They ap...

Страница 76: ...s displayed this indicator disappears from the screen A Moving image file indicator B Image size indicator C Playback button B is displayed during stop and X during playback D Image searching buttons E Menu bar and guide menu F Remaining disc capacity indicator G Counter H Image number number of stored images on a disc I Playback image J Playback bar The indicators during still image playback 100 ...

Страница 77: ...50 Manual focusing 50 Menu 42 Moisture condensation 64 Moving image Playback 26 Recording 24 MPEG 24 28 N Normal charge 9 Number of recordable images Battery pack 10 E mail mode 48 Image size 47 TEXT mode 49 TIFF mode 49 Voice mode 48 P PICTURE EFFECT 55 PLAY STILL MOVIE selector 40 Playing back INDEX screen 56 Moving images 26 Slide show 58 Still images 25 Viewing images on a TV 59 Viewing images...

Страница 78: ...01cov book Page 78 Wednesday July 19 2000 10 33 AM ...

Страница 79: ...01cov book Page 79 Wednesday July 19 2000 10 33 AM ...

Страница 80: ...masterpage Left filename D MVC CD1000 kaihan 3062473121 3062473121MVCCD1000UC 03BCO MVCFD1000UC 01covIX fm Sony Corporation Printed in Japan 01covIX fm Page 80 Wednesday July 19 2000 10 35 AM ...

Отзывы: