background image

O

p

tiona

l Com

pone

nts

23

GB

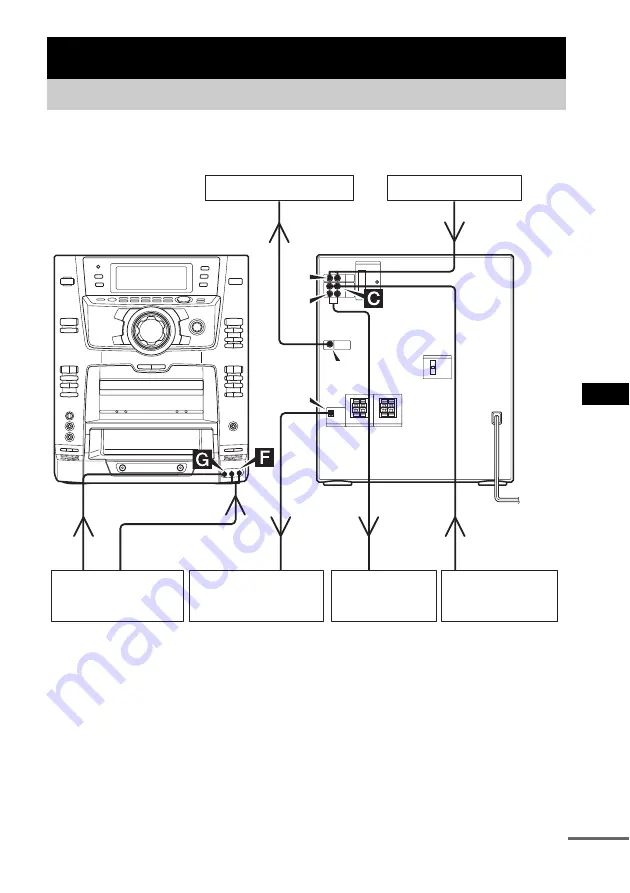
To enhance your system, you can connect optional components. Refer to the operating instructions 
provided with each component. 

A

 CD DIGITAL OUT jack

Use a digital optical cable (square, not supplied) 
to connect an optional digital component (such 
as an MD deck) to this jack. You can then output 
digital audio to that component from this 
system.

B

 MD (VIDEO) OUT L/R jacks

Use audio cords (not supplied) to connect an 
optional component (such as an MD deck or a 
VCR) to these jacks. You can then output audio 
to that component from this system.

Optional Components

Hooking up optional components

D

E
B

A

Optional TV

Optional turntable

From the outputs 
of a turntable

To the video input 
of a TV

Optional digital 

component

Optional analog 

component

Optional analog 

component

From the outputs 
of an analog 
component

To the inputs 
of an analog 
component

To the input 
of a digital 
component

Optional video game

From the video output 
of a video game

From the audio output 
of a video game

continued

Содержание LBT-XGR600 - Compact Hi-fi Stereo System

Страница 1: ...ons Owner s Record The model and serial numbers are located on the rear of the unit Record the serial number in the space provided below Refer to them whenever you call upon your Sony dealer regarding this product Model No ______________ Serial No ______________ LBT XGR88 XGR66 LBT XGR600 ...

Страница 2: ...ned to provide reasonable protection against harmful interference in a residential installation This equipment generates uses and can radiate radio frequency energy and if not installed and used in accordance with the instructions may cause harmful interference to radio communications However there is no guarantee that interference will not occur in a particular installation If this equipment does...

Страница 3: ...rporation has determined that this product meets the ENERGY STAR guidelines for energy efficiency This manual mainly explains operations using the system but the same operations can also be performed using the buttons on the remote having the same or similar names How to use this manual ...

Страница 4: ...oying sound while exchanging discs 17 Party Mode LBT XGR88 and XGR66 only Selecting the surround effect 17 Enhancing video game sound 17 Game Sync Mixing video game sound with other sound source 17 Game Mixing Singing along 18 Timer Falling asleep to music 19 Sleep Timer Waking up to music 19 Daily Timer Timer recording radio programs 20 Display Turning off the display 21 Power Saving Mode Viewing...

Страница 5: ...FRONT SPEAKER jacks for LBT XGR66 and LBT XGR600 or TWEETER WOOFER jacks for LBT XGR88 as shown below 2 Connect the speakers for biamplification system LBT XGR88 only Connect the speaker cords to the SUPER WOOFER jacks as shown below Getting Started Hooking up the system AM loop antenna Speaker right Speaker left FM lead antenna Black Red 3 Red 3 Black Black Gray 3 Gray 3 Black continued ...

Страница 6: ...n and the demonstration automatically ends If the plug does not fit the wall socket detach the supplied plug adaptor only for models equipped with an adaptor You can cancel the demonstration by pressing DISPLAY repeatedly page 21 Inserting two R6 size AA batteries into the remote Note If you do not use the remote for a long period of time remove the batteries to avoid possible damage from battery ...

Страница 7: ...o adjust the clock 1 Press c CLOCK SET or CLOCK TIMER SET on the remote 2 Press M m to select CLOCK SET then press ENTER 3 Do the same procedures as step 3 to 6 above Notes The clock settings are canceled when you disconnect the power cord or if a power failure occurs You cannot set the clock in Power Saving Mode page 21 When carrying this system Perform the following procedure to protect the CD m...

Страница 8: ...stop mode repeatedly until the mode you want appears 3 Press NX or CD N on the remote CD Play Loading a disc Playing a disc Normal Play Shuffle Play Select To play ALL DISCS Normal Play All discs in the disc tray continuously 1DISC Normal Play The tracks on the disc you have selected in original order ALL DISCS SHUFFLE Shuffle Play The tracks on all discs in random order 1DISC SHUFFLE Shuffle Play...

Страница 9: ...l Repeat Play Press REPEAT repeatedly until both REPEAT and REPEAT1 disappear Note You cannot select REPEAT and ALL DISCS SHUFFLE at the same time To Do this Stop play Press x Pause Press NX or X on the remote Press again to resume play Select a track During play or pause press or repeatedly Find a point in a track Keep pressing m or M during playback and release it at the desired point Select a d...

Страница 10: ...aying time appears 6 Program additional discs or tracks 7 Press NX or CD N on the remote Program Play starts Other operations Tips The program you made remains after Program Play finishes To play the same program again press NX or CD N on the remote appears when the total CD program time exceeds 100 minutes or when you select a CD track whose number is 21 or over Creating your own program Program ...

Страница 11: ... tuning preset 4 Press MEMORY 5 Press TUNING repeatedly to select the desired preset number 6 Press TUNER ENTER COMPLETE appears 7 Repeat steps 1 through 6 to store other stations Manual tuning preset You can manually tune in and store the radio frequency of the desired stations 1 Press TUNER BAND repeatedly to select FM or AM 2 Press TUNING MODE repeatedly until MANUAL appears 3 Press TUNING repe...

Страница 12: ...e reception adjust the supplied antennas or connect an external antenna You can listen to a radio station either by selecting a preset station or by manually tuning in the station Listening to a preset station Preset Tuning Preset radio stations in the tuner s memory first see Presetting radio stations on page 11 1 Press TUNER BAND repeatedly to select FM or AM 2 Press TUNING MODE repeatedly until...

Страница 13: ...ck B reverse side Other operations Searching for the beginning of the current or the next track AMS During playback press m or M or press or on the remote repeatedly for the number of songs you want to skip forward or backward The search direction forward or back and number of songs being skipped 1 to 9 appear AMS Automatic Music Sensor Tape Play Loading a tape With the side you want to play recor...

Страница 14: ...y to select g to record on one side Select j or RELAY to record on both sides 5 Press X Recording starts To stop recording Press x To record a disc by specifying track order You can record only your favorite CD tracks using Program Play Between steps 2 and 3 perform steps 1 to 6 of Creating your own program page 10 Also you can check the required tape length for recording a disc Press EDIT after y...

Страница 15: ...ts To stop recording Press x Note You cannot listen to other sources while recording Tips When you record on both sides be sure to start from the front side If you start from the reverse side recording stops at the end of the reverse side For recording from the tape If you set the direction to j or RELAY when the tapes you use have different lengths the tapes in each deck reverses independently Fo...

Страница 16: ...menu Press the PRESET EQ button you want The preset effect name appears See the chart Music menu options Music menu options SUR appears if you select an effect with surround effects except for LBT XGR88 and XGR66 Other operations Tip You can also select the preset effect including the personal file by pressing FILE SELECT on the remote repeatedly Making a personal audio emphasis file Personal File...

Страница 17: ...andby mode the system automatically turns on The GAME EQ is automatically selected These operations cannot be performed in the Power Saving Mode 1 Press FUNCTION repeatedly to select the desired source sound 2 Press GAME MIXING Each time you press the button the level of the game sound changes cyclically as follows MIXING LOW t MIXING MID t MIXING HIGH t MIXING OFF Note If you start recording whil...

Страница 18: ...to pause mode 3 Press z REC 4 Press DIRECTION repeatedly to select g to record on one side Select j or RELAY to record on both sides 5 Press X 6 Press NX or CD N on the remote to start playing the disc or press h H on deck A to start playing the tape Start singing along with the music To stop recording Press x Tips If acoustic feedback howling occurs move the microphone away from the speakers or c...

Страница 19: ...n page 12 2 Turn VOLUME or press VOL on the remote to adjust the volume 3 Press c CLOCK SET or CLOCK TIMER SET on the remote SET appears and DAILY SET flashes 4 Press ENTER ON appears and the hour indication flashes 5 Set the time to start playing Press M m repeatedly to set the hour then press ENTER The minute indication flashes Press M m repeatedly to set the minute then press ENTER 6 Set the ti...

Страница 20: ...M m repeatedly to select REC SET then press ENTER ON appears and the hour indication flashes 4 Set the time to start recording Press M m repeatedly to set the hour then press ENTER The minute indication flashes Press M m repeatedly to set the minute then press ENTER 5 Set the time to stop recording following the same procedure as step 4 The start time the stop time and the preset radio station to ...

Страница 21: ...PLAY while the system is off Each time you press the button the display switches cyclically as follows Demonstration display t Clock display t No display Power Saving Mode The clock is displayed only if you set the clock Note You cannot perform the following operations in Power Saving Mode setting the clock page 7 changing the AM tuning interval page 12 turning on the system by pressing the functi...

Страница 22: ...al number of tracks and the total playing time t Disc title 2 t Clock display for a few seconds t Effect status 1 appears in ALL DISCS SHUFFLE play mode or when playing the program containing more than 20 tracks or 100 minutes 2 With CD TEXT discs only certain characters cannot be displayed When the CD contains more than 20 tracks CD TEXT is not displayed from track 21 on Notes The display may not...

Страница 23: ...rds not supplied to connect an optional component such as an MD deck or a VCR to these jacks You can then output audio to that component from this system Optional Components Hooking up optional components D E B A Optional TV Optional turntable From the outputs of a turntable To the video input of a TV Optional digital component Optional analog component Optional analog component From the outputs o...

Страница 24: ...t through this system Notes The video game machine image may appear on the TV screen even if the system is turned off See Selecting the surround effect on page 17 for video game sound effects If you press GAME while the system is off the system turns on the function switches to GAME and the equalizer also switches to the GAME EQ If you press GAME while the system is on the function switches to GAM...

Страница 25: ...Hooking up optional components on page 23 2 Start recording manually See Recording on a tape manually on page 15 Making a digital recording 1 Connect the digital optical cord See Hooking up optional components on page 23 2 Start recording Refer to the operating instructions provided with connected component Making an analogue recording 1 Connect the audio cords See Hooking up optional components o...

Страница 26: ...ge 7 and timer settings pages 20 and 21 again The clock setting radio presetting timer is canceled Redo the following Setting the clock page 7 Presetting radio stations page 11 Waking up to music page 19 Timer recording radio programs page 20 There is no sound Turn VOLUME control clockwise or press VOL on the remote Make sure the headphones are not connected Check the speaker connections page 5 Th...

Страница 27: ...return to Normal Play Tuner Severe hum or noise stations cannot be received Set the proper band and frequency page 11 Connect the antenna properly page 6 Find a place and an orientation that provide good reception then set up the antenna again If you cannot obtain good reception we recommend you connect a commercially available external antenna The supplied FM lead antenna receives signals along i...

Страница 28: ... or flash in the display during operation CD CANNOT EDIT The selected disc contains more than 20 tracks or Program Play mode has been set NO STEP You have cleared all the tracks you programed OVER You have reached the end of the disc while pressing M during playback or pause PUSH STOP You have pressed PLAY MODE during playback STEP FULL You tried to program 26 or more tracks steps TAPE NO TAB You ...

Страница 29: ... will not operate properly Remove the disc and leave the system turned on for about an hour until the moisture evaporates When you move the system take out any disc If you have any questions or problems concerning your system please consult your nearest Sony dealer Notes on discs Before playing clean the disc with a cleaning cloth Wipe the disc from the center out Do not use solvents such as benze...

Страница 30: ...the metal parts that have contact with the tape after every 20 to 30 hours of use with a separately sold demagnetising cassette For details refer to the instructions of the demagnetising cassette AUDIO POWER SPECIFICATIONS LBT XGR600 USA model only POWER OUTPUT AND TOTAL HARMONIC DISTORTION With 6 ohm loads both channels driven from 120 10 000 Hz rated 160 watts per channel minimum RMS power with ...

Страница 31: ...eo Frequency response 50 13 000 Hz 3 dB using Sony TYPE I cassettes Wow and flutter 0 15 W Peak IEC 0 1 W RMS NAB 0 2 W Peak DIN Tuner section FM stereo FM AM superheterodyne tuner FM tuner section Tuning range North American model 87 5 108 0 MHz 100 kHz step Other models 87 5 108 0 MHz 50 kHz step Antenna FM lead antenna Antenna terminals 75 ohms unbalanced Intermediate frequency 10 7 MHz AM tune...

Страница 32: ...5 cm horn type Rated impedance 6 ohms Dimensions w h d Approx 255 530 370 mm Mass Approx 10 0 kg net per speaker General Power requirements North American models 120 V AC 60 Hz Other models 120 V 220 V or 230 240 V AC 50 60 Hz Adjustable with voltage selector Power consumption USA models LBT XGR600 190 watts Other models LBT XGR88 330 watts LBT XGR66 290 watts Dimensions w h d Main Unit Approx 355...

Страница 33: ...18 MIC LEVEL wg 18 PARTY 2 ea 17 PARTY MODE es 17 SAMBA 2 ROCK 2 DISCO 2 BALLAD 2 TECHNO 2 P FILE ef 16 PHONES jack qg PLAY MODE wd 8 10 Power illuminator 5 PRESET EQ es 16 SALSA REGGAE TANGO MOVIE GAME SAMBA 1 ROCK 1 JAZZ 1 DANCE 1 POP 1 PUSH OPEN ws 8 List of button locations and reference pages How to use this page Use this page to find the location of buttons and other parts of the system that...

Страница 34: ... control 6 9 19 X GROOVE qk 15 1 power 1 6 12 19 24 c CLOCK SET 0 7 19 z REC qf 15 18 x stop ej 9 m M rewind fast forward ej 9 NX play pause ej 8 9 10 18 h H play qd wj 13 14 18 x stop qd wj 13 14 18 X pause qd 9 14 18 m M rewind fast forward qd wj 13 go back go forward qh 9 10 M m ed 7 16 19 A EJECTZ Z B EJECT w 13 1 LBT XGR600 only 2 Except for LBT XGR600 R Z BUTTON DESCRIPTIONS ...

Страница 35: ...3 7 8 10 15 17 24 PRESET ql 12 SLEEP wa 19 SURROUND 5 17 TUNER BAND qf 11 12 15 TUNING qk 11 12 VOL 6 9 19 1 power 2 7 19 m M rewind fast forward qk 9 13 go back go forward ql 9 10 13 X pause qj 9 13 14 18 x stop qh 9 13 14 18 M m cursor qs 7 16 19 CD N play qg 8 10 18 TAPE AY play 8 13 TAPE BY play 7 13 ALPHABETICAL ORDER A E F Z BUTTON DESCRIPTIONS ql qk qj qh qg qf ws wa w 5 6 7 9 8 q 3 2 1 4 q...

Страница 36: ...Sony Corporation Printed in Malaysia ...

Отзывы: