background image

Installing the TV

11

Cable and Antenna

If your cable provider does not feature local channels, you may find 
this set-up convenient.

Select CABLE or antenna (ANT) mode by pressing 

ANT

 on the remote 

control.

To receive channels using an antenna, instead of the CATV cable:

1

Select antenna mode by pressing ANT on the remote control.

2

Turn the cable to OFF (see page 40).

3

Perform the Auto Program function (see page 40).

Cable Box 
Connections 

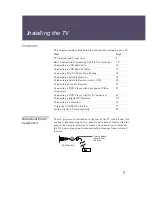
Cable Box and Cable

This is the preferred basic cable TV hookup to use if your cable TV 
company scrambles some channels, but not all of them (pay channels 
vs. regular cable channels), so you need to use a cable box.

With this setup you can:

Use the TV remote control to change channels using your cable 
box when the signal is scrambled.

Use the TV remote control to change channels using your TV 
when the signal is not scrambled. (Your TV’s tuner provides a 
better signal than the cable box.)

Use the Twin View feature. (When all channels are routed 
through your cable box, only one signal is sent to the TV, so you 
can not use the Twin View feature.)

Use the Twin View feature normally with the CATV input.

Use the Twin View feature partially with the cable box. (When 
you switch the TV input to AUX - to use the cable box - the 
unscrambled picture from the cable box will display. You can 
display the signal from both AUX and VHF/UHF inputs in the 
left Twin View picture, but you can display only the signal from 
the VHF/UHF input in the right Twin View picture.

Rear of TV

AUX

TO CONVERTER

VHF/UHF

Antenna cable

(No connection to 

CATV cable

TO CONVERTER)

Содержание KV-36XBR450

Страница 1: ...to be supplied by Kwong KV 32XBR450 KV 36XBR450 KV 40XBR700 2001 by Sony Corporation 4 085 012 21 Operating Instructions TM ...

Страница 2: ......

Страница 3: ...uipment does cause harmful interference to radio or television reception which can be determined by turning the equipment off and on the user is encouraged to try to correct the interference by one or more of the following measures Reorient or relocate the receiving antennas Increase the separation between the equipment and receiver Connect the equipment into an outlet on a circuit different from ...

Страница 4: ...ity of an internal malfunction that could create a fire hazard If a snapping or popping sound from a TV set is continuous or frequent while the TV is operating unplug the TV and consult your dealer or service technician It is normal for some TV sets to make occasional snapping or popping sounds particularly when being turned on or off Object and Liquid Entry Never push objects of any kind into the...

Страница 5: ...nd refer servicing to qualified service personnel under the following conditions When the power cord or plug is damaged or frayed If liquid has been spilled into the set If the set has been exposed to rain or water If the set has been subject to excessive shock by being dropped or the cabinet has been damaged If the set does not operate normally when following the operating instructions Adjust onl...

Страница 6: ......

Страница 7: ...g a DVD Player with Component Video Connectors 23 Connecting a DVD Player with A V Connectors 24 Connecting a Digital TV Receiver 25 Connecting a Camcorder 26 Using the CONTROL S Feature 27 Setting Up the TV Automatically 28 Using the Features Overview 29 Using Favorite Channels 30 Using Twin View 31 Using the Freeze Function 34 Using the Menus Overview 35 Using the Video Menu 36 Using the Audio M...

Страница 8: ......

Страница 9: ...itron Wega Overview This chapter defines the contents of your Wega TV and provides an overview of how to set up and use basic features Topic Page Presenting the FD Trinitron Wega 2 Package Contents 3 Using the Remote Control 3 ...

Страница 10: ...order Cinemotion Provides an optimized display by automatically detecting film content and applying a reverse 3 2 pulldown process Moving pictures will appear clearer and more natural looking Twin View Using Multi Image Driver MIDX Twin View allows you to watch two programs side by side with the ability to zoom in one picture You can watch pictures from two different sources simultaneously 16 9 En...

Страница 11: ...t you have all needed materials on hand before beginning a special connection project Using the Remote Control The remote control is the primary mechanism for controlling your TV Handle the remote control with care avoid dropping it getting it wet placing it in direct sunlight near a heater or where the humidity is high Inserting Batteries Insert two size AA R6 batteries supplied by matching the a...

Страница 12: ...ugh the available high resolution picture modes Interlaced Progressive Cinemotion Also available in the Video menu For details see Selecting Video Options on page 36 7 PIC MODE Cycles through the available video picture modes Vivid Standard Movie Pro Also available in the Video menu For details see Selecting Video Options on page 36 8 MENU Press to display the TV on screen menu Press again to exit...

Страница 13: ...select a channel the channel changes after 2 seconds Press ENTER to select immediately qj Turns on off Twin View For details see Using Twin View on page 31 qk CH Scan through channels ql FAVORITES Displays the Favorite Channels list For details see Using Favorite Channels on page 30 w FREEZE Freezes the window picture Press again to restore the picture Button Description Continued on the next page...

Страница 14: ...38 wh CODE SET Used for programming the remote control to operate non Sony video equipment For details see Programming the Remote Control on page 50 wj POWER button GREEN Turn on and off the VCR DVD equipment you have programmed into the remote control For instructions see Programming the Remote Control on page 50 wk Use to switch control for connected video equipment You can program one video sou...

Страница 15: ...on Topic Page TV Controls and Connectors 8 Basic Connection Connecting Cable TV or Antenna 10 Connecting a VCR and Cable 14 Connecting a VCR and Cable Box 15 Connecting Two VCRs for Tape Editing 18 Connecting a Satellite Receiver 19 Connecting a Satellite Receiver with a VCR 20 Connecting an Audio Receiver 22 Connecting a DVD Player with Component Video Connectors 23 Connecting a DVD Player with A...

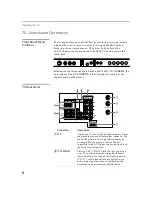
Страница 16: ... but has slight cosmetic differences TV Rear Panel Connection Description 1 AUX Allows you to view local and cable channels if your cable provider does not feature local channels You can switch between local and cable channels by pressing ANT on the remote control Devices connected to the AUX input can be viewed only in the Twin View left picture 2 TO CONVERTER This is a VHF UHF OUT jack that lets...

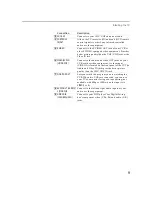
Страница 17: ...your VCR or other video equipment A video input VIDEO 2 is located on the front panel of the TV The Audio and Video IN jacks provide better picture quality than the VHF UHF IN jack 7 MONITOR OUT Lets you record the program you are watching to a VCR When two VCRs are connected you can use your TV as a monitor for tape to tape editing not available with 480p or 1080i when the input is to VIDEO 5 or ...

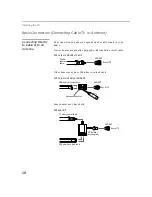
Страница 18: ...homes are usually equipped with standard coaxial cable VHF Only or VHF UHF or Cable Older homes may have 300 ohm twin lead cable VHF Only or UHF Only or VHF UHF Some homes may have both VHF and UHF 75 ohm VHF UHF coaxial cable Rear of TV 300 ohm twin lead cable VHF UHF Antenna connector Rear of TV 75 ohm coaxial cable VHF UHF 300 ohm twin lead cable U V Splitter not supplied Rear of TV ...

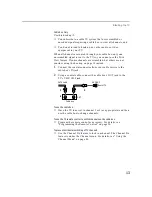
Страница 19: ...ote control to change channels using your cable box when the signal is scrambled Use the TV remote control to change channels using your TV when the signal is not scrambled Your TV s tuner provides a better signal than the cable box Use the Twin View feature When all channels are routed through your cable box only one signal is sent to the TV so you can not use the Twin View feature Use the Twin V...

Страница 20: ...n channels from Cable Box and channels coming directly into TV Press the ANT button on the TV remote control To use the TV remote control to switch channels on the cable box Program the remote control as necessary See Programming the Remote Control on page 50 To use the cable box Have your TV tuner set to channel 3 or 4 as appropriate and then use the Cable Box to change channels To prevent the ac...

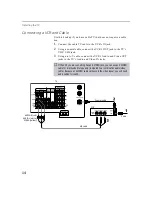
Страница 21: ...nect the coaxial connector from your cable service to the cable box s IN jack 2 Using a coaxial cable connect the cable box s OUT jack to the TV s VHF UHF jack To use the cable box Have the TV tuner set to channel 3 or 4 as appropriate and then use the cable box to change channels To use the TV remote control to switch channels on the cable box Program the remote control as necessary For details s...

Страница 22: ...VHF UHF jack 3 Using an A V cable connect the VCR s Audio and Video OUT jacks to the TV s Audio and Video IN jacks If the VCR you are connecting has an S VIDEO jack you can use an S VIDEO cable for improved picture quality compared to a combination audio video cable Because an S VIDEO cable carries only the video signal you will need audio cables for sound VCR TV Cable Coaxial cable A V cable AUDI...

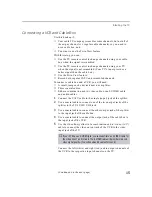
Страница 23: ...ombination audio video cable or an S VIDEO cable and audio cables 1 Connect the CATV cable to the single input jack of the splitter 2 Use a coaxial cable to connect one of the two output jacks of the splitter to the TV s VHF UHF jack 3 Use a coaxial cable to connect the other output jack of the splitter to the input jack of the cable box 4 Use a coaxial cable to connect the output jack of the cabl...

Страница 24: ...IN with the cable box OUT To use the TV remote control to change channels on the cable box Program the remote control as necessary For details see Programming the Remote Control on page 50 Then use the remote control to change the cable box channels Cable box CATV A V cable Coaxial cable VCR TV AUDIO R red AUDIO L white VIDEO yellow Coaxial cable Coaxial cable Splitter not included Continued from ...

Страница 25: ...CR The VCR s tuner is used as one of the Twin View picture sources if you do not turn on the VCR the Twin View will not work Use the remote control s TV VIDEO button to set the Twin View output to VIDEO 1 Change one Twin View channel by changing channels on the cable box ...

Страница 26: ... and Video OUT jacks to the TV s Audio and Video IN jacks To change the video input of the VCR See your VCR s user guide for instructions To view what is being recorded Use the remote control to set the TV to the video input to which the recording VCR is connected VIDEO 1 in the illustration above AUDIO R red AUDIO L white VIDEO yellow VCR recording VCR playback TV A V cable A V cable If the VCRs ...

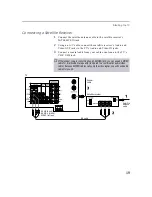
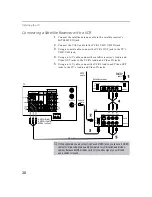
Страница 27: ...eo IN jacks 3 Connect a coaxial cable from your cable or antenna to the TV s VHF UHF jack If the receiver you are connecting has an S VIDEO jack you can use an S VIDEO cable for improved picture quality compared to a combination audio video cable Because S VIDEO cables carry only the video signal you will need audio cables for sound TV Satellite receiver Satellite cable A V cable Coaxial cable AUD...

Страница 28: ...Audio and Video OUT jacks to the VCR s Audio and Video IN jacks 5 Using an A V cable connect the VCR s Audio and Video OUT jacks to the TV s Audio and Video IN jacks TV Satellite receiver VCR A V cable Coaxial cable CATV AUDIO R red AUDIO L white VIDEO yellow Satellite antenna cable cable If the peripherals you are connecting have S VIDEO jacks you can use S VIDEO cables for improved picture quali...

Страница 29: ...VCR See your VCR s user s guide for instructions on how to do that To watch satellite TV or the VCR Press TV VIDEO on the remote control to select a video source To watch cable TV Press TV VIDEO on the remote control to select VHF UHF to select the CATV cable on the TV ...

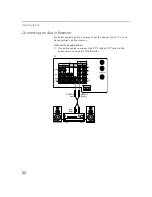
Страница 30: ...tter sound quality you may want to connect your TV to your stereo system s audio receiver To connect to an audio receiver Use audio cables to connect the TV s Audio OUT jacks to the audio receiver s audio LINE IN jacks AUDIO R AUDIO L Line red white input TV ...

Страница 31: ...der HD DVD IN 2 Using an audio cable connect the DVD player s Audio OUT jacks to the TV s Audio IN jacks Be sure to use the same column of inputs that you used for the video connection HD DVD IN 5 or 6 The Y PB and PR jacks on your DVD player are sometimes labeled Y CB and CR or Y B Y and R Y If so connect the cables to like colors Component video cables DVD player TV AUDIO R red AUDIO L white Aud...

Страница 32: ...O cable connect the DVD player s S VIDEO jack to the TV s S VIDEO jack To switch between your TV and DVD Use the TV VIDEO button on the TV s remote control to switch from one input device to another An S VIDEO connection will give a good quality video signal but if your DVD player has component video that connection described on the previous page will give an even better signal Audio cable DVD pla...

Страница 33: ...e TV s Audio IN jacks If you prefer you can use an S VIDEO cable instead of the Y PB and PR connections The Y PB and PR connections will provide the best quality picture but you cannot record the signal from any equipment connected to the Y PB and PR inputs Be sure to read the manual for the Set top box z S VIDEO VIDEO AUDIO PB Y PR AUDIO VIDEO OUT 1 2 3 MONO AUDIO R red AUDIO L white Component vi...

Страница 34: ...lly the same but has slight cosmetic differences If you have a mono camcorder connect its audio output to the TV s AUDIO L jack To view the camera s output Use the TV VIDEO button on the front panel of the TV or on the remote control to set the TV to the video input to which the camcorder is connected VIDEO 2 in the illustration above AUDIO R red AUDIO L white VIDEO yellow A V output If the camcor...

Страница 35: ...VD player or VCR connected to the TV using only the TV s remote control In addition to allowing you to control multiple devices with one remote control the CONTROL S feature allows you to always point your remote control at your TV instead of having to point it at the other equipment which might be hidden or out of direct line of sight TV ...

Страница 36: ... page 40 for information regarding Channel menu Using Auto Setup 1 Turn on the TV 2 Press the TV FUNCTION button on the remote control 3 Press CH to run Auto Setup 4 After Auto Setup has run press CH to exit Reset TV to Factory Settings To reset your TV to the factory settings 1 Turn on the TV 2 Hold down the RESET button on the remote control 3 Press and release the POWER button on the TV The TV ...

Страница 37: ...29 Using the Features Overview This chapter describes how to use features of your TV Topic Page Using Favorite Channels 30 Using Twin View 31 Using the Freeze Function 34 ...

Страница 38: ...ite channels 1 If you have not already done so create a list of favorite channels For information on setting up Favorite Channels see Selecting Channel Options on page 40 2 Press the FAVORITES button on the remote control 3 Move the joystick V or v to highlight the channel you want to watch Theprogramonthatchannelappearsinthepreviewwindow 4 Press the button to select the channel Preview window ...

Страница 39: ...y hear the sound associated with one of the pictures however You choose which picture s sound is selected You can change the relative size of each of the pictures Displaying Twin Pictures To display twin pictures 1 Press the button on your remote control A second picture window appears 2 To cancel twin pictures Press the button or Press the button ...

Страница 40: ...w include Equipment connected to the AUX and HD DVD IN numbers 5 and 6 inputs cannot be displayed in the right Twin View picture Normally the TV memorizes the last used sizes when Twin VIew is turned off then back on the last used sizes are displayed If you are using the enhanced 16 9 picture however the aspect ratio changes to 4 3 in Twin View and the picture is reformatted to that ratio To activ...

Страница 41: ...nd right pictures When you adjust the twin screen sizes the TV memorizes the change The next time you use the Twin View function the memorized sizes appear 1 Activate the picture whose size you want to change 2 Press V on the joystick to enlarge the picture 3 Press v on the joystick to make the picture smaller ...

Страница 42: ...al view if you are in Twin View it will not work To use the FREEZE function 1 When the program information you want to capture is displayed press the FREEZE button on the remote control 2 The TV switches to Twin View mode and displays the frozen picture on the right while the current program continues on the left 3 To cancel and return to normal viewing press the FREEZE button Current program in p...

Страница 43: ...ed audio options such as listening to second audio programming SAP or customizing the effect of the sound on your TV 38 CHANNEL allows you to set up a Favorite Channel list run the Auto Program function and more 40 PARENT lets you control the viewing of programs based on their ratings 42 TIMER lets you set the clock on your TV and allows you to program your TV for scheduled viewing using the Timer...

Страница 44: ...ludes the following options To change from one Video Mode to another use the PICTURE MODE button on the remote control z Option Description Mode Customized picture viewing Vivid Select for enhanced picture contrast and sharpness Standard Recommended for normal viewing conditions Movie Select for soft film like picture Pro Select for professional monitor like appearance You can alter the Video Menu...

Страница 45: ...p clean edge Select from High Medium Low Off DRC mode Digital Reality Creation mode Creates a high resolution picture with 4x density for high quality sources i e DVD player Satellite receiver Select from Interlaced Progressive or CineMotion Interlaced Recommended for moving pictures Progressive Recommended for still images and text CineMotion Provides an optimized display by automatically detecti...

Страница 46: ...tings for Treble Bass and Balance Press RESET on the remote control when in the Audio menu Selecting Audio Options The Audio Menu includes the following options Option Description Treble Adjust to increase or decrease higher pitched sounds Bass Adjust to increase or decrease lower pitched sounds Balance Adjust to emphasize left or right speaker balance Steady Sound ON Select to stabilize the volum...

Страница 47: ...roadcasts Speaker ON Select to turn on the TV speakers OFF Select to turn off the TV speakers and listen to the TV s sound only through your external audio system speakers Audio Out Easy control of volume adjustments This option can be set only when the Speaker option is set to OFF Variable Sound output varies according to the TV settings Useful when you want to use the TV s remote control to adju...

Страница 48: ...nt to add to your favorites 3 Press to select it Cable ON Select if you are receiving cable channels with a CATV cable OFF Select if you are using an antenna You should run Auto Program after changing the cable setting Channel Fix Useful when you have a cable box or satellite receiver connected 2 6 Fix your TV s channel setting to 3 or 4 and use the cable box VCR or satellite receiver to change ch...

Страница 49: ...e the joystick to scroll through the channels until you find the channel you want to skip add 2 Press to select it 3 Press the joystick V v to toggle between Add and Skip 4 Press to select Channel Label Label up to 20 channels with their station call letters Option Description ...

Страница 50: ...lock an entire channel To select the Parent Menu 1 Press MENU 2 Move the joystick to the Parent icon and press 3 Use the 0 9 buttons on the remote control to enter your four digit password 4 Confirm your password by entering it again The Parent menu options appear 5 Use the joystick to scroll through the settings 6 Press to select the desired option 7 Press MENU to exit the menu screen You need yo...

Страница 51: ...tings on off and select a rating system OFF Parental lock is off No programs are blocked from viewing Child Maximum ratings permitted are US TV Y TV G G Canada TV Y C G Youth Maximum ratings permitted are US TV PG PG Canada TV PG PG 8 ans Young Adult Maximum ratings permitted are US TV 14 PG 13 Canada TV 14 14 13 ans Custom Select to set ratings manually US See page 44 for details Canada See page ...

Страница 52: ...ence only Content Based Options FV Fantasy Violence D Suggestive Dialogue L Strong Language S Sexual situations V Violence Unrated Block programs or movies that are broadcast without a rating Block Blocks all programs and movies that are broadcast without a rating Allow Allows programs and movies that are broadcast without a rating The content ratings will increase depending on the level of the ag...

Страница 53: ...e Parental Lock To reactivate the Parental Lock settings turn off the TV When the TV is turned on again your Parental Controls settings are reactivated Option Description English Rating C All children C8 Children 8 years and older G General programming PG Parental Guidance 14 Viewers 14 and older 18 Adult programming French Rating G General programming 8 ans Not recommended for young children 13 a...

Страница 54: ...he DISPLAY button on the remote control 1 Move the joystick to Timer 1 or Timer 2 then press 2 Use the joystick to enter your date time and channel preferences then press to select each one 3 Press MENU to exit the menu screen To reset the Clock or Timers Press RESET on the remote control after selecting that option in the Timer menu This resets to the factory defaults Selecting Timer Options The ...

Страница 55: ...ng options Option Description Caption Vision Allows you to select from three closed caption modes for programs that are broadcast with closed caption CC1 CC2 CC3 CC4 Displays a printed version of the dialog or sound effects of a program Should be set to CC1 for most programs TEXT1 TEXT2 TEXT3 TEXT4 Displays network station information presented using either half or the whole screen if available Fo...

Страница 56: ...ct Skip your TV skips this connection when you press the TV VIDEO button Tilt Correction Allows you to correct any tilt of the picture Language Select to display all on screen menus in your language of choice 16 9 Enhanced Provides enhanced picture resolution for widescreen sources such as selected DVD titles only available when the TV is in VIDEO mode Press TV VIDEO and select from one of the fol...

Страница 57: ...Information Overview This chapter includes the following topics Topic Page Programming the Remote Control 50 Operating Other Equipment with Your TV Remote Control 53 Troubleshooting 55 Specifications 57 Index 59 ...

Страница 58: ...he desired equipment type 3 Press CODE SET and close the cover of the remote control 4 Enter the three digit manufacturer s code number 5 Press ENTER 6 To check if the code number works aim the TV s remote control at the equipment and press the green POWER button that corresponds with that equipment If it responds you are done If not try using another code listed for that manufacturer Sony Equipme...

Страница 59: ... enter a new code number the code number you previously entered at that setting is erased In some cases you may not be able to operate your equipment with the Sony remote control In such cases use the equipment s own remote control unit Whenever you remove the batteries to replace them the code numbers may revert to the factory setting and must be reset ...

Страница 60: ...10 Pioneer 308 Quasar 308 309 306 RCA PROSCAN 304 305 308 309 311 312 313 310 329 Realistic 309 330 328 335 324 338 Sansui 314 Samsung 322 313 321 Sanyo 330 335 Scott 312 313 321 335 323 324 325 326 Sharp 327 328 Shintom 315 Signature 2000 M Ward 338 327 SV2000 338 Sylvania 308 309 338 310 Symphonic 338 Tashiro 332 Tatung 314 336 337 Teac 314 336 338 337 Technics 309 308 Toshiba 312 311 Wards 327 ...

Страница 61: ...een POWER button under the cover Change channels CH Record N and REC simultaneously Play N Stop x Fast forward M Rewind the tape m Pause X Search the picture forward or backward M or m during playback release to resume normal playback To Do This Press Turn on off green POWER button under the cover Play N Stop x Pause X Step through different tracks of an audio disc M to step forward or m to step b...

Страница 62: ...k to previous channel JUMP To Do This Press Turn on off SAT CABLE green POWER button Select satellite receiver SAT CABLE FUNCTION button Select a channel 0 9 buttons ENTER Change channels CH Back to previous channel JUMP Display channel number DISPLAY Display SAT guide GUIDE Display SAT menu MENU Move highlight cursor Joystick Select item button To Do This Press Turn on off green POWER button unde...

Страница 63: ... Make sure Speaker is set to ON in the Audio menu see page 38 Cannot receive upper channels UHF when using an antenna Change Cable to OFF see page 40 Use Auto Program in the Channel menu to add receivable channels that are not presently in memory see page 40 No color Adjust the Color settings in the Video menu see page 36 Only snow and noise appear on the screen Check the antenna cable connections...

Страница 64: ...elections To turn this feature off select OFF in the Caption Vision option If you were trying to get closed captioning select CC1 instead of Text 1 4 There is no twin picture or it is just static Be sure your twin picture is set to a video source channel that has a program airing You may be tuned to a video input with nothing connected to it Try cycling through your video inputs using the TV VIDEO...

Страница 65: ...mpedance output 2 kilohms Monitor Out 1 1 Vp p 75 ohms unbalanced sync negative CONTROL S IN OUT 1 Component Video Input 2 Y PB PR Y 1 0 Vp p 75 ohms unbalanced sync negative PB 0 7 Vp p 75 ohms PR 0 7 Vp p 75 ohms KV 32XBR450 Supplied Accessories Remote Control RM Y184 AA R6 Batteries 2 supplied for remote control Optional Accessories AV Cable VMC 810 820 830 HG Audio Cable RKC 515HG S LINK Cable...

Страница 66: ...utput 15W x 2 Dimensions W x H x D 994 x 755 x 622 mm 39 1 4 x 29 3 4 x 24 1 2 in Mass 108 kg 238 lbs Power Consumption In Use 245 W In Standby 2 W KV 40XBR700 Supplied Accessories Remote Control RM Y184 AA R6 Batteries 2 supplied for remote control Optional Accessories AV Cable VMC 810 820 830 HG Audio Cable RKC 515HG S Link Cable RK G69HG Component Video Cable VMC 10 30 HG TV Stand SU 40XBR7 Vis...

Страница 67: ... CATV see cable Channel list adding channels 30 40 Channel menu 35 40 Channel Setup menu 40 Channel Skip Add 41 channels creating labels 41 setting up 28 closed caption modes 47 Code Set button 6 color temperature adjusting 37 color adjusting 36 Connecting Audio receiver 22 Cable box 11 13 15 16 Cable or antenna 10 13 Camcorder 26 Digital TV receiver 25 DVD player 23 24 Satellite receiver 19 21 VC...

Страница 68: ...on adjusting 37 Picture Mode 4 36 Picture size adjusting in Twin View 33 power cord removing from holder 7 presetting channels 40 problems troubleshooting 55 56 R ratings setting 42 45 viewing blocked programs 45 Rear panel controls and connections 8 9 remote control inserting batteries 3 programming 50 52 Remote control buttons 4 6 Remote control operating other equipment with Cable box 54 DVD 53...

Страница 69: ...TV Function button 4 TV Power button 4 TV VIDEO button 5 Twin View activating a picture 32 changing the picture size 33 displaying a picture 31 V VCR connecting two for tape editing 18 using with TV remote control 53 with cable box connecting 15 with cable connecting 14 with satellite receiver connecting 20 VCR DVD Power button 6 Velocity Modulation 2 37 video inputs labeling 48 Video menu 35 36 V...

Страница 70: ......

Страница 71: ......

Страница 72: ...Printed in U S A ...

Отзывы: