background image

ICD-UX71/UX81/UX71F/UX81F/UX91F QSG GB/FR/ES/NL 4-114-026-11(1)

GB

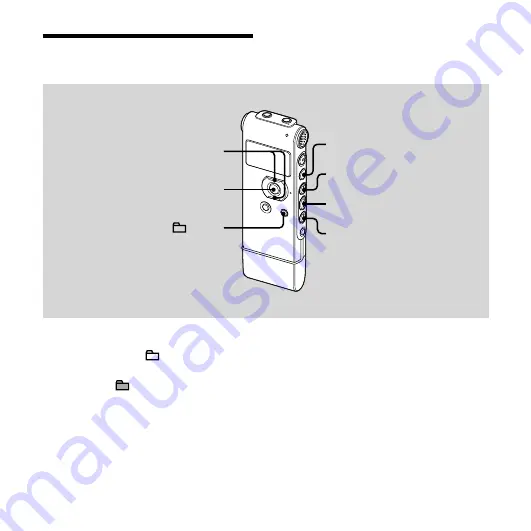
Playing Back Music 

Files

ENT



/MENU

Remove the IC recorder from your 

computer, press  /MENU, press 


or 

 on the control button to select 

the folder ( ) in which music files 

are stored, and then press ENT.

Press 

 or 

 to select the 

music file you want to play.

Press 



 to start playback.

Press 

 (stop) to stop playback.

Содержание ICD-UX71F - Digital Flash Voice Recorder

Страница 1: ......

Страница 2: ... For more detailed information about recycling of this product please contact your local Civic Office your household waste disposal service or the shop where you purchased the product Applicable accessories Headphones USB connection support cable Disposal of waste batteries applicable in the European Union and other European countries with separate collection systems This symbol on the battery or ...

Страница 3: ... separate service or guarantee documents The recorded music is limited to private use only Use of the music beyond this limit requires permission of the copyright holders Sony is not responsible for incomplete recording downloading or damaged data due to problems of the IC recorder or computer Depending on the types of the text and characters the text shown on the IC recorder may not be displayed ...

Страница 4: ...ying Back Messages Recording Messages 12 Playing Back Messages 14 Editing Messages Erasing Messages 15 Utilizing Your Computer Using the IC Recorder with Your Computer 18 Transferring Files from Your Computer to the IC Recorder 21 Playing Back Music Files 22 Listening to the FM Radio Tuning in an FM radio Station 23 Presetting FM Radio Stations Automatically 25 Listening to a Preset Radio Station ...

Страница 5: ...he film on the display window before you use the IC recorder NH AAA size AAA rechargeable battery 1 Stereo headphones 1 USB connection support cable 1 Carrying case 1 Battery case 1 CD ROM 1 The operating instructions are stored as PDF files Operating Instructions ...

Страница 6: ...you use the IC recorder Inserting the battery 1 Slide and lift the battery compartment lid 2 Insert one NH AAA rechargeable battery with correct polarity and close the lid 3 Charge the battery by connecting the USB connector of the IC recorder to your computer To USB connector IC recorder Computer ...

Страница 7: ... the Macintosh screen drag the IC RECORDER on the desktop to Trash and drop it there For details on disconnecting the IC recorder refer to the operating instructions supplied with your computer Step 2 Setting the Clock ENT MENU You need to set the clock to use the alarm function or record the date and time Clock setting display appears when you insert battery for the first time or when you insert ...

Страница 8: ...lay of the stop mode Setting the clock using the menu While the IC recorder is in the stop mode you can set the clock using the menu 1 Select DATE TIME in the menu Press and hold MENU to enter the menu mode The menu mode will be displayed in the display window Press or on the control button to select DETAIL MENU and then press ENT Press or on the control button to select DATE TIME and then press E...

Страница 9: ...ute in sequence and then press ENT 4 Press stop to return to the display of the stop mode Note If you do not press ENT within one minute of entering the clock setting data the clock setting mode is cancelled and the window will return to the display of the stopmode To display the current date and time Press stop to display the current date and time ...

Страница 10: ...r the menu mode The menu mode window will be displayed 2 Press or on the control button to select DETAIL MENU and then press ENT 3 Press or on the control button to select LANGUAGE and then press ENT 4 Press or on the control button to select the language that you want to use and then press ENT You can select the following languages European model ENGLISH Pyccкий Russian Other models ENGLISH Pyccк...

Страница 11: ...F is displayed The IC recorder turns off within a few seconds Turning the power on Slide the HOLD switch in the opposite direction from that of the arrow The IC recorder is turned on and an accessing animation is displayed Tips When you are not going to use the IC recorder for a long time we recommend to turn off the IC recorder When 10 minutes have passed after you have turned on the IC recorder ...

Страница 12: ...der selection window Press or on the control button to select the folder in which you want to record messages FOLDER01 05 and then press ENT 2 Start recording Press record pause in the stop mode The operation indicator lights in red When LED is set to OFF in the menu the operation indicator does not light You do not need to press and hold record pause while recording ...

Страница 13: ...he new message will be automatically recorded after the last recorded message Speak into the built in microphones 3 Press stop to stop recording The IC recorder stops at the beginning of the current recording ...

Страница 14: ...to select the folder and then press ENT 2 Press or to select the message you want to play 3 Press to start playback The operation indicator lights in green When LED is set to OFF in the menu the operation indicator does not light 4 Press VOL or on the control button to adjust the volume 5 Press stop to stop playback ...

Страница 15: ...s retaining all other messages when the IC recorder is in the stop or playback mode When a message is erased the remaining messages will advance and be renumbered so that there will be no space between messages 1 Select the message you want to erase 2 Press and hold MENU to enter the menu mode The menu mode window will be displayed 3 Press or on the control button to select ERASE A FILE and then p...

Страница 16: ...nother message Proceed with the same steps again from the beginning To erase a part of one message Divide the message into two messages first and then proceed with the same steps from the beginning Erasing all messages in a folder ENT MENU 1 Select the folder containing the messages you want to erase when the IC recorder is in the stop mode 2 Press and hold MENU to enter the menu mode The menu mod...

Страница 17: ...RASE ALL and then press ENT 4 Press or on the control button to select EXECUTE and then press ENT ERASING appears in the display window and all messages in the selected folder will be erased To cancel erasing Select CANCEL in step 4 and then press ENT ...

Страница 18: ...alled Notes Operation is not guaranteed if any operating system other than those described above Windows 98 or Linux etc is used Any 64 bit operating system is not supported For the latest version information and compatibility with your operating system please access the support home page for the IC recorder European model http support sony europe com DNA Other models http www sony asia com suppor...

Страница 19: ...he IC recorder and then connect the IC recorder to the USB connector of your computer The IC recorder is recognized by the computer as soon as the connection is made While the IC recorder is connected to the computer CONNECTING is displayed in the display window of the IC recorder To USB connector IC recorder Computer Tip If the IC recorder cannot be connected to the USB connector of your computer...

Страница 20: ...nnect the IC recorder from the computer when you are not using the IC recorder connected to the computer Disconnecting the IC recorder from your computer Follow the procedures below otherwise data may be damaged 1 Make sure that the operation indicator is not flashing 2 Disconnect the IC recorder from the USB connector of the computer On the Windows screen left click Safely Remove Hardware on the ...

Страница 21: ...ns Copying a music file from your computer to the IC recorder drag and drop 1 Connect the IC recorder to your computer page 19 On the Windows screen open My Computer and make sure that IC RECORDER has been recognized On the Macintosh screen make sure that an IC RECORDER drive is displayed on the desk top 2 Copy the folder in which the music files are stored to the IC recorder On the Windows screen...

Страница 22: ...IC recorder from your computer press MENU press or on the control button to select the folder in which music files are stored and then press ENT 2 Press or to select the music file you want to play 3 Press to start playback 4 Press stop to stop playback ...

Страница 23: ...ing FM reception or FM recording you can switch between the sound from the speaker and the sound from the headphones using the menu For details see page 87 in Operating Instructions Note During FM reception you cannot charge the battery Tuning in an FM radio Station ENT MENU The display in the display window may be different from the actual one in some regions ...

Страница 24: ... station 4 Press or on the control button repeatedly to tune in a station or press and hold or on the control button until the frequency digits begin to change on the display The IC recorder automatically scans the radio frequencies and stops when it finds a clear station If you cannot tune in a station press or on the control button repeatedly to change the frequency step by step When a station y...

Страница 25: ...e when listening to the FM radio The menu mode window will be displayed 2 Press or on the control button to select AUTO PRESET and then press ENT 3 Press or on the control button to select EXECUTE and then press ENT The IC recorder automatically scans for available radio frequencies and the stations will be stored in memory from the lower frequencies to the higher ones While presetting FM radio st...

Страница 26: ...presetting Press stop The preset numbers stored until you press the stop button remain in memory Listening to a Preset Radio Station ENT MENU The display in the display window may be different from the actual one in some regions ...

Страница 27: ...l button to select FM RADIO and then press ENT The IC recorder enters FM radio mode 3 To tune in a station press or on the control button repeatedly until the preset number you want is displayed When you press and hold or on the control button the preset numbers change rapidly 4 Press stop to turn the FM radio off ...

Страница 28: ...ome regions 1 Press and hold MENU to enter the menu mode The menu mode window will be displayed 2 Press or on the control button to select FM RADIO and then press ENT The IC recorder enters FM radio mode 3 To tune in a station press or on the control button repeatedly until the preset number you want to erase is displayed ...

Страница 29: ...2 V DC Use one NH AAA rechargeable battery or one LR03 size AAA alkaline battery On safety Do not operate the unit while driving cycling or operating any motorized vehicle On handling Do not leave the unit in a location near heat sources or in a place subject to direct sunlight excessive dust or mechanical shock Should any solid object or liquid fall into the unit remove the battery and have the u...

Страница 30: ...g On maintenance To clean the exterior use a soft cloth slightly moistened in water Do not use alcohol benzine or thinner If you have any questions or problems concerning your unit please consult your nearest Sony dealer Backup recommendations To avoid potential risk of data loss caused by accidental operation or malfunction of the IC recorder we recommend that you save a backup copy of your recor...

Страница 31: ...r its affiliates in the United States and or other countries 2007 Nuance Communications Inc All rights reserved MPEG Layer 3 audio coding technology and patents licensed from Fraunhofer IIS and Thomson All other trademarks and registered trademarks are trademarks or registered trademarks of their respective holders Furthermore and are not mentioned in each case in this manual This product is prote...

Страница 32: ...palité votre déchetterie ou le magasin où vous avez acheté le produit Ceci s fapplique aux accessoires suivants casque câble de prise en charge de connexion USB Elimination des piles et accumulateurs usagés Applicable dans les pays de l Union Européenne et aux autres pays européens disposant de systèmes de collecte sélective Ce symbole apposé sur les piles et accumulateurs ou sur les emballages in...

Страница 33: ...vement L utilisation de la musique au delà de cette limite nécessite l autorisation des détenteurs des droits d auteur Sony ne peut être tenu responsable de tout enregistrement ou téléchargement incomplet ou de dommages causés aux données suite à des problèmes rencontrés par l enregistreur IC ou l ordinateur Selon le type de texte et de caractères le texte affiché sur l enregistreur IC peut ne pas...

Страница 34: ...e messages Enregistrement de messages 12 Lecture de messages 14 Edition de messages Effacement de messages 15 Utilisation de l ordinateur Utilisation de l enregistreur IC avec l ordinateur 18 Transfert de fichiers de votre ordinateur vers l enregistreur IC 21 Lecture de fichiers musicaux 22 Ecouter la radio FM Réglage d une station de radio FM 23 Préréglage automatique des stations radio FM 25 Eco...

Страница 35: ...irez le film de la fenêtre d affichage avant d utiliser l enregistreur IC Pile rechargeable NH AAA AAA 1 Casque stéréo 1 Câble de prise en charge de connexion USB 1 Etui 1 Boîtier de la pile 1 CD ROM 1 Le mode d emploi est sous la forme de fichiers PDF Mode d emploi ...

Страница 36: ...gistreur IC Insertion de la pile 1 Faites glisser et soulevez le couvercle du compartiment de la pile 2 Introduisez une pile rechargeable NH AAA en respectant la polarité et refermez le couvercle 3 Chargez la pile en raccordant le connecteur USB de l enregistreur IC à l ordinateur Vers le connecteur USB Enregistreur IC Ordinateur ...

Страница 37: ...ute sécurité Sur l écran Macintosh faites glisser IC RECORDER sur le bureau et déposez le dans la Corbeille Pour obtenir des détails sur la déconnexion de l enregistreur IC consultez le mode d emploi fourni avec votre ordinateur Etape 2 Réglage de l horloge ENT MENU Vous devez régler l horloge pour utiliser la fonction de réglage de l alarme ou enregistrer la date et l heure L écran de réglage de ...

Страница 38: ...églage de l horloge à l aide du menu Lorsque l enregistreur IC est en mode d arrêt vous pouvez régler l horloge à l aide du menu 1 Sélectionnez DATE TIME dans le menu Maintenez le bouton MENU enfoncé pour activer le mode de menu Le mode de menu apparaît dans la fenêtre d affichage Appuyez sur ou sur le bouton de commande pour sélectionner DETAIL MENU puis appuyez sur ENT Appuyez sur ou sur le bout...

Страница 39: ...s l ordre puis appuyez sur ENT 4 Appuyez sur arrêt pour revenir à l affichage en mode d arrêt Remarque Si vous n appuyez pas sur ENT dans la minute qui suit la saisie des données de réglage de l horloge le mode de réglage de l horloge est annulé et la fenêtre revient à l affichage en mode d arrêt Pour afficher la date et l heure actuelles Appuyez sur arrêt pour afficher la date et l heure actuelle...

Страница 40: ...mode de menu La fenêtre du mode de menu s affiche 2 Appuyez sur ou sur le bouton de commande pour sélectionner DETAIL MENU puis appuyez sur ENT 3 Appuyez sur ou sur le bouton de commande pour sélectionner LANGUAGE puis appuyez sur ENT 4 Appuyez sur or sur le bouton de commande pour sélectionner la langue à utiliser puis appuyez sur ENT Vous pouvez sélectionner les langues suivantes Modèle européen...

Страница 41: ... L enregistreur IC s éteint au bout de quelques secondes Mise sous tension Faites glisser le commutateur HOLD dans le sens opposé à la flèche L enregistreur IC est sous tension et une animation s affiche Conseils Lorsque vous n allez pas utiliser l enregistreur IC pendant une longue période nous vous recommandons de le mettre hors tension Lorsque 10 minutes se sont écoulées après l activation de l...

Страница 42: ...a fenêtre de sélection du dossier Appuyez sur ou sur le bouton de commande pour sélectionner le dossier dans lequel vous voulez enregistrer des messages FOLDER01 05 puis appuyez sur ENT 2 Lancez l enregistrement Appuyez sur enregistrement pause en mode d arrêt L indicateur de fonctionnement s allume en rouge Lorsque LED est réglé sur OFF dans le menu l indicateur de fonctionnement ne s allume pas ...

Страница 43: ...oncé pendant l enregistrement Le nouveau message est enregistré automatiquement après le dernier message enregistré Parlez dans les microphones intégrés 3 Appuyez sur arrêt pour arrêter l enregistrement L enregistreur IC s arrête au début de l enregistrement en cours ...

Страница 44: ... appuyez sur ENT 2 Appuyez sur ou sur pour sélectionner le message que vous souhaitez lire 3 Appuyez sur pour commencer la lecture L indicateur de fonctionnement s allume en vert Lorsque LED est réglé sur OFF dans le menu l indicateur de fonctionnement ne s allume pas 4 Appuyez sur VOL ou sur le bouton de commande pour régler le volume 5 Appuyez sur arrêt pour arrêter la lecture ...

Страница 45: ...ges inutiles et conserver tous les autres messages lorsque l enregistreur IC est en mode d arrêt ou de lecture Lorsqu un message est effacé les autres messages sont avancés et renumérotés de façon à ne pas laisser d espace entre les messages 1 Sélectionnez le message que vous souhaitez effacer 2 Maintenez le bouton MENU enfoncé pour activer le mode de menu La fenêtre du mode de menu s affiche 3 Ap...

Страница 46: ...ur effacer un autre message Reprenez les mêmes étapes depuis le début Pour effacer une partie d un message Commencez par diviser le message en deux puis reprenez les mêmes étapes depuis le début Effacement de tous les messages d un dossier ENT MENU 1 Sélectionnez le dossier qui contient les messages à effacer lorsque l enregistreur IC est en mode d arrêt 2 Maintenez le bouton MENU enfoncé pour act...

Страница 47: ...ppuyez sur ENT 4 Appuyez sur ou sur le bouton de commande pour sélectionner EXECUTE et appuyez sur ENT ERASING s affiche dans la fenêtre d affichage et tous les messages du dossier sélectionné sont effacés Pour annuler l effacement Sélectionnez CANCEL à l étape 4 et appuyez sur ENT ...

Страница 48: ...st pas garanti si un système d exploitation autre que ceux décrits ci contre Windows 98 ou Linux etc est utilisé Aucun système d exploitation 64 bits n est pris en charge Pour obtenir les dernières informations de version et de compatibilité avec votre système d exploitation veuillez visiter la page d accueil de l enregistreur IC Modèle européen http support sony europe com DNA Autres modèles http...

Страница 49: ...istreur IC puis raccordez l enregistreur IC au connecteur USB de l ordinateur L enregistreur IC est reconnu par l ordinateur dès que la connexion est établie Lorsque l enregistreur IC est connecté à l ordinateur CONNECTING s affiche dans la fenêtre d affichage de l enregistreur IC Vers le connecteur USB Enregistreur IC Ordinateur Conseil S il n est pas possible de raccorder directement l enregistr...

Страница 50: ...reur IC de l ordinateur lorsque l enregistreur IC est utilisé de manière autonome Déconnexion de l enregistreur IC de votre ordinateur Suivez les procédures ci dessous sinon les données peuvent être endommagées 1 Assurez vous que l indicateur de fonctionnement ne clignote pas 2 Déconnectez l enregistreur IC du connecteur USB de l ordinateur Sur l écran Windows cliquez sur Retirer le périphérique e...

Страница 51: ...registreur IC Copie d un fichier musical de votre ordinateur vers l enregistreur IC glisser déposer 1 Raccordez l enregistreur IC à l ordinateur page 19 Sur l écran Windows ouvrez Poste de travail et assurez vous que IC RECORDER a été reconnu Sur l écran Macintosh assurez vous que le lecteur IC RECORDER s affiche sur le bureau 2 Copiez le dossier dans lequel les fichiers musicaux sont enregistrés ...

Страница 52: ...sur MENU appuyez sur ou sur le bouton de commande pour sélectionner le dossier qui contient les fichiers musicaux puis appuyez sur ENT 2 Appuyez sur ou pour sélectionner le fichier musical que vous souhaitez lire 3 Appuyez sur pour commencer la lecture 4 Appuyez sur arrêt pour arrêter la lecture ...

Страница 53: ...la réception ou de l enregistrement FM vous pouvez basculer entre le son du haut parleur et celui du casque Pour obtenir des détails consultez la page 87 dans le Mode d emploi Remarque Vous ne pouvez pas charger la pile pendant la réception FM Réglage d une station de radio FM ENT MENU L affichage de la fenêtre d affichage peut être différent de celui dans certaines régions ...

Страница 54: ...puyez plusieurs fois sur ou sur le bouton de commande pour régler une station ou appuyez et maintenez enfoncé ou sur le bouton de commande jusqu à ce que les chiffres de fréquence commencent à changer sur l écran L enregistreur IC balaie automatiquement les fréquences radio et s arrête lorsqu il trouve une station Si vous n arrivez pas à régler une station appuyez plusieurs fois sur ou sur le bout...

Страница 55: ... menu La fenêtre du mode de menu s affiche 2 Appuyez sur ou sur le bouton de commande pour sélectionner AUTO PRESET et appuyez sur ENT 3 Appuyez sur ou sur le bouton de commande pour sélectionner EXECUTE et appuyez sur ENT L enregistreur IC recherche automatiquement les fréquences radio disponibles et les stations seront enregistrées dans la mémoire des fréquences les plus basses aux plus élevées ...

Страница 56: ...yez sur arrêt Les numéros préréglés enregistrés avant que vous n appuyiez sur la touche arrêt restent en mémoire Ecouter une station de radio préréglée ENT MENU L affichage de la fenêtre d affichage peut être différent de celui dans certaines régions ...

Страница 57: ...ctionner FM RADIO et appuyez sur ENT L enregistreur IC passe en mode radio FM 3 Pour régler une station appuyez plusieurs fois sur ou sur le bouton de commande jusqu à ce que le numéro préréglé souhaité s affiche Lorsque vous maintenez ou enfoncé sur le bouton de commande les numéros préréglés changent rapidement 4 Appuyez sur arrêt pour arrêter la radio FM ...

Страница 58: ...bouton MENU enfoncé pour activer le mode de menu La fenêtre du mode de menu s affiche 2 Appuyez sur ou sur le bouton de commande pour sélectionner FM RADIO et appuyez sur ENT L enregistreur IC passe en mode radio FM 3 Pour régler une station appuyez plusieurs fois sur ou sur le bouton de commande jusqu à ce que le numéro préréglé que vous voulez effacer s affiche ...

Страница 59: ...ez une pile NH AAA rechargeable ou une pile alcaline LR03 AAA Sécurité Ne faites pas fonctionner l appareil en conduisant une voiture une bicyclette ou tout autre véhicule motorisé Manipulation Ne laissez pas l appareil à proximité d une source de chaleur ou dans un endroit exposé au rayonnement direct du soleil à une poussière excessive ou à des chocs mécaniques Si des solides ou des liquides ven...

Страница 60: ... l appareil pendant l enregistrement Entretien Pour nettoyer l extérieur utilisez un chiffon doux légèrement imprégné d eau N utilisez pas d alcool d essence ou de diluant Si vous avez des questions ou des problèmes concernant cet appareil consultez votre revendeur Sony Sauvegardes recommandées Pour éviter tout risque de perte de données à la suite d une opération accidentelle ou d un problème de ...

Страница 61: ...partenaires aux Etats Unis et ou dans d autres régions 2007 Nuance Communications Inc Tous droits réservés Technologie d encodage audio MPEG Layer 3 et brevets sous licence de Fraunhofer IIS et Thomson Les autres marques commerciales et marques déposées apparaissant dans le présent document sont des marques commerciales ou des marques déposées de leurs propriétaires respectifs En outre et ne sont ...

Страница 62: ...de que este producto se desecha correctamente Ud ayuda a prevenir las consecuencias negativas para el medio ambiente y la salud humana que podrían derivarse de la incorrecta manipulación en el momento de deshacerse de este producto El reciclaje de materiales ayuda a conservar los recursos naturales Para recibir información detallada sobre el reciclaje de este producto póngase en contacto con el ay...

Страница 63: ...de se indica cómo quitar la batería del producto de forma segura Deposite la batería en el correspondiente punto de recogida para el reciclado Para recibir información detallada sobre el reciclaje de este producto o de la batería póngase en contacto con el ayuntamiento el punto de recogida más cercano o el establecimiento donde ha adquirido el producto Aviso para los clientes la siguiente informac...

Страница 64: ...es 12 Reproducción de mensajes 14 Edición de mensajes Borrado de mensajes 15 Utilización con el ordenador Utilización de la grabadora IC con el ordenador 18 Transferencia de archivos del ordenador a la grabadora IC 21 Reproducción de archivos de música 22 Recepción de radio FM Sintonización de una emisora de radio FM 23 Preajuste automático de las emisoras de radio FM 25 Recepción de una emisora d...

Страница 65: ...o protector del visor antes de usar la grabadora IC Pila recargable NH AAA tamaño AAA 1 Auriculares estéreo 1 Cable auxiliar para la conexión USB 1 Funda de transporte 1 Funda de la pila 1 CD ROM 1 El manual de instrucciones está guardado en formato PDF Manual de instrucciones ...

Страница 66: ... visor antes de usar la grabadora IC Inserción de la pila 1 Deslice y levante la tapa del compartimiento de la pila 2 Inserte una pila recargable NH AAA con la polaridad correcta y cierre la tapa 3 Conecte el conector USB de la grabadora IC al ordenador para cargar la pila Al conector USB Grabadora IC Ordenador ...

Страница 67: ...e Macintosh arrastre IC RECORDER en el escritorio hasta Papelera y suéltela ahí Para obtener más información acerca de cómo desconectar la grabadora IC consulte el manual de instrucciones suministrado con el ordenador Paso 2 Ajuste del reloj ENT MENU Es necesario ajustar el reloj para utilizar la función de alarma o para grabar la fecha y la hora La pantalla de ajuste del reloj aparece al insertar...

Страница 68: ...l modo de parada Ajuste del reloj a través del menú Cuando la grabadora IC se encuentra en el modo de parada es posible ajustar el reloj a través del menú 1 Seleccione DATE TIME en el menú Mantenga pulsado MENU para entrar en el modo de menú El modo de menú aparecerá en el visor Pulse o en el botón de control para seleccionar DETAIL MENU y a continuación pulse ENT Pulse o en el botón de control pa...

Страница 69: ...n este orden y a continuación pulse ENT 4 Pulse parada para volver al visor en el modo de parada Nota Si no pulsa ENT antes de que transcurra un minuto después de introducir los datos de ajuste del reloj el modo de ajuste del reloj se cancelará y el visor volverá a mostrar el modo de parada Para mostrar la fecha y hora actuales Pulse parada para mostrar la fecha y hora actuales ...

Страница 70: ...l modo de menú Aparecerá la ventana del modo de menú 2 Pulse o en el botón de control para seleccionar DETAIL MENU y a continuación pulse ENT 3 Pulse o en el botón de control para seleccionar LANGUAGE y a continuación pulse ENT 4 Pulse o en el botón de control para seleccionar el idioma que desee usar y a continuación pulse ENT Puede seleccionar los siguientes idiomas Modelo europeo ENGLISH inglés...

Страница 71: ... La grabadora IC se apaga unos segundos después Para encenderla Deslice el interruptor HOLD en el sentido opuesto al que indica la flecha La grabadora IC se enciende y se muestra una animación de acceso Sugerencias Si no va a utilizar la grabadora IC durante un período de tiempo prolongado se recomienda apagar la grabadora IC Si se enciende la grabadora IC y transcurren 10 minutos sin haber realiz...

Страница 72: ...ue desea grabar mensajes FOLDER01 05 y a continuación pulse ENT 2 Inicie la grabación Pulse grabación pausa en el modo de parada El indicador de funcionamiento se ilumina en rojo Cuando LED está ajustado en OFF en el menú el indicador de funcionamiento no se ilumina No es necesario mantener pulsado grabación pausa durante la grabación ENT Toma auriculares Micrófonos incorporados Indicador de funci...

Страница 73: ...nsaje se grabará automáticamente después del último mensaje grabado Hable a través de los micrófonos incorporados 3 Pulse parada para detener la grabación La grabadora IC se detiene al principio de la grabación actual ...

Страница 74: ...ara seleccionar el mensaje que desea reproducir 3 Pulse para iniciar la reproducción El indicador de funcionamiento se ilumina en verde Cuando LED está ajustado en OFF en el menú el indicador de funcionamiento no se ilumina 4 Pulse VOL o en el botón de control para ajustar el volumen 5 Pulse parada para detener la reproducción VOL MENU Indicador de funcionamiento ...

Страница 75: ...ados y conservar el resto cuando la grabadora IC se encuentre en el modo de parada o de reproducción Si borra un mensaje los restantes avanzarán y se cambiará su numeración para que no quede espacio entre éstos 1 Seleccione el mensaje que desea borrar 2 Mantenga pulsado MENU para entrar en el modo de menú Aparecerá la ventana del modo de menú 3 Pulse o en el botón de control para seleccionar ERASE...

Страница 76: ...e Realice de nuevo el procedimiento desde el principio Para borrar una parte de un mensaje En primer lugar divida el mensaje en dos y a continuación realice el mismo procedimiento desde el principio Borrado de todos los mensajes de una carpeta ENT MENU 1 Seleccione la carpeta que contiene los mensajes que desea borrar cuando la grabadora IC esté en el modo de parada 2 Mantenga pulsado MENU para en...

Страница 77: ...tinuación pulse ENT 4 Pulse o en el botón de control para seleccionar EXECUTE y a continuación pulse ENT ERASING aparece en el visor y se borran todos los mensajes de la carpeta seleccionada Para cancelar el borrado Seleccione CANCEL en el paso 4 y a continuación pulse ENT ...

Страница 78: ...garantiza el funcionamiento si se utiliza un sistema operativo que no sea uno de los mencionados Windows 98 o Linux etc No se admiten sistemas operativos de 64 bits Para obtener la información más reciente sobre la versión y la compatibilidad con el sistema operativo visite la página de soporte técnico de la grabadora IC Modelo europeo http support sony europe com DNA Otros modelos http www sony a...

Страница 79: ...e la grabadora IC y conecte la grabadora IC al conector USB del ordenador El ordenador reconoce la grabadora IC en cuanto ésta se conecta Mientras la grabadora IC esté conectada al ordenador aparecerá CONNECTING en el visor de la grabadora IC Al conector USB Grabadora IC Ordenador Sugerencia Si no es posible conectar la grabadora IC directamente al conector USB del ordenador use el cable auxiliar ...

Страница 80: ...a grabadora IC del ordenador cuando no utilice la grabadora IC conectada a éste Desconexión de la grabadora IC del ordenador Para evitar que los datos resulten dañados siga este procedimiento 1 Asegúrese de que el indicador de funcionamiento no parpadea 2 Desconecte la grabadora IC del conector USB del ordenador En la pantalla de Windows haga clic en Quitar hardware con seguridad en la barra de ta...

Страница 81: ... instrucciones Cómo copiar un archivo de música del ordenador a la grabadora IC arrastrar y colocar 1 Conecte la grabadora IC al ordenador página 19 En la pantalla de Windows abra Mi PC y asegúrese de que se reconoce IC RECORDER En la pantalla de Macintosh asegúrese de que se muestra una unidad IC RECORDER en el escritorio 2 Copie la carpeta donde se almacenan los archivos de música a la grabadora...

Страница 82: ...or pulse MENU pulse o en el botón de control para seleccionar la carpeta donde se almacenan los archivos de música y a continuación pulse ENT 2 Pulse o para seleccionar el archivo de música que desea reproducir 3 Pulse para iniciar la reproducción 4 Pulse parada para detener la reproducción ...

Страница 83: ...grabación de FM puede cambiar entre el sonido del altavoz y el sonido de los auriculares utilizando el menú Para obtener más información consulte la página 87 en las Manual de instrucciones Nota Durante la recepción de FM no es posible cargar la batería Sintonización de una emisora de radio FM ENT MENU El algunas regiones es posible que el visor muestre algo distinto a lo que se indica en este man...

Страница 84: ...sora 4 Pulse o de forma repetida en el botón de control para sintonizar una emisora o mantenga pulsado o en el botón de control hasta que empiecen a cambiar los dígitos de la frecuencia en el visor La grabadora IC busca automáticamente las frecuencias de radio y se detiene cuando encuentra una emisora clara Si no puede sintonizar una emisora pulse o de forma repetida en el botón de control para ca...

Страница 85: ...o de menú Aparecerá la ventana del modo de menú 2 Pulse o en el botón de control para seleccionar AUTO PRESET y a continuación pulse ENT 3 Pulse o en el botón de control para seleccionar EXECUTE y a continuación pulse ENT La grabadora IC busca automáticamente las frecuencias de radio disponibles y las emisoras se almacenan automáticamente desde las frecuencias más bajas a las más altas Durante el ...

Страница 86: ...a Los números de preajuste almacenados hasta que se pulsa el botón parada se conservan en la memoria Recepción de una emisora de radio preajustada ENT MENU El algunas regiones es posible que el visor muestre algo distinto a lo que se indica en este manual ...

Страница 87: ...ionar FM RADIO y a continuación pulse ENT La grabadora IC entra en modo de radio FM 3 Para sintonizar una emisora pulse o de forma repetida en el botón de control hasta que se visualice el número de preajuste que desee Si mantiene pulsado o en el botón de control el número de preajuste cambia rápidamente 4 Pulse parada para apagar la radio FM ...

Страница 88: ... 1 Mantenga pulsado MENU para entrar en el modo de menú Aparecerá la ventana del modo de menú 2 Pulse o en el botón de control para seleccionar FM RADIO y a continuación pulse ENT La grabadora IC entra en modo de radio FM 3 Para sintonizar una emisora pulse o de forma repetida en el botón de control hasta que se visualice el número de preajuste que desee borrar ...

Страница 89: ...C de 1 5 V o 1 2 V Utilice una pila recargable NH AAA o una pila alcalina LR03 tamaño AAA Seguridad No utilice la unidad mientras conduce va en bicicleta o utiliza cualquier vehículo motorizado Manejo No deje la unidad cerca de fuentes de calor ni en lugares expuestos a la luz solar directa polvo excesivo o golpes mecánicos Si se introduce algún objeto sólido o líquido en la unidad extraiga la pil...

Страница 90: ...tenimiento Para limpiar el exterior utilice un paño suave ligeramente humedecido con agua No emplee alcohol bencina ni diluyente Si tiene problemas o preguntas acerca de esta unidad consulte al distribuidor Sony más cercano Recomendaciones sobre copias de seguridad Para evitar el posible riesgo de pérdida de datos debido a un uso accidental o a un fallo de funcionamiento de la grabadora IC se reco...

Страница 91: ...e sus filiales en los Estados Unidos y o en otros países 2007 Nuance Communications Inc Todos los derechos reservados Tecnología de codificación de audio MPEG Layer 3 y patentes con licencia de Fraunhofer IIS and Thomson Todas las demás marcas comerciales y marcas comerciales registradas son marcas comerciales o marcas comerciales registradas de sus respectivos propietarios Además y no se menciona...

Страница 92: ...oduct neemt u contact op met de gemeentelijke instanties het bedrijf of de dienst belast met de verwijdering van huishoudafval of de winkel waar u het product hebt gekocht Dit betreft de accessoires Hoofdtelefoon extra USB aansluitkabelr Verwijdering van oude batterijen in de Europese Unie en andere Europese landen met afzonderlijke inzamelingssystemen Dit symbool op de batterij of verpakking wijs...

Страница 93: ...erlijke service garantie documenten De opgenomen muziek mag alleen voor particuliere doeleinden worden gebruikt Voor elk ander gebruik van de muziek is toestemming van de copyrighthouders vereist Sony is niet aansprakelijk voor incomplete opnamen downloads of beschadigde gegevens door problemen met de IC recorder of computer Afhankelijk van de soort tekst en tekens wordt de tekst mogelijk niet alt...

Страница 94: ...chten opnemen 12 Berichten afspelen 14 Berichten bewerken Berichten wissen 15 Uw computer gebruiken De IC recorder gebruiken met uw computer 18 Bestanden overdragen van de computer naar de IC recorder 21 Muziekbestanden afspelen 22 Luisteren naar de FM radio Afstemmen op een FM radiostation 23 Automatisch FM radiozenders vooraf instellen 25 Luisteren naar een vooraf ingestelde radiozender 26 Voora...

Страница 95: ...wijder de folie van het display voordat u de IC recorder gebruikt Oplaadbare NH AAA batterij AAA formaat 1 Stereohoofdtelefoon 1 Extra USB aansluitkabel 1 Draagtas 1 Batterijdoosje 1 CD ROM 1 De gebruiksaanwijzing is opgeslagen als PDF bestand Gebruiksaanwijzing ...

Страница 96: ... De batterij plaatsen 1 Verschuif en open het deksel van de batterijhouder 2 Plaats een oplaadbare NH AAA batterij met de pool in de juiste richting in de houder en sluit het deksel 3 Laad de batterij op door de USB aansluiting van de IC recorder op de computer aan te sluiten Naar USB aansluiting IC recorder Computer ...

Страница 97: ...jderen Op het Macintosh scherm sleept u de IC recorder op het bureaublad naar Prullenbak en zet hem daar neer Raadpleeg de gebruiksaanwijzing die bij uw computer is geleverd voor meer informatie over het loskoppelen van de IC recorder Stap 2 De klok instellen ENT MENU U moet de klok instellen als u de alarmfunctie wilt gebruiken of de datum en tijd wilt opnemen Het klokinstelvenster verschijnt als...

Страница 98: ...opstand terug te keren De klok met het menu instellen Als de IC recorder in de stopstand staat kunt u de klok met behulp van het menu instellen 1 Selecteer DATA TIME in het menu Houd MENU ingedrukt om naar de menustand te gaan De menustand wordt weergegeven in het display Druk op of op de bedieningstoets om DETAIL MENU te selecteren en druk vervolgens op ENT Druk op of op de bedieningstoets om DAT...

Страница 99: ...ten in te stellen en druk vervolgens op ENT 4 Druk op stoppen om naar het display in de stopstand terug te keren Opmerking Als u niet binnen één minuut nadat u de klokgegevens hebt ingevoerd op ENT drukt wordt de klokinstelstand geannuleerd en wordt het display in de stopstand opnieuw weergegeven De huidige datum en tijd weergeven Druk op stoppen om de huidige datum en tijd weer te geven ...

Страница 100: ...ster met de menustand wordt weergegeven 2 Druk op of op de bedieningstoets om DETAIL MENU te selecteren en druk vervolgens op ENT 3 Druk op of op de bedieningstoets om LANGUAGE te selecteren en druk vervolgens op ENT 4 Druk op of op de bedieningstoets om de gewenste taal te selecteren en druk vervolgens op ENT U kunt kiezen uit de volgende talen Europees model ENGLISH Engels Pyccкий Russisch Overi...

Страница 101: ...jnt POWER OFF De IC recorder schakelt na enkele seconden uit De stroom inschakelen Schuif de HOLD schakelaar in de tegengestelde richting van de pijl De IC recorder wordt ingeschakeld en er verschijnt een toegangsanimatie Tips We raden aan om de IC recorder uit te schakelen wanneer u hem lange tijd niet gaat gebruiken Wanneer 10 minuten verstrijken nadat u de IC recorder hebt ingeschakeld zonder e...

Страница 102: ... kunt selecteren Druk op of op de bedieningstoets om de map te selecteren waarin u de berichten wilt opnemen FOLDER01 05 en druk vervolgens op ENT 2 Start de opname Druk op opnemen pauze in de stopstand De werkingaanduiding gaat rood branden Wanneer LED in het menu is ingesteld op OFF gaat de werkingsaanduiding niet branden U hoeft opnemen pauze niet ingedrukt te houden tijdens de opname ...

Страница 103: ...t nieuwe bericht wordt automatisch opgenomen na het laatst opgenomen bericht Praat in de ingebouwde microfoon 3 Druk op stoppen om de opname te stoppen De IC recorder stopt bij het begin van de huidige opname ...

Страница 104: ...druk vervolgens op ENT 2 Druk op of om het gewenste bericht te selecteren 3 Druk op om het afspelen te starten De werkingaanduiding gaat groen branden Wanneer LED in het menu is ingesteld op OFF gaat de werkingsaanduiding niet branden 4 Druk op VOL of op de bedieningstoets om het volume aan te passen 5 Druk op stoppen om het afspelen te stoppen ...

Страница 105: ...erichten bewaren wanneer de IC recorder zich in de stop of afspeelstand bevindt Als een bericht wordt gewist schuiven de resterende berichten op en worden deze opnieuw genummerd zodat er geen ruimte tussen de berichten ontstaat 1 Selecteer het bericht dat u wilt wissen 2 Houd MENU ingedrukt om naar de menustand te gaan Het venster met de menustand wordt weergegeven 3 Druk op of op de bedieningstoe...

Страница 106: ...Nog een bericht wissen Voer dezelfde stappen nogmaals vanaf het begin uit Een deel van één bericht wissen Splits het bericht eerst in twee berichten en voer vervolgens dezelfde stappen vanaf het begin uit Alle berichten in een map wissen ENT MENU 1 Selecteer de map met de berichten die u wilt wissen wanneer de IC recorder in de stopstand staat 2 Houd MENU ingedrukt om naar de menustand te gaan Het...

Страница 107: ...druk vervolgens op ENT 4 Druk op of op de bedieningstoets om EXECUTE te selecteren en druk vervolgens op ENT In het display verschijnt ERASING en alle berichten in de geselecteerde map worden verwijderd Wissen annuleren Selecteer CANCEL in stap 4 en druk vervolgens op ENT ...

Страница 108: ...king wordt niet gegarandeerd indien een ander besturingssysteem dan de hierboven genoemde Windows 98 of Linux enzovoort wordt gebruikt 64 bit besturingssystemen worden niet ondersteund Ga naar de ondersteuningswebsite voor de IC recorder voor informatie over de nieuwste versie en compatibiliteit met uw besturingssysteem Europees model http support sony europe com DNA Overige modellen http www sony...

Страница 109: ... recorder en sluit de IC recorder vervolgens aan op de USB aansluiting van uw computer De IC recorder wordt herkend door de computer zodra de aansluiting tot stand komt Terwijl de IC recorder op de computer wordt aangesloten wordt CONNECTING in het display van de IC recorder weergegeven Naar USB aansluiting IC recorder Computer Tip Gebruik de meegeleverde extra USB aansluitkabel als de IC recorder...

Страница 110: ... computer loskoppelen als u de op de computer aangesloten IC recorder niet gebruikt De IC recorder van de computer loskoppelen Volg onderstaande werkwijze anders kunnen er gegevens beschadigen 1 Controleer of de werkingsaanduiding niet knippert 2 Ontkoppel de IC recorder van de USB aansluiting van de computer Op het Windows scherm klikt u met de linkermuisknop op Hardware veilig verwijderen op de ...

Страница 111: ...zing Een muziekbestand van de computer naar de IC recorder kopiëren slepen 1 Sluit de IC recorder aan op uw computer pagina 19 Open op het Windows scherm Deze computer en controleer of de IC RECORDER wordt herkend Controleer op het Macintosh scherm of een IC RECORDER station op het bureaublad wordt weergegeven 2 Kopieer de map waarin de muziekbestanden zijn opgeslagen naar de IC recorder Gebruik a...

Страница 112: ...uter druk op MENU druk op of op de bedieningstoets om de map te selecteren waarin muziekbestanden zijn opgeslagen en druk op ENT 2 Druk op of om het muziekbestand te selecteren dat u wilt afspelen 3 Druk op om het afspelen te starten 4 Druk op stoppen om het afspelen te stoppen ...

Страница 113: ...ert Tijdens ontvangst en opname van FM kunt u via het menu schakelen tussen het geluid via de luidspreker en het geluid via de hoofdtelefoon Zie pagina 87 in de Gebruiksaanwijzing voor informatie Opmerking Tijdens FM ontvangst kunt u de batterij niet opladen Afstemmen op een FM radiostation ENT MENU De weergave in het display kan afwijken van de werkelijkheid in sommige regio s ...

Страница 114: ... een zender 4 Druk herhaaldelijk op of op de bedieningstoets om op een zender af te stemmen of houd of op de bedieningstoets ingedrukt tot de frequentiecijfers op het display gaan veranderen De IC recorder scant automatisch naar radiofrequenties en stopt wanneer het een duidelijke zender vindt Als het niet lukt om op een zender af te stemmen druk dan op of op de bedieningstoets om stap voor stap v...

Страница 115: ...aan Het venster met de menustand wordt weergegeven 2 Druk op of op de bedieningstoets om AUTO PRESET te selecteren en druk vervolgens op ENT 3 Druk op of op de bedieningstoets om EXECUTE te selecteren en druk vervolgens op ENT De IC recorder scant automatisch naar beschikbare radiofrequenties en de zenders worden in het geheugen opgeslagen van de lagere frequenties naar de hogere Tijdens het autom...

Страница 116: ...ruk op stoppen De voorkeuzenummers die zijn opgeslagen voordat u op de toets stoppen drukt blijven in het geheugen Luisteren naar een vooraf ingestelde radiozender ENT MENU De weergave in het display kan afwijken van de werkelijkheid in sommige regio s ...

Страница 117: ...IO te selecteren en druk vervolgens op ENT De IC recorder gaat in de FM radiostand 3 Stem af op een zender door herhaaldelijk te drukken op of op de bedieningstoets totdat het gewenste voorkeuzenummer wordt weergegeven Als u of op de bedieningstoets ingedrukt houdt wijzigen de voorkeuzenummers snel 4 Druk op stoppen om de FM radio uit te schakelen ...

Страница 118: ...ukt om naar de menustand te gaan Het venster met de menustand wordt weergegeven 2 Druk op of op de bedieningstoets om FM RADIO te selecteren en druk vervolgens op ENT De IC recorder gaat in de FM radiostand 3 Stem af op een zender door herhaaldelijk te drukken op of op de bedieningstoets totdat het voorkeuzenummer dat u wilt wissen wordt weergegeven ...

Страница 119: ...aadbare NH AAA batterij of één LR03 alkalinebatterij AAA formaat Veiligheid Gebruik het apparaat niet terwijl u autorijdt fietst of een gemotoriseerd voertuig bedient Gebruik Laat het apparaat niet liggen in de buurt van een warmtebron of op een plaats waar dit wordt blootgesteld aan direct zonlicht overmatig veel stof of mechanische schokken Als er een object of vloeistof in het apparaat terechtk...

Страница 120: ...nderhoud Maak de buitenkant schoon met een zachte doek die enigszins is bevochtigd met water Gebruik geen alcohol wasbenzine of thinner Neem contact op met de dichtstbijzijnde Sony handelaar voor vragen of problemen met het apparaat Reservekopieën Het wordt aangeraden een reservekopie back up van de opgenomen berichten op te slaan op een cassetterecorder of een computer om te voorkomen dat er gege...

Страница 121: ...terondernemingen in de Verenigde Staten en of andere landen 2007 Nuance Communications Inc Alle rechten voorbehouden MPEG Layer 3 audiocoderingtechnologie en octrooien onder licentie van Fraunhofer IIS en Thomson Alle andere handelsmerken en gedeponeerde handelsmerken zijn handelsmerken of gedeponeerde handelsmerken van hun respectieve eigenaren Bovendien worden en niet elke keer vermeld in deze g...

Страница 122: ......

Отзывы: