background image

54

Changing/checking the settings in your 
camcorder

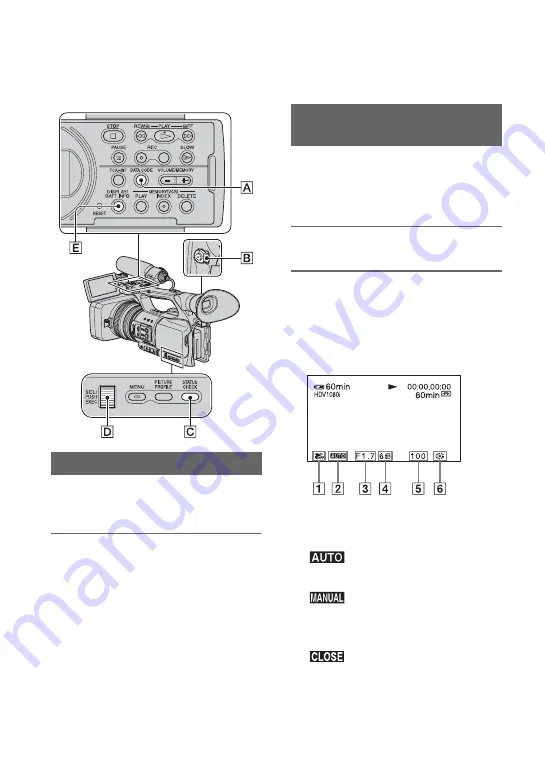
You can turn on and off the display of the 
time code, tape counter, and other 
information on the screen.

Press the DISPLAY/BATT INFO 
button 

E

.

The screen indicators turn on (displayed) 
and off (not displayed) as you press the 
button.
When the POWER switch is set to 
CAMERA, the screen changes (detailed 
display 

t

 simple display 

t

 no display) as 

you press the button. 

z

Tips

• You can display the screen indicators during 

playback on a TV. Select [V-OUT/PANEL] or 
[ALL OUTPUT] of [DISP OUTPUT] (p. 84).

You can display information, including 
date, time and camera data, automatically 
stored during recording on the screen 
during playback.

1

Set the POWER switch 

B

 to VCR.

2

Press the DATA CODE button 

A


during playback or pause.

The screen changes (date and time 
display 

t

 camera data display 

t

 no 

display) as you press the button.

A

SteadyShot off

B

Exposure 

 appears during playback of the 

movie recorded with the iris, gain and 
shutter speed automatically adjusted. 

 appears during playback of the 

movie recorded with the iris, gain and 
shutter speed manually adjusted.

C

Iris

 appears in the iris value display 

area during playback of the movie 
recorded with the iris manually adjusted 
to its maximum value. 

D

Gain

Changing the screen

Displaying recording data (Data 
code)

Содержание HVR-Z5N

Страница 1: ...led paper using VOC Volatile Organic Compound free vegetable oil based ink Printed in Japan US Digital HD Video Camera Recorder Digital HD Video Camera Recorder Operating Guide Before operating the unit please read this manual thoroughly and retain it for future reference HVR Z5U Z5N ...

Страница 2: ...DV signals are compressed in MPEG2 format which is adopted in BS broadcast satellite digital and terrestrial digital HDTV broadcastings and in Blu ray disc recorders Types of Memory Stick you can use in your camcorder You can use any Memory Stick that has the following markings Memory Stick Duo This size can be used with your camcorder Memory Stick You cannot use it in your camcorder b Notes You c...

Страница 3: ... points white red blue or green in color that appear constantly on the LCD screen and the viewfinder These points are normal results of the manufacturing process and do not affect the recording in any way Do not expose your camcorder s viewfinder lens or LCD screen to the sun or strong light source for extended periods Intense light sources especially the sun will converge on the viewfinder or len...

Страница 4: ...solution On playing back HDV tapes on other devices A tape recorded in the HDV format cannot be played back on a device that is not compatible with the HDV format Check the contents of tapes by playing them back on this camcorder prior to playing them back on other devices Notes on the icons used in this manual Features available for the HDV format only Features available for the DVCAM format only...

Страница 5: ...image brightness 30 Adjusting to natural color White balance 33 Customizing the picture quality Picture profile 35 Adjusting the volume 44 Attaching a Memory Recording Unit 44 Assigning the functions to the ASSIGN buttons 46 Recording an index signal 47 Playing back the most recently recorded movies Last scene review 48 Reviewing the most recently recorded scenes Rec review 48 Searching for the la...

Страница 6: ...ay and the viewfinder MARKER VF B LIGHT DISP OUTPUT etc IN OUT REC menu 85 Recording settings input and output settings REC FORMAT HDV PROGRE VIDEO OUT EXT REC CTRL etc TC UB SET menu 89 TC PRESET UB PRESET TC LINK etc MEMORY SET menu 91 Settings for the Memory Stick Duo ALL ERASE FORMAT etc OTHERS menu 92 Settings while recording on a tape or other basic settings QUICK REC BEEP etc Dubbing to VCR...

Страница 7: ...of the DVCAM DV formats 120 About the Memory Stick 122 About the InfoLITHIUM battery pack 123 About i LINK 124 About x v Color 125 About handling of your camcorder 125 Specifications 129 Identifying parts and controls 134 Indicators for the LCD screen and viewfinder 140 Index 143 Additional Information Quick Reference ...

Страница 8: ... Duo that you can use on your camcorder AC Adaptor Charger AC VQ1050 1 p 13 Power cord mains lead 1 p 13 Wireless Remote Commander RMT 831 1 p 139 A button type lithium battery is already installed Component A V cable 1 p 58 A V connecting cable 1 p 58 96 Large eyecup 1 p 19 Rechargeable battery pack NP F770 1 p 13 123 Only for models HVR Z5U Rechargeable battery pack NP F570 1 p 13 123 Only for m...

Страница 9: ...9 Getting Started Accessory shoe kit Accessory shoe 1 Accessory shoe plate 1 screws 4 p 134 Connecting cord DK 415 1 p 15 CD ROM Manuals for Digital HD Video Camera Recorder 1 Operating Guide 2 ...

Страница 10: ...microphone A in the microphone holder C with the model name facing upward close the cover and shut the clamp 3 Connect the plug of the microphone to the INPUT1 jack D 4 Put the microphone cable into the cable holder E 5 Select channels with the CH1 INT MIC INPUT1 switch F and the CH2 INT MIC INPUT1 INPUT2 switch G See the table below for the recording channels Attaching the supplied microphone Put...

Страница 11: ... first then disconnect it When you connect a microphone that does not support the 48V power source to the INPUT1 or INPUT2 jack set the INPUT1 INPUT2 switch to MIC If you use it with the INPUT1 INPUT2 switch set to MIC 48V it may be damaged or the recorded sound may be distorted z Tips See page 44 for adjusting the volume CH2 switch position Input channel and source INT MIC Internal microphone L C...

Страница 12: ...f you attach or remove a 72mm 2 7 8 in PL filter or MC protector remove the lens hood with lens cover To open or close the shutter of the lens hood with lens cover Move the lens cover lever up or down to open or close the lens cover Attaching the lens hood with lens cover PUSH lens hood release button Move the lens cover lever to OPEN to open the lens cover and move the lever to CLOSE to close the...

Страница 13: ...lamp turns on and charging starts After charging the battery All segments of the battery mark appear in the display window when the normal charge of the battery is completed You can fully charge the battery pack if you continue charging the battery pack after the charge lamp turns off until the battery mark with FULL appears full charge The battery life of the fully charged battery is slightly lon...

Страница 14: ...le when you use a fully charged battery pack Recording in the HDV format Recording in the DVCAM DV format Top When the LCD backlight turns on Bottom When recording with the viewfinder while the LCD panel is closed Typical recording time shows the time when you repeat recording start stop turning the power on off and zooming Playing time Approximate time min available when you use a fully charged b...

Страница 15: ...n use the AC Adaptor Charger to obtain AC power 1 Connect the power cord mains lead to the AC Adaptor Charger 2 Connect the power cord mains lead to the wall outlet wall socket 3 Connect the connecting cable DK 415 to the AC Adaptor Charger 4 Set the mode change switch of the AC Adaptor Charger to VCR CAMERA 5 Press the connecting part of the connecting cable DK 415 against the back of your camcor...

Страница 16: ...tery terminal with any metallic objects This may cause a malfunction Even if your camcorder is turned off AC power house current is still supplied to it while connected to the wall outlet wall socket via the AC Adaptor Charger Step 3 Charging the battery pack Continued ...

Страница 17: ... CAMERA To record pictures VCR To play or edit pictures b Notes The current date and time appear on the LCD screen for a few seconds when you turn on your camcorder once you set the date and time CLOCK SET p 20 2 Hold the camcorder properly 3 Ensure a good grip then fasten the grip belt To turn off the power Slide the POWER switch to OFF while pressing the green button b Notes If warning messages ...

Страница 18: ...on the LCD backlight press and hold the DISPLAY BATT INFO button for a few seconds until disappears z Tips You can adjust the brightness of the LCD screen from LCD BRIGHT p 83 b Notes You may see primary colors shimmering in the viewfinder when you move your eye line This is not a malfunction The shimmering colors will not be recorded on the recording media z Tips You can adjust the brightness of ...

Страница 19: ... bright circumstances use the supplied large eyecup To attach the large eyecup stretch it slightly and align it with the eyecup groove in the viewfinder You can attach the large eyecup facing either the right or left side b Notes Do not remove the pre attached eyecup Large eyecup supplied Attach with the protruding part at the top ...

Страница 20: ...p 128 Skip to step 4 when you set the clock for the first time 1 Press the MENU button 2 Select OTHERS by turning the SEL PUSH EXEC dial then press the dial 3 Select CLOCK SET by turning the SEL PUSH EXEC dial then press the dial 4 Set Y year by turning the SEL PUSH EXEC dial then press the dial You can set any year up to the year 2079 5 Set M month D day hour and minute then press the dial The cl...

Страница 21: ... and can be displayed during playback DATA CODE button p 54 You can change the on screen displays to show messages in a specified language Press the MENU button and select the OTHERS with the SEL PUSH EXEC dial Select the screen language in LANGUAGE p 93 Changing the language setting ...

Страница 22: ...in b Notes Do not push the portion marked while the cassette compartment is sliding in Doing so may cause a malfunction 3 Close the lid z Tips The recordable time varies depending on DV REC MODE p 86 To eject the cassette Open the lid following the same procedure as described in step 1 and remove the cassette You can use only a Memory Stick Duo marked with or p 122 1 Open the Memory Stick Duo slot...

Страница 23: ...mage data may be damaged To eject a Memory Stick Duo Lightly push the Memory Stick Duo once b Notes When the access lamp is lit or flashing your camcorder is reading writing data Do not shake or knock your camcorder turn the power off eject the Memory Stick Duo or remove the battery pack Otherwise image data may be damaged When inserting or ejecting the Memory Stick Duo be careful with the Memory ...

Страница 24: ...ies in HDV or DVCAM DV format The factory setting is HDV format REC FORMAT p 85 1 Open the shutter of the lens hood 2 Slide the POWER switch to CAMERA while pressing the green button Lens hood REC START STOP button B POWER switch REC START STOP button A Recording lamp Recording lamp ASSIGN 7 PHOTO button Press and hold the green button when you slide the POWER switch from OFF ...

Страница 25: ...screen display during recording p 54 Indicators displayed on the screen during recording are shown on page 140 The recording lamp can be set to stay off REC LAMP F REC LAMP R p 94 You cannot record movies on a Memory Stick Duo For low angle recording the REC START STOP button on the handle is convenient Release the HOLD lever to enable the REC START STOP button It might be helpful if you set the L...

Страница 26: ... Enhanced Imaging Processor allows for still image resolution equivalent to the sizes described z Tips Image sizes of still images are as follows Recording in HDV format DVCAM DV format 16 9 1 2M Recording in DVCAM DV format 4 3 0 9M Playing back in HDV format 1 2M Playing back in DVCAM DV format 16 9 0 2M Playing back in DVCAM DV format 4 3 VGA To store still images captured from movies on a tape...

Страница 27: ...27 Recording Playback Camera data stored on the tape will not be copied to the Memory Stick Duo You cannot store a still image during using your camcorder with PB ZOOM set to ON p 93 ...

Страница 28: ...increase the zoom speed of the zoom lever D or the handle zoom A SPEED ZOOM p 73 1 Set the handle zoom switch B to VAR or FIX z Tips When you set the handle zoom switch B to VAR you can zoom in or out at variable speed When you set the handle zoom switch B to FIX you can zoom in or out at fixed speed set in HANDLE ZOOM p 73 2 Press the handle zoom lever A to zoom in or out b Notes You cannot use t...

Страница 29: ...nd then towards W wide angle to adjust the zoom for recording When you want to record a close up image of a subject move the power zoom lever towards W wide angle to fully magnify the image then adjust the focus To restore automatic adjustment Set the FOCUS switch B to AUTO 9 disappears and the automatic focus adjustment is restored Record the subject while pressing and holding the PUSH AUTO butto...

Страница 30: ... the automatic focus You can adjust the image brightness by adjusting the iris gain or shutter speed or by reducing the light volume with the ND filter B Also when EXPOSURE is assigned to the iris ring A you can adjust the iris gain and shutter speed with the iris ring A You can assign IRIS or EXPOSURE to the iris ring A from IRIS EXPOSURE of the CAMERA SET menu p 69 The default setting is IRIS b ...

Страница 31: ...URE button I or set the AUTO MANUAL switch F to AUTO The iris value disappears or appears next to the iris value b Notes When you set the AUTO MANUAL switch F to AUTO other manually adjusted items gain shutter speed white balance also become automatic When IRIS EXPOSURE is set to EXPOSURE you can adjust the image brightness by adjusting the iris gain and shutter speed with the iris ring You can al...

Страница 32: ...ch H to H M or L The gain value set for the selected gain switch position appears on the screen You can set the gain value for each gain switch position from GAIN SETUP of the CAMERA SET menu p 69 To adjust the gain automatically Press the GAIN button C or set the AUTO MANUAL switch F to AUTO The gain value disappears or appears next to the gain value b Notes When you set AUTO MANUAL switch F to A...

Страница 33: ... white balance also become automatic You can record the subject clearly by using the ND filter B when the recording environment is too bright The ND filters 1 2 and 3 reduce the volume of light to about 1 4 1 16 and 1 64 respectively If flashes during the iris automatic adjustment set the ND filter to 1 If flashes during the iris automatic adjustment set the ND filter to 2 If flashes during the ir...

Страница 34: ...dial to set the temperature You can also set the color temperature from the menu WB TEMP SET p 70 To save the adjusted white balance value in memory A or B 1 Set the white balance memory switch to A A or B B in step 3 of Adjusting to natural color White balance 2 Capture a white subject such as white paper full screen in the same lighting condition as the one in which the subject is 3 Press one pu...

Страница 35: ... of the CAMERA SET menu to ON the picture profile will be disabled 1 During standby press the PICTURE PROFILE button B 2 Select a picture profile number with the SEL PUSH EXEC dial A You can record with the settings of the selected picture profile Customizing the picture quality Picture profile Picture profile number setting name Recording condition PP1 USER Default settings the same as when Pictu...

Страница 36: ...l A 3 Select SETTING with the SEL PUSH EXEC dial A 4 Select an item to be adjusted with the SEL PUSH EXEC dial A 5 Adjust the picture quality with the SEL PUSH EXEC dial A 6 Repeat steps 4 and 5 to adjust other items 7 Select RETURN with the SEL PUSH EXEC dial A 8 Select OK with the SEL PUSH EXEC dial A A picture profile indicator appears z Tips You can assign picture profiles to the ASSIGN button...

Страница 37: ...BLACK BLACK B is the black level of Bch 15 to 15 Item Description and settings STANDARD Standard gamma curve CINEMATONE1 Gamma curve 1 for producing tone of film camera images CINEMATONE2 Gamma curve 2 for producing tone of film camera images ITU709 Gamma curve that corresponds to ITU 709 Gain in low intensity area 4 5 G5 0 Gamma curve with 5 0 of a low intensity area gain PD Gamma curve for produ...

Страница 38: ...ITIVITY Sets the sensitivity HIGH MIDDLE LOW MANUAL SET Sets the knee point and slope manually POINT Sets the knee point 75 to 105 SLOPE Sets the knee slope 5 gentle to 5 steep Item Description and settings TYPE Selects a type of colors STANDARD Standard colors CINEMATONE1 Film camera image like colors good with GAMMA set to CINEMATONE1 CINEMATONE2 Film camera image like colors good with GAMMA set...

Страница 39: ...o 7 deep blue C 7 light cyan to 7 deep cyan M 7 light magenta to 7 deep magenta Y 7 light yellow to 7 deep yellow Item Description and settings TYPE Selects color correction type OFF Not correct colors COLOR REVISN Corrects colors stored in memory Colors not stored in memory displayed in black and white when COLOR EXTRCT is set will not be corrected COLOR EXTRCT Displays areas in colors that are s...

Страница 40: ...ommended when you use COLOR CORRCT Item Description and settings MEM1 COLOR Sets colors stored in Memory 1 PHASE Sets color phase 0 purple t 8 red t 16 yellow t 24 green t 31 blue RANGE Sets color phase range 0 no color selection 1 narrow to select only a single color to 31 wide to select multiple colors in similar color phase SATURATION Sets saturation 0 to select from light colors to dark colors...

Страница 41: ... and off the manual detail adjustment ON Enables the manual detail adjustment automatic optimization will not be performed OFF Disables the manual detail adjustment V H BALANCE Sets the horizontal H and vertical V balance of detail B W BALANCE Selects the balance of the upper DETAIL P and the lower DETAIL N TYPE 1 off to the lower DETAIL N side to TYPE 5 off to the upper DETAIL P side BLACK LIMIT ...

Страница 42: ...n t 127 blue RANGE Sets the color range 0 selects no color 1 narrow selects a single color to 31 wide selects multiple colors in similar color phases and saturation The detail will not be adjusted when you set RANGE to 0 SATURATION Sets the color saturation 0 selects a light color to 31 selects a deep color REVERSE Reverses the selected color range If you execute this function when a color has bee...

Страница 43: ...rofile setting to other picture profiles 1 Press the PICTURE PROFILE button B 2 Select the picture profile that you want to copy from with the SEL PUSH EXEC dial A 3 Select SETTING t COPY with SEL PUSH EXEC dial A 4 Select the number of the picture profile that you want to copy to with the SEL PUSH EXEC dial A 5 Select YES with the SEL PUSH EXEC dial A 6 Select RETURN t OK with the SEL PUSH EXEC d...

Страница 44: ...N CH1 CH2 switch A of the manually adjusted channel to AUTO z Tips To check other audio settings press the STATUS CHECK button C For other settings see the AUDIO SET menu p 77 You can attach an optional Memory Recording Unit HVR MRC1 to your camcorder for recording To attach it to your camcorder do the following Refer to the Memory Recording Unit operating instructions for details on its operation...

Страница 45: ...mory Recording Unit upward while pushing its RELEASE lever downward b Notes You cannot use the HDV DV jack when the Memory Recording Unit is attached to your camcorder When you use the Memory Recording Unit set appropriate items in EXT REC CTRL of the IN OUT REC menu p 88 ...

Страница 46: ... 47 STEADYSHOT p 72 BACK LIGHT p 72 SPOTLIGHT p 72 FADER p 73 SMTH SLW REC p 73 COLOR BAR p 76 LAST SCN RVW p 48 REC REVIEW p 48 ASSIGN 3 button END SEARCH p 48 ZEBRA p 80 ASSIGN 1 button MARKER p 81 PEAKING p 81 TC RESET p 89 TC COUNTUP p 89 PHOTO p 26 ASSIGN 7 button PICTURE PROFILE p 35 SHOT TRANSITION p 48 1 Press the MENU button B 2 Select the OTHERS t ASSIGN BTN with the SEL PUSH EXEC dial A...

Страница 47: ...ily find that scene during playback p 56 The index function will make it easier to check the transition of recording or edit your pictures using index signals 1 Assign INDEX MARK to one of the ASSIGN buttons p 46 2 Press the ASSIGN button to which INDEX MARK is assigned During recording appears for about 7 seconds and an index signal is recorded During standby flashes After you press the REC START...

Страница 48: ... the most recently recorded scenes will be played back then your camcorder returns to standby 1 Assign END SEARCH to one of the ASSIGN buttons p 46 2 Press the ASSIGN button to which END SEARCH is assigned The last scene of the most recent recording will be played back for about 5 seconds and the camcorder goes standby at the point where the last recording has finished b Notes End search will not ...

Страница 49: ...ngs stored in SHOT A or SHOT B will be erased when you set the POWER switch to OFF 3 Check the stored settings 1 Press the ASSIGN 4 button repeatedly to bring up the SHOT TRANSITION CHECK screen 2 Press the ASSIGN 5 button to check the SHOT A Press the ASSIGN 6 button to check the SHOT B The image will be displayed with the settings stored in the selected SHOT The focus zoom iris gain shutter spee...

Страница 50: ... You can also make a transition from the SHOT A to the SHOT B or from the SHOT B to the SHOT A For example to make a transition from the SHOT A to the SHOT B display the shot transition check screen press the ASSIGN 5 button to bring up the SHOT A and press the REC START STOP button Then display the shot transition execution screen and press the ASSIGN 6 button You can rehearse the shot transition...

Страница 51: ...ewind review M FF Cue fast forward y SLOW b Notes Your camcorder automatically goes into a stopped state when it is in pause for more than 3 minutes The screen may temporarily go blank losing images and sound when signals switch between HDV and DVCAM DV during playback of a tape in which HDV format and DVCAM DV format are mixed PLAY button MEMORY INDEX button SEL PUSH EXEC dial MEMORY DELETE butto...

Страница 52: ...while viewing a movie Press and hold m M during playback Picture Search To view during fast forward press and hold M To view during rewind press and hold m Skip Scan To adjust the volume Adjust the volume with the VOLUME MEMORY button To view still images 1 Set the POWER switch to VCR 2 Press the MEMORY PLAY button 3 Select still image that you want to view using the VOLUME MEMORY button To stop v...

Страница 53: ...PUSH EXEC dial The still image will be deleted b Notes Still images cannot be restored once you delete them You cannot delete still images when the Memory Stick Duo is write protected p 122 or the still image is protected p 107 z Tips To delete a still image in the index move B to the still image using the VOLUME MEMORY button then do steps 2 and 3 To delete all still images do ALL ERASE of the ME...

Страница 54: ...lay information including date time and camera data automatically stored during recording on the screen during playback 1 Set the POWER switch B to VCR 2 Press the DATA CODE button A during playback or pause The screen changes date and time display t camera data display t no display as you press the button A SteadyShot off B Exposure appears during playback of the movie recorded with the iris gain...

Страница 55: ... the ASSIGN buttons p 46 Camera setup p 69 Optional external recording unit HVR MRC1 or HVR DR60 1 Press the STATUS CHECK button C 2 Turn the SEL PUSH EXEC dial D until a desired display shows up on the screen When the POWER switch B is set to CAMERA the display changes in the following sequence AUDIO t OUTPUT t ASSIGN t CAMERA t EXT DEVICE when an external device is connected When the POWER switc...

Страница 56: ... Commander b Notes Each day of recording must be longer than 2 minutes Your camcorder may not detect the date if the recording of that date is short The date search may not work properly if a blank section exists on the tape You can search scenes by indexes recorded at the start of recording p 47 1 Set the POWER switch to VCR 2 Press the SEARCH M button A on the Remote Commander repeatedly to sele...

Страница 57: ...P button C on the Remote Commander b Notes Recording between indexes must be longer than 2 minutes Your camcorder may not detect the date if the recording between the indexes is short The index search may not work properly if a blank section exists on the tape ...

Страница 58: ...n the jack cover and connect the cable b Notes Set all the necessary menu items before you connect your camcorder to a TV If you change the settings of VCR HDV DV or i LINK SET after connecting your camcorder to the TV with an i LINK cable the TV may not recognize video signals properly Connecting to a high definition TV B C A HDMI i LINK COMPONENT IN AUDIO A movie recorded in HD quality is played...

Страница 59: ...ion signals are recorded in the pictures DVCAM DV format pictures input to the camcorder via i LINK cable p 100 cannot be output Your TVs may not function correctly for example no sound or image Do not connect the HDMI OUT jack of your camcorder and HDMI OUT jack of the external device with the HDMI cable This may cause a malfunction z Tips HDMI High Definition Multimedia Interface is an interface...

Страница 60: ...r and TV with the supplied component A V cable and A V connecting cable as illustrated in The TV needs to be set so that it recognizes that the camcorder is connected Refer to the instruction manuals supplied with your TV This camcorder has a 4 pin i LINK terminal Select a cable that fits the terminal on the TV to be attached Signal flow Reference pages Type Camcorder Cable TV Menu Setting C 1 i L...

Страница 61: ...nnect the yellow plug of the A V connecting cable to the video input jack and connect the white left channel or the red right channel plug to the audio input jack of your TV or VCR When you want to play back the sound in monaural mode use a connecting cable for that purpose Connecting to a 16 9 wide or 4 3 TV E F G S VIDEO VIDEO AUDIO VIDEO AUDIO i LINK D COMPONENT IN AUDIO A movie recorded in HD ...

Страница 62: ...to output audio signals IN OUT REC VCR HDV DV t AUTO 85 i LINK SET t HDV t DV CONV t ON 87 b Notes The TV needs to be set so that it recognizes that the camcorder is connected Refer to the instruction manuals supplied with your TV This camcorder has a 4 pin i LINK terminal Select a cable that fits the terminal on the TV to be attached Change the settings according to the TV connected D 2 Component...

Страница 63: ... HDV DV t AUTO 85 VIDEO OUT t DOWN CONVERT DV WIDE CONV t SQUEEZE LETTER BOX EDGE CROP 87 b Notes When connecting only an S VIDEO plug S VIDEO channel audio signals are not output To output audio signals connect the white and red plugs of the A V connecting cable with S VIDEO to the audio input jack of your TV This connection produces higher resolution pictures compared with the A V connecting cab...

Страница 64: ...ress the dial to select the menu CAMERA SET p 69 AUDIO SET p 77 DISPLAY SET p 80 IN OUT REC p 85 TC UB SET p 89 MEMORY SET p 91 OTHERS p 92 4 Turn the SEL PUSH EXEC dial until the desired menu item is highlighted then press the dial to select the item The available menu items vary depending on the position of the power switch of your camcorder Unavailable items will be grayed out SEL PUSH EXEC dia...

Страница 65: ...ntil the desired setting is highlighted or to bring up the desired setting then press the dial to confirm the setting 6 Press the MENU button to hide the menu screen To return to the previous screen select RETURN BEEP MENU END STBY 00 00 28 10 ON OFF ...

Страница 66: ...WB OUTDR LVL z WB TEMP SET z ATW SENS z SMOOTH WB z AE SHIFT z AE RESPONSE z AT IRIS LMT z ECS FREQ z FLCKR REDUCE z CNTRST ENHCR z BACK LIGHT z SPOTLIGHT z STEADYSHOT z AF ASSIST z FOCUS MACRO z HANDLE ZOOM z SPEED ZOOM z D EXTENDER z FADER z SMTH SLW REC z INTERVAL REC z DV FRAME REC z SHOT TRANSITION z x v Color z COLOR BAR z AUDIO SET menu p 77 DV AU MODE z AUDIO LIMIT z INT MIC SET z XLR SET ...

Страница 67: ...ISP z SHUTTER DISP z LCD BRIGHT z z LCD COLOR z z LCD BL LEVEL z z VF B LIGHT z z VF COLOR z z VF POWERMODE z z LETTER SIZE z z REMAINING z z DISP OUTPUT z z IN OUT REC menu p 85 REC FORMAT z VCR HDV DV z HDV PROGRE z DV PROGRE z DV REC MODE z z DV WIDE REC z VIDEO OUT z z i LINK SET z z EXT REC CTRL z Position of POWER switch CAMERA VCR Continued ...

Страница 68: ... z MEMORY SET menu p 91 ALL ERASE z FORMAT z z FILE NO z z NEW FOLDER z z REC FOLDER z z PB FOLDER z OTHERS menu p 92 CAMERA PROF z z ASSIGN BTN z z CLOCK SET z z WORLD TIME z z LANGUAGE z z PB ZOOM z QUICK REC z DATE REC z BEEP z z REC LAMP F z REC LAMP R z REMOTE CTRL z z HOURS METER z z Position of POWER switch CAMERA VCR Menu items Continued ...

Страница 69: ...th the SEL PUSH EXEC dial IRIS EXPOSURE remains in automatic adjustment after changing IRIS to EXPOSURE If it is in manual adjustment it remains in manual adjustment after changing IRIS to EXPOSURE You can adjust the iris gain and shutter speed with the iris ring when is displayed next to the values on the screen Adjustment for the gain and shutter speed can be switched between EXPOSURE and manual...

Страница 70: ...anded to the negative range Especially in a bright environment minus gain control allows more suitable gain setting and enables low noise recording The dynamic range of your camcorder is not reduced when you set MINUS AGC to ON B ON Enables minus gain control during automatic gain control as required OFF Disables minus gain control during automatic gain control You can use the preset white balance...

Страница 71: ...et to ON You can select the speed at which the automatic exposure adjustment function follows changes in the brightness of the subject You can select the speed from FAST MIDDLE and SLOW The default setting is FAST You can select the highest iris value for the automatic adjustment from F11 F9 6 F8 F6 8 F5 6 F4 8 and F4 The default setting is F11 b Notes This function is not effective during the man...

Страница 72: ...light during recording of a subject under strong light such as a stage For example you can prevent people s faces from over highlighting The default setting is OFF b Notes SPOTLIGHT is set to OFF when you set BACK LIGHT to ON SPOTLIGHT is set to OFF when EXPOSURE is manually adjusted You cannot use the spotlight function if at least two of iris gain and shutter speed are adjusted manually SPOTLIGH...

Страница 73: ...rger The image quality decreases because the image is digitally processed This function helps you to focus on far away subjects such as a wild bird away at a distance The default setting is OFF b Notes This function is automatically set to OFF when you turn the power off and back on You can add visual effects to transition between scenes 1 Select WHITE FADER or BLACK FADER during standby to fade i...

Страница 74: ... is automatically set to 1 250 second when you start SMTH SLW REC The recording time may be shorter than the set time depending on recording conditions The image quality is lower than with the regular recording z Tips After executing SMTH SLW REC with an ASSIGN button you can also cancel SMTH SLW REC by pressing the ASSIGN button again See page 46 for details on how to use the ASSIGN buttons When ...

Страница 75: ...ime and interval time may differ slightly from the settings If you focus manually you can get sharp images even if the lighting changes You can record stop motion or frame by frame animation movies That type of animation uses a technique of changing the subject such as a doll or a toy s positions and recording it at each different position while your camcorder sits still Use the Remote Commander t...

Страница 76: ...T B when recording is started When you set this function to ON you can record with the wider color range Your camcorder can reproduce brilliant and vivid colors for flowers and the beautiful blue green of tropical oceans that cannot be matched by conventional technologies The default setting is OFF b Notes The colors may not be well reproduced when you play back a movie recorded with this function...

Страница 77: ...in the 12 bit mode 2 stereo sounds Select this setting for the DVCAM DV SP recording B FS48K Records in the 16 bit mode 1 stereo sound with high quality Select this setting for the DVCAM DV SP recording b Notes When recording in the HDV format sound is automatically recorded in the FS48K mode appears when the DVCAM standard is not met p 120 You can set the clipping noise reduction function for CH1...

Страница 78: ... on the status check screen b Notes This function is available when the CH1 and CH2 switches are set to AUTO and the INPUT1 and INPUT2 switches are both set to MIC or both set to LINE p 44 x AU MAN GAIN You can select either linked or separate audio level control of CH1and CH2 when using an external microphone B SEPARATE Separately controls the audio levels of CH1 and CH2 Sound inputs from CH1 and...

Страница 79: ... sound the sound may be distorted at either the input point or the recording point If it is distorted at the input point adjust the sound using the INPUT TRIM function If it is distorted at the recording point lower the total volume level manually If you set INPUT TRIM too far to the minus side the microphone volume becomes too low resulting in a poor signal to noise ratio Test the effect of the I...

Страница 80: ...ecorded on a tape or a Memory Stick Duo The default setting is OFF x LEVEL You can select the brightness level between 70 and 100 or 100 The default setting is 70 z Tips The zebra pattern is a strip pattern displayed over a part of an image on the screen when the part is higher than a preset brightness level You can adjust the iris while referring to a histogram A histogram is a graph that shows t...

Страница 81: ...n select a peaking sensitivity from HIGH MIDDLE and LOW The default setting is MIDDLE b Notes You cannot record an image with enhanced details on a tape or a Memory Stick Duo z Tips You can focus more easily using this function in combination with the expanded focus function p 30 x ON OFF When you select ON you can display markers The default setting is OFF Markers will not be recorded on a tape o...

Страница 82: ...images in white and black When you set this function to ON you can constantly display the iris shutter speed and gain settings on the screen The default setting is OFF z Tips The settings appear on the screen during the manual adjustment regardless of the settings of this function indicates that the settings are automatically adjusted values The displayed settings are different from the settings t...

Страница 83: ...onds regardless of the setting of this function z Tips Shutter speed slower than 360 are displayed in multiples of 360 such as 360 2 You can adjust the brightness of the LCD screen Changes in the LCD brightness will not affect the brightness of recording images z Tips You can also turn off the LCD backlight p 18 You can adjust the color level of the LCD panel Changes in the LCD color level will no...

Страница 84: ... DISPLAY BATT INFO button ON Always displays the remaining time of a tape The remaining time is not displayed when you insert a new tape or a tape that is rewound to the beginning It is displayed when you start playback or recording You can select outputs to which display information such as time code is outputted B LCD PANEL Outputs the information to the LCD screen and viewfinder V OUT PANEL Out...

Страница 85: ...XEC dial REC FORMAT VCR HDV DV signals to or from the external device via the HDV DV i LINK jack for recording or playback HDV Plays back only HDV format sections of a tape During the i LINK connection inputs or outputs only HDV signals to or from an external device via the HDV DV i LINK jack for recording or playback Select this setting when you connect your camcorder to your computer DV Plays ba...

Страница 86: ...n using the HDV DV jack the recorded signal is outputted at the following frame rate depending on the setting of IN OUT REC menu t i LINK SET t HDV t DV CONV OFF 24 frames per second ON 30 frames per second When using other jacks the recorded signal is outputted at 30 frames per second x SCAN TYPE You can select a scan type for recording in DVCAM DV format B 60 Captures 60 fields per second in an ...

Страница 87: ...iginal image by cropping its right and left edges b Notes When you view a movie recorded in the DVCAM DV format with DV WIDE REC set to ON on a standard 4 3 TV images of the movie may appear vertically compressed In such a case set DV WIDE CONV to LETTER BOX or EDGE CROP x DV WIDE CONV You can select a down convert type when you down covert DV widescreen signal to DV signal Use this function for s...

Страница 88: ...ds movies sound and time code on a connected device when a tape on your camcorder reaches close to the end during recording EXT ONLY You can operate an external recording unit with the REC START STOP button of your camcorder HVR MRC1 optional or HVR DR60 optional b Notes When this function is set to EXT ONLY does not flash even when there is no tape inserted You can use the REC START STOP button o...

Страница 89: ... EXEC dial Press the MENU button t select the TC UB SET with the SEL PUSH EXEC dial TC PRESET TC COUNTUP UB PRESET 2 Select PRESET with the SEL PUSH EXEC dial 3 Select the first 2 digits with the SEL PUSH EXEC dial 4 Set other digits by repeating step 3 5 Select OK with the SEL PUSH EXEC dial x RESET You can reset the user bit 00 00 00 00 Select RESET in step 1 of the PRESET You can select the fra...

Страница 90: ...ders as follows 5 Select TC UB SET t TC LINK with the SEL PUSH EXEC dial The message Synchronize TC with connected device appears 6 Select YES to synchronize the time code of the sub camcorder with that of the main camcorder Disconnect the i LINK cable from your camcorders when synchronization is completed You can record with the synchronized time codes using those camcorders b Notes If you want t...

Страница 91: ... Duo select YES t YES Press the MENU button t select the MEMORY SET with the SEL PUSH EXEC dial ALL ERASE FORMAT b Notes Do not do any of the following while Formatting is displayed Operate the POWER switch buttons Eject the Memory Stick Duo Formatting erases everything on the Memory Stick Duo including protected image data and newly created folders B SERIES Assigns file numbers in sequence even i...

Страница 92: ...ry Stick Duo and load them into the other camcorders z Tips You can save menu settings picture profiles and button settings as a camera profile x To load a camera profile You can load a camera profile and use it on your camcorder 1 Select LOAD with SEL PUSH EXEC dial 2 Select the camera profile that you want to load with the SEL PUSH EXEC dial 3 Select YES in the check screen Your camcorder is res...

Страница 93: ...tings 1 Select DELETE with the SEL PUSH EXEC dial 2 Select the camera profile you want to delete with the SEL PUSH EXEC dial 3 Select YES on the check screen x To copy a camera profile You can copy camera profile saved on your camcorder to a Memory Stick Duo 1 Select COPY with the SEL PUSH EXEC dial 2 Select the camera profile that you want to copy with the SEL PUSH EXEC dial 3 Select MEMORY STICK...

Страница 94: ...s Since the power does not turn off you can restart recording by pressing the REC START STOP button again BOFF Does not superimpose the date and time on images ON Superimposes the date and time on images z Tips When DV WIDE REC is set to OFF the date and time are displayed outside the 4 3 area but properly recorded on images When you record in the HDV format the date and time are displayed at diff...

Страница 95: ...he total hours of operation in 10 hour increments DRUM RUN Displays the total hours of drum rotation in 10 hour increments TAPE RUN Displays the total hours of tape running in 10 hour increments THREADING Displays the total number of tape unthreading operation in 10 operation increments ...

Страница 96: ... on the VCR DVD HDD device and the connectors used Jacks on your camcorder Open the jack cover and connect the cable Connecting to external devices Signal flow Camcorder Cable External device 1 1 2 i LINK cable optional HDV1080i compatible device t HD quality i LINK jack which is compatible with HDV1080i specification is required on the external device i LINK cable optional A V connecting cable wi...

Страница 97: ...ify the video signal z Tips This camcorder has a 4 pin i LINK terminal Select a cable that fits the terminal on the device to be connected Pictures recorded in the DVCAM DV format are dubbed in the SD standard definition quality regardless of the connection When connecting your camcorder to a monaural device connect the yellow plug of the A V connecting cable to the video jack on the device and co...

Страница 98: ...gher quality DVCAM DV format pictures The audio will not be output when you connect with the S VIDEO cable alone Copy format Camcorder recording format Format supported by the VCR DVD device Menu setting HDV format 1 DVCAM DV format VCR HDV DV p 85 i LINK SET p 87 Copy HDV recording as HDV HDV HDV 3 AUTO OFF Convert HDV recording to DVCAM DV HDV DVCAM DV DVCAM DV ON Copy DVCAM DV recording as DVCA...

Страница 99: ...not output from the HDV DV interface i LINK jack during playback pause or in any playback mode other than normal playback Note the following when connecting with an i LINK cable The recorded picture becomes rough when a picture is paused on your camcorder while recording to a VCR DVD device Data codes date time camera settings data may not be displayed or recorded depending on the device or applic...

Страница 100: ... operation You cannot perform this operation with the A V connecting cable Your camcorder has a 4 pin i LINK terminal Select a cable that fits the terminal on the device to be attached Your camcorder can only record from an NTSC source For example French video or TV programs SECAM cannot be recorded correctly See page 118 for details on TV color systems An i LINK jack which is compatible with HDV1...

Страница 101: ... DV devices only in the DVCAM DV format Note the following when connecting with an i LINK cable The recorded picture becomes rough when a picture is paused on your camcorder while recording to a VCR You cannot record the picture and sound separately If you pause or stop the recording and restart it the picture may not be recorded smoothly If video signals inputted to your camcorder via the HDV DV ...

Страница 102: ...e format of the recorded pictures and the format for copying to the computer HDV or DVCAM DV as shown in the table below b Notes The HDV DV jack of your camcorder does not have a power supply function When you connect your camcorder to a computer via an i LINK cable make sure that the terminals of the i LINK cable are placed the right way Squeezing the terminals into jacks may damage the terminals...

Страница 103: ...der in the following situations Connecting your camcorder to a computer that does not support the video signal formats appearing on the LCD screen of your camcorder display HDV or DVCAM DV Changing VCR HDV DV p 85 and i LINK SET p 87 settings while connected with an i LINK cable Changing REC FORMAT setting while connected with an i LINK cable with the POWER switch set to CAMERA p 85 Changing the P...

Страница 104: ...copied to a computer in HDV format z Tips When images recorded in HDV format are copied to a computer the file size is about 2GB almost the same as a DV file for a 10 minute movie if the video compression format is MPEG2 When copying the movie in the HDV format from the computer to your camcorder Set VCR HDV DV to HDV and HDV t DV CONV of i LINK SET to OFF p 85 87 b Notes To copy an HDV format mov...

Страница 105: ...icon displayed in My Computer Then drag and drop a still image from the folder onto the hard disk drive of your computer A Folder containing image files recorded by other camcorders without the folder creation function for playback only B Folder containing image files recorded by your camcorder when no new folders have been created only 101MSDCF is displayed C Folder containing movie data recorded...

Страница 106: ...he camcorder gets warm The camcorder may get warmer while you use it This is not a malfunction The remaining battery time indicator does not indicate the correct time Ambient temperature is too high or too low or the battery pack has not been charged enough This is not a malfunction Fully charge the battery again If the problem persists the battery may be worn out Replace it with a new one p 13 12...

Страница 107: ... than VTR 2 for your VCR Cover the sensor of your VCR with black paper The cassette cannot be ejected from the compartment Make sure the power source battery pack or AC Adaptor Charger is connected correctly p 13 Moisture condensation has occurred inside the camcorder p 126 The Cassette Memory indicator or title display does not appear while using a cassette with the Cassette Memory function This ...

Страница 108: ...cuting FADER While executing SMTH SLW REC When SCAN TYPE is set to 24 or 24A and the shutter speed is slower than 1 48 p 85 86 When SCAN TYPE is set to 60 or 30 and the shutter speed is slower than 1 60 p 85 86 While using shot transition Assign PHOTO to the ASSIGN 7 PHOTO button or any one of the ASSIGN buttons You cannot record a smooth transition on a tape from the last recorded scene to the ne...

Страница 109: ... gain and shutter speed are set manually IRIS EXPOSURE is set to EXPOSURE and image brightness is adjusted with the iris ring HYPER GAIN is set to ON CNTRST ENHCR BACK LIGHT is set to ON FADER No tape is inserted Moisture condensation has occurred inside the camcorder The write protect tab on the cassette is set to SAVE ZEBRA PEAKING CAM DATA DSP HISTOGRAM COLOR BAR is set to ON SMTH SLW REC REC T...

Страница 110: ...he screen picture is dark and the subject does not appear on the screen Press and hold the DISPLAY BATT INFO button for a few seconds to turn on the backlight p 18 Horizontal stripes appear on the image This occurs when recording pictures under a fluorescent lamp sodium lamp or mercury lamp This is not a malfunction This can be improved by changing the shutter speed p 32 WORLD TIME DATE REC Date a...

Страница 111: ... p 123 Pictures recorded on other devices may not be played back correctly This is not a malfunction The data file name is displayed incorrectly or flashing The file is damaged The file format is not supported on your camcorder p 119 Only the file name is displayed if the folder structure does not conform to the universal standard Horizontal lines appear on the picture The displayed pictures are n...

Страница 112: ...or is displayed on the screen The tape was recorded in a TV color system other than that of your camcorder NTSC This is not a malfunction Date Search does not work correctly Be sure to record more than 2 minutes after the date changed If one day s recording is too short your camcorder may not accurately find the point where the recording date changes There is a blank section between recorded secti...

Страница 113: ...component A V cable make sure the red and white plugs are connected p 58 You cannot view the picture or hear the sound on the TV connected with the HDMI cable Pictures in the HDV format are not output from the HDMI OUT jack if copyright protection signals are recorded in the pictures DVCAM DV format pictures input to the camcorder via i LINK cable p 100 cannot be output This occurs if you record o...

Страница 114: ...vice for dubbing a picture from your camcorder When connected using an i LINK cable no picture appears on the monitor screen during dubbing Set VCR HDV DV according to the requirements of the connected device p 85 You cannot add sound to the recorded tape You cannot add sound to the recorded tape on this unit You cannot dub correctly using the HDMI cable You cannot dub pictures using the HDMI cabl...

Страница 115: ...py a movie recorded on a tape to a computer Disconnect the cable from the computer then connect it again You need the editing software optional to copy a movie recorded on a tape to your computer p 102 Your computer freezes Set VCR HDV DV correctly according to the connected device p 85 Disconnect the cable from your computer and camcorder Reboot your computer and connect your computer and camcord...

Страница 116: ... has occurred p 126 Remove the power source Reconnect it and operate your camcorder again Change the cassette Press the RESET button p 138 and operate your camcorder again E 61 ss E 62 ss Contact your Sony dealer or local authorized Sony service facility Inform them of the 5 digit code which starts from E 101 1001 Warning indicator pertaining to files The file is damaged The file is unreadable p 1...

Страница 117: ...e is set to lock p 119 Fast flashing Moisture condensation has occurred p 126 The self diagnosis display code is displayed p 116 When BEEP is set to ON p 94 you hear a melody when the warning indicators appear on the screen If messages appear on the screen follow the instructions Warning messages ...

Страница 118: ... in DVCAM DV format You need a TV with the AUDIO VIDEO input jack A connecting cable is also needed Simple setting of the clock by time difference When you are abroad you can easily adjust the clock to the local time by setting the time difference Select WORLD TIME then set the time difference p 93 System Used in NTSC Bahama Islands Bolivia Canada Central America Chile Colombia Ecuador Guyana Jama...

Страница 119: ...reated on the tape Go to the end of the recorded section using END SEARCH p 48 before you begin the next recording when you have played back the tape Copyright signal x When you play back If the cassette you play back on your camcorder contains copyright signals you cannot copy it to a tape in another video camera connected to your camcorder x When you record You cannot record software on your cam...

Страница 120: ... playback pictures recorded in the HDV format The DVCAM format was developed as a more reliable and higher end format than the consumer DV format Explained here are the differences compatibility and limitations on editing for the DVCAM and DV formats appears when the DVCAM standard is not met Differences between the DVCAM and DV formats There are 2 modes for audio recording lock mode and unlock mo...

Страница 121: ...ent to perform DV dubbing of a tape recorded in DV format the tape produced will be in the DVCAM format which the time code format will be partly misadjusted there will be no effect on the recorded picture except in certain cases 2 If the tape that is to be dubbed is in the DVCAM format as in 1 the tape produced will be in the DVCAM format and the time code format will be partly misadjusted 3 Some...

Страница 122: ...ry Stick Duo and Memory Stick Duo compliant product you use You can prevent accidental erasure of images when you slide the write protect tab on the Memory Stick Duo with a small tapered object to the write protect position Damaged or lost image data will not be compensated for and may occur in the following cases If you eject the Memory Stick Duo turn the power off on your camcorder or remove the...

Страница 123: ...rm to the Design rule for Camera File system universal standard established by the JEITA Japan Electronics and Information Technology Industries Association On your camcorder you cannot play back still images recorded on other devices DCR TRV900 or DSC D700 D770 that do not conform to the universal standard These models are not sold in some regions If you cannot use a Memory Stick Duo that has bee...

Страница 124: ...ry pack is frequently used Use the remaining battery time indication as a rough guide only The E mark that indicates low battery flashes even if there are still 5 to 10 minutes of battery time remaining depending on the operating conditions or ambient temperature About storage of the battery pack If the battery pack is not used for a long time fully charge the battery pack and use it up on your ca...

Страница 125: ...o devices Some i LINK compatible video devices such as Digital Televisions DVD MICROMV or HDV recorders players are not compatible with this unit Before connecting to other devices be sure to confirm whether the device is compatible with an HDV DV device or not For details on precautions and compatible application software refer also to the operating instructions for the device to be connected b N...

Страница 126: ...and play a cassette for about 3 minutes Use up the battery pack completely before storing it Moisture condensation If your camcorder is brought directly from a cold place to a warm place moisture may condense inside your camcorder on the surface of the tape or on the lens In this state the tape may stick to the head drum and be damaged or your camcorder may not operate correctly If there is moistu...

Страница 127: ...rding The following phenomenon occurs in HDV format The following phenomenon occurs in DVCAM DV format The video heads will be worn after long use If you cannot obtain a clear image even after using a cleaning cassette optional the video heads may be worn out Please contact your Sony dealer or local authorized Sony service facility to have the video heads replaced LCD screen Do not exert excessive...

Страница 128: ...ys charged while your camcorder is connected to the wall outlet wall socket via the AC Adaptor Charger or while the battery pack is inserted The rechargeable battery will be fully discharged in about 3 months if you do not use your camcorder at all without the AC Adaptor Charger connected or the battery pack attached Use your camcorder after charging the pre installed rechargeable battery However ...

Страница 129: ...Recording playback time DVCAM 41 min using a PHDVM 63DM cassette Recording playback time DV SP 63 min using a PHDVM 63DM cassette Fast forward rewind time Approx 2 min 40 s using a PHDVM 63DM cassette and rechargeable battery pack Approx 1 min 45 s using a PHDVM 63DM cassette and AC Adaptor Charger Viewfinder Electric viewfinder color black and white Picture 1 1 cm 0 45 type aspect ratio 16 9 Tota...

Страница 130: ... component A V cable is connected Y 1 Vp p 75 Ω ohms PB PR CB CR 350 mV 75 Ω ohms Audio signal 10 dBu at load impedance 47 kΩ kilohms Output impedance with less than 2 2 kΩ kilohms 0 dBu 0 775 Vrms HDMI OUT jack TypeA 19 pin i headphones jack Stereo minijack Ø 3 5 mm Input Output connectors LANC jack Stereo mini minijack Ø 2 5 mm INPUT1 INPUT2 jack XLR 3 pin female 48 dBu 3kΩ kilohms 4 dBu 10kΩ ki...

Страница 131: ...ood with lens cover 2 5 kg 5 lb 6 oz including the battery pack NP F570 cassette PHDVM 63DM lens hood with lens cover and microphone ECM XM1 When the HVR MRC1 is used the average power consumption increases about 2 5 W AC Adaptor Charger AC VQ1050 Power requirements AC 100 V 240 V 50 Hz 60 Hz Power consumption 22 W Output voltage DC 8 4 V Operating temperature 0 C to 40 C 32 F to 104 F Storage tem...

Страница 132: ...supplied with HVR Z5N Maximum output voltage DC 8 4 V Output voltage DC 7 2 V Maximum charge voltage DC 8 4 V Maximum charge current 3 0 A Capacity 15 8 Wh 2 200 mAh Type Li ion Design and specifications are subject to change without notice ...

Страница 133: ...the HDV logo are trademarks of Sony Corporation and Victor Company of Japan Ltd HDMI HDMI logo and High Definition Multimedia Interface are trademarks or registered trademarks of HDMI Licensing LLC Pentium is a trademark or registered trademark of Intel Corporation Adobe and Adobe Reader are trademarks of Adobe Systems Incorporated All other product names mentioned herein may be the trademarks or ...

Страница 134: ... Lift the edge of the accessory shoe plate and pull it in the direction opposite to that of the arrow on the accessory shoe plate and remove it from the accessory shoe 2 Place the accessory shoe as its protrusions matches recesses of the accessory shoe mount then fix it to the mount with four screws 3 Insert the accessory shoe plate in the direction of the arrow on the plate surface until the end ...

Страница 135: ... button AE SHIFT button 46 I ASSIGN 3 button REC REVIEW button 46 J Large eyecup 19 K CH1 INT MIC INPUT1 switch 44 L AUTO MAN CH1 switch 44 M AUDIO LEVEL CH1 dial 44 N AUDIO LEVEL CH2 dial 44 O AUTO MAN CH2 switch 44 P CH2 INT MIC INPUT1 INPUT2 switch 44 Q STATUS CHECK button 55 R PICTURE PROFILE button 35 S MENU button 20 T AUTO MANUAL switch 30 The ASSIGN 2 button AE SHIFT button has a raised ta...

Страница 136: ...INPUT2 switch 44 M INPUT1 switch 44 N Cable holder 10 Inner cable holder and outer cable holder are provided for securing an i LINK cable and a microphone cable respectively O LANC jack The LANC control jack is used for controlling the tape transport of video device and peripherals connected to it P POWER switch 17 Q REC START STOP button 24 R Cable holder 10 For securing the i LINK cable or other...

Страница 137: ... I WHT BAL button 33 J SHUTTER SPEED button 30 K OPEN EJECT lever 22 L SEL PUSH EXEC dial 20 M One push button 34 N White balance memory switch 33 O Gain switch 32 P IRIS EXPOSURE button 30 WHT BAL button has a raised tactile dot for your convenience in locating the button To attach the shoulder strap Attach the shoulder strap optional to the hooks for the shoulder strap Continued ...

Страница 138: ... press the RESET button all settings including the clock setting except the Picture profile and Camera profile settings return to the default J LCD screen 18 K Viewfinder 18 L Viewfinder lens adjustment lever 18 M Viewfinder release lever 128 N Rear remote sensor 94 O Rear recording lamp 94 The recording lamp flashes if the remaining tape or battery is low PLAY button VOLUME MEMORY button and MEMO...

Страница 139: ...en you are operating with the Remote Commander supplied with your camcorder your VCR may also operate In that case select a commander mode other than VTR 2 for your VCR or cover the sensor of your VCR with black paper To change the battery of the Remote Commander 1 While pressing on the tab inset your fingernail into the slit to pull out the battery case 2 Place a new battery with the side facing ...

Страница 140: ...g capacity of the tape approx F Audio level display 82 G Remaining recording time of an external Memory Recording Unit optional H Recording folder 91 I Image size 26 J Recording indicator 26 The date time during recording and the camera setting data will be recorded automatically They do not appear on the screen during recording but you can check them on the screen by pressing the DATA CODE button...

Страница 141: ...rent playback folder N Playback folder 92 O Previous Next folder icon The or appears when the first or last picture of the current folder is displayed and when there are multiple folders on the same Memory Stick Duo You can move to Previous Next folder with the VOLUME MEMORY button Viewing movies 60 HDV1080i 12 00 04 50 04 qa 2 1 5 4 min min Viewing still images 60min 101 0011 1 2M 9 9 101 MEMORY ...

Страница 142: ... 00 00 00 00 60min Upper left Upper right Bottom Center Indicator Meaning Z Warning 116 Indicator Meaning HISTOGRAM 80 DV AU MODE DV Audio mode 77 Manual volume control 44 78 9 Manual focus 29 Picture profile 35 SPOTLIGHT 72 BACK LIGHT 72 SteadyShot off 72 PEAKING 81 D EXTENDER 73 AE SHIFT 71 Extended clear scan 32 71 EXPOSURE control 31 Auto setting 82 n A B White balance 33 FOCUS MACRO 73 HYPER ...

Страница 143: ...7 Button type lithium battery 139 C Cable holder 10 CAM DATA DSP Camera data display 82 109 CAMERA PROF Camera profile 92 CAMERA SET menu 69 Cassette Insert Eject 22 Tape 119 Cassette compartment 22 CENTER TRIG 73 CH1 INT MIC INPUT1 switch 10 CH2 INT MIC INPUT1 INPUT2 switch 10 Charge lamp 13 Charging time 14 CLOCK SET 20 93 CNTRST ENHCR 72 109 COLOR BAR 76 COLOR CORRCT Color Correct 39 COLOR DEPT...

Страница 144: ...5 HDV DV jack 60 Headphones jack 136 High definition TV 58 HISTOGRAM 80 109 Hook for shoulder strap 137 HOURS METER 94 HYPER GAIN 70 I INDEX MARK 47 Index screen 52 Index search 56 Index signal 47 Indicators 142 INDOOR 34 Indoor 34 INPUT1 10 44 INPUT1 jack 10 44 INPUT1 MIC NR 78 INPUT1 switch 44 INPUT1 TRIM 79 INPUT1 WIND 79 INPUT2 10 44 INPUT2 jack 44 INPUT2 MIC NR 79 INPUT2 switch 44 INPUT2 TRIM...

Страница 145: ...RATION 95 OTHERS menu 92 OUTDOOR 34 Outdoor 34 Outside power source 15 P PAL 118 PB FOLDER Playback folder 92 PB ZOOM Playback zoom 93 PEAKING 81 109 PHOTO 46 PHOTO button 26 Picture profile 35 PICTURE PROFILE button 35 Picture Search 52 PLAY button 51 Playing time 14 POWER switch 17 Pre installed rechargeable battery 128 PRESET 89 PROFILE NAME 42 PROGRESSIVE 85 PUSH AT IRIS 46 PUSH AUTO button 30...

Страница 146: ...lephoto 28 THREADING 95 Time code 140 TONE 77 Trademark 133 TRANS TIME 75 Transmitter 139 TRIG 73 TRIG LEVEL 73 Troubleshooting 106 TV 58 TV color systems 118 U UB PRESET 89 UB TIME REC 90 UB DATE TC TIME 90 109 Using the menu items 64 Using your camcorder abroad 118 V VCR HDV DV 85 VF B LIGHT 83 109 VF COLOR 84 VF POWERMODE 84 Video control buttons 139 Video head 127 VIDEO OUT 87 Viewfinder 18 Vi...

Страница 147: ......

Отзывы: