background image

16

Chapter 1

Overview

Ch
ap
te

r 1

O

v

e

rv

ie

w

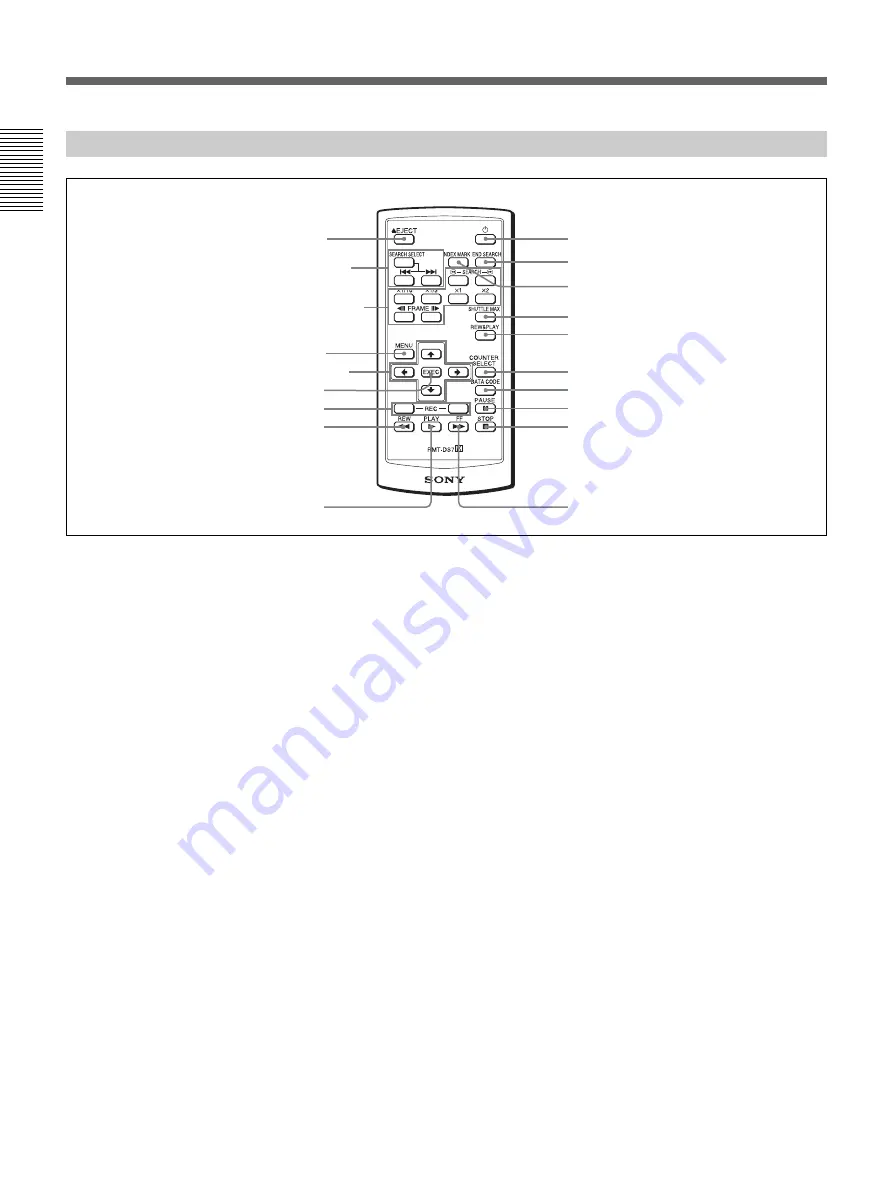
Location and Function of Parts

a

Z

 EJECT button 

b

SEARCH SELECT buttons 

Press these buttons to search for scenes using the search 
function. 

For details on the search function, see “Searching using the 
search function” on page 34. 

c

Buttons for playing at various speeds 

You can play back a tape at normal speed or at a speed 
other than normal with these buttons. 

For details, see “Playing at various speeds” on page 33

d

MENU button

Press this button to display the menu on the screen.

For details on the menu, see “Operating Menus” on page 48.

e

J

/

j

/

K

/

k

 button

Press these buttons to operate the cursor on the menu 
screen or to move the display position of the counter.

f

EXEC (execute) button

Press this button to input the value set on various menu 
setting screens.

g

REC (record) buttons 

When you press both these buttons at the same time, the 
REC indicator and the PLAY indicator on the front 
panel light and recording begins.

h

REW (rewind) button 

i

PLAY button 

j

FF (fast forward) button 

k

STOP button 

l

PAUSE button 

m

DATA CODE button 

Press this button to display the data codes (recording 
date/time). 

For details on data codes, see “Displaying information (data 
codes) recorded on a tape” on page 32. 

n

COUNTER SELECT button

This button is not available for the unit.

o

REW&PLAY (rewind and play) button

Press this button to rewind the tape to its beginning and 
start playing automatically. (During rewind, the REW 
indicator lights and the PLAY indicator blinks on the 
unit.)

p

SHUTTLE MAX button

During tape playback, press this button to play back the 
video at the maximum speed.

Supplied Remote Commander

3

Buttons for playing at 
various speeds

1

EJECT button

4

MENU button

2

SEARCH SELECT 
buttons

7

REC button

5

J

/

j

/

K

/

k

 button

8

REW button

6

EXEC button

9

PLAY button

ql

1

 button

q;

FF button

qa

STOP button

qs

PAUSE button

qd

DATA CODE button

qf

COUNTER SELECT button

qg

REW&PLAY button

qh

SHUTTLE MAX button

qj

INDEX MARK button

qk

END SEARCH button

Содержание HVR-M15AE

Страница 1: ...7 11 1 Digital HD Videocassette Recorder Operating Instructions Before operating the unit please read this manual thoroughly and retain it for future reference HVR M15AU M15AN M15AE M15AP 2008 Sony Corporation ...

Страница 2: ...Formats 24 Input Output Signals in EE Mode 25 Recording Input Signals and Recording Formats 26 Playback Tape Format and Output Signals 26 Settings for Output Signals from Each Jack 27 Playback 29 Connections for Playback 29 Settings for Playback 31 Playback Procedures 31 Playback Functions 32 Auto Repeat 35 Using the Unit as a Videocassette Recorder 36 Connections for Recording 36 Settings for Rec...

Страница 3: ... Messages 65 Notes on Use 67 Notes on the Videocassette Recorder 67 Cleaning of the Video Heads 67 Notes on the Video Cassettes 68 About Moisture Condensation 69 Digital Hours Meter 70 About the Built in Rechargeable Battery 70 Using your Videocassette Recorder abroad 70 Notes on the License 70 Appendix Notes on Dubbing 71 About i LINK 74 Specifications 75 Index 78 Submenu Index 80 ...

Страница 4: ...computers which are compatible with the interfaces DVCAM DV format DVCAM is based on the consumer DV format which uses the 4 1 1 component digital format 60i or the 4 2 0 format 50i and provides a 1 4 inch digital recording format for professional use The unit provides both DVCAM format recording playback and DV format in SP mode recording playback For details see Major Differences among HDV1080i ...

Страница 5: ... size allowing vertical installation The compact size of the unit allows installation in a vertical position and saves space During non linear editing you can install the unit in a vertical position next to the computer and save working space Easy maintenance functions Self diagnostics alarm functions The system automatically detects an invalid operation bad connection or a malfunction and outputs...

Страница 6: ...assette is loaded Does not light up when there is no cassette loaded in the unit This indicator blinks while a cassette is being ejected For details see Inserting Ejecting Cassettes on page 21 d ON STANDBY switch and lamp Press this switch to turn the unit on and the ON STANDBY lamp lights up in green When you press this switch again the unit goes into the standby mode and the lamp lights up in re...

Страница 7: ... DV jack the settings of the menus listed below are unavailable 60i 50i SEL AUDIO MODE AUDIO LOCK AUDIO AGC AUDIO REC LV f Cassette Lid Open this lid to insert or eject a cassette For details on cassettes that can be used see Notes on Power Supply and Video Cassettes on page 20 For details of inserting or ejecting a cassette see Inserting Ejecting Cassettes on page 21 g MENU button Press this butt...

Страница 8: ...format it may take a few seconds to start recording During this time the REC indicator blinks c PAUSE button Press this button to set the unit to pause mode The indicator lights during recording or playing Press this button again to resume the operation d FF fast forward button When you press this button the indicator lights and the tape is fast forwarded During fast forward the picture does not a...

Страница 9: ...mat f REW rewind button When you press this button the indicator lights and the tape starts rewinding During rewind the picture does not appear on the monitor You can see the picture as it is seen in EE mode during rewind To locate a scene while monitoring the picture hold this button down during rewind playback or in the playback pause mode If you press the PLAY button while holding down this but...

Страница 10: ...set to DVCAM During recording or in EE mode c DV indicator Lights when the unit is in either of the following operating states When a tape recorded in DV format SP mode only is being played back When the following four conditions are met When HDV DV SEL in the IN OUT REC menu is set to AUTO When REC MODE in the IN OUT REC menu is set to DV When DV or DVCAM signals are being input from any of the i...

Страница 11: ... operating states During recording or in EE mode when 60i 50i SEL in the OTHERS menu is set to 50i When 1080 50i signals or PAL signals are input from the HDV DV jack When a tape that has 1080 50i signals or PAL signals is being played back h 25p indicator Lights when the unit is in either of the following operating states When a tape recorded in 1080 25p format or 720 25p format is being played b...

Страница 12: ...set to FS32K sounds will be recorded on channels 1 and 2 When the audio mode is 32 kHz 4 channel you can set AUDIO MIX in the AUDIO SET menu to select the audio signals to be output page 54 When you select MIX the audio output level becomes 50 6 dB of the original audio levels on each channel If you input a sound at a level that exceeds the acceptable range the recorded sound is distorted For deta...

Страница 13: ... from the S VIDEO OUT jack VIDEO OUT jack or HDV DV jack may be distorted for a moment When you play back a tape in DVCAM DV format and while an EE picture in NTSC PAL is displayed either the 480i resolution or the 576i resolution is output regardless of the setting of COMPONENT of VIDEO OUT in the IN OUT REC menu When COMPONENT of VIDEO OUT in the IN OUT REC menu is set to either 1080i 480i or 10...

Страница 14: ... OTHERS menu to CONTROL S When you change the video format setting of COMPONENT of VIDEO OUT in the IN OUT REC menu the video signals output from S VIDEO OUT jack VIDEO OUT jack or HDV DV jack may be distorted The unit is only compatible with standard video signals If you input the types of video signals shown below recorded picture and sound may be distorted Signals from some home game machines B...

Страница 15: ...ew 15 Chapter 1 Overview To output video signals to the VIDEO S VIDEO or COMPONENT OUT jacks without text data set the DISPLAY OUTPUT switch to OFF or press the DATA CODE or SEARCH SELECT button on the remote commander ...

Страница 16: ...or and the PLAY indicator on the front panel light and recording begins h REW rewind button i PLAY button j FF fast forward button k STOP button l PAUSE button m DATA CODE button Press this button to display the data codes recording date time For details on data codes see Displaying information data codes recorded on a tape on page 32 n COUNTER SELECT button This button is not available for the un...

Страница 17: ...sable control from Remote Commander set COMMANDER in the OTHERS menu to CONTROL S Before using Remote Commander Remove the insulation sheet before using the Remote Commander To change the battery of the Remote Commander 1 While pressing on the tab inset your fingernail into the slit to pull out the battery case 2 Place a new battery with the side facing up 3 Insert the battery case back into the R...

Страница 18: ... is displayed while an HVR DR60 is connected using the HDV DV jack When an HVR MRC1 is connected CF is displayed e Alarm indicator Displays an alarm indicator For details on alarm indicators see Warning Indicators and Messages on page 65 f x v Color indicator Displays an x v Color indicator while pictures recorded in x v Color are played back For details on x v Color see Playback with x v Color ou...

Страница 19: ...dard audio and is displayed during playback or when the signal is input from the HDV DV jack n Audio level meters For details of the audio level meter display see AUDIO MIX in the AUDIO SET menu page 54 If the audio level meter turns red in EE or recording mode the sound will be distorted because the input level is too high However when the audio mode is set to 32 kHz 4 channel 12 bits and AUDIO M...

Страница 20: ...µm respectively The specifications are the same as those of home use DV SP tapes The recording time on an HDV tape is also the same as that of a DV SP tape The track pitch of DVCAM is 15 µm which is 1 5 times that of HDV DV SP Therefore the recording time using DVCAM recording on the same tape will be two thirds of the time available when HDV DV SP recording is used Cassette memory Some mini casse...

Страница 21: ...ct A short circuit can damage the unit Use a nearby wall outlet when using the AC Adaptor Disconnect the AC Adaptor from the wall outlet immediately if any malfunction occurs Do not use the AC Adaptor placed in a narrow space such as between a wall and furniture The CLOCK SET screen appears when you turn on the unit for the first time For details on CLOCK SET see page 58 To insert a cassette Do no...

Страница 22: ...the cassette compartment The cassette is disengaged and ejected 2 Remove the cassette from the unit and close the cassette lid No compensation for contents of the recording Contents of the recording cannot be compensated for if recording or playback is not successful due to a malfunction of the unit video tape etc Copyright precautions Television programs films video tapes and other materials may ...

Страница 23: ...he tape speed is stabilized Note on playback on other equipment A tape recorded in HDV format with the unit cannot be played back with devices not compatible with the same format We recommend confirming the contents of the tape by playing back the tape with the unit before playing it back on another video equipment Playback with x v Color output The unit can play back pictures recorded in x v Colo...

Страница 24: ...n you edit audio 3 The unit cannot record in DV format with 16 bit 32 kHz or 44 1 kHz 4 The unit has been functionally extended with a function for switching between Lock mode and Unlock mode 5 The unit has been functionally extended with a function to enable selecting DF NDF for 60i including 24p and 30p with HDV or DV SP format 6 The unit is not equipped with user bit setting function Major Diff...

Страница 25: ...ion Pictures may be distorted or not be displayed depending on the TV monitors This will not appear while recording with the unit Be aware of these phenomena when you connect other recording device via the analog jacks of the unit 4 Depending on the TV monitor being connected the screen may blink or be distorted when DVCAM DV signals which are input from the HDV DV jack or video signals which are ...

Страница 26: ...down conversion page 27 HDV 720 30p 25p 24p signals can be played back but not input output via the HDV DV jack on the unit HDV 720 60p HDV720 50p and SD 480p 576p signals cannot be input output recorded or played back on the unit Recording Input Signals and Recording Formats a Recordable Not recordable Recording format Input signal Input jack HDV DVCAM DV SP Input format 1080 60i a 1080 24p a HDV...

Страница 27: ...unit HDV 720 60p HDV720 50p and SD 480p 576p signals cannot be input output recorded or played back on the unit Settings for Output Signals from Each Jack 60i 50i SEL Format of the original signals Setting of the COMPONENT menu Format of the signals output from each jack COMPONENT OUT VIDEO S VIDEO 60i HDV 1080 60i HDV 1080 24p HDV 1080 30p HDV 720 24p 1 HDV 720 30p 1 480i 480 60i 2 480 60i 2 480p...

Страница 28: ...SEL is set to AUTO or HDV 1 You can select SQUEEZE or EDGE CROP in i LINK SET of VIDEO OUT in the IN OUT REC menu page 51 You cannot set LETTER BOX in this menu Format of the original signals Setting of the HDV t DV CONV menu Format of signals output from the HDV DV jack HDV 1080 60i HDV 1080 30p HDV 1080 24p OFF Complies with input signals DVCAM DVCAM 480 60i 1 DV SP DV 480 60i 1 HDV 1080 50i HDV...

Страница 29: ...unit to a monitor without an i LINK jack You can connect the unit to a video monitor recorder without an i LINK jack Connect video cables and audio cables as shown below For each jack see page 12 Connections for Playback Signal flow Monitor recorder To S video input To video input To audio input S video cable not supplied Video cable not supplied Audio cable not supplied Component video cable not ...

Страница 30: ...protected signals or input HDV signals with copyright protection to the HDV DV jack pictures may be output in either 480i NTSC or 576i PAL format regardless of the setting of COMPONENT of VIDEO OUT in the IN OUT REC menu The unit cannot up convert DVCAM DV recordings to HDV at output When COMPONENT of VIDEO OUT in the IN OUT REC menu is set to either 1080i 480i or 1080i 576i 1080 24p and 1080 30p ...

Страница 31: ...a function however may not work with the unit Preparation on the unit Text information is superimposed to the VIDEO OUT jack S VIDEO OUT jack and COMPONENT OUT jacks To output video signals without text data set the DISPLAY OUTPUT switch to OFF For details on the DISPLAY OUTPUT switch see page 6 For details on text data see Displaying Various Data on page 18 To view a tape recorded in HDV format b...

Страница 32: ...g playback you can check the recording date and time from the data codes by displaying this information on the unit Each time you press the DATA CODE button on the Remote Commander the display switches between no data code display and recording date time display Also you can change the display by setting DATA CODE in the DISPLAY SET menu For details see DATA CODE on page 53 If data codes were not ...

Страница 33: ...ame forward scanning 8 speed SHUTTLE MAX 24 speed DVCAM DV formatted tape Playback options Operation Play at 1 10 of normal speed Press the 1 10 button during playback Play at 1 3 of normal speed Press the 1 3 button during playback Play at normal speed Press the 1 button during playback Play at twice the normal speed Press the 2 button during playback Play frame by frame Press the FRAME c C butto...

Страница 34: ...beginnings of the recordings Index search Searching for a point on the tape where the recorded date changes Date search To search for scenes use the supplied Remote Commander 1 Press the SEARCH SELECT button on the Remote Commander to select the search type The search type changes in the order of Index search t Date search t No indication 2 Press the button repeatedly to locate the scene you want ...

Страница 35: ... 3 Set the start time on the external AC timer At the preset time the power of the unit turns on and after a few to several tens of seconds auto repeat playback starts automatically When the following items on the tape are searched for the unit rewinds the tape to its beginning and starts auto repeat playback automatically Index signals A portion unrecorded A portion recorded in a format set by ot...

Страница 36: ...ons of the player and the unit refer to the instruction manual of the player For details see also page 45 and 46 To video equipment without an i LINK jack You can connect the unit to video equipment without an i LINK jack Use the unit as a recorder as follows Connect either an S video cable or a video cable Note Connections for Recording Player Monitor HVR M15A rear panel To S video output To vide...

Страница 37: ...any degradation in quality enabling high quality recording The signal flow is automatically detected so you do not need to make separate connections for input and output When you record video from HDV compatible equipment set HDV DV SEL in the IN OUT REC menu to AUTO To record video from DVCAM DV equipment set HDV DV SEL in the IN OUT REC menu to AUTO or DV before connecting the i LINK cable page ...

Страница 38: ...PUT SELECT switch to select a signal that is not being input or disconnect the cables The unit cannot record MPEG2 signals except 1080 60i 1080 24p 1080 30p 1080 50i 1080 25p of HDV When you record HDV signals input from the HDV DV jack the connection between the recorded signals pauses for about one second The unit cannot record color bar output in the progressive system Color bar outputs are rec...

Страница 39: ...s at the bottom of the TV monitor display due to the jitter Depending on the display area of the TV monitor you have the distortion of the picture may appear at the bottom of the screen This is not a malfunction Pictures may be distorted or not be displayed depending on the TV monitors This will not appear while recording with the unit Be aware of these phenomena when you connect other recording d...

Страница 40: ...yer The player starts playback 3 On the unit press the PLAY button while holding the REC button down When the unit records HDV format images it takes a while until recording starts This delay however is not an error STBY is displayed on the screen and the REC indicator blinks until recording starts To stop recording Press the STOP button on the unit To pause recording Press the PAUSE button on the...

Страница 41: ...refer to the editing controller instruction manual Before dubbing you must set the format in which you want to output signals Make HDV DV SEL page 50 and i LINK SET page 51 settings in the IN OUT REC menu For details refer to Major Differences among HDV1080i DVCAM and DV Formats on page 24 For details on i LINK output formats see page 72 To dub a tape recorded in HDV format using the duplicate fun...

Страница 42: ...HDV format the picture is output as a simplified picture during playback at various speeds page 33 When using an i LINK connection you cannot output only pictures or sounds separately When progressive HDV signals are played back and down converted into DVCAM or DV format to output to i LINK connection the signals are converted to interlace system 1080 24p and 1080 30p are converted to 480i and 108...

Страница 43: ...EO OUT in the IN OUT REC menu page 51 depending on the signals you wish to output See also Notes on page 30 The audio output signal is selected by the setting of AUDIO MIX in the AUDIO SET menu Signal flow Recorder To S video input To video input To audio input S video cable not supplied Video cable not supplied Audio cable not supplied Component video cable not supplied To component video input H...

Страница 44: ...rder has an input selector switch select an input For details refer to your recorder s instruction manual 3 Start playback on the unit and start recording on the recorder Refer to Playback Procedures on page 31 For details refer to your recorder s instruction manual 4 When dubbing is finished stop recording on the recorder and then stop playback of the unit Dubbing Procedures ...

Страница 45: ...connect the i LINK cable turn off the computer and pull out the plug of its power cord from the wall outlet beforehand If you connect or disconnect the i LINK cable while the computer is connected to the AC outlet high voltage current 8 to 40 V is output from the i LINK jack of the device to the unit which may cause a malfunction Before connecting the i LINK cable set HDV DV SEL and i LINK SET in ...

Страница 46: ...etween scenes on the tape will be displayed as a still picture for approximately 1 second We recommend you perform digital nonlinear editing If your editing software has the capability to output the time code as well as the video and audio signals to the unit and you intend to record that time code set HDV DV IN TC in the TC UB SET menu of the unit to EXTERNAL For details on the TC UB SET menu see...

Страница 47: ...e IN OUT REC menu to HDV page 50 To transfer data from a computer editing machine in DVCAM DV format set HDV DV SEL in the IN OUT REC menu to DV page 50 Then according to the desired recording format set REC MODE to DVCAM or DV SP page 50 Before connecting the unit to a computer editing machine set HDV t DV CONV of i LINK SET in the IN OUT REC menu to OFF for HDV or to DVCAM DV SP for DVCAM DV pag...

Страница 48: ...i 50i SEL setting and the time code of the FREE RUN setting will be initialized The internal backup battery is fully charged if you connect the power to the unit for about 24 hours A fully charged internal battery can run for about 1 month Changing a menu setting 1 Press the MENU button 2 Pressing the J j buttons select the menu icon you want to change then press the EXEC button 3 Pressing the J j...

Страница 49: ...ET DATA CODE page 53 LETTER SIZE page 53 DATE DISPLAY page 53 TIME DISPLAY page 53 REMAINING page 53 AUDIO SET AUDIO MODE page 54 AUDIO AGC page 54 AUDIO REC LV page 54 AUDIO MIX page 54 AUDIO LOCK page 54 JOG AUDIO page 55 VTR SET AUTO REPEAT page 55 AUTO INDEX page 55 STILL PICT page 55 FF REW SPEED page 55 STILL TIME page 55 FROM STILL page 56 FROM REC P page 56 TC UB SET HDV DV IN TC page 56 T...

Страница 50: ...back Also select this setting when the unit is connected via an i LINK cable to a computer supporting HDV format see pages 37 41 DV Outputs signals of portions recorded in DVCAM DV format during tape playback When an i LINK cable is connected only signals in DVCAM DV format from the HDV DV jack are input or output for recording playback Also select this setting when the unit is connected via an i ...

Страница 51: ...ut in either 480i NTSC or 576i PAL format regardless of the setting of this submenu i LINK SET pages 28 45 Adjusts the down conversion format This menu is available when HDV DV SEL is set to AUTO or HDV HDV t DV CONV BOFF Disables down conversion DVCAM Down converts to DVCAM format DV SP Down converts to DV SP format DOWN CONVERT This setting is available when HDV t DV CONV is set to DVCAM or DV S...

Страница 52: ...ecorded in 1080 60i or 1080 50i format according to the setting of 60i 50i SEL in the OTHERS menu page 58 When the unit is turned off and on again COLOR BAR is automatically set to OFF BARS TYPE Selects the type of color bars TYPE 1 Outputs TYPE 1 color bars BTYPE 2 Outputs TYPE 2 color bars TYPE 3 Outputs TYPE 3 color bars When color bars are output in NTSC 60i mode on the unit no setup 0 IRE sig...

Страница 53: ...ects the character size of the menu at the cursor BNORMAL Normal size 2 Double height size DATE DISPLAY Selects the date display in the data code display Y M D Displays YY MM DD year month day M D Y Displays MM DD YY month day year Default setting for the HVR M15AU M15AN D M Y Displays DD MM YY day month year Default setting for the HVR M15AE M15AP TIME DISPLAY Selects the time display in the data...

Страница 54: ...g 6 dB Decreases 6 dB from the original audio input level B0 dB Leaves the original audio input level 6 dB Increases 6 dB from the original audio input level This setting is available only when AUDIO AGC is set to OFF When the level reaches the maximum value of the audio level meter and the meter turns red the sound will be distorted For details on the maximum audio recording level input see Speci...

Страница 55: ...ayed in the still mode DVCAM DV SP format only BAUTO Displays an optimized image according to the movement in the image FRAME Displays a frame image FIELD Displays a field image If you select FIELD the image of field 2 is displayed For an HDV format video an optimized image according to the movement in the image is displayed FF REW SPEED pages 8 9 Selects the tape transport mode in fast forward an...

Страница 56: ...lect STOP Icon Menu Submenu Setting Note Note Icon Menu Submenu Setting TC UB SET HDV DV IN TC Selects whether to record internal time code or external time code while the unit records signals input from the HDV DV jack BINTERNAL Records the time code generated by the internal time code generator If there is time code already recorded on the tape the unit records continuous time code from this poi...

Страница 57: ... was set to 50i TC RESET Resets the time code value to 00 00 00 00 BNO Does not reset the time code value YES Resets the time code value WhenThis setting is available only when the unit is in REC or REC PAUSE mode Also when the INPUT SELECT switch is set to HDV DV and HDV DV IN TC is set to EXTERNAL this setting will not be affected and the time code will not be reset Icon Menu Submenu Setting Not...

Страница 58: ...f the day and the time may be cleared from the memory In this case charge the built in rechargeable battery and set the clock again page 70 HOURS METER page 70 Displays the accumulated time counts using the digital hours meter in units of 10 hours or 10 counts OPERATION Power on duration DRUM RUN Drum rotation duration TAPE RUN Tape run duration THREADING Tape unthreading count AC ON MODE Switches...

Страница 59: ...ng do not pull out the plug while adjusting the menu or the brightness of the LCD monitor The unit operates by itself COMMANDER in the OTHERS menu is set to WIRELESS and a Sony Remote Commander with its command mode set to VTR4 is operating near the unit t Set COMMANDER to CONTROL S page 57 The supplied wireless Remote Commander does not work t Set COMMANDER in the OTHERS menu to WIRELESS page 57 ...

Страница 60: ...te This is not a malfunction t The unit ejects the cassette slowly to protect the tape While the cassette is being ejected the q cassette indicator blinks The cassette tape is not ejected when you press the EJECT button t Check whether the power supply is connected properly Moisture condensation has occurred in the unit page 69 The cassette memory data and title are not displayed when using a cass...

Страница 61: ...erform a date search or index search There is a portion with no recording at the beginning or in the middle of a tape This is not a malfunction The time code is not reset to 00 00 00 00 after rewinding a tape to the recording starting point The time code is not displayed correctly at the starting point of recording This condition however is not a malfunction When you restart playback the time code...

Страница 62: ...n the pause mode set FROM REC P in the VTR SET menu to REC PAUSE page 56 When the tape is rewound to its beginning the playback automatically starts AUTO REPEAT in the VTR SET menu is set to ON t Set AUTO REPEAT to OFF You pressed the PLAY button while holding the REW button down t If you do this the unit rewinds the tape to its beginning and begins playback page 9 During playback the unit starts ...

Страница 63: ...l is too low The recorded sound is distorted Confirm the level of the sound output from the player by referring to the player s instruction manual If you are not clear about the player s output level try the following procedures Set AUDIO AGC in the AUDIO SET menu to OFF set AUDIO REC LV to 0 dB and play back the tape which you intend to use for playback to check the audio level meter If the audio...

Страница 64: ...stem The functions on the unit do not operate The INPUT SELECT switch is set to a setting other than HDV DV t Set it to HDV DV page 6 The editing controller or the editing software is not compatible with the unit t Refer to the instruction manuals of the controller or the software and consult their manufacturers Symptom Cause Remedy ...

Страница 65: ...nsation has occurred Remove the cassette and insert it again after approximately 1 hour page 69 C 22 ss t The video head is dirty Use a cleaning cassette to clean the head page 67 C 31 ss C 32 ss t Symptoms other than the above are occurring Insert the cassette again and retry the operation Do not take this action however if there is any condensation at all in the unit page 69 t Unplug the power c...

Страница 66: ...cassette t See page 21 Z Reinsert the cassette Check for damage to the tape or other irregularities Q Z The tape is locked check the tab t See page 20 Q The tape has reached the end Others Cannot record due to copyright protection Change to correct tape format This is an unsupported format and cannot be played back No output image in HDV DV SEL Change format Stop playback or signal input or change...

Страница 67: ... with a mild detergent solution and finish it with a dry cloth Do not put magnetic objects close to the unit Magnetic fields may damage the recording To prevent electromagnetic interference caused by radio communication equipment such as cellular phones transceivers etc The use of radio communication equipment such as cellular phones or transceivers near the unit may cause a malfunction and can af...

Страница 68: ...dust or sand Leaving a tape in the unit for a long time Cleaning cassettes are replaceable After using the supplied cleaning cassette for the specified number of times buy a replacement cleaning cassette After prolonged use the video heads may become worn out If optimum picture quality is not restored even after you have cleaned the video heads with the cleaning cassette the video heads may have w...

Страница 69: ...ect the cassette or Moisture condensation Turn off for 1H appears Moisture condensation is likely to occur under the following conditions The unit or cassette is brought from the cold outdoors to a warm indoor location The unit or cassette is brought from the air conditioned indoors to the hot outdoors The unit is used in a place subject to cold currents from an air conditioner When bringing the u...

Страница 70: ...tery is charged as long as the unit is operated If the period the unit is operated is short the battery discharges gradually and if it is not used at all for approximately 1 month the battery will discharge completely In that case charge the battery and then start using the unit If you do not need to record the date and time when the rechargeable battery is not fully charged you can use the unit i...

Страница 71: ...ails see the following table Playback and editing of a tape may be restricted for some dubbing methods Read Chapter 3 Dubbing Editing before dubbing a tape Some editing software can correctly edit even a tape created in LOCK MODE In that case select LOCK MODE if required Recording tapes used when the unit serves as a recorder Setting independent Input signal format Menu item Recording tape format ...

Страница 72: ...layer When you play back a tape employing a copy protection signal on the unit you cannot record images from the unit to other equipment You cannot up convert DVCAM DV format to HDV format on the unit During playback in HDV if DV SP is selected from HDV t DV CONV in i LINK SET AUDIO MODE is fixed to UNLOCK MODE When you play back a tape in DVCAM or DV format the unit cannot convert between DVCAM a...

Страница 73: ... you use a proper DVCAM formatted tape for playback and the unit dubs and creates a DVCAM formatted tape the time code may be partially different from the time code format specified as DVCAM on other DV video equipment You cannot use the unit to record video and audio recorded with copyright protection signals If you try to record such video or audio materials the message Cannot record due to copy...

Страница 74: ...ay vary from the indicated value when the unit is connected to equipment with a different maximum baud rate What is Mbps Mbps stands for megabits per second or the volume of data that can be sent or received in 1 second For example a baud rate of 100 Mbps means that 100 megabits of data can be sent in 1 second To use the i LINK functions of the unit For details on how to perform dubbing when the u...

Страница 75: ...layback time DVCAM Approx 184 min using PHDV 276DM Approx 41 min using PHDVM 63DM Recording playback time DV SP Approx 276 min using PHDV 276DM Approx 63 min using PHDVM 63DM AUDIO jacks IN Pin jack 10 dBu Impedance Minimum 47 kΩ kilo ohms unbalanced Maximum input level 16 dBu approx 5 Vrms 60i system 14 dBu approx 4 Vrms 50i system OUT Pin jack Impedance Maximum 1 kΩ kilo ohms Output level 47 kΩ ...

Страница 76: ... Ω ohms unbalanced Pb Cb B Y Pr Cr R Y 0 7 Vp p output impedance 75 Ω ohms unbalanced 100 color bars with no setup 480i 480p Y with 0 3 Vp p sync negative 1080i 720p Y Pb Pr with 0 6 Vp p 3 level sync HDV DV jack i LINK IEEE 1394 6 pin connector S100 Remote control LANC Stereo mini mini jack ø 2 5 CONTROL S IN Stereo mini jack ø 3 5 General Peak inrush current Hot switching inrush current measured...

Страница 77: ...der 1 Operating Instructions 2 AC Adaptor AC L100 Power requirements AC 100 V 240 V 50 Hz 60 Hz Current consumption 0 35 A 0 18 A Power consumption 18 W Output voltage DC OUT 8 4 V Operating temperature 0 C to 40 C 32 F to 104 F Storage temperature 20 C to 60 C 4 F to 140 F See the label on the AC Adaptor for other specifications Design and specifications are subject to change without notice ...

Страница 78: ...de 8 EJECT button 22 END SEARCH button 17 EXEC button 7 F FF button 8 Front panel 6 FS32K 39 FS48K 39 H HDV cassette 20 HDV format 4 24 HDV DV jack 14 Editing 45 Playback 30 Recording 37 I i LINK 74 t HDV DV jack IN OUT REC menu 50 Index 40 INDEX MARK button 17 Index search 34 Indicator section 10 INPUT SELECT switch 6 Input signal during recording 26 in EE mode 25 Insulation sheet 17 L LANC jack ...

Страница 79: ...intenance 70 Search 34 SEARCH SELECT button 16 Self diagnosis 65 SHUTTLE MAX button 16 Specifications 75 STOP button 9 T TC UB SET menu 56 Troubleshooting 59 U Unlock mode 24 Usable cassette 20 V VIDEO jack 12 VTR SET menu 55 W Warning 65 X x v Color 23 ...

Страница 80: ...2 C CLOCK SET 58 COLOR BAR 52 COMMANDER 57 D DATA CODE 53 DATE DISPLAY 53 DV BARS 52 E EE PB SEL 52 F FF REW SPEED 55 FROM REC P 56 FROM STILL 56 H HDV DV IN TC 56 HDV DV SEL 50 HOURS METER 58 I i LINK SET 51 INITIALIZE 58 J JOG AUDIO 55 L LANGUAGE 57 LETTER SIZE 53 P PB CNR 58 PB YNR 57 R REC MODE 50 REMAINING 53 S STILL PICT 55 STILL TIME 55 T TC FORMAT 57 TC RESET 57 TIME DISPLAY 53 V VIDEO OUT...

Страница 81: ......

Страница 82: ......

Страница 83: ......

Страница 84: ...Printed in Japan Printed on 70 or more recycled paper using VOC Volatile Organic Compound free vegetable oil based ink GB ...

Отзывы: