21
Connections / Turning the Unit On and Off
Chapter
Cha
p
te
r 2
P
repa
rat
ion
2
Preparation
Connections
1
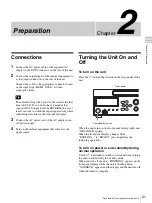
Connect the DC power cable of the supplied AC
adapter to the DC IN connector on the rear of the unit.
2
Connect the output signal of the medical equipment to
a video input connector on the rear of the unit.
Connect the cable to the appropriate connector based
on the signal type (HDMI, DVI-D, S-Video,
composite video).
The default setting when you start the unit for the first
time is DVI-D. If you do not have a monitor that
supports DVI-D input, hold the ENTER button for at
least 5 seconds to switch the input signal setting while
confirming selections in the front panel display.
3
Connect the AC power cord of the AC adapter to an
AC power supply.
4
Turn on the medical equipment that will act as the
signal source.
Turning the Unit On and
Off
To turn on the unit
Press the
1
(on/standby) switch on the front panel of the
unit.
When the unit turns on, the front panel display lights and
“WELCOME” appears.
When the front panel display changes from
“BOOTING...” to “READY” you can perform the
following operations.
To turn on power or enter standby during
normal operation
Use the
1
(on/standby) switch to switch between turning
the unit on and entering the standby mode.
When you turn off the unit, “FINISHING” appears on the
front panel display while the unit is shutting down.
“GOODBYE” appears and the display and the unit turn off
when shutdown is complete.
Tip
1
(on/standby) switch
Front panel


