background image

Ta
bl

e o

co
nte
n

ts

O

per

a

tion 

S

ear

ch

Se
ttin
g

Se
ar

ch

Inde

x

52

GB

Useful functions when 
connecting the camera to your 
computer

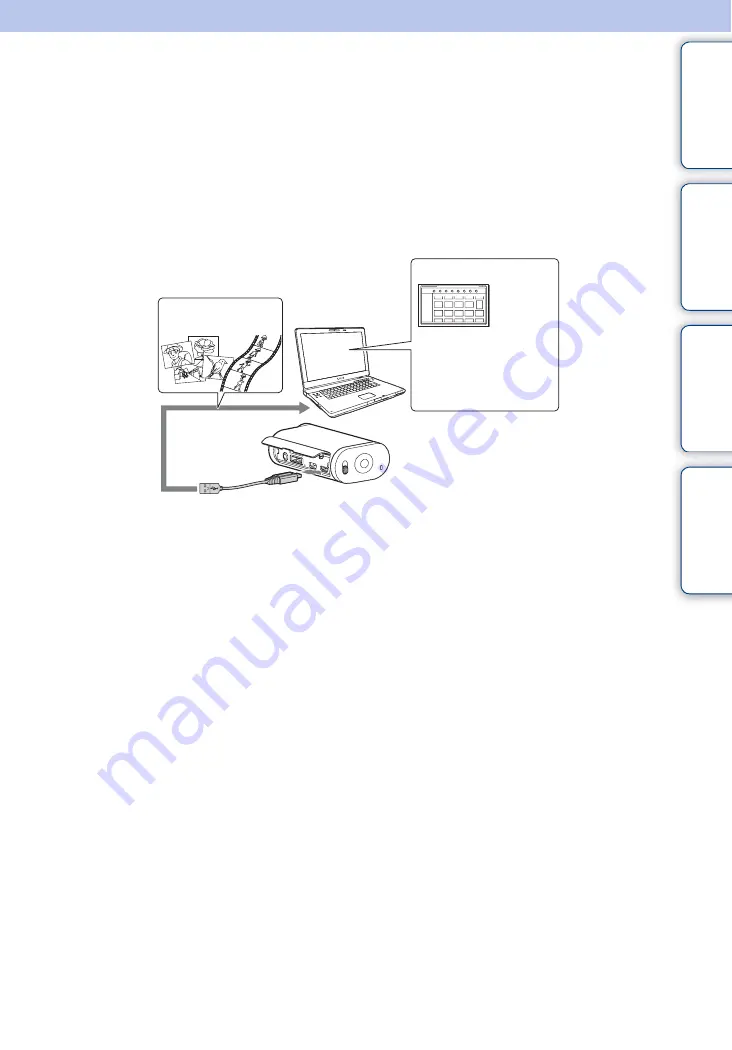
The “PlayMemories Home” software allows you to import movies and still images to your 
computer to use them in a variety of ways.
Visit the following URL to install the software.
www.sony.net/pm/

• Use the micro USB cable (supplied) when connecting the camera to your computer.
• Functions of “PlayMemories Home” that can be used differ for Windows and for Mac.
• For details on other applications, visit the following URL.

Windows: http://www.sony.co.jp/imsoft/Win/
Mac: http://www.sony.co.jp/imsoft/Mac/

Importing images

Playback

Edit
Display movies with 
tracking information 
and movement speed.

Содержание HDR-AS30V

Страница 1: ... 2013 Sony Corporation 4 477 527 12 1 GB Handbook Digital HD Video Camera Recorder HDR AS30 AS30V Table of contents Operation Search Settings Search Index ...

Страница 2: ...arch for information by function Search for information by operation Search for information in a listing of Settings items Search for information by keyword Marks and notations used in this handbook Table of contents Operation Search Settings Search Index The default setting is indicated by Indicates cautions and limitations relevant to the correct operation of the camera z Indicates information t...

Страница 3: ...nual On camera s temperature The camera may get warm due to continuous use but it is not a malfunction On the overheat protection Depending on the camera and battery temperature you may be unable to record movies or the power may turn off automatically to protect the camera A message will be displayed on the display panel before the power turns off or you can no longer record movies Notes on the b...

Страница 4: ...tails check your wireless LAN administrator and or service provider Sony makes no guarantees whatsoever in the provision of a network service Sony bears absolutely no responsibility for damages that may arise from the use of a network service even in the case of claims made by a third party We assume no responsibility whatsoever for any damage caused by unauthorized access to or unauthorized use o...

Страница 5: ...tents Operation Search Settings Search Index 5GB How to enjoy the camera Enjoy more using the accessories Handlebar Mount Waterproof Case Wrist Mount Strap Waterproof Case Handheld Grip with LCD Screen Continued r ...

Страница 6: ...hare them by using the wireless network function of this camera page 45 Connect to TV Connect the camera to a TV with a micro HDMI cable sold separately and enjoy images on the big screen page 43 Record GPS information HDR AS30V only You can view location information and movement speed while viewing movies using PlayMemories Home page 25 ...

Страница 7: ...ings Search 11 Identifying parts 13 Getting started Checking the bundled items 14 Inserting the battery pack 15 Inserting a memory card 18 Recording Mode 20 SteadyShot 21 Field Angle 22 Scene 23 Interval Photo Recording 24 GPS Log HDR AS30V only 25 Airplane Mode 27 Auto Power Off 28 Beep 29 Date Time Setting 30 USB Power Supply 31 Switching NTSC PAL 32 Resetting the Settings 33 Format 34 Using acc...

Страница 8: ... Fi 45 Setting Wi Fi 46 Smart Remote Control 49 Copy 51 Computer Useful functions when connecting the camera to your computer 52 Preparing a computer 53 Starting the PlayMemories Home software 56 Troubleshooting Troubleshooting 57 Warning indicators and messages 61 Others Recordable time 63 Battery pack 65 Using the camera abroad 66 Precautions 67 Specifications 69 ...

Страница 9: ...Table of contents Operation Search Settings Search Index 9GB Index Index 72 ...

Страница 10: ... Mode 20 Deleting images Format 34 Changing the date time and region Date Time Setting 30 Initializing settings Resetting the Settings 33 Viewing on TVs Viewing images on a TV 43 Operating using a smartphone or tablet Smart Remote Control 49 Uploading images to a network service Setting Wi Fi 46 Recording the location information GPS Log HDR AS30V only 25 ...

Страница 11: ... used to change the menu In this manual we usually use the NEXT button for description When using only the PREV button we describe it as the PREV button Setting items Items Display Default setting Recording Mode VIDEO HQ 1920 1080 30p SteadyShot STEDY ON Field Angle ANGLE 120 Scene SCENE NORML Interval Photo Recording LAPSE 5sec Smart Remote Control Wi Fi ON Copy SHARE GPS Log HDR AS30V only GPS O...

Страница 12: ...on to turn on the power To power off select PwOFF and press the ENTER button 2 Press the NEXT button to display SETUP then press the ENTER button 3 Press the NEXT button to display the setting item then press the ENTER button To return to the SETUP menu select BACK and press the ENTER button ...

Страница 13: ...k memory card cover S Memory card insertion slot T Battery ejection lever U Battery insertion slot 1 Used to prevent accidental operation Slide in the direction of b to lock the REC button Slide in the opposite direction to release 2 Touch the mark when you connect the camera to a smartphone equipped with the NFC function NFC Near Field Communication is an international standard of the short range...

Страница 14: ...e number in parentheses indicates the quantity of that item bundled Camera 1 Micro USB cable 1 Rechargeable battery pack NP BX1 1 Waterproof Case SPK AS2 1 Adhesive Mount VCT AM1 Attachment Buckle 1 Flat Adhesive Mount 1 Curved Adhesive Mount 1 Handbook this manual Included in the internal memory of this camera Set of printed documentation ...

Страница 15: ...ert the battery pack Make sure the direction of the battery pack is correct then insert it pushing against the battery ejection lever until the lever locks 3 Close the cover zTo set Auto Power Off function Select A OFF from the SETUP screen then set the Auto Power Off function The default setting is 60sec Change the setting as necessary For details see Auto Power Off page 28 Continued r ...

Страница 16: ... be depleted rapidly Do not leave the camera connected to the computer for a long time Charging the battery pack or the connection with customized or hand built computers is not guaranteed Depending on the type of USB device used charging may not function properly Operation with all computers is not assured If you do not intend to use the camera for an extended period charge the camera once every ...

Страница 17: ...remaining battery charge A remaining charge indicator appears on the upper right of the display panel The displayed remaining charge indicator may not be correct under certain circumstances It takes about one minute until the correct remaining charge indicator appears High Low ...

Страница 18: ...Insert a memory card squarely in the correct orientation otherwise the camera will not recognize it 3 Close the cover microSD card MemoryStickMicro Mark2 media Printed side Terminal side A B zTo eject the memory card Open the cover then lightly push the memory card once zWhat types of memory cards you can use with this camera Operation with all memory cards is not assured Types of memory cards SD ...

Страница 19: ...function may result When inserting or ejecting the memory card be careful to prevent the memory card from popping out and dropping Guaranteed operating temperature of the camera is between 10 C to 40 C 14 F to 104 F However depending on the types of memory cards guaranteed operating temperature varies For details refer to the operating instructions supplied with the memory card Images recorded in ...

Страница 20: ...dyShot is set to ON Audio is not recorded during shooting in the following situation SSLOW 720 120p SLOW 720 60p is set When the Recording Mode is set to VGA the angle of view becomes narrower compared to other Recording Modes Frame rate depends on the NTSC PAL setting page 32 If the NTSC PAL setting is switched to PAL the frame rate will not be displayed Display Recorded image Resolution Imaging ...

Страница 21: ...EDY SteadyShot then press the ENTER button 3 Press the NEXT button to select the setting then press the ENTER button When SteadyShot is set to ON the field angle will be set to 120 When the field angle is set to 170 SteadyShot will be set to OFF When the Recording Mode is set to SSLOW SteadyShot will not be effective SteadyShot is not available when the camera is set to the photo mode Uses SteadyS...

Страница 22: ...GLE Angle then press the ENTER button 3 Press the NEXT button to select the setting then press the ENTER button When SteadyShot is set to ON the field angle will be set to 120 When the field angle is set to 170 SteadyShot will be set to OFF When the Recording Mode is set to VGA the angle of view becomes narrower compared to other Recording Modes Records with a field angle of 170 Records with a fie...

Страница 23: ...first 1 Press the NEXT button to display SETUP then press the ENTER button 2 Press the NEXT button to display SCENE Scene then press the ENTER button 3 Press the NEXT button to select the setting then press the ENTER button Shoots images in the standard quality Shoots images in an image quality suitable for underwater shooting Returns to the SCENE menu t Setting display ...

Страница 24: ...hoto is recorded immediately after recording is started without waiting for the completion of the set interval From the second photo photos will be recorded at the set intervals If it is not possible to record photos at the set intervals the recording will be delayed The maximum number of recordable files is 40 000 in total including movie MP4 files Continues to record photos at about 5 second int...

Страница 25: ...mation when you use the GPS for the first time or use it again after long intervals Triangulating time can be shortened by taking in GPS assist data page 26 Do not cover the GPS sensor with your finger when searching for GPS satellites or when triangulating This decreases the sensitivity of the GPS sensor and triangulation may fail page 13 Sony does not collect location information and routing inf...

Страница 26: ...GPS assist data If connection via Internet is made using the software PlayMemories Home the GPS assist data can be updated automatically If the Date Time Setting is not set or set time is shifted greatly the time for the GPS acquiring location information cannot be shortened If the term of validity of GPS assist data has run out the time until you can record location information cannot be shortene...

Страница 27: ...c If you set the airplane mode to ON an airplane mark will be displayed on the display panel 1 Press the NEXT button to display SETUP then press the ENTER button 2 Press the NEXT button to display PLANE Airplane Mode then press the ENTER button 3 Press the NEXT button to select the setting then press the ENTER button Select this when you are on board an airplane Select this for normal use Returns ...

Страница 28: ... photo recording mode During movie playback or a slideshow Wi Fi connection is in process smart remote control is being connected or an image is being uploaded to a smartphone HDMI connection is being made Supplying power from a connected USB device Connecting a mass storage device In the following cases even if you have selected 10sec or 60sec in the Auto Power Off function the time that elapses ...

Страница 29: ...Press the NEXT button to display BEEP Beep then press the ENTER button 3 Press the NEXT button to select the setting then press the ENTER button All operation sounds are enabled Operation sounds are emitted for the following operations only Power turned on Recording started Recording stopped Shutter pressed A disabled operation was selected or an error occurred All operation sounds are disabled Re...

Страница 30: ...00 for midnight 12 00 for noon When you set the GPS log to ON the camera adjusts date time and region automatically during shooting mode HDR AS30V only Display Default setting 2013 Sets the year 01 Sets the month 01 Sets the day 00 Sets the hour 00 Sets the minutes GMT 0 Sets the region in which you use the camera Regions are defined by time difference from Greenwich Mean Time GMT Notes t Setting ...

Страница 31: ...T button to select the setting then press the ENTER button If you change the setting while the micro USB cable is connected disconnect the cable then reconnect Power may not be supplied properly from a USB device with a power supply capacity of less than 1 5 A Supplies power from a connected device through the micro USB cable Does not supply power from a connected device through the micro USB cabl...

Страница 32: ...s the NEXT button while OK is displayed select CANCL then press the ENTER button When you select PAL the camera behaves as follows SLOW and SSLOW are not available When the camera is set to the movie mode the frame rate is not displayed On the Recording Mode setting screen the frame rate is not displayed When you change the NTSC PAL setting the camera will restart automatically Recording media for...

Страница 33: ...splay SETUP then press the ENTER button 2 Press the NEXT button to display RESET Reset then press the ENTER button 3 Press the ENTER button to display SURE while OK is displayed then press the ENTER button again The camera automatically restarts when resetting is complete To cancel resetting press the NEXT button to select CANCL while SURE or OK is displayed then press the ENTER button t Setting d...

Страница 34: ...RMT Format then press the ENTER button 3 Press the ENTER button to display SURE while OK is displayed then press the ENTER button again Formatting starts and DONE appears when formatting finishes To cancel formatting press the NEXT button to select CANCL while SURE or OK is displayed then press the ENTER button Save important images before formatting Do not perform any of the following operations ...

Страница 35: ... a beach Attachment method 1 Slide the buckle lock in the direction of 1 and hold it then hold the circled parts and swing out the buckle in the direction of 2 2 Open the case cover 3 Insert the camera in the case body Release the bREC HOLD switch on the camera Waterproof Case SPK AS2 Case cover Cord attachment hole Case body REC button HOLD lever Tripod screw hole Buckle Buckle lock NEXT button P...

Страница 36: ...ater temperature range of 0 C to 40 C 32 F to 104 F Sometimes waterproof performance is lost if the Waterproof Case is subject to a strong shock such as from being dropped We recommend the Waterproof Case be inspected at an authorized repair shop chargeable If you use the camera at a water depth of 5 m or more or in marine sports use the Waterproof Case SPK AS1 sold separately You cannot operate t...

Страница 37: ...ony dealer immediately Repair costs must be borne by the customer In the unlikely event that a malfunction of the Waterproof Case causes damage due to water leakage Sony does not guarantee against damages to the equipment contained in it camera battery pack etc and the recorded contents nor expenses entailed in the photography O ring The Waterproof Case uses an O ring to maintain its water resista...

Страница 38: ...hly using lukewarm water Wipe the inside of the Waterproof Case with a soft dry cloth Do not wash it with water Be sure to perform the above maintenance each time you use the Waterproof Case Do not use any type of solvent such as alcohol benzine or thinner for cleaning as this might damage the surface finish of the Waterproof Case When storing the Waterproof Case To prevent deterioration of the O ...

Страница 39: ...h the Attachment Buckle with the Waterproof Case set in step 1 to the Flat Adhesive Mount or Curved Adhesive Mount by sliding it until it clicks into place 3 Remove dust moisture and oily substances completely from the surface where the Adhesive Mount is to be attached 4 Peel off the release paper on the back and fix the Adhesive Mount in the desired location Adhesive power reaches its maximum str...

Страница 40: ... or oily substances are attached adhesive strength may be impaired and the item could detach with slight impact Use the appropriate Adhesive Mount flat or curved for the surface where the camera will be located If the mount is not suitable for the surface it may detach by slight impact Thread a suitable cord through the attachment hole of the Waterproof Case then attach the cord to an item you int...

Страница 41: ...ss NEXT button to display MOVIE 2 Press the REC button to start shooting 3 Press the REC button again to stop shooting 1 Turn on the power then press NEXT button to display PHOTO 2 Press the REC button to start shooting After you start shooting the camera records still images at regular intervals until you stop shooting 1 Turn on the power then press NEXT button to display INTVL 2 Press the REC bu...

Страница 42: ...omatically Leave the camera for 10 minutes or longer to allow the temperature inside the camera to decrease to a safe level Under high ambient temperatures the temperature of the camera rises quickly When the temperature of the camera rises the image quality may deteriorate It is recommended that you wait until the temperature of the camera drops before continuing to shoot The surface of the camer...

Страница 43: ...ENTER button 6 Press the NEXT button to display MP4 or PHOTO then press the ENTER button Select MP4 to play back movies or PHOTO to view photos Press the ENTER button again to stop playback Connect the micro HDMI jack of the micro HDMI cable sold separately to the HDMI OUT jack of the camera Do not connect the output terminal of the camera to that of other devices This may result in malfunction So...

Страница 44: ... PREV NEXT button Pause movies only Press the PREV and NEXT buttons simultaneously If you press and hold the PREV or NEXT button during pause slow rewind or slow forward can be performed Adjusting the volume movies only Press and hold the PREV and NEXT buttons simultaneously Starting a slideshow photos only Press the PREV and NEXT buttons simultaneously Ending playback Press the ENTER button PREV ...

Страница 45: ...OS 4 3 or later One touch functions NFC are not available Search for PlayMemories Mobile on App Store then install it An NFC enabled smartphone or tablet is required for using One touch functions NFC Have ready the sticker attached to the Operating Guide on which the ID password is printed It is not necessary when using one touch connect by a smartphone Installing the PlayMemories Mobile software ...

Страница 46: ...of the smartphone to the N Mark of the camera If there is no N Mark on the smartphone refer to the instruction manual of the smartphone for the touch area If the camera and the smartphone cannot be connected by NFC see Android iPhone not supporting NFC and connect them When the airplane mode is set to ON the Wi Fi function is not available Android supporting NFC Notes Setting display zAbout NFC NF...

Страница 47: ...shooting mode MOVIE Movie mode PHOTO Photo mode INTVL Interval photo recording mode Android 1 Start PlayMemories Mobile 2 Select the SSID as printed on the sticker attached to the Operating Guide 3 Input the password as printed on the sticker attached to the Operating Guide First time only Android iPhone not supporting NFC Continued r ...

Страница 48: ...tphone then select Wi Fi and the SSID of the camera 2 Input the password as printed on the sticker attached to the Operating Guide First time only 3 Confirm the connection to the SSID as printed on the sticker attached to the Operating Guide 4 Return to the home screen and start PlayMemories Mobile ...

Страница 49: ... ENTER button 4 Select MOVIE PHOTO or INTVL 5 Activate a suitable application on the smartphone and connect to the camera through Wi Fi For details on the smartphone setting see Setting Wi Fi on page 46 6 Operate the camera by the smartphone Sample smartphone screen display Operates by the smartphone Does not operate by the smartphone Returns to the Wi Fi menu t Setting display Features of the sma...

Страница 50: ...movie mode only Changing the SteadyShot setting Changing the field angle setting To use the smart remote control function a compatible application is necessary on your smartphone See page 45 for details on downloading applications The camera battery charge may be consumed quickly if the camera is operated by a smartphone If a Wi Fi Direct connection request from a Wi Fi Direct device appears on th...

Страница 51: ...the Wi Fi connection For details on the smartphone setting see Setting Wi Fi on page 46 3 Change the mode of the camera to the copy mode on the PlayMemories Mobile screen of the smartphone 4 Select the image s to be copied Before activating the smart remote control function update the PlayMemories Mobile software to the latest ver 3 1 or later You can copy images to your smartphone when the camera...

Страница 52: ...ays Visit the following URL to install the software www sony net pm Use the micro USB cable supplied when connecting the camera to your computer Functions of PlayMemories Home that can be used differ for Windows and for Mac For details on other applications visit the following URL Windows http www sony co jp imsoft Win Mac http www sony co jp imsoft Mac Importing images Playback Edit Display movie...

Страница 53: ...a SP2 Windows 7 SP1 Windows 8 CPU 2 Intel Core Duo 1 66 GHz or faster or Intel Core 2 Duo 1 66 GHz or faster Memory 1 GB or more Hard disk Disk space required for installation Approximately 600 MB Display Minimum 1 024 768 dots Others USB port this must be provided as standard Hi Speed USB USB 2 0 compatible Either NTFS or exFAT file system is recommended as the hard disk file system OS 1 Mac OS X...

Страница 54: ...er connect the camera to the computer and register the camera with the PlayMemories Home software Functions that can be used with this camera will then be available If the PMB Picture Motion Browser software is installed on your computer it will be overwritten by the PlayMemories Home software For details on PlayMemories Home select PlayMemories Home Help Guide on the software or visit the PlayMem...

Страница 55: ...f the camera using a computer If you do this the camera will not operate correctly When you access the camera from the computer use the PlayMemories Home software Do not directly modify the files or folders on the camera from the computer The image files may be damaged or may not be played back Operation is not guaranteed if you operate the data on the memory card of the camera from the computer U...

Страница 56: ...PlayMemories Home icon on the computer screen The PlayMemories Home software starts up 2 For how to use PlayMemories Home refer to the help of the PlayMemories Home zPlease register your product Sony asks you to register your product for enhanced support For Mac users use the Mac application Product registration software ...

Страница 57: ...Index 57GB Troubleshooting If you experience trouble with the camera try the following solutions 1 Check the items on pages 58 to 62 2 Turn the power off and then on again 3 Consult your Sony dealer or local authorized Sony service facility Continued r ...

Страница 58: ... pack may need to be replaced Consult your nearest Sony dealer Cannot charge the camera Turn off the camera and make the USB connection Disconnect the micro USB cable supplied and then reconnect it Use the micro USB cable supplied Charge the battery pack in an ambient temperature of 10 C to 30 C 50 F to 86 F Turn on the computer and connect the camera Release the computer from sleep or hibernation...

Страница 59: ...ired Update GPS assist data As the positions of GPS satellites vary constantly it may take longer to determine the location or the receiver may not be able to determine the location at all depending on the location and time you use the camera GPS is a system for determining geographic location by triangulating radio signals from GPS satellites Avoid using the camera in places where radio signals a...

Страница 60: ...es on your computer Consult the computer or software manufacturer It takes too much time to transfer an image Microwave ovens or Bluetooth enabled devices use the 2 4 GHz wavelength and could hinder the communication If such devices are in the vicinity move the camera away from those devices or shut those devices down The lens gets fogged Moisture condensation has occurred Turn off the camera and ...

Страница 61: ...yable images LowPw There is no remaining battery charge BATT Battery charge is insufficient for operation The battery pack is delivering current exceeding the maximum discharge current beyond which proper operation of the camera cannot be assured when an external microphone etc is connected A different battery pack is detected when the camera is powered on Battery pack deterioration is detected FU...

Страница 62: ...Table of contents Operation Search Settings Search Index 62GB PLANE When the airplane mode is set to ON GPS and Wi Fi cannot be used page 27 ...

Страница 63: ... use a fully charged battery pack Approximate time when images are played back on a TV connected with a micro HDMI cable sold separately MP4AVC 2ch Average In the SLOW SSLOW setting the above figure indicates the recordable time when shooting and differs from actual playback time When using a Sony memory card Estimated duration of recording and playback for each battery pack Units minutes Battery ...

Страница 64: ... approximately 3 hours When using a Sony memory card The number of recordable photos for the memory card shown is for the maximum image size for your camera The actual number of recordable photos is displayed on the LCD screen during shooting The number of recordable photos for a memory card may vary depending on the shooting conditions Notes Estimated number of recordable photos unit image 8GB 16...

Страница 65: ...pare battery packs handy for two times or three times the expected shooting time and making trial shots before taking the actual shots You may not be able to turn on the camera or the battery pack may not be effectively charged if the terminal section of the battery pack is dirty In this case wipe any dust with a soft cloth lightly to clean the battery pack Do not expose the battery pack to water ...

Страница 66: ...ustralia Austria Argentina Belgium Bulgaria Brazil China Croatia Czech Republic Denmark Finland France French Guiana Germany Greece Hong Kong Hungary Indonesia Iran Iraq Italy Kuwait Malaysia Monaco Netherlands New Zealand Norway Paraguay Poland Portugal Romania Russia Singapore Slovakia Spain Sweden Switzerland Thailand Turkey Ukraine United Kingdom Uruguay Vietnam etc World time difference Time ...

Страница 67: ... above On cleaning Clean the camera surface with a soft cloth slightly moistened with water then wipe the surface with a dry cloth Do not use any of the following as they may damage the finish or the casing Chemical products such as thinner benzine alcohol disposable cloths insect repellent sunscreen or insecticide etc Do not touch the camera with any of the above on your hand Do not leave the cam...

Страница 68: ...row streets surrounded by buildings In underground locations locations surrounded by dense trees under an elevated bridge or in locations where magnetic fields are generated such as near high voltage cables Near devices that generate radio signals of the same frequency band as the camera near 1 5 GHz band mobile telephones etc If you take images with the GPS log set to ON and upload those images t...

Страница 69: ... pack 3 6 V NP BX1 supplied Multi Micro USB Terminal 5 0 V USB charging Multi Micro USB Terminal DC 5 0 V 500 mA 800 mA Charging time Via a computer NP BX1 supplied Approx 245 min Via a AC UD20 sold separately NP BX1 supplied Approx 175 min Power consumption 1 9 W when the movie image size is 1920 1080 30p Operating temperature 10 C to 40 C 14 F to 104 F Storage temperature 20 C to 60 C 4 F to 140...

Страница 70: ...12 5 mm 58 5 mm 2 in 1 2 in 2 3 8 in W H D excluding protrusions Mass Approx 14 g 0 5 oz Curved Adhesive Mount Dimensions Approx 50 0 mm 16 0 mm 58 5 mm 2 in 21 32 in 2 3 8 in W H D excluding protrusions Mass Approx 16 g 0 6 oz Design and specifications are subject to change without notice ...

Страница 71: ...r countries iOS is a registered trademark or trademark of Cisco Systems Inc and or its affiliates in the United States and certain other countries Android Google Play are trademarks of Google Inc iPhone is a trademark or a registered trademark of Apple Inc Wi Fi the Wi Fi logo Wi Fi PROTECTED SET UP are registered trademarks of the Wi Fi Alliance In addition system and product names used in this m...

Страница 72: ...Interval photo recording 24 Interval photo recording mode 41 INTVL 41 L LAPSE 24 M MOVIE 41 Multi Micro USB Terminal 54 N NEXT button 11 NFC 46 Number of recordable photos 64 P PHOTO 41 PLANE 27 PLAY 43 PREV button 11 R REC button 41 REC HOLD switch 41 REC access lamp 41 Recordable time of movies 63 Recording mode 20 RESET 33 Resetting the settings 33 S SCENE 23 Scene 23 Settings 11 Shooting Movie...

Страница 73: ...Table of contents Operation Search Settings Search Index 73GB V V SYS 32 VIDEO 20 View Movies 43 Still image 43 W Warning messages 61 Wi Fi 46 ...

Отзывы: