background image

Pla
yba
ck

Playback

35

Playing back with 
ease 

– Easy Handycam

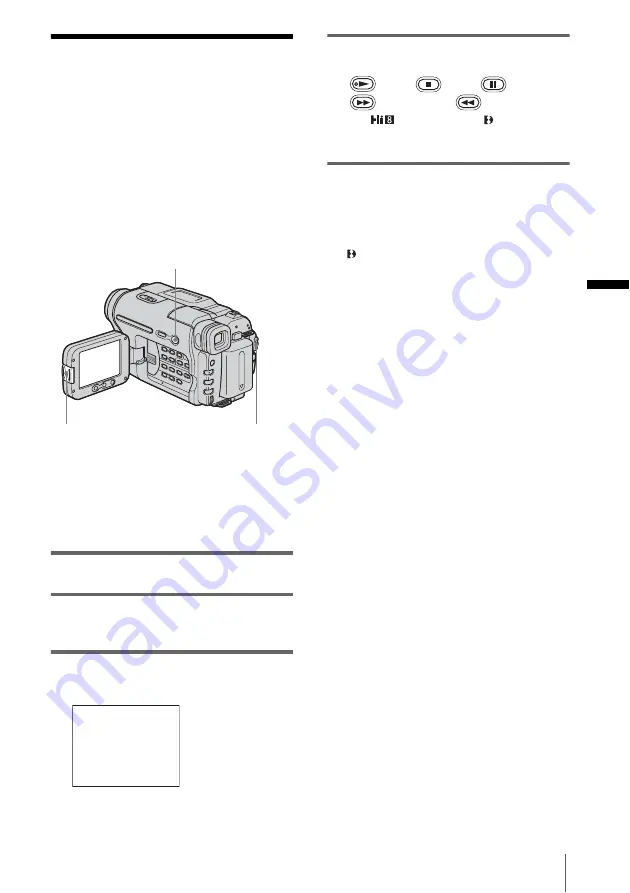
Easy Handycam operation allows easy 
playback for even first time users by 
providing only the basic functions for 
playback. Also screen font size increases for 
easy viewing. Make sure you have a recorded 
cassette inserted into your camcorder.

z

Tip

• Buttons that do not work during Easy Handycam 

operation have a dot beside them on your camcorder. 
Also, only menu items that are available during Easy 
Handycam operation are displayed when MENU is 
pressed.

1

Press OPEN and open the LCD panel. 

2

Slide the POWER switch repeatedly to 
select the PLAY/EDIT mode.

3

Press EASY.

EASY lights up in blue.

4

Play back a tape.

The following buttons can be operated.

 (play)/

 (stop)/

 (pause)/

 (fast forward)/

 (rewind)

For TRV238E/438E/

TRV285E:

You can operate those operations and 
SLOW 

y

 on the Remote Commander.

To cancel Easy Handycam operation

Press EASY again.

b

Notes

For TRV270E/285E:
• During Easy Handycam operation, you cannot 

connect the USB cable to your camcorder.

• You cannot use Easy Handycam operation together 

with USB Streaming.

POWER switch

EASY

OPEN

Easy  Handycam

operation

ON

Содержание Handycam CCD-TRV238

Страница 1: ...2 515 260 14 1 2005 Sony Corporation Camera Operations Guide Read this first Video Camera Recorder Digital Video Camera Recorder CCD TRV238E TRV438E DCR TRV270E TRV285E ...

Страница 2: ...ith separate collection systems This symbol on the product or on its packaging indicates that this product shall not be treated as household waste Instead it shall be handed over to the applicable collection point for the recycling of electrical and electronic equipment By ensuring this product is disposed of correctly you will help prevent potential negative consequences for the environment and h...

Страница 3: ...l camera and thus may appear different from what you see In this instruction manual each model is indicated as follows CCD TRV238E TRV238E CCD TRV438E TRV438E DCR TRV270E TRV270E DCR TRV285E TRV285E Instructions with no specific model names are for all models Instructions with specific model names are for the indicated models only Before you start reading this manual check the model name of your c...

Страница 4: ...ape 18 Step 7 Setting the screen language 19 Recording Recording movies 21 Recording for a longer time 22 Using zoom 23 Using the built in light 23 Recording in mirror mode 24 Superimposing the date and time on pictures TRV238E 438E 24 Recording still images Tape photo recording TRV270E 285E 25 Recording with ease Easy Handycam 26 Adjusting the exposure 27 Adjusting the exposure for backlit subjec...

Страница 5: ...ck with ease Easy Handycam 35 Various playback functions 36 Displaying the screen indicators 36 Displaying the date time and camera settings data Data code TRV270E 285E 36 Playing the picture on a TV 38 Locating a scene on a tape for playback TRV285E 39 Searching quickly for a desired scene Zero set memory 39 Searching for a scene by date of recording Date search 40 Searching for a still image Pho...

Страница 6: ...ubbing selected scenes from a tape Digital program editing TRV270E 285E 67 Using with your computer Features TRV270E 285E 72 Installing the software and First Step Guide on a computer TRV270E 285E 74 Using First Step Guide TRV270E 285E 78 Creating a DVD Direct Access to Click to DVD TRV270E 285E 79 Troubleshooting Troubleshooting 82 Warning indicators and messages 92 Additional Information Using y...

Страница 7: ...7 ...

Страница 8: ...battery pack in the direction of the arrow until it clicks a Slide the OPEN EJECT lever in the direction of the arrow and open the lid until it clicks The cassette compartment comes out automatically b Insert the cassette with its window side facing up then push the center of the back of the cassette c Press Close the cassette lid after the cassette compartment slides back in by itself OPEN EJECT ...

Страница 9: ...ur camcorder p 104 b Press OPEN and open the LCD panel c While pressing the green button slide the POWER switch down to light up the CAMERA lamp The power turns on d Press REC START STOP Recording starts To change to standby mode press REC START STOP again You can alsouseREC START STOP of the LCD panel a Slide the POWER switch repeatedly until the PLAY EDIT lamp lights up b Press rewind c Press pl...

Страница 10: ... allows easy recording playback for even first time users by providing only the basic functions for recording playback For details see instructions for each operation See page 26 for recording page 35 for playback Press EASY when recording playing back EASY lights up in blue 1 and screen font size increases 2 during Easy Handycam operation Easy Handycam operation ON ...

Страница 11: ...ens cap 1 See page 104 on how to attach the lens cap Shoulder strap 1 See page 107 on how to attach the shoulder strap Wireless Remote Commander 1 A button type lithium battery is already installed RMT 833 TRV238E 438E RMT 830 TRV285E A V connecting cable 1 Monaural TRV238E 438E Stereo TRV270E 285E USB cable 1 TRV270E 285E Rechargeable battery pack NP FM30 1 CD ROM Picture Package Ver 1 5 1 TRV270...

Страница 12: ...cket when using the AC Adaptor Disconnect the AC Adaptor from the wall socket immediately if any malfunction occurs Do not install the appliance in a confined space such as a bookcase or build in cabinet 1 Lift up the viewfinder 2 Attach the battery pack by sliding it in the direction of the arrow until it clicks 3 With the v mark on the DC plug facing up connect the AC Adaptor to the DC IN jack o...

Страница 13: ...Info You can check the battery s current charge level and its current remaining recording time both during charging or when the power is turned off 1 Set the POWER switch to CHG OFF 2 Press OPEN and open the LCD panel 3 Press DISPLAY BATT INFO The battery information appears for about 7 seconds Keep the button pressed to view it for about 20 seconds A Battery charge level Displays approximate rema...

Страница 14: ...RV270E 285E Battery pack NP FM30 supplied 145 NP FM50 150 NP QM71D 260 NP QM91D 360 Battery pack Continuous recording time Typical recording time NP FM30 supplied 115 55 NP FM50 185 90 NP QM71D 445 220 NP QM91D 670 335 Battery pack Continuous recording time Typical recording time NP FM30 supplied 90 50 NP FM50 145 80 NP QM71D 355 220 NP QM91D 535 300 Battery pack Continuous recording time Typical ...

Страница 15: ...y to run out While you are using the AC Adaptor the battery pack will not lose its charge even when it is attached to your camcorder PRECAUTION Even if your camcorder is turned off AC power mains is still supplied to it while connected to the wall socket via the AC Adaptor Connect your camcorder as shown in Charging the battery pack p 12 Step 3 Turning the power on You need to slide the POWER swit...

Страница 16: ... with the SEL PUSH EXEC dial then press the dial 5 Press MENU z Tips If you rotate the LCD panel 180 degrees to the lens side you can close the LCD panel with the LCD screen facing out If you are using the battery pack for power source you can adjust the brightness by selecting LCD B L in the LCD SET menu p 52 The recorded picture will not be affected by this setting You can turn off the operation...

Страница 17: ... OPEN and open the LCD panel Proceed to step 6 when you set the clock for the first time 3 Press MENU 4 Turn the SEL PUSH EXEC dial to select SETUP MENU then press the dial 5 Turn the SEL PUSH EXEC dial to select CLOCK SET then press the dial 6 Turn the SEL PUSH EXEC dial to set Y year then press the dial You can set any year up to the year 2079 7 Set M month D day H hour and M minute in the same ...

Страница 18: ...igital8 video cassettes on your camcorder For details on these cassettes such as write protection see page 95 b Notes Do not force the cassette into the compartment This may cause a malfunction of your camcorder For TRV270E 285E The recording time when you use your camcorder is 2 3 of the indicated time on Hi8 tape If you select the LP mode in the menu settings the recording time is the indicated ...

Страница 19: ...assette compartment automatically slides back in 3 Close the lid Step 7 Setting the screen language You can select the language to be used on the LCD screen 1 Turn on your camcorder 2 Press OPEN to open the LCD panel 3 Press MENU 4 Turn the SEL PUSH EXEC dial to select SETUP MENU then press the dial Window side Push the center of the back of the cassette lightly POWER switch OPEN SEL PUSH EXEC dia...

Страница 20: ...l to select the desired language then press the dial 7 Press MENU z Tip Your camcorder offers ENG SIMP simplified English for when you cannot find your native tongue among the options STBY SETUP MENU CLOCK SET USB STREAM LTR SIZE LANGUAGE DEMO MODE MENU END DEUTSCH ENGL I SH ENG S I MP ESPAÑOL FRANÇA I S I TAL I ANO ...

Страница 21: ... Pull the lens cap string down and attach it to the grip belt 2 Press OPEN and open the LCD panel 3 Slide the POWER switch until the CAMERA lamp lights up Your camcorder is set to the standby mode 4 Press REC START STOP Recording starts REC appears on the LCD screen and the Camera recording lamp lights up Press REC START STOP again to stop recording To turn the power off Slide the POWER switch up ...

Страница 22: ...ry power A SHUT OFF p 58 To restart recording slide the POWER switch down to select CAMERA and then press REC START STOP z Tips You can also use REC START STOP on LCD frame to record moving pictures It is useful when you record from a low angle or record by yourself in the mirror mode To press REC START STOP on LCD frame support the LCD panel with your hand To ensure smooth transition on a tape fr...

Страница 23: ...ss the zoom buttons on LCD frame support the LCD panel with your hand Using the built in light You can use the built in light to suit your shooting situation The recommended distance between the subject and camcorder is about 1 5 m 5 feet Press LIGHT repeatedly to select a setting The settings are displayed cyclically in the following order No indicator displayed Always records without using the b...

Страница 24: ... 180 degrees towards the subject A mirror image of the subject appears on the LCD screen but the picture will be normal when recorded b Notes For TRV238E 438E appears in the viewfinder and on the LCD screen Xz appears in the standby mode and z appears in the recording mode Some of other indicators appear mirror reversed and others are not displayed During recording in the mirror mode DATE and TIME...

Страница 25: ...icture will become a still image Recording does not start at this point 5 Press PHOTO fully A shutter sound is heard and the image is recorded with sound for 7 seconds The still image is displayed on the screen until recording is completed To turn the power off Slide the POWER switch up to CHG OFF b Note appears when the tape photo recording does not work z Tip You can record about 510 images in t...

Страница 26: ...de the POWER switch to select the CAMERA mode You can record movies only 4 Press EASY EASY lights up in blue 5 Press REC START STOP Recording starts REC appears on the LCD screen and the Camera recording lamp lights up Press REC START STOP again to stop recording To turn the power off Slide the POWER switch up to CHG OFF To cancel Easy Handycam operation Press EASY again b Notes You cannot switch ...

Страница 27: ...d when you press EXPOSURE p 27 Adjusting the exposure manually You can fix the brightness of a picture at the best exposure When recording indoors on a clear day for instance you can avoid backlight shadows on people next to the window by manually fixing the exposure to that of the wall side of the room 1 Press EXPOSURE in CAMERA mode The exposure indicator appears on the screen 2 Turn the SEL PUS...

Страница 28: ... with PROGRAM AE Manual exposure Adjust the focus manually when it is hard to focus automatically Do not cover the infrared port with your fingers or other objects Remove the conversion lens optional if it is attached Depending on the shooting conditions or circumstances colors may not be reproduced properly z Tip If you record subjects in complete darkness set N S LIGHT to ON in the menu settings...

Страница 29: ...ject using a tripod 1 Press FOCUS in CAMERA mode 9 appears 2 Turn the SEL PUSH EXEC dial to sharpen focus 9 changes to when the focus cannot be adjusted any further 9 changes to when the focus cannot be adjusted any closer Tips for focusing manually It is easier to focus on the subject when you use the zoom function Move the power zoom lever towards T telephoto to adjust the focus and then towards...

Страница 30: ...ADER until the desired fader indicator flashes in the standby mode to fade in or during recording to fade out 3 Press REC START STOP The fader indicator stops flashing and disappears when the fade is complete To cancel the operation In step 2 press FADER repeatedly until the indicator disappears b Notes For TRV270E 285E You cannot use the FADER function together with Tape photo recording FRAME REC...

Страница 31: ...urn the SEL PUSH EXEC dial to select the next character and enter the character in the same manner 6 When you have finished entering characters turn the SEL PUSH EXEC dial to select O K then press the dial The title is stored in memory 2 Turn the SEL PUSH EXEC dial to select the title you want to insert then press the dial To insert an original title turn the SEL PUSH EXEC dial to select CUSTOM1 o...

Страница 32: ...emain stored in memory Turn the power back on then start again from step 1 to continue superimposing the title For TRV238E 438E The date and time or either of them may not be displayed depending on the size or position of the title z Tip To change a created title select the title in step 1 Turn the SEL PUSH EXEC dial to select CREATE EDIT and press the dial then reselect characters Searching for t...

Страница 33: ...ress rewind to go to the point you want to view 4 Press play to start playback To adjust the volume Press either of the two buttons on VOLUME When you close the LCD panel sound is turned off To turn the volume down To turn the volume up To stop playback Press stop To pause Press pause during playback Press pause or play to restart the playback Playback stops automatically when pause mode continues...

Страница 34: ...rward or rewind during playback To resume normal playback release the button To view the picture while fast forwarding or rewinding Skip scan Keep on pressing fast forward or rewind while fast forwarding or rewinding the tape To resume fast forwarding or rewinding release the button To view pictures at slow speed slow playback For TRV238E 438E TRV285E Press SLOW y on the Remote Commander during pl...

Страница 35: ... Handycam operation are displayed when MENU is pressed 1 Press OPEN and open the LCD panel 2 Slide the POWER switch repeatedly to select the PLAY EDIT mode 3 Press EASY EASY lights up in blue 4 Play back a tape The following buttons can be operated play stop pause fast forward rewind For TRV238E 438E TRV285E You can operate those operations and SLOW y on the Remote Commander To cancel Easy Handyca...

Страница 36: ...a settings data Data code TRV270E 285E During playback you can view the date time data DATE TIME and the camera settings data CAM DATA that are automatically recorded while recording pictures on a tape 1 Slide the POWER switch repeatedly to select the PLAY EDIT mode 2 Press MENU during playback or playback pause 3 Turn the SEL PUSH EXEC dial to select OTHERS then press the dial 4 Turn the SEL PUSH...

Страница 37: ...p 5 Camera settings data display In the date time data display the date and time is displayed in the same area If you record the picture without setting the clock and will appear A SteadyShot off B Exposure C White balance D Gain E Shutter speed F Aperture value 100 AWB F1 6 9dB AUTO 0 00 00 00 60min 1 2 3 4 5 6 ...

Страница 38: ...nnect the supplied AC Adaptor to the wall socket for the power supply p 12 Refer also to the instruction manuals supplied with the devices to be connected To copy to another tape see page 62 For TRV270E 285E Signal flow A V OUT jack A V connecting cable supplied VCRs or TVs Yellow Black Signal flow A V OUT jack A V connecting cable supplied VCRs or TVs Yellow White Red ...

Страница 39: ...V VCR has a 21 pin connector EUROCONNECTOR To play back movies connect your camcorder to the TV VCR using the 21 pin adaptor optional For TRV238E 438E For TRV270E 285E Locating a scene on a tape for playback TRV285E Searching quickly for a desired scene Zero set memory 1 During playback press ZERO SET MEMORY on the Remote Commander at the point you want to locate later on The tape counter is reset...

Страница 40: ...ss STOP on the Remote Commander b Notes If one day s recording is less than 2 minutes your camcorder may not accurately find the point where the recording date changes The Date search will not function correctly when there is a blank section between recorded sections on the tape Searching for a still image Photo search You can locate the still image you have recorded on a tape 1 Slide the POWER sw...

Страница 41: ...ch repeatedly to select the PLAY EDIT mode 2 Press SEARCH M on the Remote Commander repeatedly to select PHOTO SCAN 3 Press previous next on the Remote Commander Each photo will be played back for about 5 seconds To cancel the operation Press STOP on the Remote Commander b Note If a tape has a blank section between recorded sections the Photo scan function may not work correctly SEARCH M STOP ...

Страница 42: ...SH EXEC dial to select the desired item then press the dial The available menu items vary depending on the position of the POWER switch Unavailable items will be grayed out 5 Turn the SEL PUSH EXEC dial to select the desired mode then press the dial 6 Press MENU to hide the menu screen If you want to change other items select RETURN and press the dial then repeat steps from 3 to 5 POWER switch SEL...

Страница 43: ...ot using PROGRAM AE SPOTLIGHT spotlight Select to prevent people s faces from appearing excessively white when subjects are lit by strong light such as in a theater or at a wedding PORTRAIT soft portrait Select to bring out the subject such as people or flowers while creating a soft background SPORTS sports lesson Select to minimize shake when shooting fast moving subjects such as in tennis or gol...

Страница 44: ...n not using the Picture effect setting NEG ART Select to record play the picture with the color and brightness of the picture reversed SEPIA Select to record play the picture appearing in sepia B W Select to record play the picture appearing in monochrome black and white SOLARIZE Select to record play the picture looking like an illustration with strong contrast SLIM Select to record the picture a...

Страница 45: ...E 285E You can copy pictures edited using picture effects to another tape p 62 AUTO SHTR GON Select to automatically activate the electronic shutter to adjust the shutter speed when recording in bright conditions OFF Select when recording without using the electronic shutter ...

Страница 46: ... to a level greater than 20 times while recording on a tape Note that the image quality decreases when you are using the digital zoom This function is useful when recording enlarged pictures of a distant subject such as a bird CAMERA SET D ZOOM 1 6 9W I DE STEADYSHOT N S L I GHT MENU END GOFF Select to deactivate the digital zoom Up to 20 times zoom is performed optically 40 Select to activate the...

Страница 47: ...en you play a picture in 4 3 mode it appears as you have seen on the LCD screen or in the viewfinder GOFF Standard setting to record pictures to play back on a 4 3 TV The recorded picture will not be wide CINEMA Select to record a picture to be played back in CINEMA mode 16 9 FULL Select to record a picture to be played back on a 16 9 wide TV When viewed on the LCD screen viewfinder When viewed on...

Страница 48: ...uals supplied with your TV Picture appears in full screen when the wide screen TV switches to full mode In 4 3 mode When you play a picture in the wide mode it appears as you have seen on the LCD screen z Tip The SteadyShot does not work If you set 16 9 WIDE to ON in the menu settings when the SteadyShot is working flashes and the SteadyShot does not function GOFF Standard setting to record pictur...

Страница 49: ...cording a fast moving subject When the zoom position is set to the W end side N S LIGHT When using the NightShot plus function to record you can record clearer pictures by using the NightShot Light to emit infrared rays invisible GON Standard setting enable the SteadyShot function If you select a function that STEADYSHOT cannot work with appears OFF Select to deactivate the SteadyShot function Sel...

Страница 50: ...order However you cannot record a dual sound track on this camcorder The setting returns to STEREO when you disconnect the power source from your camcorder for more than 5 minutes EDIT For TRV238E 438E Picture degradation is minimized when you dub or edit a tape using the camcorder as the playback device b Note The setting returns to OFF when you disconnect the power source from your camcorder for...

Страница 51: ...e Only the originally recorded sound will be heard when you disconnect the power source from your camcorder for more than 5 minutes GON Select to correct jitter horizontal picture shake during playback OFF Select to not compensate picture distortion when playing back a tape on which you have dubbed repeatedly or recorded TV game signals GON Select to eliminate color noise in the picture OFF Select...

Страница 52: ... 16 for details LCD B L You can adjust the brightness of the LCD screen s backlight The recorded picture will not be affected by this setting b Notes When you connect your camcorder to outside power sources BRIGHT is automatically selected for the setting When you select BRIGHT battery life is reduced by about 10 percent during recording LCD COLOR Turn the SEL PUSH EXEC dial to adjust the color on...

Страница 53: ...rted or the time code may not be written properly between the scenes AUDIO MODE For TRV270E 285E ORC TO SET For TRV238E 438E You can automatically adjust the recording condition to get the best possible recording When you select ORC TO SET in the menu settings START STOP KEY appears Press REC START STOP ORC appears on the screen and adjustment starts Your camcorder returns to the standby mode when...

Страница 54: ...not be indicated correctly The last scene will be longer than other scenes GAUTO Select to display the remaining tape bar For about 8 seconds after you turn on your camcorder with the cassette inserted and your camcorder calculates the remaining amount of tape For about 8 seconds after play is pressed For about 8 seconds after DISPLAY BATT INFO is pressed to display the screen indicators For the p...

Страница 55: ...USH EXEC dial to select REC TIME then press the dial 5 Turn the SEL PUSH EXEC dial to select the desired recording time 0 5 1 1 5 2 seconds then press the dial 6 Turn the SEL PUSH EXEC dial to select RETURN then press the dial 7 Turn the SEL PUSH EXEC dial to select ON then press the dial 8 Press MENU to hide the menu settings flashes 9 Press REC START STOP The interval recording starts lights up ...

Страница 56: ...ly appear more than once a day if you set the date and time you eject and insert the tape again you stop recording within 10 seconds you set AUTO DATE to OFF once and set it back to ON in the menu settings USB STREAM For TRV270E 285E You can connect a USB cable supplied to your camcorder and view the picture displayed on the screen of your camcorder on your computer USB Streaming For details refer...

Страница 57: ...iew the demonstration in about 10 minutes b Note You can view the demonstration only when the NIGHTSHOT PLUS switch is set to OFF z Tips The demonstration will be suspended in situations such as those described below When a cassette is inserted When a mode other than CAMERA is selected If A SHUT OFF is set to 5 min when the camcorder is used on the battery pack the power will be turned off after a...

Страница 58: ...ginally set time BEEP A SHUT OFF OTHERS WORLD TIME BEEP A SHUT OFF COMMANDER DISPLAY REC LAMP MENU END GOFF Select not to display date time and the camera settings data during playback DATE TIME Select to display the date and time during playback p 36 CAM DATA Select to display the camera setting data during playback p 36 GMELODY Select to play a melody when you start stop recording operate your c...

Страница 59: ... your camcorder OFF Select to deactivate the Remote Commander to prevent your camcorder from responding to a command sent by another VCR remote control unit GLCD Select to show the displays such as the time code on the LCD screen and in the viewfinder V OUT LCD Select to show the displays such as the time code on the TV screen LCD screen and in the viewfinder GON Select to turn on the camera recor...

Страница 60: ...d on your camcorder on other recording devices p 62 For TRV285E you can also record the picture from a VCR to a tape on your camcorder p 67 Connect your camcorder to a VCR as shown in the following illustration For TRV238E 438E A V connecting cable supplied Signal flow VCRs A V OUT jack Yellow Black ...

Страница 61: ...n the VCR For TRV270E 285E When you are connecting your camcorder to a monaural device connect the yellow plug of the A V connecting cable to the video jack and the red right channel or the white left channel plug to the audio jack on the VCR To use an i LINK cable for connection For TRV270E 285E Use an i LINK cable optional to connect your camcorder to other device via the DV Interface The video ...

Страница 62: ... camcorder and the VCR b Notes When dubbing using the A V connecting cable press DISPLAY BATT INFO to hide indicators such as time code p 36 Otherwise they will be recorded on the tape For TRV270E 285E When connected using the A V connecting cable to record the date time and camera settings data have it displayed on screen p 36 For TRV270E 285E When your camcorder is connected to the VCR via the D...

Страница 63: ...UP then press the dial 6 Turn the SEL PUSH EXEC dial to select IR SETUP then press the dial When you connect with an A V connecting cable you need to check the IR SETUP code signal to see if your VCR can be operated by your camcorder infrared ray emitter 7 Turn the SEL PUSH EXEC dial to select the IR SETUP code of your VCR then press the dial For the IR SETUP code of your VCR refer to IR SETUP cod...

Страница 64: ...ry again 14Turn the SEL PUSH EXEC dial to select RETURN then press the dial IR SETUP code list The following IR SETUP codes are recorded on your camcorder by default It is set at 3 as the default setting Remote sensor VCR Infraredray emitter Manufacturing company IR SETUP code Sony 1 2 3 4 5 6 Aiwa 47 53 54 Akai 50 62 74 Alba 73 Amstrad 73 Baird 30 36 Blaupunkt 11 83 Bush 74 CGM 36 47 83 Clatronic...

Страница 65: ... the SEL PUSH EXEC dial to select OK then press the dial The title lights up b Notes You can put a title only into the tape of the VCR If you set the background color to FADE the picture may not appear properly depending on the connected VCR z Tips The title color changes as follows WHITE y YELLOW y VIOLET y RED y CYAN y GREEN y BLUE The title size changes as follows SMALL y LARGE Roadstar 47 SABA...

Страница 66: ...ng time VCR c Playback time camcorder Step 4 Performing Easy Dubbing Make sure that your camcorder and VCR are connected and that the VCR is set to recording pause 1 Turn the SEL PUSH EXEC dial to select START then press the dial 2 Turn the SEL PUSH EXEC dial to select EXECUTE then press the dial When dubbing ends your camcorder and VCR stop automatically Then the display returns to the Easy Dubbi...

Страница 67: ... your TV Dubbing selected scenes from a tape Digital program editing TRV270E 285E You can select up to 20 scenes programs and record them in the desired order to other recording device such as VCR Step 1 Preparing your camcorder and VCR for operation Follow the steps below when you are performing digital program editing for the first time to a tape in a VCR You can skip this setting if you have se...

Страница 68: ...R SETUP code When you connect with an A V connecting cable you need to check the IR SETUP code signal to see if your VCR can be operated by your camcorder infrared ray emitter 1 Turn the SEL PUSH EXEC dial to select IR SETUP then press the dial 2 Turn the SEL PUSH EXEC dial to select the IR SETUP code of your VCR then press the dial For the IR SETUP code of your VCR refer to IR SETUP code list p 6...

Страница 69: ...o recording pause mode Skip this step if you have selected i LINK in step 9 on p 68 b Note Run the tape for about 10 seconds before pausing The starting scenes may not get recorded when you start recording from the beginning of the tape 3 Turn the SEL PUSH EXEC dial to select ADJ TEST then press the dial 4 Turn the SEL PUSH EXEC dial to select EXECUTE then press the dial EXECUTING flashes and a pi...

Страница 70: ...k into the camcorder Insert a cassette for recording into your VCR 2 Press MENU 3 Turn the SEL PUSH EXEC dial to select OTHERS then press the dial 4 Turn the SEL PUSH EXEC dial to select VIDEO EDIT then press the dial 5 Search for the beginning of the first scene that you want to record on your camcorder then pause playback 6 Turn the SEL PUSH EXEC dial to select MARK then press the dial The start...

Страница 71: ...ess MENU in step 11 The program is stored in memory until the cassette is ejected To erase programs 1 Follow steps 1 to 4 in Recording the selected scenes as programs p 70 2 Turn the SEL PUSH EXEC dial to select UNDO or ERASE ALL then press the dial When you select UNDO You can erase the last set program When you select ERASE ALL You can erase all the programs 3 Turn the SEL PUSH EXEC dial to sele...

Страница 72: ...rom your camcorder by selecting from thumbnails Still images and movies are saved in folders by date Music Video Slideshow Producer You can select your favorite movies and still images from pictures saved on your computer and easily create a short original video or slide show with added music and visual styles Automatic Music Video Producer You can easily create a short original video with added m...

Страница 73: ...0 MHz or faster recommended Application DirectX 9 0c or later this product is based on DirectX technology It is necessary to have DirectX installed Windows Media Player 7 0 or later Macromedia Flash Player 6 0 or later Sound system 16 bit stereo sound card and stereo speakers Memory 64 MB or more Hard disk Available memory required for installation 500 MB or more Available free hard disk space rec...

Страница 74: ... details on the software refer to First Step Guide Installing on a Windows computer z Tips To view First Step Guide on a Windows computer Microsoft Internet Explorer Ver 6 0 or later is recommended It may not be displayed correctly even in a recommended environment depending on the setting of the browser In this case refer to it in PDF When you want to print out First Step Guide or cannot install ...

Страница 75: ...ouble click PICTUREPACKAGE Disc drive Drive names such as E may vary depending on the computer 4 Click Install Depending on the operating system on the computer a message appears notifying you that First Step Guide cannot be installed automatically with the InstallShield Wizard In such a case manually copy First Step Guide to your computer according to the message instructions 5 Select the languag...

Страница 76: ... Step Guide 12Click Next then follow the on screen instructions to install ImageMixer VCD2 13If the Installing Microsoft R DirectX R screen is displayed follow the steps below to install DirectX 9 0c If not skip to step 14 1 Read License Agreement then click Next 2 Click Next 3 Click Finish 14Make sure Yes I want to restart my computer now is checked then click Finish The computer turns off once t...

Страница 77: ...ing on the computer before installing the software 3 Place the CD ROM in the disc drive of your computer 4 Double click CD ROM icon 5 Copy FirstStepGuide pdf stored in the desired language in the FirstStepGuide folder to your computer 6 Copy IMXINST SIT in the MAC folder of the CD ROM to a folder of your choice 7 Double click IMXINST SIT in the folder it was copied to 8 Double click the unzipped I...

Страница 78: ...r sources the Music Contents are the copyrighted work of the respective owners thereof and are protected by copyright laws and other applicable laws of each country region Except to the extent expressly permitted by applicable laws you are not permitted to use including without limitation copying modifying reproducing uploading transmitting or placing to the external network accessible to the publ...

Страница 79: ...arks of their respective companies Furthermore and are not mentioned in each case in this manual Creating a DVD Direct Access to Click to DVD TRV270E 285E b Note You can only use an i LINK cable for this operation You cannot use a USB cable You can create DVDs when you connect your camcorder to a Sony VAIO series computer that supports Click to DVD via an i LINK cable optional The picture is autom...

Страница 80: ...tic Mode Launcher is set up for each Windows XP user 1 Turn on the computer Quit all applications running with an i LINK 2 Prepare the power source for your camcorder then slide the POWER switch repeatedly to select the PLAY EDIT mode Use the supplied AC Adaptor as the power source since it takes a few hours to create a DVD 3 Insert a recorded cassette into your camcorder 4 Connect your camcorder ...

Страница 81: ...mcorder until the picture is completely copied to the computer The DVD is created even if you disconnect the i LINK cable optional or turn off the power of your camcorder while WRITING or CONVERTING is displayed When any of the following occurs copying of the picture is canceled A DVD containing the data up to the point the operation was canceled is created Refer to the help files of Click to DVD ...

Страница 82: ...8E 438E TRV285E The supplied Remote Commander does not function cSet COMMANDER in the OTHERS menu to ON p 59 cInsert a battery into the battery holder with the polarities correctly matching the marks If this still does not solve the problem insert a new battery since the battery is dead p 108 cRemove any obstructions between the Remote Commander and the remote sensor Symptom Cause and or Correctiv...

Страница 83: ...hen the camcorder is connected to the AC Adaptor cTurn off the power and disconnect the AC Adaptor from the wall socket Then connect it again Symptom Cause and or Corrective Actions Cassette cannot be ejected from the compartment cMake sure the power source battery pack or AC Adaptor is connected correctly p 12 cRemove the battery pack from the camcorder then attach it again p 12 cAttach a charged...

Страница 84: ...battery pack is discharged p 12 For TRV438E TRV270E 285E The SteadyShot does not function cSet STEADYSHOT to ON in the CAMERA SET menu p 49 cSet 16 9 WIDE to OFF in the CAMERA SET menu p 47 The auto focus does not function cPress FOCUS to enable auto focus p 29 cThe recording conditions are not suitable for auto focus Adjust the focus manually p 29 A vertical band appears when recording candleligh...

Страница 85: ... 50 No sound or only a low sound is heard cFor TRV270E 285E Set HiFi SOUND to STEREO in the PLAYER SET menu for TRV270E or in the VCR SET menu for TRV285E p 50 cTurn up the volume p 33 cFor TRV270E 285E In the PLAYER SET menu for TRV270E or in the VCR SET menu for TRV285E adjust AUDIO MIX from the ST2 side until the sound is heard appropriately p 51 cMake sure the black plug for TRV238E 438E or th...

Страница 86: ... p 68 cSet your camcorder and the VCR more than 30 cm 12 in apart p 68 The program may not be set to a blank section on the tape You cannot perform the Digital program editing on a VCR that does not support IR SETUP codes a DVD recorder and a DVD recorder equipped with an HDD etc For TRV270E 285E The VCR is not responding properly during Digital program editing when it is connected via an i LINK c...

Страница 87: ...seeing on the computer cDisconnect the cable from the computer turn on the camcorder then connect it again cSlide the POWER switch to select the CAMERA mode set USB STREAM to ON in the SETUP MENU p 56 Only when connecting to the Windows computer with a USB cable For TRV270E 285E You cannot view the pictures recorded on a tape on the computer cDisconnect the cable from the computer turn on the camc...

Страница 88: ...alled right click them then click Remove to delete them For copying and viewing pictures recorded on a tape USB Audio Device in the Sound video and game controllers folder USB Device in the Other devices folder USB Composite Device in the Universal Serial Bus Controller folder 5 When the Confirm Device Removal screen appears click OK 6 Turn off the power of your camcorder disconnect the USB cable ...

Страница 89: ...iversal Serial Bus Controller folder USB Audio Device in the Sound video and game controller folder Composite USB Device in the Other devices folder 7 When the Confirm Device Removal screen appears click OK 8 Turn off the power of your camcorder disconnect the USB cable then restart the computer 9 Place the CD ROM in the disc drive of your computer 10 Follow the steps below and try to install the ...

Страница 90: ...Device in the Other devices folder 8 When the Confirm Device Removal screen appears click OK 9 Turn off the power of your camcorder disconnect the USB cable then restart the computer 10 Place the CD ROM in the disc drive of your computer 11 Follow the steps below and try to install the USB driver again 1 Double click My Computer 2 Right click PICTUREPACKAGE Disc drive Drive names such as E may var...

Страница 91: ...XP Picture Package Handycam Tools and USB Streaming Tool then start up USB Streaming Tool 2 Adjust the slider in the direction on Select video quality 3 Follow the on screen instructions click Next then click Done For TRV270E 285E Picture Package does not function correctly cClose Picture Package then restart the Windows computer For TRV270E 285E An error message appears while operating Picture Pa...

Страница 92: ...bove have occurred Remove and insert the cassette then operate your camcorder again Do not perform this procedure if moisture starts to condense p 99 cRemove the power source Reconnect it again and operate your camcorder again cChange the tape cPress the RESET button and operate your camcorder again E 61 ss E 62 ss cContact your Sony dealer or local authorized Sony service facility Inform them of ...

Страница 93: ...a new one cSee page 96 Z Re attach the power source Moisture condensation Z Moisture condensation Eject the cassette cSee page 99 Moisture condensation Turn off for 1H cSee page 99 Cassette tape Q Insert a cassette cSee page 18 Z Reinsert the cassette cThe cassette might be damaged etc Q Z The tape is locked check the tab cSee page 95 Q The tape has reached the end Others Cannot record due to copy...

Страница 94: ...e clock to the local time by setting a time difference when using your camcorder abroad Select WORLD TIME in the OTHERS menu then set the time difference p 58 System Used in PAL Australia Austria Belgium China Czech Republic Denmark Finland Germany Holland Hong Kong Hungary Italy Kuwait Malaysia New Zealand Norway Poland Portugal Singapore Slovak Republic Spain Sweden Switzerland Thailand United K...

Страница 95: ...ord from the beginning to the end of the tape as described above Copyright signal When you play back If the cassette you play back on your camcorder contains copyright signals you cannot copy it to a tape in another video camera connected to your camcorder For TRV285E When you record You cannot record software on your camcorder that contains copyright control signals for copyright protection of so...

Страница 96: ...a large capacity battery pack NP QM71D QM91D optional Frequent use of the LCD screen or a frequent playback fast forward or rewind operation wears out the battery pack faster We recommend using a large capacity battery pack NP QM71D QM91D optional Be sure to set the POWER switch to CHG OFF when not recording or playing back on your camcorder The battery pack is also consumed when your camcorder is...

Страница 97: ...ous digital AV devices When two or more i LINK compatible device are connected to this unit in a daisy chain operations and data transactions are possible with not only the device that this unit is connected to but also with other devices via the directly connected device Note however that the method of operation sometimes varies according to the characteristics and specifications of the device to...

Страница 98: ...f Sony Corporation Maintenance and precautions On use and care Do not use or store the camcorder and accessories in the following locations Anywhere extremely hot or cold Never leave them exposed to temperatures above 60 C 140 F such as under direct sunlight near heaters or in a car parked in the sun They may malfunction or become deformed Near strong magnetic fields or mechanical vibration The ca...

Страница 99: ...used again if the or Z does not appear when the power is turned on again If moisture starts to condense your camcorder sometimes cannot detect condensation If this happens the cassette is sometimes not ejected for 10 seconds after the cassette lid is opened This is not a malfunction Do not close the cassette lid until the cassette is ejected Notes on moisture condensation Moisture may condense whe...

Страница 100: ...g chemicals such as thinner benzine alcohol chemical cloths repellent and insecticide Handling with above substances on your hands Leaving the casing in contact with rubber or vinyl objects for a long period of time About care and storage of the lens Wipe the surface of the lens clean with a soft cloth in the following instances When there are fingerprints on the lens surface In hot or humid locat...

Страница 101: ...CD Charge Coupled Device Gross Approx 380 000 pixels Effective Approx 230 000 pixels For TRV270E 285E 3 0 mm 1 6 type CCD Charge Coupled Device Gross Approx 540 000 pixels Effective Approx 350 000 pixels Lens Combined power zoom lens Filter diameter 37 mm 1 1 2 in 20 Optical 990 Digital F 1 6 2 4 Focal length 2 5 50 mm 1 8 2 in When converted to a 35 mm still camera 42 840 mm 1 11 16 33 1 8 in Col...

Страница 102: ...8 cassette lens cap and shoulder strap Supplied accessories See page 11 AC Adaptor AC L15A L15B Power requirements AC 100 240 V 50 60 Hz Current consumption 0 35 0 18 A Power consumption 18 W Output voltage DC 8 4 V 2 Operating temperature 0 C to 40 C 32 F to 104 F Storage temperature 20 C to 60 C 4 F to 140 F Dimensions approx 56 31 100 mm 2 1 4 1 1 4 4 in w h d excluding the projecting parts Mas...

Страница 103: ...ded Model CCD DCR TRV238E TRV438E TRV270E TRV285E Recording system Hi8 Hi8 Digital8 Digital8 Playback system Hi8 8 Hi8 8 Digital8 Digital8 Audio recording Monaural Monaural Stereo Stereo AUDIO VIDEO jack OUT OUT OUT OUT DV Interface OUT IN OUT USB jack z z SteadyShot z z z Remote sensor z z z ...

Страница 104: ...me p 23 F VOLUME button p 33 G END SEARCH button p 32 H Speaker I Viewfinder p 2 16 If you attach the large capacity battery pack NP QM71D QM91D optional to the camcorder extend and lift up the viewfinder and adjust its angle J Battery pack K LIGHT button p 23 L FADER button p 30 M BACK LIGHT button p 27 N FOCUS button p 29 O SEL PUSH EXEC dial p 42 This button has a tactile dot To attach the lens...

Страница 105: ...nsor D Camera recording lamp p 21 26 E Microphone F NIGHTSHOT PLUS switch p 28 G EASY button p 26 35 H DISPLAY BATT INFO button p 13 36 A Jack cover B For TRV270E 285E A V OUT jack p 38 61 C For TRV285E DV Interface p 61 For TRV270E DV OUT Interface p 61 D For TRV270E 285E USB jack E For TRV238E 438E A V OUT jack p 38 60 continued ...

Страница 106: ...e supplied CD ROM For TRV238E 438E EASY DUB Easy Dubbing button p 63 C TITLE button p 31 D EXPOSURE button p 27 E MENU button p 42 F Video control buttons p 33 STOP stop REW rewind PLAY playback FF fast forward PAUSE pause G CHG charge lamp p 12 H CAMERA mode lamp p 15 I PLAY EDIT mode lamp p 15 J For TRV285E Rec buttons p 67 REC rec K For TRV238E 438E COUNTER RESET button p 21 L For TRV238E 438E ...

Страница 107: ...therwise you cannot attach the tripod securely and the screw may damage your camcorder A Power zoom lever p 23 B BATT battery release button p 12 C Hooks for shoulder strap D For TRV270E 285E PHOTO button p 25 E POWER switch p 15 F Grip belt p 3 G REC START STOP button p 21 H DC IN jack p 12 To attach the shoulder strap Attach the shoulder strap supplied with your camcorder to the hooks for the sh...

Страница 108: ...op Slow p 33 E DISPLAY button p 36 39 F PHOTO button p 25 G SEARCH M button p 40 41 H buttons p 40 41 I ZERO SET MEMORY button p 39 To remove the insulation sheet To change the button type battery 1 While pressing on the tab inset your fingernail into the slit to pull out the battery case 2 Remove the button type lithium battery 3 Place a new button type lithium battery with the side facing up 4 I...

Страница 109: ... the Remote Commander may not function properly When you are operating with the Remote Commander supplied with your camcorder your VCR may also operate In that case select a commander mode other than VTR 2 for your VCR or cover the sensor of your VCR with black paper CAUTION Danger of explosion if battery is incorrectly replaced Replace only with the same or equivalent type recommended by the manu...

Страница 110: ...ng standby recording mode Mirror mode p 24 Tape photo recording p 25 Format indicator Audio mode p 53 Remaining tape p 21 Interval recording p 55 Frame recording p 54 DV input p 67 Zero set memory p 39 Built in light p 23 NightShot plus p 28 0 00 00 STBY 60min Example Indicators in the CAMERA mode Time code p 21 Tape counter p 21 Self diagnosis p 92 Tape photo recording p 25 Q E Z Warning p 92 Man...

Страница 111: ...rect Access to Click to DVD 79 DirectX 9 0c 76 Display DISPLAY 59 Display indicator 110 DNR 51 Dual sound track tape 50 Dubbing 60 DV Interface 79 E Easy Dubbing 63 Easy Handycam 26 35 EDIT 50 END SEARCH 32 Exposure 27 F FADER 30 First Step Guide 73 74 Focus 29 Frame recording FRAME REC 54 Full charge 12 G Grip belt 3 H Hi8 standard 8 mm system 95 HiFi SOUND 50 I i LINK 97 i LINK cable 61 67 72 79...

Страница 112: ...nsor 105 RESET 106 S Self diagnosis display 92 Setting the date and time 17 Skip scan 34 SP Standard Play See Recording mode REC MODE STEADYSHOT 49 Stereo 21 39 STRIPE FADER 30 Sub sound See HiFi SOUND T Tape counter 21 Tape photo recording 25 TBC 51 Telephoto See Zoom Time code 21 Title 31 TV color systems 94 U USB cable 72 USB jack 105 USB Streaming USB STREAM 56 Using abroad 94 V Video head 99 ...

Страница 113: ......

Страница 114: ......

Страница 115: ......

Страница 116: ...Printed in Japan ...

Отзывы: