


16
GB
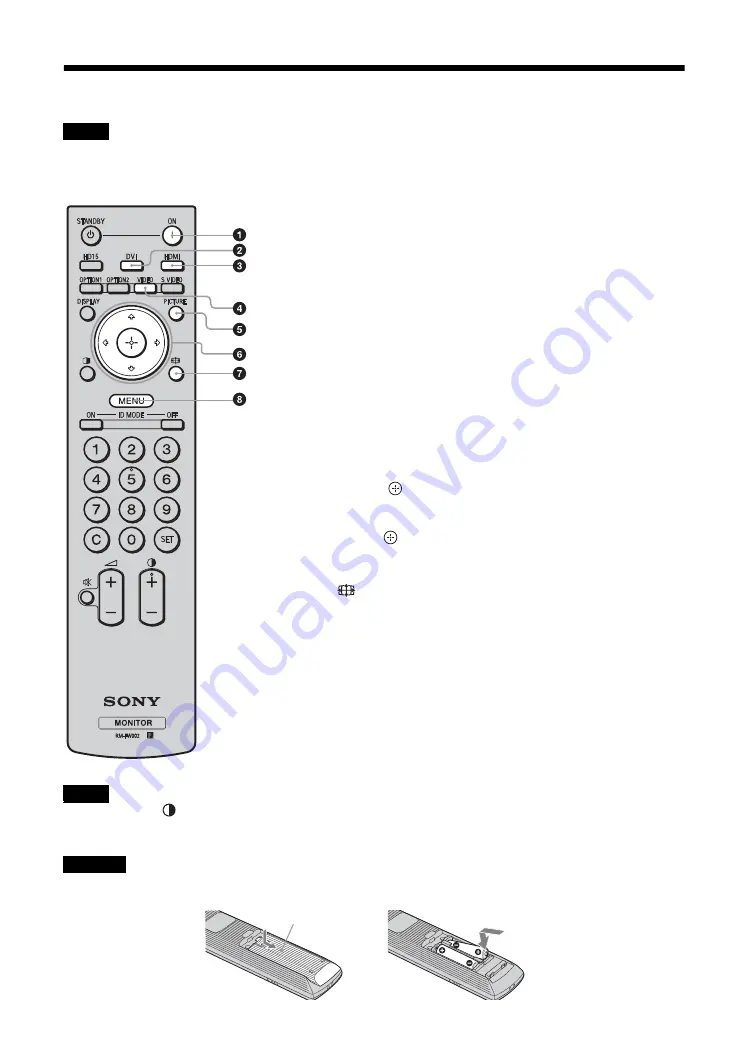
Remote Control
You cannot use the S VIDEO button and the OPTION2 button on this display.
Button Description
• The 5 button and
button have a tactile dot. Use the tactile dot as a reference when operating the display.
• Insert two size AA (R6) batteries (supplied) by matching the
3
and
#
on the batteries to the diagram inside the remote control’s
battery compartment.
Danger of explosion if battery is incorrectly replaced. Replace only with the same or equivalent type recommended by the
manufacturer. When you dispose of the battery, you must obey the law in the relative area or country.
Note
1
ON (power-on) button
Press to turn the display on.
Operate when the main power switch on the rear of the display is
“ON.”
2
DVI button
Press to select the signal input to the DVI port.
3
HDMI button
Press to select the signal input to the HDMI IN connector from a
piece of video equipment.
4
VIDEO button
Press to switch between the input signals from VIDEO IN and
COMPONENT IN
5
PICTURE button
Selects “Picture Mode”. Each press toggles between “Vivid”,
“Standard”, “Custom”, “Conference”, and “TC Control”.
6
F
/
f
/
G
/
g
/
buttons
Press the
F
/
f
/
G
/
g
buttons to move the selected menu item and set
the values.
Pressing
sets the selected menu or setting items.
When displaying Picture in Picture (PinP), you can change the
settings of the inset picture (page 19).
7
button
Press to change the aspect ratio (page 18).
8
MENU button
Press to show the menu on the screen. Press again to hide the menu
(page 24).
Notes
Caution
,
Push and slide to open
Содержание FWDS42H2
Страница 13: ...13JP JP 後面 ...
Страница 25: ...25JP JP ケーブルを処理する ケーブルホルダーを使う 付属のケーブルホルダー 6 個 を使って ケーブル類をすっきりとまとめることができます ケーブ ルホルダーは 以下のように取り付けます 2 1 本機後面 ...
Страница 55: ...7GB GB ...
Страница 59: ...11GB GB Rear ...
Страница 95: ......
Страница 103: ...9FR FR Arrière ...
Страница 139: ......
Страница 147: ...9 DE DE Rückseite ...
Страница 183: ...45DE DE W Weitere Einstell 22 29 Wide Zoom 16 28 Z Zoom 16 28 Zurücksetzen 25 28 ...
Страница 191: ...9ES ES Parte posterior ...
Страница 227: ...45ES ES V Ventana 27 Vívido 23 ...
Страница 235: ...9 IT FWD S46H2 S42H2 4 443 082 01 1 IT Parte posteriore ...
Страница 271: ...45 IT FWD S46H2 S42H2 4 443 082 01 1 IT V Vivido 23 Z Zoom 16 28 Zoom largo 16 28 ...
Страница 275: ...5 CS CS ...
Страница 277: ...7 CS CS 水平安装显示器 垂直安装显示器 前视图 侧视图 25 10 10 25 5 单位 cm 前视图 侧视图 必须使 1 电源 开关位于 左下方 20 25 25 10 单位 cm 5 ...
Страница 279: ...9 CS CS 后视图 ...
Страница 291: ...21CS CS 电缆布置 使用电缆夹 可用附送的电缆夹 6 整齐地捆扎电缆 请按下图所示的方法安装电缆夹 2 1 后视图 ...
Страница 315: ...45CS CS 邮件帐户 36 Z 执行按钮 10 主电源开关 11 Zoom 16 28 ...


