


19
GB
GB
Using the ID MODE button
You can operate a specific display by entering the
"Index Number" of that display without affecting
other displays installed at the same time.
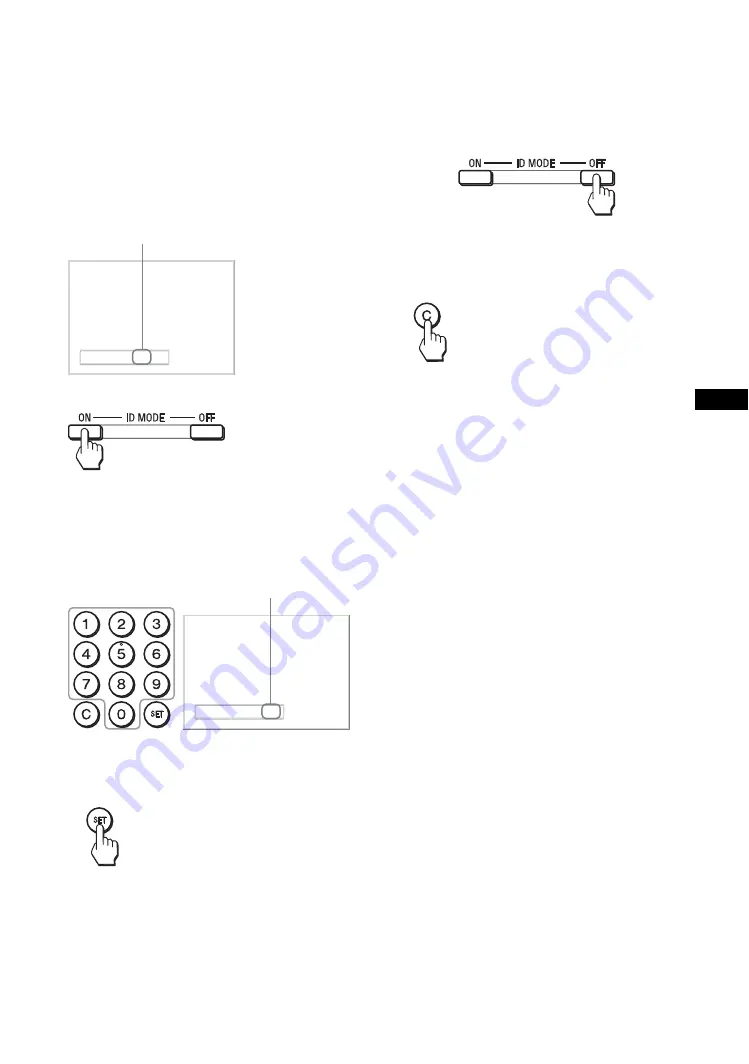
1
Press
ON
button.
Display’s “Index Number” appears in black
characters on the lower left menu on the screen.
(Every display is allocated an individual preset
“Index Number” from 1 to 255.)
2
Input the “Index Number” of the display you
want to operate using the 0
-
9 buttons on
the remote control.
The input number appears right next to the “Index
Number” of each display.
3
Press
SET
button.
The characters on the selected display change to
green while the others change to red.
You can operate the specified display indicated
with green characters only.
Only the operation of ON (power-on) button and
STANDBY/ID MODE-OFF button is effective to
other displays, as well.
4
When all of the setting changes have been
completed, press
OFF
button.
The display returns to the normal screen.
To correct the Index Number
Press the
C
button to clear the current input “Index
Number”. Return to Step
2
, and input a new “Index
Number”.
Tip
To change the “Index Number” of the display, see “Index
Number” in “Control Setting” on page 28.
Index Number :
117
Index Number
Index Number :
117 117
Input Number
Содержание FWD-32B1
Страница 13: ...13JP JP 後面 FWD 55B2 46B2 42B2 FWD 32B1 2 ...
Страница 47: ......
Страница 53: ...7GB GB ...
Страница 57: ...11GB GB Rear FWD 55B2 46B2 42B2 FWD 32B1 2 ...
Страница 97: ...9FR FR Arrière FWD 55B2 46B2 42B2 FWD 32B1 2 ...
Страница 137: ...9DE DE Rückseite FWD 55B2 46B2 42B2 FWD 32B1 2 ...
Страница 177: ...9ES ES Parte posterior FWD 55B2 46B2 42B2 FWD 32B1 2 ...
Страница 217: ...9 IT IT Parte posteriore FWD 55B2 46B2 42B2 FWD 32B1 2 ...
Страница 253: ...5CS CS ...
Страница 255: ...7CS CS 水平安装显示器 垂直安装显示器 前视图 侧视图 25 10 10 25 5 单位 cm 前视图 侧视图 必须使 1 电源 开关位于 左下方 20 25 25 10 单位 cm 5 ...
Страница 257: ...9CS CS 后视图 FWD 55B2 46B2 42B2 FWD 32B1 2 ...
Страница 267: ...19CS CS 电缆布置 使用电缆夹 可用附送的电缆夹 6 FWD 32B1 3 整齐地捆扎电缆 请按下图所示的方法安装电缆夹 2 1 后视图 FWD 55B2 46B2 42B2 FWD 32B1 ...


