background image

F:\SONY DVD\2666954112 DVP-
NC85H_US\SOURCE\DVP-
NC85H_US\01US10ADV2-CEK.fm

master page=left

48

DVP-NC85H

2-666-954-11(1)

2

Press 

C

/

c

 to adjust the picture 

contrast.

To go to the next or previous picture item 
without saving the current setting, press 

X

/

x

.

3

Press ENTER.

The adjustment is saved and 
“BRIGHTNESS” adjustment bar 
appears.

4

Repeat step 2 and 3 to adjust 
“BRIGHTNESS,” “COLOR” and 
“HUE.”

To turn off the display

Press 

O

 RETURN or DISPLAY.

Note

The “BRIGHTNESS” setting is not effective if you 
connect the player via the LINE OUT (VIDEO) or 
S VIDEO OUT jack and select “PROGRESSIVE 
AUTO” or “PROGRESSIVE VIDEO” by using the 
PROGRESSIVE button on the front panel.

Sharpening the Picture 

(SHARPNESS)  


You can enhance the outlines of images to 
produce a sharper picture.

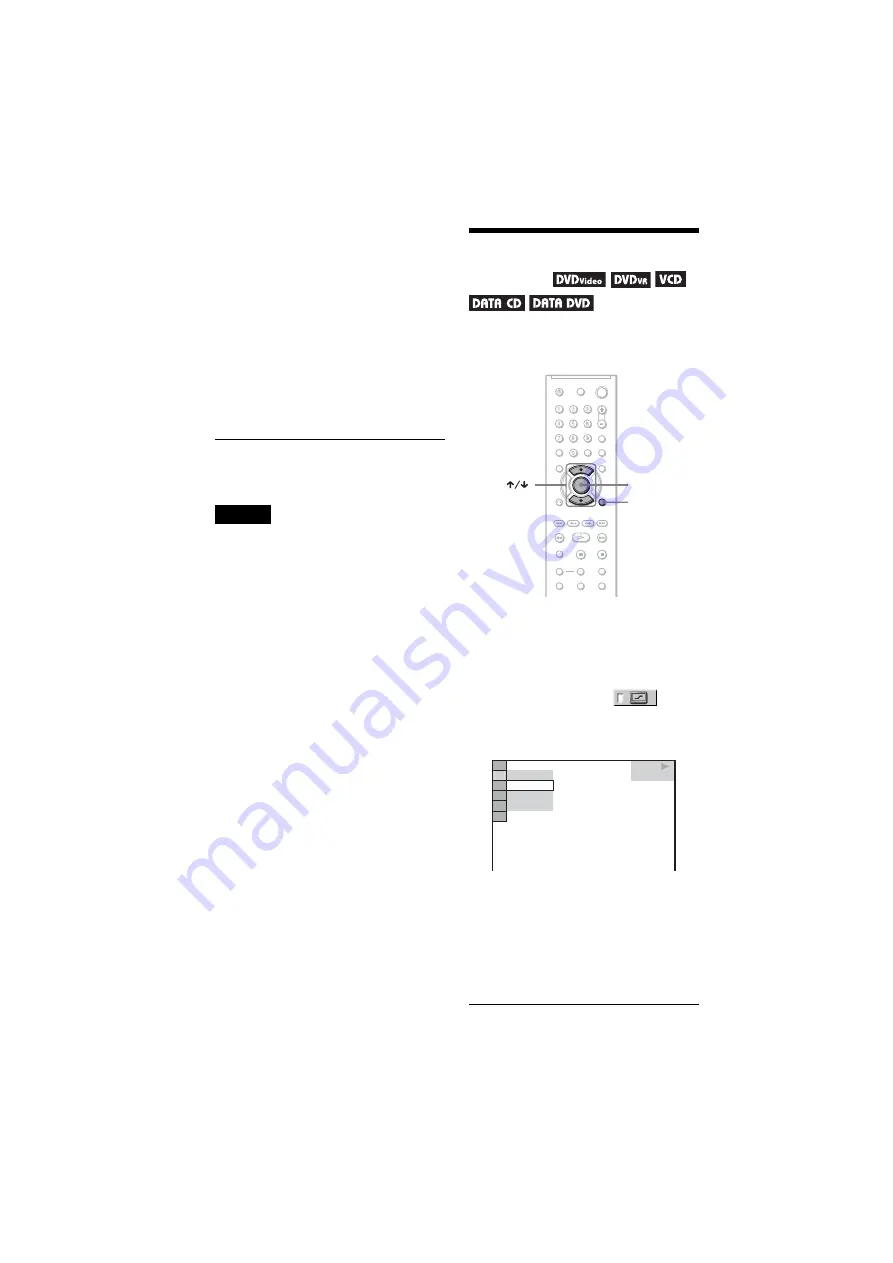
1

Press DISPLAY twice during 

playback.

The Control Menu appears.

2

Press 

X

/

x

 to select 


(SHARPNESS), then press ENTER.

The options for “SHARPNESS” appear.

3

Press 

X

/

x

 to select a level.

• 1: enhances the outline.
• 2: enhances the outline more than 1.

4

Press ENTER.

The selected setting takes effect.

ENTER

DISPLAY

DVD VIDEO

OFF

2

1

OFF

Содержание DVP-NC85H - HDMI/CD Progressive Scan DVD Changer

Страница 1: ... number in the space provided below Refer to them whenever you call upon your Sony dealer regarding this product Model No DVP NC85H Serial No ______________ For Customers in Canada If this product is not working properly please call 1 877 602 2008 for Peace of Mind Warranty Replacement service For other product related questions please contact our Customer Information Service Centre at 1 877 899 7...

Страница 2: ...re designed to provide reasonable protection against harmful interference in a residential installation This equipment generates uses and can radiate radio frequency energy and if not installed and used in accordance with the instructions may cause harmful interference to radio communications However there is no guarantee that interference will not occur in a particular installation If this equipm...

Страница 3: ... Do not overload wall outlets extension cords or convenience receptacles beyond their capacity since this can result in fire or electric shock Object and Liquid Entry Never push objects of any kind into the set through openings as they may touch dangerous voltage points or short out parts that could result in a fire or electric shock Never spill liquid of any kind on the set Attachments Do not use...

Страница 4: ...age to the set due to lightning and power line surges Antenna Lead in Wire Ground Clamp Antenna Discharge unit NEC Section 810 20 Grounding Conductors NEC Section 810 21 Ground Clamps Power Service Grounding Electrode System NEC Art 250 Part H Electric Service Equipment NEC NATIONAL ELECTRICAL CODE Damage Requiring Service Unplug the set from the wall outlet and refer servicing to qualified servic...

Страница 5: ...s occur the player may not operate properly In this case remove the disc and leave the player turned on for about half an hour until the moisture evaporates When you move the player take out any discs If you don t the disc may be damaged On adjusting volume Do not turn up the volume while listening to a section with very low level inputs or no audio signals If you do the speakers may be damaged wh...

Страница 6: ... the Point Where You Stopped the Disc Multi disc Resume 29 Using the DVD s Menu 30 Selecting ORIGINAL or PLAY LIST on a DVD RW DVD R 30 Playing VIDEO CDs With PBC Functions PBC Playback 31 Various Play Mode Functions Program Play Shuffle Play Repeat Play A B Repeat Play 32 Searching for a Scene 36 Searching for a Particular Point on a Disc Search Scan Slow motion Play Freeze Frame 36 Searching for...

Страница 7: ...ndex 78 About This Manual Instructions in this manual describe the controls on the remote You can also use the controls on the player if they have the same or similar names as those on the remote DVD may be used as a general term for DVD VIDEOs DVD RWs DVD Rs VR mode and DVD RWs DVD Rs video mode The meaning of the icons used in this manual is described below Icons Meaning Functions available for ...

Страница 8: ...rmats listed on this page CD ROMs recorded in PHOTO CD format Data part of CD Extras DVD Audio discs HD layer on Super Audio CDs Also the player cannot play the following discs A DVD VIDEO with a different region code A disc recorded in a color system other than NTSC such as PAL or SECAM this player conforms to the NTSC color system A disc that has a non standard shape e g card heart A disc with p...

Страница 9: ...chnologies are marketed by some record companies Please be aware that among those discs there are some that do not conform to the CD standard and may not be playable by this product Note on DualDiscs A DualDisc is a two sided disc product which mates DVD recorded material on one side with digital audio material on the other side However since the audio material side does not conform to the Compact...

Страница 10: ... HDMI or DVI Digital Visual Interface input C DISC 1 5 buttons 27 D H play button 26 E x stop button 27 F previous next buttons 36 G A open close button 26 H DISC SKIP button 28 I PROGRESSIVE button indicator 21 Lights up when the player outputs progressive signals J remote sensor 17 K EXCHANGE button 28 L Disc tray 26 M Front panel display 12 This player is based on version 1 1 of High Definition...

Страница 11: ...UT high definition multimedia interface out jack 18 B DIGITAL OUT OPTICAL jack 22 C DIGITAL OUT COAXIAL jack 22 D LINE OUT L R AUDIO jacks 22 E LINE OUT VIDEO jack 18 F S VIDEO OUT jack 18 G COMPONENT VIDEO OUT Y PB PR jacks 18 S VIDEO OUT LINE OUT COMPONENT VIDEO OUT R AUDIO L DIGITAL OUT COAXIAL VIDEO Y PB PR OPTICAL HDMI OUT continued ...

Страница 12: ... without PBC the VCD indicator is displayed z Hint You can adjust the lighting of the front panel display by setting DIMMER in CUSTOM SETUP page 67 Disc type Current disc All Discs Repeat mode 34 Playing status Disc numbers 27 Lights up when you can change the angle 46 Lights up during Repeat Play 34 Playing time of the current title 41 Disc type Current playing time 40 Playing status Lights up du...

Страница 13: ...EV NEXT previous next buttons 27 J m M SCAN SLOW buttons 37 K ZOOM button 27 55 L SLOW PLAY FAST PLAY buttons 27 M AUDIO button 43 N SUBTITLE button 46 O 1 on standby button 26 P VOL volume buttons 61 The button has a tactile dot Q TV VIDEO button 61 R PICTURE NAVI picture navigation button 39 55 S TIME TEXT button 40 T MENU button 30 U ENTER button 24 V DISPLAY button 14 W H PLAY button 26 The H ...

Страница 14: ...s album number for DATA CDs DATA DVDs 2 Displays the index number for VIDEO CDs MP3 audio track number or JPEG image file number for DATA CDs DATA DVDs 3 Displays Super VCD as SVCD 4 Displays the date for JPEG files To turn off the display Press DISPLAY repeatedly Control Menu display 1 m Control Menu display 2 appears for certain discs only m Control Menu display off OFF 1 8 3 4 1 2 2 7 T 1 3 2 5...

Страница 15: ...e chapter or track to play in the order you want SHUFFLE page 34 Plays the title chapter or track in random order REPEAT page 34 Plays the entire disc all titles all tracks all albums repeatedly or one title chapter track album repeatedly A B REPEAT page 35 Specifies the parts you want to play repeatedly CUSTOM PICTURE MODE page 47 Adjusts the video signal from the player You can select the pictur...

Страница 16: ...splay the aspect ratio of the TV and the audio output signal CUSTOM Setup In addition to the Quick Setup setting you can adjust various other settings RESET Returns the settings in SETUP to the default setting ALBUM page 52 Selects the album that contains MP3 audio track and JPEG image file to be played FILE page 37 Selects the JPEG image file to be played DATE page 55 Displays the date the pictur...

Страница 17: ...hono plug 3 y phono plug 3 1 Remote commander remote 1 Size AA R6 batteries 2 Step 2 Inserting Batteries Into the Remote You can control the player using the supplied remote Insert two Size AA R6 batteries by matching the 3 and ends on the batteries to the markings inside the compartment When using the remote point it at the remote sensor on the player Notes Do not leave the remote in an extremely...

Страница 18: ...ttern C Select pattern D when connecting to a TV projector or AV amplifier receiver equipped with HDMI input R AUDIO L DIGITAL OUT COAXIAL A VIDEO AUDIO INPUT L R C PR PB Y COMPONENT VIDEO IN B INPUT S VIDEO D IN HDMI OUT COMPONENT VIDEO OUT Y PB PR OPTICAL S VIDEO OUT LINE OUT VIDEO Audio video cord supplied l Signal flow S VIDEO cord not supplied yellow TV projector or AV amplifier receiver CD D...

Страница 19: ... three video cords not supplied of the same kind and length You will enjoy accurate color reproduction and high quality images If your TV accepts progressive 480p format signals use this connection and press the PROGRESSIVE button on the front panel to output progressive signals For details see Using the PROGRESSIVE button page 21 D If you are connecting to an HDMI DVI input jack Use a certified S...

Страница 20: ...change the aspect ratio see page 65 Notes Do not connect a VCR etc between your TV and the player If you pass the player signals via the VCR you may not receive a clear image on the TV screen If your TV has only one audio video input jack connect the player to this jack If the picture appears too white when you are using A or B connection set BLACK LEVEL in SCREEN SETUP to OFF page 66 VCR CD DVD p...

Страница 21: ...tware Select this if the image is not clear when you select PROGRESSIVE AUTO Note that the picture will not be clear or no picture will appear if you select these settings when either of the above conditions is not met NORMAL INTERLACE Select this setting when your TV does not accept progressive signals or your TV is connected to jacks other than the COMPONENT VIDEO OUT jacks LINE OUT VIDEO or S V...

Страница 22: ... VIDEO AUDIO INPUT L R B A LINE OUT R AUDIO L VIDEO HDMI OUT DIGITAL OUT COAXIAL OPTICAL LINE OUT R AUDIO L VIDEO HDMI OUT DIGITAL OUT COAXIAL OPTICAL AV amplifier receiver with a decoder red TV projector or AV amplifier receiver Audio video cord supplied Signal flow Coaxial digital cord not supplied to LINE OUT L R AUDIO Rear L CD DVD player white yellow yellow white red Speakers Front L Speakers...

Страница 23: ...are trademarks of Dolby Laboratories 2 DTS and DTS Digital Out are trademarks of Digital Theater Systems Inc Notes After you have completed the connection be sure to set DOLBY DIGITAL to DOLBY DIGITAL and DTS to ON in Quick Setup page 24 When you connect an amplifier receiver that conforms to the 96 kHz sampling frequency set 48kHz 96kHz PCM in AUDIO SETUP to 96kHz 24bit page 70 The TVS effects of...

Страница 24: ... Quick Setup appears at the bottom of the screen If this message does not appear select QUICK quick under SETUP setup in the Control Menu to run Quick Setup page 64 4 Press ENTER without inserting a disc The Setup Display for selecting the language used in the on screen display appears 5 Press X x to select a language The player displays the menu and subtitles in the selected language 6 Press ENTE...

Страница 25: ...ing a digital coaxial or optical HDMI cord select YES DIGITAL OUTPUT 10Press X x to select the type of Dolby Digital signal you wish to send to your amplifier receiver If your AV amplifier receiver has a Dolby Digital decoder select DOLBY DIGITAL Otherwise select D PCM 11Press ENTER DTS is selected 12Press X x to select whether or not you wish to send a DTS signal to your amplifier receiver If you...

Страница 26: ...rom the last disc placed on the tray 5 Press H The disc tray closes The player starts playback continuous play Adjust the volume on the TV or the amplifier receiver Depending on the disc a menu may appear on the TV screen For DVD VIDEOs see page 30 For VIDEO CDs see page 31 To turn off the player Press 1 The player enters standby mode z Hint You can have the player turn off automatically whenever ...

Страница 27: ...PLAY To return to normal playback Press H Notes You can only use this function with DVDs VIDEO CDs Super VCDs and DVD RWs DVD Rs in VR mode only Operation not possible will appear when maximum or minimum speed is reached During Fast Play or Slow Play mode you cannot change the angle page 46 subtitle page 46 or sound page 43 The sound can only be changed for VIDEO CDs Super VCDs Fast Play and Slow ...

Страница 28: ...rent disc end the player stops playing If the disc is played in One Disc Repeat Play mode page 34 the current disc starts playing again In Shuffle Play mode page 34 titles tracks chapters are reshuffled only on the current disc In Program Play mode page 32 the titles tracks chapters only on the current disc are played Note Do not push the disc tray to close in step 5 as you may damage the player L...

Страница 29: ...m the beginning of the disc press x twice then press H Notes MULTI DISC RESUME in CUSTOM SETUP must be set to ON default for this function to work page 67 The point where you stopped playing is cleared when you change the play mode you change the settings on the Setup Display For DVD RWs DVD Rs in VR mode CDs DATA CDs and DATA DVDs the player remembers the resume playback point for the current dis...

Страница 30: ...If you press the number buttons the following display appears Press the number buttons to select the item you want 3 Press ENTER Selecting ORIGINAL or PLAY LIST on a DVD RW DVD R Some DVD RWs DVD Rs in VR Video Recording mode have two types of titles for playback originally recorded titles ORIGINAL and titles that can be created on recordable DVD players for editing PLAY LIST You can select the ty...

Страница 31: ... in the menu for interactive operations Refer to the instructions supplied with the disc as the operating procedure may differ depending on the VIDEO CD To return to the menu Press O RETURN z Hint To play without using PBC press or the number buttons while the player is stopped to select a track then press H or ENTER Play without PBC appears on the TV screen and the player starts continuous play Y...

Страница 32: ...e titles chapters or tracks on the disc to create your own program You can program up to 99 titles chapters and tracks 1 Press DISPLAY The Control Menu appears 2 Press X x to select PROGRAM then press ENTER The options for PROGRAM appear 3 Press X x to select SET t then press ENTER 4 Press c The cursor moves to the title or track row T in this case 01 CLEAR ENTER DISPLAY OFF OFF SET ON PLAY 1 8 3 ...

Страница 33: ...d press c If you want to delete the title chapter or track from the program press CLEAR 3 Follow step 5 for new programming To cancel a program select under T then press ENTER To cancel all of the titles chapters or tracks in the programmed order 1 Follow steps 1 to 3 of Creating your own program Program Play 2 Press X and select ALL CLEAR 3 Press ENTER z Hint You can perform Repeat Play or Shuffl...

Страница 34: ...huffle play mode You can only shuffle the contents of the current disc Playing repeatedly Repeat Play You can play all of the titles or tracks on a disc or a single title chapter or track repeatedly You can use a combination of Shuffle or Program Play modes 1 Press DISPLAY during playback The Control Menu appears 2 Press X x to select REPEAT then press ENTER The options for REPEAT appear 3 Press X...

Страница 35: ... Repeat Play You can play a specific portion of a title chapter or track repeatedly This function is useful when you want to memorize lyrics etc 1 Press DISPLAY during playback The Control Menu appears 2 Press X x to select A B REPEAT then press ENTER The options for A B REPEAT appear 3 Press X x to select SET t then press ENTER The A B REPEAT setting bar appears 4 During playback when you find th...

Страница 36: ...riefly to go to the next or previous chapter track scene Or press and hold or to search forward or backwards and release the button when you find the point you want to return to normal playback Search Locating a point quickly by playing a disc in fast forward or fast reverse Scan Press m or M while playing a disc When you find the point you want press H to return to normal speed Each time you pres...

Страница 37: ...e Press STEP to go to the preceding frame DVD DVD VR mode only To return to normal playback press H Note You cannot search for a still picture on a DVD RW DVD R in VR mode Searching for a Title Chapter Track Scene etc You can search a DVD by title or chapter and you can search a VIDEO CD CD DATA CD DATA DVD by track index file or scene As titles and tracks are assigned unique numbers on the disc y...

Страница 38: ...selected number To search for a scene using the time code DVD VIDEO DVD VR mode only 1 In step 2 select TIME TEXT T playing time of the current title is selected 2 Press ENTER T changes to T 3 Input the time code using the number buttons then press ENTER For example to find the scene at 2 hours 10 minutes and 20 seconds after the beginning just enter 2 10 20 z Hints When the Control Menu display i...

Страница 39: ...EWER VIDEO CD Super VCD only displays the first scene of each track 3 Press ENTER The first scene of each chapter title or track appears as follows 4 Press C X x c to select a chapter title or track and press ENTER Playback starts from the selected scene To return to normal play during setting Press O RETURN or DISPLAY z Hint If there are more than 9 chapters titles or tracks V is displayed at the...

Страница 40: ...laying a DVD VIDEO or DVD VR mode disc T hours minutes seconds Playing time of the current title T Remaining time of the current title C Playing time of the current chapter C Remaining time of the current chapter When playing a VIDEO CD or Super VCD with PBC functions minutes seconds Playing time of the current scene When playing a VIDEO CD without PBC functions or CD T minutes seconds Playing tim...

Страница 41: ... DATA DVD you can display the name of the album track and the audio bit rate the amount of data per second of the current audio track on your TV screen Checking the information on the front panel display You can view the time information and text displayed on the TV screen also on the front panel display The information on the front panel display changes as follows when you change the time informa...

Страница 42: ...ation and text using the Control Menu page 14 Notes Depending on the type of disc being played the DVD CD text or track name may not be displayed The player can only display the first level of the DVD CD text such as the disc name or title Playing time of MP3 audio tracks may not be displayed correctly If you play a disc containing JPEG image files only NO AUDIO DATA appears when MODE MP3 JPEG is ...

Страница 43: ...guage is displayed two or more times the DVD VIDEO is recorded in multiple audio formats When playing a DVD VR mode disc The types of sound tracks recorded on a disc are displayed The default setting is underlined Example 1 MAIN main sound 1 SUB sub sound 1 MAIN SUB main and sub sound When playing a VIDEO CD CD or DATA CD MP3 audio DATA DVD MP3 audio The default setting is underlined STEREO the st...

Страница 44: ...gs TVS When you connect a stereo TV or 2 front speakers TVS TV Virtual Surround lets you enjoy surround sound effects by using sound imaging to create virtual rear speakers from the sound of the front speakers L left R right without using actual rear speakers TVS was developed by Sony to produce surround sound for home use using just a stereo TV This only works when playing a multichannel Dolby au...

Страница 45: ...rs on a stereo TV TVS NIGHT Large sounds such as explosions are suppressed but the quieter sounds are unaffected This feature is useful when you want to hear the dialog and enjoy the surround sound effects of TVS WIDE at low volume TVS STANDARD Creates three sets of virtual rear speakers from the sound of the front speakers L R without using actual rear speakers shown below Use this setting when y...

Страница 46: ...orded on the discs you can change the subtitles or turn them on and off whenever you want while playing a DVD 1 Press SUBTITLE during playback The following display appears 2 Press SUBTITLE repeatedly to select a setting When playing a DVD VIDEO Select the language Depending on the DVD VIDEO the choice of language varies When 4 digits are displayed they indicate a language code See Language Code L...

Страница 47: ...s a bold dynamic picture by increasing the picture contrast and the color intensity DYNAMIC 2 produces a more dynamic picture than DYNAMIC 1 by further increasing the picture contrast and color intensity CINEMA 1 enhances details in dark areas by increasing the black level CINEMA 2 white colors become brighter and black colors become richer and the color contrast is increased MEMORY adjusts the pi...

Страница 48: ... Note The BRIGHTNESS setting is not effective if you connect the player via the LINE OUT VIDEO or S VIDEO OUT jack and select PROGRESSIVE AUTO or PROGRESSIVE VIDEO by using the PROGRESSIVE button on the front panel Sharpening the Picture SHARPNESS You can enhance the outlines of images to produce a sharper picture 1 Press DISPLAY twice during playback The Control Menu appears 2 Press X x to select...

Страница 49: ...PROGRESSIVE VIDEO by using the PROGRESSIVE button on the front panel Adjusting the Picture Quality BNR MNR You can adjust the picture quality by BNR Block Noise Reduction or MNR Mosquito Noise Reduction Adjusting the BNR The BNR function adjusts the picture quality by reducing the block noise or mosaic like patterns that appear on your TV screen 1 Press DISPLAY twice during playback The Control Me...

Страница 50: ...ture quality by reducing the faint noise appearing around the outlines of the images The noise reduction effects are automatically adjusted within each setting range according to the video bit rate and other factors 1 Press DISPLAY twice during playback The Control Menu appears 2 Press X x to select MNR then press ENTER The options for MNR appear 3 Press X x to select the setting OFF To cancel the...

Страница 51: ...ress ENTER The AV SYNC adjustment bar appears 4 Press c repeatedly to adjust the delay Each time you press C c the delay is adjusted by 10 milliseconds 5 Press ENTER The selected setting takes effect To reset the AV SYNC setting Press CLEAR in step 4 Notes This function is not effective if you use the DIGITAL OUT OPTICAL or COAXIAL jack and set DOLBY DIGITAL or DTS in AUDIO SETUP to DOLBY DIGITAL ...

Страница 52: ...t supplied for details on the recording format Note The player may not be able to play some DATA CDs DATA DVDs created in the Packet Write format MP3 audio track or JPEG image file that the player can play The player can play the following tracks and files MP3 audio tracks with the extension MP3 JPEG image files with the extension JPEG or JPG JPEG image files that conform to the DCF image file for...

Страница 53: ...mmended that you create albums with no more than two trees Notes Depending on the software you use to create the DATA CD DATA DVD the playback order may differ from the above illustration The playback order above may not be applicable if there are more than 200 albums and 300 tracks files in each album The player can recognize up to 200 albums the player will count just albums including albums tha...

Страница 54: ... MP3 audio track 1 After step 2 of Selecting an album press ENTER The list of tracks in the album appears 2 Press X x to select a track and press ENTER Playback starts from the selected track To stop playback Press x To go to the next or previous page Press c or C To return to the previous display Press O RETURN To go to the next or previous MP3 audio track Press or during playback You can select ...

Страница 55: ... while viewing the image Each time you press X the image rotates counterclockwise by 90 degrees To return to normal view press CLEAR Note that the view also returns to normal if you press C c to go to the next or previous image Example when X is pressed once To magnify a JPEG image ZOOM Press ZOOM while viewing the image You can enlarge the image up to four times the original size and scroll using...

Страница 56: ...PLAY during stop mode The Control Menu appears 2 Press X x to select MODE MP3 JPEG and press ENTER The options for MODE MP3 JPEG appear 3 Press X x to select AUTO default and press ENTER AUTO plays both the JPEG image files and MP3 audio tracks in the same album as a slide show AUDIO MP3 plays only MP3 audio tracks continuously IMAGE JPEG plays only JPEG image files continuously 4 Press MENU The l...

Страница 57: ...set MODE MP3 JPEG to AUTO Setting the pace for a slide show INTERVAL You can set the time the slides are displayed on the screen 1 Press DISPLAY twice while viewing a JPEG image or when the player is in stop mode The Control Menu appears 2 Press X x to select INTERVAL then press ENTER The options for INTERVAL appear 3 Press X x to select a setting The default setting is underlined NORMAL sets the ...

Страница 58: ... 41st disc the first disc is canceled 1 Insert the disc you want to lock If the disc is playing press x to stop playback 2 Press DISPLAY while the player is in stop mode The Control Menu appears 3 Press X x to select PARENTAL CONTROL then press ENTER The options for PARENTAL CONTROL appear 4 Press X x to select ON t then press ENTER If you have not entered a password The display for registering a ...

Страница 59: ...play will ask you to enter a new 4 digit password Parental Control limited playback Playback of some DVD VIDEOs can be limited according to a predetermined level such as the age of the users The PARENTAL CONTROL function allows you to set a playback limitation level 1 Press DISPLAY while the player is in stop mode The Control Menu appears 2 Press X x to select PARENTAL CONTROL then press ENTER The...

Страница 60: ...sert the disc and press H The display for entering your password appears 2 Enter your 4 digit password using the number buttons then press ENTER The player starts playback z Hint If you forget your password remove the disc and repeat steps 1 to 3 of Parental Control limited playback When you are asked to enter your password enter 199703 using the number buttons then press ENTER The display will as...

Страница 61: ...ng the number buttons then press ENTER 6 To confirm your password re enter it using the number buttons then press ENTER If you make a mistake entering your password Press C before you press ENTER and input the correct number Controlling Your TV with the Supplied Remote You can control the sound level input source and power switch of your Sony TV with the supplied remote You can control your TV usi...

Страница 62: ...ow 2 Release TV 1 Code numbers of controllable TVs If more than one code number is listed try entering them one at a time until you find the one that works with your TV Notes When you replace the batteries of the remote the code number you have set may be reset to the default setting Set the appropriate code number again Depending on the connected unit you may not be able to control your TV using ...

Страница 63: ...r SETUP appear 3 Press X x to select CUSTOM then press ENTER The Setup Display appears 4 Press X x to select the setup item from the displayed list LANGUAGE SETUP SCREEN SETUP CUSTOM SETUP or AUDIO SETUP Then press ENTER The Setup item is selected Example SCREEN SETUP 5 Press X x to select an item then press ENTER The options for the selected item appear Example TV TYPE ENTER DISPLAY STOP 1 5 QUIC...

Страница 64: ...o use the display see Using the Setup Display page 63 OSD On Screen Display Switches the display language on the screen MENU DVD VIDEO only You can select the desired language for the disc s menu AUDIO DVD VIDEO only Switches the language of the sound track When you select ORIGINAL the language given priority in the disc is selected SUBTITLE DVD VIDEO only Switches the language of the subtitle rec...

Страница 65: ...usts the video signals that are suitable for the TV When the HDMI indicator on the front panel lights up images from the S VIDEO OUT and LINE OUT VIDEO jacks are enlarged vertically Except when 720 480p is selected YCBCR RGB HDMI Selects the type of HDMI signal output from HDMI OUT jack Notes If the playback picture becomes distorted set YCBCR to RGB If the HDMI OUT jack is connected to equipment ...

Страница 66: ...ct ratio progressive signals If you can change the aspect ratio on your progressive format 480p compatible TV change the setting on your TV not the player Note that this setting is effective only for HDMI connection or progressive signals output from the COMPONENT VIDEO OUT jacks ON Turns on the screen saver OFF Turns off the screen saver JACKET PICTURE The jacket picture still picture appears but...

Страница 67: ...ital sound tracks have the same number of channels the player selects PCM DTS and Dolby Digital sound tracks in this order MULTI DISC RESUME DVD VIDEO VIDEO CD only Switches the Multi disc Resume setting on or off Resume playback can be stored in memory for up to 6 different DVD VIDEOs VIDEO CDs page 29 Note If you run Quick Setup Multi disc Resume settings stored in memory may return to the defau...

Страница 68: ... output of the LINE OUT L R AUDIO jacks AUDIO DRC Dynamic Range Control DVD VIDEO DVD VR mode only Makes the sound clear when the volume is turned down when playing a DVD that conforms to AUDIO DRC This function affects the output from the following jacks LINE OUT L R AUDIO jacks DIGITAL OUT OPTICAL or COAXIAL HDMI OUT jack only when DOLBY DIGITAL is set to D PCM page 70 AUTO Normally select this ...

Страница 69: ... connection details see page 22 Select DOLBY DIGITAL DTS and 48kHz 96kHz PCM after setting DIGITAL OUT to ON If you connect a component that is incompatible with the selected audio signal a loud noise or no sound may be heard from the speakers risking damage to your ears or speakers Notes The AV SYNC function page 51 is not effective if you use the DIGITAL OUT OPTICAL or COAXIAL jack and set DOLBY...

Страница 70: ...the HDMI OUT jack is connected to equipment not compatible with 96 kHz 24 bit signals 48 kHz 16 bit PCM will be automatically output even when you select 96kHz 24bit D PCM Select this when the player is connected to an audio component without a built in Dolby Digital decoder You can select whether the signals conform to Dolby Surround Pro Logic or not by making adjustments to the DOWNMIX item in A...

Страница 71: ...RLACE using the PROGRESSIVE button on the front panel so that the PROGRESSIVE indicator turns off and the player is set to normal interlace format The player is connected to an input device that is not HDCP compliant the HDMI indicator on the front panel does not light up See page 19 If the HDMI OUT jack is used for video output changing the HDMI RESOLUTION setting in SCREEN SETUP may solve the pr...

Страница 72: ...yer Moisture has condensed inside the player page 5 The player cannot play a recorded disc that is not correctly finalized page 9 The MP3 audio track cannot be played page 53 The DATA CD is not recorded in an MP3 format that conforms to ISO 9660 Level 1 Level 2 or Joliet The DATA DVD is not recorded in MP3 format that conforms to UDF Universal Disk Format The MP3 audio track does not have the exte...

Страница 73: ...ed or turned off Try using the DVD s menu instead of the direct selection button on the remote page 30 Multilingual subtitles are not recorded on the DVD being played The DVD prohibits the changing of subtitles The angles cannot be changed Try using the DVD s menu instead of the direct selection button on the remote page 30 Multi angles are not recorded on the DVD being played The angle can only b...

Страница 74: ...d discretely and little deterioration is realized because all channel data processing is digital DTS page 22 70 Digital audio compression technology that Digital Theater Systems Inc developed This technology conforms to multi channel surround sound The rear channel is stereo and there is a discrete subwoofer channel in this format DTS provides the same discrete channels of high quality digital aud...

Страница 75: ...cond HDMI High Definition Multimedia Interface HDMI is an interface that supports both video and audio on a single digital connection The HDMI connection carries standard to high definition video signals and multi channel audio signals to AV components such as HDMI equipped TVs in digital form without degradation Since the video signals are compatible with the current DVI Digital Visual Interface ...

Страница 76: ...LINE OUT AUDIO Phono jack 2 Vrms 10 kilohms DIGITAL OUT OPTICAL Optical output jack 18 dBm wave length 660 nm DIGITAL OUT COAXIAL Phono jack 0 5 Vp p 75 ohms HDMI OUT Type A 19 pin COMPONENT VIDEO OUT Y PB PR Phono jack Y 1 0 Vp p PB PR interlace 1 0 648 Vp p progressive or interlace 2 0 7 Vp p 75 ohms 1 BLACK LEVEL COMPONENT OUT is ON 2 BLACK LEVEL COMPONENT OUT is OFF LINE OUT VIDEO Phono jack 1...

Страница 77: ...atin 1326 Lingala 1327 Laothian 1332 Lithuanian 1334 Latvian Lettish 1345 Malagasy 1347 Maori 1349 Macedonian 1350 Malayalam 1352 Mongolian 1353 Moldavian 1356 Marathi 1357 Malay 1358 Maltese 1363 Burmese 1365 Nauru 1369 Nepali 1376 Dutch 1379 Norwegian 1393 Occitan 1403 Afan Oromo 1408 Oriya 1417 Punjabi 1428 Polish 1435 Pashto Pushto 1436 Portuguese 1463 Quechua 1481 Rhaeto Romance 1482 Kirundi ...

Страница 78: ... 57 EXCHANGE 28 F Fast forward 36 FAST PLAY 27 Fast reverse 36 FILE 38 File 75 Film based software 21 75 Freeze Frame 37 Front panel display 12 H Handling discs 2 HDMI AUDIO HDMI 68 HDMI 75 HDMI RESOLUTION 65 Hooking up 17 I INDEX 38 Interlace format 75 INTERVAL 57 J JPEG 7 52 L LANGUAGE SETUP 64 Locating a specific point by watching the TV screen 36 M MEMORY 47 MENU 64 MNR 50 MODE MP3 JPEG 56 MP3...

Страница 79: ... fm master page right 79 DVP NC85H 2 666 954 11 1 Additional Information TOP MENU 30 TRACK 38 Track 12 TRACK SELECTION 67 TRACK VIEWER 39 Troubleshooting 71 TV TYPE 65 TVS TV Virtual Surround 44 U Usable discs 8 V Video based software 21 75 VIDEO CD 7 26 Z ZOOM 27 55 ...

Страница 80: ..._US 01US15BCO CEK fm master page left Sony Corporation Printed in Malaysia Printed on 100 recycled paper using VOC Volatile Organic Compound free vegetable oil based ink DVP NC85H 2 666 954 11 2 01US15BCO CEK fm Page 80 Thursday December 8 2005 1 37 PM ...

Отзывы: