background image

E:\4697418211\4697418211DSX410BTUC\01GB-DSX410BTUC\040CD.fm

masterpage: Left

DSX-410BT

4-697-418-

21

(1)

6

GB

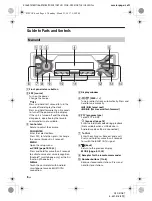
Guide to Parts and Controls

OFF

Press and hold for 1 second to turn the 
source off and display the clock.
Press and hold for more than 2 seconds 
to turn off the power and the display.


If the unit is turned off and the display 
disappears, operation by the remote 
commander is not available.

Main unit

010COV.book  Page 6  Thursday, March 23, 2017  5:59 PM

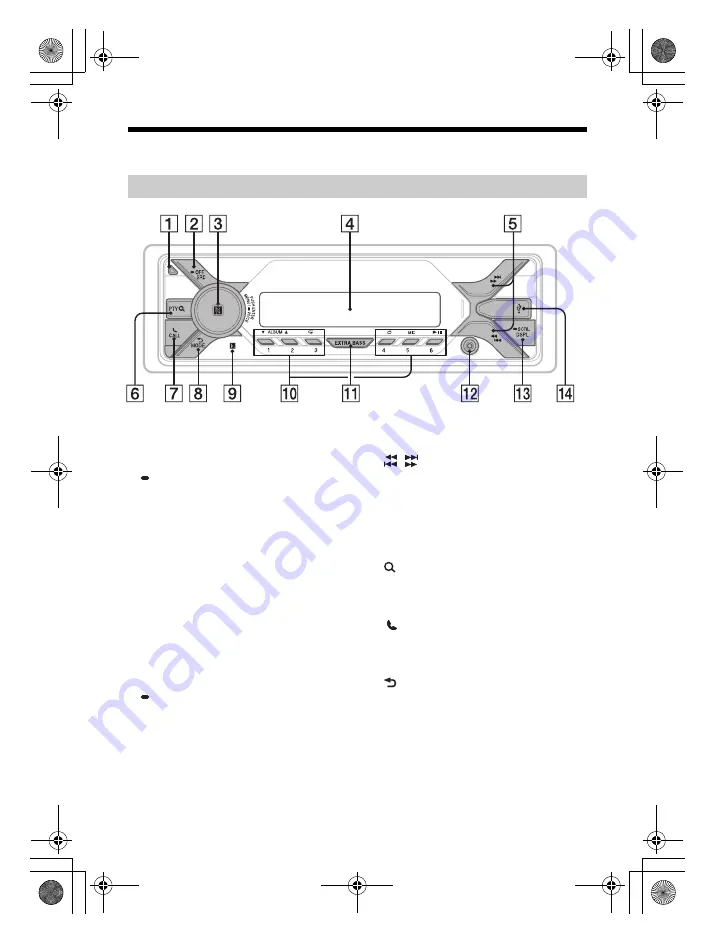
Front panel release button

SRC (source)

Turn on the power.
Change the source.

Control dial

Rotate to adjust the volume.

PUSH ENTER

Enter the selected item.
Press SRC, rotate then press to change 
the source (timeout in 2 seconds).

MENU

Open the setup menu.

VOICE (page


18

,

20,21

)

Press and hold for more than 2 seconds 
to activate voice dial, voice recognition 
(Android™ smartphone only), or the Siri 
function (iPhone only).

N-Mark

Touch the control dial with Android 
smartphone to make BLUETOOTH 
connection.

/

 (prev/next) 

/

 (fast-reverse/fast-forward)

 (browse) (page 13)

Enter the browse mode during playback.
(Not available when a USB device in 
Android mode or iPod is connected.)

CALL

Enter the call menu. Receive/end a call.
Press and hold for more than 2 seconds 
to switch the BLUETOOTH signal.

 (back)

Return to the previous display.

MODE (page


8,11,18)


Number buttons (1 to 6)

Receive stored radio stations. Press and 
hold to store stations.


Display window


/


(SEEK /  

– +)

Tune in radio stations automatically. Press and 
hold to tune manually.


Receptor for the remote commander


PTY (program type)


Select PTY in RDS.

Содержание DSX-410BT

Страница 1: ... of the unit Record the serial number in the space provided below Refer to these numbers whenever you call upon your Sony dealer regarding this product Model No DSX 415BT Serial No To cancel the demonstration DEMO display see page 21 For the connection installation see page 37 Pour annuler l affichage de démonstration DEMO reportez vous à la page 23 Pour le raccordement l installation reportez vou...

Страница 2: ...ation This equipment generates uses and can radiate radio frequency energy and if not installed and used in accordance with the instructions may cause harmful interference to radio communications However there is no guarantee that interference will not occur in a particular installation If this equipment does cause harmful interference to radio or television reception which can be determined by tu...

Страница 3: ...mmander contains a coin button cell battery If the coin button cell battery is swallowed it can cause severe internal burns in just 2 hours and can lead to death Keep new and used batteries away from children If the battery compartment does not close securely stop using the product and keep it away from children If you think batteries might have been swallowed or placed inside any part of the body...

Страница 4: ...E 4697418211 4697418211DSX410BTUC 01GB DSX410BTUC 020INT fm masterpage Right_S ideIndex DSX 410BT 4 697 418 21 1 3GB 010COV book Page 3 Thursday March 23 2017 5 59 PM ...

Страница 5: ...cannot guarantee connection under all conditions Therefore do not rely solely upon any electronic device for essential communications such as medical emergencies On BLUETOOTH communication Microwaves emitting from a BLUETOOTH device may affect the operation of electronic medical devices Turn off this unit and other BLUETOOTH devices in the following locations as it may cause an accident where infl...

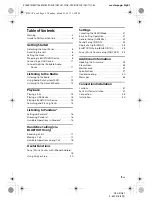
Страница 6: ...acks 15 Listening to Pandora Setting up Pandora 16 Streaming Pandora 16 Available Operations in Pandora 16 Handsfree Calling via BLUETOOTH only Receiving a Call 17 Making a Call 17 Available Operations during Call 18 19 Using Siri Eyes Free 20 Settings Canceling the DEMO Mode 21 Basic Setting Operation 21 General Setup GENERAL 22 Sound Setup SOUND 23 Display Setup DISPLAY 24 BLUETOOTH Setup BLUETO...

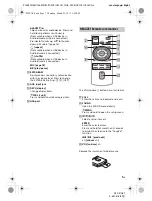
Страница 7: ...meout in 2 seconds MENU Open the setup menu VOICE page 18 20 21 Press and hold for more than 2 seconds to activate voice dial voice recognition Android smartphone only or the Siri function iPhone only N Mark Touch the control dial with Android smartphone to make BLUETOOTH connection prev next fast reverse fast forward browse page 13 Enter the browse mode during playback Not available when a USB de...

Страница 8: ...EXTRA BASS Reinforce bass sound in synchronization with the volume level Press to change the EXTRA BASS setting 1 2 OFF AUX input jack DSPL display Change display items SCRL scroll Press and hold to scroll a display item USB port The VOL volume button has a tactile dot CALL Enter the call menu Receive end a call SOUND Open the SOUND menu directly MENU Press and hold to open the setup menu Select a...

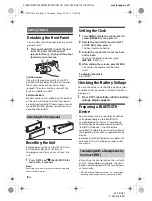
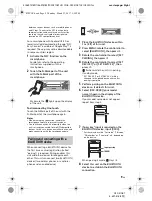
Страница 9: ...s it 2 Rotate the control dial to select SET CLOCK ADJ then press it The hour indication flashes 3 Rotate the control dial to set the hour and minute To move the digital indication press SEEK 4 After setting the minute press MENU The setup is complete and the clock starts To display the clock Press DSPL Preparing a BLUETOOTH Device You can enjoy music or perform handsfree calling depending on the ...

Страница 10: ...on with the smartphone again When connecting a BLUETOOTH device for the first time mutual registration called pairing is required Pairing enables this unit and other devices to recognize each other This unit can connect two BLUETOOTH devices two cellular phones or a cellular phone and an audio device 1 Place the BLUETOOTH device within 1 m 3 ft of this unit 2 Press MENU rotate the control dial to ...

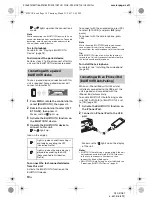
Страница 11: ... phone press CALL Note While streaming BLUETOOTH audio you cannot connect from this unit to the cellular phone Connect from the cellular phone to this unit instead Tip With BLUETOOTH signal on when the ignition is turned to on this unit reconnects automatically to the last connected cellular phone To install the microphone For details see Installing the microphone page 40 When an iPhone iPod with ...

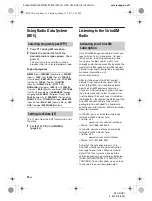
Страница 12: ...hen select SOUND SET AUX VOL page 23 Listening to the Radio To listen to the radio press SRC to select TUNER 1 Press MODE to change the band FM1 FM2 FM3 AM1 or AM2 2 Press MENU rotate the control dial to select GENERAL then press it 3 Rotate the control dial to select SET BTM then press it The unit stores stations in order of frequency on the number buttons 1 Press MODE to change the band FM1 FM2 ...

Страница 13: ...ct Vehicle Tuner and its packaging You will need this number to activate your subscription Write the number down for reference In the USA you can activate online or by calling SiriusXM Listener Care Online Visit www siriusxm com activatenow Phone Call 1 866 635 2349 In Canada you can activate online or by calling SiriusXM Listener Care Online Visit www siriusxm ca activatexm Phone Call 1 877 438 9...

Страница 14: ...al control feature allows you to limit access to SiriusXM channels with mature content When enabled the parental control feature requires you to enter a passcode to tune to the locked channels Information on setting up the passcode and locking channels can be found below 1 Press MENU and rotate the control dial 2 Select GENERAL SXM PARENTAL LOCK SELECT LOCK ON 3 Enter the passcode by rotating the ...

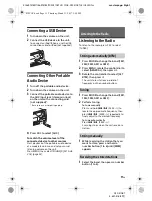
Страница 15: ...roid smartphone visit the support site on the back cover Playback of the following files is not supported MP3 WMA FLAC copyright protected files DRM Digital Rights Management files Multi channel audio files MP3 WMA lossless compression files Before making a connection select the USB mode Android mode or MSC MTP mode depending on the USB device page 22 1 Connect a USB device to the USB port page 11...

Страница 16: ...Available play modes differ depending on the selected sound source Not available when a USB device in Android mode or iPod is connected 1 During USB playback press browse to display the list of search categories When the track list appears press back repeatedly to display the desired search category During USB playback press browse for more than 2 seconds to directly return to the beginning of the...

Страница 17: ... select PANDORA 3 Launch Pandora application on your mobile device 4 Press play pause to start playback If the device number appears Make sure that the same numbers are displayed e g 123456 in this unit and the mobile device then press ENTER on this unit and select Yes on the mobile device When activating the BLUETOOTH function You can adjust the volume level Press MENU then select SOUND SET BTA V...

Страница 18: ...s it 4 Rotate the control dial to select a name from the name list then press it 5 Rotate the control dial to select a number from the number list then press it The phone call starts 1 Press CALL When two cellular phones are connected to the unit rotate the control dial to select either phone then press it 2 Rotate the control dial to select RECENT CALL then press it A list of the call history app...

Страница 19: ...ular phone Your voice is recognized and the call is made To cancel voice dialing Press VOICE Available Operationsduring Call To adjust the ringtone volume Rotate the control dial while receiving a call To adjust the talker s voice volume Rotate the control dial during a call To adjust the volume for the other party Mic gain adjustment Press MIC Adjustable volume levels MIC LOW MIC MID MIC HI To re...

Страница 20: ...select SONY APP then press it 4 Rotate the control dial to select CONNECT then press it Connection to iPhone Android smartphone starts For details on the operations on iPhone Android smartphone see the help of the application Establishing the Sony Music Center connection To terminate connection 1 Press MENU rotate the control dial to select SONY APP then press it 2 Rotate the control dial to selec...

Страница 21: ...iPhone Android smartphone For details on settings refer to the help of the application 1 Activate the Siri function on the iPhone For details refer to the operating instructions supplied with the iPhone 2 Press and hold VOICE for more than 2 seconds The voice command display appears 3 After the iPhone beeps speak into the microphone The iPhone beeps again then Siri starts responding To deactivate ...

Страница 22: ... press it The setting is complete 4 Press back twice The display returns to normal reception play mode Basic Setting Operation You can set items in the following setup categories General setup GENERAL Sound setup SOUND Display setup DISPLAY BLUETOOTH setup BLUETOOTH 1 Press MENU 2 Rotate the control dial to select the setup category then press it The items that can be set differ depending on the s...

Страница 23: ...e function you want to assign to the steering wheel remote control then press it While REGISTER is blinking press and hold the button on the steering wheel remote control you want to assign the function to When registration is complete REGISTERED is displayed To register other functions repeat steps and Available only when STR CONTROL is set to CUSTOM RESET CUSTOM Resets the setting of the steerin...

Страница 24: ... dB BALANCE Adjusts the sound balance RIGHT 15 CENTER LEFT 15 FADER Adjusts the relative level FRONT 15 CENTER REAR 15 S WOOFER subwoofer SW LEVEL subwoofer level Adjusts the subwoofer volume level 6 dB 0 dB 6 dB ATT is displayed at the lowest setting SW PHASE subwoofer phase Selects the subwoofer phase NORM REV LPF FREQ low pass filter frequency Selects the subwoofer cut off frequency 80Hz 100Hz ...

Страница 25: ...TH function 010COV book Page 24 Thursday March 23 2017 5 59 PM DIMMER Changes the display brightness ON OFF CLK clock To set this function to be active only during a fixed period select CLK then set the start and end times To set the brightness when the dimmer function is activated Set DIMMER to ON then adjust BRIGHTNESS To set the brightness when the dimmer function is deactivated Set DIMMER to O...

Страница 26: ...e front panel or audio devices brought in inside the car or it may cause malfunction due to high temperature in direct sunlight Power antenna aerial extends automatically Moisture condensation Should moisture condensation occur inside the unit remove the disc and wait for about an hour for it to dry out otherwise the unit will not operate properly To maintain high sound quality Do not splash liqui...

Страница 27: ...Apple performance standards Apple is not responsible for the operation of this device or its compliance with safety and regulatory standards Please note that the use of this accessory with iPod or iPhone may affect wireless performance If you have any questions or problems concerning your unit that are not covered in this manual consult your nearest Sony dealer About iPod Compatible Model Bluetoot...

Страница 28: ...er to prevent this detach the front panel page 8 and clean the connectors with a cotton swab Do not apply too much force Otherwise the connectors may be damaged Notes For safety turn off the ignition before cleaning the connectors and remove the key from the ignition switch Never touch the connectors directly with your fingers or with any metal device Specifications FOR THE CUSTOMERS IN THE USA NO...

Страница 29: ...obstacles between devices magnetic fields around a microwave oven static electricity reception sensitivity antenna aerial s performance operating system software application etc 2 BLUETOOTH standard profiles indicate the purpose of BLUETOOTH communication between devices Power amplifier section Output Speaker outputs Speaker impedance 4 Ω 8 Ω Maximum power output 55 W 4 at 4 Ω General Outputs Audi...

Страница 30: ...gle Google Play and Android are trademarks of Google Inc libFLAC Copyright C 2000 2009 Josh Coalson Copyright C 2011 2013 Xiph Org Foundation Redistribution and use in source and binary forms with or without modification are permitted provided that the following conditions are met Redistributions of source code must retain the above copyright notice this list of conditions and the following discla...

Страница 31: ...matched correctly with the car s accessory power connector During playback or reception the demonstration mode starts If no operation is performed for 5 minutes with DEMO ON set the demonstration mode starts Set DEMO OFF page 22 The display disappears from does not appear in the display window The dimmer is set to DIM ON page 24 The display disappears if you press and hold OFF Press OFF on the uni...

Страница 32: ...er cannot be performed These operations cannot be performed when a USB device in Android mode or iPod is connected Set USB MODE to MSC MTP page 22 Remove the iPod The USB mode of the device is not set to the appropriate mode Make sure that the USB mode of the device is set to MSC MTP mode The sound cannot be output during playback in Android mode While the unit is in Android mode the sound outputs...

Страница 33: ...e other than the phone call sound is loud try reducing this noise E g If a window is open and road noise etc is loud shut the window If an air conditioner is loud lower the air conditioner The phone is not connected When BLUETOOTH audio is played the phone is not connected even if you press CALL Connect from the phone The phone sound quality is poor Phone sound quality depends on reception conditi...

Страница 34: ... 2 0 is connected to the unit while USB MODE is set to ANDROID Set USB MODE to MSC MTP page 22 OVERLOAD The USB device is overloaded Disconnect the USB device then press SRC to select another source The USB device has a fault or an unsupported device is connected READ Now reading information Wait until reading is complete and playback starts automatically This may take some time depending on the f...

Страница 35: ...peration BOOKMARK ERROR Bookmarking failed Wait for a while then try again CANNOT SKIP Skipping tracks is not allowed Wait until the commercial ends next track begins or select another station on the list Pandora limits the number of skips allowed on their service 010COV book Page 34 Thursday March 23 2017 5 59 PM For Sony Music Center operation APP A connection with the application is not establi...

Страница 36: ...try again UPDATE PANDORA APP An old version of Pandora is connected Update the Pandora application to the latest version For SiriusXM operation CH LOCKED The channel that you have requested is locked by the radio parental control feature See To set a parental control page 13 for more information on the parental control feature and how to access locked channels CH UNAVAIL The channel that you have ...

Страница 37: ...a away from any obstructions Inspect the antenna cable for damage and kinks Consult the SiriusXM Connect Vehicle Tuner installation manual for more information on antenna installation Replace the antenna if the cable is damaged SiriusXM products are available at your local car audio retailer or online at www shop siriusxm com SUBSCRIPTION UPDATED PRESS ENT TO CONTINUE The radio has detected a chan...

Страница 38: ... near heater ducts Use only the supplied mounting hardware for a safe and secure installation Note on the power supply lead yellow When connecting this unit in combination with other stereo components the amperage rating of the car circuit to which the unit is connected must be higher than the sum of each component s fuse amperage rating Mounting angle adjustment Adjust the mounting angle to less ...

Страница 39: ...a wired remote control not supplied from a wired remote control not supplied 4 White White black striped Gray Black Yellow Red Blue white striped from a car antenna aerial Front speaker 1 2 Rear speaker 1 2 Gray black striped Green Green black striped Purple Purple black striped 3 3 Subwoofer 1 Power amplifier 1 For details see Making connections page 39 Satellite radio tuner SiriusXM 1 010COV boo...

Страница 40: ...t necessary to connect this lead if there is no power antenna aerial or antenna aerial booster or with a manually operated telescopic antenna aerial To AMP REMOTE IN of an optional power amplifier This connection is only for amplifiers and a power antenna aerial Connecting any other system may damage the unit Subwoofer Easy Connection You can use a subwoofer without a power amplifier when it is co...

Страница 41: ...bent inwards 2 mm 3 32 in For Japanese cars see Mounting the unit in a Japanese car page 41 1 Position the bracket inside the dashboard then bend the claws outward for a tight fit 2 Mount the unit onto the bracket then attach the protection collar Notes If the catches are straight or bent outwards the unit will not be installed securely and may spring out Make sure the 4 catches on the protection ...

Страница 42: ...ge 8 When replacing the fuse be sure to use one matching the amperage rating stated on the original fuse If the fuse blows check the power connection and replace the fuse If the fuse blows again after replacement there may be an internal malfunction In such a case consult your nearest Sony dealer to dashboard center console Existing parts supplied with your car Bracket Bracket to dashboard center ...

Страница 43: ...utes dernières informations techniques sur ce produit rendez vous sur le site Web suivant Support site If you have any questions or for the latest support information on this product please visit the web site below If you have any questions problems regarding this product try the following 1 Read Troubleshooting in these Operating Instructions 2 Please contact U S A only Call 1 800 222 7669 URL ht...

Отзывы: