background image

42 

GB

Changing the settings of 
the auto power on/off 
function

The timer function to turn the photo frame on/
off automatically can be set. Main power needs 
to be switched ON for this function.

1

Press MENU.

The menu is displayed.

2

Press 

B

/

b

 to select the 


(Settings) tab.

The settings screen is displayed.

3

Press 

v

/

V

 to select [Auto power ON/

OFF] and press 

.

The screen used for setting a value for 
[Auto power ON/OFF] is displayed.

4

Press 

v

/

V

 to select [Simple] or 

[Advanced] and then press 

.

[Simple]: Sets the auto power ON/OFF 
function finely in one minute increments.

[Advanced]: Sets the auto power ON/OFF 
function according to a day of the week by 
one hour units.

5

Set the time setting.

[Simple]

1

Press 

v

/

V

 to select [Auto power ON/

OFF] and then press 

.

2

Press 

v

/

V

 to select [Enable] and then 

press .

3

Set the auto on/off timer.
Press 

v

/

V

 to set the time you want.

AM or PM is displayed on the right of 
the screen when you select [12 hours] 
on the time display setting.

4

Set the auto ON/OFF day.
Press 

v

/

V

 to select the day you want to 

use this function and then press 

 to 

check.  Press 

v

/

V

 to select [OK] and 

then press 

.

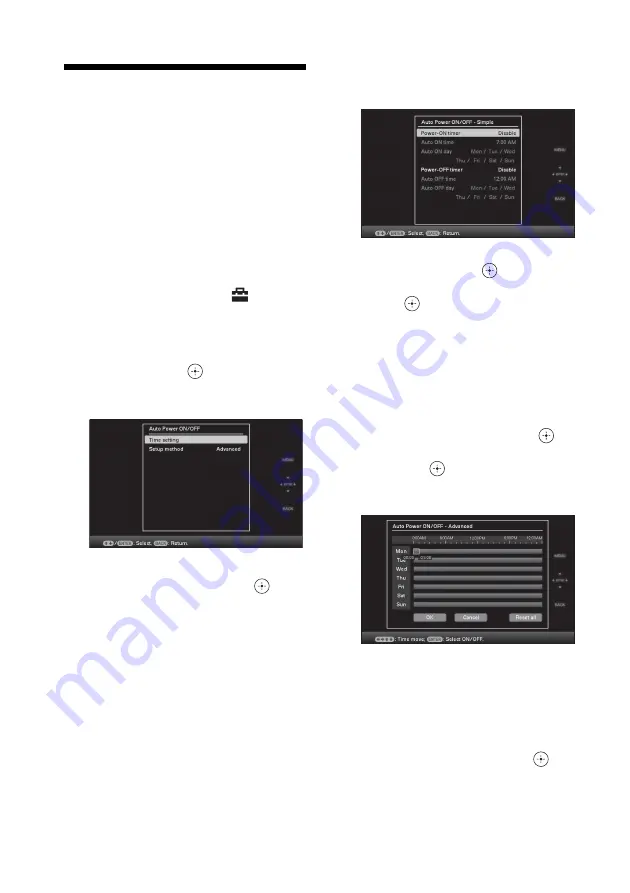
[Advanced]

1

Press 

B

/

b

/

v

/

V

 to select the time you 

want to use the auto power on/off 
function.
You can set this function according to a 
day of the week by one hour units.
The color of the selected time zone 
changes to blue after you press 

. The 

power supply of the photo frame will be 
turned on when the blue time zone time 
occurs. The color of the selected time 

Содержание DPF D92 - LCD WVGA 15:9 Diagonal Digital Photo Frame

Страница 1: ...ssages Troubleshooting Additional information Operating Instructions Before operating this unit please read this manual thoroughly and retain it for future reference Owner s Record The model and serial numbers are located at the rear Record the serial number in the space provided below Refer to these numbers whenever you call upon your Sony dealer regarding this product Model No DPF D82 D92 Serial...

Страница 2: ...llation If this equipment does cause harmful interference to radio or television reception which can be determined by turning the equipment off and on the user is encouraged to try to correct the interference by one or more of the following measures Reorient or relocate the receiving antenna Increase the separation between the equipment and receiver Connect the equipment into an outlet on a circui...

Страница 3: ...sal of waste batteries applicable in the European Union and other European countries with separate collection systems This symbol on the battery or on the packaging indicates that the battery provided with this product shall not be treated as household waste By ensuring these batteries are disposed of correctly you will help prevent potentially negative consequences for the environment and human h...

Страница 4: ...ains iTypeTM and fonts from Monotype Imaging Inc iTypeTM is a trademark of Monotype Imaging Inc All other companies and product names mentioned herein may be the trademarks or registered trademarks of their respective companies Furthermore and are not mentioned in each case in this manual This unit is equipped with face recognition feature Sony Face Recognition technology developed by Sony is used...

Страница 5: ...F Sony Corporation reserves the right to make any modification to this manual or the information contained herein at any time without notice The software described herein may also be governed by the terms of a separate user license agreement Any design data such as sample pictures provided in this software cannot be modified or duplicated except for the purpose of personal use Any unauthorized dup...

Страница 6: ...g the settings of the slideshow 29 Refresh mode 32 Adding images to the internal memory 32 Exporting an image 34 Deleting an image 36 Registering a mark 37 Searching for an image Filtering 39 Specifying the playback device 40 Adjusting the image size and position 40 Enlarging reducing an image 40 Rotating an image 41 Changing the settings of the auto power on off function 42 Using the alarm functi...

Страница 7: ...sage appears 53 Troubleshooting If trouble occurs 55 Additional information Precautions 60 Safety 60 Installation 60 Cleaning 60 Restrictions on duplication 61 About memory cards 61 Memory Stick 61 SD memory card 62 xD Picture Card 62 CompactFlash card 62 Notes on using a memory card 63 Specifications 64 Index 66 ...

Страница 8: ...B Before operation Enjoying your photo frame in various ways The Sony DPF D82 D92 is a digital photo frame for easily displaying images taken with a digital camera or other device without using a computer ...

Страница 9: ...ewing modes such as the slideshow display Clock and calendar display Single view mode and Index image display page 23 xVarious modes The displayed image can be switched automatically as though you are turning the pages of an album yourself You can select from various modes including just images a clock or calendar view You can also change playback settings such as the playback order page 29 xAddin...

Страница 10: ...ientation Images are also automatically rotated when the photo frame is set in either the portrait or landscape position page 16 xEasy transfer of images taken with a Bluetooth compatible mobile phone or other device You can transfer images to the photo frame s internal memory from a Bluetooth compatible device via a Bluetooth adaptor optional page 49 xDisplaying images on a wall You can hang the ...

Страница 11: ... In some regions the warranty is not supplied Identifying the parts For details see the pages indicated in the parentheses The illustrations are of the DPF D92 The locations and names of buttons and connectors of the DPF D82 are identical to those of the DPF D92 although the LCD screen size and shape is different Front A LCD screen B Remote sensor When using the supplied remote control point it at...

Страница 12: ...witch page 19 F Memory Stick PRO Standard Duo slot page 21 G Access lamp H Standby indicator I 1 on standby button J MENU button Displays the menu From the menu you can operate the same functions as those of the buttons on the remote control such as Slideshow Settings Rotate Add to album and Date time settings K Direction B b v V buttons Press B b v V to select the menu items Then press to enter t...

Страница 13: ...13 GB Before operation P Buzzer Q VIEW MODE button page 23 R Alarm switch page 43 S Holes for hanging unit on the wall page 17 T Space for storing the stand Continued ...

Страница 14: ...23 This button switches from the single view mode to the index image display D SINGLE button page 23 E MENU button F BACK button G 1 on standby button H CLOCK button page 23 I Zoom in Zoom out buttons page 40 J ALBUM button page 32 K Direction B b v V buttons L enter button M ROTATE button page 40 ...

Страница 15: ...ing replace the battery CR2025 lithium battery with a new one 1 Pull out the battery holder While pressing in the tab of the battery holder pull out the battery holder 2 Remove the old battery from the battery holder and then insert a new battery Insert the battery so that is facing upwards 3 Reinsert the battery holder into the remote control Notes When the lithium battery becomes weak the operat...

Страница 16: ...corrosion Incorrectly inserting shorting dismantling or heating the battery or throwing it into a fire may cause the battery to rupture or leak About descriptions in this manual The operations described in this manual are based on remote control operation When an operation is performed differently for example with the remote control and the buttons on the photo frame it will be explained in a tip ...

Страница 17: ...rd near the photo frame Tip It is easier to turn the stand if you wind or wrap a rubber band tightly around the stand when you remove the stand from the photo frame To display the photo frame on the wall You can hang the photo frame on the wall using the following procedure 1 Prepare screws not supplied suitable for the screw holes on the rear panel 2 Screw the screws not supplied into the wall Be...

Страница 18: ...cting to the AC power source 1 Insert the plug of the AC adaptor into the DC IN 12 V jack on the rear of the photo frame 2 Connect the AC adaptor to the wall outlet Notes The socket outlet should be as close as possible to the unit and easily accessible Do not place the photo frame in an unsteady location such as on an unsteady table or tilted surface Connect the AC adaptor to an easily accessible...

Страница 19: ...utlet via the AC adaptor Do not turn the photo frame off or disconnect the AC adaptor from the photo frame before the standby indicator turns red Doing so may damage the photo frame Turning the photo frame on When the power switch is set to off When the power switch is set to on the standby indicator turns green and the Sony logo on the front panel lights up When the power switch is set to on Pres...

Страница 20: ...hen set the date and time Setting the current time The clock of the photo frame needs to be adjusted in order to display an accurate time in the clock and calendar view modes 1 Press MENU The menu screen is displayed 2 Press B b to select the Settings tab The settings screen is displayed Tip You can use the B b button only when a memory card is inserted in the photo frame an external device is con...

Страница 21: ...hours and then press 9 Press MENU The menu screen is closed Inserting a memory card Insert the memory card firmly into the corresponding slot with its label side facing toward you when you are facing the back side of the photo frame The access lamp flashes when the memory card is inserted correctly Reinsert the memory card after checking the label side of the memory card if the access lamp does no...

Страница 22: ...priorities Memory card t The device connected to the USB A Bluetooth connector t internal memory If multiple memory cards are inserted when the photo frame is turned on the images of the first memory card you inserted take priority and are displayed If multiple devices are inserted while the photo frame is turned off the priority order for display is as follows Memory Stick b CompactFlash card b S...

Страница 23: ... the photo frame using the buttons on the photo frame 3 Press B b v V or VIEW MODE to select the style you want and then press Note You cannot select a group other than the Clock and calendar display when there is no image stored in the internal memory Group Explanation Slideshow Displays a slideshow display style Clock and calendar Displays a clock or calendar style Displays a single image style ...

Страница 24: ... on the photo frame when the image you want appears in the slideshow display You can use the VIEW MODE button on the photo frame Group Image Style Explanation Slideshow A Single view Images are displayed on a single screen one after another with the effect selected in the Slideshow Settings menu B Multi image view Displays multiple images at the same time C Clock view Displays images with the pres...

Страница 25: ...ou can use the VIEW MODE button on the photo frame Clock1 Clock2 Clock3 Clock4 Clock5 Clock6 Clock7 Clock8 Clock9 Clock10 Clock11 Calendar1 Calendar2 Calendar3 Lunar Calendar when you select Simplified Chinese in Language setting Arabic Calendar when you select Arabic in Language setting Farsi Calendar when you select Persian in Language setting ...

Страница 26: ...re image Displays an entire image in the screen You can switch the images to be displayed by pressing B b B Fit to screen Displays an image over the whole screen You can switch the images to be displayed by pressing B b C Entire image with Exif Displays image information such as the image number file name and shooting date while displaying the entire image You can switch the images to be displayed...

Страница 27: ...onstration mode ends if a button other than 1 on standby is pressed You can select the single view mode when you press on the photo frame when the image you want appears in the index image display You can use the VIEW MODE button on the photo frame Group Image Style Explanation Index A Index 1 Displays a list of large thumbnails You can select an image by pressing B b v V B Index 2 Displays a list...

Страница 28: ...evice Model name of image input device Shutter speed e g 1 8 Aperture value e g F2 8 Exposure value e g 0 0EV Rotation information 4Setting information 5Image number folder file number This is displayed if the image is DCF compliant 6Shooting date time Icons Meaning Memory Stick input SD Memory Card input CompactFlash input xD Picture Card input External Device input Internal memory input Icons Me...

Страница 29: ...tings tab The settings screen is displayed 3 Press v V to select Slideshow Settings and then press The slideshow settings screen is displayed 4 Press v V to select the item and then press Refer to the tables on the next page for details on the setting items Notes Note the following when you select a slideshow using the image stored on the memory card Due to one of the characteristics of the memory...

Страница 30: ... the screen is too bright it may make you feel nauseous Be careful that you do not make the brightness settings too bright when you use the photo frame Tip You can also use the VIEW MODE button on the photo frame ...

Страница 31: ... image by fading out the current image and fading in the next image Wipe Transitions to the next image as though the current image is being wiped off the screen to reveal the next image Random Uses the above five effects randomly Shuffle ON Displays images randomly OFF Cancels shuffle playback Color effect Color Displays an image in color Sepia Displays an image in a sepia color Monochrome Display...

Страница 32: ...y Notes We recommend that you perform a backup of your data periodically to avoid losing it Do not run a slideshow with less than 10 images continuously if you have set the interval time for the slideshow to 3 seconds You may not be able to protect some images in the internal memory Adding images to the internal memory You can use the photo frame as a digital album saving important images in the i...

Страница 33: ...for the search Other than during a search Displays all images in the device displayed on the screen Refer to Searching for an image Filtering page 39 1Press B b v V to select the image to add to the album and then press A check mark will be attached to the check box of each selected image Repeat this operation to add multiple images at the same time To cancel the selection select images to cancel ...

Страница 34: ...ecommend that you perform a backup of your data periodically to avoid losing it Exporting an image You can export the images in the internal memory to a memory card or external device 1 Press MENU when an image stored on the internal device is displayed on the screen The menu is displayed 2 Press B b to select the Editing tab The screen used for editing is displayed 3 Press v V to select Export an...

Страница 35: ...o export is displayed 6 Press v V to select the device to which to export the image and then press 7 Press v V to select the folder you want to save to and press The confirmation screen used to decide whether to export or not is displayed Tip A new folder is created automatically when you select New folder 8 Press v V to select Yes and then press The exporting is finished 9 Press when the confirma...

Страница 36: ...k mark will be attached to the check box of each selected image Repeat this operation to delete multiple images at the same time To cancel the selection select images to cancel and then press to delete the check mark in the check box 2Press MENU The delete confirmation screen is displayed 6 Press v V to select Yes and then press The image is deleted 7 Press when the confirmation screen is displaye...

Страница 37: ... 2 Press B b to select the Editing tab The screen used for editing is displayed 3 Press v V to select Marking and then press 4 Press v V to select the mark you want and then press 5 Press v V to select Mark this image Selected images or Mark all images and then press If you select Mark this image the image currently displayed will be marked and showed in the future Go to step 7 This item cannot be...

Страница 38: ...rk will be removed from the image 7 Press v V to select Yes and then press The mark is attached to the selected image To delete the registration of a mark Select Unmark this image or Unmark all images and then press in step 5 You can also cancel the selection when you remove the check mark from the check box Unmark this image Removes a mark from the image currently displayed This item cannot be se...

Страница 39: ...by the folder Search by vertical horizontal Filters by the image orientation Search by mark Filters by the mark 5 Press v V to select the item you want and then press To cancel the search for an image Press the MENU button when an image is displayed on the screen and then select Exit search show all photo To change the criteria for a search Press the BACK button when an image you searched for is d...

Страница 40: ...out Each press of the button enlarges the image further You can enlarge an image to a maximum of 5 times the original scale You can move an enlarged image up down left and right About crop and save The screen currently displayed is saved as it was trimmed after you press B b v V to move the enlarged image and then press the MENU button You can select Save as new image or Overwrite by pressing the ...

Страница 41: ...for editing is displayed 3 Press v V to select Rotate and then press The Rotate menu is displayed 4 Press v V to select the direction to rotate and then press Rotates the image 90 degrees clockwise Rotates the image 90 degrees counter clockwise 5 Press v V to select OK and then press Note An enlarged image cannot be rotated Tips The information used to rotate the image is retained even after the p...

Страница 42: ... the week by one hour units 5 Set the time setting Simple 1Press v V to select Auto power ON OFF and then press 2Press v V to select Enable and then press 3Set the auto on off timer Press v V to set the time you want AM or PM is displayed on the right of the screen when you select 12 hours on the time display setting 4Set the auto ON OFF day Press v V to select the day you want to use this functio...

Страница 43: ...r ON during the standby mode 2Press B b v V to select OK Using the alarm function You can use the photo frame as an alarm clock Set to the alarm switch on the rear panel to ON Under condition of main power switch set to On the alarm sound and alarm mode screen will appear at the scheduled alarm time To turn off the alarm Set the alarm switch on the rear panel to OFF The alarm is stopped although a...

Страница 44: ...ff at scheduled time power will also turn on regardless of auto off settings Main power needs to be set at ON for alarm to operate Changing the settings You can change the following settings Slideshow Settings Alarm Setting Auto power ON OFF Date time settings General Settings Listing Order Sony logo ON OFF etc Language setting Initialize Note Only internal memory can be formatted 1 Press MENU The...

Страница 45: ...isplayed in gray and cannot be selected 5 Press v V to select a setting value and then press Each time you press v V v V from the photo frame the setting value changes In the case of a numerical value press V to increase the value and press v to decrease the value If you press the setting is confirmed 6 Press MENU The menu closes To reset to factory default settings 1 Press MENU and then select Se...

Страница 46: ...tes all the selected times Setup method Advanced Sets the auto power ON OFF function according to a day of the week by one hour units Simple Sets the auto power ON OFF function finely in one minute increments Date time settings Sets the date time first day of a week etc page 20 General Settings Listing Order Sets the display order of images This setting affects the order in Slideshow Settings Numb...

Страница 47: ...n Japanese English French Spanish German Italian Russian Korean Simplified Chinese Traditional Chinese Dutch Portuguese Arabic Persian Hungarian Polish Czech Thai Greek Turkish Malay Swedish Norwegian Danish Finnish Note Default language setting may vary in some regions Initialize Format internal memory You can format the internal memory Notes All the images added to the internal memory will be de...

Страница 48: ...t USB Connect to Normal or Mass Storage 3 Turn the photo frame to ON page 19 4 Connect the digital camera or external device to the USB A Bluetooth connector Use the USB cable supplied with the digital camera or external device to connect to the photo frame 5 Select the playback device page 40 An image on the device is displayed on the screen For details on the slideshow refer to page 29 For detai...

Страница 49: ...sible the devices used in the communicated should support the same profile Compatible image file formats that can be displayed See page 64 Maximum number of pixels that can be handled See page 64 1 Connect the photo frame to the AC power source page 18 2 Turn the photo frame to ON page 19 3 Connect the Bluetooth adaptor optional to the USB A Bluetooth connector is displayed on the upper portion of...

Страница 50: ...here a wireless LAN is established or a microwave oven is being used near by or other electromagnetic waves are emitted We cannot guarantee that this product works with all devices enabled with Bluetooth wireless technology Sony cannot assume any responsibility for any information leakage that may be caused by the use of Bluetooth communications Sony cannot accept responsibilities for any failure ...

Страница 51: ...d simultaneously Do not disconnect the USB cable during data communication Operation with all computers that satisfy the recommended system requirements is not guaranteed The photo frame has been demonstrated as operable when connected to PC or Sony digital photo printer When other devices are connected to the photo frame these devices may not recognize the internal memory of the photo frame 1 Con...

Страница 52: ...displayed in order of the shooting date on the index image display etc as the information on the shooting date may have been changed or lost when you edited or saved that image file on a computer When images from the computer are saved in the internal memory of the photo frame the image files are saved without being compressed As a result fewer images may be able to be saved to the internal memory...

Страница 53: ...files that can be displayed with the photo frame Cannot delete a protected image To delete a protected file cancel the protection on your digital camera Media is protected Remove protection then try again The memory card is write protected Slide the write protect switch to the enable position page 62 The Memory Stick is full The CompactFlash card is full The SD Memory Card is full The xD Picture C...

Страница 54: ...at not supported The images cannot be displayed if the image file is not supported by the photo frame Cannot open the image No more USB hubs can be connected Connect the device directly to the photo frame or use a device without a built in USB hub Incompatible USB device Check device s USB settings Connect a device with support for mass storage If the USB setting of your device is incorrect set th...

Страница 55: ...mory card inserted or an external device connected properly c Insert a memory card or connect an external device properly pages 21 49 Does the memory card contain images saved with a digital camera or other device Are images stored on the external device c Insert a memory card containing images or connect an external device containing images c Check the file formats that can be displayed page 64 I...

Страница 56: ... is displayed again the image cannot be displayed because the image file is not supported by the photo frame Does the mark displayed below appear in the index view c If the mark shown on the left is displayed the image file is supported by the photo frame but the thumbnail data or image itself cannot be opened Select the mark and press If the mark shown on the left is displayed again the image can...

Страница 57: ...width Symptom Check item Cause Solutions Cannot save an image Is the memory card write protected c Cancel write protection and try saving again Is the write protect switch of the memory card in the LOCK position c Slide the write protect switch to the enable position Is the memory card full c Replace the memory card with one with sufficient free space Or delete any unwanted images page 36 Is the i...

Страница 58: ...image was deleted accidentally c An image cannot be recovered once it is deleted Symptom Check item Cause Solutions The camera is connected but nothing is displayed Is the cable connected properly c Connect the cable properly Is the photo frame turned on c Turn both the photo frame and the camera to ON Nothing happens even if the USB cable is disconnected and then re connected c An over current er...

Страница 59: ... the battery inserted in the remote control properly c Replace the battery page 15 c Insert a battery page 15 c Insert a battery in the proper orientation page 15 c Point the top end of the remote control towards the remote sensor on the photo frame page 15 c Remove any obstruction between the remote control and the remote sensor ...

Страница 60: ...ia the AC adaptor Be sure to use the AC adaptor supplied with the photo frame Do not use other AC adaptors as this may cause a malfunction Do not use the supplied AC adaptor for other devices Do not use an electrical transformer travel converter as this may cause overheating or a malfunction In case the cord of the AC adaptor is damaged do not use it any longer as this may be dangerous On moisture...

Страница 61: ...atible with both standard size and Duo size media Without a Memory Stick Duo adaptor you can use both a standard size Memory Stick and the compact size Memory Stick Duo 3 When using a Memory Stick Micro with the photo frame always insert it into an M2 adaptor 4 M2 is an abbreviation for Memory Stick Micro In this section M2 is used to describe a Memory Stick Micro 5 Data reading recording that req...

Страница 62: ...e data if you slide the write protect switch to LOCK Do not attach any other material than the supplied label on the labelling position When you attach the supplied label be sure to attach it to the labelling position Be careful that the label does not stick out The SD memory card slot of the photo frame allows you to use the following SD memory card 1 miniSD card microSD card An adaptor is necess...

Страница 63: ...on of the card and the correct insertion slot When inserting the memory card it will only insert part of the way so do not try to force it as this could damage the memory card and or photo frame Do not remove a card or turn off the photo frame while the photo frame is reading or writing data or the access indicator is flashing Otherwise data may be rendered unreadable or be erased We recommend tha...

Страница 64: ...ixels that can be displayed 8 000 H 6 000 V pixels File system FAT12 16 32 sector size of 2 048 bytes or smaller Image file name DCF format 256 characters within 8th hierarchy Maximum number of files that can be handled 9 999 files for a memory card an external device Internal memory capacity 3 DPF D92 D82 1 GB Approx 2 000 images 4 can be saved When measuring media capacity 1 GB equals 1 billion ...

Страница 65: ...g the protruding parts Mass Approx 110 g 4 oz See the label of AC adaptor for more details Design and specifications are subject to change without notice 1 Baseline JPEG with 4 4 4 4 2 2 or 4 2 0 format 2 RAW files are displayed as thumbnail preview 3 The capacity is calculated as 1 MB is equivalent to 1 000 000 bytes The actual capacity is reduced as files for management and applications are incl...

Страница 66: ...lay 27 Initialize 47 L Language setting 47 M Mass storage compatible devices 48 Memory cards 61 Memory Stick 61 CompactFlash card 62 Notes on use 63 SD memory card 62 xD Picture Card 62 P Placing in portrait or landscape orientation 16 Playback device 40 Precautions 60 R Remote control 15 Replacing the battery of the remote control 15 Reset 47 Rotating an image 41 S Searching for an image 39 Setti...

Страница 67: ......

Страница 68: ...Sony Corporation Printed in China Printed using VOC Volatile Organic Compound free vegetable oil based ink ...

Отзывы: