background image

DHC-AZ55D/AZ33D.GB.3-215-548-11(1)

1

GB

Item

Item Name, Relevant Disc Type, Function
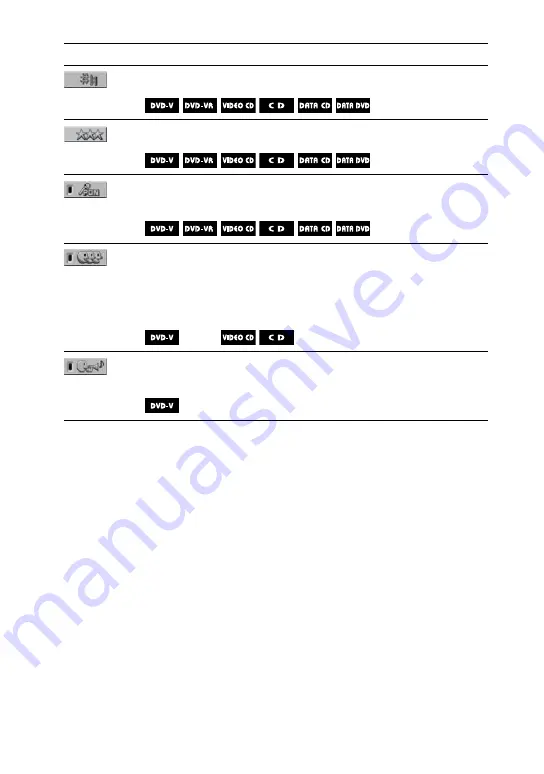
[KEY CONTROL]

1))

 (page )

Changes the key to suit your vocal range.

[SCORE MODE]

1))

 (page 5)

Selects the level for scoring mode.

[KARAOKE PON]

1))

 (page )

Enjoys karaoke with a stereo-recorded disc by reducing the sound of 

the vocals.

[VOCAL SELECT]

)

 (page )

Selects the guide vocal recorded on the “Dolby Digital Karaoke” 

Format disc (DVD VIDEO only).

Selects the vocal type recorded on the disc (VIDEO CD, AUDIO CD 

only).

Turns off the vocal (VIDEO CD, AUDIO CD only).

[GUIDE MELODY]

)

 (page 5)

Turns on or off the guide melody for “Dolby Digital Karaoke” Format 

disc.

1)

  These functions are the same when using a USB device. However, some menu items 

may not be available.

2)

  This function is only available during karaoke mode.

Содержание DHC-AZ33D

Страница 1: ...Printed in China 2007 Sony Corporation Display Side Hi Fi Component System DHC AZ55D DHC AZ33D 3 215 548 12 1 Operating Instructions ...

Страница 2: ... Directives 1 29 896 6 3 8 7 463 9 8 7 32 36436 8 32 32 2 2 83 9 3 3 4 2 98 36 46 7 28 8 36 2 463 9 8 7 8 7 32 987 0 2 1 0 2 6 86 77 8988 68 61 2 36 2 7 6 36 9 6 28 1 88 67 40 7 6 6 83 8 6 77 7 2 2 7 4 6 8 7 6 36 9 6 28 3 91 287 7 7 1 30 32 8 463 9 8 36 32 87 4 2 2 8 7 8 8 8 7 463 9 8 7 00 238 86 8 7 397 30 78 278 8 7 00 2 3 6 83 8 440 0 300 8 32 43 28 36 8 6 0 2 3 0 86 0 2 0 8632 59 41 28 2796 2 ...

Страница 3: ...selector 2 Make sure that the 13 A 3 pin plug Type BF is securely attached to the power cord The 13 A 3 pin plug is attached when shipped from the factory For AC 127 V wall sockets 1 Make the appropriate voltage setting on the system only for models with a voltage selector 2 Remove the 13 A 3 pin plug using a screwdriver 3 Attach the supplied parallel blade plug Type A ...

Страница 4: ... player Stereo cassette deck Amplifier Speaker system SS AZ55D Front speakers In this manual the DHC AZ55D is used for illustration purposes unless stated otherwise Icons such as listed at the top of each explanation indicate what kind of media can be used with the function being explained The Control Menu items may be different depending on the disc The Control Menu items may vary depending on th...

Страница 5: ...out this manual 4 Playable discs 7 Guide to parts and controls 12 Getting Started Hooking up the system 20 Hooking up the TV 23 Positioning the speakers 26 Setting the clock 29 Performing QUICK setup 30 Using the THEATRE SYNC function 32 Disc Playing a disc 34 Normal Play Using play mode 41 Searching selecting a disc 45 Playing MP3 JPEG discs 49 Enjoying DivX video files 55 Adjusting the delay bet...

Страница 6: ... GB Additional Information Troubleshooting 108 Precautions 122 Specifications 124 Guide to the Control Menu display 128 Language code list 133 Playable USB devices 135 Glossary 136 Index 141 ...

Страница 7: ...e VR mode DVD R RW in VR Video Recording mode VIDEO CD VIDEO CD Super VCD CD R RW in VIDEO CD or Super VCD format CD AUDIO CD CD R RW in AUDIO CD format DATA CD CD ROM R RW in DATA CD format containing MP3 audio tracks1 JPEG image files2 or DivX video files3 and conforming to ISO 96604 Level 1 or Level 2 or Joliet expansion format Continued ...

Страница 8: ...ompresses audio data MP3 audio tracks must be in MPEG 1 Audio Layer 3 format 2 JPEG image files must conform to the DCF image file format DCF Design rule for Camera File System Image standards for digital cameras regulated by Japan Electronics and Information Technology Industries Association JEITA 3 DivX video files must be recorded in DivX format with the extension AVI or DIVX 4 A logical format...

Страница 9: ...nd subsequent tracks of a session 3 CPRM Content Protection for Recordable Media is a coding technology that protects copyright for Copy Once programs Region code of DVDVIDEOs you can play back on this system Your system has a region code printed on the back of the unit and will only play back DVD VIDEOs labeled with identical region code DVD VIDEOs labeled will also be played back on this system ...

Страница 10: ...d with the DVD VIDEOs or VIDEO CDs Musicdiscsencodedwith copyrightprotectiontechnologies This product is designed to play back discs that conform to the Compact Disc CD standard Recently various music discs encoded with copyright protection technologies are marketed by some record companies Please be aware that among those discs there are some that do not conform to the CD standard and may not be ...

Страница 11: ...Digital Surround System 1 Manufactured under license from Dolby Laboratories Dolby Pro Logic and the double D symbol are trademarks of Dolby Laboratories 2 DTS and DTS Digital Surround are registered trademarks of DTS Inc DTS is a registered trademark of DTS Inc and DTS 2 0 Digital Out is a trademark of DTS Inc DivX is a video file compression technology developed by DivX Inc DivX DivX Certified a...

Страница 12: ...12GB Guide to parts and controls This manual mainly explains operations using the remote but the same operations can also be performed using the buttons on the unit having the same or similar names Unit ...

Страница 13: ...or 108 Lights up when the system is turned off Display eject 36 Press to eject the disc Disc slot DVD 23 25 30 34 74 91 Touch to select the DVD function TUNER BAND 70 71 Touch to select the TUNER function Touch to switch among FM and AM band TAPE 73 74 Touch to select the TAPE function USB 77 Touch to select the USB function DMPORT 107 Touch to select the DMPORT function VIDEO SAT 106 Touch to sel...

Страница 14: ...ge the TV channels VOLUME 2 34 97 Touch or press to adjust the volume Remote TV VOL 1 2 26 Press to adjust the TV volume PUSH OPEN CLOSE 73 Press to insert or eject a tape Tape deck USB port 77 Connect an optional USB device Digital music player or USB storage media MIC 1 MIC 2 jacks 92 Connect to a microphone MIC LEVEL 91 Turn to adjust the microphone volume ECHO LEVEL 92 Turn to adjust the echo ...

Страница 15: ...front panel display FUNCTION 25 30 34 70 73 77 91 106 Press to select the function PICTURE NAVI 48 80 Press to select the viewer format for searching the chapters titles and tracks Press to display the thumbnail pictures REPEAT FM MODE 45 72 86 Press to listen to a disc a single track or file repeatedly Press to select FM reception mode monaural or stereo AUDIO 37 102 Press to display the current ...

Страница 16: ... find a point in a track chapter or video file TV1 26 Press to operate the TV functions STEP 36 Press to play one frame at a time when playback is paused ADVANCE 36 Press to advance the current scene during playback REPLAY 36 Press to replay the previous scene during playback RETURN 39 49 51 57 80 Press to return to the previous menu on the TV screen 29 30 41 70 79 94 97 Press to select the menu i...

Страница 17: ...ODE 92 Press to select the Karaoke mode KARAOKE PON 95 Press to activate the KARAOKE PON function TIME TEXT 99 101 Press to change the information appearing in the front panel display or on screen display SLEEP 32 97 Press to set the Sleep Timer TV INPUT1 26 Press to switch the input sources TIMER MENU 29 97 Press to set the clock and the timers THEATRE SYNC 32 Press to activate the THEATRE SYNC f...

Страница 18: ...18GB Display ...

Страница 19: ...when the Karaoke Mode is turned on 91 Indicates the playback status of the tape Indicates the playback direction of the tape Lights up during recording 74 Lights up when DSGX is turned on 87 Indicates the current surround format Lights up when the timer is set 97 Lights up when the USB device is recognized 77 Lights up when P AUTO or P VIDEO is selected 25 Indicates the track information Indicates...

Страница 20: ...ng up the system FM lead antenna Extend it horizontally AM loop antenna Front speaker Right Front speaker Left Center speaker DHC AZ55D only Surround speaker Right DHC AZ55D only Surround speaker Left DHC AZ55D only Wall socket ...

Страница 21: ...tes Be sure to connect the speakers securely and correctly When connecting speaker cords insert the connector straight into the terminals For DHC AZ55D be sure to match the speaker cord to the appropriate terminal on the components to and to If the cords are reversed the sound will be distorted and will lack bass Voltageselector For models with a voltage selector set VOLTAGE SELECTOR to the local ...

Страница 22: ...emove the batteries to avoid possible damage from battery leakage and corrosion Tip With normal use the batteries should last for about six months When the remote no longer operates the system replace both batteries with new ones Attaching the speaker pads Attach the supplied speaker pads at each corner on the bottom of the speakers to prevent them from slipping Front speakers Left 4 Right 4 Cente...

Страница 23: ...ress to turn on the system then touch DVD 2 Make sure that no disc is loaded in the system and check that No Disc appears 3 Keep touching and then press until STANDBY appears in the display Then MECHA LOCK appears in the display 4 Unplug the power cord Hooking up the TV Connect the video input jack of your TV to the VIDEO OUT jack with the supplied video cord ...

Страница 24: ...is connection and press PROGRESSIVE on the unit repeatedly until P AUTO or P VIDEO appears in the display page 25 You can use an optional S Video cord to connect the S VIDEO input jack on your TV to the S VIDEO OUT jack of this unit Changingthecolorsystem Except for European and Russian models Set the color system to PAL or NTSC depending on the color system of your TV The default setting for colo...

Страница 25: ...d selects the appropriate conversion method P VIDEO PROGRESSIVE VIDEO The system fixes the conversion method to Progressive Video for video based software Select this if the image is not clear when you select P AUTO AboutDVDVIDEOsoftwaretypesand theconversionmethod The DVD VIDEO software can be divided into 2 types Film based software Film based software is derived from film and displays the image...

Страница 26: ...holding down TV Adjust the volume of the TV speaker s TV VOL while holding down TV For double digit number hold down TV and press then press the number For example hold down TV press then 2 and 5 for entering 25 Positioning the speakers 1 Place the front speakers at an angle of 45 degrees from your listening position Front speaker left Front speaker right Surround speaker left DHC AZ55D only Surro...

Страница 27: ...o connect the both left and right surround speakers Otherwise the sound will not be heard The subwoofer is an option sold separately Refer to the subwoofer operating instructions for the detailed setting method DHC AZ55D only Toinstallthesurroundspeakerson thewall DHC AZ55Donly 1 Prepare screws not supplied that are suitable for the hole on the back of each speaker See the illustrations below 9 mm...

Страница 28: ...shop or installer regarding the wall material or screws to be used Sony is not responsible for accident or damage caused by improper installation insufficient wall strength or improper screw installation natural calamity etc Speakersettings To enjoy DVD VIDEOs and other discs with multichannel sound and Dolby surround effects the speakers need to be adjusted Set the distance from the listening pos...

Страница 29: ...peatedly to select CLOCK SET then press ENTER 3 Press or repeatedly to set the hour 4 Press ENTER The minute indication flashes in the display 5 Press or repeatedly to set the minutes 6 Press ENTER The clock starts functioning Note The clock settings are canceled when you disconnect the power cord or if a power failure occurs Todisplaytheclockwhenthesystem isoff Press DISPLAY The clock is displaye...

Страница 30: ...orm QUICK setup press on the unit to remove the disc Make sure that the headphone or microphone is not connected Otherwise you cannot perform SPEAKER SETUP 3 Press FUNCTION repeatedly to select DVD or touch DVD on the unit The guide message appears at the bottom of the TV screen 4 Press ENTER without inserting a disc LANGUAGE SETUP appears on the TV screen 5 Press or repeatedly to select a languag...

Страница 31: ... on the TV screen The system is ready for playback If you want to change each setting individually see Using the DVD setup menu page 63 8 Press or repeatedly to select the front speaker distance from your listening position then press ENTER Repeat this step to adjust the center and surround speaker distance The setting is selected and QUICK SETUP is complete appears on the TV screen The system is ...

Страница 32: ... Using the THEATRE SYNC function THEATRE SYNC allows you to turn on your Sony TV and this system changes the system s function to DVD and then switches the TV s input source you have set with just one button Preparing to use the THEATRE SYNC function Register the TV s input source connected to this system ToselecttheTV sinput Press the following buttons while holding down SLEEP Press TV s input so...

Страница 33: ...ctly then press THEATRE SYNC If this function does not work change the transmission time The transmission time varies depending on the TV Tochangethetransmissiontime Press the following buttons while holding down Press Transmission time 1 0 5 Default 2 1 3 1 5 4 2 5 2 5 6 3 7 3 5 8 4 Note This function is only for Sony TV series however some TV products may also not work ...

Страница 34: ... Example When playing a DVD VIDEO Title number Elapsed playing time 1 Press FUNCTION repeatedly to select DVD or touch DVD on the unit 2 Insert a disc in the disc slot with the label side facing right If the playback does not start automatically press or touch on the unit Insert a disc with the label side facing right 3 Press VOLUME or touch VOLUME on the unit to adjust the volume ...

Страница 35: ...he surface Do not push a disc into the disc slot when the system is off Doing so may cause the system to malfunction Do not load an 8 cm disc with an adaptor Doing so may cause the system to malfunction Depending on the system status the volume level may not appear on the TV screen Otheroperations To Do this Stop playback Press Pause playback Press 1 Press again or press or touch on the unit to re...

Страница 36: ...c Press on the unit 1 There may be some disturbance in the video image 2 Except for JPEG image files You cannot select an audio track during Lock Search operation of MP3 audio tracks 3 DVD VIDEO DVD R RW in VR mode VIDEO CD AUDIO CD and DivX video file only 4 MP3 audio tracks JPEG image files and DivX video files only 5 Except for JPEG image files No sound is output depending on the audio source 6...

Страница 37: ... or turns off Notes Depending on the DVD VIDEO you may not be able to change the subtitles even if multilingual subtitles are recorded on the DVD VIDEO You also may not be able to turn the subtitles off You can change the subtitles if the DivX video file has an AVI or DivX extension and contains subtitle information within the same file Other useful functions Changingthesound When playing a DVD VI...

Страница 38: ... track 2 2 SUB the sub sound of the audio track 2 2 MAIN SUB the main and sub sound of the audio track 2 These items do not appear if only one audio stream is recorded on the disc being played back When playing a DivX video file The options for audio format differ depending on the DivX video files When playing a VIDEO CD AUDIO CD or MP3 audio track STEREO the standard stereo sound 1 L the sound of...

Страница 39: ...instructions on the menus Refer to the operating instructions supplied with the VIDEO CD as the operating procedure may differ depending on the VIDEO CD To return to the previous menu Press RETURN Note PBC playback is canceled when Shuffle Play Program Play or Repeat Play is activated To cancel playback with PBC functions 1 Press or repeatedly or press the numeric buttons to select a track when pl...

Страница 40: ... beginning of the disc press twice then press or touch on the unit Resumingplaybackofadiscthatwas stopped Multi discResume DVD VIDEO and VIDEO CD only This system can store the point where you stopped the playback of the disc for up to 40 discs and resumes playback when you insert the same disc again If you store a playback resume point for the 41st disc the playback resume point for the first dis...

Страница 41: ...elect PROGRAM then press ENTER The options for PROGRAM appear on the TV screen 3 Press or repeatedly to select SET then press ENTER Track number 4 Press The cursor moves to the track list T in this case 01 5 Select the track you want to program For example select track 02 Press or repeatedly to select 02 under T then press ENTER Selected track Total time of the programmed tracks 6 To program other...

Страница 42: ...in the program list Press to select ALL CLEAR Then press ENTER TocancelProgramPlay Press CLEAR or select OFF in step 3 To play back the same program again select ON in step 3 and press ENTER ToturnofftheControlMenu Press DISPLAY repeatedly until the Control Menu disappears from the TV screen Notes When Program Play is activated the REPEAT setting is automatically changed to ON if the current setti...

Страница 43: ... program list is played back randomly When playing a DATA CD DVD except for DivX video files ON MP3 all MP3 audio tracks in the selected album on the disc are played back randomly When no album is selected the first album is played back randomly 4 Press ENTER 5 Press or touch on the unit Shuffle Play starts To cancel Shuffle Play press CLEAR or select OFF in step 3 ToturnofftheControlMenu Press DI...

Страница 44: ...D RW in VR mode OFF does not play back repeatedly DISC repeats all the titles on the disc TITLE repeats the current title CHAPTER repeats the current chapter When playing a VIDEO CD or AUDIO CD OFF does not play back repeatedly DISC repeats all the tracks on the disc TRACK repeats the current track When playing a DATA CD or DATA DVD OFF does not play back repeatedly DISC repeats all the albums on ...

Страница 45: ... files the audio sound will not match the image if their playing time are different You cannot select TRACK when MODE MP3 JPEG is set to IMAGE JPEG page 53 Repeat Play is canceled when you eject the disc you turn off the system you change the function Searching selecting a disc Playing DVDVIDEOs using the menu Some DVD VIDEOs have menus to help you enjoy the DVD VIDEOs You can play back DVD VIDEOs...

Страница 46: ...LAY LIST then press ENTER The options for ORIGINAL PLAY LIST appear on the TV screen 3 Press or repeatedly to select the setting you want PLAY LIST play back according to the playlist created on the disc ORIGINAL play back according to the originally recorded sequence 4 Press ENTER Using the on screen display to search for a title chapter scene track index album file You can search by different in...

Страница 47: ...s turned off you can search for a chapter DVD VIDEO and DVD R RW in VR mode or track AUDIO CD and VIDEO CD or file DivX video files in DATA CD DVD by pressing the numeric buttons and ENTER 1 Press DISPLAY When playing a DATA CD DVD with JPEG image files press DISPLAY twice The Control Menu appears on the TV screen 2 Press or repeatedly to select the search item Example when you select CHAPTER is s...

Страница 48: ...rs 10 minutes and 20 seconds after the beginning enter 21020 If you make a mistake press CLEAR to cancel the number Note Depending on the disc you cannot perform Time Search Searching by scene Picture Navigation 1 Press PICTURE NAVI repeatedly to select the viewer format you want to search in CHAPTER VIEWER DVD VIDEO TITLE VIEWER DVD VIDEO TRACK VIEWER VIDEO CD or Super VCD 2 Press ENTER The first...

Страница 49: ...tem will play back any data with the extension MP3 JPG or JPEG even if they are not in MP3 or JPEG format Playing this data may generate a loud noise which could damage your speaker system Depending on the encoding writing software recording device or the recording media used to record an MP3 audio track you may encounter problems such as cannot play back sound interruptions and noise The followin...

Страница 50: ...unit The system starts playback from the first track of the selected album To stop playback press Playing a track 1 Press ENTER The list of MP3 audio tracks of the selected album appears 2 Press or repeatedly to select the MP3 audio track you want then press ENTER The system starts playing the selected MP3 audio track To stop playback press Todisplaythenextorpreviouspageof tracklistoralbumlist Pre...

Страница 51: ...roffthealbumlistortrack list Press DVD TUNER MENU repeatedly Selecting a JPEG image file or album 1 Insert a disc in the disc slot The system starts playing the first album 2 Press DVD TUNER MENU The album list appears on the TV screen 3 Press or repeatedly to select an album Playing an album Press or touch on the unit The system starts a slide show from the first image file of the selected album ...

Страница 52: ...t file of the next album is selected However you cannot select the previous album by pressing repeatedly To select the previous album select the album from the album list Toturnonoroffthealbumlist Press DVD TUNER MENU repeatedly TorotateaJPEGimagefile When a JPEG image file is displayed on the TV screen you can rotate the image by 90 degrees Press or repeatedly while viewing an image Press CLEAR t...

Страница 53: ...o tracks in the same album as a slide show with sound AUDIO MP3 Plays back MP3 audio tracks continuously IMAGE JPEG Plays back JPEG image files as a slide show 5 Press or repeatedly to select AUTO then press ENTER 6 Press DVD TUNER MENU The album lists appear on the TV screen 7 Press or repeatedly to select the album you want then press or touch on the unit The slide show with sound starts from th...

Страница 54: ...repeatedly until the Control Menu for JPEG image files appears on the TV screen 2 Press or repeatedly to select INTERVAL then press ENTER The options for INTERVAL appear on the TV screen 3 Press or repeatedly to select the transition interval you want The default setting is underlined NORMAL Sets the duration to about 6 to 9 seconds Images that are 3 000 000 pixels or more will lengthen the durati...

Страница 55: ...y cycle through the effects MODE 5 The next image slides over the current image OFF Turns off this function 4 Press ENTER The selected setting takes effect Enjoying DivX video files About DivXVideo Files DivX is a video file compression technology developed by DivX Inc This product is an official DivX Certified product This system can play back files which have the extension AVI or DIVX that conta...

Страница 56: ...st of DivX video files of the selected album appears 2 Press or repeatedly to select the DivX video file you want then press ENTER The system starts playing the selected of DivX video files To stop playback press Todisplaythenextorpreviouspageof filelistoralbumlist Press or repeatedly when the file list or album list is displayed ToplaybackthenextalbumofDivX videofiles You can select the next albu...

Страница 57: ...um A maximum of 200 albums can be recognized Tip If the number of viewing times has been preset you can play back the DivX video files as many times as the preset number The following occurrences are counted when the system is turned off when the disc is removed when another DivX video file is played back Adjusting the delay between the picture and sound A V SYNC When the sound does not synchroniz...

Страница 58: ...erent scenes The same password is used for both Custom Parental Control and Parental Control Preventing playback of specific discs CUSTOM PARENTAL CONTROL You can set the same Custom Parental Control password for up to 40 discs When you set the 41st disc the playback restriction for the first disc is canceled 1 Insert the disc you want to set the playback restriction If the disc is playing press t...

Страница 59: ...ER Custom parental control is set appears on the TV screen and the screen returns to the Control Menu Ifyoumakeamistakewhenentering yourpassword Press repeatedly to delete the number you have entered then re enter your password again ToturnofftheCustomParental Controlfunction 1 Follow steps 1 through 3 of Preventing playback of specific discs page 58 2 Press or repeatedly to select OFF then press ...

Страница 60: ...according to a predetermined level such as the age of the users 1 Press DISPLAY when playback is stopped The Control Menu appears on the TV screen 2 Press or repeatedly to select PARENTAL CONTROL then press ENTER The options for PARENTAL CONTROL appear on the TV screen 3 Press or repeatedly to select PLAYER then press ENTER If you have not registered a password The display for registering a new pa...

Страница 61: ...area code list page 134 7 Press or repeatedly to select LEVEL then press ENTER The options for LEVEL appear on the TV screen 8 Press or repeatedly to select the level you want then press ENTER Parental Control setting is completed The lower the value the stricter the limitation Ifyoumakeamistakewhenentering yourpassword Press repeatedly to delete the number you have entered then re enter your pass...

Страница 62: ...it password After you enter a new 4 digit password reinsert the disc and press or touch on the unit When the display for entering your password appears enter your new password Changing the password 1 Press DISPLAY when playback is stopped The Control Menu appears on the TV screen 2 Press or repeatedly to select PARENTAL CONTROL then press ENTER The options for PARENTAL CONTROL appear on the TV scr...

Страница 63: ...Press or repeatedly to select SETUP then press ENTER The options for SETUP appear on the TV screen 3 Press or repeatedly to select CUSTOM then press ENTER The Setup menu appears on the TV screen 4 Press or repeatedly to select the setup item from the displayed list LANGUAGE SETUP SCREEN SETUP CUSTOM SETUP or SPEAKER SETUP Then press ENTER The setup item is selected Example SCREEN SETUP Selected it...

Страница 64: ... the sound track When you select ORIGINAL the language given priority in the disc is selected SUBTITLE DVD VIDEO only Switches the language of the subtitle When you select AUDIO FOLLOW the language for the subtitles changes according to the language you selected for the sound track When you select a language in MENU SUBTITLE or AUDIO that is not recorded on the DVD VIDEO one of the recorded langua...

Страница 65: ...ff the portions that do not fit COLOR SYSTEM VIDEO CD Except for European and Russian models Select the output video signal when you play back a VIDEO CD AUTO Output the video signal according to the color system of the disc either PAL or NTSC PAL Change the video signal of an NTSC disc and output it in PAL system NTSC Change the video signal of a PAL disc and output it in NTSC system SCREEN SAVER...

Страница 66: ...lt setting varies depending on the country or region 2 Depending on the DVD VIDEO 4 3 LETTER BOX may be selected automatically instead of 4 3 PAN SCAN or vice versa Settingplaybackoptions CUSTOM SETUP Set up playback related and other settings The default setting is underlined PAUSE MODE DVD VIDEO and DVD R RW in VR mode only AUTO The picture including subjects that move dynamically is output with...

Страница 67: ...engineer intended Useful for watching movies at low volume late at night MAX Narrows the dynamic range fully DivX Displays the registration code for this system For more information go to http www divx com on the Internet 1 If each audio sound track has the same number of channels the system selects the audio sound tracks in the order from PCM DTS Dolby Digital to MPEG 2 When you set TRACK SELECTI...

Страница 68: ...NE Select this if the surround speakers are not connected Position diagram SUBWOOFER2 YES Select this if you have connected the subwoofer NONE Select this if the subwoofer is not connected DISTANCE DHC AZ55D only 3 FRONT 3 0 m4 Front speaker distance from the listening position can be set CENTER 3 0 m5 Center speaker distance from the listening position can be set SURROUND 3 0 m4 5 Surround speake...

Страница 69: ...before you press ENTER However note that you cannot return the setting of CONNECTION to default setting Note that you cannot perform SPEAKER SETUP when you connect headphones or microphones to the unit 2 Depending on the settings of other speakers the subwoofer may output excessive sound 3 The items that are set to NONE in CONNECTION cannot be selected When you perform QUICK setup page 30 the defa...

Страница 70: ...l AUTO lights up and then release Scanning stops automatically when a station is tuned in and TUNED lights up in the display When a FM stereo program is tuned in STEREO lights up in the display If TUNED does not appear and the scanning does not stop press TUNING repeatedly to tune in the station you want 3 Press DVD TUNER MENU Memory flashes in the display 4 Press ENTER A preset number flashes in ...

Страница 71: ...by pressing D TUNING button Listening to a non preset radio station station with a weak signal 1 Press FUNCTION repeatedly to select TUNER FM or TUNER AM or touch TUNER BAND on the unit repeatedly to select FM or AM 2 Press TUNING repeatedly to tune in the station you want TochangetheAMtuninginterval The AM tuning interval is factory preset to 9 kHz or 10 kHz for some areas this function is not av...

Страница 72: ...tion adjust the supplied antennas or connect an external antenna When an FM stereo program has static noise press REPEAT FM MODE repeatedly until MONO lights up in the display There will be no stereo effect but the reception will improve ...

Страница 73: ...ing the tape or the cassette holder 3 Press DIRECTION on the unit repeatedly to select to play one side Select or to play both sides 4 Press or touch on the unit on the unit The tape starts playing To play the reverse side press the button again The tape deck stops automatically after repeating the sequence five times Otheroperations To Do this Stop playback Press Pause playback Press Press again ...

Страница 74: ... the tape deck then touch TAPE to select TAPE 2 Press DIRECTION repeatedly to select to record on one side Select or to record on both sides 3 Touch repeatedly to select recording side then touch If you select both sides recording or front side recording touch repeatedly to light up the indicator then touch If you record on the reverse side touch repeatedly to light up the indicator then touch 4 P...

Страница 75: ...s or change the direction of the microphone Tostoprecording Touch Ą ȯ Notes ˎ CD Synchro Recording is not available with DVDs DATA CDs and DATA DVDs ˎ You cannot listen to other sources while recording ˎ When you press CD SYNC in step 5 the surround effect may automatically change ˎ When you record from a VIDEO CD playback with PBC functions is automatically canceled ˎ If you connect or disconnect...

Страница 76: ...m the beginning of the reverse side When you record on both sides be sure to start from the front side If you start from the reverse side recording stops at the end of the reverse side When high level sound signals are input the system automatically adjusts the recording level to prevent distortion of the recorded sound signal Auto Level Control function ...

Страница 77: ...port as shown below USB device Digital music player or USB storage media When USB cable connection is necessary connect the USB cable supplied with the USB device to be connected See the operation manual supplied with the USB device to be connected for details on the operation method When the USB device is connected Reading appears and USB MEMORY lights up Notes When inserting the USB device make ...

Страница 78: ...m and the USB device through an USB hub With some connected USB devices after an operation is performed there may be a delay before it is performed by this system If the system is turned off during Resume Play mode when the system is turned on again playback starts from the beginning of the MP3 audio track that was in Resume Play mode This system does not necessarily support all the functions prov...

Страница 79: ...ck from the first track of the selected album To stop playback press Playing a track 1 Press ENTER The list of MP3 audio tracks of the selected album appears 2 Press or repeatedly to select the MP3 audio track you want then press ENTER The system starts playing the selected MP3 audio track To stop playback press Todisplaythenextorpreviouspageof tracklistoralbumlist Press or repeatedly when the tra...

Страница 80: ...Press RETURN Toturnonoroffthealbumlistortrack list Press DVD TUNER MENU repeatedly Selecting a JPEG image file or album 1 Insert an USB device to the USB port The album list appears on the TV screen 2 Press or repeatedly to select an album Playing an album Press or touch on the unit The system starts a slide show from the first image file of the selected album Playing an image file 1 Press PICTURE...

Страница 81: ...t file of the next album is selected However you cannot select the previous album by pressing repeatedly To select the previous album select the album from the album list Toturnonoroffthealbumlist Press DVD TUNER MENU repeatedly TorotateaJPEGimagefile When a JPEG image file is displayed on the TV screen you can rotate the image by 90 degrees Press or repeatedly while viewing an image Press CLEAR t...

Страница 82: ... AUDIO MP3 Plays back MP3 audio tracks continuously IMAGE JPEG Plays back JPEG image files as a slide show 4 Press or repeatedly to select AUTO then press ENTER 5 Press DVD TUNER MENU The album lists appear on the TV screen 6 Press or repeatedly to select the album you want then press or touch on the unit The slide show with sound starts from the selected album To stop playback press Toturnonoroff...

Страница 83: ...ess DISPLAY repeatedly until the Control Menu for JPEG image files appears on the TV screen 2 Press or repeatedly to select INTERVAL then press ENTER The options for INTERVAL appear on the TV screen 3 Press or repeatedly to select the transition interval you want The default setting is underlined NORMAL Sets the duration to about 6 to 9 seconds Images that are 3 000 000 pixels or more will lengthe...

Страница 84: ...effects MODE 5 The next image slides over the current image OFF Turns off this function 4 Press ENTER The selected setting takes effect Playing in random order Shuffle Play You can play back the tracks on the USB device in random order Each time you perform Shuffle Play the playing order may differ 1 Press DISPLAY The Control Menu appears on the TV screen 2 Press or repeatedly to select SHUFFLE th...

Страница 85: ...on an USB device repeatedly You can select Shuffle Play at the same time 1 Press DISPLAY The Control Menu appears on the TV screen 2 Press or repeatedly to select REPEAT then press ENTER The options for REPEAT appear on the TV screen 3 Press or repeatedly to select the setting you want The default setting is underlined OFF does not play back repeatedly MEMORY repeats all the albums on the USB devi...

Страница 86: ...PEAT FM MODE repeatedly REP lights up in the display when Repeat Play is set to MEMORY ALBUM or ON REP1 lights up in the display when Repeat Play is set to TRACK When playing an USB device which contains MP3 audio tracks and JPEG image files the audio sound will not match the image if their playing time are different You cannot select TRACK when MODE MP3 JPEG is set to IMAGE JPEG page 82 Repeat Pl...

Страница 87: ...g the preset effect 1 Press PRESET EQ on the unit The last selected preset effect appears in the display 2 Press PRESET EQ on the unit repeatedly to select the preset effect you want Preseteffectoptions Effect Category ROCK POP JAZZ CLASSIC DANCE Standard music sources FLAT Original music source cancels the preset effect USER EQ User equalizer setting see below Toadjustthegraphicequalizerand store...

Страница 88: ...new setting Selecting the sound field You can take advantage of the surround sound simply by selecting one of the sound fields They bring the exciting and powerful sound of movie theaters into your home 1 Press SOUND FIELD The last selected sound field appears in the display 2 Press SOUND FIELD repeatedly when the last selected sound field appears in the display to select the sound field you want ...

Страница 89: ... Movie mode decoding This setting is ideal for movies encoded in Dolby Surround In addition this mode can reproduce sound in 5 1 channels when watching videos of overdubbed or old movies The source recorded in 2 channels is decoded into 5 1 channels PLII MUSIC2 Performs Pro Logic II Music mode decoding This setting is ideal for normal stereo sources such as AUDIO CDs The source recorded in 2 chann...

Страница 90: ...ng functions other than DVD and during playback of stereo sources such as AUDIO CD VIDEO CD and MP3 audio tracks 2CH SUR Reproduces stereo output with surround effect from multi channel sources such as DVD VIDEO during DVD function The system outputs the original sound with surround effect during functions other than DVD VIRTUAL A Creates 3 sets of virtual surround speakers from the sound of the f...

Страница 91: ...surround speakers even if LINK is selected For DHC AZ33D VIRTUAL A VIRTUAL B and HP VIRTUAL are effective only when a multi channel source is played VIRTUAL A VIRTUAL B and HP VIRTUAL can be selected only when the system function is set to DVD or USB DHC AZ33D only Singing along Karaoke You can sing along with any multiplex AUDIO CD multiplex VIDEO CD or DVD VIDEO in Dolby Digital Karaoke format P...

Страница 92: ...music ToturnofftheKaraokeMode Disconnect the microphone or press KARAOKE MODE KARAOKE MODE OFF appears on the TV screen Otheroperations To Do this Adjust the microphone volume Turn MIC LEVEL on the unit Adjust the microphone echo Turn ECHO LEVEL on the unit Cancel the echo effect Turn ECHO LEVEL on the unit to MIN Notes The sound input from the microphone is not output from the DVD USB DIGITAL OUT...

Страница 93: ...in normal Dolby Digital format 5 channel Center Front L Front R Surround L Surround R Speaker output in Dolby Digital Karaoke format Center Front L Front R Surround L Surround R Accompaniment Accompaniment Guide melody Guide vocal 1 Guide vocal 2 You can select any of these You can check the audio information by pressing AUDIO page 37 When playing a Dolby Digital Karaoke disc appears at the curren...

Страница 94: ...ect the setting you want then press ENTER SettingKaraokeMode The default settings are underlined KARAOKE PON1 ON Enjoy karaoke with any disc even if it is not a karaoke or multiplex disc by reducing the sound of the vocal OFF Cancel the KARAOKE PON effect KEY CONTROL2 Adjust the pitch of the music to suit your vocal range Select to cancel the KEY CONTROL effect VOCAL SELECT3 DVD VIDEO VIDEO CD AUD...

Страница 95: ...e or professional level DEMO Demonstration mode Consistently displays a high score for every song 1 Press SCORE before singing a song in Karaoke Mode The previous highest score appears on the TV screen 2 After singing for more than a minute press SCORE again to view your score Your score is calculated from a scale of 0 to 99 1 The singer s voice may not be reduced when only a few instruments are p...

Страница 96: ...rded you cannot change the vocal You can change the vocal when the audio sound track is recorded in Dolby Digital Karaoke format 5 When playing a DVD VIDEO the function only works for Dolby Digital Karaoke format For DVD VIDEOs without guide melody you cannot hear the guide melody even if you set the setting to ON 6 The highest score is reset when the system is turned off If you press other button...

Страница 97: ...station at a specified time 1 Prepare the sound source For Play Timer Insert a disc or load a tape with the side you want to play back facing forward or tune in the preset station you want Then press VOLUME or touch VOLUME on the unit to adjust the volume For Rec Timer Tune in the preset radio station you want 2 Press TIMER MENU 3 Press or repeatedly to select PLAY SET or REC SET then press ENTER ...

Страница 98: ...e to start from the front side If you start from the reverse side recording stops at the end of reverse side Otheroperations To Do this Check the setting 1 Press TIMER MENU TIMER SEL flashes in the display 2 Press ENTER 3 Press or repeatedly to select PLAY SELECT or REC SELECT then press ENTER Change the setting Start from step 1 Cancel the Play Timer 1 Press TIMER MENU TIMER SEL flashes in the di...

Страница 99: ...ay appears Note You cannot perform the following operations during Power Saving Mode Setting the clock page 29 Changing the AM tuning interval Except for European Russian and Saudi Arabian models page 71 Changing the color system Except for European and Russian models page 24 Viewing information about the disc Viewing information about the disc in the front panel display Press DISPLAY Each time yo...

Страница 100: ... CD DVD Elapsed playing time of the current track file Title of the track file5 Checkingthetotalplayingtimeand titles Press TIME TEXT repeatedly when playback is stopped Each time you press TIME TEXT the display changes from DVD VIDEO or DVD R RW in VR mode Total number of titles on the disc Title of the disc1 VIDEO CD without PBC playback or AUDIO CD Total number of the tracks on the disc and the...

Страница 101: ...u cannot use TIME TEXT to change the display of disc information when a JPEG image file is played back playback is stopped for DATA CD DVD with MP3 audio tracks and or JPEG image files playback is stopped for DATA CD DVD with DivX video files If the MP3 audio track title contains characters which cannot be displayed these characters will be displayed as The elapsed playing time of MP3 audio tracks...

Страница 102: ...le Notes Only alphabet letters numbers and some symbols can be displayed Depending on the disc the system can only display a limited number of characters For MP3 audio tracks with format other than ISO 9660 Level 1 and Level 2 album title and track title may not be displayed Displayingtheaudioinformationof thedisc DVD VIDEO and DivX video files only When you press AUDIO repeatedly during playback ...

Страница 103: ... 1 2 0 01 01 2007 DATA CD JPEG Exchangeable Image File Format is a digital camera image format defined by the Japan Electronics Information Technology Industries Association JEITA Note The date information format varies depending on the area Hooking up optional components To enhance your system you can connect optional components Refer to the operating instructions provided with each component DHC...

Страница 104: ...gital component such as amplifier You can enjoy 5 1 channel sound if the connected amplifier equipped with Dolby Digital or DTS decoder Notes Sound is output only when the system function is set to DVD or USB If you press AUDIO SOUND FIELD or the buttons related to Karaoke Mode or if you connect or disconnect microphones or headphones the sound cuts off for a moment S VIDEO OUT jack Connect the S ...

Страница 105: ...SYNC OUT jack Except for European Australian and Korean models Connect the D LIGHT SYNC controller not supplied You need to connect the D LIGHT SYNC controller to the lighting device not supplied The lighting device will react according to control signals transmitted by the D LIGHT SYNC controller upon receiving music source from the system For details on the use of D LIGHT SYNC controller and lig...

Страница 106: ... the sound is distorted or too loud when VIDEO is selected change the function to SAT Recording the audio and video signals from aVIDEO CD onto a video tape 1 Connect optional audio cords from the VIDEO SAT OUT L R jacks and the supplied video cord from the VIDEO OUT jack to the audio and video input jacks of your VCR 2 Start recording Refer to the operating instructions provided with connected co...

Страница 107: ... PORT adaptor not supplied you may be able to operate the connected component using either the buttons on the remote or the unit Enjoying the multi channel sound with the optional amplifier DHC AZ33D only 1 Connect the digital optical cord See Hooking up optional components page 103 2 Connect the speakers to an optional amplifier equipped with a decoder For the speakers placement refer to the oper...

Страница 108: ...the STANDBY indicator stops flashing reconnect the power cord and turn on the system If the issue persists contact your nearest Sony dealer General The display starts flashing as soon as you plug in the power cord even though you have not turned on the system Press DISPLAY once while the system is off The demonstration disappears appears in the display A power failure has occurred Set the clock pa...

Страница 109: ...the unit away from the TV or VCR Move the unit away from the source of noise Connect the unit to a different wall outlet Install a noise filter commercially available to the power cord The timer does not function Check the timer setting and set the correct time page 97 Cancel the Sleep Timer function The remote does not function Remove the obstacles between the remote and the unit Move the remote ...

Страница 110: ...peaker only DHC AZ55D only Depending on the disc the sound may come from the center speaker only There is no sound from the subwoofer Make sure that SUBWOOFER setting is set to YES Set the subwoofer level to the appropriate level No sound is produced from the subwoofer when you play back a DVD VIDEO that does not have subwoofer output recorded Check that the subwoofer is connected securely and cor...

Страница 111: ...e the unit to a place without vibration e g on top of a stable stand Move the speakers away from the unit or place them on separate stands When you listen to a track with bass sounds at high volume the speaker vibration may cause the sound to skip Playback does not start from the first track Shuffle Play mode Program Play mode or Repeat Play mode is selected Resume Play has been selected Press twi...

Страница 112: ... JPG or JPEG The JPEG image file is larger than 3 072 width 2 048 height in normal mode or more than 2 000 000 pixels in Progressive JPEG mode which is mainly used on the Internet website JPEG image files with a high width to length ratio cannot be played back For MP3 JPEG files the DATA CD DVD contains a DivX video file The DivX video file does not have the extension AVI or DIVX DivX video files ...

Страница 113: ...or MPEG audio format The sound loses stereo effect when you play back a DVD VIDEO VIDEO CD AUDIO CD MP3 audio track or DivX video file Unplug the microphone or press KARAOKE MODE repeatedly until disappears from the display Make sure the system is connected properly USBdevice Over Current appears A problem has been detected with the level of electrical current from the USB port Turn off the system...

Страница 114: ...is being inserted backwards Insert the USB device in the correct orientation The USB device which has been used on another device does not work It may be recorded in an unsupported format If so first take the precaution of backing up important files on the USB device by copying them to your computer hard disk Next format the USB device with a FAT12 FAT16 or FAT32 file system and transfer the backe...

Страница 115: ...FAT12 FAT16 or FAT32 are unsupported Files that are encrypted or protected by passwords etc cannot be played back The MP3 audio track does not have the extension MP3 The data is not stored in the desired format The MP3 audio tracks in format other than MPEG 1 Audio Layer 3 cannot be played back The system can playback to a depth of 8 folders only For MP3 JPEG files check the MODE MP3 JPEG setting ...

Страница 116: ...u select the video input on the TV so that you can view the pictures from the system Make sure you set the color system correctly according to your TV s color system Except for European and Russian models Make sure you connect the unit and your TV using only the supplied video cord Press PROGRESSIVE on the unit repeatedly to select INTERLACE if you connect your TV to the unit s COMPONENT VIDEO OUT...

Страница 117: ...he unit with the S Video cord connect directly to the TV Otherwise you may not change the aspect ratio Depending on the TV you may not change the aspect ratio Messages do not appear on the TV screen in the language you want Select the language you want for the on screen display in OSD under LANGUAGE SETUP in the Setup Menu page 64 The language for the sound track cannot be changed Multilingual tra...

Страница 118: ...off the surrounding electrical equipment A stereo FM program cannot be received in stereo Press REPEAT FM MODE repeatedly until MONO disappears from the display Tapedeck The tape does not record or playback or there is a decrease in sound level The tape heads are dirty see Cleaning the tape heads page 124 The record playback heads are magnetized see Demagnetizing the tape heads page 124 The tape d...

Страница 119: ...tem to its factory default settings 1 Unplug the power cord 2 Plug the power cord back in 3 Press to turn on the system 4 While holding down DISPLAY touch and press at the same time COLD RESET appears in the display The system is reset to the factory settings except for DVD settings You should set the settings you made such as the preset stations clock and timer ToreturntheDVDsetuptothedefault set...

Страница 120: ...t cloth page 122 C 31 The disc is not inserted correctly Restart the system then re insert the disc correctly E XX XX is a number To prevent a malfunction the system has performed the self diagnosis function Contact your nearest Sony dealer or local authorized Sony service facility and give the 5 character service number Example E 61 10 Whendisplayingtheversionnumber ontheTVscreen When you turn on...

Страница 121: ... file has the extension AVI or DIVX but it is not in DivX format Device Error The USB device could not be recognized Hub No Support The USB device is connected to this system through a hub Invalid You have pressed an invalid button JPEG The playback mode is IMAGE JPEG and a JPEG image file is being played back No Audio The inserted USB device does not contain MP3 audio tracks No Device No USB devi...

Страница 122: ...d for vinyl LPs Do not expose discs to direct sunlight or heat sources such as hot air ducts nor leave it in a car parked in direct sunlight On cleaning discs disc lens cleaner Do not use a commercially available cleaning disc or disc lens cleaner wet or spray type These may cause apparatus to malfunction On operating voltage Before operating the system check that the operating voltage of the unit...

Страница 123: ... evaporates On heat buildup Heat buildup on the unit during operation is normal and is not cause for alarm Do not touch the cabinet if it has been used continuously at a high volume because the cabinet may have become hot Do not obstruct the ventilation holes In case color irregularity is observed on a nearby TV screen With the magnetically shielded type of speakers the speakers can be installed n...

Страница 124: ...izing the tape heads Use a demagnetizing cassette available separately after every 20 to 30 hours of use Failure to demagnetize the tape heads can cause an increase in noise a loss of high frequency sound and an inability to completely erase tapes For details refer to the instructions of the demagnetizing cassette Specifications Main unit Amplifier section DHC AZ55D The following measured at AC 12...

Страница 125: ... only the supplied speaker SS CT77D USB section Supported audio file format MP3 MPEG 1 Audio Layer 3 Bit rate 32 320 kbps VBR Sampling frequencies 32 44 1 48 kHz USB port Maximum current 500 mA Video color system format European and Russian models PAL Other models NTSC and PAL 128 kbps or higher bit rate is recommended Continued Disc player section System Compact disc and digital audio and video s...

Страница 126: ...1 242 mm Mass Approx 4 7 kg net per speaker Surround speaker SS RSX77D for DHC AZ55D Speaker system 1 way 1 unit bass reflex type Speaker units Full range 8 cm cone type Rated impedance 8 Ω Dimensions w h d Approx 174 96 112 mm Mass Approx 0 7 kg net per speaker Center speaker SS CT77D for DHC AZ55D Speaker system 1 way 1 unit bass reflex type magnetically shielded type Speaker units Full range 8 ...

Страница 127: ...55D Approx 6 6 kg DHC AZ33D Approx 6 0 kg Supplied accessories Remote Commander 1 AM loop antenna 1 FM lead antenna 1 Video cord 1 Speaker pads DHC AZ55D 20 DHC AZ33D 8 Speaker cords 3 DHC AZ55D only R6 Size AA batteries 2 Design and specifications are subject to change without notice Standby power consumption 0 4 W Halogenated flame retardants are not used in the printed wiring boards Halogenated...

Страница 128: ...Control Menu display 1 Control Menu display The Control Menu display 1 and 2 will show different items depending on the disc type Example Control Menu display 1 when playing a DVD VIDEO Playback status Playback Pause Stop etc Currently playing title number Currently playing chapter number Total number of titles Total number of chapters Control Menu items Type of disc being played back Elapsed play...

Страница 129: ...CK 1 page 46 Selects the track to be played back ORIGINAL PLAY LIST page 46 Selects the playback sequence either to the originally recorded sequence or to the playlist created on the disc TIME TEXT 1 page 48 Checks the elapsed playing time and the remaining time Inputs the time code for picture and music searching Displays the text information on the DVD TEXT discs and MP3 audio tracks PROGRAM pag...

Страница 130: ... track album file repeatedly A V SYNC page 57 Sets the delay time between the sound and display PARENTAL CONTROL page 58 Sets to prohibit playback on this system SETUP 1 page 32 63 119 QUICK Use QUICK Setup to choose the language of the on screen display and the aspect ratio of the TV CUSTOM In addition to the QUICK setup setting you can adjust other settings RESET Returns the settings in SETUP to...

Страница 131: ...hen the picture was taken by a digital camera INTERVAL 1 page 54 83 Specifies the duration for which the slides are displayed on the TV screen EFFECT 1 page 55 84 Selects the transition effects to be used for changing slides during a slide show MODE MP3 JPEG 1 page 53 82 Selects the data type MP3 audio track AUDIO MP3 JPEG image file IMAGE JPEG or both AUTO to be played back when playing a DATA CD...

Страница 132: ...als VOCAL SELECT 2 page 94 Selects the guide vocal recorded on the Dolby Digital Karaoke Format disc DVD VIDEO only Selects the vocal type recorded on the disc VIDEO CD AUDIO CD only Turns off the vocal VIDEO CD AUDIO CD only GUIDE MELODY 2 page 95 Turns on or off the guide melody for Dolby Digital Karaoke Format disc 1 These functions are the same when using a USB device However some menu items m...

Страница 133: ...1408 Oriya 1535 Tonga 1067 Tibetan 1254 Italian 1417 Punjabi 1538 Turkish 1070 Breton 1257 Hebrew 1428 Polish 1539 Tsonga 1079 Catalan 1261 Japanese 1435 Pashto Pushto 1540 Tatar 1093 Corsican 1269 Yiddish 1436 Portuguese 1543 Twi 1097 Czech 1283 Javanese 1463 Quechua 1557 Ukrainian 1103 Welsh 1287 Georgian 1481 Rhaeto Romance 1564 Urdu 1105 Danish 1297 Kazakh 1482 Kirundi 1572 Uzbek 1109 German 1...

Страница 134: ...ce 2376 Netherlands 2499 Sweden 2046 Austria 2109 Germany 2390 New Zealand 2086 Switzerland 2057 Belgium 2248 India 2379 Norway 2528 Thailand 2070 Brazil 2238 Indonesia 2427 Pakistan 2184 United Kingdom 2079 Canada 2254 Italy 2424 Philippines 2090 Chile 2276 Japan 2436 Portugal 2092 China 2304 Korea 2489 Russia 2115 Denmark 2363 Malaysia 2501 Singapore ...

Страница 135: ... name Model name IC Recorder ICD U50 U60 U70 VerifiedSonyUSBstoragemedia asof April2007 Product name Model name MICROVAULT USM 256J 512J 1GJ 2GJ 4GJ USM 512JX 1GJX 2GJX 4GJX USM 256H 512H 1GH 2GH 4GH Notes Do not use USB devices other than these USB devices Operation of models not listed here is not guaranteed Operation may not always be ensured even when using these USB devices Some of these USB ...

Страница 136: ...cted at the reproduction of music Digital Cinema Sound is designed specifically for the enjoyment of movies DivX Digital video technology created by DivX Inc Videos encoded with DivX technology are among the highest quality with a relatively small file size DolbyDigital This sound format for movie theaters is more advanced than Dolby Surround Pro Logic In this format the surround speakers output s...

Страница 137: ...nology developed by DTS Inc This technology conforms to 5 1 channel surround The surround channel is stereo and there is discrete subwoofer channel in this format DTS provides the same 5 1 discrete channels of high quality digital audio The good channel separation is realized because the all channel data is recorded discrete and processed in digital DVDVIDEO A disc that contains up to 8 hours of m...

Страница 138: ...ased or Video based software Film based DVD VIDEOs contain the same images 24 frames per second that are shown at movie theaters Video based DVD VIDEOs such as television dramas or sitcoms displays images at 30 frames or 60 fields per second Interlaceformat Interlacedscanning The Interlace format is the NTSC standard method for displaying TV images at 30 frames per second Each frame is scanned twi...

Страница 139: ...erlace format the progressive format can reproduce 50 60 frames per second by reproducing all scanning lines 525 lines for the NTSC system 625 lines for PAL system The overall picture quality increases and still images text and horizontal lines appear sharper This format is compatible with the 525 or 625 progressive format RegionCode This system is used to protect copyrights A region code is alloc...

Страница 140: ...up to 74 minutes of moving pictures VIDEO CDs also contain compact audio data Sounds outside the range of human hearing are compressed while the sounds we can hear are not compressed VIDEO CDs can hold 6 times the audio information of conventional AUDIO CDs There are 2 versions of VIDEO CDs Version 1 1 You can play back only moving pictures and sounds Version 2 0 You can play back high resolution ...

Страница 141: ...37 Music mode 137 Dolby Surround Pro Logic 137 DTS 137 DVD 7 8 DVD RW 7 138 DVD RW 7 138 DVD Setup menu 63 DVD VIDEO 137 E EFFECT 55 84 131 F Fast forward 35 Fast reverse 35 FILE 44 131 File 138 Film based software 138 Freeze Frame 36 Front panel display 18 H Handling discs 35 I INDEX 46 129 Instant Advance 36 Instant Replay 36 INTERLACE 25 Interlace format 138 INTERVAL 54 83 131 J JPEG 49 51 53 8...

Страница 142: ...ing 74 Region Code 139 Remote 13 REPEAT 44 85 130 Repeat Play 44 85 RESET 119 130 Resume Play 39 S SCENE 129 Scene 139 SCREEN SAVER 65 SCREEN SETUP 30 65 Searching 45 SETUP 130 SHUFFLE 43 84 130 Shuffle Play 43 84 Sleep Timer 97 Slide Show 51 80 Slow motion Play 36 Sound Field 88 SPEAKER SETUP 68 SUBTITLE 64 S VIDEO 104 Synchro recording 74 T THEATRE SYNC 32 TIME TEXT 48 129 Timer 97 TITLE 44 129 ...

Отзывы: