Страница 1: ...SON_ 4_171_s13_ 1 DCR SX83 Digital Video Camera Recorder Operating Guide Guia de operaciones M_NDRY _TI K M _ _ 2010 Sony Corporation ...
Страница 2: ...nstructions in the literature accompanying the appliance To reduce fire or shock hazard do not expose the unit to rain or moisture Do not expose the batteries to excessive heat such as sunshine fire or the like CAUHON 10 REDUC _H_ RISKOFE CTRICSNOOK Do NOr REMOVE COVER O_ BACK NO USE_ SERVlCEAIJLE PARRSINSIDE rtEFERSErtVlClNGTOQUALIFIED SERVICEPERSONNEL This symbol is intended to alert the user to...
Страница 3: ...ectrician for replacement of the obsolete outlet Protect the power cord from being walked on or pinched particularly at plugs conw nience receptacles and the point where they exit from the apparatus Only use attachments accessories specified by the manufacturer Use only with the cart stand tripod bracket or table specified by the manufacturer or sold with the apparatus When a cart is used use caut...
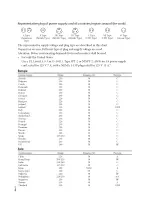
Страница 4: ...h a NEMA 1 15P plug rated for 125 V 15 A Europe Countries regions Voltage Frequency Hz Plug type Austria 230 50 C Belgium 230 50 C Czech 220 50 C I enmark 230 50 C Finland 230 50 C France 230 50 C Germany 230 50 C Greece 220 50 C Hungary 220 50 C Iceland 230 50 C Ireland 230 50 C BF Italy 220 50 C I uxemburg 230 50 C Netherlands 230 50 C Norway 230 50 C Poland 220 50 C Portugal 230 50 C Romania 22...
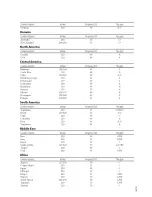
Страница 5: ...60 A Jamaica 110 50 A Mexico 120 127 60 A Nicaragua 120 240 60 A Panama 110 220 60 A South America Countries regions Voltage Frequency Hz Plugtype Argentina 220 50 BF O Brazil 127 220 60 A C Chile 220 50 C Colombia 120 60 A Peru 220 60 A C _ nezuela 120 60 A Middle East Countries regions Voltage Frequency Hz Plugtype h an 220 50 C BF Iraq 220 50 C BF Israel 230 50 C Saudi Arabia 127 220 50 A C BF ...
Страница 6: ...battery with the specified type onb Otherwise fire or injury may result ACAdaptor Do not use the AC Adaptor placed in a narrow space such as between a wall and furniture Use the nearby wall outlet wall socket when using the AC Adaptor Disconnect the AC Adaptor from the wall outlet wall socket immediately if aW malfunction occurs while using your camcorder Ew n if your camcorder is turned off AC po...
Страница 7: ...dential installation This equipment generates uses and can radiate radio frequency energy and if not installed and used in accordance with the instructions may cause harmful interference to radio communications Howew r there is no guarantee that interference will not occur in a particular installation If this equipment does cause harmful interference to radio or television reception which can be d...
Страница 8: ...he language setting The or screen displays in each local language are used fbr illustrating the operating procedures Change the screen language befbre using your camcorder if necessary p 17 Recording When you use a memory card with your camcorder br the first time fbrmatting the memory card with your camcorder p 51 is recommended fbr stable operation All data recorded on the memory card will be de...
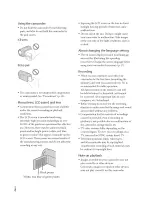
Страница 9: ...e camcorder using a computer If you do so our camcorder may not operate correctly When connecting our camcorder to another device with a cable be sure to insert the connector plug in the correct way Pushing the plug fbrcibly into the terminal will damage the terminal and may result in a malfunction of our camcorder If you cannot record play back images perform MEDIA FORMAT If you repeat recording ...
Страница 10: ...ct the memory card when the access lamp p 20 is litor flashing Remove the battery pack or AC Adaptor f com the camcorder or subject the camcorder to shock or vibraion when the _ Movie U_ Photo lamps p 16 or the access lamp p 20 are litor flashing When using ashoulder belt sold separately do not crash the camcorder against an object Do not use your camcorder invery loud areas ...
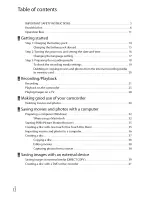
Страница 11: ...s _ p 24 Playing movies and photos Playback on the camcorder _ p 25 Playing images on a TV _ p 28 Saving images Saving movies and photos with a computer _ p 32 Saving movies and photos in external media _ p 39 Saving images with a DVD writer recorder _ p 41 Deleting movies and photos p 30 If you delete the image data that has been saved on your computer _ or a disc you can record new images on the...
Страница 12: ...memory card 20 _ Recording Playback Recording 21 Playback on the camcorder 25 Playing images on a TV 28 Making good use of your camcorder Deleting movies and photos 30 _ Saving movies and photos with a computer Preparing a computer Windows 32 When using a Macintosh 32 Starting PMB Picture Motion Browser 35 Creating a disc with one touch One Touch Disc Burn 35 Importing movies and photos to a compu...
Страница 13: ... Using menus 46 Getting detailed information from the Handycam Handbook 52 _ Additional information _ lroubleshooting 53 Precautions 55 Specifications 57 Quick reference Screen indicators 60 Parts and controls 61 Index 63 D n _3 ...
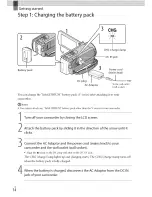
Страница 14: ...o your camcorder Turn offyour camcorder by closing the LCDscreen Attach the battery pack by sliding it in the direction of the arrow until it clicks Connect the AC Adaptor and the power cord mains lead to your camcorder and the wall outlet wall socket Align the mark on the DC plug with that on the DC IN jack The CHG charge lamp lights up and charging starts The CHG charge lamp turns off when the b...
Страница 15: ...p 16 the access lamp p 20 are turned of__ The CHG charge lamp flashes during charging under the fbllowing conditions The battery pack is not attached correctl3c The battery pack is damaged The temperature of the battery pack is lox_c Remove the battery pack comyour camcorder and put it in a warm place The temperature of the battery pack is high Remove the battery pack comyour camcorder and put it ...
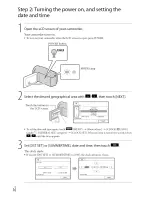
Страница 16: ...ired geographical area with _ _ then touch NEXT Touch the button on the LCD screen To set the date and time again touch _ MENU _ Show others _ CLOCK LANG under _ GENERAL SET category _ CLOCK SET Vhen an item is not on the screen touch m m until the item appears Set DST SET or SUMMERTIME date and time then touch Ii_l The clock starts If you set DST SET or SUMMERTIME to ON the clock advances 1 hour ...
Страница 17: ... _ BEEP _ OFF _ _ _ _ _ Ik _ If the button you touch does not react correctly calibrate the touch panel To turn offthe power Close the LCD screen The _ll Movie lamp flashes for a fbw seconds and the power is turned off_ _Tips 5_u can turn off your camcorder also by pressing POWER When POWER ON BY LCD is set to OFF turn offyour camcorder by pressing POWER 63 Changing the language setting _ You can ...
Страница 18: ...aybackand editing operations on the selected medimn _Tips See page 59 for the recordable time of movies Touch _ MENU _ Show others _ MEDIA SETTINGS under_ MANAGE MEDIA category _ MOVIE MEDIA SET The MOVIE MEDIA SET screen appears Touch the desired recording media Touch YES _ The recording medium is changed Touch _ MENU _ Show others _ MEDIA SETTINGS under_ MANAGE MEDIA category _ PHOTO MEDIA SET T...
Страница 19: ...mory Stick PRO HG Duo media are referred to as Memory Stick PRO Duo media Memory cards of up to 32 GB are guaranteed to work with our camcorder Types of Memory Stick media that can be used with your camcorder For recording movies it is recommended that you use Memory Stick PRO Duo media of 512 MB or larger marked with MEMORY SLIERPRO null Memory Stick PRO Duo media MEMORYSTI I PRO HG DUO Memory St...
Страница 20: ...mory card slot or imagedata maybe damaged Notes If Failed to create a new hnage Database File It may be possible that there is not enough ficeespace is displayed initialize the memory card by touching _ MENU _ Show others _ MEDIA FORMAT under _ a MANAGE MEDIA category _ MEMORY CARD _ YES _ YES To eject the memory card Open the cow r and lightly push the memory card in once Do not open the cover du...
Страница 21: ...recording or when you play back images close the lens cover Fasten the grip belt g 3 E Open the LCD screen of your camcorder Your camcorder turns Oll To turn on your camcorder when the LCD screen is alrea open press POWER p 16 _ m can switch recording modes by pressing MODE Press MODE to light up the desired recording mode lamp MODE button MODE I_ Movie When recording a movie I_ Photo When shootin...
Страница 22: ...corder or switching the recording movie photo playback modes To display the icons and indicators again touch an _ here on the screen except the rec zoom buttons on the LCD Rec zoom buttons on LCD about 3sec _7 after Notes If you close the LCD screen while recording movies the camcorder stops recording The maximum continuous recordable time of movies is about 13 hours When a movie file exceeds 2 GB...
Страница 23: ...imated remaining capacity etc by touching _ MENU Show others _ MEDIA INFO under _i MANAGE MEDIA category The LCD screen of your camcorder can display recording images across the entire screen full pixel display However this may cause slight trimming of the top bottom right and left edges of images when played back on a TV which is not compatible with full pixel display In this case set GUIDEFRAME ...
Страница 24: ... ratio becomes 4 3 Press PHOTO lightly to adjust the focus then press it fully 5_u can record photos alsoby touching _ on the L D screen Flashes Lights up WhenMilldisappears the photo is recorded _Tips To change the image size touch _ MENU _ Show others _ IMAGE SIZE under _ PHOTO SETTINGS category _ a desired setting _ _ 5_u cannot record photos while _ is displayed 5_u can check the recordable nu...
Страница 25: ...MAGES The VISUAL INDEX screen appears after some seconds _ ucan display the VISUAL INDEX screen also by touching VIEW IMAGES on the LCD screen Touch _ll Movie _ a desired movie to play back a movie Touch the I_ Photo _ a desired photo to view a photo Movies are displayed and sorted by recording date s Switches operating button display To MENU screen Displays the screen to select the index type DAT...
Страница 26: ...returns to the VISUAL INDEX screen Touch EI _II _ during pause to play back movies slowl c As you repeat toucbing I_11 _ during playback nrovies are played as fhst as about 5 times about 10 times _ about 30 times _ about 60 times 5_u can display the VISUAL INDEX bv touching _ MENU _ Show others _ VISUAL INDEX under _ PLAYBACK category The recording date time and shooting conditions are recorded au...
Страница 27: ...hotos Yourcamcorder displaysthe selected photo I Previous To the VISUAL _ iil Next J _T_ 1 OPTION INDEX screen _Tips When viewing photos recorded on a memory card _ playback iolder appears on the screen g 3 7 _7 ...
Страница 28: ...g cable with an S VIDE cable sold separately higher quality images can be produced than with an A V connecting cable Connect the white and red plugs left right audio and the S VIDE plug S VIDEO channel of the A V connecting cable with an S VIDEO cable sold separately The yellow plug connection is not necessary Connecting only the S VIDEO plug will not output audio I VIDEO VIDEO Yellow A V R A V Re...
Страница 29: ... When you connect your camcorder to a TV compatible with the ID 1 ID 2 system set TV TYPE to 16 9 The TV switches to fi dlmode automaticall3c Refi r also to the instruction manuals supplied with our T V_ When you set TV TYPE to 4 3 the image quality may deteriorate Also when the recorded image s aspect ratio switches between 16 9 wide and 4 3 the image may jitter On some 4 3 TVs the photos recorde...
Страница 30: ...cording media and recover all the recordable space of the media fbrmat the media Reduced size images which enable you to view many images at the same time on an index screen are called thumbnails2 1Touch _ MENU _ Show others _ DELETE under _ EDIT category To delete movies touch 1t_ DELETE _ g ltDELETE Tu delete photos touch _DELETE _ _DELETE Touch and display the 4 mark on the movies or photos to ...
Страница 31: ...uch _ _ to select the recording date of the desired movies photos then touch _ Touch the image down on the LCD screen to confirm tile image Touch _ to return to the previous screen Touch YES E _ _ _ 57 3 S ...
Страница 32: ...discs ii Minimunl 1 024 x 768 dots _ Standard installation is required Operation is not assured if the OS has been upgraded or in a multi boot environment _264 bit editions and Starter Edition are not supported Windows Image Mastering API IMAPI Ver 2 0 or newer is required to use disc creation function etc _3Starter Edition is not supported _4Faster processor is recommended _ Notes Operation with ...
Страница 33: ...tion to be installed then proceed to the next screen Read the terms of the license agreement carefully If you agree to the terms change to _ and N The USB SELECT screen appears on the camcorder screen automatically Touch the one of the media types displayed on the camcorder screen to make the computer recognize your camcorder I_IUSB CONNECT Internal memory Tiledisplayed recording media difi r depe...
Страница 34: ...0 fbr Windows XP has not been installed yet select it from required programs on the installation screen and install it bllowing the procedures displayed The computer must be connected to the internet fbr the installation 5_u may install hnage Mastering API v2 0 fbr Windows XP in response to the message displayed when you try to start those functions Touch END _ YES on the camcorder screen Disconne...
Страница 35: ... with one touch OneTouch Disc Burn Movies and photos recorded on your camcorder that haw not yet been saw d with One Touch Disc Burn function can be saw d on a disc automatically Install PMB belbrehand p 32 however do not start PMB Connect your camcorder to the wall outlet wall socket using the AC Adaptor supplied fbr this operation p 15 With One Touch Disc Burn function on your camcorder you can ...
Страница 36: ...e supplied AC Adaptor brthis operation p 15 Turn on your camcorder then connect the camcorder to the computer using the supplied USB cable 2 The USB SELECT screen appears on the camcorder screen Touch the recording media that contains the images you want to save on the camcorder screen _ USB CONNECT Internal memory _ USB CONNECT Memory card The displayed recording media differ depending onthe mode...
Страница 37: ...iscs you can use If any other software than PMB starts automatically shut it down Start PMg p 35 Click Calendar or Index on the left side in the window and select the date or folder then select the movies To select plural movies hold the Ctrl key down and click thumbnails At the top of the window click _ _ Create DVD Video Format Discs STD _ The window used to select movies o_ appears _3_ To add m...
Страница 38: ...ration Capturing photos from a movie You can save a frame of a movie as a photo file Double click the movie to be edited on PMB then dick Show Edit Palette on the right side of the screen _ Save Frame See PMB Help p 35 for details You C an CUtOUt0n y necessary p arts from a movie and save it as another file Doub e click the movie to be edited on PMB then click Show Edit Palette on the rig ht Side ...
Страница 39: ...dia is connected to our camcorder Operation is not assured with every device satisfying requirements fbr operating Connect your camcorder to the wall outlet wall socket using the supplied A adaptor p 15 Refi r to the instruction manual supplied with the external media For details on available external media go to the Sony support website in your country region Connect the AC Adaptor and the power ...
Страница 40: ...w the on screen instructions to select the recording media and image selection methods When you selected DUB by select touch the image to be saw 4 appears When you selected DUBbydate select the date of the imagesto be dubbed with _ then touch _ and go to step Remaining external media capacity Press and hold the image down on the LCD screen to confirm the image Touch to return to the previous scree...
Страница 41: ...e DVD writer to the USB jack of your camcorder with the USB cable of the DVD writer H Insert an unused disc into the DVD writer and close the disc tray The DISC BURN screen appears Oll the camcorder screen Press _ DISC BURN on the DVD writer Movies recorded Oll the internal recording media that haw not been saw d on aW discs will be recorded onto the disc Repeat steps 3 and 4 when the total memory...
Страница 42: ...creen Press the play button on the DVD writer _ m can also operate bythe camcorder screen Touch END EJECT DISC on the camcorder screen and remow the disc after the operation is completed Touch _ and disconnect the USB cable Notes Do not do any of the fbllowing when creating a disc Turn offthe camcorder Disconnect the USB cable or the AC adaptor Subject the camcorder to mechanical shock or vibratio...
Страница 43: ...tlet wall socket p 15 Turn on your camcorder and connect a DVD writer etc to the USB jack of your camcorder with the USB cable supplied The USB SELECT screen appears on the camcorder screen If the USB SELECT screen does not appear touch _ MENU _ Show others _ USB CONNECT under OTHERS category Touch the recording media that contains the images on the camcorder screen I_1USB CONNECT Internal nlemory...
Страница 44: ... to another device via the S VIDE jack by using an A V connecting cable with an S VIDEO cable sold separately higher quality images can be produced than with an A V connecting cable Connect the white and red plug left right audio and the S VIDEO plug S VIDE channel of the A V connecting cable with an S VIDEO cable If you connect the S VIDEO plug only you will hear no sound The yellow plug video co...
Страница 45: ...DISP OUTPUT _ LCD PANEL the defimlt setting _ _ _ _ _ _ To record the date time or camera settings data touch _ MENU _ Show others PLAYBACK SET under _ PLAYBACK category _ DATA CODE _ a desired setting _ _ _ _ In addition touch _ MENU _ Show others _ OUTPUT SETTINGS under _ GENERAL SET category _ DISP OUTPUT IV OUT PANEL _ _ When the screen size of display devices T v etc is 4 3 touch _ MENU _ Sho...
Страница 46: ...ENERAL SET Other setup items p 51 Menu items are described in more details in the Handycam Handbook _ _ The menu list mow s from category to category _ The menu list moves through 4 items at once 5_u can touch buttons and drag the screen to scroll the list of the menu The selected category icon is displayed in orange When you touch _ the screen returns to the MY MENU screen _ Touch _ MENU Touch Sh...
Страница 47: ... menu items you use most often on MY MENU You can register 6 menu items on each MY MENU of the MOVIE PHOTO and PLAYBACK Example deleting SPOT MTR FCS and registering 11 11FADER _ SCENE SELECTION Z _ Touch MENU Touch MY MENU SETTING Touch MOVIE Touch SPOT MTR FCS Touch Ii i_l Touch g lt FADER under MANUAL SETTINGS category _ When MY MENU is displayed touch Repeat the same steps abow to register men...
Страница 48: ...items you call change ill the context appear Menu item I Tab _ Touch _ OPTION Touch the desired tab the item to change the setting After completing the setting touch Notes Grayed out menu items or settings are not available When the item you want is not on the screen touch another tab There maybe notab The tabs and itemsthat appear on the screen depend on the recording playback status ofynur camco...
Страница 49: ...n when recording movies CONVERSION LENS Sets the type of an attached conversion lens sold separately Optimizes the SteadyShot fl mction and focus according to the attached lens LOW LUX Records bright color images in the dim FACEDETECTION Adjusts the image quality of the fi_ce s automaticall c PRIORITYSETTING Select the subject that has priority fbr the fi_ce detection and the smile shutter SMILE D...
Страница 50: ...os from desired scenes of movies MOVIEDUB DUB by select Selects movies and dub DUB by date Dubs all movies of a specified date DUB ALL Dubs all saved movies in a playlist PHOTO COPY COPY by select Selects photos and cop _ COPY by date Copies all photos of a specified date PLAYMSTEDIT It 11 ADD Adds movies in a playlist gZ_ADDby date Adds movies recorded on a same day at one time in a p aylist ERAS...
Страница 51: ...brightness of the LCD screen LCD BL LEVEL Adjusts the backlight of the LCD screen LCD COLOR Adjusts the color intensity of the LCD screen DISPLAYSET Sets the duration that icons or indicators are displayed on the LCD screen OUTPUT SETTINGS TV TYPE Converts the signal depending on the TV connected p 28 DISP OUTPUT Sets whether the omscreen displays appears on the TV screen or not CLOCK LANG CLOCKSE...
Страница 52: ... view the Handycam Handbook double click the short cut icon Oll the COlnputer screen When using a Macintosh open the Handbook US folder in the CD ROM then copy Handbook pdf _ m need Adobe Reader to read Handycam Handbook If it is not installed on our computer you can download it from the Adobe Systems web page http x_q_v adobe com Refbr to PMB Help fbr details on the supplied software PMB p 35 Sel...
Страница 53: ...aptor to the wall outh t wall socket p 15 The camcorder does not operate even when the power is set to on It takes a f_ w seconds for your camcorder to be ready to shoot after the power is turned on This is not a malfunction Disconnect the AC Adaptor froln the wall outlet wall socket or remove the battery pack then reconnect it after about 1 minute If your camcorder still does not work press RESET...
Страница 54: ...inning with 2 or E C 04 1717 The battery pack is not an InfoLITHIUM battery pack V series Use an InfoLITHIUM battery pack V series p 14 Connect the DC plug of the AC Adaptor to your camcorder securely p 14 C 06 DD The battery pack temperature is high Change the battery pack or place it in a cool place C I 3 rTr7 C 32 rTr7 P enmve the power source Reconnect it and operate your camcorder again E _IT...
Страница 55: ...nd or dust gets in your camcorder it may malfl mction Sometimes this malfimction cannot be repaired Near windows or outdoors where the LCD screen or the lens rnwbe exposed to direct sunlight This damages the inside of the LCD screen Operate your camcorder on DC 6 8 V 7 2 V battery pack or DC 8 4 V AC Adaptor For DC or AC operation use the accessories reconnnended in these operating instructions Do...
Страница 56: ...with water and then wipe the casing with a dry soft cloth Avoid the lbllowing to avoid damage to the finish Using chemicals such as thinner benzine alcohol chemical cloths repellent insecticide and sunscreen Handling the camcorder with above substances on our hands Leaving the casing in contact with rubber or vinyl objects fbr a long period of time About care and storage of the lens Wipe the surfh...
Страница 57: ... lbrmat Video MPEG 2 PS Audio recording system Dolby Digital 2ch Dolby Digital Stereo Creator Photo file fbrmat DCF V r 2 0Compatible Exif Vet 2 21 Compatible MPF Baseline Compatible Recording media Movie Photo Internal memory 16 GB Memory Stick PRO Duo media SD memory card SDHC memory card Class 2 4 6 10 When measuring media capacity 1 GB equals 1 billion bytes a portion of which is used fbr syst...
Страница 58: ...chargeable battery pack AC Adaptor AC L200C AC L200D Power requirements AC 100 V 240 V 50 Hz 60 Hz Current consumption 0 35 A 0 18 A Power consumption 18 W Output voltage DC 8 4 V Operating temperature 0 C to 40 C 32 F to 104 F Storage temperature 20 C to 60 C 4 F to 140 F Dimensions approx 48 29 x 81 mm 1 15 16 x 1 3 16 x 3 1 4 in w h d excluding the projecting parts Mass approx 170 g 6 0 oz excl...
Страница 59: ...ry Stick and MagicGate Memory Stick Duo are trademarks or registered trademarks of SoW Corporation InibLITHIUM is a trademark of SoW Corporation BIONZ is a trademark of Sony Corporation DVDirect is a trademark of Sony Corporation Dolby and the double D symbol are trademarks of Dolby Laboratories Microsoft Windows Windows Vista and DirectX are either registered trademarks or trademarks of Microsoft...
Страница 60: ...CK EAOEH EAOEH FADER 9999 I1_ _ Approximate number of 9999 _1 1_ recordable photos and recording media _ Playback fblder of memory card Current playing movie or 100 112 photo Number of total recorded movies or photos Bottom tg g FACE DETECTION set to OFF O1 SMILE DETECTION LOW LUX IA Manual fncus i_i _ _ _ SCENE SELECTION _ _ 6_ b mzl White balance _ _ SteadyShot off SPOT MTR FCS SPOT METER EXPOSU...
Страница 61: ...s RESET using a pointed object Press RESET to initialize all tbe settings including tbe clock setting _ _ USB jack 33 35 36 39 41 _ MODE button 21 _ 11211 movie O photo lamp 21 _ DISC BURN button 35 _ button _ POWER button 16 Power zoom lever PHOTO button 24 Battery pack _ START STOP button 22 _ DC IN jack 14 _ A V Remote Connector 28 _CHG charge lamp 14 _ Grip belt 21 _ Memory card slot 19 _ BATT...
Страница 62: ... _ Tripod receptacle Attach a tripod sold separately to the tripod receptacle using a tripod screw sold separately the length of the screw must be less than 5 5 mm 7 32 in ...
Страница 63: ...ry Stick PRO Duo media 19 Menus 46 49 MOVIE MEDIA SET 18 Movies 22 25 MY MENU 46 MY MENU SETTING 46 One Touch Disc Burn 35 Operation beeps 17 Operation flow 1 l OPTION MENU 48 Parts and controls 61 PHOTO MEDIA SET 18 Photos 24 25 Playback 25 PMB Picture Motion Browser 32 35 PMB Help 35 Power on 16 Precautions 55 Rec zoom buttons on LCD 22 Recording 22 Recording and playback time 58 Recording media...
Страница 64: ...quivalente recomendada por Son _ Deshfigase de la baterias usada lo antes posible segfin el procedimiento que se describe en las instrucciones Sustituya la bateria unicamente por otra del tipo especificado De lo contrario es posible que se produzcan incendios o lesiones Adaptador de alimentacion de ca No utilice el adaptador de alimentaci6n de ca colocado en un espacio angosto tal como entre una p...
Страница 65: ...ambio del ajuste de idioma Para ilustrar los procedimientos operativos se utilizan indicaciones en pantalla en cada idioma local Si es necesario cambie el idioma de la pantalla antes de utilizar la videoc_ mmra p_ig 13 Grabaci6n taIldo use por primera vez una tarjeta de memoria en la videocfimara se recomienda Ibrmatearla en la videoc_ mmra Dig 48 para lograr una operaci6n estable En el fbrmateo s...
Страница 66: ...arl Zeiss que permite obtener imrigenes de gran calidad y que rue desarrollado conjuntamente por Carl Zeiss en Alemania y SoW Corporation Adopta el sistema de medici6n MTF para videocrimaras y ofrece una calidad eqniparable a la de un objetivo Carl Zeiss MTF Modulation Transfi r Function E1 valor num rico indica la cantidad de luz de un motivo que entra en el objetivo Si la videockmara se conecta ...
Страница 67: ...s a modificaciones sin previo aviso Confirme el nOmero de modelo de la videockmara Confirme el nfimero de modelo de la videocrimara No realice ninguna de las acciones que se describen a continuacidn de lo contrario el soporte de grabacidn podria resultar daflado podrla ser imposible reproducir imrigenes grabadas que estas se perdieran o podrlan producirse otras lhllas de funcionamiento Expulsar la...
Страница 68: ...peliculas y fOtOS Reproduccidn en la videoc_imara _ p_ig 21 Reproduccidn de im_igenes en un televisor _ p_ig 24 Almacenamiento de ima genes Almacenan_iento de peliculas y tbtos con una computadora prig 28 Ahnacenamiento de peliculas y fbtos en soportes externos Dig 35 Ahnacenamiento de imtigenes con una grabadora de DVD prig 37 ...
Страница 69: ...r 24 Utilizaci6n correcta de la videoc_mara Eliminaci6n de peliculas y fotos 26 _ Almacenamiento de peliculas y fotos con una computadora Preparaci6n de la computadora Windows 28 Si utiliza un Macintosh 28 Inicio de PMB Picture Motion Browser 31 Creaci6n de un disco con un solo toque OneTouch Disc Burn 31 Importaci6n de peliculas y fotos a una computadora 32 Creaci6n de un disco 33 Copia de un dis...
Страница 70: ...Informaci6n complementaria Soluci6n de problemas 50 Precauciones 53 Especificaciones 55 _ Referencia r_pida Indicadores de la pantalla 58 Piezas y controles 59 ndice 61 ...
Страница 71: ...eoc_mara cierre la pantalla de cristal liquido Instale la bateria en la direcci6n que indica la flecha hasta que oiga un dic Conecte el adaptador de alimentaci6n de ca y el cable de alimentaci6n a la videoc_mara y al tomacorriente de pared Alinee la marca de la clavija de cc con la marca de la toma DC IN E1 indicador CHG carga se enciende y se inicia el proceso de carga E1 indicador CHG carga se a...
Страница 72: ...Ca suministrado con la videoc_mara dentro d e Un rang0 de ca de entre 100 v y 240 v 50 Hz 60 Hz No utilice un transformador de voltaje electrdnico Notas sobre la bateria Antes de extraer la baterla o el adaptador de alimel_tacidn de ca cierre la pantalla de cristal llquido y compruebe que los indicadores _ Pelicula l_ Foto prig 12 y el indicador de acceso prig 16 est_n apagados E1indicador CHG car...
Страница 73: ...la videocamara desconecte el adaptador de alimentacidn de ca del tomacorriente de pared inmediatamente No coloque el adaptador de alimentaci6n de ca en lugares estrechos como pot ejemplo entre una pared y un mueble No provnque un cortocircuito en la clavija de cc del adaptador de alimentaci6n de ca ni en el terminal de la baterla con ningt m objeto mettilico ya que podria causar una aliade funcion...
Страница 74: ...o la pantalla de cristal llquido est_iabierta presione POWER Boron POWER Indicador MODE Seleccione la zona geogrMica deseada con _ _ y a continuaci6n toque SIGUIENTE Para ajustar la fecha y la hora de nuevo toque _ MENU _ Mostrar otros _ AI REL IDIOM en la categorla A UST GENERALES _ AIUS RELOI Cuando tm elemento no aparece en la pantalla toque m m hasta que aparezca ...
Страница 75: ...ctivar los pitidos de funcionamiento toque _ MENU _ Mostrar otros _ A US o SON PANT en la categoria _ AJUST GENERALES _ PITIDO _ DESACTI vl _ _ 5 K Si el botdn que toca no reacciona correctamente deberia calibrar el panel tfictil Para apagar la videockmara Cierre la pantalla de cristal liquido E1 indicador n Pelicula parpadea durante varios segundo y se apaga la videoc_imara Sugerencias Tambi _ pu...
Страница 76: ...cidn o edicidn en elsoporte seleccionado Sugerencias Consulte la pfigina 56 para conocer el tiempo de grabacidn de las peliculas Toque _ MENU _ Mostrar otros _ AJUSTES SOPORTE en la categoria _ GESTION SOPORTE _ AJ SOPORTE PEL Apareceni la pantalla AJ SOPORTE PEL Toque el soporte de grabaci6n deseado Toque S _ _ E1 soporte de grabaci6n se cambia Toque _ MENU _ Mostrar otros _ AJUSTES SOPORTE en la...
Страница 77: ... una MultiMediaCard En este manual tanto Memory Stick PRO Dud como Memory Stick PRO HG Dud reciben el nombre de Memory Stick PRO Dud Se garantiza el timcionamiento de tarjetas de memoria de hasta 32 GB con la videocfimara Tipos de Memory Stick que se pueden utilizar con la videockmara Para grabar pellculas so recomienda utilizar un Memory Stick PRO Duo de una capacidad de 512 MB o m_isde las marca...
Страница 78: ...ue se daflela tarjeta de memoria la ranura para tarjeta de memoria o los datos de imagen Notas Si aparece Error al crear un nuevo archivo de base de datos de im_igenes Es posible que no exista suficiente espacio libre toque _ MENU _ Mostrar otros _ FORMAT SOPORTE en la categorla Q _ GESTION SOPORTE _ TARI MEMORIA _ IS _ S _ _ para inicializar la tarjeta de memoria Para expulsar la tarjeta de memor...
Страница 79: ... o cuando reproduzca las imtlgenes cierre la tapa del objetivo Ajuste la correa de sujecidn d3 m o m _ o Abra la pantalla de cristal liquido de la videoc_mara La videoc_hnara se enciende Para encender la videoc_imara cuando la pantalla de cristal llquido est_i abierta presione POWER p_ig 12 Para alternar entre modos de grabaci6n presione MODE Presione MODE para que se encienda el indicador de acce...
Страница 80: ...roduccidn los iconos e indicadores del panel de cristal liqnido se muestran durante unos 3 segundo y luego desaparecen Para mostrar los iconos e indicadores de nuevo toque cualqnier parte de la pantalla de cristal liquido excepto los botones de grabacidn y zoom Botones de grabaci6n y zoom de la pantalla de cristal llquido I uno 3 E _7 segundo despu_s _ Notas Si cierra la pantalla de cristal liquid...
Страница 81: ...peliculas Para comprobar el tiempo yla capacidad de grabacidn restantes aproximados etc toque MENU _ Mostrar otros _ INFO SOPORTE en lacategorfa _ GESTION SOPORTE La pantalla de cristal llquido de la videocfimara puede mostrar imfigenes de grabacidn en toda la pantalla visualizacidn de pixeles completos Sin embargo esto puede ocasionar un leve recorte de los bordes superior infi rior derecho e izq...
Страница 82: ...ell 4 3 Presione PHOTO levemente para ajustar el enfoque y luego presi6nelo completamente Para grabar iotos tambi n puede tocar _ on la pantalla de cristal llquido ii ii ii ii ii ii ii ii ii i_ii _ Parpadea Se enciende Cuando IMII desaparece se graba la _bto Sugerencias Para cambiar el tamafio de la imagen toque _ MENU _ Mostrar otros _ _TAM IMAGEN en la categorla _ AJUST FOTO CAM _ el _ iuste des...
Страница 83: ...o la pantalla de cristal llquido est_iabierta presione POWER prig 12 Presione _ VISUALIZAR IMAGENES 3 Luego de unos segundo aparece la pantalla VISUAL INDEX Tambi a puede mostrar la pantalla VISUAL INDEX al tocar _ VISUALIZAR IMAGENES en la pantalla de cristal llquido Para reproducir una pelicula toque II 11 Pelicula _ la pelicula deseada Para vet una foto toque I_1 Foto _ _ la foto deseada Las pe...
Страница 84: ...uccidn desde la pelicula seleccionada llega a la dltima pelicula vuelve a mostrarse la pantalla VISUAL INDEX Toque I_ _11 durante la pausa para reproducir la pelicula a cfimara lenta Si sigue tocando m_l _lN _ durante la reproduccidn las peliculas se reproducen con un aumento de velocidad de aproximadamente 5 veces _ 10 veces _ 30 veces _ 60 veces Puede mostrar la pantalla VISUAL INDEX si toca _ M...
Страница 85: ...nada I Inicio detenci6n de presentaci6n de Anterim l I diapositivas I_1t1_ oo14 Siguiente Ir a la pantalla _ iilj _T_ I OPTION VISUAL INDEX Sugerencias Cuando visualiza fotos grabadas en una tarjeta de memoria aparece en la pantalla _ _ carpeta de reproduccidn g _3 ...
Страница 86: ...V con un cable S VIDEO se vende por separado se pueden producir im lgenes de mayor calidad que con un cable de conexidn de A V_ Conecte las clavijas blanca y roja audio izquierdo derecho y la clavija S VIDEO canal S VIDEO del cable de conexidn de A V con el cable S VIDEO se vende por separado La conexion de la clavija amarilla no es necesaria Si se conecta s61o la clavija de S VIDEO no habr l sali...
Страница 87: ...dora _ Notas Cuando conecte la videoctimara a un televisor compatible con el sistema ID 1 ID 2 ajuste TWO TV en 16 9 E1televisor cambia autom_iticamente al modo de pantalla completa Consulte tambi_n los manuales de instrucciones suministrados con el televisor Si ajusta TWO TV en 4 31 puede deteriorarse la calidad de imagen Asimismo cuando la relaci6n de aspecto de la imagen grabada cambia entre 16...
Страница 88: ...odas las imfigenes almacenadas en el soporte de grabacidn y recuperar todo el espacio disponible en el soporte fbrmatee el soporte Las im_igenes de tamafio reducido que pernfiten ver varias im_igenes al nfismo tiempo en una pantalla de indice se conocen como miniaturas _ 1Toque _ MENU _ Mostrar otros _ BORRAR en la categorfa _ EDIT Para eliminar pelfculas toque CIVIl BORRAR _ 1tl BORRAR Para elimi...
Страница 89: ... _BORRAR BORRAR p fi cha Toque m_ _ para seleccionar la fk cha de grabacidn de las peliculas fbtos que desee y a continuacidn toque I_ _ Toque laimagen en lapantalla de cristal llquido para confirmarla Toque paravoNer a lapantalla anterior Toque i1 _ _ C g _7 ...
Страница 90: ...ita una unidad de CD ROM para la instalacidn _ Se reqniere la instalacidn est_indar No se garantiza el flmcionamiento en un sistema operativo actualizado o en un entorno de arranque mfiltiple _2Las ediciones de 64 bits y Starter Edition no son compatibles Se reqniere Windows hnage Mastering API IMAPI versidn 2 0 para utilizar la funcidn de creacidn de discos o similar _ Starter Edition no es compa...
Страница 91: ...adora Aparecerti la pantalla de instalacidn Si la pantalla no aparece haga clic en Inicio _ Equipo en Windows XP Mi PC y a cnntinuacidn haga doble clic en SONYPMB E CD ROM _ _ Los nombres de las unidades como E pueden variar en funcidn de la computadora Haga clic en Instalaci6n Handycam Application Softwale Seleccione el pais o la regi6n Seleccione el idioma del programa que desea instalar y conti...
Страница 92: ...ng API versidn 2 0 para Windows XP Si a6n no se ha instalado Image Mastering API versidn 2 0 para Windows XP selecci6nelo desde los programas requeridos en la pantalla de instalaci6n y siga los siguientes procedimientos que se muestran para instalarlo La computadora debe estar conectada a Internet para realizar la instalacidn Puede instalar Image Mastering API versidn 2 0 para Windows XP como resp...
Страница 93: ...B 2 Creaci6n de un disco con un solo toque OneTouch Disc Burn Las peliculas y las fotos grabadas en la videoc_hnara que no se hayan guardado con la funci6n One Touch Disc Burn se pueden guardar autom_iticamente en un disco Instale en primer lugar PMB p_ig 28 sin embargo no inicie PMB _ Conecte la videoc_imara al tnmacorriente de pared mediante el adaptador de alimentaci6n de ca suministrado para r...
Страница 94: ... usando eladaptador de alimentacidn de ca suministrado para esta operacidn p_ig 10 Encienda la videoc_mara y con tela a la computadora mediante el cable USB suministrado 2 La pantalla SELEC USB aparece ell la pantalla de la videocthnara Toque en la pantalla de la videoc_mara el soporte de grabaci6n que contiene las im_genes que desea guardar _ CONEXION USB n_emoria interna _ CONEXION USB tarjeta d...
Страница 95: ...n la unidad de DVD Consulte la p_igina28 paraobtener intbrmacidn acerca de los discos que puede utilizar Si un softwareditbrente a PMB se inicia autom_iticamente ci relo Inicie PMB p_g 31 Haga clic en Calendario o ndice en el lateral izquierdo de la ventana y seleccione la fecha o la carpeta y a continuaci6n seleccione las peliculas Para seleccionarvarias pellculas mantenga presionada latecla Ctrl...
Страница 96: ...ayuda de Video Disc Copier Es posibl e _orta r las partes d e una pelictfla que se 0ns der_ necesafias Y guardarlas como un archivo separado Haga dobleclic en la peliculaque desea editar en IPMB y a c0ntinuaci6n hag a dicen Mostrar paleta de edici6n en el lateral dere o de 1a panta la Rec0rtar yideo oseleccioneel men_ Manipular _ Editar _ Rec0rtar video par a obtener mas detalles consulte i_yuda d...
Страница 97: ...ctimara Si el soporte externo se brmate6 con el sistema de archivos NTFS o similar fbrmat elo en la videoc_imara antes de utilizarlo Aparecer_i la pantalla de brmato cuando el soporte externo se conecte a la videoctimara No se asegura el funcionamiento con todos los dispositivos que satisI agan los requisitos de hncionamiento Conecte la videoc_imara al tomacorriente de pared mediante el adaptador ...
Страница 98: ...talla VISUAL INDEX cambian tal como se muestra en la siguiente ilustraci6n Puede hacer ajustes del mend de los soportes externos como por ejemplo eliminar im_igenes Toque _ MENU Mostrar otros en la pantalla VISUAL INDEX Para guardar las peliculas y fotos deseadas _ Notas No es posible buscar ni copiar btosgrabadas en una tarjeta de memoria pot fbcha de grabacidn _ Toque Reproducir sin copiar en el...
Страница 99: ...Desconecte el cable adaptador USB Creaci6n de un disco con una grabadora de DVD Es posible crear un disco o reproducir las im_igenes de un disco creado usando la grabadora de DVD especifica DVDirect Express sew nde por separado Consulte tambi n los manuales de instrucciones suministrados con la grabadora de DVD _ Notas Conecte la videoc_imara al tomacorriente de pared usando el adaptador de alimen...
Страница 100: ...lizar un disco con OPC GRAB DISCO Llew a cabo esta operacidn en los siguientes casos A1 copiar una imagen deseada A1 crear varias copias del mismo disco A1 copiar im_igenes en la tarjeta de memoria _ Toque OPC GRAB DISCO en el paso 4 _ Seleccione el soporte de grabaci6n que contiene las peliculas que desea guardar _ Toque la pelicula que desea grabar en el disco Aparece _ Capacidad restante del di...
Страница 101: ...nte antes de eliminar las pellculas de la videocfimara Si Se produjo un error o Error al ejecutar GRABAR EN DISCO aparecen en la pantalla inserte otro disco en la grabadora de DVD y repita la operacidn de DISC BURN Sugerencias Si el tamafio de memoria total de las pellculas que se van a grabar mediante la operacidn DISC BURN supera el tamaflo del disco la creacidn del disco se detendrfi al alcanza...
Страница 102: ...lla SELEC USB toque _ MENU _ Mostrar otros CONEXION USB en la categorla OTROS Toque en la pantalla de la videograbadora el soporte de grabaci6n que contiene las imagenes t_ CONEXION USB memoria interna _CONEXION USB tarjeta de menloria Puede copiar im_igenes reproducidas en la videoc_hnara en un disco o videocasete si conecta la videoc_hnara a una grabadora de discos una grabadora de DVD de Sony e...
Страница 103: ...i6n en el dispositivo de grabaci6n Si eldispositivo de grabacidn tiene un selector de entrada aj6stelo en elmodo de entrada Conecte la videocamara al dispositivo de grabaci6n grabadora de discos etc con un cable de conexi6n de A V suministrado o un cable de conexi6n de A V con SVlDEO se vende pot separado Conecte la videoc_imara a las tomas de entrada del dispositivo de grabacidn Amarillo Entrada ...
Страница 104: ...IGO DATOS el ajuste deseado _ _ _ _ B _ _ Ademfis toque MENU _ Mostrar otros AJUSTES SALIDAI en la categorla ff_ AJUSZ GENERALESD SALIDA PANT _ SAL V LCD _ _ _ _ _ _ Si el tamafio de pantalla de los dispositivos de visualizaci6n televisor etc es 4 3 toque MENU _ Mostrar otros AJUSTES SALIDA en la categoria _ AJUST GENERALES TIPO TV _ 4 3 Si conecta la videoc_imara a un dispositivo monoaural introd...
Страница 105: ... GESTION SOPORTE Elementos para los soportes de grabaci6n p6g 48 AJUST GENERALES Otros elementos de la configuraci6n p6g 48 Los elementos de menfl se describen detalladamente en la Guia pr_ictica de Handycam _ _ la lista del lnenfi se mueve de categoria a categoria _ la lista del menti se muew de a 4 elementos al mismo tiempo Puede tocar los botones y arrastrar la pantalla para desplazarse pot la ...
Страница 106: ...dn y el modo de grabacidn pelicula fbto Es posible utilizar los elementos de lnenu ln_s fScilmente si registra los elementos de lnenu que utiliza con m_is frecuencia ell MI MENI Es posible registrar 6 elementos de lnenu ell cada MI MENI2 de PELICULA FOTO y REPRODUCCION Ejemplo anular MED ENF PUNTO y registrar EtIDESVANECEDOR _ A JUSTMANU L_S _i777iii_iii_i_ 7771 _ Toque _ MENU Toque AJUSTE MI MENI...
Страница 107: ...ra que aparezcan los elementos de menti que es posible cambiar en el contexto Elemento de menfi Ficha _ Toque _ OPTION Toque la ficha deseada el elemento cuyo ajuste desea cambiar Cuando finalice el ajuste toque RT _ _ Notas Los elementos de menfi o ajustes atenuados no est_in disponibles Si el elemento que desea no aparece en la pantalla toque otra ficha Es posible que no haya ninguna ficha Las f...
Страница 108: ...esttl en posicidn horizontal o vertical g NSTEADYSHOT Permite ajustar la Ihncidn SteadyBhot cuando se graban peliculas OBJETIVO CONVER Permite _ justar el tipo de objetivo de conversidn instalado se vende por separado Permite optimizar la hmcidn BteadyShot y realizar el enIbque en flmcidn del objetivo colocado LOW LUX Permite grabar iimlgenes de color brillantes en condiciones de escasa lmninosida...
Страница 109: ...R Permite DIVI DI R Permite TOMA FOTOGR_ F Permite COPIA PEL CULA COPIA por seleccidn Permite COPIA por fecha Permite COPIA DE TODO Permite COPIAR FOTO COPIAR por selec Permite COPIAR por fecha Pennite EDICION PLAYLIST II llAIqADIR Permite AIqADIR p fecha Permite playlist BORRAR Permite BORRAR TODO Permite MOVER Permite Categoria _ OTROS CONEXION USB eliminar peliculas eliminar iotos proteger las ...
Страница 110: ...ite ajustar si el sonido de luncionamiento emite un pitido o no BRILLOLCD Permite ajustar el brillo de la pantalla de cristal liquido NIVLUZ LCD Permite ajustar la luz de fbndo de la pantalla de cristal liquido COLOR LCD Permite ajustar la intensidad del color de la pantalla de cristal liquido AJUSTE PANTALLA Permite ajustar la duracidn de la visualizaci6n de los iconos o indicadores en la pantall...
Страница 111: ...lo de la videoc_mara y a continuaci6n haga clic en Guia pr_ctica de Handycam PDF E1nombre del modelode lavideoc_imara se encuentra impreso en la superficie infi riorde esta Haga clic en Salir _ Salir y a continuaci6n extraiga el CD ROM de la computadora Para ver la Guia pr_ictica de Handycam haga done clic en el icono de acceso directo en la pantalla de la computadora Cuando utilice un Macintosh a...
Страница 112: ...prfictica de Handycam Dig 49 para obtener infbrmacidn sobre los problemas de la videoc_imara y la Ayuda de PMB Dig 31 para obtener infbrmacidn sobre la conexi6n de la videoc_imara a una computadora La videoc_mara no se enciende Instale una bateria cargada en la videocfimara Dig 9 Conecte la clavija del adaptador de alilnentacidn de ca al tomacorriente de pared p_ig 10 La videoc_mara no funciona au...
Страница 113: ...ciela co nputadora La computadora no reconoce la videoc mara Desconecte cuak uier dispositivo de a toma USB de la computadora excepto el teclado el ratdn y la videocimmra Desconecte el cable USB de la computadora y de la videocfimara reinicie la computadora y a continuaci6n conecte de nuevo la computadora con la videocfimara de la manera apropiada Si en la pantalla de cristal liquido aparecen indi...
Страница 114: ...strar otrosl REP ARCH BD IM I en la categoria _ i GESTION SOPORTE _ el soporte de grabaci6n La tarjeta de memoria estri daflada Formatee la tarjeta de memoria con la videocrilnara prig 48 Se insert6 una tarjeta de meinoria incompatible prig 15 _ O _ Se restringi6 el acceso a la tarjeta de memoria en otto dispositivo La videocrimara se encuentra en una posicidn inestable St tela firmemente con amba...
Страница 115: ...nte y exponerla a golpes o impactos como martillazos caldas o pisotones Sea especialmente cuidadoso con el objetivo Cuando no utilice la videocfimara mant_ngala apagada No utilice la videoctlmara envuelta en una toalla por ejemplo Si lo hace puede recalentarse internamente Cuando desconecte el cable de alimentaci6n tire del enchulb y nunca del cable Procure no daflar el cable de alimentacidn al co...
Страница 116: ...nstalada La bateria recargable se descargartl completamente transcurridos aproximadamente 3 meses si no utiliza la videocfimara en absoluto Utilice la videocfimara despu s de cargar la bateria recargable preinstalada Sin embargo aunque no est_ cargada el funcionamiento de la videocfimara no se verfi afi ctado siempre qne no se est grabando la f_ cha Procedimientos Conecte la videoctlmara a un toma...
Страница 117: ...cuando LOW LUX est_i ajustado en ACTIVADO velocidad de obturaci6n 1 30 de segundo _La exclusiva matriz de pixeles del sensor ClearVid de Sony y el sistema de procesamiento de imfigenes BIONZ permiten una resoluci6n para las imfigenes fijas eqnivalente a los tamarios descritos _2 gZ_STEADYSHOT estfi ajustado en ESTA NDAR o DESACTI_ 3Los valores correspondientes a la distancia fbcal son cii as reale...
Страница 118: ...as condiciones de grabacidn y del motivo g _ MODO GRAB Condiciones de grabacidn modo de grabacidn ajustado en SPI E1tiempo de grabacidn normal indica el tiempo de grabaci6n al repetir las operaciones de inicio parada al cambiar el indicador MODE y al utilizar el zoom Tiempo de grabaci6n previsto para peliculas en el soporte de grabaci6n interno en minuto Para _ justar el modo de grabacidn toque ME...
Страница 119: ...colnerciales registradas o marcas comerciales de Microsoft Corporation en los Estados Unidos y o en otros paises Macintosh y Mac OS son marcas comerciales registradas de Apple Inc en los EE UU y en otros paises Intel Intel Core y Pentium son marcas comerciales o marcas comerciales registradas de Intel Corporation o sus subsidiarias en los Estados Unidos y en otros paises Adobe el logotipo de Adobe...
Страница 120: ...idn reproduccion edicidn 0 00 00 Contador hora minuto segundo 00min Tiempo de grabacion restante previsto _UND FUND 8L_NCO NEaRO DESVANECEDOR 9999 I_1 _ N0mero aproximado de fotos que puede grabar y 9999 I_1 Z_ soporte de grabaci6n _ Carpeta de reproduccidn de la tarjeta de memoria Pellcula o foto en 100 112 reproducci6n nfimero total de peliculas o fotos grabadas Parte inferior c g DETECCION CARA...
Страница 121: ...os indicadores no _g_arezcan Los ntimeros entre corresponden alas ptiginas de refk rencia _Objetivo objetivo Carl Zeiss _ Interruptor LENS COVER Micr6fono incorporado _ Pantalla de cristal liquido panel tkctil Si gira el panel de cristal llquido 180 grados podr_ l cerrarlo con la pantalla de cristal lfquido mirando hacia fuera Este procedimiento resuha adecuado para las operaciones de reproducci6n...
Страница 122: ...ot6n PHOTO 20 Bateria Bot6n START STOP 18 Toma DC IN 9 Conector remoto de A V 24 Indicador CHG carga 9 Correa de sujeci6n 17 Ranura de tarjeta de memoria 15 Palanca BATT liberaci6n de la bateria 10 Indicador de acceso tarjeta de memoria 15 Cuando e indicador est_iencendido o parpadea a videoc_ mmraest_igrabando o eyendo datos Receptaculo de tripode Co oque un tripode sevende pot separado en e rece...
Страница 123: ...d 12 Especificaciones 55 FECHA HORA 13 Flujo de operacidn 6 Fotos 20 21 Grabaci6n 18 Grabadora de discos 40 Grabadora de DVD 37 39 Guia imictica de Handycam 49 Indicadores de advertencia 51 Indicadores de la pantalla 58 Instalaci6n 28 Macintosh 28 Mantenimiento 53 Memoria interna 14 Memory Stick 15 Memory Stick PRO Duo 15 Memory Stick PRO HG Duo Menfis 43 46 MI MENI 43 Miniatura 26 One Touch Disc ...
Страница 124: ... Customer Support Website Puede encontrar m_isinibmlaci6n sobre este producto y respuestas alas preguntas m_isfrecuentes en nuestro sitio Web de atenci6n alcliente htt p www so ny net Printed on 70 or more recycled paper Impreso en papel reciclado en un 70 o mas Printed in China IIIIIIIIIII 4171513110 ...
Страница 125: ...SON_ 4_171_s13_ 1 DCR SX83 Digital Video Camera Recorder Operating Guide Guia de operaciones M_NDRY _TI K M _ _ 2010 Sony Corporation ...
Страница 126: ...nstructions in the literature accompanying the appliance To reduce fire or shock hazard do not expose the unit to rain or moisture Do not expose the batteries to excessive heat such as sunshine fire or the like CAUHON 10 REDUC _H_ RISKOFE CTRICSNOOK Do NOr REMOVE COVER O_ BACK NO USE_ SERVlCEAIJLE PARRSINSIDE rtEFERSErtVlClNGTOQUALIFIED SERVICEPERSONNEL This symbol is intended to alert the user to...
Страница 127: ...ectrician for replacement of the obsolete outlet Protect the power cord from being walked on or pinched particularly at plugs conw nience receptacles and the point where they exit from the apparatus Only use attachments accessories specified by the manufacturer Use only with the cart stand tripod bracket or table specified by the manufacturer or sold with the apparatus When a cart is used use caut...
Страница 128: ...h a NEMA 1 15P plug rated for 125 V 15 A Europe Countries regions Voltage Frequency Hz Plug type Austria 230 50 C Belgium 230 50 C Czech 220 50 C I enmark 230 50 C Finland 230 50 C France 230 50 C Germany 230 50 C Greece 220 50 C Hungary 220 50 C Iceland 230 50 C Ireland 230 50 C BF Italy 220 50 C I uxemburg 230 50 C Netherlands 230 50 C Norway 230 50 C Poland 220 50 C Portugal 230 50 C Romania 22...
Страница 129: ...60 A Jamaica 110 50 A Mexico 120 127 60 A Nicaragua 120 240 60 A Panama 110 220 60 A South America Countries regions Voltage Frequency Hz Plugtype Argentina 220 50 BF O Brazil 127 220 60 A C Chile 220 50 C Colombia 120 60 A Peru 220 60 A C _ nezuela 120 60 A Middle East Countries regions Voltage Frequency Hz Plugtype h an 220 50 C BF Iraq 220 50 C BF Israel 230 50 C Saudi Arabia 127 220 50 A C BF ...
Страница 130: ...battery with the specified type onb Otherwise fire or injury may result ACAdaptor Do not use the AC Adaptor placed in a narrow space such as between a wall and furniture Use the nearby wall outlet wall socket when using the AC Adaptor Disconnect the AC Adaptor from the wall outlet wall socket immediately if aW malfunction occurs while using your camcorder Ew n if your camcorder is turned off AC po...
Страница 131: ...dential installation This equipment generates uses and can radiate radio frequency energy and if not installed and used in accordance with the instructions may cause harmful interference to radio communications Howew r there is no guarantee that interference will not occur in a particular installation If this equipment does cause harmful interference to radio or television reception which can be d...
Страница 132: ...he language setting The or screen displays in each local language are used fbr illustrating the operating procedures Change the screen language befbre using your camcorder if necessary p 17 Recording When you use a memory card with your camcorder br the first time fbrmatting the memory card with your camcorder p 51 is recommended fbr stable operation All data recorded on the memory card will be de...
Страница 133: ...e camcorder using a computer If you do so our camcorder may not operate correctly When connecting our camcorder to another device with a cable be sure to insert the connector plug in the correct way Pushing the plug fbrcibly into the terminal will damage the terminal and may result in a malfunction of our camcorder If you cannot record play back images perform MEDIA FORMAT If you repeat recording ...
Страница 134: ...ct the memory card when the access lamp p 20 is litor flashing Remove the battery pack or AC Adaptor f com the camcorder or subject the camcorder to shock or vibraion when the _ Movie U_ Photo lamps p 16 or the access lamp p 20 are litor flashing When using ashoulder belt sold separately do not crash the camcorder against an object Do not use your camcorder invery loud areas ...
Страница 135: ...s _ p 24 Playing movies and photos Playback on the camcorder _ p 25 Playing images on a TV _ p 28 Saving images Saving movies and photos with a computer _ p 32 Saving movies and photos in external media _ p 39 Saving images with a DVD writer recorder _ p 41 Deleting movies and photos p 30 If you delete the image data that has been saved on your computer _ or a disc you can record new images on the...
Страница 136: ...memory card 20 _ Recording Playback Recording 21 Playback on the camcorder 25 Playing images on a TV 28 Making good use of your camcorder Deleting movies and photos 30 _ Saving movies and photos with a computer Preparing a computer Windows 32 When using a Macintosh 32 Starting PMB Picture Motion Browser 35 Creating a disc with one touch One Touch Disc Burn 35 Importing movies and photos to a compu...
Страница 137: ... Using menus 46 Getting detailed information from the Handycam Handbook 52 _ Additional information _ lroubleshooting 53 Precautions 55 Specifications 57 Quick reference Screen indicators 60 Parts and controls 61 Index 63 D n _3 ...
Страница 138: ...o your camcorder Turn offyour camcorder by closing the LCDscreen Attach the battery pack by sliding it in the direction of the arrow until it clicks Connect the AC Adaptor and the power cord mains lead to your camcorder and the wall outlet wall socket Align the mark on the DC plug with that on the DC IN jack The CHG charge lamp lights up and charging starts The CHG charge lamp turns off when the b...
Страница 139: ...p 16 the access lamp p 20 are turned of__ The CHG charge lamp flashes during charging under the fbllowing conditions The battery pack is not attached correctl3c The battery pack is damaged The temperature of the battery pack is lox_c Remove the battery pack comyour camcorder and put it in a warm place The temperature of the battery pack is high Remove the battery pack comyour camcorder and put it ...
Страница 140: ...ired geographical area with _ _ then touch NEXT Touch the button on the LCD screen To set the date and time again touch _ MENU _ Show others _ CLOCK LANG under _ GENERAL SET category _ CLOCK SET Vhen an item is not on the screen touch m m until the item appears Set DST SET or SUMMERTIME date and time then touch Ii_l The clock starts If you set DST SET or SUMMERTIME to ON the clock advances 1 hour ...
Страница 141: ... _ BEEP _ OFF _ _ _ _ _ Ik _ If the button you touch does not react correctly calibrate the touch panel To turn offthe power Close the LCD screen The _ll Movie lamp flashes for a fbw seconds and the power is turned off_ _Tips 5_u can turn off your camcorder also by pressing POWER When POWER ON BY LCD is set to OFF turn offyour camcorder by pressing POWER 63 Changing the language setting _ You can ...
Страница 142: ...aybackand editing operations on the selected medimn _Tips See page 59 for the recordable time of movies Touch _ MENU _ Show others _ MEDIA SETTINGS under_ MANAGE MEDIA category _ MOVIE MEDIA SET The MOVIE MEDIA SET screen appears Touch the desired recording media Touch YES _ The recording medium is changed Touch _ MENU _ Show others _ MEDIA SETTINGS under_ MANAGE MEDIA category _ PHOTO MEDIA SET T...
Страница 143: ...mory Stick PRO HG Duo media are referred to as Memory Stick PRO Duo media Memory cards of up to 32 GB are guaranteed to work with our camcorder Types of Memory Stick media that can be used with your camcorder For recording movies it is recommended that you use Memory Stick PRO Duo media of 512 MB or larger marked with MEMORY SLIERPRO null Memory Stick PRO Duo media MEMORYSTI I PRO HG DUO Memory St...
Страница 144: ...mory card slot or imagedata maybe damaged Notes If Failed to create a new hnage Database File It may be possible that there is not enough ficeespace is displayed initialize the memory card by touching _ MENU _ Show others _ MEDIA FORMAT under _ a MANAGE MEDIA category _ MEMORY CARD _ YES _ YES To eject the memory card Open the cow r and lightly push the memory card in once Do not open the cover du...
Страница 145: ...recording or when you play back images close the lens cover Fasten the grip belt g 3 E Open the LCD screen of your camcorder Your camcorder turns Oll To turn on your camcorder when the LCD screen is alrea open press POWER p 16 _ m can switch recording modes by pressing MODE Press MODE to light up the desired recording mode lamp MODE button MODE I_ Movie When recording a movie I_ Photo When shootin...
Страница 146: ...corder or switching the recording movie photo playback modes To display the icons and indicators again touch an _ here on the screen except the rec zoom buttons on the LCD Rec zoom buttons on LCD about 3sec _7 after Notes If you close the LCD screen while recording movies the camcorder stops recording The maximum continuous recordable time of movies is about 13 hours When a movie file exceeds 2 GB...
Страница 147: ...imated remaining capacity etc by touching _ MENU Show others _ MEDIA INFO under _i MANAGE MEDIA category The LCD screen of your camcorder can display recording images across the entire screen full pixel display However this may cause slight trimming of the top bottom right and left edges of images when played back on a TV which is not compatible with full pixel display In this case set GUIDEFRAME ...
Страница 148: ... ratio becomes 4 3 Press PHOTO lightly to adjust the focus then press it fully 5_u can record photos alsoby touching _ on the L D screen Flashes Lights up WhenMilldisappears the photo is recorded _Tips To change the image size touch _ MENU _ Show others _ IMAGE SIZE under _ PHOTO SETTINGS category _ a desired setting _ _ 5_u cannot record photos while _ is displayed 5_u can check the recordable nu...
Страница 149: ...MAGES The VISUAL INDEX screen appears after some seconds _ ucan display the VISUAL INDEX screen also by touching VIEW IMAGES on the LCD screen Touch _ll Movie _ a desired movie to play back a movie Touch the I_ Photo _ a desired photo to view a photo Movies are displayed and sorted by recording date s Switches operating button display To MENU screen Displays the screen to select the index type DAT...
Страница 150: ...returns to the VISUAL INDEX screen Touch EI _II _ during pause to play back movies slowl c As you repeat toucbing I_11 _ during playback nrovies are played as fhst as about 5 times about 10 times _ about 30 times _ about 60 times 5_u can display the VISUAL INDEX bv touching _ MENU _ Show others _ VISUAL INDEX under _ PLAYBACK category The recording date time and shooting conditions are recorded au...
Страница 151: ...hotos Yourcamcorder displaysthe selected photo I Previous To the VISUAL _ iil Next J _T_ 1 OPTION INDEX screen _Tips When viewing photos recorded on a memory card _ playback iolder appears on the screen g 3 7 _7 ...
Страница 152: ...g cable with an S VIDE cable sold separately higher quality images can be produced than with an A V connecting cable Connect the white and red plugs left right audio and the S VIDE plug S VIDEO channel of the A V connecting cable with an S VIDEO cable sold separately The yellow plug connection is not necessary Connecting only the S VIDEO plug will not output audio I VIDEO VIDEO Yellow A V R A V Re...
Страница 153: ... When you connect your camcorder to a TV compatible with the ID 1 ID 2 system set TV TYPE to 16 9 The TV switches to fi dlmode automaticall3c Refi r also to the instruction manuals supplied with our T V_ When you set TV TYPE to 4 3 the image quality may deteriorate Also when the recorded image s aspect ratio switches between 16 9 wide and 4 3 the image may jitter On some 4 3 TVs the photos recorde...
Страница 154: ...cording media and recover all the recordable space of the media fbrmat the media Reduced size images which enable you to view many images at the same time on an index screen are called thumbnails2 1Touch _ MENU _ Show others _ DELETE under _ EDIT category To delete movies touch 1t_ DELETE _ g ltDELETE Tu delete photos touch _DELETE _ _DELETE Touch and display the 4 mark on the movies or photos to ...
Страница 155: ...uch _ _ to select the recording date of the desired movies photos then touch _ Touch the image down on the LCD screen to confirm tile image Touch _ to return to the previous screen Touch YES E _ _ _ 57 3 S ...
Страница 156: ...discs ii Minimunl 1 024 x 768 dots _ Standard installation is required Operation is not assured if the OS has been upgraded or in a multi boot environment _264 bit editions and Starter Edition are not supported Windows Image Mastering API IMAPI Ver 2 0 or newer is required to use disc creation function etc _3Starter Edition is not supported _4Faster processor is recommended _ Notes Operation with ...
Страница 157: ...tion to be installed then proceed to the next screen Read the terms of the license agreement carefully If you agree to the terms change to _ and N The USB SELECT screen appears on the camcorder screen automatically Touch the one of the media types displayed on the camcorder screen to make the computer recognize your camcorder I_IUSB CONNECT Internal memory Tiledisplayed recording media difi r depe...
Страница 158: ...0 fbr Windows XP has not been installed yet select it from required programs on the installation screen and install it bllowing the procedures displayed The computer must be connected to the internet fbr the installation 5_u may install hnage Mastering API v2 0 fbr Windows XP in response to the message displayed when you try to start those functions Touch END _ YES on the camcorder screen Disconne...
Страница 159: ... with one touch OneTouch Disc Burn Movies and photos recorded on your camcorder that haw not yet been saw d with One Touch Disc Burn function can be saw d on a disc automatically Install PMB belbrehand p 32 however do not start PMB Connect your camcorder to the wall outlet wall socket using the AC Adaptor supplied fbr this operation p 15 With One Touch Disc Burn function on your camcorder you can ...
Страница 160: ...e supplied AC Adaptor brthis operation p 15 Turn on your camcorder then connect the camcorder to the computer using the supplied USB cable 2 The USB SELECT screen appears on the camcorder screen Touch the recording media that contains the images you want to save on the camcorder screen _ USB CONNECT Internal memory _ USB CONNECT Memory card The displayed recording media differ depending onthe mode...
Страница 161: ...iscs you can use If any other software than PMB starts automatically shut it down Start PMg p 35 Click Calendar or Index on the left side in the window and select the date or folder then select the movies To select plural movies hold the Ctrl key down and click thumbnails At the top of the window click _ _ Create DVD Video Format Discs STD _ The window used to select movies o_ appears _3_ To add m...
Страница 162: ...ration Capturing photos from a movie You can save a frame of a movie as a photo file Double click the movie to be edited on PMB then dick Show Edit Palette on the right side of the screen _ Save Frame See PMB Help p 35 for details You C an CUtOUt0n y necessary p arts from a movie and save it as another file Doub e click the movie to be edited on PMB then click Show Edit Palette on the rig ht Side ...
Страница 163: ...dia is connected to our camcorder Operation is not assured with every device satisfying requirements fbr operating Connect your camcorder to the wall outlet wall socket using the supplied A adaptor p 15 Refi r to the instruction manual supplied with the external media For details on available external media go to the Sony support website in your country region Connect the AC Adaptor and the power ...
Страница 164: ...w the on screen instructions to select the recording media and image selection methods When you selected DUB by select touch the image to be saw 4 appears When you selected DUBbydate select the date of the imagesto be dubbed with _ then touch _ and go to step Remaining external media capacity Press and hold the image down on the LCD screen to confirm the image Touch to return to the previous scree...
Страница 165: ...e DVD writer to the USB jack of your camcorder with the USB cable of the DVD writer H Insert an unused disc into the DVD writer and close the disc tray The DISC BURN screen appears Oll the camcorder screen Press _ DISC BURN on the DVD writer Movies recorded Oll the internal recording media that haw not been saw d on aW discs will be recorded onto the disc Repeat steps 3 and 4 when the total memory...
Страница 166: ...creen Press the play button on the DVD writer _ m can also operate bythe camcorder screen Touch END EJECT DISC on the camcorder screen and remow the disc after the operation is completed Touch _ and disconnect the USB cable Notes Do not do any of the fbllowing when creating a disc Turn offthe camcorder Disconnect the USB cable or the AC adaptor Subject the camcorder to mechanical shock or vibratio...
Страница 167: ...tlet wall socket p 15 Turn on your camcorder and connect a DVD writer etc to the USB jack of your camcorder with the USB cable supplied The USB SELECT screen appears on the camcorder screen If the USB SELECT screen does not appear touch _ MENU _ Show others _ USB CONNECT under OTHERS category Touch the recording media that contains the images on the camcorder screen I_1USB CONNECT Internal nlemory...
Страница 168: ... to another device via the S VIDE jack by using an A V connecting cable with an S VIDEO cable sold separately higher quality images can be produced than with an A V connecting cable Connect the white and red plug left right audio and the S VIDEO plug S VIDE channel of the A V connecting cable with an S VIDEO cable If you connect the S VIDEO plug only you will hear no sound The yellow plug video co...
Страница 169: ...DISP OUTPUT _ LCD PANEL the defimlt setting _ _ _ _ _ _ To record the date time or camera settings data touch _ MENU _ Show others PLAYBACK SET under _ PLAYBACK category _ DATA CODE _ a desired setting _ _ _ _ In addition touch _ MENU _ Show others _ OUTPUT SETTINGS under _ GENERAL SET category _ DISP OUTPUT IV OUT PANEL _ _ When the screen size of display devices T v etc is 4 3 touch _ MENU _ Sho...
Страница 170: ...ENERAL SET Other setup items p 51 Menu items are described in more details in the Handycam Handbook _ _ The menu list mow s from category to category _ The menu list moves through 4 items at once 5_u can touch buttons and drag the screen to scroll the list of the menu The selected category icon is displayed in orange When you touch _ the screen returns to the MY MENU screen _ Touch _ MENU Touch Sh...
Страница 171: ... menu items you use most often on MY MENU You can register 6 menu items on each MY MENU of the MOVIE PHOTO and PLAYBACK Example deleting SPOT MTR FCS and registering 11 11FADER _ SCENE SELECTION Z _ Touch MENU Touch MY MENU SETTING Touch MOVIE Touch SPOT MTR FCS Touch Ii i_l Touch g lt FADER under MANUAL SETTINGS category _ When MY MENU is displayed touch Repeat the same steps abow to register men...
Страница 172: ...items you call change ill the context appear Menu item I Tab _ Touch _ OPTION Touch the desired tab the item to change the setting After completing the setting touch Notes Grayed out menu items or settings are not available When the item you want is not on the screen touch another tab There maybe notab The tabs and itemsthat appear on the screen depend on the recording playback status ofynur camco...
Страница 173: ...n when recording movies CONVERSION LENS Sets the type of an attached conversion lens sold separately Optimizes the SteadyShot fl mction and focus according to the attached lens LOW LUX Records bright color images in the dim FACEDETECTION Adjusts the image quality of the fi_ce s automaticall c PRIORITYSETTING Select the subject that has priority fbr the fi_ce detection and the smile shutter SMILE D...
Страница 174: ...os from desired scenes of movies MOVIEDUB DUB by select Selects movies and dub DUB by date Dubs all movies of a specified date DUB ALL Dubs all saved movies in a playlist PHOTO COPY COPY by select Selects photos and cop _ COPY by date Copies all photos of a specified date PLAYMSTEDIT It 11 ADD Adds movies in a playlist gZ_ADDby date Adds movies recorded on a same day at one time in a p aylist ERAS...
Страница 175: ...brightness of the LCD screen LCD BL LEVEL Adjusts the backlight of the LCD screen LCD COLOR Adjusts the color intensity of the LCD screen DISPLAYSET Sets the duration that icons or indicators are displayed on the LCD screen OUTPUT SETTINGS TV TYPE Converts the signal depending on the TV connected p 28 DISP OUTPUT Sets whether the omscreen displays appears on the TV screen or not CLOCK LANG CLOCKSE...
Страница 176: ... view the Handycam Handbook double click the short cut icon Oll the COlnputer screen When using a Macintosh open the Handbook US folder in the CD ROM then copy Handbook pdf _ m need Adobe Reader to read Handycam Handbook If it is not installed on our computer you can download it from the Adobe Systems web page http x_q_v adobe com Refbr to PMB Help fbr details on the supplied software PMB p 35 Sel...
Страница 177: ...aptor to the wall outh t wall socket p 15 The camcorder does not operate even when the power is set to on It takes a f_ w seconds for your camcorder to be ready to shoot after the power is turned on This is not a malfunction Disconnect the AC Adaptor froln the wall outlet wall socket or remove the battery pack then reconnect it after about 1 minute If your camcorder still does not work press RESET...
Страница 178: ...inning with 2 or E C 04 1717 The battery pack is not an InfoLITHIUM battery pack V series Use an InfoLITHIUM battery pack V series p 14 Connect the DC plug of the AC Adaptor to your camcorder securely p 14 C 06 DD The battery pack temperature is high Change the battery pack or place it in a cool place C I 3 rTr7 C 32 rTr7 P enmve the power source Reconnect it and operate your camcorder again E _IT...
Страница 179: ...nd or dust gets in your camcorder it may malfl mction Sometimes this malfimction cannot be repaired Near windows or outdoors where the LCD screen or the lens rnwbe exposed to direct sunlight This damages the inside of the LCD screen Operate your camcorder on DC 6 8 V 7 2 V battery pack or DC 8 4 V AC Adaptor For DC or AC operation use the accessories reconnnended in these operating instructions Do...
Страница 180: ...with water and then wipe the casing with a dry soft cloth Avoid the lbllowing to avoid damage to the finish Using chemicals such as thinner benzine alcohol chemical cloths repellent insecticide and sunscreen Handling the camcorder with above substances on our hands Leaving the casing in contact with rubber or vinyl objects fbr a long period of time About care and storage of the lens Wipe the surfh...
Страница 181: ... lbrmat Video MPEG 2 PS Audio recording system Dolby Digital 2ch Dolby Digital Stereo Creator Photo file fbrmat DCF V r 2 0Compatible Exif Vet 2 21 Compatible MPF Baseline Compatible Recording media Movie Photo Internal memory 16 GB Memory Stick PRO Duo media SD memory card SDHC memory card Class 2 4 6 10 When measuring media capacity 1 GB equals 1 billion bytes a portion of which is used fbr syst...
Страница 182: ...chargeable battery pack AC Adaptor AC L200C AC L200D Power requirements AC 100 V 240 V 50 Hz 60 Hz Current consumption 0 35 A 0 18 A Power consumption 18 W Output voltage DC 8 4 V Operating temperature 0 C to 40 C 32 F to 104 F Storage temperature 20 C to 60 C 4 F to 140 F Dimensions approx 48 29 x 81 mm 1 15 16 x 1 3 16 x 3 1 4 in w h d excluding the projecting parts Mass approx 170 g 6 0 oz excl...
Страница 183: ...ry Stick and MagicGate Memory Stick Duo are trademarks or registered trademarks of SoW Corporation InibLITHIUM is a trademark of SoW Corporation BIONZ is a trademark of Sony Corporation DVDirect is a trademark of Sony Corporation Dolby and the double D symbol are trademarks of Dolby Laboratories Microsoft Windows Windows Vista and DirectX are either registered trademarks or trademarks of Microsoft...
Страница 184: ...CK EAOEH EAOEH FADER 9999 I1_ _ Approximate number of 9999 _1 1_ recordable photos and recording media _ Playback fblder of memory card Current playing movie or 100 112 photo Number of total recorded movies or photos Bottom tg g FACE DETECTION set to OFF O1 SMILE DETECTION LOW LUX IA Manual fncus i_i _ _ _ SCENE SELECTION _ _ 6_ b mzl White balance _ _ SteadyShot off SPOT MTR FCS SPOT METER EXPOSU...
Страница 185: ...s RESET using a pointed object Press RESET to initialize all tbe settings including tbe clock setting _ _ USB jack 33 35 36 39 41 _ MODE button 21 _ 11211 movie O photo lamp 21 _ DISC BURN button 35 _ button _ POWER button 16 Power zoom lever PHOTO button 24 Battery pack _ START STOP button 22 _ DC IN jack 14 _ A V Remote Connector 28 _CHG charge lamp 14 _ Grip belt 21 _ Memory card slot 19 _ BATT...
Страница 186: ... _ Tripod receptacle Attach a tripod sold separately to the tripod receptacle using a tripod screw sold separately the length of the screw must be less than 5 5 mm 7 32 in ...
Страница 187: ...ry Stick PRO Duo media 19 Menus 46 49 MOVIE MEDIA SET 18 Movies 22 25 MY MENU 46 MY MENU SETTING 46 One Touch Disc Burn 35 Operation beeps 17 Operation flow 1 l OPTION MENU 48 Parts and controls 61 PHOTO MEDIA SET 18 Photos 24 25 Playback 25 PMB Picture Motion Browser 32 35 PMB Help 35 Power on 16 Precautions 55 Rec zoom buttons on LCD 22 Recording 22 Recording and playback time 58 Recording media...
Страница 188: ...quivalente recomendada por Son _ Deshfigase de la baterias usada lo antes posible segfin el procedimiento que se describe en las instrucciones Sustituya la bateria unicamente por otra del tipo especificado De lo contrario es posible que se produzcan incendios o lesiones Adaptador de alimentacion de ca No utilice el adaptador de alimentaci6n de ca colocado en un espacio angosto tal como entre una p...
Страница 189: ...ambio del ajuste de idioma Para ilustrar los procedimientos operativos se utilizan indicaciones en pantalla en cada idioma local Si es necesario cambie el idioma de la pantalla antes de utilizar la videoc_ mmra p_ig 13 Grabaci6n taIldo use por primera vez una tarjeta de memoria en la videocfimara se recomienda Ibrmatearla en la videoc_ mmra Dig 48 para lograr una operaci6n estable En el fbrmateo s...
Страница 190: ...arl Zeiss que permite obtener imrigenes de gran calidad y que rue desarrollado conjuntamente por Carl Zeiss en Alemania y SoW Corporation Adopta el sistema de medici6n MTF para videocrimaras y ofrece una calidad eqniparable a la de un objetivo Carl Zeiss MTF Modulation Transfi r Function E1 valor num rico indica la cantidad de luz de un motivo que entra en el objetivo Si la videockmara se conecta ...
Страница 191: ...s a modificaciones sin previo aviso Confirme el nOmero de modelo de la videockmara Confirme el nfimero de modelo de la videocrimara No realice ninguna de las acciones que se describen a continuacidn de lo contrario el soporte de grabacidn podria resultar daflado podrla ser imposible reproducir imrigenes grabadas que estas se perdieran o podrlan producirse otras lhllas de funcionamiento Expulsar la...
Страница 192: ...peliculas y fOtOS Reproduccidn en la videoc_imara _ p_ig 21 Reproduccidn de im_igenes en un televisor _ p_ig 24 Almacenamiento de ima genes Almacenan_iento de peliculas y tbtos con una computadora prig 28 Ahnacenamiento de peliculas y fbtos en soportes externos Dig 35 Ahnacenamiento de imtigenes con una grabadora de DVD prig 37 ...
Страница 193: ...r 24 Utilizaci6n correcta de la videoc_mara Eliminaci6n de peliculas y fotos 26 _ Almacenamiento de peliculas y fotos con una computadora Preparaci6n de la computadora Windows 28 Si utiliza un Macintosh 28 Inicio de PMB Picture Motion Browser 31 Creaci6n de un disco con un solo toque OneTouch Disc Burn 31 Importaci6n de peliculas y fotos a una computadora 32 Creaci6n de un disco 33 Copia de un dis...
Страница 194: ...Informaci6n complementaria Soluci6n de problemas 50 Precauciones 53 Especificaciones 55 _ Referencia r_pida Indicadores de la pantalla 58 Piezas y controles 59 ndice 61 ...
Страница 195: ...eoc_mara cierre la pantalla de cristal liquido Instale la bateria en la direcci6n que indica la flecha hasta que oiga un dic Conecte el adaptador de alimentaci6n de ca y el cable de alimentaci6n a la videoc_mara y al tomacorriente de pared Alinee la marca de la clavija de cc con la marca de la toma DC IN E1 indicador CHG carga se enciende y se inicia el proceso de carga E1 indicador CHG carga se a...
Страница 196: ...Ca suministrado con la videoc_mara dentro d e Un rang0 de ca de entre 100 v y 240 v 50 Hz 60 Hz No utilice un transformador de voltaje electrdnico Notas sobre la bateria Antes de extraer la baterla o el adaptador de alimel_tacidn de ca cierre la pantalla de cristal llquido y compruebe que los indicadores _ Pelicula l_ Foto prig 12 y el indicador de acceso prig 16 est_n apagados E1indicador CHG car...
Страница 197: ...la videocamara desconecte el adaptador de alimentacidn de ca del tomacorriente de pared inmediatamente No coloque el adaptador de alimentaci6n de ca en lugares estrechos como pot ejemplo entre una pared y un mueble No provnque un cortocircuito en la clavija de cc del adaptador de alimentaci6n de ca ni en el terminal de la baterla con ningt m objeto mettilico ya que podria causar una aliade funcion...
Страница 198: ...o la pantalla de cristal llquido est_iabierta presione POWER Boron POWER Indicador MODE Seleccione la zona geogrMica deseada con _ _ y a continuaci6n toque SIGUIENTE Para ajustar la fecha y la hora de nuevo toque _ MENU _ Mostrar otros _ AI REL IDIOM en la categorla A UST GENERALES _ AIUS RELOI Cuando tm elemento no aparece en la pantalla toque m m hasta que aparezca ...
Страница 199: ...ctivar los pitidos de funcionamiento toque _ MENU _ Mostrar otros _ A US o SON PANT en la categoria _ AJUST GENERALES _ PITIDO _ DESACTI vl _ _ 5 K Si el botdn que toca no reacciona correctamente deberia calibrar el panel tfictil Para apagar la videockmara Cierre la pantalla de cristal liquido E1 indicador n Pelicula parpadea durante varios segundo y se apaga la videoc_imara Sugerencias Tambi _ pu...
Страница 200: ...cidn o edicidn en elsoporte seleccionado Sugerencias Consulte la pfigina 56 para conocer el tiempo de grabacidn de las peliculas Toque _ MENU _ Mostrar otros _ AJUSTES SOPORTE en la categoria _ GESTION SOPORTE _ AJ SOPORTE PEL Apareceni la pantalla AJ SOPORTE PEL Toque el soporte de grabaci6n deseado Toque S _ _ E1 soporte de grabaci6n se cambia Toque _ MENU _ Mostrar otros _ AJUSTES SOPORTE en la...
Страница 201: ... una MultiMediaCard En este manual tanto Memory Stick PRO Dud como Memory Stick PRO HG Dud reciben el nombre de Memory Stick PRO Dud Se garantiza el timcionamiento de tarjetas de memoria de hasta 32 GB con la videocfimara Tipos de Memory Stick que se pueden utilizar con la videockmara Para grabar pellculas so recomienda utilizar un Memory Stick PRO Duo de una capacidad de 512 MB o m_isde las marca...
Страница 202: ...ue se daflela tarjeta de memoria la ranura para tarjeta de memoria o los datos de imagen Notas Si aparece Error al crear un nuevo archivo de base de datos de im_igenes Es posible que no exista suficiente espacio libre toque _ MENU _ Mostrar otros _ FORMAT SOPORTE en la categorla Q _ GESTION SOPORTE _ TARI MEMORIA _ IS _ S _ _ para inicializar la tarjeta de memoria Para expulsar la tarjeta de memor...
Страница 203: ... o cuando reproduzca las imtlgenes cierre la tapa del objetivo Ajuste la correa de sujecidn d3 m o m _ o Abra la pantalla de cristal liquido de la videoc_mara La videoc_hnara se enciende Para encender la videoc_imara cuando la pantalla de cristal llquido est_i abierta presione POWER p_ig 12 Para alternar entre modos de grabaci6n presione MODE Presione MODE para que se encienda el indicador de acce...
Страница 204: ...roduccidn los iconos e indicadores del panel de cristal liqnido se muestran durante unos 3 segundo y luego desaparecen Para mostrar los iconos e indicadores de nuevo toque cualqnier parte de la pantalla de cristal liquido excepto los botones de grabacidn y zoom Botones de grabaci6n y zoom de la pantalla de cristal llquido I uno 3 E _7 segundo despu_s _ Notas Si cierra la pantalla de cristal liquid...
Страница 205: ...peliculas Para comprobar el tiempo yla capacidad de grabacidn restantes aproximados etc toque MENU _ Mostrar otros _ INFO SOPORTE en lacategorfa _ GESTION SOPORTE La pantalla de cristal llquido de la videocfimara puede mostrar imfigenes de grabacidn en toda la pantalla visualizacidn de pixeles completos Sin embargo esto puede ocasionar un leve recorte de los bordes superior infi rior derecho e izq...
Страница 206: ...ell 4 3 Presione PHOTO levemente para ajustar el enfoque y luego presi6nelo completamente Para grabar iotos tambi n puede tocar _ on la pantalla de cristal llquido ii ii ii ii ii ii ii ii ii i_ii _ Parpadea Se enciende Cuando IMII desaparece se graba la _bto Sugerencias Para cambiar el tamafio de la imagen toque _ MENU _ Mostrar otros _ _TAM IMAGEN en la categorla _ AJUST FOTO CAM _ el _ iuste des...
Страница 207: ...o la pantalla de cristal llquido est_iabierta presione POWER prig 12 Presione _ VISUALIZAR IMAGENES 3 Luego de unos segundo aparece la pantalla VISUAL INDEX Tambi a puede mostrar la pantalla VISUAL INDEX al tocar _ VISUALIZAR IMAGENES en la pantalla de cristal llquido Para reproducir una pelicula toque II 11 Pelicula _ la pelicula deseada Para vet una foto toque I_1 Foto _ _ la foto deseada Las pe...
Страница 208: ...uccidn desde la pelicula seleccionada llega a la dltima pelicula vuelve a mostrarse la pantalla VISUAL INDEX Toque I_ _11 durante la pausa para reproducir la pelicula a cfimara lenta Si sigue tocando m_l _lN _ durante la reproduccidn las peliculas se reproducen con un aumento de velocidad de aproximadamente 5 veces _ 10 veces _ 30 veces _ 60 veces Puede mostrar la pantalla VISUAL INDEX si toca _ M...
Страница 209: ...nada I Inicio detenci6n de presentaci6n de Anterim l I diapositivas I_1t1_ oo14 Siguiente Ir a la pantalla _ iilj _T_ I OPTION VISUAL INDEX Sugerencias Cuando visualiza fotos grabadas en una tarjeta de memoria aparece en la pantalla _ _ carpeta de reproduccidn g _3 ...
Страница 210: ...V con un cable S VIDEO se vende por separado se pueden producir im lgenes de mayor calidad que con un cable de conexidn de A V_ Conecte las clavijas blanca y roja audio izquierdo derecho y la clavija S VIDEO canal S VIDEO del cable de conexidn de A V con el cable S VIDEO se vende por separado La conexion de la clavija amarilla no es necesaria Si se conecta s61o la clavija de S VIDEO no habr l sali...
Страница 211: ...dora _ Notas Cuando conecte la videoctimara a un televisor compatible con el sistema ID 1 ID 2 ajuste TWO TV en 16 9 E1televisor cambia autom_iticamente al modo de pantalla completa Consulte tambi_n los manuales de instrucciones suministrados con el televisor Si ajusta TWO TV en 4 31 puede deteriorarse la calidad de imagen Asimismo cuando la relaci6n de aspecto de la imagen grabada cambia entre 16...
Страница 212: ...odas las imfigenes almacenadas en el soporte de grabacidn y recuperar todo el espacio disponible en el soporte fbrmatee el soporte Las im_igenes de tamafio reducido que pernfiten ver varias im_igenes al nfismo tiempo en una pantalla de indice se conocen como miniaturas _ 1Toque _ MENU _ Mostrar otros _ BORRAR en la categorfa _ EDIT Para eliminar pelfculas toque CIVIl BORRAR _ 1tl BORRAR Para elimi...
Страница 213: ... _BORRAR BORRAR p fi cha Toque m_ _ para seleccionar la fk cha de grabacidn de las peliculas fbtos que desee y a continuacidn toque I_ _ Toque laimagen en lapantalla de cristal llquido para confirmarla Toque paravoNer a lapantalla anterior Toque i1 _ _ C g _7 ...
Страница 214: ...ita una unidad de CD ROM para la instalacidn _ Se reqniere la instalacidn est_indar No se garantiza el flmcionamiento en un sistema operativo actualizado o en un entorno de arranque mfiltiple _2Las ediciones de 64 bits y Starter Edition no son compatibles Se reqniere Windows hnage Mastering API IMAPI versidn 2 0 para utilizar la funcidn de creacidn de discos o similar _ Starter Edition no es compa...
Страница 215: ...adora Aparecerti la pantalla de instalacidn Si la pantalla no aparece haga clic en Inicio _ Equipo en Windows XP Mi PC y a cnntinuacidn haga doble clic en SONYPMB E CD ROM _ _ Los nombres de las unidades como E pueden variar en funcidn de la computadora Haga clic en Instalaci6n Handycam Application Softwale Seleccione el pais o la regi6n Seleccione el idioma del programa que desea instalar y conti...
Страница 216: ...ng API versidn 2 0 para Windows XP Si a6n no se ha instalado Image Mastering API versidn 2 0 para Windows XP selecci6nelo desde los programas requeridos en la pantalla de instalaci6n y siga los siguientes procedimientos que se muestran para instalarlo La computadora debe estar conectada a Internet para realizar la instalacidn Puede instalar Image Mastering API versidn 2 0 para Windows XP como resp...
Страница 217: ...B 2 Creaci6n de un disco con un solo toque OneTouch Disc Burn Las peliculas y las fotos grabadas en la videoc_hnara que no se hayan guardado con la funci6n One Touch Disc Burn se pueden guardar autom_iticamente en un disco Instale en primer lugar PMB p_ig 28 sin embargo no inicie PMB _ Conecte la videoc_imara al tnmacorriente de pared mediante el adaptador de alimentaci6n de ca suministrado para r...
Страница 218: ... usando eladaptador de alimentacidn de ca suministrado para esta operacidn p_ig 10 Encienda la videoc_mara y con tela a la computadora mediante el cable USB suministrado 2 La pantalla SELEC USB aparece ell la pantalla de la videocthnara Toque en la pantalla de la videoc_mara el soporte de grabaci6n que contiene las im_genes que desea guardar _ CONEXION USB n_emoria interna _ CONEXION USB tarjeta d...
Страница 219: ...n la unidad de DVD Consulte la p_igina28 paraobtener intbrmacidn acerca de los discos que puede utilizar Si un softwareditbrente a PMB se inicia autom_iticamente ci relo Inicie PMB p_g 31 Haga clic en Calendario o ndice en el lateral izquierdo de la ventana y seleccione la fecha o la carpeta y a continuaci6n seleccione las peliculas Para seleccionarvarias pellculas mantenga presionada latecla Ctrl...
Страница 220: ...ayuda de Video Disc Copier Es posibl e _orta r las partes d e una pelictfla que se 0ns der_ necesafias Y guardarlas como un archivo separado Haga dobleclic en la peliculaque desea editar en IPMB y a c0ntinuaci6n hag a dicen Mostrar paleta de edici6n en el lateral dere o de 1a panta la Rec0rtar yideo oseleccioneel men_ Manipular _ Editar _ Rec0rtar video par a obtener mas detalles consulte i_yuda d...
Страница 221: ...ctimara Si el soporte externo se brmate6 con el sistema de archivos NTFS o similar fbrmat elo en la videoc_imara antes de utilizarlo Aparecer_i la pantalla de brmato cuando el soporte externo se conecte a la videoctimara No se asegura el funcionamiento con todos los dispositivos que satisI agan los requisitos de hncionamiento Conecte la videoc_imara al tomacorriente de pared mediante el adaptador ...
Страница 222: ...talla VISUAL INDEX cambian tal como se muestra en la siguiente ilustraci6n Puede hacer ajustes del mend de los soportes externos como por ejemplo eliminar im_igenes Toque _ MENU Mostrar otros en la pantalla VISUAL INDEX Para guardar las peliculas y fotos deseadas _ Notas No es posible buscar ni copiar btosgrabadas en una tarjeta de memoria pot fbcha de grabacidn _ Toque Reproducir sin copiar en el...
Страница 223: ...Desconecte el cable adaptador USB Creaci6n de un disco con una grabadora de DVD Es posible crear un disco o reproducir las im_igenes de un disco creado usando la grabadora de DVD especifica DVDirect Express sew nde por separado Consulte tambi n los manuales de instrucciones suministrados con la grabadora de DVD _ Notas Conecte la videoc_imara al tomacorriente de pared usando el adaptador de alimen...
Страница 224: ...lizar un disco con OPC GRAB DISCO Llew a cabo esta operacidn en los siguientes casos A1 copiar una imagen deseada A1 crear varias copias del mismo disco A1 copiar im_igenes en la tarjeta de memoria _ Toque OPC GRAB DISCO en el paso 4 _ Seleccione el soporte de grabaci6n que contiene las peliculas que desea guardar _ Toque la pelicula que desea grabar en el disco Aparece _ Capacidad restante del di...
Страница 225: ...nte antes de eliminar las pellculas de la videocfimara Si Se produjo un error o Error al ejecutar GRABAR EN DISCO aparecen en la pantalla inserte otro disco en la grabadora de DVD y repita la operacidn de DISC BURN Sugerencias Si el tamafio de memoria total de las pellculas que se van a grabar mediante la operacidn DISC BURN supera el tamaflo del disco la creacidn del disco se detendrfi al alcanza...
Страница 226: ...lla SELEC USB toque _ MENU _ Mostrar otros CONEXION USB en la categorla OTROS Toque en la pantalla de la videograbadora el soporte de grabaci6n que contiene las imagenes t_ CONEXION USB memoria interna _CONEXION USB tarjeta de menloria Puede copiar im_igenes reproducidas en la videoc_hnara en un disco o videocasete si conecta la videoc_hnara a una grabadora de discos una grabadora de DVD de Sony e...
Страница 227: ...i6n en el dispositivo de grabaci6n Si eldispositivo de grabacidn tiene un selector de entrada aj6stelo en elmodo de entrada Conecte la videocamara al dispositivo de grabaci6n grabadora de discos etc con un cable de conexi6n de A V suministrado o un cable de conexi6n de A V con SVlDEO se vende pot separado Conecte la videoc_imara a las tomas de entrada del dispositivo de grabacidn Amarillo Entrada ...
Страница 228: ...IGO DATOS el ajuste deseado _ _ _ _ B _ _ Ademfis toque MENU _ Mostrar otros AJUSTES SALIDAI en la categorla ff_ AJUSZ GENERALESD SALIDA PANT _ SAL V LCD _ _ _ _ _ _ Si el tamafio de pantalla de los dispositivos de visualizaci6n televisor etc es 4 3 toque MENU _ Mostrar otros AJUSTES SALIDA en la categoria _ AJUST GENERALES TIPO TV _ 4 3 Si conecta la videoc_imara a un dispositivo monoaural introd...
Страница 229: ... GESTION SOPORTE Elementos para los soportes de grabaci6n p6g 48 AJUST GENERALES Otros elementos de la configuraci6n p6g 48 Los elementos de menfl se describen detalladamente en la Guia pr_ictica de Handycam _ _ la lista del lnenfi se mueve de categoria a categoria _ la lista del menti se muew de a 4 elementos al mismo tiempo Puede tocar los botones y arrastrar la pantalla para desplazarse pot la ...
Страница 230: ...dn y el modo de grabacidn pelicula fbto Es posible utilizar los elementos de lnenu ln_s fScilmente si registra los elementos de lnenu que utiliza con m_is frecuencia ell MI MENI Es posible registrar 6 elementos de lnenu ell cada MI MENI2 de PELICULA FOTO y REPRODUCCION Ejemplo anular MED ENF PUNTO y registrar EtIDESVANECEDOR _ A JUSTMANU L_S _i777iii_iii_i_ 7771 _ Toque _ MENU Toque AJUSTE MI MENI...
Страница 231: ...ra que aparezcan los elementos de menti que es posible cambiar en el contexto Elemento de menfi Ficha _ Toque _ OPTION Toque la ficha deseada el elemento cuyo ajuste desea cambiar Cuando finalice el ajuste toque RT _ _ Notas Los elementos de menfi o ajustes atenuados no est_in disponibles Si el elemento que desea no aparece en la pantalla toque otra ficha Es posible que no haya ninguna ficha Las f...
Страница 232: ...esttl en posicidn horizontal o vertical g NSTEADYSHOT Permite ajustar la Ihncidn SteadyBhot cuando se graban peliculas OBJETIVO CONVER Permite _ justar el tipo de objetivo de conversidn instalado se vende por separado Permite optimizar la hmcidn BteadyShot y realizar el enIbque en flmcidn del objetivo colocado LOW LUX Permite grabar iimlgenes de color brillantes en condiciones de escasa lmninosida...
Страница 233: ...R Permite DIVI DI R Permite TOMA FOTOGR_ F Permite COPIA PEL CULA COPIA por seleccidn Permite COPIA por fecha Permite COPIA DE TODO Permite COPIAR FOTO COPIAR por selec Permite COPIAR por fecha Pennite EDICION PLAYLIST II llAIqADIR Permite AIqADIR p fecha Permite playlist BORRAR Permite BORRAR TODO Permite MOVER Permite Categoria _ OTROS CONEXION USB eliminar peliculas eliminar iotos proteger las ...
Страница 234: ...ite ajustar si el sonido de luncionamiento emite un pitido o no BRILLOLCD Permite ajustar el brillo de la pantalla de cristal liquido NIVLUZ LCD Permite ajustar la luz de fbndo de la pantalla de cristal liquido COLOR LCD Permite ajustar la intensidad del color de la pantalla de cristal liquido AJUSTE PANTALLA Permite ajustar la duracidn de la visualizaci6n de los iconos o indicadores en la pantall...
Страница 235: ...lo de la videoc_mara y a continuaci6n haga clic en Guia pr_ctica de Handycam PDF E1nombre del modelode lavideoc_imara se encuentra impreso en la superficie infi riorde esta Haga clic en Salir _ Salir y a continuaci6n extraiga el CD ROM de la computadora Para ver la Guia pr_ictica de Handycam haga done clic en el icono de acceso directo en la pantalla de la computadora Cuando utilice un Macintosh a...
Страница 236: ...prfictica de Handycam Dig 49 para obtener infbrmacidn sobre los problemas de la videoc_imara y la Ayuda de PMB Dig 31 para obtener infbrmacidn sobre la conexi6n de la videoc_imara a una computadora La videoc_mara no se enciende Instale una bateria cargada en la videocfimara Dig 9 Conecte la clavija del adaptador de alilnentacidn de ca al tomacorriente de pared p_ig 10 La videoc_mara no funciona au...
Страница 237: ...ciela co nputadora La computadora no reconoce la videoc mara Desconecte cuak uier dispositivo de a toma USB de la computadora excepto el teclado el ratdn y la videocimmra Desconecte el cable USB de la computadora y de la videocfimara reinicie la computadora y a continuaci6n conecte de nuevo la computadora con la videocfimara de la manera apropiada Si en la pantalla de cristal liquido aparecen indi...
Страница 238: ...strar otrosl REP ARCH BD IM I en la categoria _ i GESTION SOPORTE _ el soporte de grabaci6n La tarjeta de memoria estri daflada Formatee la tarjeta de memoria con la videocrilnara prig 48 Se insert6 una tarjeta de meinoria incompatible prig 15 _ O _ Se restringi6 el acceso a la tarjeta de memoria en otto dispositivo La videocrimara se encuentra en una posicidn inestable St tela firmemente con amba...
Страница 239: ...nte y exponerla a golpes o impactos como martillazos caldas o pisotones Sea especialmente cuidadoso con el objetivo Cuando no utilice la videocfimara mant_ngala apagada No utilice la videoctlmara envuelta en una toalla por ejemplo Si lo hace puede recalentarse internamente Cuando desconecte el cable de alimentaci6n tire del enchulb y nunca del cable Procure no daflar el cable de alimentacidn al co...
Страница 240: ...nstalada La bateria recargable se descargartl completamente transcurridos aproximadamente 3 meses si no utiliza la videocfimara en absoluto Utilice la videocfimara despu s de cargar la bateria recargable preinstalada Sin embargo aunque no est_ cargada el funcionamiento de la videocfimara no se verfi afi ctado siempre qne no se est grabando la f_ cha Procedimientos Conecte la videoctlmara a un toma...
Страница 241: ...cuando LOW LUX est_i ajustado en ACTIVADO velocidad de obturaci6n 1 30 de segundo _La exclusiva matriz de pixeles del sensor ClearVid de Sony y el sistema de procesamiento de imfigenes BIONZ permiten una resoluci6n para las imfigenes fijas eqnivalente a los tamarios descritos _2 gZ_STEADYSHOT estfi ajustado en ESTA NDAR o DESACTI_ 3Los valores correspondientes a la distancia fbcal son cii as reale...
Страница 242: ...as condiciones de grabacidn y del motivo g _ MODO GRAB Condiciones de grabacidn modo de grabacidn ajustado en SPI E1tiempo de grabacidn normal indica el tiempo de grabaci6n al repetir las operaciones de inicio parada al cambiar el indicador MODE y al utilizar el zoom Tiempo de grabaci6n previsto para peliculas en el soporte de grabaci6n interno en minuto Para _ justar el modo de grabacidn toque ME...
Страница 243: ...colnerciales registradas o marcas comerciales de Microsoft Corporation en los Estados Unidos y o en otros paises Macintosh y Mac OS son marcas comerciales registradas de Apple Inc en los EE UU y en otros paises Intel Intel Core y Pentium son marcas comerciales o marcas comerciales registradas de Intel Corporation o sus subsidiarias en los Estados Unidos y en otros paises Adobe el logotipo de Adobe...
Страница 244: ...idn reproduccion edicidn 0 00 00 Contador hora minuto segundo 00min Tiempo de grabacion restante previsto _UND FUND 8L_NCO NEaRO DESVANECEDOR 9999 I_1 _ N0mero aproximado de fotos que puede grabar y 9999 I_1 Z_ soporte de grabaci6n _ Carpeta de reproduccidn de la tarjeta de memoria Pellcula o foto en 100 112 reproducci6n nfimero total de peliculas o fotos grabadas Parte inferior c g DETECCION CARA...
Страница 245: ...os indicadores no _g_arezcan Los ntimeros entre corresponden alas ptiginas de refk rencia _Objetivo objetivo Carl Zeiss _ Interruptor LENS COVER Micr6fono incorporado _ Pantalla de cristal liquido panel tkctil Si gira el panel de cristal llquido 180 grados podr_ l cerrarlo con la pantalla de cristal lfquido mirando hacia fuera Este procedimiento resuha adecuado para las operaciones de reproducci6n...
Страница 246: ...ot6n PHOTO 20 Bateria Bot6n START STOP 18 Toma DC IN 9 Conector remoto de A V 24 Indicador CHG carga 9 Correa de sujeci6n 17 Ranura de tarjeta de memoria 15 Palanca BATT liberaci6n de la bateria 10 Indicador de acceso tarjeta de memoria 15 Cuando e indicador est_iencendido o parpadea a videoc_ mmraest_igrabando o eyendo datos Receptaculo de tripode Co oque un tripode sevende pot separado en e rece...
Страница 247: ...d 12 Especificaciones 55 FECHA HORA 13 Flujo de operacidn 6 Fotos 20 21 Grabaci6n 18 Grabadora de discos 40 Grabadora de DVD 37 39 Guia imictica de Handycam 49 Indicadores de advertencia 51 Indicadores de la pantalla 58 Instalaci6n 28 Macintosh 28 Mantenimiento 53 Memoria interna 14 Memory Stick 15 Memory Stick PRO Duo 15 Memory Stick PRO HG Duo Menfis 43 46 MI MENI 43 Miniatura 26 One Touch Disc ...
Страница 248: ... Customer Support Website Puede encontrar m_isinibmlaci6n sobre este producto y respuestas alas preguntas m_isfrecuentes en nuestro sitio Web de atenci6n alcliente htt p www so ny net Printed on 70 or more recycled paper Impreso en papel reciclado en un 70 o mas Printed in China IIIIIIIIIII 4171513110 ...
Страница 249: ...SON_ 4_171_s13_ 1 DCR SX83 Digital Video Camera Recorder Operating Guide Guia de operaciones M_NDRY _TI K M _ _ 2010 Sony Corporation ...
Страница 250: ...nstructions in the literature accompanying the appliance To reduce fire or shock hazard do not expose the unit to rain or moisture Do not expose the batteries to excessive heat such as sunshine fire or the like CAUHON 10 REDUC _H_ RISKOFE CTRICSNOOK Do NOr REMOVE COVER O_ BACK NO USE_ SERVlCEAIJLE PARRSINSIDE rtEFERSErtVlClNGTOQUALIFIED SERVICEPERSONNEL This symbol is intended to alert the user to...
Страница 251: ...ectrician for replacement of the obsolete outlet Protect the power cord from being walked on or pinched particularly at plugs conw nience receptacles and the point where they exit from the apparatus Only use attachments accessories specified by the manufacturer Use only with the cart stand tripod bracket or table specified by the manufacturer or sold with the apparatus When a cart is used use caut...
Страница 252: ...h a NEMA 1 15P plug rated for 125 V 15 A Europe Countries regions Voltage Frequency Hz Plug type Austria 230 50 C Belgium 230 50 C Czech 220 50 C I enmark 230 50 C Finland 230 50 C France 230 50 C Germany 230 50 C Greece 220 50 C Hungary 220 50 C Iceland 230 50 C Ireland 230 50 C BF Italy 220 50 C I uxemburg 230 50 C Netherlands 230 50 C Norway 230 50 C Poland 220 50 C Portugal 230 50 C Romania 22...
Страница 253: ...60 A Jamaica 110 50 A Mexico 120 127 60 A Nicaragua 120 240 60 A Panama 110 220 60 A South America Countries regions Voltage Frequency Hz Plugtype Argentina 220 50 BF O Brazil 127 220 60 A C Chile 220 50 C Colombia 120 60 A Peru 220 60 A C _ nezuela 120 60 A Middle East Countries regions Voltage Frequency Hz Plugtype h an 220 50 C BF Iraq 220 50 C BF Israel 230 50 C Saudi Arabia 127 220 50 A C BF ...
Страница 254: ...battery with the specified type onb Otherwise fire or injury may result ACAdaptor Do not use the AC Adaptor placed in a narrow space such as between a wall and furniture Use the nearby wall outlet wall socket when using the AC Adaptor Disconnect the AC Adaptor from the wall outlet wall socket immediately if aW malfunction occurs while using your camcorder Ew n if your camcorder is turned off AC po...
Страница 255: ...dential installation This equipment generates uses and can radiate radio frequency energy and if not installed and used in accordance with the instructions may cause harmful interference to radio communications Howew r there is no guarantee that interference will not occur in a particular installation If this equipment does cause harmful interference to radio or television reception which can be d...
Страница 256: ...he language setting The or screen displays in each local language are used fbr illustrating the operating procedures Change the screen language befbre using your camcorder if necessary p 17 Recording When you use a memory card with your camcorder br the first time fbrmatting the memory card with your camcorder p 51 is recommended fbr stable operation All data recorded on the memory card will be de...
Страница 257: ...e camcorder using a computer If you do so our camcorder may not operate correctly When connecting our camcorder to another device with a cable be sure to insert the connector plug in the correct way Pushing the plug fbrcibly into the terminal will damage the terminal and may result in a malfunction of our camcorder If you cannot record play back images perform MEDIA FORMAT If you repeat recording ...
Страница 258: ...ct the memory card when the access lamp p 20 is litor flashing Remove the battery pack or AC Adaptor f com the camcorder or subject the camcorder to shock or vibraion when the _ Movie U_ Photo lamps p 16 or the access lamp p 20 are litor flashing When using ashoulder belt sold separately do not crash the camcorder against an object Do not use your camcorder invery loud areas ...
Страница 259: ...s _ p 24 Playing movies and photos Playback on the camcorder _ p 25 Playing images on a TV _ p 28 Saving images Saving movies and photos with a computer _ p 32 Saving movies and photos in external media _ p 39 Saving images with a DVD writer recorder _ p 41 Deleting movies and photos p 30 If you delete the image data that has been saved on your computer _ or a disc you can record new images on the...
Страница 260: ...memory card 20 _ Recording Playback Recording 21 Playback on the camcorder 25 Playing images on a TV 28 Making good use of your camcorder Deleting movies and photos 30 _ Saving movies and photos with a computer Preparing a computer Windows 32 When using a Macintosh 32 Starting PMB Picture Motion Browser 35 Creating a disc with one touch One Touch Disc Burn 35 Importing movies and photos to a compu...
Страница 261: ... Using menus 46 Getting detailed information from the Handycam Handbook 52 _ Additional information _ lroubleshooting 53 Precautions 55 Specifications 57 Quick reference Screen indicators 60 Parts and controls 61 Index 63 D n _3 ...
Страница 262: ...o your camcorder Turn offyour camcorder by closing the LCDscreen Attach the battery pack by sliding it in the direction of the arrow until it clicks Connect the AC Adaptor and the power cord mains lead to your camcorder and the wall outlet wall socket Align the mark on the DC plug with that on the DC IN jack The CHG charge lamp lights up and charging starts The CHG charge lamp turns off when the b...
Страница 263: ...p 16 the access lamp p 20 are turned of__ The CHG charge lamp flashes during charging under the fbllowing conditions The battery pack is not attached correctl3c The battery pack is damaged The temperature of the battery pack is lox_c Remove the battery pack comyour camcorder and put it in a warm place The temperature of the battery pack is high Remove the battery pack comyour camcorder and put it ...
Страница 264: ...ired geographical area with _ _ then touch NEXT Touch the button on the LCD screen To set the date and time again touch _ MENU _ Show others _ CLOCK LANG under _ GENERAL SET category _ CLOCK SET Vhen an item is not on the screen touch m m until the item appears Set DST SET or SUMMERTIME date and time then touch Ii_l The clock starts If you set DST SET or SUMMERTIME to ON the clock advances 1 hour ...
Страница 265: ... _ BEEP _ OFF _ _ _ _ _ Ik _ If the button you touch does not react correctly calibrate the touch panel To turn offthe power Close the LCD screen The _ll Movie lamp flashes for a fbw seconds and the power is turned off_ _Tips 5_u can turn off your camcorder also by pressing POWER When POWER ON BY LCD is set to OFF turn offyour camcorder by pressing POWER 63 Changing the language setting _ You can ...
Страница 266: ...aybackand editing operations on the selected medimn _Tips See page 59 for the recordable time of movies Touch _ MENU _ Show others _ MEDIA SETTINGS under_ MANAGE MEDIA category _ MOVIE MEDIA SET The MOVIE MEDIA SET screen appears Touch the desired recording media Touch YES _ The recording medium is changed Touch _ MENU _ Show others _ MEDIA SETTINGS under_ MANAGE MEDIA category _ PHOTO MEDIA SET T...
Страница 267: ...mory Stick PRO HG Duo media are referred to as Memory Stick PRO Duo media Memory cards of up to 32 GB are guaranteed to work with our camcorder Types of Memory Stick media that can be used with your camcorder For recording movies it is recommended that you use Memory Stick PRO Duo media of 512 MB or larger marked with MEMORY SLIERPRO null Memory Stick PRO Duo media MEMORYSTI I PRO HG DUO Memory St...
Страница 268: ...mory card slot or imagedata maybe damaged Notes If Failed to create a new hnage Database File It may be possible that there is not enough ficeespace is displayed initialize the memory card by touching _ MENU _ Show others _ MEDIA FORMAT under _ a MANAGE MEDIA category _ MEMORY CARD _ YES _ YES To eject the memory card Open the cow r and lightly push the memory card in once Do not open the cover du...
Страница 269: ...recording or when you play back images close the lens cover Fasten the grip belt g 3 E Open the LCD screen of your camcorder Your camcorder turns Oll To turn on your camcorder when the LCD screen is alrea open press POWER p 16 _ m can switch recording modes by pressing MODE Press MODE to light up the desired recording mode lamp MODE button MODE I_ Movie When recording a movie I_ Photo When shootin...
Страница 270: ...corder or switching the recording movie photo playback modes To display the icons and indicators again touch an _ here on the screen except the rec zoom buttons on the LCD Rec zoom buttons on LCD about 3sec _7 after Notes If you close the LCD screen while recording movies the camcorder stops recording The maximum continuous recordable time of movies is about 13 hours When a movie file exceeds 2 GB...
Страница 271: ...imated remaining capacity etc by touching _ MENU Show others _ MEDIA INFO under _i MANAGE MEDIA category The LCD screen of your camcorder can display recording images across the entire screen full pixel display However this may cause slight trimming of the top bottom right and left edges of images when played back on a TV which is not compatible with full pixel display In this case set GUIDEFRAME ...
Страница 272: ... ratio becomes 4 3 Press PHOTO lightly to adjust the focus then press it fully 5_u can record photos alsoby touching _ on the L D screen Flashes Lights up WhenMilldisappears the photo is recorded _Tips To change the image size touch _ MENU _ Show others _ IMAGE SIZE under _ PHOTO SETTINGS category _ a desired setting _ _ 5_u cannot record photos while _ is displayed 5_u can check the recordable nu...
Страница 273: ...MAGES The VISUAL INDEX screen appears after some seconds _ ucan display the VISUAL INDEX screen also by touching VIEW IMAGES on the LCD screen Touch _ll Movie _ a desired movie to play back a movie Touch the I_ Photo _ a desired photo to view a photo Movies are displayed and sorted by recording date s Switches operating button display To MENU screen Displays the screen to select the index type DAT...
Страница 274: ...returns to the VISUAL INDEX screen Touch EI _II _ during pause to play back movies slowl c As you repeat toucbing I_11 _ during playback nrovies are played as fhst as about 5 times about 10 times _ about 30 times _ about 60 times 5_u can display the VISUAL INDEX bv touching _ MENU _ Show others _ VISUAL INDEX under _ PLAYBACK category The recording date time and shooting conditions are recorded au...
Страница 275: ...hotos Yourcamcorder displaysthe selected photo I Previous To the VISUAL _ iil Next J _T_ 1 OPTION INDEX screen _Tips When viewing photos recorded on a memory card _ playback iolder appears on the screen g 3 7 _7 ...
Страница 276: ...g cable with an S VIDE cable sold separately higher quality images can be produced than with an A V connecting cable Connect the white and red plugs left right audio and the S VIDE plug S VIDEO channel of the A V connecting cable with an S VIDEO cable sold separately The yellow plug connection is not necessary Connecting only the S VIDEO plug will not output audio I VIDEO VIDEO Yellow A V R A V Re...
Страница 277: ... When you connect your camcorder to a TV compatible with the ID 1 ID 2 system set TV TYPE to 16 9 The TV switches to fi dlmode automaticall3c Refi r also to the instruction manuals supplied with our T V_ When you set TV TYPE to 4 3 the image quality may deteriorate Also when the recorded image s aspect ratio switches between 16 9 wide and 4 3 the image may jitter On some 4 3 TVs the photos recorde...
Страница 278: ...cording media and recover all the recordable space of the media fbrmat the media Reduced size images which enable you to view many images at the same time on an index screen are called thumbnails2 1Touch _ MENU _ Show others _ DELETE under _ EDIT category To delete movies touch 1t_ DELETE _ g ltDELETE Tu delete photos touch _DELETE _ _DELETE Touch and display the 4 mark on the movies or photos to ...
Страница 279: ...uch _ _ to select the recording date of the desired movies photos then touch _ Touch the image down on the LCD screen to confirm tile image Touch _ to return to the previous screen Touch YES E _ _ _ 57 3 S ...
Страница 280: ...discs ii Minimunl 1 024 x 768 dots _ Standard installation is required Operation is not assured if the OS has been upgraded or in a multi boot environment _264 bit editions and Starter Edition are not supported Windows Image Mastering API IMAPI Ver 2 0 or newer is required to use disc creation function etc _3Starter Edition is not supported _4Faster processor is recommended _ Notes Operation with ...
Страница 281: ...tion to be installed then proceed to the next screen Read the terms of the license agreement carefully If you agree to the terms change to _ and N The USB SELECT screen appears on the camcorder screen automatically Touch the one of the media types displayed on the camcorder screen to make the computer recognize your camcorder I_IUSB CONNECT Internal memory Tiledisplayed recording media difi r depe...
Страница 282: ...0 fbr Windows XP has not been installed yet select it from required programs on the installation screen and install it bllowing the procedures displayed The computer must be connected to the internet fbr the installation 5_u may install hnage Mastering API v2 0 fbr Windows XP in response to the message displayed when you try to start those functions Touch END _ YES on the camcorder screen Disconne...
Страница 283: ... with one touch OneTouch Disc Burn Movies and photos recorded on your camcorder that haw not yet been saw d with One Touch Disc Burn function can be saw d on a disc automatically Install PMB belbrehand p 32 however do not start PMB Connect your camcorder to the wall outlet wall socket using the AC Adaptor supplied fbr this operation p 15 With One Touch Disc Burn function on your camcorder you can ...
Страница 284: ...e supplied AC Adaptor brthis operation p 15 Turn on your camcorder then connect the camcorder to the computer using the supplied USB cable 2 The USB SELECT screen appears on the camcorder screen Touch the recording media that contains the images you want to save on the camcorder screen _ USB CONNECT Internal memory _ USB CONNECT Memory card The displayed recording media differ depending onthe mode...
Страница 285: ...iscs you can use If any other software than PMB starts automatically shut it down Start PMg p 35 Click Calendar or Index on the left side in the window and select the date or folder then select the movies To select plural movies hold the Ctrl key down and click thumbnails At the top of the window click _ _ Create DVD Video Format Discs STD _ The window used to select movies o_ appears _3_ To add m...
Страница 286: ...ration Capturing photos from a movie You can save a frame of a movie as a photo file Double click the movie to be edited on PMB then dick Show Edit Palette on the right side of the screen _ Save Frame See PMB Help p 35 for details You C an CUtOUt0n y necessary p arts from a movie and save it as another file Doub e click the movie to be edited on PMB then click Show Edit Palette on the rig ht Side ...
Страница 287: ...dia is connected to our camcorder Operation is not assured with every device satisfying requirements fbr operating Connect your camcorder to the wall outlet wall socket using the supplied A adaptor p 15 Refi r to the instruction manual supplied with the external media For details on available external media go to the Sony support website in your country region Connect the AC Adaptor and the power ...
Страница 288: ...w the on screen instructions to select the recording media and image selection methods When you selected DUB by select touch the image to be saw 4 appears When you selected DUBbydate select the date of the imagesto be dubbed with _ then touch _ and go to step Remaining external media capacity Press and hold the image down on the LCD screen to confirm the image Touch to return to the previous scree...
Страница 289: ...e DVD writer to the USB jack of your camcorder with the USB cable of the DVD writer H Insert an unused disc into the DVD writer and close the disc tray The DISC BURN screen appears Oll the camcorder screen Press _ DISC BURN on the DVD writer Movies recorded Oll the internal recording media that haw not been saw d on aW discs will be recorded onto the disc Repeat steps 3 and 4 when the total memory...
Страница 290: ...creen Press the play button on the DVD writer _ m can also operate bythe camcorder screen Touch END EJECT DISC on the camcorder screen and remow the disc after the operation is completed Touch _ and disconnect the USB cable Notes Do not do any of the fbllowing when creating a disc Turn offthe camcorder Disconnect the USB cable or the AC adaptor Subject the camcorder to mechanical shock or vibratio...
Страница 291: ...tlet wall socket p 15 Turn on your camcorder and connect a DVD writer etc to the USB jack of your camcorder with the USB cable supplied The USB SELECT screen appears on the camcorder screen If the USB SELECT screen does not appear touch _ MENU _ Show others _ USB CONNECT under OTHERS category Touch the recording media that contains the images on the camcorder screen I_1USB CONNECT Internal nlemory...
Страница 292: ... to another device via the S VIDE jack by using an A V connecting cable with an S VIDEO cable sold separately higher quality images can be produced than with an A V connecting cable Connect the white and red plug left right audio and the S VIDEO plug S VIDE channel of the A V connecting cable with an S VIDEO cable If you connect the S VIDEO plug only you will hear no sound The yellow plug video co...
Страница 293: ...DISP OUTPUT _ LCD PANEL the defimlt setting _ _ _ _ _ _ To record the date time or camera settings data touch _ MENU _ Show others PLAYBACK SET under _ PLAYBACK category _ DATA CODE _ a desired setting _ _ _ _ In addition touch _ MENU _ Show others _ OUTPUT SETTINGS under _ GENERAL SET category _ DISP OUTPUT IV OUT PANEL _ _ When the screen size of display devices T v etc is 4 3 touch _ MENU _ Sho...
Страница 294: ...ENERAL SET Other setup items p 51 Menu items are described in more details in the Handycam Handbook _ _ The menu list mow s from category to category _ The menu list moves through 4 items at once 5_u can touch buttons and drag the screen to scroll the list of the menu The selected category icon is displayed in orange When you touch _ the screen returns to the MY MENU screen _ Touch _ MENU Touch Sh...
Страница 295: ... menu items you use most often on MY MENU You can register 6 menu items on each MY MENU of the MOVIE PHOTO and PLAYBACK Example deleting SPOT MTR FCS and registering 11 11FADER _ SCENE SELECTION Z _ Touch MENU Touch MY MENU SETTING Touch MOVIE Touch SPOT MTR FCS Touch Ii i_l Touch g lt FADER under MANUAL SETTINGS category _ When MY MENU is displayed touch Repeat the same steps abow to register men...
Страница 296: ...items you call change ill the context appear Menu item I Tab _ Touch _ OPTION Touch the desired tab the item to change the setting After completing the setting touch Notes Grayed out menu items or settings are not available When the item you want is not on the screen touch another tab There maybe notab The tabs and itemsthat appear on the screen depend on the recording playback status ofynur camco...
Страница 297: ...n when recording movies CONVERSION LENS Sets the type of an attached conversion lens sold separately Optimizes the SteadyShot fl mction and focus according to the attached lens LOW LUX Records bright color images in the dim FACEDETECTION Adjusts the image quality of the fi_ce s automaticall c PRIORITYSETTING Select the subject that has priority fbr the fi_ce detection and the smile shutter SMILE D...
Страница 298: ...os from desired scenes of movies MOVIEDUB DUB by select Selects movies and dub DUB by date Dubs all movies of a specified date DUB ALL Dubs all saved movies in a playlist PHOTO COPY COPY by select Selects photos and cop _ COPY by date Copies all photos of a specified date PLAYMSTEDIT It 11 ADD Adds movies in a playlist gZ_ADDby date Adds movies recorded on a same day at one time in a p aylist ERAS...
Страница 299: ...brightness of the LCD screen LCD BL LEVEL Adjusts the backlight of the LCD screen LCD COLOR Adjusts the color intensity of the LCD screen DISPLAYSET Sets the duration that icons or indicators are displayed on the LCD screen OUTPUT SETTINGS TV TYPE Converts the signal depending on the TV connected p 28 DISP OUTPUT Sets whether the omscreen displays appears on the TV screen or not CLOCK LANG CLOCKSE...
Страница 300: ... view the Handycam Handbook double click the short cut icon Oll the COlnputer screen When using a Macintosh open the Handbook US folder in the CD ROM then copy Handbook pdf _ m need Adobe Reader to read Handycam Handbook If it is not installed on our computer you can download it from the Adobe Systems web page http x_q_v adobe com Refbr to PMB Help fbr details on the supplied software PMB p 35 Sel...
Страница 301: ...aptor to the wall outh t wall socket p 15 The camcorder does not operate even when the power is set to on It takes a f_ w seconds for your camcorder to be ready to shoot after the power is turned on This is not a malfunction Disconnect the AC Adaptor froln the wall outlet wall socket or remove the battery pack then reconnect it after about 1 minute If your camcorder still does not work press RESET...
Страница 302: ...inning with 2 or E C 04 1717 The battery pack is not an InfoLITHIUM battery pack V series Use an InfoLITHIUM battery pack V series p 14 Connect the DC plug of the AC Adaptor to your camcorder securely p 14 C 06 DD The battery pack temperature is high Change the battery pack or place it in a cool place C I 3 rTr7 C 32 rTr7 P enmve the power source Reconnect it and operate your camcorder again E _IT...
Страница 303: ...nd or dust gets in your camcorder it may malfl mction Sometimes this malfimction cannot be repaired Near windows or outdoors where the LCD screen or the lens rnwbe exposed to direct sunlight This damages the inside of the LCD screen Operate your camcorder on DC 6 8 V 7 2 V battery pack or DC 8 4 V AC Adaptor For DC or AC operation use the accessories reconnnended in these operating instructions Do...
Страница 304: ...with water and then wipe the casing with a dry soft cloth Avoid the lbllowing to avoid damage to the finish Using chemicals such as thinner benzine alcohol chemical cloths repellent insecticide and sunscreen Handling the camcorder with above substances on our hands Leaving the casing in contact with rubber or vinyl objects fbr a long period of time About care and storage of the lens Wipe the surfh...
Страница 305: ... lbrmat Video MPEG 2 PS Audio recording system Dolby Digital 2ch Dolby Digital Stereo Creator Photo file fbrmat DCF V r 2 0Compatible Exif Vet 2 21 Compatible MPF Baseline Compatible Recording media Movie Photo Internal memory 16 GB Memory Stick PRO Duo media SD memory card SDHC memory card Class 2 4 6 10 When measuring media capacity 1 GB equals 1 billion bytes a portion of which is used fbr syst...
Страница 306: ...chargeable battery pack AC Adaptor AC L200C AC L200D Power requirements AC 100 V 240 V 50 Hz 60 Hz Current consumption 0 35 A 0 18 A Power consumption 18 W Output voltage DC 8 4 V Operating temperature 0 C to 40 C 32 F to 104 F Storage temperature 20 C to 60 C 4 F to 140 F Dimensions approx 48 29 x 81 mm 1 15 16 x 1 3 16 x 3 1 4 in w h d excluding the projecting parts Mass approx 170 g 6 0 oz excl...
Страница 307: ...ry Stick and MagicGate Memory Stick Duo are trademarks or registered trademarks of SoW Corporation InibLITHIUM is a trademark of SoW Corporation BIONZ is a trademark of Sony Corporation DVDirect is a trademark of Sony Corporation Dolby and the double D symbol are trademarks of Dolby Laboratories Microsoft Windows Windows Vista and DirectX are either registered trademarks or trademarks of Microsoft...
Страница 308: ...CK EAOEH EAOEH FADER 9999 I1_ _ Approximate number of 9999 _1 1_ recordable photos and recording media _ Playback fblder of memory card Current playing movie or 100 112 photo Number of total recorded movies or photos Bottom tg g FACE DETECTION set to OFF O1 SMILE DETECTION LOW LUX IA Manual fncus i_i _ _ _ SCENE SELECTION _ _ 6_ b mzl White balance _ _ SteadyShot off SPOT MTR FCS SPOT METER EXPOSU...
Страница 309: ...s RESET using a pointed object Press RESET to initialize all tbe settings including tbe clock setting _ _ USB jack 33 35 36 39 41 _ MODE button 21 _ 11211 movie O photo lamp 21 _ DISC BURN button 35 _ button _ POWER button 16 Power zoom lever PHOTO button 24 Battery pack _ START STOP button 22 _ DC IN jack 14 _ A V Remote Connector 28 _CHG charge lamp 14 _ Grip belt 21 _ Memory card slot 19 _ BATT...
Страница 310: ... _ Tripod receptacle Attach a tripod sold separately to the tripod receptacle using a tripod screw sold separately the length of the screw must be less than 5 5 mm 7 32 in ...
Страница 311: ...ry Stick PRO Duo media 19 Menus 46 49 MOVIE MEDIA SET 18 Movies 22 25 MY MENU 46 MY MENU SETTING 46 One Touch Disc Burn 35 Operation beeps 17 Operation flow 1 l OPTION MENU 48 Parts and controls 61 PHOTO MEDIA SET 18 Photos 24 25 Playback 25 PMB Picture Motion Browser 32 35 PMB Help 35 Power on 16 Precautions 55 Rec zoom buttons on LCD 22 Recording 22 Recording and playback time 58 Recording media...
Страница 312: ...quivalente recomendada por Son _ Deshfigase de la baterias usada lo antes posible segfin el procedimiento que se describe en las instrucciones Sustituya la bateria unicamente por otra del tipo especificado De lo contrario es posible que se produzcan incendios o lesiones Adaptador de alimentacion de ca No utilice el adaptador de alimentaci6n de ca colocado en un espacio angosto tal como entre una p...
Страница 313: ...ambio del ajuste de idioma Para ilustrar los procedimientos operativos se utilizan indicaciones en pantalla en cada idioma local Si es necesario cambie el idioma de la pantalla antes de utilizar la videoc_ mmra p_ig 13 Grabaci6n taIldo use por primera vez una tarjeta de memoria en la videocfimara se recomienda Ibrmatearla en la videoc_ mmra Dig 48 para lograr una operaci6n estable En el fbrmateo s...
Страница 314: ...arl Zeiss que permite obtener imrigenes de gran calidad y que rue desarrollado conjuntamente por Carl Zeiss en Alemania y SoW Corporation Adopta el sistema de medici6n MTF para videocrimaras y ofrece una calidad eqniparable a la de un objetivo Carl Zeiss MTF Modulation Transfi r Function E1 valor num rico indica la cantidad de luz de un motivo que entra en el objetivo Si la videockmara se conecta ...
Страница 315: ...s a modificaciones sin previo aviso Confirme el nOmero de modelo de la videockmara Confirme el nfimero de modelo de la videocrimara No realice ninguna de las acciones que se describen a continuacidn de lo contrario el soporte de grabacidn podria resultar daflado podrla ser imposible reproducir imrigenes grabadas que estas se perdieran o podrlan producirse otras lhllas de funcionamiento Expulsar la...
Страница 316: ...peliculas y fOtOS Reproduccidn en la videoc_imara _ p_ig 21 Reproduccidn de im_igenes en un televisor _ p_ig 24 Almacenamiento de ima genes Almacenan_iento de peliculas y tbtos con una computadora prig 28 Ahnacenamiento de peliculas y fbtos en soportes externos Dig 35 Ahnacenamiento de imtigenes con una grabadora de DVD prig 37 ...
Страница 317: ...r 24 Utilizaci6n correcta de la videoc_mara Eliminaci6n de peliculas y fotos 26 _ Almacenamiento de peliculas y fotos con una computadora Preparaci6n de la computadora Windows 28 Si utiliza un Macintosh 28 Inicio de PMB Picture Motion Browser 31 Creaci6n de un disco con un solo toque OneTouch Disc Burn 31 Importaci6n de peliculas y fotos a una computadora 32 Creaci6n de un disco 33 Copia de un dis...
Страница 318: ...Informaci6n complementaria Soluci6n de problemas 50 Precauciones 53 Especificaciones 55 _ Referencia r_pida Indicadores de la pantalla 58 Piezas y controles 59 ndice 61 ...
Страница 319: ...eoc_mara cierre la pantalla de cristal liquido Instale la bateria en la direcci6n que indica la flecha hasta que oiga un dic Conecte el adaptador de alimentaci6n de ca y el cable de alimentaci6n a la videoc_mara y al tomacorriente de pared Alinee la marca de la clavija de cc con la marca de la toma DC IN E1 indicador CHG carga se enciende y se inicia el proceso de carga E1 indicador CHG carga se a...
Страница 320: ...Ca suministrado con la videoc_mara dentro d e Un rang0 de ca de entre 100 v y 240 v 50 Hz 60 Hz No utilice un transformador de voltaje electrdnico Notas sobre la bateria Antes de extraer la baterla o el adaptador de alimel_tacidn de ca cierre la pantalla de cristal llquido y compruebe que los indicadores _ Pelicula l_ Foto prig 12 y el indicador de acceso prig 16 est_n apagados E1indicador CHG car...
Страница 321: ...la videocamara desconecte el adaptador de alimentacidn de ca del tomacorriente de pared inmediatamente No coloque el adaptador de alimentaci6n de ca en lugares estrechos como pot ejemplo entre una pared y un mueble No provnque un cortocircuito en la clavija de cc del adaptador de alimentaci6n de ca ni en el terminal de la baterla con ningt m objeto mettilico ya que podria causar una aliade funcion...
Страница 322: ...o la pantalla de cristal llquido est_iabierta presione POWER Boron POWER Indicador MODE Seleccione la zona geogrMica deseada con _ _ y a continuaci6n toque SIGUIENTE Para ajustar la fecha y la hora de nuevo toque _ MENU _ Mostrar otros _ AI REL IDIOM en la categorla A UST GENERALES _ AIUS RELOI Cuando tm elemento no aparece en la pantalla toque m m hasta que aparezca ...
Страница 323: ...ctivar los pitidos de funcionamiento toque _ MENU _ Mostrar otros _ A US o SON PANT en la categoria _ AJUST GENERALES _ PITIDO _ DESACTI vl _ _ 5 K Si el botdn que toca no reacciona correctamente deberia calibrar el panel tfictil Para apagar la videockmara Cierre la pantalla de cristal liquido E1 indicador n Pelicula parpadea durante varios segundo y se apaga la videoc_imara Sugerencias Tambi _ pu...
Страница 324: ...cidn o edicidn en elsoporte seleccionado Sugerencias Consulte la pfigina 56 para conocer el tiempo de grabacidn de las peliculas Toque _ MENU _ Mostrar otros _ AJUSTES SOPORTE en la categoria _ GESTION SOPORTE _ AJ SOPORTE PEL Apareceni la pantalla AJ SOPORTE PEL Toque el soporte de grabaci6n deseado Toque S _ _ E1 soporte de grabaci6n se cambia Toque _ MENU _ Mostrar otros _ AJUSTES SOPORTE en la...
Страница 325: ... una MultiMediaCard En este manual tanto Memory Stick PRO Dud como Memory Stick PRO HG Dud reciben el nombre de Memory Stick PRO Dud Se garantiza el timcionamiento de tarjetas de memoria de hasta 32 GB con la videocfimara Tipos de Memory Stick que se pueden utilizar con la videockmara Para grabar pellculas so recomienda utilizar un Memory Stick PRO Duo de una capacidad de 512 MB o m_isde las marca...
Страница 326: ...ue se daflela tarjeta de memoria la ranura para tarjeta de memoria o los datos de imagen Notas Si aparece Error al crear un nuevo archivo de base de datos de im_igenes Es posible que no exista suficiente espacio libre toque _ MENU _ Mostrar otros _ FORMAT SOPORTE en la categorla Q _ GESTION SOPORTE _ TARI MEMORIA _ IS _ S _ _ para inicializar la tarjeta de memoria Para expulsar la tarjeta de memor...
Страница 327: ... o cuando reproduzca las imtlgenes cierre la tapa del objetivo Ajuste la correa de sujecidn d3 m o m _ o Abra la pantalla de cristal liquido de la videoc_mara La videoc_hnara se enciende Para encender la videoc_imara cuando la pantalla de cristal llquido est_i abierta presione POWER p_ig 12 Para alternar entre modos de grabaci6n presione MODE Presione MODE para que se encienda el indicador de acce...
Страница 328: ...roduccidn los iconos e indicadores del panel de cristal liqnido se muestran durante unos 3 segundo y luego desaparecen Para mostrar los iconos e indicadores de nuevo toque cualqnier parte de la pantalla de cristal liquido excepto los botones de grabacidn y zoom Botones de grabaci6n y zoom de la pantalla de cristal llquido I uno 3 E _7 segundo despu_s _ Notas Si cierra la pantalla de cristal liquid...
Страница 329: ...peliculas Para comprobar el tiempo yla capacidad de grabacidn restantes aproximados etc toque MENU _ Mostrar otros _ INFO SOPORTE en lacategorfa _ GESTION SOPORTE La pantalla de cristal llquido de la videocfimara puede mostrar imfigenes de grabacidn en toda la pantalla visualizacidn de pixeles completos Sin embargo esto puede ocasionar un leve recorte de los bordes superior infi rior derecho e izq...
Страница 330: ...ell 4 3 Presione PHOTO levemente para ajustar el enfoque y luego presi6nelo completamente Para grabar iotos tambi n puede tocar _ on la pantalla de cristal llquido ii ii ii ii ii ii ii ii ii i_ii _ Parpadea Se enciende Cuando IMII desaparece se graba la _bto Sugerencias Para cambiar el tamafio de la imagen toque _ MENU _ Mostrar otros _ _TAM IMAGEN en la categorla _ AJUST FOTO CAM _ el _ iuste des...
Страница 331: ...o la pantalla de cristal llquido est_iabierta presione POWER prig 12 Presione _ VISUALIZAR IMAGENES 3 Luego de unos segundo aparece la pantalla VISUAL INDEX Tambi a puede mostrar la pantalla VISUAL INDEX al tocar _ VISUALIZAR IMAGENES en la pantalla de cristal llquido Para reproducir una pelicula toque II 11 Pelicula _ la pelicula deseada Para vet una foto toque I_1 Foto _ _ la foto deseada Las pe...
Страница 332: ...uccidn desde la pelicula seleccionada llega a la dltima pelicula vuelve a mostrarse la pantalla VISUAL INDEX Toque I_ _11 durante la pausa para reproducir la pelicula a cfimara lenta Si sigue tocando m_l _lN _ durante la reproduccidn las peliculas se reproducen con un aumento de velocidad de aproximadamente 5 veces _ 10 veces _ 30 veces _ 60 veces Puede mostrar la pantalla VISUAL INDEX si toca _ M...
Страница 333: ...nada I Inicio detenci6n de presentaci6n de Anterim l I diapositivas I_1t1_ oo14 Siguiente Ir a la pantalla _ iilj _T_ I OPTION VISUAL INDEX Sugerencias Cuando visualiza fotos grabadas en una tarjeta de memoria aparece en la pantalla _ _ carpeta de reproduccidn g _3 ...
Страница 334: ...V con un cable S VIDEO se vende por separado se pueden producir im lgenes de mayor calidad que con un cable de conexidn de A V_ Conecte las clavijas blanca y roja audio izquierdo derecho y la clavija S VIDEO canal S VIDEO del cable de conexidn de A V con el cable S VIDEO se vende por separado La conexion de la clavija amarilla no es necesaria Si se conecta s61o la clavija de S VIDEO no habr l sali...
Страница 335: ...dora _ Notas Cuando conecte la videoctimara a un televisor compatible con el sistema ID 1 ID 2 ajuste TWO TV en 16 9 E1televisor cambia autom_iticamente al modo de pantalla completa Consulte tambi_n los manuales de instrucciones suministrados con el televisor Si ajusta TWO TV en 4 31 puede deteriorarse la calidad de imagen Asimismo cuando la relaci6n de aspecto de la imagen grabada cambia entre 16...
Страница 336: ...odas las imfigenes almacenadas en el soporte de grabacidn y recuperar todo el espacio disponible en el soporte fbrmatee el soporte Las im_igenes de tamafio reducido que pernfiten ver varias im_igenes al nfismo tiempo en una pantalla de indice se conocen como miniaturas _ 1Toque _ MENU _ Mostrar otros _ BORRAR en la categorfa _ EDIT Para eliminar pelfculas toque CIVIl BORRAR _ 1tl BORRAR Para elimi...
Страница 337: ... _BORRAR BORRAR p fi cha Toque m_ _ para seleccionar la fk cha de grabacidn de las peliculas fbtos que desee y a continuacidn toque I_ _ Toque laimagen en lapantalla de cristal llquido para confirmarla Toque paravoNer a lapantalla anterior Toque i1 _ _ C g _7 ...
Страница 338: ...ita una unidad de CD ROM para la instalacidn _ Se reqniere la instalacidn est_indar No se garantiza el flmcionamiento en un sistema operativo actualizado o en un entorno de arranque mfiltiple _2Las ediciones de 64 bits y Starter Edition no son compatibles Se reqniere Windows hnage Mastering API IMAPI versidn 2 0 para utilizar la funcidn de creacidn de discos o similar _ Starter Edition no es compa...
Страница 339: ...adora Aparecerti la pantalla de instalacidn Si la pantalla no aparece haga clic en Inicio _ Equipo en Windows XP Mi PC y a cnntinuacidn haga doble clic en SONYPMB E CD ROM _ _ Los nombres de las unidades como E pueden variar en funcidn de la computadora Haga clic en Instalaci6n Handycam Application Softwale Seleccione el pais o la regi6n Seleccione el idioma del programa que desea instalar y conti...
Страница 340: ...ng API versidn 2 0 para Windows XP Si a6n no se ha instalado Image Mastering API versidn 2 0 para Windows XP selecci6nelo desde los programas requeridos en la pantalla de instalaci6n y siga los siguientes procedimientos que se muestran para instalarlo La computadora debe estar conectada a Internet para realizar la instalacidn Puede instalar Image Mastering API versidn 2 0 para Windows XP como resp...
Страница 341: ...B 2 Creaci6n de un disco con un solo toque OneTouch Disc Burn Las peliculas y las fotos grabadas en la videoc_hnara que no se hayan guardado con la funci6n One Touch Disc Burn se pueden guardar autom_iticamente en un disco Instale en primer lugar PMB p_ig 28 sin embargo no inicie PMB _ Conecte la videoc_imara al tnmacorriente de pared mediante el adaptador de alimentaci6n de ca suministrado para r...
Страница 342: ... usando eladaptador de alimentacidn de ca suministrado para esta operacidn p_ig 10 Encienda la videoc_mara y con tela a la computadora mediante el cable USB suministrado 2 La pantalla SELEC USB aparece ell la pantalla de la videocthnara Toque en la pantalla de la videoc_mara el soporte de grabaci6n que contiene las im_genes que desea guardar _ CONEXION USB n_emoria interna _ CONEXION USB tarjeta d...
Страница 343: ...n la unidad de DVD Consulte la p_igina28 paraobtener intbrmacidn acerca de los discos que puede utilizar Si un softwareditbrente a PMB se inicia autom_iticamente ci relo Inicie PMB p_g 31 Haga clic en Calendario o ndice en el lateral izquierdo de la ventana y seleccione la fecha o la carpeta y a continuaci6n seleccione las peliculas Para seleccionarvarias pellculas mantenga presionada latecla Ctrl...
Страница 344: ...ayuda de Video Disc Copier Es posibl e _orta r las partes d e una pelictfla que se 0ns der_ necesafias Y guardarlas como un archivo separado Haga dobleclic en la peliculaque desea editar en IPMB y a c0ntinuaci6n hag a dicen Mostrar paleta de edici6n en el lateral dere o de 1a panta la Rec0rtar yideo oseleccioneel men_ Manipular _ Editar _ Rec0rtar video par a obtener mas detalles consulte i_yuda d...
Страница 345: ...ctimara Si el soporte externo se brmate6 con el sistema de archivos NTFS o similar fbrmat elo en la videoc_imara antes de utilizarlo Aparecer_i la pantalla de brmato cuando el soporte externo se conecte a la videoctimara No se asegura el funcionamiento con todos los dispositivos que satisI agan los requisitos de hncionamiento Conecte la videoc_imara al tomacorriente de pared mediante el adaptador ...
Страница 346: ...talla VISUAL INDEX cambian tal como se muestra en la siguiente ilustraci6n Puede hacer ajustes del mend de los soportes externos como por ejemplo eliminar im_igenes Toque _ MENU Mostrar otros en la pantalla VISUAL INDEX Para guardar las peliculas y fotos deseadas _ Notas No es posible buscar ni copiar btosgrabadas en una tarjeta de memoria pot fbcha de grabacidn _ Toque Reproducir sin copiar en el...
Страница 347: ...Desconecte el cable adaptador USB Creaci6n de un disco con una grabadora de DVD Es posible crear un disco o reproducir las im_igenes de un disco creado usando la grabadora de DVD especifica DVDirect Express sew nde por separado Consulte tambi n los manuales de instrucciones suministrados con la grabadora de DVD _ Notas Conecte la videoc_imara al tomacorriente de pared usando el adaptador de alimen...
Страница 348: ...lizar un disco con OPC GRAB DISCO Llew a cabo esta operacidn en los siguientes casos A1 copiar una imagen deseada A1 crear varias copias del mismo disco A1 copiar im_igenes en la tarjeta de memoria _ Toque OPC GRAB DISCO en el paso 4 _ Seleccione el soporte de grabaci6n que contiene las peliculas que desea guardar _ Toque la pelicula que desea grabar en el disco Aparece _ Capacidad restante del di...
Страница 349: ...nte antes de eliminar las pellculas de la videocfimara Si Se produjo un error o Error al ejecutar GRABAR EN DISCO aparecen en la pantalla inserte otro disco en la grabadora de DVD y repita la operacidn de DISC BURN Sugerencias Si el tamafio de memoria total de las pellculas que se van a grabar mediante la operacidn DISC BURN supera el tamaflo del disco la creacidn del disco se detendrfi al alcanza...
Страница 350: ...lla SELEC USB toque _ MENU _ Mostrar otros CONEXION USB en la categorla OTROS Toque en la pantalla de la videograbadora el soporte de grabaci6n que contiene las imagenes t_ CONEXION USB memoria interna _CONEXION USB tarjeta de menloria Puede copiar im_igenes reproducidas en la videoc_hnara en un disco o videocasete si conecta la videoc_hnara a una grabadora de discos una grabadora de DVD de Sony e...
Страница 351: ...i6n en el dispositivo de grabaci6n Si eldispositivo de grabacidn tiene un selector de entrada aj6stelo en elmodo de entrada Conecte la videocamara al dispositivo de grabaci6n grabadora de discos etc con un cable de conexi6n de A V suministrado o un cable de conexi6n de A V con SVlDEO se vende pot separado Conecte la videoc_imara a las tomas de entrada del dispositivo de grabacidn Amarillo Entrada ...
Страница 352: ...IGO DATOS el ajuste deseado _ _ _ _ B _ _ Ademfis toque MENU _ Mostrar otros AJUSTES SALIDAI en la categorla ff_ AJUSZ GENERALESD SALIDA PANT _ SAL V LCD _ _ _ _ _ _ Si el tamafio de pantalla de los dispositivos de visualizaci6n televisor etc es 4 3 toque MENU _ Mostrar otros AJUSTES SALIDA en la categoria _ AJUST GENERALES TIPO TV _ 4 3 Si conecta la videoc_imara a un dispositivo monoaural introd...
Страница 353: ... GESTION SOPORTE Elementos para los soportes de grabaci6n p6g 48 AJUST GENERALES Otros elementos de la configuraci6n p6g 48 Los elementos de menfl se describen detalladamente en la Guia pr_ictica de Handycam _ _ la lista del lnenfi se mueve de categoria a categoria _ la lista del menti se muew de a 4 elementos al mismo tiempo Puede tocar los botones y arrastrar la pantalla para desplazarse pot la ...
Страница 354: ...dn y el modo de grabacidn pelicula fbto Es posible utilizar los elementos de lnenu ln_s fScilmente si registra los elementos de lnenu que utiliza con m_is frecuencia ell MI MENI Es posible registrar 6 elementos de lnenu ell cada MI MENI2 de PELICULA FOTO y REPRODUCCION Ejemplo anular MED ENF PUNTO y registrar EtIDESVANECEDOR _ A JUSTMANU L_S _i777iii_iii_i_ 7771 _ Toque _ MENU Toque AJUSTE MI MENI...
Страница 355: ...ra que aparezcan los elementos de menti que es posible cambiar en el contexto Elemento de menfi Ficha _ Toque _ OPTION Toque la ficha deseada el elemento cuyo ajuste desea cambiar Cuando finalice el ajuste toque RT _ _ Notas Los elementos de menfi o ajustes atenuados no est_in disponibles Si el elemento que desea no aparece en la pantalla toque otra ficha Es posible que no haya ninguna ficha Las f...
Страница 356: ...esttl en posicidn horizontal o vertical g NSTEADYSHOT Permite ajustar la Ihncidn SteadyBhot cuando se graban peliculas OBJETIVO CONVER Permite _ justar el tipo de objetivo de conversidn instalado se vende por separado Permite optimizar la hmcidn BteadyShot y realizar el enIbque en flmcidn del objetivo colocado LOW LUX Permite grabar iimlgenes de color brillantes en condiciones de escasa lmninosida...
Страница 357: ...R Permite DIVI DI R Permite TOMA FOTOGR_ F Permite COPIA PEL CULA COPIA por seleccidn Permite COPIA por fecha Permite COPIA DE TODO Permite COPIAR FOTO COPIAR por selec Permite COPIAR por fecha Pennite EDICION PLAYLIST II llAIqADIR Permite AIqADIR p fecha Permite playlist BORRAR Permite BORRAR TODO Permite MOVER Permite Categoria _ OTROS CONEXION USB eliminar peliculas eliminar iotos proteger las ...
Страница 358: ...ite ajustar si el sonido de luncionamiento emite un pitido o no BRILLOLCD Permite ajustar el brillo de la pantalla de cristal liquido NIVLUZ LCD Permite ajustar la luz de fbndo de la pantalla de cristal liquido COLOR LCD Permite ajustar la intensidad del color de la pantalla de cristal liquido AJUSTE PANTALLA Permite ajustar la duracidn de la visualizaci6n de los iconos o indicadores en la pantall...
Страница 359: ...lo de la videoc_mara y a continuaci6n haga clic en Guia pr_ctica de Handycam PDF E1nombre del modelode lavideoc_imara se encuentra impreso en la superficie infi riorde esta Haga clic en Salir _ Salir y a continuaci6n extraiga el CD ROM de la computadora Para ver la Guia pr_ictica de Handycam haga done clic en el icono de acceso directo en la pantalla de la computadora Cuando utilice un Macintosh a...
Страница 360: ...prfictica de Handycam Dig 49 para obtener infbrmacidn sobre los problemas de la videoc_imara y la Ayuda de PMB Dig 31 para obtener infbrmacidn sobre la conexi6n de la videoc_imara a una computadora La videoc_mara no se enciende Instale una bateria cargada en la videocfimara Dig 9 Conecte la clavija del adaptador de alilnentacidn de ca al tomacorriente de pared p_ig 10 La videoc_mara no funciona au...
Страница 361: ...ciela co nputadora La computadora no reconoce la videoc mara Desconecte cuak uier dispositivo de a toma USB de la computadora excepto el teclado el ratdn y la videocimmra Desconecte el cable USB de la computadora y de la videocfimara reinicie la computadora y a continuaci6n conecte de nuevo la computadora con la videocfimara de la manera apropiada Si en la pantalla de cristal liquido aparecen indi...
Страница 362: ...strar otrosl REP ARCH BD IM I en la categoria _ i GESTION SOPORTE _ el soporte de grabaci6n La tarjeta de memoria estri daflada Formatee la tarjeta de memoria con la videocrilnara prig 48 Se insert6 una tarjeta de meinoria incompatible prig 15 _ O _ Se restringi6 el acceso a la tarjeta de memoria en otto dispositivo La videocrimara se encuentra en una posicidn inestable St tela firmemente con amba...
Страница 363: ...nte y exponerla a golpes o impactos como martillazos caldas o pisotones Sea especialmente cuidadoso con el objetivo Cuando no utilice la videocfimara mant_ngala apagada No utilice la videoctlmara envuelta en una toalla por ejemplo Si lo hace puede recalentarse internamente Cuando desconecte el cable de alimentaci6n tire del enchulb y nunca del cable Procure no daflar el cable de alimentacidn al co...
Страница 364: ...nstalada La bateria recargable se descargartl completamente transcurridos aproximadamente 3 meses si no utiliza la videocfimara en absoluto Utilice la videocfimara despu s de cargar la bateria recargable preinstalada Sin embargo aunque no est_ cargada el funcionamiento de la videocfimara no se verfi afi ctado siempre qne no se est grabando la f_ cha Procedimientos Conecte la videoctlmara a un toma...
Страница 365: ...cuando LOW LUX est_i ajustado en ACTIVADO velocidad de obturaci6n 1 30 de segundo _La exclusiva matriz de pixeles del sensor ClearVid de Sony y el sistema de procesamiento de imfigenes BIONZ permiten una resoluci6n para las imfigenes fijas eqnivalente a los tamarios descritos _2 gZ_STEADYSHOT estfi ajustado en ESTA NDAR o DESACTI_ 3Los valores correspondientes a la distancia fbcal son cii as reale...
Страница 366: ...as condiciones de grabacidn y del motivo g _ MODO GRAB Condiciones de grabacidn modo de grabacidn ajustado en SPI E1tiempo de grabacidn normal indica el tiempo de grabaci6n al repetir las operaciones de inicio parada al cambiar el indicador MODE y al utilizar el zoom Tiempo de grabaci6n previsto para peliculas en el soporte de grabaci6n interno en minuto Para _ justar el modo de grabacidn toque ME...
Страница 367: ...colnerciales registradas o marcas comerciales de Microsoft Corporation en los Estados Unidos y o en otros paises Macintosh y Mac OS son marcas comerciales registradas de Apple Inc en los EE UU y en otros paises Intel Intel Core y Pentium son marcas comerciales o marcas comerciales registradas de Intel Corporation o sus subsidiarias en los Estados Unidos y en otros paises Adobe el logotipo de Adobe...
Страница 368: ...idn reproduccion edicidn 0 00 00 Contador hora minuto segundo 00min Tiempo de grabacion restante previsto _UND FUND 8L_NCO NEaRO DESVANECEDOR 9999 I_1 _ N0mero aproximado de fotos que puede grabar y 9999 I_1 Z_ soporte de grabaci6n _ Carpeta de reproduccidn de la tarjeta de memoria Pellcula o foto en 100 112 reproducci6n nfimero total de peliculas o fotos grabadas Parte inferior c g DETECCION CARA...
Страница 369: ...os indicadores no _g_arezcan Los ntimeros entre corresponden alas ptiginas de refk rencia _Objetivo objetivo Carl Zeiss _ Interruptor LENS COVER Micr6fono incorporado _ Pantalla de cristal liquido panel tkctil Si gira el panel de cristal llquido 180 grados podr_ l cerrarlo con la pantalla de cristal lfquido mirando hacia fuera Este procedimiento resuha adecuado para las operaciones de reproducci6n...
Страница 370: ...ot6n PHOTO 20 Bateria Bot6n START STOP 18 Toma DC IN 9 Conector remoto de A V 24 Indicador CHG carga 9 Correa de sujeci6n 17 Ranura de tarjeta de memoria 15 Palanca BATT liberaci6n de la bateria 10 Indicador de acceso tarjeta de memoria 15 Cuando e indicador est_iencendido o parpadea a videoc_ mmraest_igrabando o eyendo datos Receptaculo de tripode Co oque un tripode sevende pot separado en e rece...
Страница 371: ...d 12 Especificaciones 55 FECHA HORA 13 Flujo de operacidn 6 Fotos 20 21 Grabaci6n 18 Grabadora de discos 40 Grabadora de DVD 37 39 Guia imictica de Handycam 49 Indicadores de advertencia 51 Indicadores de la pantalla 58 Instalaci6n 28 Macintosh 28 Mantenimiento 53 Memoria interna 14 Memory Stick 15 Memory Stick PRO Duo 15 Memory Stick PRO HG Duo Menfis 43 46 MI MENI 43 Miniatura 26 One Touch Disc ...
Страница 372: ... Customer Support Website Puede encontrar m_isinibmlaci6n sobre este producto y respuestas alas preguntas m_isfrecuentes en nuestro sitio Web de atenci6n alcliente htt p www so ny net Printed on 70 or more recycled paper Impreso en papel reciclado en un 70 o mas Printed in China IIIIIIIIIII 4171513110 ...
Страница 373: ...SON_ 4_171_s13_ 1 DCR SX83 Digital Video Camera Recorder Operating Guide Guia de operaciones M_NDRY _TI K M _ _ 2010 Sony Corporation ...
Страница 374: ...nstructions in the literature accompanying the appliance To reduce fire or shock hazard do not expose the unit to rain or moisture Do not expose the batteries to excessive heat such as sunshine fire or the like CAUHON 10 REDUC _H_ RISKOFE CTRICSNOOK Do NOr REMOVE COVER O_ BACK NO USE_ SERVlCEAIJLE PARRSINSIDE rtEFERSErtVlClNGTOQUALIFIED SERVICEPERSONNEL This symbol is intended to alert the user to...
Страница 375: ...ectrician for replacement of the obsolete outlet Protect the power cord from being walked on or pinched particularly at plugs conw nience receptacles and the point where they exit from the apparatus Only use attachments accessories specified by the manufacturer Use only with the cart stand tripod bracket or table specified by the manufacturer or sold with the apparatus When a cart is used use caut...
Страница 376: ...h a NEMA 1 15P plug rated for 125 V 15 A Europe Countries regions Voltage Frequency Hz Plug type Austria 230 50 C Belgium 230 50 C Czech 220 50 C I enmark 230 50 C Finland 230 50 C France 230 50 C Germany 230 50 C Greece 220 50 C Hungary 220 50 C Iceland 230 50 C Ireland 230 50 C BF Italy 220 50 C I uxemburg 230 50 C Netherlands 230 50 C Norway 230 50 C Poland 220 50 C Portugal 230 50 C Romania 22...
Страница 377: ...60 A Jamaica 110 50 A Mexico 120 127 60 A Nicaragua 120 240 60 A Panama 110 220 60 A South America Countries regions Voltage Frequency Hz Plugtype Argentina 220 50 BF O Brazil 127 220 60 A C Chile 220 50 C Colombia 120 60 A Peru 220 60 A C _ nezuela 120 60 A Middle East Countries regions Voltage Frequency Hz Plugtype h an 220 50 C BF Iraq 220 50 C BF Israel 230 50 C Saudi Arabia 127 220 50 A C BF ...
Страница 378: ...battery with the specified type onb Otherwise fire or injury may result ACAdaptor Do not use the AC Adaptor placed in a narrow space such as between a wall and furniture Use the nearby wall outlet wall socket when using the AC Adaptor Disconnect the AC Adaptor from the wall outlet wall socket immediately if aW malfunction occurs while using your camcorder Ew n if your camcorder is turned off AC po...
Страница 379: ...dential installation This equipment generates uses and can radiate radio frequency energy and if not installed and used in accordance with the instructions may cause harmful interference to radio communications Howew r there is no guarantee that interference will not occur in a particular installation If this equipment does cause harmful interference to radio or television reception which can be d...
Страница 380: ...he language setting The or screen displays in each local language are used fbr illustrating the operating procedures Change the screen language befbre using your camcorder if necessary p 17 Recording When you use a memory card with your camcorder br the first time fbrmatting the memory card with your camcorder p 51 is recommended fbr stable operation All data recorded on the memory card will be de...
Страница 381: ...e camcorder using a computer If you do so our camcorder may not operate correctly When connecting our camcorder to another device with a cable be sure to insert the connector plug in the correct way Pushing the plug fbrcibly into the terminal will damage the terminal and may result in a malfunction of our camcorder If you cannot record play back images perform MEDIA FORMAT If you repeat recording ...
Страница 382: ...ct the memory card when the access lamp p 20 is litor flashing Remove the battery pack or AC Adaptor f com the camcorder or subject the camcorder to shock or vibraion when the _ Movie U_ Photo lamps p 16 or the access lamp p 20 are litor flashing When using ashoulder belt sold separately do not crash the camcorder against an object Do not use your camcorder invery loud areas ...
Страница 383: ...s _ p 24 Playing movies and photos Playback on the camcorder _ p 25 Playing images on a TV _ p 28 Saving images Saving movies and photos with a computer _ p 32 Saving movies and photos in external media _ p 39 Saving images with a DVD writer recorder _ p 41 Deleting movies and photos p 30 If you delete the image data that has been saved on your computer _ or a disc you can record new images on the...
Страница 384: ...memory card 20 _ Recording Playback Recording 21 Playback on the camcorder 25 Playing images on a TV 28 Making good use of your camcorder Deleting movies and photos 30 _ Saving movies and photos with a computer Preparing a computer Windows 32 When using a Macintosh 32 Starting PMB Picture Motion Browser 35 Creating a disc with one touch One Touch Disc Burn 35 Importing movies and photos to a compu...
Страница 385: ... Using menus 46 Getting detailed information from the Handycam Handbook 52 _ Additional information _ lroubleshooting 53 Precautions 55 Specifications 57 Quick reference Screen indicators 60 Parts and controls 61 Index 63 D n _3 ...
Страница 386: ...o your camcorder Turn offyour camcorder by closing the LCDscreen Attach the battery pack by sliding it in the direction of the arrow until it clicks Connect the AC Adaptor and the power cord mains lead to your camcorder and the wall outlet wall socket Align the mark on the DC plug with that on the DC IN jack The CHG charge lamp lights up and charging starts The CHG charge lamp turns off when the b...
Страница 387: ...p 16 the access lamp p 20 are turned of__ The CHG charge lamp flashes during charging under the fbllowing conditions The battery pack is not attached correctl3c The battery pack is damaged The temperature of the battery pack is lox_c Remove the battery pack comyour camcorder and put it in a warm place The temperature of the battery pack is high Remove the battery pack comyour camcorder and put it ...
Страница 388: ...ired geographical area with _ _ then touch NEXT Touch the button on the LCD screen To set the date and time again touch _ MENU _ Show others _ CLOCK LANG under _ GENERAL SET category _ CLOCK SET Vhen an item is not on the screen touch m m until the item appears Set DST SET or SUMMERTIME date and time then touch Ii_l The clock starts If you set DST SET or SUMMERTIME to ON the clock advances 1 hour ...
Страница 389: ... _ BEEP _ OFF _ _ _ _ _ Ik _ If the button you touch does not react correctly calibrate the touch panel To turn offthe power Close the LCD screen The _ll Movie lamp flashes for a fbw seconds and the power is turned off_ _Tips 5_u can turn off your camcorder also by pressing POWER When POWER ON BY LCD is set to OFF turn offyour camcorder by pressing POWER 63 Changing the language setting _ You can ...
Страница 390: ...aybackand editing operations on the selected medimn _Tips See page 59 for the recordable time of movies Touch _ MENU _ Show others _ MEDIA SETTINGS under_ MANAGE MEDIA category _ MOVIE MEDIA SET The MOVIE MEDIA SET screen appears Touch the desired recording media Touch YES _ The recording medium is changed Touch _ MENU _ Show others _ MEDIA SETTINGS under_ MANAGE MEDIA category _ PHOTO MEDIA SET T...
Страница 391: ...mory Stick PRO HG Duo media are referred to as Memory Stick PRO Duo media Memory cards of up to 32 GB are guaranteed to work with our camcorder Types of Memory Stick media that can be used with your camcorder For recording movies it is recommended that you use Memory Stick PRO Duo media of 512 MB or larger marked with MEMORY SLIERPRO null Memory Stick PRO Duo media MEMORYSTI I PRO HG DUO Memory St...
Страница 392: ...mory card slot or imagedata maybe damaged Notes If Failed to create a new hnage Database File It may be possible that there is not enough ficeespace is displayed initialize the memory card by touching _ MENU _ Show others _ MEDIA FORMAT under _ a MANAGE MEDIA category _ MEMORY CARD _ YES _ YES To eject the memory card Open the cow r and lightly push the memory card in once Do not open the cover du...
Страница 393: ...recording or when you play back images close the lens cover Fasten the grip belt g 3 E Open the LCD screen of your camcorder Your camcorder turns Oll To turn on your camcorder when the LCD screen is alrea open press POWER p 16 _ m can switch recording modes by pressing MODE Press MODE to light up the desired recording mode lamp MODE button MODE I_ Movie When recording a movie I_ Photo When shootin...
Страница 394: ...corder or switching the recording movie photo playback modes To display the icons and indicators again touch an _ here on the screen except the rec zoom buttons on the LCD Rec zoom buttons on LCD about 3sec _7 after Notes If you close the LCD screen while recording movies the camcorder stops recording The maximum continuous recordable time of movies is about 13 hours When a movie file exceeds 2 GB...
Страница 395: ...imated remaining capacity etc by touching _ MENU Show others _ MEDIA INFO under _i MANAGE MEDIA category The LCD screen of your camcorder can display recording images across the entire screen full pixel display However this may cause slight trimming of the top bottom right and left edges of images when played back on a TV which is not compatible with full pixel display In this case set GUIDEFRAME ...
Страница 396: ... ratio becomes 4 3 Press PHOTO lightly to adjust the focus then press it fully 5_u can record photos alsoby touching _ on the L D screen Flashes Lights up WhenMilldisappears the photo is recorded _Tips To change the image size touch _ MENU _ Show others _ IMAGE SIZE under _ PHOTO SETTINGS category _ a desired setting _ _ 5_u cannot record photos while _ is displayed 5_u can check the recordable nu...
Страница 397: ...MAGES The VISUAL INDEX screen appears after some seconds _ ucan display the VISUAL INDEX screen also by touching VIEW IMAGES on the LCD screen Touch _ll Movie _ a desired movie to play back a movie Touch the I_ Photo _ a desired photo to view a photo Movies are displayed and sorted by recording date s Switches operating button display To MENU screen Displays the screen to select the index type DAT...
Страница 398: ...returns to the VISUAL INDEX screen Touch EI _II _ during pause to play back movies slowl c As you repeat toucbing I_11 _ during playback nrovies are played as fhst as about 5 times about 10 times _ about 30 times _ about 60 times 5_u can display the VISUAL INDEX bv touching _ MENU _ Show others _ VISUAL INDEX under _ PLAYBACK category The recording date time and shooting conditions are recorded au...
Страница 399: ...hotos Yourcamcorder displaysthe selected photo I Previous To the VISUAL _ iil Next J _T_ 1 OPTION INDEX screen _Tips When viewing photos recorded on a memory card _ playback iolder appears on the screen g 3 7 _7 ...
Страница 400: ...g cable with an S VIDE cable sold separately higher quality images can be produced than with an A V connecting cable Connect the white and red plugs left right audio and the S VIDE plug S VIDEO channel of the A V connecting cable with an S VIDEO cable sold separately The yellow plug connection is not necessary Connecting only the S VIDEO plug will not output audio I VIDEO VIDEO Yellow A V R A V Re...
Страница 401: ... When you connect your camcorder to a TV compatible with the ID 1 ID 2 system set TV TYPE to 16 9 The TV switches to fi dlmode automaticall3c Refi r also to the instruction manuals supplied with our T V_ When you set TV TYPE to 4 3 the image quality may deteriorate Also when the recorded image s aspect ratio switches between 16 9 wide and 4 3 the image may jitter On some 4 3 TVs the photos recorde...
Страница 402: ...cording media and recover all the recordable space of the media fbrmat the media Reduced size images which enable you to view many images at the same time on an index screen are called thumbnails2 1Touch _ MENU _ Show others _ DELETE under _ EDIT category To delete movies touch 1t_ DELETE _ g ltDELETE Tu delete photos touch _DELETE _ _DELETE Touch and display the 4 mark on the movies or photos to ...
Страница 403: ...uch _ _ to select the recording date of the desired movies photos then touch _ Touch the image down on the LCD screen to confirm tile image Touch _ to return to the previous screen Touch YES E _ _ _ 57 3 S ...
Страница 404: ...discs ii Minimunl 1 024 x 768 dots _ Standard installation is required Operation is not assured if the OS has been upgraded or in a multi boot environment _264 bit editions and Starter Edition are not supported Windows Image Mastering API IMAPI Ver 2 0 or newer is required to use disc creation function etc _3Starter Edition is not supported _4Faster processor is recommended _ Notes Operation with ...
Страница 405: ...tion to be installed then proceed to the next screen Read the terms of the license agreement carefully If you agree to the terms change to _ and N The USB SELECT screen appears on the camcorder screen automatically Touch the one of the media types displayed on the camcorder screen to make the computer recognize your camcorder I_IUSB CONNECT Internal memory Tiledisplayed recording media difi r depe...
Страница 406: ...0 fbr Windows XP has not been installed yet select it from required programs on the installation screen and install it bllowing the procedures displayed The computer must be connected to the internet fbr the installation 5_u may install hnage Mastering API v2 0 fbr Windows XP in response to the message displayed when you try to start those functions Touch END _ YES on the camcorder screen Disconne...
Страница 407: ... with one touch OneTouch Disc Burn Movies and photos recorded on your camcorder that haw not yet been saw d with One Touch Disc Burn function can be saw d on a disc automatically Install PMB belbrehand p 32 however do not start PMB Connect your camcorder to the wall outlet wall socket using the AC Adaptor supplied fbr this operation p 15 With One Touch Disc Burn function on your camcorder you can ...
Страница 408: ...e supplied AC Adaptor brthis operation p 15 Turn on your camcorder then connect the camcorder to the computer using the supplied USB cable 2 The USB SELECT screen appears on the camcorder screen Touch the recording media that contains the images you want to save on the camcorder screen _ USB CONNECT Internal memory _ USB CONNECT Memory card The displayed recording media differ depending onthe mode...
Страница 409: ...iscs you can use If any other software than PMB starts automatically shut it down Start PMg p 35 Click Calendar or Index on the left side in the window and select the date or folder then select the movies To select plural movies hold the Ctrl key down and click thumbnails At the top of the window click _ _ Create DVD Video Format Discs STD _ The window used to select movies o_ appears _3_ To add m...
Страница 410: ...ration Capturing photos from a movie You can save a frame of a movie as a photo file Double click the movie to be edited on PMB then dick Show Edit Palette on the right side of the screen _ Save Frame See PMB Help p 35 for details You C an CUtOUt0n y necessary p arts from a movie and save it as another file Doub e click the movie to be edited on PMB then click Show Edit Palette on the rig ht Side ...
Страница 411: ...dia is connected to our camcorder Operation is not assured with every device satisfying requirements fbr operating Connect your camcorder to the wall outlet wall socket using the supplied A adaptor p 15 Refi r to the instruction manual supplied with the external media For details on available external media go to the Sony support website in your country region Connect the AC Adaptor and the power ...
Страница 412: ...w the on screen instructions to select the recording media and image selection methods When you selected DUB by select touch the image to be saw 4 appears When you selected DUBbydate select the date of the imagesto be dubbed with _ then touch _ and go to step Remaining external media capacity Press and hold the image down on the LCD screen to confirm the image Touch to return to the previous scree...
Страница 413: ...e DVD writer to the USB jack of your camcorder with the USB cable of the DVD writer H Insert an unused disc into the DVD writer and close the disc tray The DISC BURN screen appears Oll the camcorder screen Press _ DISC BURN on the DVD writer Movies recorded Oll the internal recording media that haw not been saw d on aW discs will be recorded onto the disc Repeat steps 3 and 4 when the total memory...
Страница 414: ...creen Press the play button on the DVD writer _ m can also operate bythe camcorder screen Touch END EJECT DISC on the camcorder screen and remow the disc after the operation is completed Touch _ and disconnect the USB cable Notes Do not do any of the fbllowing when creating a disc Turn offthe camcorder Disconnect the USB cable or the AC adaptor Subject the camcorder to mechanical shock or vibratio...
Страница 415: ...tlet wall socket p 15 Turn on your camcorder and connect a DVD writer etc to the USB jack of your camcorder with the USB cable supplied The USB SELECT screen appears on the camcorder screen If the USB SELECT screen does not appear touch _ MENU _ Show others _ USB CONNECT under OTHERS category Touch the recording media that contains the images on the camcorder screen I_1USB CONNECT Internal nlemory...
Страница 416: ... to another device via the S VIDE jack by using an A V connecting cable with an S VIDEO cable sold separately higher quality images can be produced than with an A V connecting cable Connect the white and red plug left right audio and the S VIDEO plug S VIDE channel of the A V connecting cable with an S VIDEO cable If you connect the S VIDEO plug only you will hear no sound The yellow plug video co...
Страница 417: ...DISP OUTPUT _ LCD PANEL the defimlt setting _ _ _ _ _ _ To record the date time or camera settings data touch _ MENU _ Show others PLAYBACK SET under _ PLAYBACK category _ DATA CODE _ a desired setting _ _ _ _ In addition touch _ MENU _ Show others _ OUTPUT SETTINGS under _ GENERAL SET category _ DISP OUTPUT IV OUT PANEL _ _ When the screen size of display devices T v etc is 4 3 touch _ MENU _ Sho...
Страница 418: ...ENERAL SET Other setup items p 51 Menu items are described in more details in the Handycam Handbook _ _ The menu list mow s from category to category _ The menu list moves through 4 items at once 5_u can touch buttons and drag the screen to scroll the list of the menu The selected category icon is displayed in orange When you touch _ the screen returns to the MY MENU screen _ Touch _ MENU Touch Sh...
Страница 419: ... menu items you use most often on MY MENU You can register 6 menu items on each MY MENU of the MOVIE PHOTO and PLAYBACK Example deleting SPOT MTR FCS and registering 11 11FADER _ SCENE SELECTION Z _ Touch MENU Touch MY MENU SETTING Touch MOVIE Touch SPOT MTR FCS Touch Ii i_l Touch g lt FADER under MANUAL SETTINGS category _ When MY MENU is displayed touch Repeat the same steps abow to register men...
Страница 420: ...items you call change ill the context appear Menu item I Tab _ Touch _ OPTION Touch the desired tab the item to change the setting After completing the setting touch Notes Grayed out menu items or settings are not available When the item you want is not on the screen touch another tab There maybe notab The tabs and itemsthat appear on the screen depend on the recording playback status ofynur camco...
Страница 421: ...n when recording movies CONVERSION LENS Sets the type of an attached conversion lens sold separately Optimizes the SteadyShot fl mction and focus according to the attached lens LOW LUX Records bright color images in the dim FACEDETECTION Adjusts the image quality of the fi_ce s automaticall c PRIORITYSETTING Select the subject that has priority fbr the fi_ce detection and the smile shutter SMILE D...
Страница 422: ...os from desired scenes of movies MOVIEDUB DUB by select Selects movies and dub DUB by date Dubs all movies of a specified date DUB ALL Dubs all saved movies in a playlist PHOTO COPY COPY by select Selects photos and cop _ COPY by date Copies all photos of a specified date PLAYMSTEDIT It 11 ADD Adds movies in a playlist gZ_ADDby date Adds movies recorded on a same day at one time in a p aylist ERAS...
Страница 423: ...brightness of the LCD screen LCD BL LEVEL Adjusts the backlight of the LCD screen LCD COLOR Adjusts the color intensity of the LCD screen DISPLAYSET Sets the duration that icons or indicators are displayed on the LCD screen OUTPUT SETTINGS TV TYPE Converts the signal depending on the TV connected p 28 DISP OUTPUT Sets whether the omscreen displays appears on the TV screen or not CLOCK LANG CLOCKSE...
Страница 424: ... view the Handycam Handbook double click the short cut icon Oll the COlnputer screen When using a Macintosh open the Handbook US folder in the CD ROM then copy Handbook pdf _ m need Adobe Reader to read Handycam Handbook If it is not installed on our computer you can download it from the Adobe Systems web page http x_q_v adobe com Refbr to PMB Help fbr details on the supplied software PMB p 35 Sel...
Страница 425: ...aptor to the wall outh t wall socket p 15 The camcorder does not operate even when the power is set to on It takes a f_ w seconds for your camcorder to be ready to shoot after the power is turned on This is not a malfunction Disconnect the AC Adaptor froln the wall outlet wall socket or remove the battery pack then reconnect it after about 1 minute If your camcorder still does not work press RESET...
Страница 426: ...inning with 2 or E C 04 1717 The battery pack is not an InfoLITHIUM battery pack V series Use an InfoLITHIUM battery pack V series p 14 Connect the DC plug of the AC Adaptor to your camcorder securely p 14 C 06 DD The battery pack temperature is high Change the battery pack or place it in a cool place C I 3 rTr7 C 32 rTr7 P enmve the power source Reconnect it and operate your camcorder again E _IT...
Страница 427: ...nd or dust gets in your camcorder it may malfl mction Sometimes this malfimction cannot be repaired Near windows or outdoors where the LCD screen or the lens rnwbe exposed to direct sunlight This damages the inside of the LCD screen Operate your camcorder on DC 6 8 V 7 2 V battery pack or DC 8 4 V AC Adaptor For DC or AC operation use the accessories reconnnended in these operating instructions Do...
Страница 428: ...with water and then wipe the casing with a dry soft cloth Avoid the lbllowing to avoid damage to the finish Using chemicals such as thinner benzine alcohol chemical cloths repellent insecticide and sunscreen Handling the camcorder with above substances on our hands Leaving the casing in contact with rubber or vinyl objects fbr a long period of time About care and storage of the lens Wipe the surfh...
Страница 429: ... lbrmat Video MPEG 2 PS Audio recording system Dolby Digital 2ch Dolby Digital Stereo Creator Photo file fbrmat DCF V r 2 0Compatible Exif Vet 2 21 Compatible MPF Baseline Compatible Recording media Movie Photo Internal memory 16 GB Memory Stick PRO Duo media SD memory card SDHC memory card Class 2 4 6 10 When measuring media capacity 1 GB equals 1 billion bytes a portion of which is used fbr syst...
Страница 430: ...chargeable battery pack AC Adaptor AC L200C AC L200D Power requirements AC 100 V 240 V 50 Hz 60 Hz Current consumption 0 35 A 0 18 A Power consumption 18 W Output voltage DC 8 4 V Operating temperature 0 C to 40 C 32 F to 104 F Storage temperature 20 C to 60 C 4 F to 140 F Dimensions approx 48 29 x 81 mm 1 15 16 x 1 3 16 x 3 1 4 in w h d excluding the projecting parts Mass approx 170 g 6 0 oz excl...
Страница 431: ...ry Stick and MagicGate Memory Stick Duo are trademarks or registered trademarks of SoW Corporation InibLITHIUM is a trademark of SoW Corporation BIONZ is a trademark of Sony Corporation DVDirect is a trademark of Sony Corporation Dolby and the double D symbol are trademarks of Dolby Laboratories Microsoft Windows Windows Vista and DirectX are either registered trademarks or trademarks of Microsoft...
Страница 432: ...CK EAOEH EAOEH FADER 9999 I1_ _ Approximate number of 9999 _1 1_ recordable photos and recording media _ Playback fblder of memory card Current playing movie or 100 112 photo Number of total recorded movies or photos Bottom tg g FACE DETECTION set to OFF O1 SMILE DETECTION LOW LUX IA Manual fncus i_i _ _ _ SCENE SELECTION _ _ 6_ b mzl White balance _ _ SteadyShot off SPOT MTR FCS SPOT METER EXPOSU...
Страница 433: ...s RESET using a pointed object Press RESET to initialize all tbe settings including tbe clock setting _ _ USB jack 33 35 36 39 41 _ MODE button 21 _ 11211 movie O photo lamp 21 _ DISC BURN button 35 _ button _ POWER button 16 Power zoom lever PHOTO button 24 Battery pack _ START STOP button 22 _ DC IN jack 14 _ A V Remote Connector 28 _CHG charge lamp 14 _ Grip belt 21 _ Memory card slot 19 _ BATT...
Страница 434: ... _ Tripod receptacle Attach a tripod sold separately to the tripod receptacle using a tripod screw sold separately the length of the screw must be less than 5 5 mm 7 32 in ...
Страница 435: ...ry Stick PRO Duo media 19 Menus 46 49 MOVIE MEDIA SET 18 Movies 22 25 MY MENU 46 MY MENU SETTING 46 One Touch Disc Burn 35 Operation beeps 17 Operation flow 1 l OPTION MENU 48 Parts and controls 61 PHOTO MEDIA SET 18 Photos 24 25 Playback 25 PMB Picture Motion Browser 32 35 PMB Help 35 Power on 16 Precautions 55 Rec zoom buttons on LCD 22 Recording 22 Recording and playback time 58 Recording media...
Страница 436: ...quivalente recomendada por Son _ Deshfigase de la baterias usada lo antes posible segfin el procedimiento que se describe en las instrucciones Sustituya la bateria unicamente por otra del tipo especificado De lo contrario es posible que se produzcan incendios o lesiones Adaptador de alimentacion de ca No utilice el adaptador de alimentaci6n de ca colocado en un espacio angosto tal como entre una p...
Страница 437: ...ambio del ajuste de idioma Para ilustrar los procedimientos operativos se utilizan indicaciones en pantalla en cada idioma local Si es necesario cambie el idioma de la pantalla antes de utilizar la videoc_ mmra p_ig 13 Grabaci6n taIldo use por primera vez una tarjeta de memoria en la videocfimara se recomienda Ibrmatearla en la videoc_ mmra Dig 48 para lograr una operaci6n estable En el fbrmateo s...
Страница 438: ...arl Zeiss que permite obtener imrigenes de gran calidad y que rue desarrollado conjuntamente por Carl Zeiss en Alemania y SoW Corporation Adopta el sistema de medici6n MTF para videocrimaras y ofrece una calidad eqniparable a la de un objetivo Carl Zeiss MTF Modulation Transfi r Function E1 valor num rico indica la cantidad de luz de un motivo que entra en el objetivo Si la videockmara se conecta ...
Страница 439: ...s a modificaciones sin previo aviso Confirme el nOmero de modelo de la videockmara Confirme el nfimero de modelo de la videocrimara No realice ninguna de las acciones que se describen a continuacidn de lo contrario el soporte de grabacidn podria resultar daflado podrla ser imposible reproducir imrigenes grabadas que estas se perdieran o podrlan producirse otras lhllas de funcionamiento Expulsar la...
Страница 440: ...peliculas y fOtOS Reproduccidn en la videoc_imara _ p_ig 21 Reproduccidn de im_igenes en un televisor _ p_ig 24 Almacenamiento de ima genes Almacenan_iento de peliculas y tbtos con una computadora prig 28 Ahnacenamiento de peliculas y fbtos en soportes externos Dig 35 Ahnacenamiento de imtigenes con una grabadora de DVD prig 37 ...
Страница 441: ...r 24 Utilizaci6n correcta de la videoc_mara Eliminaci6n de peliculas y fotos 26 _ Almacenamiento de peliculas y fotos con una computadora Preparaci6n de la computadora Windows 28 Si utiliza un Macintosh 28 Inicio de PMB Picture Motion Browser 31 Creaci6n de un disco con un solo toque OneTouch Disc Burn 31 Importaci6n de peliculas y fotos a una computadora 32 Creaci6n de un disco 33 Copia de un dis...
Страница 442: ...Informaci6n complementaria Soluci6n de problemas 50 Precauciones 53 Especificaciones 55 _ Referencia r_pida Indicadores de la pantalla 58 Piezas y controles 59 ndice 61 ...
Страница 443: ...eoc_mara cierre la pantalla de cristal liquido Instale la bateria en la direcci6n que indica la flecha hasta que oiga un dic Conecte el adaptador de alimentaci6n de ca y el cable de alimentaci6n a la videoc_mara y al tomacorriente de pared Alinee la marca de la clavija de cc con la marca de la toma DC IN E1 indicador CHG carga se enciende y se inicia el proceso de carga E1 indicador CHG carga se a...
Страница 444: ...Ca suministrado con la videoc_mara dentro d e Un rang0 de ca de entre 100 v y 240 v 50 Hz 60 Hz No utilice un transformador de voltaje electrdnico Notas sobre la bateria Antes de extraer la baterla o el adaptador de alimel_tacidn de ca cierre la pantalla de cristal llquido y compruebe que los indicadores _ Pelicula l_ Foto prig 12 y el indicador de acceso prig 16 est_n apagados E1indicador CHG car...
Страница 445: ...la videocamara desconecte el adaptador de alimentacidn de ca del tomacorriente de pared inmediatamente No coloque el adaptador de alimentaci6n de ca en lugares estrechos como pot ejemplo entre una pared y un mueble No provnque un cortocircuito en la clavija de cc del adaptador de alimentaci6n de ca ni en el terminal de la baterla con ningt m objeto mettilico ya que podria causar una aliade funcion...
Страница 446: ...o la pantalla de cristal llquido est_iabierta presione POWER Boron POWER Indicador MODE Seleccione la zona geogrMica deseada con _ _ y a continuaci6n toque SIGUIENTE Para ajustar la fecha y la hora de nuevo toque _ MENU _ Mostrar otros _ AI REL IDIOM en la categorla A UST GENERALES _ AIUS RELOI Cuando tm elemento no aparece en la pantalla toque m m hasta que aparezca ...
Страница 447: ...ctivar los pitidos de funcionamiento toque _ MENU _ Mostrar otros _ A US o SON PANT en la categoria _ AJUST GENERALES _ PITIDO _ DESACTI vl _ _ 5 K Si el botdn que toca no reacciona correctamente deberia calibrar el panel tfictil Para apagar la videockmara Cierre la pantalla de cristal liquido E1 indicador n Pelicula parpadea durante varios segundo y se apaga la videoc_imara Sugerencias Tambi _ pu...
Страница 448: ...cidn o edicidn en elsoporte seleccionado Sugerencias Consulte la pfigina 56 para conocer el tiempo de grabacidn de las peliculas Toque _ MENU _ Mostrar otros _ AJUSTES SOPORTE en la categoria _ GESTION SOPORTE _ AJ SOPORTE PEL Apareceni la pantalla AJ SOPORTE PEL Toque el soporte de grabaci6n deseado Toque S _ _ E1 soporte de grabaci6n se cambia Toque _ MENU _ Mostrar otros _ AJUSTES SOPORTE en la...
Страница 449: ... una MultiMediaCard En este manual tanto Memory Stick PRO Dud como Memory Stick PRO HG Dud reciben el nombre de Memory Stick PRO Dud Se garantiza el timcionamiento de tarjetas de memoria de hasta 32 GB con la videocfimara Tipos de Memory Stick que se pueden utilizar con la videockmara Para grabar pellculas so recomienda utilizar un Memory Stick PRO Duo de una capacidad de 512 MB o m_isde las marca...
Страница 450: ...ue se daflela tarjeta de memoria la ranura para tarjeta de memoria o los datos de imagen Notas Si aparece Error al crear un nuevo archivo de base de datos de im_igenes Es posible que no exista suficiente espacio libre toque _ MENU _ Mostrar otros _ FORMAT SOPORTE en la categorla Q _ GESTION SOPORTE _ TARI MEMORIA _ IS _ S _ _ para inicializar la tarjeta de memoria Para expulsar la tarjeta de memor...
Страница 451: ... o cuando reproduzca las imtlgenes cierre la tapa del objetivo Ajuste la correa de sujecidn d3 m o m _ o Abra la pantalla de cristal liquido de la videoc_mara La videoc_hnara se enciende Para encender la videoc_imara cuando la pantalla de cristal llquido est_i abierta presione POWER p_ig 12 Para alternar entre modos de grabaci6n presione MODE Presione MODE para que se encienda el indicador de acce...
Страница 452: ...roduccidn los iconos e indicadores del panel de cristal liqnido se muestran durante unos 3 segundo y luego desaparecen Para mostrar los iconos e indicadores de nuevo toque cualqnier parte de la pantalla de cristal liquido excepto los botones de grabacidn y zoom Botones de grabaci6n y zoom de la pantalla de cristal llquido I uno 3 E _7 segundo despu_s _ Notas Si cierra la pantalla de cristal liquid...
Страница 453: ...peliculas Para comprobar el tiempo yla capacidad de grabacidn restantes aproximados etc toque MENU _ Mostrar otros _ INFO SOPORTE en lacategorfa _ GESTION SOPORTE La pantalla de cristal llquido de la videocfimara puede mostrar imfigenes de grabacidn en toda la pantalla visualizacidn de pixeles completos Sin embargo esto puede ocasionar un leve recorte de los bordes superior infi rior derecho e izq...
Страница 454: ...ell 4 3 Presione PHOTO levemente para ajustar el enfoque y luego presi6nelo completamente Para grabar iotos tambi n puede tocar _ on la pantalla de cristal llquido ii ii ii ii ii ii ii ii ii i_ii _ Parpadea Se enciende Cuando IMII desaparece se graba la _bto Sugerencias Para cambiar el tamafio de la imagen toque _ MENU _ Mostrar otros _ _TAM IMAGEN en la categorla _ AJUST FOTO CAM _ el _ iuste des...
Страница 455: ...o la pantalla de cristal llquido est_iabierta presione POWER prig 12 Presione _ VISUALIZAR IMAGENES 3 Luego de unos segundo aparece la pantalla VISUAL INDEX Tambi a puede mostrar la pantalla VISUAL INDEX al tocar _ VISUALIZAR IMAGENES en la pantalla de cristal llquido Para reproducir una pelicula toque II 11 Pelicula _ la pelicula deseada Para vet una foto toque I_1 Foto _ _ la foto deseada Las pe...
Страница 456: ...uccidn desde la pelicula seleccionada llega a la dltima pelicula vuelve a mostrarse la pantalla VISUAL INDEX Toque I_ _11 durante la pausa para reproducir la pelicula a cfimara lenta Si sigue tocando m_l _lN _ durante la reproduccidn las peliculas se reproducen con un aumento de velocidad de aproximadamente 5 veces _ 10 veces _ 30 veces _ 60 veces Puede mostrar la pantalla VISUAL INDEX si toca _ M...
Страница 457: ...nada I Inicio detenci6n de presentaci6n de Anterim l I diapositivas I_1t1_ oo14 Siguiente Ir a la pantalla _ iilj _T_ I OPTION VISUAL INDEX Sugerencias Cuando visualiza fotos grabadas en una tarjeta de memoria aparece en la pantalla _ _ carpeta de reproduccidn g _3 ...
Страница 458: ...V con un cable S VIDEO se vende por separado se pueden producir im lgenes de mayor calidad que con un cable de conexidn de A V_ Conecte las clavijas blanca y roja audio izquierdo derecho y la clavija S VIDEO canal S VIDEO del cable de conexidn de A V con el cable S VIDEO se vende por separado La conexion de la clavija amarilla no es necesaria Si se conecta s61o la clavija de S VIDEO no habr l sali...
Страница 459: ...dora _ Notas Cuando conecte la videoctimara a un televisor compatible con el sistema ID 1 ID 2 ajuste TWO TV en 16 9 E1televisor cambia autom_iticamente al modo de pantalla completa Consulte tambi_n los manuales de instrucciones suministrados con el televisor Si ajusta TWO TV en 4 31 puede deteriorarse la calidad de imagen Asimismo cuando la relaci6n de aspecto de la imagen grabada cambia entre 16...
Страница 460: ...odas las imfigenes almacenadas en el soporte de grabacidn y recuperar todo el espacio disponible en el soporte fbrmatee el soporte Las im_igenes de tamafio reducido que pernfiten ver varias im_igenes al nfismo tiempo en una pantalla de indice se conocen como miniaturas _ 1Toque _ MENU _ Mostrar otros _ BORRAR en la categorfa _ EDIT Para eliminar pelfculas toque CIVIl BORRAR _ 1tl BORRAR Para elimi...
Страница 461: ... _BORRAR BORRAR p fi cha Toque m_ _ para seleccionar la fk cha de grabacidn de las peliculas fbtos que desee y a continuacidn toque I_ _ Toque laimagen en lapantalla de cristal llquido para confirmarla Toque paravoNer a lapantalla anterior Toque i1 _ _ C g _7 ...
Страница 462: ...ita una unidad de CD ROM para la instalacidn _ Se reqniere la instalacidn est_indar No se garantiza el flmcionamiento en un sistema operativo actualizado o en un entorno de arranque mfiltiple _2Las ediciones de 64 bits y Starter Edition no son compatibles Se reqniere Windows hnage Mastering API IMAPI versidn 2 0 para utilizar la funcidn de creacidn de discos o similar _ Starter Edition no es compa...
Страница 463: ...adora Aparecerti la pantalla de instalacidn Si la pantalla no aparece haga clic en Inicio _ Equipo en Windows XP Mi PC y a cnntinuacidn haga doble clic en SONYPMB E CD ROM _ _ Los nombres de las unidades como E pueden variar en funcidn de la computadora Haga clic en Instalaci6n Handycam Application Softwale Seleccione el pais o la regi6n Seleccione el idioma del programa que desea instalar y conti...
Страница 464: ...ng API versidn 2 0 para Windows XP Si a6n no se ha instalado Image Mastering API versidn 2 0 para Windows XP selecci6nelo desde los programas requeridos en la pantalla de instalaci6n y siga los siguientes procedimientos que se muestran para instalarlo La computadora debe estar conectada a Internet para realizar la instalacidn Puede instalar Image Mastering API versidn 2 0 para Windows XP como resp...
Страница 465: ...B 2 Creaci6n de un disco con un solo toque OneTouch Disc Burn Las peliculas y las fotos grabadas en la videoc_hnara que no se hayan guardado con la funci6n One Touch Disc Burn se pueden guardar autom_iticamente en un disco Instale en primer lugar PMB p_ig 28 sin embargo no inicie PMB _ Conecte la videoc_imara al tnmacorriente de pared mediante el adaptador de alimentaci6n de ca suministrado para r...
Страница 466: ... usando eladaptador de alimentacidn de ca suministrado para esta operacidn p_ig 10 Encienda la videoc_mara y con tela a la computadora mediante el cable USB suministrado 2 La pantalla SELEC USB aparece ell la pantalla de la videocthnara Toque en la pantalla de la videoc_mara el soporte de grabaci6n que contiene las im_genes que desea guardar _ CONEXION USB n_emoria interna _ CONEXION USB tarjeta d...
Страница 467: ...n la unidad de DVD Consulte la p_igina28 paraobtener intbrmacidn acerca de los discos que puede utilizar Si un softwareditbrente a PMB se inicia autom_iticamente ci relo Inicie PMB p_g 31 Haga clic en Calendario o ndice en el lateral izquierdo de la ventana y seleccione la fecha o la carpeta y a continuaci6n seleccione las peliculas Para seleccionarvarias pellculas mantenga presionada latecla Ctrl...
Страница 468: ...ayuda de Video Disc Copier Es posibl e _orta r las partes d e una pelictfla que se 0ns der_ necesafias Y guardarlas como un archivo separado Haga dobleclic en la peliculaque desea editar en IPMB y a c0ntinuaci6n hag a dicen Mostrar paleta de edici6n en el lateral dere o de 1a panta la Rec0rtar yideo oseleccioneel men_ Manipular _ Editar _ Rec0rtar video par a obtener mas detalles consulte i_yuda d...
Страница 469: ...ctimara Si el soporte externo se brmate6 con el sistema de archivos NTFS o similar fbrmat elo en la videoc_imara antes de utilizarlo Aparecer_i la pantalla de brmato cuando el soporte externo se conecte a la videoctimara No se asegura el funcionamiento con todos los dispositivos que satisI agan los requisitos de hncionamiento Conecte la videoc_imara al tomacorriente de pared mediante el adaptador ...
Страница 470: ...talla VISUAL INDEX cambian tal como se muestra en la siguiente ilustraci6n Puede hacer ajustes del mend de los soportes externos como por ejemplo eliminar im_igenes Toque _ MENU Mostrar otros en la pantalla VISUAL INDEX Para guardar las peliculas y fotos deseadas _ Notas No es posible buscar ni copiar btosgrabadas en una tarjeta de memoria pot fbcha de grabacidn _ Toque Reproducir sin copiar en el...
Страница 471: ...Desconecte el cable adaptador USB Creaci6n de un disco con una grabadora de DVD Es posible crear un disco o reproducir las im_igenes de un disco creado usando la grabadora de DVD especifica DVDirect Express sew nde por separado Consulte tambi n los manuales de instrucciones suministrados con la grabadora de DVD _ Notas Conecte la videoc_imara al tomacorriente de pared usando el adaptador de alimen...
Страница 472: ...lizar un disco con OPC GRAB DISCO Llew a cabo esta operacidn en los siguientes casos A1 copiar una imagen deseada A1 crear varias copias del mismo disco A1 copiar im_igenes en la tarjeta de memoria _ Toque OPC GRAB DISCO en el paso 4 _ Seleccione el soporte de grabaci6n que contiene las peliculas que desea guardar _ Toque la pelicula que desea grabar en el disco Aparece _ Capacidad restante del di...
Страница 473: ...nte antes de eliminar las pellculas de la videocfimara Si Se produjo un error o Error al ejecutar GRABAR EN DISCO aparecen en la pantalla inserte otro disco en la grabadora de DVD y repita la operacidn de DISC BURN Sugerencias Si el tamafio de memoria total de las pellculas que se van a grabar mediante la operacidn DISC BURN supera el tamaflo del disco la creacidn del disco se detendrfi al alcanza...
Страница 474: ...lla SELEC USB toque _ MENU _ Mostrar otros CONEXION USB en la categorla OTROS Toque en la pantalla de la videograbadora el soporte de grabaci6n que contiene las imagenes t_ CONEXION USB memoria interna _CONEXION USB tarjeta de menloria Puede copiar im_igenes reproducidas en la videoc_hnara en un disco o videocasete si conecta la videoc_hnara a una grabadora de discos una grabadora de DVD de Sony e...
Страница 475: ...i6n en el dispositivo de grabaci6n Si eldispositivo de grabacidn tiene un selector de entrada aj6stelo en elmodo de entrada Conecte la videocamara al dispositivo de grabaci6n grabadora de discos etc con un cable de conexi6n de A V suministrado o un cable de conexi6n de A V con SVlDEO se vende pot separado Conecte la videoc_imara a las tomas de entrada del dispositivo de grabacidn Amarillo Entrada ...
Страница 476: ...IGO DATOS el ajuste deseado _ _ _ _ B _ _ Ademfis toque MENU _ Mostrar otros AJUSTES SALIDAI en la categorla ff_ AJUSZ GENERALESD SALIDA PANT _ SAL V LCD _ _ _ _ _ _ Si el tamafio de pantalla de los dispositivos de visualizaci6n televisor etc es 4 3 toque MENU _ Mostrar otros AJUSTES SALIDA en la categoria _ AJUST GENERALES TIPO TV _ 4 3 Si conecta la videoc_imara a un dispositivo monoaural introd...
Страница 477: ... GESTION SOPORTE Elementos para los soportes de grabaci6n p6g 48 AJUST GENERALES Otros elementos de la configuraci6n p6g 48 Los elementos de menfl se describen detalladamente en la Guia pr_ictica de Handycam _ _ la lista del lnenfi se mueve de categoria a categoria _ la lista del menti se muew de a 4 elementos al mismo tiempo Puede tocar los botones y arrastrar la pantalla para desplazarse pot la ...
Страница 478: ...dn y el modo de grabacidn pelicula fbto Es posible utilizar los elementos de lnenu ln_s fScilmente si registra los elementos de lnenu que utiliza con m_is frecuencia ell MI MENI Es posible registrar 6 elementos de lnenu ell cada MI MENI2 de PELICULA FOTO y REPRODUCCION Ejemplo anular MED ENF PUNTO y registrar EtIDESVANECEDOR _ A JUSTMANU L_S _i777iii_iii_i_ 7771 _ Toque _ MENU Toque AJUSTE MI MENI...
Страница 479: ...ra que aparezcan los elementos de menti que es posible cambiar en el contexto Elemento de menfi Ficha _ Toque _ OPTION Toque la ficha deseada el elemento cuyo ajuste desea cambiar Cuando finalice el ajuste toque RT _ _ Notas Los elementos de menfi o ajustes atenuados no est_in disponibles Si el elemento que desea no aparece en la pantalla toque otra ficha Es posible que no haya ninguna ficha Las f...
Страница 480: ...esttl en posicidn horizontal o vertical g NSTEADYSHOT Permite ajustar la Ihncidn SteadyBhot cuando se graban peliculas OBJETIVO CONVER Permite _ justar el tipo de objetivo de conversidn instalado se vende por separado Permite optimizar la hmcidn BteadyShot y realizar el enIbque en flmcidn del objetivo colocado LOW LUX Permite grabar iimlgenes de color brillantes en condiciones de escasa lmninosida...
Страница 481: ...R Permite DIVI DI R Permite TOMA FOTOGR_ F Permite COPIA PEL CULA COPIA por seleccidn Permite COPIA por fecha Permite COPIA DE TODO Permite COPIAR FOTO COPIAR por selec Permite COPIAR por fecha Pennite EDICION PLAYLIST II llAIqADIR Permite AIqADIR p fecha Permite playlist BORRAR Permite BORRAR TODO Permite MOVER Permite Categoria _ OTROS CONEXION USB eliminar peliculas eliminar iotos proteger las ...
Страница 482: ...ite ajustar si el sonido de luncionamiento emite un pitido o no BRILLOLCD Permite ajustar el brillo de la pantalla de cristal liquido NIVLUZ LCD Permite ajustar la luz de fbndo de la pantalla de cristal liquido COLOR LCD Permite ajustar la intensidad del color de la pantalla de cristal liquido AJUSTE PANTALLA Permite ajustar la duracidn de la visualizaci6n de los iconos o indicadores en la pantall...
Страница 483: ...lo de la videoc_mara y a continuaci6n haga clic en Guia pr_ctica de Handycam PDF E1nombre del modelode lavideoc_imara se encuentra impreso en la superficie infi riorde esta Haga clic en Salir _ Salir y a continuaci6n extraiga el CD ROM de la computadora Para ver la Guia pr_ictica de Handycam haga done clic en el icono de acceso directo en la pantalla de la computadora Cuando utilice un Macintosh a...
Страница 484: ...prfictica de Handycam Dig 49 para obtener infbrmacidn sobre los problemas de la videoc_imara y la Ayuda de PMB Dig 31 para obtener infbrmacidn sobre la conexi6n de la videoc_imara a una computadora La videoc_mara no se enciende Instale una bateria cargada en la videocfimara Dig 9 Conecte la clavija del adaptador de alilnentacidn de ca al tomacorriente de pared p_ig 10 La videoc_mara no funciona au...
Страница 485: ...ciela co nputadora La computadora no reconoce la videoc mara Desconecte cuak uier dispositivo de a toma USB de la computadora excepto el teclado el ratdn y la videocimmra Desconecte el cable USB de la computadora y de la videocfimara reinicie la computadora y a continuaci6n conecte de nuevo la computadora con la videocfimara de la manera apropiada Si en la pantalla de cristal liquido aparecen indi...
Страница 486: ...strar otrosl REP ARCH BD IM I en la categoria _ i GESTION SOPORTE _ el soporte de grabaci6n La tarjeta de memoria estri daflada Formatee la tarjeta de memoria con la videocrilnara prig 48 Se insert6 una tarjeta de meinoria incompatible prig 15 _ O _ Se restringi6 el acceso a la tarjeta de memoria en otto dispositivo La videocrimara se encuentra en una posicidn inestable St tela firmemente con amba...
Страница 487: ...nte y exponerla a golpes o impactos como martillazos caldas o pisotones Sea especialmente cuidadoso con el objetivo Cuando no utilice la videocfimara mant_ngala apagada No utilice la videoctlmara envuelta en una toalla por ejemplo Si lo hace puede recalentarse internamente Cuando desconecte el cable de alimentaci6n tire del enchulb y nunca del cable Procure no daflar el cable de alimentacidn al co...
Страница 488: ...nstalada La bateria recargable se descargartl completamente transcurridos aproximadamente 3 meses si no utiliza la videocfimara en absoluto Utilice la videocfimara despu s de cargar la bateria recargable preinstalada Sin embargo aunque no est_ cargada el funcionamiento de la videocfimara no se verfi afi ctado siempre qne no se est grabando la f_ cha Procedimientos Conecte la videoctlmara a un toma...
Страница 489: ...cuando LOW LUX est_i ajustado en ACTIVADO velocidad de obturaci6n 1 30 de segundo _La exclusiva matriz de pixeles del sensor ClearVid de Sony y el sistema de procesamiento de imfigenes BIONZ permiten una resoluci6n para las imfigenes fijas eqnivalente a los tamarios descritos _2 gZ_STEADYSHOT estfi ajustado en ESTA NDAR o DESACTI_ 3Los valores correspondientes a la distancia fbcal son cii as reale...
Страница 490: ...as condiciones de grabacidn y del motivo g _ MODO GRAB Condiciones de grabacidn modo de grabacidn ajustado en SPI E1tiempo de grabacidn normal indica el tiempo de grabaci6n al repetir las operaciones de inicio parada al cambiar el indicador MODE y al utilizar el zoom Tiempo de grabaci6n previsto para peliculas en el soporte de grabaci6n interno en minuto Para _ justar el modo de grabacidn toque ME...
Страница 491: ...colnerciales registradas o marcas comerciales de Microsoft Corporation en los Estados Unidos y o en otros paises Macintosh y Mac OS son marcas comerciales registradas de Apple Inc en los EE UU y en otros paises Intel Intel Core y Pentium son marcas comerciales o marcas comerciales registradas de Intel Corporation o sus subsidiarias en los Estados Unidos y en otros paises Adobe el logotipo de Adobe...
Страница 492: ...idn reproduccion edicidn 0 00 00 Contador hora minuto segundo 00min Tiempo de grabacion restante previsto _UND FUND 8L_NCO NEaRO DESVANECEDOR 9999 I_1 _ N0mero aproximado de fotos que puede grabar y 9999 I_1 Z_ soporte de grabaci6n _ Carpeta de reproduccidn de la tarjeta de memoria Pellcula o foto en 100 112 reproducci6n nfimero total de peliculas o fotos grabadas Parte inferior c g DETECCION CARA...
Страница 493: ...os indicadores no _g_arezcan Los ntimeros entre corresponden alas ptiginas de refk rencia _Objetivo objetivo Carl Zeiss _ Interruptor LENS COVER Micr6fono incorporado _ Pantalla de cristal liquido panel tkctil Si gira el panel de cristal llquido 180 grados podr_ l cerrarlo con la pantalla de cristal lfquido mirando hacia fuera Este procedimiento resuha adecuado para las operaciones de reproducci6n...
Страница 494: ...ot6n PHOTO 20 Bateria Bot6n START STOP 18 Toma DC IN 9 Conector remoto de A V 24 Indicador CHG carga 9 Correa de sujeci6n 17 Ranura de tarjeta de memoria 15 Palanca BATT liberaci6n de la bateria 10 Indicador de acceso tarjeta de memoria 15 Cuando e indicador est_iencendido o parpadea a videoc_ mmraest_igrabando o eyendo datos Receptaculo de tripode Co oque un tripode sevende pot separado en e rece...
Страница 495: ...d 12 Especificaciones 55 FECHA HORA 13 Flujo de operacidn 6 Fotos 20 21 Grabaci6n 18 Grabadora de discos 40 Grabadora de DVD 37 39 Guia imictica de Handycam 49 Indicadores de advertencia 51 Indicadores de la pantalla 58 Instalaci6n 28 Macintosh 28 Mantenimiento 53 Memoria interna 14 Memory Stick 15 Memory Stick PRO Duo 15 Memory Stick PRO HG Duo Menfis 43 46 MI MENI 43 Miniatura 26 One Touch Disc ...
Страница 496: ... Customer Support Website Puede encontrar m_isinibmlaci6n sobre este producto y respuestas alas preguntas m_isfrecuentes en nuestro sitio Web de atenci6n alcliente htt p www so ny net Printed on 70 or more recycled paper Impreso en papel reciclado en un 70 o mas Printed in China IIIIIIIIIII 4171513110 ...