6-11
DCR-SR32E/SR33E/SR42/SR42A/SR42E/SR52E/SR62/SR62E/SR72E/SR82/SR82C/SR82E_ADJ
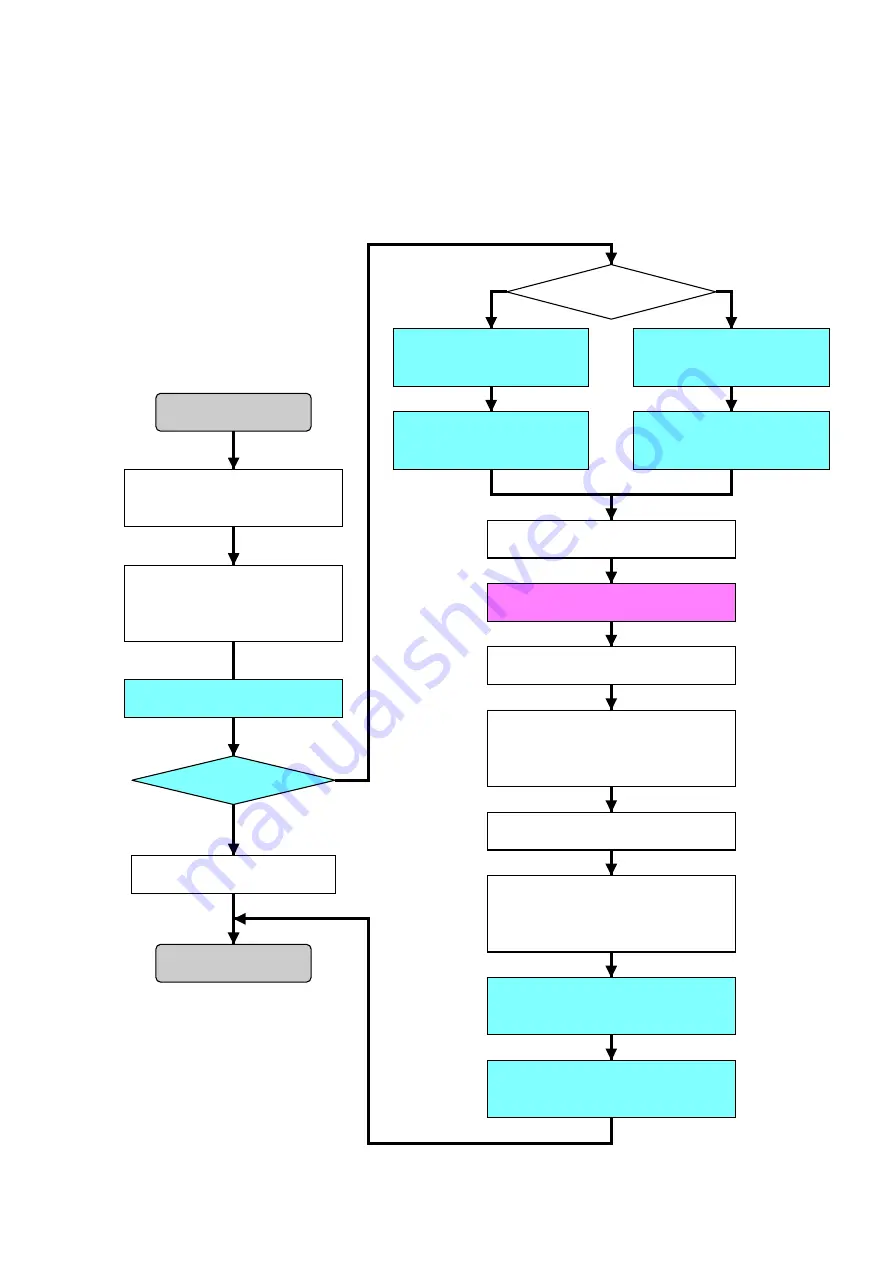
Message is checked.
When message is
“No Error”
When message is
“Error Detected”
Is replacement HDD new one?
No
Reused HDD
Yes
New HDD
Connect the camcorder to the PC
with a USB cable, and turn on the
power switch.
Turn off the power of camcorder.
Turn off the power and turn on again.
Turning on the power of camcorder
will start automatic Factory Check.
Wait until Factory Check completed. (Note)
[EST. PROCESS TIME]
Default: 6 min.
Full:
1 hour 58 min.
Replace the HDD.
The USB SELECT menu will appear
on the LCD screen of the camcorder,
and the select “COMPUTER” to
establish the connection.
“Manegement file damaged.
Create new file?” will appear
on the LCD screen of the camcorder,
and the select [YES].
Execte the “CheckHDDError.vbe”.
(Double-click the file.)
Execte the
“SetFactoryCheckDefault.vbe”.
(Double-click the file.)
Wait until “JOB Success”
message is displayed.
(several seconds)
Wait until “JOB Success”
message is displayed.
(several seconds)
Wait until “JOB Success”
message is displayed.
(several seconds)
Execte the
“SetFactoryCheckFull.vbe”.
(Double-click the file.)
Execte the
“ExecAfterFactoryCheck.vbe”.
(Double-click the file.)
Replacing the HDD is unneccessary.
Start
End
1.
HDD Replacement Procedure
Note:
During the execution of Factory Check, the LCD screen of
the camcorder becomes gray.
When the Factory Check finished, the LCD screen changes
as follows:
When Factory Check is OK: Camera image display
When Factory Check is NG: Blue display


