background image

Recor

d

ing

Recording

29

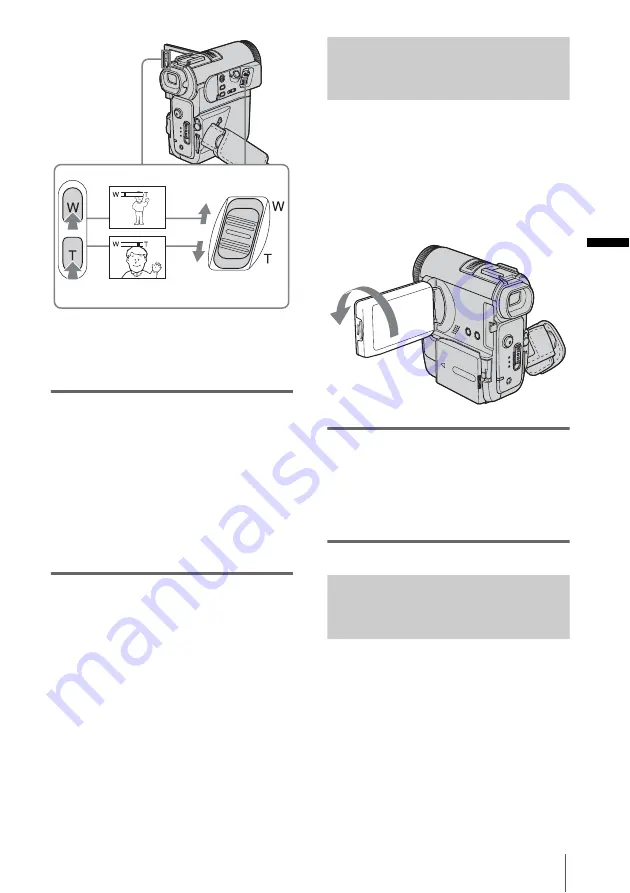
Move the power zoom lever slightly for a 
slower zoom. Move it further for a faster 
zoom.

To record wider range of view

Move the power zoom lever towards W.
The subject appears farther away (Wide 
angle).

To record closer view

Move the power zoom lever towards T.
The subject appears closer (Telephoto).

To use the zoom buttons on LCD frame

Keep W pressed to record wider range of view, 
and keep T pressed to record closer view.

b

Note

• You cannot change the zoom speed with the zoom 

buttons on LCD frame.

• To press the zoom buttons on LCD frame, support 

the LCD panel with your hand.

Recording in mirror mode

You can turn the LCD panel towards the 
subject so that you and your subject can share 
the image being recorded. You can also 
utilize this function when recording yourself, 
to keep the attention of small children 
attracted to the camcorder while you record 
them.

Open the LCD panel 90 degrees to the 
camcorder, then rotate it 180 degrees 
towards the subject.

A mirror-image of the subject appears on the 
LCD screen, but the picture will be normal 
when recorded.

Using the self-timer

With the self-timer, you can start recording 
after a delay of about 10 seconds.

1 cm (approx. 1/2 inch)

*

80 cm (approx. 2 5/8 feet)

*

* The minimum distance required between your 

camcorder and the subject to get a sharp focus in 
that position of the lever.

,

continued

Содержание DCR-PC350 - Digital Handycam Camcorder

Страница 1: ...2 050 779 11 1 2004 Sony Corporation Camera Operations Guide US Camera Operations Guide Read this first Digital Video Camera Recorder DCR PC350 ...

Страница 2: ...ontinue midway fail restart the application or disconnect and connect the USB cable again For customers in the U S A and CANADA RECYCLING LITHIUM ION BATTERIES Lithium Ion batteries are recyclable You can help preserve our environment by returning your used rechargeable batteries to the collection and recycling location nearest you For more information regarding recycling of rechargeable batteries...

Страница 3: ...t different from that to which the receiver is connected Consult the dealer or an experienced radio TV technician for help The supplied interface cable must be used with the equipment in order to comply with the limits for a digital device pursuant to Subpart B of Part 15 of FCC Rules Notes on use Note on Cassette Memory Your camcorder is based on the DV format You can use only mini DV cassettes i...

Страница 4: ...or plug forcibly in the wrong direction the terminal may be damaged or this may cause a malfunction of your camcorder Notes on using this manual The images of the LCD screen and the viewfinder used on this manual are captured using a digital still camera and thus may appear different from what you see The on screen displays in each local language are used in illustrating the operating procedures C...

Страница 5: ...r from the Handycam Station hold both the DC plug and the Handycam Station and disconnect the AC Adaptor Be sure to turn the power of your camcorder off before inserting it into or removing it from the Handycam Station Your camcorder may not attach properly to the Handycam Station if the camcorder s DC IN jack cover is open or the Strap Belt is caught between your camcorder and the Handycam Statio...

Страница 6: ... Inserting a cassette tape 22 Inserting a Memory Stick Duo 23 Step 7 Setting the screen language 24 Recording Recording movies 26 Recording for a longer time 28 Using zoom 28 Recording in mirror mode 29 Using the self timer 29 Recording movies fit for breaking into still images Progressive recording mode 30 Recording still images Memory photo recording 31 Selecting image quality or size 33 Using t...

Страница 7: ...ent recording END SEARCH 48 Searching manually EDIT SEARCH 48 Reviewing the most recently recorded scenes Rec review 49 Playback Viewing movies recorded on a tape 50 Playing back in various modes 51 Viewing recordings with added effects Digital effect 52 Viewing recordings on a Memory Stick Duo 53 Playing back in various modes from a Memory Stick Duo 54 Playing back with ease Easy Handycam 55 Maki...

Страница 8: ...U menu CLOCK SET WORLD TIME etc 89 Customizing Personal Menu 90 Dubbing Editing Connecting to a VCR or TV 93 Dubbing to another tape 94 Recording pictures from a VCR or TV 95 Dubbing pictures from a tape to a Memory Stick Duo 96 Dubbing still images from a Memory Stick Duo to a tape 97 Dubbing selected scenes from a tape Digital program editing 98 Dubbing sound to a recorded tape 105 Deleting reco...

Страница 9: ... 128 About the InfoLITHIUM battery pack 130 About i LINK 132 Maintenance and precautions 133 Specification 136 Quick Reference Identifying parts and controls 139 Index 147 Refer also to other operating instructions supplied with your camcorder Editing images with your computer cComputer Applications Guide ...

Страница 10: ...rection of 3 b Attach the battery pack with its terminal side facing your camcorder as shown in the illustration and press down the battery pack until it clicks a Slide the OPEN EJECT lever in the direction of the arrow to open the lid The cassette compartment automatically comes out and opens up b Insert the cassette with its window side facing up then push the center of the back of the cassette ...

Страница 11: ...pen the LCD panel c While pressing the green button slide the POWER switch down to light up the CAMERA TAPE lamp The power turns on d Press REC START STOP Recording starts To change to standby mode press REC START STOP again You can also use REC START STOP of the LCD panel a Slide the POWER switch repeatedly until the PLAY EDIT lamp lights up b Touch rewind c Touch play to start the playback To st...

Страница 12: ...ase lever in the direction of 1 and push it down in the direction of 2 Remove the battery terminal cover when it lifts up in the direction of 3 b Attach the battery pack with its terminal side facing your camcorder as shown in the illustration and press down the battery pack until it clicks Insert it so that the B mark is at the upper right corner Push in until it clicks BATT battery release lever...

Страница 13: ... button slide the POWER switch repeatedly until the CAMERA MEMORY lamp lights up The power turns on d Press PHOTO lightly A short beep sound is heard when the focus is adjusted e Press PHOTO fully A shutter sound is heard and the still image is recorded on a Memory Stick Duo a Slide the POWER switch repeatedly until the PLAY EDIT lamp lights up b Touch The most recently recorded image is displayed...

Страница 14: ... allows easy recording playback for even first time users by providing only the basic functions for recording playback For details see instructions for each operation See page 36 for recording page 55 for playback Press EASY when recording playing back EASY lights up in blue 1 and screen font size increases 2 during Easy Handycam operation Easy Handycam operation ON ...

Страница 15: ... a Memory Stick Duo you can use a Memory Stick Duo with any of the devices compatible with a standard Memory Stick AC Adaptor 1 Power cord 1 Lens cap 1 Attached to the camcorder Handycam Station 1 Wireless Remote Commander 1 A button type lithium battery is already installed A V connecting cable 1 USB cable 1 Shoulder Strap 1 Rechargeable battery pack NP FF51 1 If your camcorder is silver the batt...

Страница 16: ... 1 Attach the charged battery pack to the camcorder 1 Slide the BATT battery release lever in the direction of 1 and push it down in the direction of 2 Remove the battery terminal cover when it lifts up in the direction of 3 2 Attach the battery pack with its terminal side facing your camcorder as shown in the following illustration and press down the battery pack until it clicks 2 With the v mark...

Страница 17: ...the DC IN jack To remove the battery pack 1 Set the POWER switch to OFF CHG 2 Slide the BATT battery release lever in the direction of 1 and push it down in the direction of 2 Remove the battery pack when it lifts up in the direction of 3 b Note Be careful not to drop the battery pack when you remove the battery pack if your camcorder is in a vertical state Always attach the terminal cover to prot...

Страница 18: ...7 F With LCD BACKLIGHT set to ON With LCD BACKLIGHT set to OFF Recording time when recording with the viewfinder Approximate number of minutes available when you use a fully charged battery pack at 25 C 77 F Approximate number of minutes when recording while you repeatedly record start stop slide the POWER switch to change the power mode and zoom The actual battery life may be shorter Playing time...

Страница 19: ...an use the AC Adaptor as the power source when you do not want the battery to run out While you are using the AC Adaptor the battery pack will not lose its charge even when it is attached to your camcorder PRECAUTION Even if your camcorder is turned off AC power house current is still supplied to it while connected to the wall outlet via the AC Adaptor Connect your camcorder as shown in Charging t...

Страница 20: ...ry pack for power source you can adjust the brightness by selecting LCD BL LEVEL from the LCD VF SET on the STANDARD SET menu p 85 When you use your camcorder in bright conditions press LCD BACKLIGHT to switch off the LCD screen backlight appears on the screen This setting saves battery power Even if you adjust the LCD screen backlight the recorded picture will not be affected You can turn off the...

Страница 21: ...ouch z Tip To adjust the brightness of the viewfinder backlight select STANDARD SET menu LCD VF SET then VF B LIGHT when you are using the battery pack p 85 Step 5 Setting the date and time Set the date and time when using this camcorder for the first time If you do not set the date and time the CLOCK SET screen appears every time you turn on your camcorder b Note If you do not use your camcorder ...

Страница 22: ...tails on these cassettes such as write protection see page 127 b Note Do not force the cassette into the compartment This may cause a malfunction of your camcorder 1 Slide the OPEN EJECT lever in the direction of the arrow and open the lid The cassette compartment automatically comes out and opens up 2 Insert a cassette with its window side facing up OK 60min PROGRAM AE CAMERA SET SPOT METER EXPOS...

Страница 23: ...ry Stick Duo For details on the Memory Stick Duo such as write protection see page 128 b Note You can use only a Memory Stick Duo which is about half the size of a standard Memory Stick in your camcorder p 128 Do not try to force any other type of Memory Stick into the Memory Stick Duo slot Insert the Memory Stick Duo with the B mark at the upper right corner until it clicks To eject a Memory Stic...

Страница 24: ...Memory Stick Duo Do not shake or knock your camcorder turn the power off eject the Memory Stick Duo or remove the battery pack Otherwise image data may be damaged Step 7 Setting the screen language You can select the language to be used on the LCD screen 1 Turn on your camcorder 2 Open the LCD panel 3 Touch 4 Touch LANGUAGE If the item is not displayed on the screen touch If you cannot find it tou...

Страница 25: ...Getting started Getting started 25 5 Select the desired language with then touch z Tip Your camcorder offers ENG SIMP simplified English for when you cannot find your native tongue among the options ...

Страница 26: ...TAPE lamp lights up and your camcorder is set to the standby mode To record on a Memory Stick Duo MPEG MOVIE EX Slide the POWER switch repeatedly until the CAMERA MEMORY lamp lights up and the currently selected recording folder appears on the screen 4 Press REC START STOP Recording starts REC appears on the LCD screen and the camera recording lamp lights up Press REC START STOP again to stop reco...

Страница 27: ...older B Approximate remaining battery and continuous recording time The indicated time may not be correct depending on the environment of use When you opened or closed the LCD panel it takes about 1 minute to display the correct remaining battery time C Recording status REC recording D Movie size E Recorded time hour minute second F Recording capacity of the Memory Stick Duo G Memory Stick Duo rec...

Страница 28: ...on the recording media without being displayed on the screen You can view this information during playback by selecting DATA CODE in the menu setting p 58 Recording for a longer time To record for a longer time on a tape In the STANDARD SET menu select REC MODE then LP p 84 In the LP mode you can record 1 5 times longer than you can when recording in the SP mode A tape recorded in the LP mode shou...

Страница 29: ...nel with your hand Recording in mirror mode You can turn the LCD panel towards the subject so that you and your subject can share the image being recorded You can also utilize this function when recording yourself to keep the attention of small children attracted to the camcorder while you record them Open the LCD panel 90 degrees to the camcorder then rotate it 180 degrees towards the subject A m...

Страница 30: ...Recording movies fit for breaking into still images Progressive recording mode This feature is useful for movies you intend to import to your computer to produce still images You can record pictures with less blurring than recording in the normal mode producing pictures suitable for analyzing high speed action such as sports To enjoy as a movie it is better to record the picture in the normal mode...

Страница 31: ...d with all the pixels A picture recorded in this mode appears clearer but a moving subject may appear awkward b Note When recording in the progressive recording mode under fluorescent light or a light bulb the screen may flicker This is not a malfunction You cannot use the progressive recording mode with 16 9 WIDE mode CINEMA EFECT of Digital effect Recording still images Memory photo recording Yo...

Страница 32: ...cordstill images continuously Burst Select the MEMORY SET menu STILL SET then BURST p 71 You can record 3 to 32 images continuously in a time interval of about 0 5 to 0 07 seconds Indicators displayed during recording A Recording folder B Image size 2016 1512 1600 1200 or 640 480 C Quality FINE or STANDARD D Personal Menu button p 63 E Review button p 32 z Tip When you press PHOTO on your Remote C...

Страница 33: ...sh The recommended distance to the subject when using the built in flash is 0 3 to 2 5 m 1 to 8 feet Your camcorder is set to auto flashing by default so according to the lighting conditions the flash may be automatically activated when you press PHOTO Follow the steps below when you always want to use the flash or when you do not want to use the flash at all The available settings vary according ...

Страница 34: ...lickers while charging and remains lit when the battery charge is complete In the CAMERA TAPE mode it takes a while to fully charge the flash lamp since it charges its battery The flash will not work during the following operations Super NightShot function Color Slow Shutter function Digital effect Progressive recording mode Burst Tape recording 16 9 WIDE mode Even if auto flashing or Auto red eye...

Страница 35: ... z Tip The image size is set to 640 480 If you want to record a still image in a different size use the Memory photo recording function p 31 Press PHOTO fully during tape recording To record still images in standby mode Press and hold PHOTO lightly Check the image and press it fully b Note You cannot record a still image on a Memory Stick Duo during the following operations 16 9 WIDE mode Progress...

Страница 36: ...ve the lens cap Pull the lens cap string down and attach it to the Strap Belt 2 Open the LCD panel 3 Slide the POWER switch until the CAMERA TAPE lamp lights up 4 Press EASY The EASY lights up in blue 5 Press REC START STOP Recording starts REC appears on the LCD screen and the camera recording lamp lights up Press REC START STOP again to stop recording To turn the power off Slide the POWER switch...

Страница 37: ... adjusted Recording does not start at this point The number of images that can be recorded varies depending on the recording environment 6 Press PHOTO fully A shutter sound is heard When bars of disappear the image is recorded on the Memory Stick Duo To turn the power off Slide the POWER switch up to the OFF CHG position To cancel Easy Handycam operation Press EASY again b Note You cannot turn Eas...

Страница 38: ...ting down for about 10 seconds When the bars of disappear the image is recorded on the Memory Stick Duo Adjusting the exposure The exposure is adjusted automatically in the default setting Adjusting the exposure for backlit subjects When your subject has its back to the sun or other light you can adjust the exposure to prevent the subject from becoming shadowed Press BACK LIGHT during recording or...

Страница 39: ... step 3 Or set EXPOSURE to AUTO p 39 b Note You cannot use the Flexible spot meter together with NightShot function Super NightShot function Color Slow Shutter function If you set PROGRAM AE SPOT METER is automatically set to AUTO z Tip If you set SPOT METER EXPOSURE is automatically set to MANUAL Adjusting the exposure manually You can fix the brightness of a picture at the best exposure When rec...

Страница 40: ...ing with the NightShot Super NightShot or Color Slow Shutter function The Color Slow Shutter function enables you to record in color Set the NIGHTSHOT switch to ON and NIGHTSHOT appear To cancel NightShot set the NIGHTSHOT switch to OFF To record clearer pictures on the tape Super NightShot The picture will be recorded at a maximum of 16 times the sensitivity of NightShot recording 1 Slide the POW...

Страница 41: ...on Digital effect You cannot use the Color Slow Shutter function together with PROGRAM AE Manual exposure Flexible spot meter When using the Super NightShot or Color Slow Shutter function the shutter speed of your camcorder changes depending on the brightness The motion of the picture may slow down at this time Adjust the focus manually when it is hard to focus automatically Do not cover the infra...

Страница 42: ...er 9 changes to when the focus cannot be adjusted any closer Tips for focusing manually It is easier to focus on the subject when you use the zoom function Move the power zoom lever towards T telephoto to adjust the focus and then towards W wide angle to adjust the zoom for recording When you want to record a close up image of a subject move the power zoom lever towards W wide angle to fully magni...

Страница 43: ... fade in only DOT FADER fade in only 1 Slide the POWER switch to select the CAMERA TAPE mode 2 Touch in the standby mode to fade in or during recording to fade out 3 Touch FADER If the item is not displayed on the screen touch If you cannot find it touch MENU and select it from the PICT APPLI menu 4 Touch the desired effect then touch When you touch OVERLAP WIPE or DOT FADER the image on the tape ...

Страница 44: ...en OVERLAP by touching and The recorded image appears on the thumbnail screen 6 Touch previous next to select the still image to be superimposed 7 Touch ON then 8 Touch 9 Press REC START STOP to start recording M OVRLAP stops flashing and disappears when fading is finished Using special effects Digital effect You can add digital effects to the recordings CINEMA EFECT Cinematic Effect You can add a...

Страница 45: ...ipod to steady the camcorder 5 Touch appears To cancel Digital effect Follow steps 2 and 3 then select OFF in step 4 b Note You cannot use Digital effect together with Super NightShot function Color Slow Shutter function FADER function Memory overlap MEMORY MIX function You cannot use the following effects when PROGRAM AE is anything other than AUTO CINEMA EFECT SLOW SHUTTR OLD MOVIE You cannot us...

Страница 46: ...you have already finished recording MTCAM LUMI Memory Luminance key You can swap the brighter white area of a still image into a movie To use this function have a still image of an illustration or title handwritten on white paper recorded on a Memory Stick Duo beforehand CAMTM CHROMA Camera Chroma key You can superimpose a movie on top of a still image such as an image which can be used as backgro...

Страница 47: ...ch is to be swapped into a movie 8 Touch twice appears 9 Start recording When you are recording on a tape Press REC START STOP When you are recording on a Memory Stick Duo Press PHOTO fully To cancel MEMORY MIX Follow steps 3 and 4 then touch OFF in step 5 b Note When the overlapping still image has a large amount of white the image in the thumbnail screen may not be clear When you use the MEMORY ...

Страница 48: ... played back for about 5 seconds and the camcorder enters the standby mode at the point where the last recording has finished To cancel the operation Touch CANCEL b Note The END SEARCH function will not work correctly when there is a blank section between recorded sections on the tape z Tip You can do this operation by selecting END SEARCH in the menu setting When the PLAY EDIT mode is selected yo...

Страница 49: ...st recently recorded scenes Rec review You can view a few seconds of the scene recorded just before you stopped the tape 1 Slide the POWER switch repeatedly to select the CAMERA TAPE mode 2 Touch 3 Touch once The last few seconds of the most recently recorded scene are played back Then your camcorder is set to the standby mode 0 00 00 STBY 60min EDIT ...

Страница 50: ...want to view 4 Touch play to start playback To adjust the volume 1 Touch 2 Touch VOLUME If the item is not displayed on the screen touch If you cannot find it touch MENU and select it from the STANDARD SET menu 3 Adjust the volume by touching decrease increase then touch To stop playback Touch stop To pause Touch pause during playback Touch it again to restart the playback Playback stops automatic...

Страница 51: ...ewinding release the button To play back in various modes You will not hear the recorded sound Also you may see mosaic like images of the previously played picture remaining on the screen 1 During playback or playback pause touch 2 Touch VAR SPD PB If the item is not displayed on the screen touch If you cannot find it touch MENU and select it from the EDIT PLAY menu 3 Select a playback mode To ret...

Страница 52: ...ing and touch 5 Select an effect then adjust the effect by touching decrease increase 6 Touch twice then appears To cancel Digital effect Follow steps 2 to 4 then select OFF in step 5 b Note You cannot add effects to externally input pictures Also you cannot output pictures edited with Digital effects via the DV Interface z Tip You cannot copy a picture played back with effects added to a tape wit...

Страница 53: ...the screen 4 Touch previous next to select a picture When you view a movie touch when the selected movie appears on the screen To adjust the volume of movies 1 Touch 2 Touch VOLUME If the item is not displayed on the screen touch If you cannot find it touch MENU and select it from the STANDARD SET menu 3 Adjust the volume by touching decrease increase then touch To stop or pause movies Touch Touch...

Страница 54: ... on a computer renamed folders and modified pictures may not appear on the screen While playing back movies on a Memory Stick Duo the only menu items available will be those with short cuts on the Personal Menu In order to use other menu items add them to the Personal Menu p 90 z Tip Once you record a picture in a folder the same folder will be set as the default folder for playback You can select...

Страница 55: ...y the basic functions for playback Also screen font size increases for easy viewing Make sure you have a recorded cassette or a recorded Memory Stick Duo inserted into your camcorder 1 Open the LCD panel 2 Slide the POWER switch repeatedly to select the PLAY EDIT mode 3 Press EASY The EASY lights up in blue 4 Play back pictures When playing back on a tape The following buttons can be operated 101 ...

Страница 56: ...e menu items are displayed on the screen 2 Touch the desired item 3 Select the desired setting For CLOCK SET 1 Set Y year with then touch 2 Set M month D day hour and minutes in the same way as Y year then touch For LANGUAGE Select the desired language with then touch For BEEP See page 87 For VOLUME Adjust the volume by touching decrease increase then touch For DATA CODE During playback you can vi...

Страница 57: ...nal size and centered at the point you touched on the screen When you touch another place the point you touched becomes the center 6 Adjust the zoom ratio using the power zoom lever You can select the zoom ratio from approximately 1 1 to 5 times the original size Move the power zoom lever towards W to decrease or towards T to increase the ratio To cancel the operation Touch END b Note Pictures edi...

Страница 58: ...MERA DATA that are automatically recorded while recording pictures on a tape or a Memory Stick Duo 1 Slide the POWER switch repeatedly to select the PLAY EDIT mode 2 Touch during playback or playback pause 3 Touch DATA CODE If the item is not displayed on the screen touch If you cannot find it touch MENU and select it from the STANDARD SET menu 4 Select CAMERA DATA or DATE TIME then touch To hide ...

Страница 59: ...Appears only during tape playback b Note Camera setting data do not appear when movies on a Memory Stick Duo are played back z Tip Exposure adjustment value 0EV appears when a Memory Stick Duo is played back appears for the picture recorded using the flash ...

Страница 60: ...ll not be output when you connect with the S video plug alone When your TV is connected to a VCR Connect your camcorder to the LINE IN input on the VCR using the A V connecting cable Set the input selector on the VCR to LINE When your TV is monaural When your TV has only one audio input jack Connect the yellow plug of the A V connecting cable to the video input jack and connect the white or the re...

Страница 61: ...Y The playback starts from the point designated 0 00 00 on the tape counter To cancel the operation Press ZERO SET MEMORY on the Remote Commander again b Note There may be a discrepancy of several seconds between the time code and the tape counter Zero set memory will not function correctly if there is a blank section between recorded sections on the tape Searching for a scene using Cassette Memor...

Страница 62: ... your cassette has Cassette Memory you can select the recording date itself When your cassette does not have Cassette Memory you can select the previous or the next date of the present point on the tape Playback starts automatically from the point where the date changes To cancel the operation Press STOP on the Remote Commander b Note If one day s recording is less than 2 minutes your camcorder ma...

Страница 63: ...the desired item with then touch You can also touch the item directly to select it You can scroll and see all items The available items vary depending on the power mode of your camcorder Unavailable items will be grayed out 6 Select the desired setting changes to If you decide not to change the setting touch to return to the previous screen POWER switch 1 3 0 00 00 00 60min MENU VOLUME END SEARCH ...

Страница 64: ...der Unavailable items will be grayed out You can customize the short cuts p 90 1 Touch 2 Touch the desired item 3 Select the desired setting then touch z Tip When the PLAY EDIT mode is selected touch on the screen displayed after step 2 p 63 to display the video operation screen Touch to return to the previous screen It is convenient if the items you often use appear as short cuts on the Personal ...

Страница 65: ... AE SPOTLIGHT spotlight Select to prevent people s faces from appearing excessively white when subjects are lit by strong light such as in a theater or at a wedding PORTRAIT soft portrait Select to bring out the subject such as people or flowers while creating a soft background SPORTS sports lesson Select to minimize shake when shooting fast moving subjects such as in tennis or golf BEACH SKI beac...

Страница 66: ...when recording a sunset sunrise general night views neon signs or fireworks Select when under daylight fluorescent lamps INDOOR n Select when recording at a party or in studios where lighting conditions change quickly Select when under video lamps such as those in a studio under sodium lamps mercury lamps or warm white fluorescent lamps ONE PUSH Select when you want to record with the white balanc...

Страница 67: ...amps SHARPNESS You can adjust the sharpness of the image outline with appears when the sharpness is anything other than the default setting z Tip You cannot adjust the sharpness when CINEMA EFECT is selected in Digital effect AUTO SHUTTER AE SHIFT You can adjust the exposure using and the setting value appear when the exposure is anything other than the default setting z Tip Touch if the subject i...

Страница 68: ...EYE REDUC SUPER NS See page 40 for details NS LIGHT When using the NightShot function to record you can record clearer pictures by using the NightShot Light to emit infrared rays invisible The maximum shooting distance using the NightShot Light is about 3 meters 10 feet COLOR SLOW S See page 41 for details GOFF Select to deactivate expanded focus ON Select to activate expanded focus HIGH Select to...

Страница 69: ...ord a 16 9 wide picture on the tape to watch on a 16 9 wide screen TV 16 9WIDE mode With this function ON your camcorder offers even wider angles when you move the power zoom lever to the W side than recording in OFF When you connect your camcorder to a TV compatible with the ID 1 ID 2 system and play the tape the TV switches to full mode automatically GOFF The zebra pattern is not displayed 70 Th...

Страница 70: ...n STEADYSHOT You can select this function to compensate for camera shake PROGRES REC See page 30 for details GOFF Standard setting to record pictures to play back on a 4 3 TV The recorded picture will not be wide ON Select to record a picture to be played back on a 16 9 wide TV The recorded picture will be played in full mode when you connect to your TV compatible with ID 1 ID 2 systems GON Standa...

Страница 71: ...he flash will not function while you are recording images continuously The maximum number of images will be recorded in the self timer mode or when you are operating with the Remote Commander The images may flicker or discolor when you select HIGH SPEED EXP BRKTG will not function when you have space for fewer than 3 images remaining on the Memory Stick Duo When it is hard to see the difference be...

Страница 72: ...ures This setting can be selected only in the CAMERA MEMORY mode 640 480 Select to record for playing on a small screen You can record even more pictures G320 240 Select to record movies for playing on a large screen or to record clearer pictures 160 112 Select to record for longer time GAUTO Select to display the remaining capacity of the Memory Stick Duo in the following cases After inserting a ...

Страница 73: ...s displayed Move the POWER switch to select other power modes Operate any buttons Eject the Memory Stick Duo Formatting erases everything on the Memory Stick Duo including protected image data and newly created folders FILE NO NEW FOLDER You can create a new folder 102MSDCF to 999MSDCF on a Memory Stick Duo When a folder is full a maximum of 9999 images are stored a new folder is automatically cre...

Страница 74: ... as the number of folders increases on the Memory Stick Duo REC FOLDER As the default setting pictures are saved in the 101MSDCF folder You can select a folder to save your pictures Create new folders from the NEW FOLDER menu then select the folder to be used for recording with and touch When you have a lot of pictures you can search for the desired picture easily when you sort them in folders PB ...

Страница 75: ... FADER See page 43 for details OVERLAP See page 44 for details D EFFECT See page 44 and 52 for details PICT EFFECT You can add special effects such as films to a picture before or after recording on a tape appears when the effect is selected OK 0 00 00 60min STBY FADER PICT APPLI OVERLAP D EFFECT GOFF Select when not using the Picture effect setting NEG ART Select to record play the picture with t...

Страница 76: ...CURRNT FOLDER then touch 4 Touch REPEAT 5 Touch ON or OFF then 6 Touch END 7 Touch START Your camcorder plays back the images recorded on the Memory Stick Duo in sequence PASTEL Select to record the picture looking like a pale pastel drawing This effect is not available during playback MOSAIC Select to record picture appearing mosaic patterned This effect is not available during playback GALL FILE...

Страница 77: ...t scene will be longer than other scenes SMTH INT REC This function is useful to observe the movement of clouds or the changes of daylight Your camcorder will shoot 1 frame of the picture at a selected interval and keep them in memory until it has stored several frames Then those frames are recorded on the tape at one time These pictures appear smooth when played back Connect your camcorder to the...

Страница 78: ...t the power source while a message is displayed on the screen b Note The camcorder will shoot several frames for the first and last shots of the Smooth interval recording You cannot use the Smooth interval recording with MEMORY MIX function Memory overlap CINEMA EFECT or DELAY MOTION of Digital effect Smooth interval recording is released when approximately 12 hours have elapsed after shooting has...

Страница 79: ... about 10 minutes b Note You cannot view the demonstration when the NIGHTSHOT switch is set to ON z Tip The demonstration will be suspended in situations such as those described below When you touch the screen during the demonstration The demonstration starts again in about 10 minutes When a cassette or Memory Stick Duo is inserted When a mode other than CAMERA TAPE is selected If A SHUT OFF is se...

Страница 80: ... page 95 and 97 for details AUD DUB CTRL See page 106 for details PROG EDIT REC CTRL For recording on a Memory Stick Duo See page 95 and 96 for details BURN DVD When your camcorder is connected to a Sony VAIO series personal computer you can easily burn the picture recorded on the tape on a DVD Direct Access to Click to DVD using this command See the supplied Computer Applications Guide for detail...

Страница 81: ...abel is recorded 1 Select a desired title from the displayed titles 2 original titles that you have created before and the preset titles that have been stored in your camcorder You can create original titles up to 2 types of title of within 20 characters each in the following procedure 1 Select CUSTOM 1 or CUSTOM 2 using then touch 2 Touch the button repeatedly to select the desired character on t...

Страница 82: ...title is set b Note The point you superimposed the title may be detected as an index signal when searching a recording with other video device When you are using your camcorder on the battery pack and do not operate it for 5 minutes the power automatically goes off as the default setting If you may take 5 minutes or longer to enter characters set A SHUT OFF on the STANDARD SET menu to NEVER p 88 T...

Страница 83: ...character and enter the character in the same manner 3 When you have finished entering characters touch 4 Touch z Tip To erase the label you have created touch repeatedly to erase the characters then touch To change the label you have created insert the cassette into your camcorder and go through the procedure from step 1 ALL ERASE You can delete all data such as date title and cassette label save...

Страница 84: ...yback picture may be distorted or the time code may not be written properly between the scenes AUDIO MODE VOLUME See page 50 and 53 for details MULTI SOUND You can select how to play back audio recorded on a tape in stereo mode 0 00 00 60min STBY REC MODE STANDARD SET AUDIO MODE LCD VF SET OK GSP Select to record in the SP Standard Play mode on a cassette LP Select to increase the recording time t...

Страница 85: ...u disconnect the power source from your camcorder for more than 5 minutes LCD VF SET The recorded picture will not be affected by this setting LCD BRIGHT See page 20 for details LCD BL LEVEL You can adjust the brightness of the LCD screen s backlight b Note When you connect your camcorder to the wall outlet BRIGHT is automatically selected for the setting When you select BRIGHT battery life is red...

Страница 86: ...Stick Duo in your camcorder on your computer For details refer to the Computer Applications Guide GUIDEFRAME GOFF Select when not using the Digital convert function ON To output analog images and sound in digital format using your camcorder The analog signal input to the A V jack of your camcorder will be converted and output from the DV Interface of your camcorder For details refer to the Compute...

Страница 87: ...ON Select to always display the remaining tape indicator GON Select when using the Remote Commander supplied with your camcorder OFF Select to deactivate the Remote Commander to prevent your camcorder from responding to a command sent by another VCR remote control unit GON Select to turn on the camera recording lamp on the front of your camcorder during recording OFF Select this setting in the fol...

Страница 88: ...touch panel operation confirmation beep GLCD PANEL Select to show the displays such as the time code on the LCD screen and in the viewfinder V OUT PANEL Select to show the displays such as the time code on the TV screen LCD screen and in the viewfinder GNORMAL Select to scroll the menu items downwards by touching OPPOSITE Select to scroll the menu items upwards by touching G5 min Select to activat...

Страница 89: ...n set the date and time p 21 WORLD TIME You can adjust the time difference when using your camcorder abroad Set the time difference by touching the clock will be adjusted in accordance with the time difference If you set the time difference to 0 the clock returns to the originally set time LANGUAGE You can select or change the language used for the on screen display p 24 You can select from Englis...

Страница 90: ... p 91 1 Touch 2 Touch P MENU SET UP If the desired menu is not displayed on the screen touch until the menu is displayed 3 Touch ADD 4 Touch to select a menu category then touch The available items vary depending on the power mode of the camcorder Only the available items are displayed 5 Touch to select a menu item then touch 6 Touch YES The menu is added to the end of the list 7 Touch STBY P MENU...

Страница 91: ...t delete MENU and P MENU SET UP Arranging the order of menus displayed on Personal Menu Sort You can sort the menus added to Personal Menu in the desired order 1 Touch 2 Touch P MENU SET UP If the menu is not displayed on the screen touch until the desired menu is displayed 3 Touch SORT STBY P MENU SET UP ADD SORT DELETE 0 00 00 RESET 60min END STBY STBY Delete this from CAMERA TAPE mode s P MENU ...

Страница 92: ...efault settings after adding or deleting menus 1 Touch 2 Touch P MENU SET UP If the desired menu is not displayed on the screen touch until the menu is displayed 3 Touch RESET 4 Touch YES 5 Touch YES The Personal Menu settings return to the default settings To cancel reset touch NO 6 Touch STBY STBY STBY P MENU SET UP ADD SORT DELETE 0 00 00 RESET 60min END STBY Initialize CAMERA TAPE mode s P MEN...

Страница 93: ... recommended The audio will not be output when you connect with the S video plug alone b Note Use the A V connecting cable supplied to connect your camcorder to other devices Before connecting make sure the DISPLAY setting in the STANDARD SET menu is set to LCD PANEL the default setting p 88 Connect the A V connecting cable to the output jack of a device you are dubbing a picture from or to the in...

Страница 94: ...r set it to the input mode 3 Prepare your camcorder for playback Insert the recorded cassette Slide the POWER switch to select the PLAY EDIT mode 4 Start the playback on your camcorder and record it on the VCR Refer to the operating instructions supplied with your VCR for details 5 When the dubbing is finished stop your camcorder and the VCR b Note When your camcorder is connected to the VCR via t...

Страница 95: ...ct the EDIT PLAY menu then REC CTRL with an icon 5 Start playing the cassette on your VCR or select a TV program The picture played on the connected device appears on the LCD screen of your camcorder 6 Touch REC START at the point you want to start recording 7 Stop recording When recording on a tape Touch stop or REC PAUSE When recording on a Memory Stick Duo Touch REC STOP 8 Touch then z Tip The ...

Страница 96: ...lect the PLAY EDIT mode 2 Search and record the scene you want to record When recording a still image 1 Touch play to play back the tape 2 Press PHOTO lightly at the scene you want to record Check the image and press it fully When recording a movie 1 Touch 2 Touch MENU 3 Select the EDIT PLAY menu then REC CTRL with an icon 4 Touch play to play back the tape 5 Touch REC START at the point you want ...

Страница 97: ...e you have the Memory Stick Duo with the images and a cassette inserted into your camcorder 1 Slide the POWER switch to select the PLAY EDIT mode 2 Search for the point where you want to start dubbing by touching rewind or fast forward then touch stop 3 Touch 4 Touch previous next to select the image you want to dub 5 Touch 6 Touch REC CTRL with an icon If the item is not displayed on the screen t...

Страница 98: ...a Memory Stick Duo skip steps 1 and 2 and start from Recording the selected scenes as programs p 103 Step 1 Preparing your camcorder and VCR for operation Follow the steps below when you are performing a digital program edit for the first time to a tape in a VCR You can skip this setting if you have set up the VCR by the following procedure before b Note You cannot perform the Digital program edit...

Страница 99: ...6 Touch to select EDIT PLAY then touch 7 Touch to select PROG EDIT then touch 8 Touch OTHER DEVICE 9 Touch EDIT SET 10Touch CONTROL 11Select IR or i LINK When connecting with an A V connecting cable Touch IR then Follow the procedure described in To set the IR SETUP code p 100 OK 60min STILL SET MEMORY SET MOVIE SET ALL ERASE 0 00 00 00 VAR SPD PB PRINT PICT EFFECT REC CTRL D EFFECT AUD DUR CTRL P...

Страница 100: ...try each code and find the most appropriate one 3 Touch PAUSEMODE 4 Select the mode to cancel recording pause on your VCR then touch Refer to the operating instructions supplied with your VCR for details on operation 5 Point the infrared ray emitter of your camcorder towards the remote sensor on your VCR from about 30 cm 12 in away with no obstructions 6 Insert a cassette into your VCR and set the...

Страница 101: ...7 78 JC Penny 8 21 33 35 36 42 77 JVC 12 13 14 21 33 35 Kenwood 21 33 35 47 LXI Sears 36 37 42 44 45 47 49 80 Magnavox 17 77 78 83 Marantz 21 33 35 Marta 47 Memorex 37 77 Minolta 8 42 Mitsubishi MGA 22 23 24 28 29 Multitech 23 32 80 NEC 21 33 35 Olympic 77 78 Optimus 22 Orion 60 Panasonic 16 17 77 78 Pentax 8 42 Philco 26 70 77 78 Philips 47 77 78 83 Pioneer 78 Quasar 6 16 17 77 78 RCA PROSCAN 7 8...

Страница 102: ...EXEC A picture about 50 seconds long with 5 IN and OUT indicators each for adjusting synchronization is recorded Completed appears when the recording is finished 5 Rewind the tape on your VCR then play back in slow mode 5 opening numbers for each IN and closing numbers for each OUT appear 6 Take a note of the opening number value of each CUT IN and the closing number value of each CUT OUT then cal...

Страница 103: ... repeatedly to select the desired image size 7 Search for the beginning of the first scene that you want to dub on your camcorder then pause playback You can adjust the position with frame 8 Touch MARK IN The starting point of the first program is set and the upper part of the program mark changes to light blue 9 Search for the end of the first scene that you want to record on your camcorder then ...

Страница 104: ... Touch END To save a program without using it to record Touch END in step 11 The program is stored in memory until the cassette is ejected To erase programs 1 Follow steps 1 to 6 in Recording the selected scenes as programs p 103 then touch UNDO 2 Touch DEL 1MARK to delete the last set program Or touch ALL ERASE to erase all the programs 3 Touch EXEC The programs are deleted To cancel this operati...

Страница 105: ...ional audio When the tape is recorded in the 16 bit mode When the tape is recorded in the LP mode When your camcorder is connected via the i LINK cable On blank sections of the tape On the tape recorded on another device with a 4ch microphone 4CH MIC REC When the write protect tab of the cassette is set to SAVE When you are using the A V jack or the internal microphone to record additional sound t...

Страница 106: ...he LCD screen 10Touch play and start playing back the audio you want to record at the same time A red mark remains on the LCD screen while recording sound The new sound is recorded in stereo 2 ST2 during the playback of the tape 11Touch stop when you want to stop recording To dub on other scenes repeat steps 3 and 4 to select scenes then touch AUDIO DUB 12Touch then To set the end point for audio ...

Страница 107: ...inutes after the battery pack or other power sources have been disconnected Deleting recorded pictures You can delete all or selected pictures stored on a Memory Stick Duo 1 Slide the POWER switch repeatedly to select the PLAY EDIT mode 2 Touch 3 Touch previous next to select a picture you want to delete 4 Touch 5 Touch YES The selected picture is deleted To cancel deletion touch NO To delete all ...

Страница 108: ...he write protect tab and the Memory Stick Duo is write protected p 129 or when the selected picture is protected p 108 The pictures cannot be restored once they are deleted Make sure you check the pictures before deleting them Marking recorded images with specific information Image protection Print mark When you are using a Memory Stick Duo with the write protect tab make sure the write protect ta...

Страница 109: ... Print Order Format standard is used to select images for printing on your camcorder 1 Slide the POWER switch to select the PLAY EDIT mode 2 Touch 3 Touch 4 Touch 5 Touch PRINT MARK 6 Touch the image that you want to print out later 7 Touch 8 Touch END To cancel the Print mark Follow steps 1 to 5 then touch the image to cancel the Print mark disappears from the image 2 10 101 0002 PROTECT 101 2 10...

Страница 110: ...ge is an industry standard established by the Camera Imaging Products Association CIPA You can print still images without using a computer by connecting a printer directly to a digital video camera or digital still camera regardless of model manufacturer Connect your camcorder to the printer b Note Connect the supplied AC Adaptor to the wall outlet for the power supply 1 Insert the Memory Stick Du...

Страница 111: ... of models that are not PictBridge compatible You cannot connect your camcorder to the printer if USB PLY EDT in the menu settings is not set to PictBridge Follow the instructions shown on the screen Printing 1 Select the image to be printed by touching previous image next image 2 Touch then COPIES 3 Select the number of copies to be printed by touching then touch You can set a maximum of 20 copie...

Страница 112: ... performed properly Sliding the POWER switch to select other power modes Disconnecting the USB cable from your Handycam Station or printer Removing the Memory Stick Duo from your camcorder If the printer stops working disconnect the USB cable and restart the operation from the beginning Some printer models may not support the date printing function Refer to your printer s operating instructions fo...

Страница 113: ...wer is set to on cDisconnect the AC Adaptor from the wall outlet or remove the battery pack then reconnect it after about 1 minute If the functions still do not work press the RESET button using a sharp pointed object If you press the RESET button all settings including the clock setting are reset except the Personal Menu items A clattering noise is heard when the camcorder is handled with the POW...

Страница 114: ...ged enough This is not a malfunction cFully charge the battery again If the problem persists replace the battery pack with a new one It may be damaged p 16 131 The power turns off frequently although the remaining battery indicator indicates that the battery pack has enough power to operate A problem has occurred in the remaining battery time indicator or the battery pack has not been charged enou...

Страница 115: ...without inserting a cassette and Memory Stick Duo cTouch on the LCD screen or insert a cassette or Memory Stick Duo to cancel DEMO MODE You can also set DEMO MODE to OFF on the menu p 79 An unknown indicator appears on the screen cRefer to the indicator list p 146 The buttons do not appear on the touch panel cTouch the LCD panel lightly cPress DISPLAY BATT INFO or DISPLAY on the Remote Commander p...

Страница 116: ...ally p 42 A vertical band appears when recording candlelight or electric light in the dark This occurs when the contrast between the subject and the background is too high This is not a malfunction A vertical band appears when recording a bright subject This phenomenon is called the smear effect This is not a malfunction Tiny spots in white red blue or green appear on the screen The spots appear w...

Страница 117: ...tures are not clear or do not appear cClean the head using the cleaning cassette optional p 134 Fine patterns flicker diagonal lines look jagged cAdjust SHARPNESS to the soften side in the CAMERA SET menu before recording p 67 No sound or only a low sound is heard cSet MULTI SOUND to STEREO in the STANDARD SET menu p 84 cTurn up the volume p 50 cOn the STANDARD SET menu adjust AUDIO MIX from the S...

Страница 118: ... The pictures are not played back in the actual size Pictures recorded on other devices may not appear in the actual size This is not a malfunction Image data cannot be played back cDeactivate the USB Streaming function on your camcorder and set the USB ON OFF switch on the Handycam Station to OFF Image data cannot be played back if you have modified files or folders or have edited the data on a c...

Страница 119: ...t is not supported on your camcorder p 128 Symptom Cause and or Corrective Actions Pictures from connected devices are not displayed on the LCD screen or the viewfinder cSet DISPLAY to LCD PANEL in the STANDARD SET menu p 88 Cannot dub correctly using the A V connecting cable cSet DISPLAY to LCD PANEL in the STANDARD SET menu p 88 The A V connecting cable is not connected properly cMake sure that ...

Страница 120: ...corder and VCR for operation p 98 cAdjust the synchronization of the VCR p 102 cEnter a correct IR SETUP code p 101 cSelect the mode used to cancel recording pause again p 100 cSet your camcorder and the VCR more than 30 cm 12 in apart p 100 The program cannot be set to a blank section on the tape You cannot perform the Digital program editing on a VCR that does not support IR SETUP codes a DVD re...

Страница 121: ...der again Do not perform this procedure if moisture starts to condense p 133 cRemove the power source Reconnect it again and operate your camcorder again cChange the cassette Press RESET p 141 and operate your camcorder again E 61 ss E 62 ss E 91 ss cContact your Sony dealer or local authorized Sony service facility Inform them of the 5 digit code which starts from E 101 0001 Warning indicator per...

Страница 122: ...nosis display code is displayed p 121 Warning indicator pertaining to image deletion The image is protected p 108 Warning indicator pertaining to the write protect of the Memory Stick Duo The write protect tab on the Memory Stick Duo is set to lock p 129 Warning indicator pertaining to the flash Slow flashing During charging Fast flashing The self diagnosis display code is displayed p 121 There is...

Страница 123: ...ory cSee page 127 Memory Stick Duo Insert a Memory Stick cSee page 23 Reinsert the Memory Stick cReinsert the Memory Stick Duo a few times cFormat the Memory Stick Duo p 73 cIf even then the indicator flashes the Memory Stick Duo might be damaged Try with another Memory Stick Duo Do not eject the Memory Stick during writing This is a read only Memory Stick cInsert a writable Memory Stick Duo Incom...

Страница 124: ... delete them using your computer Cannot record still images on Memory Stick Cannot record movies on Memory Stick Cannot record Memory Stick movie on a tape PictBridge compliant printer Check the connected device cSwitch off the printer and switch it on again then disconnect the USB cable and reconnect it Connect the camcorder to a PictBridge Compatible printer cSwitch off the printer and switch it...

Страница 125: ...not cancel Easy Handycam with USB connected Invalid button with Easy Handycam operation USB is invalid in this mode during Easy Handycam You can select STD USB in PLAY EDIT mode during Easy Handycam operation but you cannot select PictBridge or USB STREAM The message disappears when you touch HDV recorded tape Cannot playback cYour camcorder cannot play back this format Play back the tape with equ...

Страница 126: ...clock by time difference You can easily set the clock to the local time by setting a time difference when using your camcorder abroad Select WORLD TIME in the TIME LANGU menu then set the time difference p 89 System Used in NTSC Bahama Islands Bolivia Canada Central America Chile Colombia Ecuador Guyana Jamaica Japan Korea Mexico Peru Surinam Taiwan the Philippines the U S A Venezuela etc PAL Aust...

Страница 127: ...IT SEARCH If there is a blank section or discontinuous signals on your tape re record from the beginning to the end of the tape as described above b Note The Cassette Memory may not function correctly when you record using a digital video camera recorder that does not support Cassette Memory on a tape already recorded on using a Cassette Memory compatible digital video camera recorder z Tip The me...

Страница 128: ...der However appearance on the list does not guarantee the operation of all types of Memory Stick Duo on your camcorder 1 The Memory Stick Duo is about half the size of a standard Memory Stick 2 The types of Memory Stick that support high speed data transfer The speed of data transfer varies depending on the device to be used 3 MagicGate is a copyright protection technology that records and transfe...

Страница 129: ...eep the following notes in mind when handling a Memory Stick Duo Be careful not to apply excessive force when writing on a memo area on a Memory Stick Duo Do not attach a label or the like on a Memory Stick Duo or a Memory Stick Duo adaptor When you carry or store a Memory Stick Duo put it in its case Do not touch or allow metallic objects to come into contact with the terminal Do not bend drop or...

Страница 130: ... their respective companies Furthermore and are not mentioned in each case in this manual About the InfoLITHIUM battery pack This unit is compatible with the InfoLITHIUM battery pack F series Your camcorder operates only with the InfoLITHIUM battery pack InfoLITHIUM F series battery packs have the mark What is the InfoLITHIUM battery pack The InfoLITHIUM battery pack is a lithium ion battery pack ...

Страница 131: ...a long time or if left in a fully charged state or when the battery pack is frequently used Use the remaining battery time indication as a guide to the approximate shooting time The E mark that indicates low battery flashes even if there are still 5 to 10 minutes of battery time remaining depending on the operating conditions or ambient temperature and environment About storage of the battery pack...

Страница 132: ...i LINK s maximum baud rate varies according to the device There are 3 types S100 approx 100Mbps S200 approx 200Mbps S400 approx 400Mbps The baud rate is listed under Specifications in the operating instructions of each piece of device It is also indicated near the i LINK interface on some device The maximum baud rate for device that does not have any indication such as this unit is S100 The baud r...

Страница 133: ...corder with a towel for example and operate it Doing so might cause heat to build up inside When disconnecting the power cord pull by the plug and not the lead Do not damage the power cord such as by placing anything heavy on it Keep metal contacts clean Keep the Remote Commander and button type battery out of children s reach If the battery is accidentally swallowed consult a doctor immediately I...

Страница 134: ...appears on the screen during recording The video head suffers from wear after long use If you cannot obtain a clear image even after using a cleaning cassette it might be because the video head is worn Please contact your Sony dealer or local authorized Sony service facility to have the video head replaced LCD screen Do not add excessive pressure on the LCD screen as it may cause damage If your ca...

Страница 135: ...re in a well ventilated location subject to little dirt or dust To prevent molds periodically clean the lens as described above It is recommended you operate your camcorder about once a month to keep it in an optimum state for a long time To charge the pre installed button type battery Your camcorder has a pre installed button type battery to retain the date time and other settings even when the P...

Страница 136: ...by the JEITA Japan Electronics and Information Technology Industries Association Files in this format can have additional information such as your camcorder s setting information at the time of recording Audio recording system Rotary heads PCM system Quantization 12 bits Fs 32 kHz stereo 1 stereo 2 16 bits Fs 48 kHz stereo Video signal NTSC color EIA standards Usable cassette Mini DV cassette with...

Страница 137: ...pedance 6 8 kΩ kilohms Ø 3 5 mm Stereo type LCD screen Picture 6 2 cm 2 5 type Total dot number 123 200 560 220 General Power requirements DC 7 2 V battery pack DC 8 4 V AC Adaptor Average power consumption when using the battery pack During camera recording using the viewfinder 3 1 W During camera recording using the LCD 3 4 W Operating temperature 0 C to 40 C 32 F to 104 F Storage temperature 20...

Страница 138: ...xcluding the projecting parts Mass approx 190 g 6 7 oz excluding the power cord Rechargeable battery pack NP FF51 Maximum output voltage DC 8 4 V Output voltage DC 7 2 V Capacity 5 6 Wh 780 mAh Dimensions approx 40 8 12 5 49 1 mm 1 5 8 1 2 1 15 16 in w h d Mass approx 45 g 1 6 oz Operating temperature 0 C to 40 C 32 F to 104 F Type Lithium ion Design and specifications are subject to change withou...

Страница 139: ...K Eyecup p 135 L Viewfinder p 4 20 M POWER switch p 19 N MIC PLUG IN POWER jack red MIC jack cover p 105 This jack works as an input jack for an external microphone as well as a power supply jack for a plug in power microphone When the external microphone is connected it takes precedence O Access lamp p 23 129 P CAMERA TAPE CAMERA MEMORY PLAY EDIT mode lamps p 19 Q Memory Stick Duo slot p 23 This ...

Страница 140: ...cessory shoe p 105 z Tips on the Intelligent accessory shoe The Intelligent accessory shoe supplies power to optional accessories such as a video light a flash or microphone The accessory can be turned on or off as you operate the POWER switch on your camcorder Refer to the operating instructions of the accessory for details The Intelligent accessory shoe has a safety device for fixing the install...

Страница 141: ...FOCUS button p 42 F NIGHTSHOT switch p 40 G Belt lock release lever p 142 H BACK LIGHT button p 38 I PHOTO button p 31 J Power zoom lever p 28 K Flash L Camera recording lamp p 26 M RESET button If you press RESET all the settings including the date and time except the Personal Menu items return to the default These buttons are not available during Easy Handycam operation z mark on the camcorder 4...

Страница 142: ...e you cannot attach the tripod securely and the screw may damage your camcorder Using the Strap Belt as a wrist strap This is useful for carrying your camcorder 1 Slide and hold the belt lock release lever in the direction of the arrow 1 then move the Strap Belt attachment in the direction of the arrow 2 2 Detach the Strap Belt attachment from your camcorder 3 Use the Strap Belt as a wrist strap a...

Страница 143: ...licks and is locked b Note The Strap Belt may detach accidentally if not attached properly z Tip The length of the Strap Belt is adjustable p 4 Handycam Station A Interface connector B USB ON OFF switch Set the USB ON OFF switch to ON to use the USB connection C A V jack p 60 93 105 D S VIDEO jack E DC IN jack p 16 F DV Interface jack p 93 G USB jack 1 2 6 5 4 3 7 ...

Страница 144: ...r camcorder point towards the remote sensor to control your camcorder H REC START STOP button p 29 I Power zoom button p 28 J DISPLAY button p 61 These buttons are not available during Easy Handycam operation To remove the insulation sheet To change the battery 1 While pressing on the tab inset your fingernail into the slit to pull out the battery case 2 Remove the button type lithium battery 3 Pl...

Страница 145: ...mote Commander may not function properly The Remote Commander may not function properly when the remote sensor is obstructed with a conversion lens optional When you are operating with the Remote Commander supplied with your camcorder your VCR may also operate In that case select a commander mode other than VTR 2 for your VCR or cover the sensor of your VCR with black paper CAUTION Danger of explo...

Страница 146: ...sh is in use Frame recording p 77 0 00 00 STBY P MENU 60min 60min Example Indicators in the CAMERA TAPE mode Time code p 58 Tape counter p 58 Self diagnosis p 121 Picture number p 54 Exposure adjustment scale Outputting analog images and sound in digital format p 86 DV input p 95 Zero set memory p 61 NightShot p 40 Super NightShot p 40 Color Slow Shutter p 41 Q Z Warning p 121 Picture effect p 75 ...

Страница 147: ... Delayed Motion Effect DELAY MOTION 44 Delete Deleting pictures 107 DEMO MODE 79 Digital convert function A V c DV OUT 86 Digital effect D EFFECT 44 52 Digital program editing PROG EDIT 98 DIGITAL ZOOM 69 Direct Access to Click to DVD See BURN DVD Direct Access to Video CD Burn See BURN VCD Display DISPLAY 88 Display indicators 146 DOT FADER 43 Dual sound track tape 84 Dubbing REC CTRL 95 E Easy H...

Страница 148: ...2 MPEG 128 MULTI SOUND 84 N NEW FOLDER 73 NightShot 40 NightShot Light NS LIGHT 68 NORMAL See Burst BURST NTSC 126 O OLD MOVIE 45 Operation confirmation beep See BEEP P PAL 126 PB FOLDER 74 Personal Menu P MENU 63 PictBridge 110 Picture effect PICT EFFECT 75 Picture search 51 Playback VAR SPD PB Double speed 51 Frame 51 Reverse 51 Slow 51 Playback Zoom PB ZOOM 57 Playing time 18 Power mode 19 PRIN...

Страница 149: ... TITLE 83 TITL ERASE 82 TITLE 81 TITLE DISP 82 Title search 61 TRAIL 45 TV color systems 126 U USB jack 143 USB ON OFF switch 143 USB Streaming 86 USB CAMERA 86 USB PLY EDT 86 Using abroad 126 V Video head 134 Viewfinder 20 Brightness VF B LIGHT 85 Volume VOLUME 50 53 W Warning indicators 121 Warning messages 121 White balance WHITE BAL 66 WHITE FADER 43 Wide angle See Zoom WIPE 43 WORLD TIME 89 W...

Страница 150: ......

Страница 151: ......

Страница 152: ...Printed in Japan Printed on 100 recycled paper using VOC Volatile Organic Compound free vegetable oil based ink ...

Отзывы: