background image

Using the Menu

54

B

Advanced operations

Using the Menu

Selecting menu items

You can change various settings or make 
detailed adjustments using the menu items 
displayed on the screen.

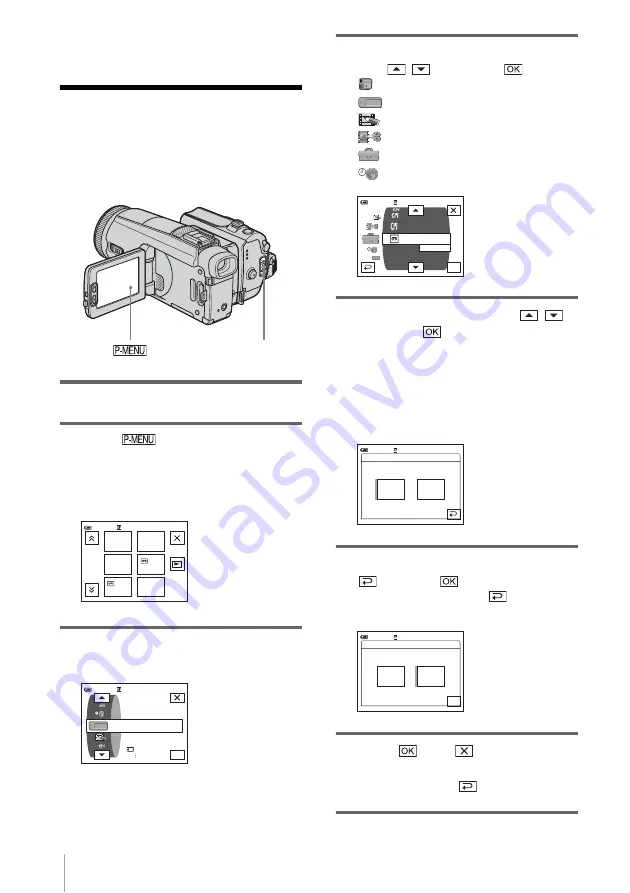
1

Turn on the power (p. 16).

2

Touch .

The Personal Menu appears. Items that are 
used often are displayed as short-cuts.

3

Touch [MENU] to display the menu 
index screen.

4

Select the icon of the desired menu 
with 

/

, then touch 

.

 CAMERA 

SET 

(p. 56)

  MEMORY SET (p. 63)

  PICT. APPLI. (p. 67)

 EDIT/PLAY (p. 72)

 STANDARD 

SET 

(p. 76)

 TIME/LANGU. 

(p. 82)

5

Select the desired item with 

/

then touch 

.

You can also touch the item directly to 
select it.
You can scroll and see all items.
The available items vary depending on the 
power mode of your camcorder.
Unavailable items will be grayed out.

6

Select the desired setting.

 changes to 

. If you decide not to 

change the setting, touch 

 to return to 

the previous screen.

7

Touch 

, then 

 to hide the menu 

screen.

You can also touch 

 (return) to go back 

a screen each time you touch the button.

POWER switch

1/3

0:00:00:00

60min

MENU

VOLUME

END
SEARCH

DATA
CODE

     REC
CTRL

     VAR.
SPD PB

Example: PLAY/EDIT mode’s 
Personal Menu

OK

60min

STILL  SET

MEMORY  SET

MOVIE  SET
      ALL  ERASE

0:00:00:00

OK

0:00:00:00

60min

      REC  MODE

      ALL  ERASE

AUDIO  MODE

      TAPE  TITLE

VOLUME

      TITLE  ERASE

MULTI  SOUND

SP

REMOTE  CTRL: ON

OFF

ON

0:00:00:00

60min

REMOTE  CTRL: OFF

OFF

ON

0:00:00:00

OK

60min

Содержание DCR-HC1000 - Digital Handycam Camcorder

Страница 1: ...2 055 844 12 1 2004 Sony Corporation Camera Operations Guide US Camera Operations Guide Read this first Digital Video Camera Recorder DCR HC1000 ...

Страница 2: ...ou For more information regarding recycling of rechargeable batteries call toll free 1 800 822 8837 or visit http www rbrc org Caution Do not handle damaged or leaking Lithium Ion batteries Memory Stick This device complies with Part 15 of the FCC Rules Operation is subject to the following two conditions 1 This device may not cause harmful interference and 2 this device must accept any interferen...

Страница 3: ...corder is based on the DV format You can use only mini DV cassettes in your camcorder Use of mini DV cassettes with Cassette Memory is recommended as you can use Title search p 52 Date search p 53 TITLE p 73 TAPE TITLE p 75 Cassettes with Cassette Memory are marked with Note on the type of Memory Stick you can use in your camcorder You can use only a Memory Stick Duo which is about half the size o...

Страница 4: ...ing the operating procedures Change the screen language before using your camcorder if necessary p 21 Notes on using the camcorder Hold your camcorder correctly Rotate the Multi Angle Grip to the angle you prefer Do not rotate the Multi Angle Grip forcefully or subject it to shock as distorted images or sound may result Fasten the Grip Belt as shown in the following illustration When you are using...

Страница 5: ...cording media 19 Inserting a cassette tape 19 Inserting a Memory Stick Duo 20 Step 7 Setting the screen language 21 Recording Recording movies 22 Recording for a longer time 24 Using zoom 24 Recording in mirror mode 25 Using the self timer 26 Enhanced sound recording 4CH MIC REC 27 Recording still images Memory photo recording 29 Selecting image quality or size 30 Using the flash 31 Using the self...

Страница 6: ...ARCH 42 Searching manually EDIT SEARCH 42 Reviewing the most recently recorded scenes Rec review 43 Playback Viewing movies recorded on a tape 44 Playing back in various modes 45 Viewing recordings with added effects Digital effect 45 Viewing recordings on a Memory Stick Duo 46 Playing back in various modes from a Memory Stick Duo 48 Various playback functions 49 Magnifying pictures Tape playback ...

Страница 7: ...TV 88 Dubbing pictures from a tape to a Memory Stick Duo 89 Dubbing still images from a Memory Stick Duo to a tape 90 Dubbing selected scenes from a tape Digital program editing 91 Dubbing sound to a recorded tape 98 Deleting recorded pictures 100 Marking recorded images with specific information Image protection Print mark 101 Printing recorded images PictBridge compliant printer 103 Troubleshoot...

Страница 8: ... open the lid b Insert the battery pack in the direction of the arrow until it clicks c Close the battery compartment lid a Slide the OPEN EJECT lever in the direction of the arrow to open the lid The cassette compartment comes out automatically b Insert the cassette with its window side facing out then push the center of the back of the cassette c Press Close the cassette lid after the cassette c...

Страница 9: ...N and open the LCD panel c While pressing the green button slide the POWER switch down to light up the CAMERA TAPE lamp The power turns on d Press REC START STOP Recording starts To change to standby mode press REC START STOP again You can also use REC START STOP of the LCD panel a Slide the POWER switch repeatedly until the PLAY EDIT lamp lights up b Touch rewind c Touch play to start the playbac...

Страница 10: ...nto the camcorder a Push the catch on the battery compartment lid in the direction of the arrow 1 to open the lid b Insert the battery pack in the direction of the arrow until it clicks c Close the battery compartment lid a Open the Memory Stick Duo cover b Insert a Memory Stick Duo with its terminal facing up until it clicks c Close the Memory Stick Duo cover ...

Страница 11: ...pressing the green button slide the POWER switch repeatedly until the CAMERA MEMORY lamp lights up The power turns on d Press PHOTO lightly A short beep sound is heard when the focus is adjusted e Press PHOTO fully A shutter sound is heard and the still image is recorded a Slide the POWER switch repeatedly until the PLAY EDIT lamp lights up b Touch The most recently recorded image is displayed c T...

Страница 12: ...ory Stick Duo with any of the devices compatible with a standard Memory Stick AC Adaptor 1 Power cord 1 Lens cap 1 Attached to the camcorder Lens hood 1 Use the lens hood to record under strong light such as under the sun Note when you use a filter optional the shadow of the lens hood may appear on the screen Also if you force the lens hood on you may not be able to remove it again Shoulder strap ...

Страница 13: ... the AC Adaptor Disconnect the AC Adaptor from the wall outlet immediately if any malfunction occurs 1 Push the catch on the battery compartment lid in the direction of the arrow 1 to open the lid 2 Insert the battery pack in the direction of the arrow until it clicks 3 Close the battery compartment lid 4 With the v mark on the DC plug facing the battery compartment lid side connect the AC Adaptor...

Страница 14: ...o check the remaining battery Battery Info You can check the battery s current charge level and its current remaining recording time both during charging or when the power is turned off 1 Set the POWER switch to CHG OFF 2 Press OPEN and open the LCD panel 3 Press DISPLAY BATT INFO The battery information appears for about 7 seconds Keep the button pressed to view it for about 20 seconds A Battery ...

Страница 15: ...ording and playback time will be shorter when you use your camcorder in low temperature The flash CHG charge lamp flashes during charging or the battery information will not be correctly displayed in following conditions The battery pack is not attached correctly The battery pack is damaged The battery pack is fully discharged For Battery information only Using an outside power source You can use ...

Страница 16: ...de To play or edit pictures on a tape or Memory Stick Duo To turn off the power Slide the POWER switch up to CHG OFF Step 4 Adjusting the LCD panel and viewfinder Adjusting the LCD panel You can adjust the angle and brightness of the LCD panel to meet various recording situations Even when there are obstructions between you and the subject you can check the subject on the LCD screen during recordi...

Страница 17: ...unning out or when the screen is hard to see Adjust the viewfinder lens adjustment lever until the picture is clear To use the viewfinder during operation When you are recording on a tape or a Memory Stick Duo you can adjust the exposure p 34 and fader p 37 while checking the image on the viewfinder Have the LCD panel rotated 180 degrees and closed with the screen facing out 1 Set the power mode t...

Страница 18: ...rder p 16 2 Press OPEN and open the LCD panel Proceed to step 7 when you set the clock for the first time 3 Touch 4 Touch MENU 5 Select TIME LANGU with then touch 6 Select CLOCK SET with then touch 7 Set Y year with then touch You can set any year up to the year 2079 8 Set M month D day hour and minute in the same way as was done in step 7 then touch The clock starts For midnight set it to 12 00AM...

Страница 19: ...tion of the arrow and open the lid The cassette compartment automatically comes out and opens up 2 Insert a cassette with its window side facing out 3 Press The cassette compartment automatically slides back in 4 Close the lid To eject the cassette 1 Slide the OPEN EJECT lever and open the lid The cassette compartment automatically comes out and opens up 2 Take out the cassette then press The cass...

Страница 20: ...o cover 2 Lightly push the Memory Stick Duo in once 3 Close the Memory Stick Duo cover b Note If you force the Memory Stick Duo into the Memory Stick Duo slot in the wrong direction the Memory Stick Duo slot may be damaged Image files in the Memory Stick Duo may also be damaged Do not insert anything other than a Memory Stick Duo into the Memory Stick Duo slot Doing so may cause a malfunction of y...

Страница 21: ...ed on the screen touch If you cannot find it touch MENU and select it from the TIME LANGU menu p 82 5 Select the desired language with then touch z Tip Your camcorder offers ENG SIMP simplified English for when you cannot find your native tongue among the options POWER switch OPEN 1 3 0 00 00 60min STBY MENU EXPO SURE SHUTTR SPEED PRGRAM AE WHITE BAL SPOT METER LANGUAGE ENGLISH 1 2 0 00 00 60min S...

Страница 22: ...andby mode To record on a Memory Stick Duo MPEG MOVIE EX Slide the POWER switch repeatedly until the CAMERA MEMORY lamp lights up and the currently selected recording folder appears on the screen 4 Press REC START STOP Recording starts REC appears on the LCD screen and the Camera recording lamp lights up Press REC START STOP again to stop recording To check the most recently recorded MPEG movie Re...

Страница 23: ...use When you opened or closed the LCD panel it takes about 1 minute to display the correct remaining battery time C Recording status REC recording D Movie size E Recorded time hour minute second F Recording capacity of the Memory Stick Duo G Memory Stick Duo recording start indicator appears for about 5 seconds H Personal Menu button p 54 I Review button p 22 b Note Before changing the battery pac...

Страница 24: ...r time To record for a longer time on a tape In the STANDARD SET menu select REC MODE then LP p 76 In the LP mode you can record 1 5 times longer than you can when recording in the SP mode A tape recorded in the LP mode should be played back only on this camcorder To record for a longer time on a Memory Stick Duo In the MEMORY SET menu select MOVIE SET IMAGE SIZE then 160 112 p 64 The length of ti...

Страница 25: ...M switch to ZOOM appears on the screen 2 Turn the zoom ring at the desired speed b Note If you turn the zoom ring too fast the zoom function might not follow the speed Recording in mirror mode You can turn the LCD panel towards the subject so that you and your subject can share the image being recorded You can also utilize this function when recording yourself to keep the attention of small childr...

Страница 26: ...SET menu p 56 3 Touch ON then appears 4 Press REC START STOP You will hear a beep sound counting down for about 10 seconds The count down indication begins from 8 The recording starts To stop recording press REC START STOP To cancel the count down Touch RESET or press REC START STOP To cancel the self timer Follow steps 1 and 2 then select OFF in step 3 REC START STOP REC START STOP SELF TIMER OFF...

Страница 27: ...ion software Click to DVD Ver 2 0 or later bundled with Sony VAIO series personal computers is required for creating a DVD in 5 1ch surround sound format For details on Creating a DVD refer to the supplied Computer applications Guide b Note Your camcorder does not output audio in the 5 1ch audio format Sound is recorded in 12 bit mode If the AUDIO MODE has been set to 16BIT it automatically switch...

Страница 28: ...h To check the recorded sound You can check the recorded front and rear sound after recording 1 Slide the POWER switch repeatedly to select the PLAY EDIT mode 2 Touch 3 Touch AUDIO MIX If the item is not displayed on the screen touch If you cannot find it touch MENU and select it from the STANDARD SET menu 4 Adjust the balance of the front and rear sound with then touch The front sound can be hear...

Страница 29: ... a light beeping sound when the focus and brightness settings are adjusted Recording does not start at this point The number of images that can be recorded varies depending on the image quality setting and the recording environment 5 Press PHOTO fully A shutter sound is heard When bars of disappear the image is recorded on the Memory Stick Duo To check the most recently recorded image Review Touch...

Страница 30: ...edia without being displayed on the screen You can view this information during playback by selecting DATA CODE on the screen p 50 The recording angle is wider than that of the CAMERA TAPE mode Selecting image quality or size Select the MEMORY SET menu STILL SET then QUALITY or IMAGE SIZE p 64 The number of pictures you can record on a Memory Stick Duo varies depending on the quality size of the i...

Страница 31: ...h When the red eye reduction feature is turned on Auto red eye reduction Pre flashes to reduce red eye before the flash automatically flashes when there is not enough surrounding light m Forced red eye reduction Always uses the flash and the red eye reducing pre flash regardless of the surrounding brightness m No flash Always records without using the flash b Note Remove the dust from the surface ...

Страница 32: ... it manually select FLASH LEVEL of FLASH SET in the CAMERA SET menu p 60 When the focus is hard to adjust refer to Adjusting the focus manually p 36 for the proper focal distance information Using the self timer With the self timer you can record a still image after a delay of about 10 seconds 1 Touch 2 Touch SELF TIMER If the item is not displayed on the screen touch If you cannot find it touch M...

Страница 33: ...tions 16 9 WIDE mode Memory overlap MEMORY MIX function Titles are not recorded on a Memory Stick Duo Adjusting the exposure The exposure is adjusted automatically in the default setting Adjusting the exposure for backlit subjects When your subject has its back to the sun or other light you can adjust the exposure to prevent the subject from becoming shadowed Press BACK LIGHT during recording or i...

Страница 34: ...usting the exposure for the selected point 5 Touch END To return the setting to automatic exposure Follow steps 1 to 3 and touch AUTO in step 4 Or set the AUTO LOCK switch to ON b Note If you set PROGRAM AE SPOT METER is automatically set to AUTO z Tip If you set SPOT METER EXPOSURE is automatically set to MANUAL Adjusting the exposure manually You can fix the brightness of a picture at the best e...

Страница 35: ... the focus for an off center subject SPOT FOCUS You can select and adjust the focal point to aim it at a subject not located in the center of the screen 1 Set the FOCUS ZOOM switch to MANUAL during recording or in the standby mode 9 appears 2 Touch 3 Touch MENU 4 Select CAMERA SET menu then SPOT FOCUS by touching and touch 5 Touch the subject for which you want to adjust the focus on the screen SP...

Страница 36: ...t when you use the zoom function Move the power zoom lever towards T telephoto to adjust the focus and then towards W wide angle to adjust the zoom for recording When you want to record a close up image of a subject move the power zoom lever towards W wide angle to fully magnify the image then adjust the focus To use the expanded focus It will be easier to confirm the focus setting by enlarging th...

Страница 37: ... fading out the picture gradually changes from color to black and white OVERLAP fade in only WIPE fade in only DOT FADER fade in only 1 Slide the POWER switch to select the CAMERA TAPE mode 2 Touch in the standby mode to fade in or during recording to fade out 3 Touch FADER If the item is not displayed on the screen touch If you cannot find it touch MENU and select it from the PICT APPLI menu POWE...

Страница 38: ...uperimposed and a tape in your camcorder 2 Slide the POWER switch to select the CAMERA TAPE mode 3 Touch 4 Touch MENU 5 Select PICT APPLI then OVERLAP by touching and The recorded image appears on the thumbnail screen 6 Touch previous next to select the still image to be superimposed 7 Touch ON then 8 Touch 9 Press REC START STOP to start recording M OVRLAP stops flashing and disappears when fadin...

Страница 39: ...t Follow steps 2 and 3 then select OFF in step 4 b Note You cannot use Digital effect together with FADER function Memory overlap MEMORY MIX function Shutter speed 1 30 second or slower You cannot use OLD MOVIE together with PROGRAM AE except AUTO 16 9 WIDE mode Picture effect PICT EFFECT MANUAL of SHUTTR SPEED z Tip You can create a picture with color and brightness reversed while recording on a ...

Страница 40: ...gainst a blue background Only the blue area of the movie will be swapped with the still image MTCAM CHROMA Memory Chroma key You can have the movie swap into the blue area of a still image such as an illustration or into a frame with a blue area enclosed by the frame 1 Check that you have a Memory Stick Duo with the still image to be superimposed and a tape only if you are recording on tape in you...

Страница 41: ...into a movie 8 Touch twice appears 9 Start recording When you are recording on a tape Press REC START STOP When you are recording on a Memory Stick Duo Press PHOTO fully To cancel MEMORY MIX Follow steps 3 and 4 then touch OFF in step 5 b Note When the overlapping still image has a large amount of white the image in the thumbnail screen may not be clear When you use the MEMORY MIX function in the ...

Страница 42: ...layed back for about 5 seconds and the camcorder enters the standby mode at the point where the last recording has finished To cancel the operation Touch CANCEL b Note The END SEARCH function will not work correctly when there is a blank section between recorded sections on the tape z Tip You can do this operation also by selecting END SEARCH in the menu setting When the PLAY EDIT mode is selected...

Страница 43: ...st recently recorded scenes Rec review You can view a few seconds of the scene recorded just before you stopped the tape 1 Slide the POWER switch repeatedly to select the CAMERA TAPE mode 2 Touch 3 Touch once The last few seconds of the most recently recorded scene are played back Then your camcorder is set to the standby mode 0 00 00 STBY 60min EDIT ...

Страница 44: ...isplayed on the screen touch If you cannot find it touch MENU and select it from the STANDARD SET menu 3 Adjust the volume by touching decrease increase then touch To stop playback Touch stop To pause Touch pause during playback Touch it again to restart the playback Playback stops automatically when the pause mode continues for more than 5 minutes To fast forward or rewind Touch fast forward or r...

Страница 45: ...iously played picture remaining on the screen 1 During playback or playback pause touch 2 Touch VAR SPD PB If the item is not displayed on the screen touch If you cannot find it touch MENU and select it from the EDIT PLAY menu 3 Select a playback mode To return to the normal playback mode touch play pause twice once from frame playback Horizontal lines may appear at the top bottom or in the center...

Страница 46: ...igital effects via the DV Interface z Tip You cannot record the pictures edited using special effects on the tape in your camcorder but you can copy them to a Memory Stick Duo p 89 or another tape p 87 Viewing recordings on a Memory Stick Duo You can view pictures one at a time on the screen When you have a lot of pictures you can list them to search through them easily Make sure you have a record...

Страница 47: ... only F Previous next folder icon The following indicators appear when the first or last picture of the current folder is displayed and when there are multiple folders on the same Memory Stick Duo Touch to move to the previous folder Touch to move to the next folder Touch to move to either the previous or the next folder G Image delete button H Print mark still images only p 102 I Image protection...

Страница 48: ... in order to start playback from a particular scene The number of scenes you can divide the movie into depends on the length of the movie 1 Touch previous next to select a scene from which to start the playback 2 Touch To display 6 pictures at a time including movies Index Screen Touch To return to the single display mode touch the picture that you want to display To view pictures in other folders...

Страница 49: ...iginal size and centered at the point you touched on the screen When you touch another place the point you touched becomes the center 6 Adjust the zoom ratio using the power zoom lever You can select the zoom ratio from approximately 1 1 to 5 times the original size Touch W to decrease or T to increase the ratio If the FOCUS ZOOM switch is set to ZOOM the zoom ring becomes functional To cancel the...

Страница 50: ...he item is not displayed on the screen touch If you cannot find it touch MENU and select it from the STANDARD SET menu 4 Select CAMERA DATA or DATE TIME then touch To hide the date time or camera settings data Follow steps 2 and 3 and select OFF in step 4 Camera settings data display In the date time data display the date and time is displayed in the same area If you record the picture without set...

Страница 51: ...the S video plug to that jack instead of using the yellow video plug The audio will not be output when you connect with the S video plug alone When your TV is connected to a VCR Connect your camcorder to the LINE IN input on the VCR using the A V connecting cable Set the input selector on the VCR to LINE When your TV is monaural When your TV has only one audio input jack Connect the yellow plug of...

Страница 52: ...Y The playback starts from the point designated 0 00 00 on the tape counter To cancel the operation Press ZERO SET MEMORY on the Remote Commander again b Note There may be a discrepancy of several seconds between the time code and the tape counter Zero set memory will not function correctly if there is a blank section between recorded sections on the tape Searching for a scene using Cassette Memor...

Страница 53: ... When your cassette has Cassette Memory you can select the recording date itself When your cassette does not have Cassette Memory you can select the previous or the next date of the present point on the tape Playback starts automatically from the point where the date changes To cancel the operation Press STOP on the Remote Commander b Note If one day s recording is less than 2 minutes your camcord...

Страница 54: ... directly to select it You can scroll and see all items The available items vary depending on the power mode of your camcorder Unavailable items will be grayed out 6 Select the desired setting changes to If you decide not to change the setting touch to return to the previous screen 7 Touch then to hide the menu screen You can also touch return to go back a screen each time you touch the button POW...

Страница 55: ...e the Personal Menu see page 83 Using the AUTO LOCK switch By changing the position of the AUTO LOCK switch you can select automatic adjustment or manual adjustment of the setting required for recording Setting the AUTO LOCK switch ON Your camcorder automatically adjusts the settings needed for recording OFF Use this when you adjust the flexible spot meter exposure PROGRAM AE white balance or shut...

Страница 56: ...orehand p 55 If it is set to ON you cannot select PROGRAM AE OK 0 00 00 60min STBY PROGRAM AE CAMERA SET SPOT METER EXPOSURE G AUTO Select when not using PROGRAM AE SPOTLIGHT spotlight Select to prevent people s faces from appearing excessively white when subjects are lit by strong light such as in a theater or at a wedding PORTRAIT soft portrait Select to bring out the subject such as people or f...

Страница 57: ...u cannot select WHITE BAL LANDSCAPE landscape Select when shooting distant subjects such as mountains This setting also prevents your camcorder from focusing on glass or metal mesh in windows that comes in between the camcorder and the subject G AUTO Select when you want to record with the white balance adjusted automatically OUTDOOR Select when recording a sunset sunrise general night views neon ...

Страница 58: ...sharpness of the image outline with appears when the default setting is changed SHUTTR SPEED You can adjust and fix the shutter speed freely This is useful when you want to freeze frame a moving subject or emphasize its movement Set the AUTO LOCK switch to OFF beforehand p 55 If it is set to ON you cannot select SHUTTR SPEED ONE PUSH Select when you want to record with the white balance adjusted a...

Страница 59: ...TO SHUTTER AE SHIFT You can adjust exposure with appears when the default setting is changed z Tip We recommend that you use when shooting a white or a backlit subject and when shooting a dark subject or in low light You can adjust the automatic exposure level to brighter or darker when EXPOSURE is set to AUTO CAMERA COLOR You can adjust the color intensity with appears when the default setting is...

Страница 60: ... more than 5 minutes REDEYE REDUC ZEBRA This is useful as a guide when adjusting the exposure appears when the default setting is changed The zebra pattern is not recorded GOFF Select to deactivate expanded focus ON Select to activate expanded focus HIGH Select to make the flash level higher than the standard setting GNORMAL Standard setting LOW Select to make the flash level lower than the standa...

Страница 61: ...u can record a 16 9 wide picture on the tape to watch on a 16 9 wide screen TV 16 9WIDE mode With this function ON your camcorder offers even wider angles when you move the power zoom lever to the W side than recording in OFF When you connect your camcorder to a TV compatible with the ID 1 ID 2 system and play the tape the TV switches to full mode automatically Refer also to the manuals supplied w...

Страница 62: ...YSHOT You can select this function to compensate for camera shake GOFF Standard setting to record pictures to play back on a 4 3 TV The recorded picture will not be wide ON Select to record a picture to be played back on a 16 9 wide TV The recorded picture will be played in full mode when you connect to your TV compatible with ID 1 ID 2 systems GON Standard setting enable the SteadyShot function O...

Страница 63: ...e NORMAL setting the maximum number of images are recorded as long as you are pressing PHOTO fully b Note The flash will not function while you are recording images continuously The maximum number of images will be recorded in the self timer mode or when you are operating with the Remote Commander EXP BRKTG will not function when the number of pictures recordable on the Memory Stick Duo is fewer t...

Страница 64: ... mode 640 480 Select to record many still images or for playing on a small screen G320 240 Select to record movies for playing on a large screen or to record clearer pictures 160 112 Select to record for longer time GAUTO Select to display the remaining capacity of the Memory Stick Duo in the following cases After inserting a Memory Stick Duo with the POWER switch in the CAMERA MEMORY mode for abo...

Страница 65: ...uding protected image data and newly created folders FILE NO NEW FOLDER You can create a new folder 102MSDCF to 999MSDCF on a Memory Stick Duo When a folder is full a maximum of 9999 images are stored a new folder is automatically created 1 Touch YES A newly created folder will be numbered in sequence after the last folder number To cancel creation select NO 2 Touch b Note You cannot delete the cr...

Страница 66: ...elect a folder to save your pictures Create new folders from the NEW FOLDER menu then select the folder to be used for recording with and touch When you have a lot of pictures you can search for the desired picture easily when you sort them in folders PB FOLDER Select the playback folder with then touch ...

Страница 67: ...ed out FADER See page 37 for details OVERLAP See page 38 for details D EFFECT See page 38 and 45 for details PICT EFFECT You can add special effects such as films to a picture before or after recording on a tape appears when the effect is selected OK 0 00 00 60min STBY FADER PICT APPLI OVERLAP D EFFECT GOFF Select when not using the Picture effect setting NEG ART Select to record play the picture ...

Страница 68: ... FOLDER 3 Select ALL FILES or CURRNT FOLDER then touch 4 Touch REPEAT 5 Touch ON or OFF then 6 Touch END 7 Touch START Your camcorder plays back the images recorded on the Memory Stick Duo in sequence To cancel the slide show touch END To pause touch PAUSE MOSAIC Select to record picture appearing mosaic patterned This effect is not available during playback GALL FILES Select to execute a slide sh...

Страница 69: ...nger than other scenes INTERVAL REC You can record pictures on a tape at a selected interval when you record flowers blooming etc Connect your camcorder to the wall outlet using the supplied AC Adaptor during the operation a REC TIME b INTERVAL 1 Touch 2 Touch INTERVAL 3 Select a desired interval time 30 seconds 1 5 or 10 minutes then touch 4 Touch REC TIME 5 Select a desired recording time 0 5 1 ...

Страница 70: ...REC STL This function is useful to observe the movement of clouds or the change of daylight Your camcorder will shoot a still image at a selected interval and record it on a Memory Stick Duo a Shooting time b Interval 1 Touch 2 Select a desired interval time 1 5 or 10 minutes then touch 3 Touch ON then touch 4 Touch flashes 5 Press PHOTO fully stops flashing and the interval photo recording starts...

Страница 71: ...ring the demonstration The demonstration starts again in about 10 minutes When a cassette or Memory Stick Duo is inserted When a mode other than CAMERA TAPE is selected If A SHUT OFF is set to 5 min when the camcorder is used on the battery pack the power will be turned off after approximately 5 minutes p 81 PRINT See page 103 for details GON Select to see an overview of the functions available su...

Страница 72: ...ge 88 and 90 for details AUD DUB CTRL See page 99 for details PROG EDIT REC CTRL For recording on a Memory Stick Duo See page 88 and 89 for details BURN DVD When your camcorder is connected to a Sony VAIO series personal computer you can easily burn the picture recorded on the tape on a DVD Direct Access to Click to DVD using this command See the supplied Computer Applications Guide for details 0 ...

Страница 73: ...abel is recorded 1 Select a desired title from the displayed titles 2 original titles that you have created before and the preset titles that have been stored in your camcorder You can create original titles up to 2 types of title of within 20 characters each in the following procedure 1 Select CUSTOM 1 or CUSTOM 2 using then touch 2 Touch the button repeatedly to select the desired character on t...

Страница 74: ...reen for about 5 seconds and the title is set b Note The point you superimposed the title may be detected as an index signal when searching a recording with other video device When you are using your camcorder on the battery pack and do not operate it for 5 minutes the power automatically goes off as the default setting If you may take 5 minutes or longer to enter characters set A SHUT OFF on the ...

Страница 75: ...ch to move s to select the next character and enter the character in the same manner 3 When you have finished entering characters touch 4 Touch z Tip To erase the label you have created touch repeatedly to erase the characters then touch To change the label you have created insert the cassette into your camcorder and go through the procedure from step 1 ALL ERASE You can delete all data such as da...

Страница 76: ...he playback picture may be distorted or the time code may not be written properly between the scenes AUDIO MODE VOLUME See page 44 47 for details MULTI SOUND You can select how to play back audio recorded on a tape in stereo mode 0 00 00 60min STBY REC MODE STANDARD SET AUDIO MODE VOLUME OK GSP SP Select to record in the SP Standard Play mode on a cassette LP LP Select to increase the recording ti...

Страница 77: ...djust the recording sound level manually Use headphones to monitor the sound when adjusting it b Note The setting returns to AUTO when you disconnect the power source from your camcorder for more than 5 minutes z Tip The limiter in your camcorder enables recording with reduced distortion even if you set the recording level too high in the MANUAL setting For best results adjust the recording level ...

Страница 78: ...log device to your camcorder and convert the signal transmitted from the connected devices to the appropriate signal on your camcorder VIDEO INPUT When you connect your camcorder to another device using the supplied A V connecting cable set the type of plug you are going to use for the connection GNORMAL Standard brightness BRIGHT Select to brighten the LCD screen GNORMAL Standard brightness BRIGH...

Страница 79: ...nitor screen DATA CODE GOFF Select to deactivate the USB Streaming function USB STREAM Select to activate the USB Streaming function GSTD USB Select to view the picture on the Memory Stick Duo PictBridge Select to connect the PictBridge compliant printer p 103 USB STREAM Select to view the picture on the tape GOFF Select to hide the guide frame ON Select to show the guide frame to confirm if the s...

Страница 80: ...ng to a command sent by another VCR remote control unit GON Select to turn on the camera recording lamp on the front of your camcorder during recording OFF Select this setting in the following recording situations The camera recording lamp will not light up during recording When you do not want the subject to be nervous about being recorded When you are recording close to the subject When the subj...

Страница 81: ... SHUT OFF is automatically set to NEVER V OUT PANEL Select to show the displays such as the time code on the TV screen LCD screen and in the viewfinder GNORMAL Select to scroll the menu items downwards by touching OPPOSITE Select to scroll the menu items upwards by touching G5 min Select to activate the Auto shut off When approximately 5 minutes have elapsed while you do not operate your camcorder...

Страница 82: ...he date and time p 18 WORLD TIME You can adjust the time difference when using your camcorder abroad Set the time difference by touching the clock will be adjusted in accordance with the time difference If you set the time difference to 0 the clock returns to the originally set time LANGUAGE You can select or change the language used for the on screen display p 21 You can select from English Simpl...

Страница 83: ...T UP If the desired menu is not displayed on the screen touch until the menu is displayed 3 Touch ADD 4 Touch to select a menu category then touch The available items vary depending on the power mode of the camcorder Only the available items are displayed 5 Touch to select a menu item then touch 6 Touch YES The menu is added to the end of the list 7 Touch 1 3 0 00 00 60min STBY MENU EXPO SURE SHUT...

Страница 84: ...ET UP If the menu is not displayed on the screen touch until the desired menu is displayed 3 Touch SORT 1 3 0 00 00 60min STBY MENU EXPO SURE SHUTTR SPEED PRGRAM AE WHITE BAL SPOT METER P MENU SET UP ADD SORT DELETE 0 00 00 RESET 60min END STBY Select button to delete 1 3 0 00 00 60min END MENU SPOT METER EXPO SURE SHUTTR SPEED WHITE BAL PRGRAM AE STBY Delete this from CAMERA TAPE mode s P MENU DE...

Страница 85: ...u is displayed 3 Touch RESET 4 Touch YES 5 Touch YES The Personal Menu settings return to the default settings To cancel reset touch NO 6 Touch OK Select new location 1 3 1 2 3 4 5 6 60min END MENU SPOT METER EXPO SURE SHUTTR SPEED WHITE BAL PRGRAM AE 0 00 00 STBY END OK Select new location 1 3 1 2 3 4 5 6 60min MENU SPOT METER EXPO SURE SHUTTR SPEED WHITE BAL PRGRAM AE 0 00 00 STBY 1 3 0 00 00 60...

Страница 86: ...w video plug The audio will not be output when you connect with the S video plug alone b Note Use the A V connecting cable supplied to connect your camcorder to other devices Before connecting make sure the DISPLAY setting in the STANDARD SET menu is set to LCD PANEL the default setting p 80 Connect the A V connecting cable to the output jack of a device you are dubbing a picture from or to the in...

Страница 87: ...ack Insert the recorded cassette Slide the POWER switch to select the PLAY EDIT mode 4 Start the playback on your camcorder and record it on the VCR Refer to the operating instructions supplied with your VCR for details 5 When the dubbing is finished stop your camcorder and the VCR b Note When your camcorder is connected to the VCR via the DV Interface you cannot record the title indicators inform...

Страница 88: ...find it touch MENU and select it from the EDIT PLAY menu p 72 3 Touch REC PAUSE When recording on a Memory Stick Duo 1 Touch 2 Touch MENU 3 Select the EDIT PLAY menu then REC CTRL with an icon 5 Start playing the cassette on your VCR or select a TV program The picture played on the connected device appears on the LCD screen of your camcorder 6 Touch REC START at the point you want to start recordi...

Страница 89: ...you have a recorded tape and a Memory Stick Duo inserted into your camcorder 1 Slide the POWER switch to select the PLAY EDIT mode 2 Search and record the scene you want to record When recording a still image 1 Touch play to play back the tape 2 Press PHOTO lightly at the scene you want to record Check the image and press it fully When recording a movie 1 Touch 2 Touch MENU 3 Select the EDIT PLAY ...

Страница 90: ...n a tape Make sure you have the Memory Stick Duo with the images and a tape inserted into your camcorder 1 Slide the POWER switch to select the PLAY EDIT mode 2 Search for the point where you want to start dubbing by touching rewind or fast forward then touch stop 3 Touch 4 Touch previous next to select the image you want to dub 5 Touch 6 Touch REC CTRL with an icon If the item is not displayed on...

Страница 91: ... steps 1 and 2 and start from Recording the selected scenes as programs p 95 Step 1 Preparing your camcorder and VCR for operation Follow the steps below when you are performing a digital program edit for the first time to a tape in a VCR You can skip this setting if you have set up the VCR by the following procedure before b Note Digital program editing cannot be performed on the following equipm...

Страница 92: ...EVICE 9 Touch EDIT SET 10Touch CONTROL 11Select IR or i LINK When connecting with an A V connecting cable Touch IR then Follow the procedure described in To set the IR SETUP code p 93 When connecting with an i LINK cable Touch i LINK then Go on to Step 2 Adjusting the synchronization of the VCR p 94 OK 60min STILL SET MEMORY SET MOVIE SET ALL ERASE 0 00 00 00 VAR SPD PB PRINT PICT EFFECT REC CTRL ...

Страница 93: ...R TEST 8 Touch EXEC The recording starts on your VCR when the setting is correct Completed appears when the IR SETUP code test is finished Go on to Step 2 Adjusting the synchronization of the VCR p 94 When recording fails to start select another IR SETUP code and try again IR SETUP code list The following IR SETUP codes are recorded on your camcorder by default It is set at 3 as the default settin...

Страница 94: ...g of the tape 3 Touch then ADJ TEST 4 Touch EXEC A picture about 50 seconds long with 5 IN and OUT indicators each for adjusting synchronization is recorded Completed appears when the recording is finished Multitech 23 32 80 NEC 21 33 35 Olympic 77 78 Optimus 22 Orion 60 Panasonic 16 17 77 78 Pentax 8 42 Philco 26 70 77 78 Philips 47 77 78 83 Pioneer 78 Quasar 6 16 17 77 78 RCA PROSCAN 7 8 16 40 4...

Страница 95: ... is set 11Touch END twice Recording the selected scenes as programs When you are performing a digital program edit for the first time to a tape in a VCR go through the procedures described in Steps 1 and 2 p 91 to p 94 beforehand 1 Prepare a cassette or a Memory Stick Duo Insert a tape to be played back into the camcorder When you are recording on a tape insert a cassette for recording into your V...

Страница 96: ...djust the position with frame 10Touch MARK OUT The ending point of the first program is set and the lower part of the program mark changes to light blue 11Repeat steps 7 to 10 and create programs 12Set your VCR to recording pause Skip this step if your camcorder is connected via an i LINK cable or recording on a Memory Stick Duo 13Touch START PROG EDIT END Select the media 0 00 00 00 OTHER DEVICE ...

Страница 97: ...gram is stored in memory until the cassette is ejected To erase programs 1 Follow steps 1 to 6 in Recording the selected scenes as programs p 95 then touch UNDO 2 Touch DEL 1MARK to delete the last set program Or touch ALL ERASE to erase all the programs 3 Touch EXEC The programs are deleted To cancel this operation touch CANCEL b Note You cannot set starting point or ending point on a blank secti...

Страница 98: ...udio When the tape is recorded in the 16 bit mode When the tape is recorded in the LP mode When your camcorder is connected via the i LINK cable On sections of a tape that were recorded with the 4CH MIC REC function On blank sections of the tape When the write protect tab of the cassette is set to SAVE When you are using the A V jack or the internal microphone to record additional sound the pictur...

Страница 99: ...0Touch play and start playing back the audio you want to record at the same time A red mark remains on the LCD screen while recording sound The new sound is recorded in stereo 2 ST2 during the playback of the tape 11Touch stop when you want to stop recording To dub on other scenes repeat steps 3 and 4 to select scenes then touch AUDIO DUB 12Touch then To set the end point for audio dubbing During ...

Страница 100: ...fter the battery pack or other power sources have been disconnected Deleting recorded pictures You can delete all or selected pictures stored on a Memory Stick Duo 1 Slide the POWER switch repeatedly to select the PLAY EDIT mode 2 Touch 3 Touch previous next to select a picture you want to delete 4 Touch 5 Touch YES The selected picture is deleted To cancel deletion touch NO To delete all pictures...

Страница 101: ...h the write protect tab and the Memory Stick Duo is write protected p 122 or when the selected picture is protected p 101 The pictures cannot be restored once they are deleted Make sure you check the pictures before deleting them Marking recorded images with specific information Image protection Print mark When you are using a Memory Stick Duo with the write protect tab make sure the write protect...

Страница 102: ...cannot specify the number of printouts The DPOF Digital Print Order Format standard is used to select images for printing on your camcorder 1 Slide the POWER switch to select the PLAY EDIT mode 2 Touch 3 Touch 4 Touch 5 Touch PRINT MARK 6 Touch the image that you want to print out later 7 Touch 8 Touch END 2 10 101 0002 PROTECT 101 2 10 101 0002 PROTECT 101 OK appears on the selected image 101 000...

Страница 103: ... on the camcorder without using a computer z Tip PictBridge is an industry standard established by the Camera Imaging Products Association CIPA You can print still images without using a computer by connecting a printer directly to a digital video camera or digital still camera regardless of model manufacturer Connect your camcorder to the printer b Note Connect the supplied AC Adaptor to the wall...

Страница 104: ...ge Follow the instructions shown on the screen Printing 1 Select the image to be printed by touching previous image next image 2 Touch then COPIES 3 Select the number of copies to be printed by touching then touch You can set a maximum of 20 copies of one image to be printed 4 Touch END To print the date on the image 1 Touch then DATE TIME 2 Select DATE or DAY TIME and The default setting is OFF 5...

Страница 105: ...cting the USB cable from your camcorder or printer Removing the Memory Stick Duo from your camcorder If the printer stops working disconnect the USB cable and restart the operation from the beginning Some printer models may not support the date printing function Refer to your printer s operating instructions for details We cannot guarantee the printing of images recorded with a device other than y...

Страница 106: ...amcorder does not operate even when the power is set to on cDisconnect the AC Adaptor from the wall outlet or remove the battery pack then reconnect it after about 1 minute If the functions still do not work press the RESET button using a sharp pointed object If you press the RESET button all settings including the clock setting are reset except Personal Menu items The supplied Remote Commander do...

Страница 107: ...ot a malfunction cFully charge the battery again If the problem persists replace the battery pack with a new one It may be damaged p 13 123 The power turns off frequently although the remaining battery indicator indicates that the battery pack has enough power to operate A problem has occurred in the remaining battery time indicator or the battery pack has not been charged enough cFully charge the...

Страница 108: ...t inserting a cassette and Memory Stick Duo cTouch on the LCD screen or insert a cassette or Memory Stick Duo to cancel DEMO MODE You can also set DEMO MODE to OFF on the menu p 71 An unknown indicator appears on the screen cRefer to the indicator list p 137 The buttons do not appear on the touch panel cTouch the LCD panel lightly cPress DISPLAY BATT INFO or DISPLAY on the Remote Commander p 50 Th...

Страница 109: ...not suitable for auto focus Adjust the focus manually p 36 A vertical band appears when recording candlelight or electric light in the dark This occurs when the contrast between the subject and the background is too high This is not a malfunction A vertical band appears when recording a bright subject This phenomenon is called the smear effect This is not a malfunction Picture appears too bright o...

Страница 110: ...connecting cable are connected as well p 51 Sound recorded using the 4CH MIC REC function is not heard cAdjust AUDIO MIX in the STANDARD SET menu p 28 The sound breaks off cClean the head using the cleaning cassette optional p 127 Cannot perform the Date search with the recording date displayed on the screen cUse a cassette with Cassette Memory p 120 cSet SEARCH to ON in the EDIT PLAY menu p 73 Th...

Страница 111: ...tures recorded on other devices may not be played back This is not a malfunction The picture you have recorded on the tape has also been recorded on the Memory Stick Duo cThe picture was recorded on a Memory Stick Duo because you pressed REC START STOP during tape playback Delete the picture from the Memory Stick Duo if the picture is unnecessary p 100 Pictures cannot be deleted cWhen you are usin...

Страница 112: ... correctly using the A V connecting cable cSet VIDEO INPUT to the appropriate signal in the STANDARD SET menu p 78 cSet DISPLAY to LCD PANEL in the STANDARD SET menu p 80 The A V connecting cable is not connected properly cMake sure that the A V connecting cable is connected to the proper jack i e to the output jack of a device you are dubbing a picture from or to the input jack of another device ...

Страница 113: ...nnected to a DV device that is not a Sony product via an i LINK cable select IR in step11 of Step 1 Preparing your camcorder and VCR for operation p 91 cAdjust the synchronization of the VCR p 94 cEnter a correct IR SETUP code p 93 cSelect the mode used to cancel recording pause again p 93 cSet your camcorder and the VCR more than 30 cm 12 in apart p 93 The program cannot be set to a blank section...

Страница 114: ...ss cSymptoms that are not described above have occurred Remove and insert the cassette then operate your camcorder again Do not perform this procedure if moisture starts to condense p 126 cRemove the power source Reconnect it again and operate your camcorder again cChange the cassette Press RESET button p 133 and operate your camcorder again E 61 ss E 62 ss E 91 ss cContact your Sony dealer or loc...

Страница 115: ...warning Slow flashing The write protect tab on the cassette is set to lock p 120 Fast flashing Moisture condensation has occurred p 126 The self diagnosis display code is displayed p 114 Warning indicator pertaining to image deletion The image is protected p 101 Warning indicator pertaining to the write protect of the Memory Stick Duo The write protect tab on the Memory Stick Duo is set to lock p ...

Страница 116: ...t then format the Memory Stick Duo as necessary p 65 Cannot record The Memory Stick is full cDelete unnecessary images p 100 The Memory Stick is locked check the tab cSee page 122 Cannot playback Reinsert the Memory Stick Cannot record Reinsert the Memory Stick No file No file is recorded or there is no readable file on the Memory Stick Duo NO FILE AVAILABLE There is no file in the selected folder...

Страница 117: ...idge compatible printer cSwitch off the printer and switch it on again then disconnect the USB cable and reconnect it Check the printer Error Cancel the task cCheck the printer Cannot print Check the printer cSwitch off the printer and switch it on again then disconnect the USB cable and reconnect it FLASH The strobe cannot charge Not available cSee page 31 Subjects Indications Corrective Actions ...

Страница 118: ... front microphone plug to the MIC FRONT jack and the rear microphone plug to the MIC REAR jack Cannot use 4CH MIC REC You disconnected connected the microphone cable during recording 4CH MIC REC is only possible with the specified microphone p 27 Cassette Memory is full cSee page 75 Cannot record 44 1 kHz audio on a Memory Stick Already added to CAMERA TAPE mode s P MENU Already added to CAMERA ME...

Страница 119: ...setting of clock by time difference You can easily set the clock to the local time by setting a time difference when using your camcorder abroad Select WORLD TIME in the TIME LANGU menu then set the time difference p 82 System Used in NTSC Bahama Islands Bolivia Canada Central America Chile Colombia Ecuador Guyana Jamaica Japan Korea Mexico Peru Surinam Taiwan the Philippines the U S A Venezuela e...

Страница 120: ...RCH If there is a blank section or discontinuous signals on your tape re record from the beginning to the end of the tape as described above b Note The Cassette Memory may not function correctly when you record using a digital video camera recorder that does not support Cassette Memory on a tape already recorded on using a Cassette Memory compatible digital video camera recorder z Tip The memory c...

Страница 121: ...camcorder However appearance on the list does not guarantee the operation of all types of Memory Stick Duo on your camcorder 1 The Memory Stick Duo is about half the size of a standard Memory Stick 2 The types of Memory Stick that support high speed data transfer The speed of data transfer varies depending on the device to be used 3 MagicGate is a copyright protection technology that records and t...

Страница 122: ...e following notes in mind when handling a Memory Stick Duo Be careful not to apply excessive force when writing on a memo area on a Memory Stick Duo Do not attach a label or the like on a Memory Stick Duo or a Memory Stick Duo adaptor When you carry or store a Memory Stick Duo put it in its case Do not touch or allow metallic objects to come into contact with the terminal Do not bend drop or apply...

Страница 123: ...ation About the InfoLITHIUM battery pack This unit is compatible with the InfoLITHIUM battery pack F series Your camcorder operates only with the InfoLITHIUM battery pack InfoLITHIUM F series battery packs have the mark What is the InfoLITHIUM battery pack The InfoLITHIUM battery pack is a lithium ion battery pack that has functions for communicating information related to operating conditions bet...

Страница 124: ... as a guide to the approximate shooting time The E mark that indicates low battery flashes even if there are still 5 to 10 minutes of battery time remaining depending on the operating conditions or ambient temperature and environment About storage of the battery pack If the battery pack is not used for a long time fully charge the battery pack and use it on your camcorder once a year to maintain t...

Страница 125: ...NK Baud rate i LINK s maximum baud rate varies according to the device There are three types S100 approx 100Mbps S200 approx 200Mbps S400 approx 400Mbps The baud rate is listed under Specifications in the operating instructions of each piece of device It is also indicated near the i LINK interface on some device The maximum baud rate for device that does not have any indication such as this unit i...

Страница 126: ...g so might cause heat to build up inside When disconnecting the power cord pull by the plug and not the cord Do not damage the power cord such as by placing anything heavy on it Keep metal contacts clean Keep the Remote Commander and button type battery out of children s reach If the battery is accidentally swallowed consult a doctor immediately If the battery electrolytic liquid has leaked consul...

Страница 127: ...ear after long use If you cannot obtain a clear image even after using a cleaning cassette it might be because the video head is worn Please contact your Sony dealer or local authorized Sony service facility to have the video head replaced LCD screen Do not add excessive pressure on the LCD screen as it may cause damage If your camcorder is used in a cold place a residual image may appear on the L...

Страница 128: ...u operate your camcorder about once a month to keep it in an optimum state for a long time To charge the pre installed button type battery Your camcorder has a pre installed button type battery to retain the date time and other settings even when the POWER switch is set to CHG OFF The pre installed button type battery is always charged while you are using your camcorder but it will get discharged ...

Страница 129: ...ice Gross Approx 1 070 000 pixels Effective still Approx 1 000 000 pixels Effective movie Approx 690 000 pixels Lens Carl Zeiss Vario Sonnar T Combined power zoom lens Filter diameter 37 mm 1 1 2 in 12 Optical 150 Digital F 1 6 2 8 Focal length 3 6 43 2 mm 5 32 1 3 4 in When converted to a 35 mm still camera In CAMERA TAPE 49 588 mm 1 15 16 23 1 4 in In CAMERA MEMORY 41 492 mm 1 5 8 19 3 8 in Colo...

Страница 130: ...ed accessories See page 12 AC Adaptor AC L25A L25B Power requirements AC 100 240 V 50 60 Hz Current consumption 0 35 0 18 A Power consumption 18 W Output voltage DC 8 4 V 1 5 A Operating temperature 0 C to 40 C 32 F to 104 F Storage temperature 20 C to 60 C 4 F to 140 F Dimensions approx 56 31 100 mm 2 1 4 1 1 4 4 in w h d excluding the projecting parts Mass approx 190 g 6 7 oz excluding the power...

Страница 131: ...ACKLIGHT p 16 D OPEN button p 16 E REC START STOP p 22 F Speaker G Viewfinder p 3 17 H Eyecup I CAMERA TAPE CAMERA MEMORY PLAY EDIT mode lamps p 16 J i headphones jack green When you use headphones the speaker on your camcorder is silent K POWER switch p 16 L flash button p 31 M flash CHG charge lamp p 13 31 2 1 4 3 5 6 9 8 q qs qd qa 5 7 continued ...

Страница 132: ...our camcorder is also T coated to suppress unwanted reflection and faithfully reproduce colors MTF stands for Modulation Transfer Function The value number indicates the amount of light from a subject coming into the lens E Remote sensor Infrared ray emitter p 93 F Microphone p 98 G DISPLAY BATT INFO button p 14 H FOCUS ZOOM switch p 25 35 AUTO ZOOM Select to zoom using the zoom ring Focusing is a...

Страница 133: ...sory loosen the screw and then press down and pull out the accessory When using a video light with the intelligent accessory shoe the built in flash does not function B Viewfinder lens adjustment lever p 17 C Jack cover D Battery pack p 13 E Battery release tab p 14 F Battery compartment lid p 13 G RESET button If you press RESET all the settings including the date and time except the Personal Men...

Страница 134: ...microphone is connected it takes precedence E MIC jack cover 3 2 1 4 5 A Tripod receptacle Make sure that the length of the tripod screw is less than 5 5 mm 7 32 inch Otherwise you cannot attach the tripod securely and the screw may damage your camcorder B Memory Stick Duo cover p 20 C Hooks for shoulder strap D Access lamp p 20 122 E Memory Stick Duo slot p 20 To attaching the shoulder strap Atta...

Страница 135: ...ton p 52 G Transmitter After turning on your camcorder point towards the remote sensor to control your camcorder H REC START STOP p 22 I Power zoom button p 24 J DISPLAY button p 52 To remove the insulation sheet To change the battery 1 While pressing on the tab inset your fingernail into the slit to pull out the battery case 2 Remove the button type lithium battery 3 Place a new button type lithi...

Страница 136: ...mander may not function properly The Remote Commander may not function properly when the remote sensor is obstructed with a conversion lens optional When you are operating with the Remote Commander supplied with your camcorder your VCR may also operate In that case select a commander mode other than VTR 2 for your VCR or cover the sensor of your VCR with black paper CAUTION Danger of explosion if ...

Страница 137: ... image recording p 70 0 00 00 P MENU STBY 60min 60min Example Indicators in the CAMERA TAPE mode Time code p 50 Tape counter p 23 Self diagnosis p 114 Picture number p 47 Exposure adjustment scale Flash p 31 This indicator appears only when the flash is in use Frame recording p 69 Outputting analog images and sound in digital format p 78 DV input p 88 Zero set memory p 52 Q Z Warning p 114 Picture...

Страница 138: ...83 D Data code DATA CODE 50 79 Date search 53 Date time 50 Delete Deleting pictures 100 DEMO MODE 71 Digital convert function A V c DV OUT 78 Digital effect D EFFECT 38 45 Digital program editing PROG EDIT 91 DIGITAL ZOOM 61 Direct Access to Click to DVD See BURN DVD Direct Access to Video CD Burn See BURN VCD Display DISPLAY 80 Display indicators 137 DOT FADER 37 Dual sound track tape 76 Dubbing ...

Страница 139: ...electing items 54 STANDARD SET 76 TIME LANGU 82 MIC LEVEL 77 Mirror mode 25 Moisture condensation 126 MONOTONE 37 MOSAIC FADER 37 MOVIE SET 64 MPEG 121 Multi Angle Grip 4 MULTI SOUND 76 N NEW FOLDER 65 NORMAL See Burst BURST NTSC 119 O OLD MOVIE 39 Operation Confirmation beep See BEEP P PAL 119 PB FOLDER 66 Personal Menu P MENU 54 PictBridge 103 Picture effect PICT EFFECT 67 Picture search 45 Play...

Страница 140: ...elephoto See Zoom Time code 23 Title Cassette Memory TAPE TITLE 75 TITL ERASE 74 TITLE 73 TITLE DISP 75 Title search 52 TRAIL 39 TV color systems 119 U USB jack 133 USB Streaming USB CAMERA 79 USB PLY EDT 79 Using abroad 119 V Video head 127 VIDEO INPUT 78 Viewfinder 16 Brightness VF B LIGHT 78 Volume VOLUME 44 47 W Warning indicators 114 Warning messages 115 White balance WHITE BAL 57 WHITE FADER...

Отзывы: