background image

47

DSC-L1   2-186-455-11(1) [OpenType FONT]

Before advanced operations

Changing the items in the 
Setup screen

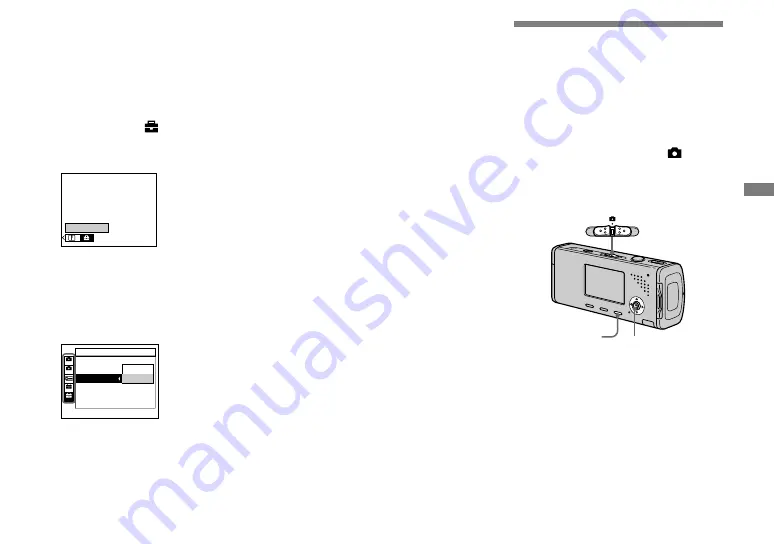
  Press MENU.

The menu appears.

 

Press 

 on the control button 

to advance to  , then press 


again.

The Setup screen appears.

Setup

t

 

Press 

/

/

/

 on the control 

button to select the item you 
want to set.

The frame of the selected item turns 
yellow.

Cancel

OK

Setup 2

File Number:
USB Connect:

Clock Set:

2

1

2

1

 

Press 

 on the control button 

to enter the setting.

To turn off the Setup screen 

display

Press MENU again.

To return to the menu from the 

Setup screen

Press 

 on the control button to return to 

the position enclosed by the frame in step 

, then press 

 again.

•  For a detailed description of the Setup items, 

see page 112.

Deciding the still 

image quality

You can select the still image quality from 
[Fine] (high quality) or [Standard].

Before operation

When shooting still images, set 


(Camera) in the menu to other than [Auto] 
(pages 46 and 109).

MENU

Mode switch

Control button

Содержание Cyber-shot DSC-L1

Страница 1: ... your computer _______ Troubleshooting______________________ Additional information _________________ Index ______________________________ 2 186 445 13 1 Digital Still Camera Operating Instructions Before operating the unit please read this manual thoroughly and retain it for future reference Owner s Record The model and serial numbers are located on the bottom Record the serial number in the spac...

Страница 2: ...utioned that any changes or modifications not expressly approved in this manual could void your authority to operate this equipment Note This equipment has been tested and found to comply with the limits for a Class B digital device pursuant to Part 15 of the FCC Rules These limits are designed to provide reasonable protection against harmful interference in a residential installation This equipmen...

Страница 3: ...ithout the fuse cover If you should lose the fuse cover please contact your nearest Sony service station Attention for the Customers in Europe This product has been tested and found compliant with the limits set out in the EMC Directive for using connection cables shorter than 3 meters 9 8 feet Attention The electromagnetic fields at the specific frequencies may influence the picture and sound of thi...

Страница 4: ...e may be some tiny black points and or bright points white red blue or green in color that constantly appear on the LCD screen and the LCD finder These points are normal in the manufacturing process and do not affect the recording in any way Be careful when placing the camera near a window or outdoors Exposing the LCD screen the finder or the lens to direct sunlight for long periods may cause malfun...

Страница 5: ...he camera may not be able to record or play back properly Carl Zeiss lens This camera is equipped with a Carl Zeiss lens which is capable of reproducing sharp images with excellent contrast The lens for this camera has been produced under a quality assurance system certified by Carl Zeiss in accordance with the quality standards of Carl Zeiss in Germany The pictures used in this manual The photogra...

Страница 6: ...ng a Memory Stick Duo with Memory Stick compatible equipment Be sure to insert the Memory Stick Duo into the supplied Memory Stick Duo Adaptor Memory Stick Duo Adaptor On InfoLITHIUM battery pack When using the battery pack for the first time Be sure to charge the supplied NP FT1 battery pack page 13 Recharging The battery pack can be charged even when it has not been completely discharged In addit...

Страница 7: ...nited States and or other countries Macintosh Mac OS QuickTime iMac iBook PowerBook Power Mac and eMac are trademarks or registered trademarks of Apple Computer Inc Macromedia and Flash are trademarks or registered trademarks of Macromedia Inc in the United States and or other countries Intel MMX and Pentium are trademarks or registered trademarks of Intel Corporation In addition system and produc...

Страница 8: ...of your camera 40 Viewing single images 40 Viewing an index screen 41 Deleting still images Deleting images 42 Deleting images in index mode 43 Formatting a Memory Stick Duo 44 Before advanced operations How to setup and operate your camera 46 Changing the menu settings 46 Changing the items in the Setup screen 47 Deciding the still image quality 47 Creating or selecting a folder 48 Creating a new...

Страница 9: ... Enjoying images on your computer Copying images to your computer For Windows users 80 Installing the USB driver 81 Connecting the camera to your computer 82 Copying images 83 Viewing the images on your computer 85 Image file storage destinations and file names 85 Viewing image files once copied to a computer with your camera 87 Installing Picture Package and ImageMixer VCD2 87 Copying images using P...

Страница 10: ...vies To shoot still images To view or edit images Shutter button 26 For shooting Zoom W T lever 30 For viewing Playback zoom lever 61 Index lever 41 Flash 32 Self timer lamp 31 AF illuminator 33 112 Screw groove 12 POWER button 17 POWER lamp 17 Microphone 75 USB jack 69 82 DC IN jack 13 16 Jack cover 13 16 Tripod adaptor attachment groove 12 Lens ...

Страница 11: ...utton 46 109 Control button Menu on 17 Menu off 32 31 29 55 CHG lamp orange 14 Battery Memory Stick Duo cover Battery eject lever 13 RESET button 95 Access lamp 21 Hook for neck strap Attaching the strap Attaching the strap is recommended to prevent dropping the camera Internal battery cover This contains a rechargeable button battery Do not open this cover as this may cause a malfunction ...

Страница 12: ...ove Screw groove Locking screw Protrusion 2 Make sure to match the locking screw with the screw groove on the camera and then turn the locking screw to secure the tripod adaptor to the camera 6 5 Locking screw Tripod screw hole Attach the tripod here See the operating instructions supplied with the tripod for the method of attaching the tripod Use a tripod with a screw length of less than 5 5 mm 7...

Страница 13: ...he way then close the cover Battery insertion slot Insert the battery pack so that tip of the marks on the side of the battery pack face the tip of the mark on the battery insertion slot The battery pack is easily inserted by pushing the battery eject lever toward the front of the camera using the tip of the battery pack 3 DC plug AC Adaptor Jack cover Connect the AC Adaptor supplied to the DC IN ...

Страница 14: ... shows the remaining shooting or viewing time Remaining indicator 60min Remaining time The displayed time remaining may not be correct under certain circumstances or conditions Charging time Approximate time to charge a completely discharged battery pack using the AC Adaptor at a temperature of 25 C 77 F Battery pack Charging time min NP FT1 supplied Approx 150 The charging time may become longer ...

Страница 15: ... Quality is set to Fine Shooting one time every 30 seconds The zoom is switched alternately between the W and T ends The flash strobes once every two times The power turns on and off once every ten times AF Mode is set to Single on the Setup screen The measurement method is based on CIPA standard CIPA Camera Imaging Products Association Viewing still images2 Image size NP FT1 supplied No of images ...

Страница 16: ...Do not use the AC Adaptor placed in a narrow space such as between a wall and furniture After using the AC Adaptor disconnect it both from the DC IN jack of the camera and from a wall outlet wall socket The set is not disconnected from the AC power source mains as long as it is connected to the wall outlet wall socket even if the set itself has been turned off Using your camera abroad Power source...

Страница 17: ...erforming Setup the camera turns off automatically to prevent wearing down the battery The auto power off function only operates when the camera is operating using a battery pack The auto power off function also will not operate in the following circumstances When viewing movies When playing back a slide show When connecting USB cable How to use the control button 2 1 2 1 2 1 2 1 Camera 1 AF Mode ...

Страница 18: ...Press POWER to turn on the power The POWER lamp green lights up and the Clock Set screen appears on the LCD screen 3 2004 1 1 12 00 AM OK Cancel Clock Set D M Y M D Y Y M D Select the desired date display format with on the control button then press Select from Y M D year month day M D Y month day year or D M Y day month year If the rechargeable button battery page 116 which provides the power for...

Страница 19: ...l button then press to enter it After entering the number moves to the next item Repeat steps and until all of the items are set If you selected D M Y in step set the time on a 24 hour cycle Midnight is indicated as 12 00 AM and noon as 12 00 PM 6 2005 1 1 10 30 AM OK Cancel Clock Set D M Y M D Y Y M D Select OK with on the control button then press The date and time are entered and the clock star...

Страница 20: ...ting You can change the screen display like menu items warnings and messages in your desired language To change the language setting select Language in 1 Setup 1 on the Setup screen pages 47 and 113 and select the desired language ...

Страница 21: ...tick Duo make sure of the direction and insert it all the way to the connector If the Memory Stick Duo is not inserted correctly you may not be able to record or display images with the Memory Stick Duo And also it may result in malfunction of both the camera and Memory Stick Duo 3 Access lamp Close the battery Memory Stick Duo cover To remove a Memory Stick Duo Open the battery Memory Stick Duo c...

Страница 22: ...ze setup appears For details on the image size see page 23 3 VGA E Mail 1M 3M 3 2 4M VGA Image Size Select the desired image size with on the control button The image size is set When the setting is complete press Image Size so that the Image Size setup disappears from the LCD screen The image size selected here is maintained even when the power is turned off ...

Страница 23: ...ecreases Refer to the table on the right and choose the image size and image quality appropriate to the kind of images you want to shoot Short description of the image size The following illustration shows a brief image using the maximum image size and the minimum one 2304 1728 480 640 Image size 4M 4M 2304 pixels 1728 pixels 3 981 312 pixels Image size VGA E Mail VGA 640 pixels 480 pixels 307 200...

Страница 24: ...he image quality Image quality Compression ratio Usage guideline Fine Low compression looks better High compression normal For recording or printing with better image quality Standard For recording a larger number of images ...

Страница 25: ...101 187 202 376 357 649 726 1320 VGA E Mail 97 243 196 491 394 985 790 1975 1428 3571 2904 7261 1 When REC Mode is set to Normal For the number of images that can be saved in other modes see page 108 2 For more information about the image quality compression ratio see page 47 When images recorded using earlier Sony models are played back on this camera the display may differ from the actual image ...

Страница 26: ...itch is set to or Do not touch the lens portion while it is operating such as when you press POWER to turn on the power or when the zoom function is working page 30 2 Hold the camera steadily with both hands and position the subject in the center of the focus frame This camera has an Auto Macro AF function The minimum focal distance needed to focus on a subject is approx 12 cm 4 3 4 inches from th...

Страница 27: ... button fully down The shutter sounds The image will be recorded in the Memory Stick Duo The recorded image is displayed for approximately two seconds Auto Review page 112 When operating the camera using a battery pack if you do not operate the camera for a while during recording or playback the camera turns off automatically to prevent wearing down the battery page 17 Mode switch When you set the...

Страница 28: ...en you try to shoot a subject that is difficult to focus on the AE AF lock indicator changes to flashing slowly In addition the AE locked beep does not sound The Auto Focus function may have difficulty working under the following conditions In such cases release the shutter button then recompose the shot and focus again The subject is distant from the camera and dark The contrast between the subject ...

Страница 29: ...processing Indicators on the LCD screen during shooting Each time you press the display changes in the following order For a detailed description of the indicators see page 121 For a detailed description of the histogram see page 53 You can extend the battery remaining time by turning off the LCD backlight When shooting viewing movies the status of the LCD screen changes as follows Indicators off ...

Страница 30: ...hooting purpose Optical zoom The telephoto and wide angle adjustment is made by the lens in the same manner as a conventional film camera The maximum optical zoom is 3 Digital zoom The camera has the following two types of digital zoom Smart zoom The image is enlarged with almost no distortion This lets you use smart zoom with the same feeling as optical zoom The maximum smart zoom scale depends on...

Страница 31: ... on the LCD screen as follows The W side of this line is optical zoom and the T side is digital zoom Zoom scaling indicator The zoom scaling indicator differs according to the zoom type Optical zoom Smart zoom Precision digital zoom The AF range finder frame does not appear when using the digital zoom The or indicators flashes and AF operates with priority on subjects located near the center Using t...

Страница 32: ...gardless of the surrounding brightness SL Slow synchro The flash strobes regardless of the surrounding brightness The shutter speed is slow in a dark place so you can clearly shoot the background that is out of flash light No flash The flash does not strobe If the menu is currently displayed press MENU first so that the menu disappears The recommended shooting distance using the flash is approx 0 2 to 2...

Страница 33: ...ears on the LCD screen and the AF illuminator emits red light when the shutter button is pressed halfway until the focus is locked VGA 60min 101 96 ON FINE F3 5 30 S AF When this function is not needed set AF Illuminator to Off on the Setup screen page 112 If AF illuminator light does not reach the subject sufficiently or the subject has no contrast focus will not be achieved A distance up to appro...

Страница 34: ...e LCD screen during shooting instead indicator appears on the LCD screen The actual date and time appear in red on the lower right corner during playback only You can also carry out this operation with the mode switch set to or 2 Setup t Mode Press on the control button to advance to then press again The Setup screen appears 3 Day Time Date Off Camera 1 AF Mode Digital Zoom Date Time Red Eye Reduc...

Страница 35: ...erimposes the date hour and minute onto the image Date Superimposes the year month and day onto the image Off Does not superimpose the date and time onto the image After the setting has been completed press MENU first so that the menu disappears and shoot the image If you select Date the date is superimposed onto the image in the order selected in Setting the date and time page 18 Date and time set...

Страница 36: ...es Allows you to shoot sharp images of people in dark places without losing the dark atmosphere of the surroundings The shutter speed becomes slower so using a tripod is recommended Landscape mode Focuses only on a distant subject to shoot landscapes etc Soft snap mode This mode lets you shoot skin colors in brighter and warmer tones for more beautiful pictures In addition the soft focus effect cr...

Страница 37: ...aside or lakeside scenes the blue of the water is clearly recorded Candle mode You can record parties candle services and other candlelit scenes without spoiling the candlelight atmosphere The shutter speed becomes slower so using a tripod is recommended ...

Страница 38: ...MENU The menu appears 2 Mode Program Auto Camera Select Camera with on the control button then select the desired mode with To return to normal mode Select Auto or Program with on the control button Scene Selection setting is maintained even when the power is turned off ...

Страница 39: ...e set to your preference NR slow shutter The NR slow shutter function reduces noise from recorded images providing clear images When the shutter speed is 1 6 second or slower the camera automatically activates the NR slow shutter function and NR is indicated next to the shutter speed indicator Press the shutter button fully down Capturing Then the screen turns black Processing Finally when Process...

Страница 40: ...e at a time displayed over the entire screen Index screen Nine images are displayed simultaneously in separate panels on the LCD screen For details on viewing movies see page 76 For a detailed description of the indicators see page 123 Viewing single images 1 BACK NEXT VOLUME VGA 60min 10 30PM 2005 1 1 101 0008 8 9 101 Set the mode switch to and turn on the power The last image in the selected rec...

Страница 41: ... screen 1 SINGLE DISPLAY Slide index to the W side The display switches to the index screen To display the next previous index screen Press on the control button to move the yellow frame up down left right 2 SINGLE DISPLAY Select the desired still image with on the control button The image in the yellow frame is selected To return to the single image screen Slide the index to the T side or press o...

Страница 42: ...in BACK NEXT Press Delete The image has not yet been deleted at this point You cannot delete the protected image page 64 3 VGA 2 9 101 60min Delete Exit BACK NEXT Select Delete with on the control button then press The message Access appears and the image has been deleted To continue and delete other images Display the image to be deleted with on the control button Then select Delete with and pres...

Страница 43: ... This Folder Select Select with on the control button then press 3 TO NEXT SELECT Select an image you want to delete with on the control button then press The Delete indicator appears on the selected image At this point the image has not yet been deleted Repeat this step for all of the images you want to delete To cancel a selection select the image then press on the control button again so that t...

Страница 44: ...r are deleted To cancel deleting select Cancel then press You can also delete movies page 77 Formatting a Memory Stick Duo 1 Terminal side Insert the Memory Stick Duo you want to format into the camera The term formatting means preparing a Memory Stick Duo to record images this process is also called initialization The Memory Stick Duo supplied with your camera and commercially available Memory St...

Страница 45: ...2 1 Memory Stick Tool Format Create REC Folder Change REC Folder OK Cancel Select Memory Stick Tool with on the control button Select Format with then press Select OK with then press To cancel the formatting Select Cancel with on the control button then press 4 Format All data will be erased 60min Ready OK Cancel Select OK with on the control button then press The message Formatting appears When t...

Страница 46: ...m you want to set WB ISO 100 200 400 Auto ISO When the mode switch is set to press on the control button after selecting the item Press on the control button to select the desired setting The selected setting is enlarged and the setting is entered When the marks appear with an item There are items that are not displayed on the screen Press on the control button to display these items To turn off t...

Страница 47: ... 2 1 Press on the control button to enter the setting To turn off the Setup screen display Press MENU again To return to the menu from the Setup screen Press on the control button to return to the position enclosed by the frame in step then press again For a detailed description of the Setup items see page 112 Deciding the still image quality You can select the still image quality from Fine high q...

Страница 48: ...MENU Mode switch Control button Up to 4 000 images can be stored in one folder When the folder capacity is exceeded a new folder is automatically created Creating a new folder Select Memory Stick Tool with Create REC Folder with and OK with then press The creating folder screen appears Create REC Folder Creating REC folder 102MSDCF Ready OK Cancel 60min Select OK with then press A new folder is cr...

Страница 49: ...t REC Folder Cancel OK Folder Name 102 2 2 Created No Of Files 2005 102MSDCF 0 1 1 1 05 34AM Select the desired folder with and OK with then press To cancel changing the recording folder Select Cancel in step or You cannot select the 100MSDCF folder as a recording folder page 85 The image is stored in the newly selected folder You cannot move recorded images to a different folder with this camera ...

Страница 50: ...oint AF Center AF This mode is useful for focusing on a subject near the center of the frame Use together with the AF lock function lets you shoot in the desired image composition Set the mode switch to or Press MENU The menu appears Select Focus with then select the desired AF range with VGAFINE 98 101 S AF 60min P AF range finder frame The focus is adjusted automatically The color of the AF range...

Страница 51: ...he factory setting is Single AF Monitoring AF M AF The camera automatically adjusts the focus before the shutter button is pressed and held halfway down letting you compose images with the focus already adjusted When the shutter button is pressed and held halfway down and AF lock is complete the focus is locked Battery consumption may be faster than in Single AF mode Before operation Set the menu ...

Страница 52: ...down F3 5 30 VGA FINE 98 101 S AF 60min P VGA FINE 97 101 S AF P F3 5 30 60min AF range finder frame AE AF lock indicator When you are using AF lock you can capture an image with the correct focus even if the subject is at the edge of the frame You can carry out the AF lock adjustment process before you press the shutter button fully down Adjusting the exposure EV adjustment You can manually adjust...

Страница 53: ...ct is being shot in extremely bright or dark conditions or the flash is used the exposure adjustment may not be effective Displaying a histogram A histogram is a graph showing the brightness of an image The horizontal axis shows the brightness and the vertical axis shows the number of pixels The graph display indicates a bright image when skewed to the right side a dark image when skewed to the lef...

Страница 54: ...ack a single image or during Quick Review In particular a large difference may appear in the following cases When the flash strobes When the shutter speed is slow or high The histogram may not appear for images recorded using other cameras Shooting techniques When shooting images the camera automatically sets the exposure When shooting a whitish overall image such as a backlit subject or a snowy sc...

Страница 55: ...ou shoot images that are not too dark even when the subject is backlit or adjust the exposure to the subject when there is strong contrast between the subject and the background Before operation When shooting still images set Camera in the menu to other than Auto pages 46 and 109 Mode switch Control button Set the mode switch to or Press to turn spot metering on The spot metering cross hair appear...

Страница 56: ...ing under a cloudy sky Fluorescent Shooting under fluorescent lighting Incandescent Places where the lighting conditions change quickly Under bright lighting such as photography studios Before operation When shooting still images set Camera in the menu to other than Auto pages 46 and 109 MENU Mode switch Control button Set the mode switch to or Press MENU The menu appears Select WB White Bal with t...

Страница 57: ... the flash level lower than normal You may not be able to set the flash level a depending on the Scene Selection mode page 39 Shooting continuously This mode is used for continuous shooting The maxium number of images you can shoot per one shooting depends on the image size and image quality settings MENU Mode switch Shutter button Control button When the battery power decreases with use or the capa...

Страница 58: ... each time you press the shutter button This is convenient for checking your form in sports for example MENU Mode switch Control button Set the mode switch to Press MENU The menu appears Select Mode REC Mode with then select Multi Burst with Select M Interval with then select the desired frame interval with You can choose the frame interval from 1 7 5 1 15 or 1 30 second 1 30 PFX Mode BRK M 1 15 1...

Страница 59: ...a toned like an old photograph Before operation When shooting still images set Camera in the menu to other than Auto pages 46 and 109 MENU Mode switch Control button Set the mode switch to or Press MENU The menu appears Select PFX P Effect with then select the desired mode with Shoot the image To cancel Picture Effects Select Off in step Picture Effect setting is not maintained when the power is t...

Страница 60: ...2005 102MSDCF 9 1 1 1 05 34AM Select OK with then press To cancel the selection In step select Cancel When multiple folders are created in the Memory Stick Duo When the first or last image in the folder is displayed the following indicators appear on the screen Moves to the previous folder Moves to the next folder Moves to both the previous and next folders Single screen VGA 10 30PM 2005 1 1 101 00...

Страница 61: ...ith Press Press Press Press To view more of the top of the image To view more of the bottom of the image To view more of the left side of the image To view more of the right side of the image Adjust the image size with the playback zoom To cancel playback zoom Press You cannot use playback zoom for movies and Multi Burst images If you slide the playback zoom to the W side while a non enlarged imag...

Страница 62: ...red in the Memory Stick Duo Repeat On Plays back images in a continuous loop Off After all the images have been played back the slide show ends Select Start with then press The slide show begins To cancel the slide show setting Select Cancel in step To stop slide show playback Press select Exit with then press again To skip to the next previous image during the slide show Press next or previous Th...

Страница 63: ... images shot in Multi Burst mode You can play back Multi Burst images continuously or play them back frame by frame This function is used for checking the image Mode switch Control button When Multi Burst images are played back on a computer or on a camera without the Multi Burst function the 16 frames you shot will be displayed at the same time as part of one image You cannot cut the Multi Burst ...

Страница 64: ...n to the normal playback Press in step The playback starts from the frame displayed on the LCD screen To delete shot images When using this mode you cannot delete only certain frames When you delete images all 16 of the frames are deleted at the same time 1 Display the desired Multi Burst image to delete 2 Press Delete 3 Select Delete then press All of the frames are deleted Protecting images Prot...

Страница 65: ...ss Select Select with then press Select the image you want to protect with then press The green indicator appears on the selected image TONEXT MENU SELECT Repeat step to protect other images Press MENU Select OK with then press The indicator turns white The selected images are protected To exit the Protect function Select Cancel in step or select Exit in step then press To cancel individual protec...

Страница 66: ...size with Press MENU The menu appears Select Resize with then press Select the desired size with then press The resized image is recorded in the recording folder as the newest file To cancel resizing Select Cancel in step You cannot change the size of movies or Multi Burst images When you change from a small size to a large size the image quality deteriorates You cannot resize to an image size of 3...

Страница 67: ... Stick compatible printer See the users manual supplied with the printer for details Printing with a computer page 91 You can print images that have been loaded to a computer using the PicturePackage software included on the CD ROM supplied with your camera See the users manual supplied with the printer for the printer operation method Printing at a shop page 73 Just bring the Memory Stick Duo and...

Страница 68: ...t movies When an error notification is received from the connected printer the indicator flashes for approximately five seconds Check the connected printer Single print Index print If you arrange the same image side by side select This image in single image mode then set Index to On page 70 The number of images printed on a single index print differs according to the printer Preparing the camera Set ...

Страница 69: ... the indicator appears on the LCD screen Printer When USB Connect is not set to PictBridge on the Setup screen Even if you turn on the camera you cannot use the PictBridge function Disconnect the USB cable from the camera and set USB Connect to PictBridge page 68 Printing in single image mode When you connect the camera and a printer the print menu appears MENU Mode switch Control button Select th...

Страница 70: ...e When you select Date for Date setting the date will be inserted in the order set in Setting the date and time page 18 Date function may not be provided depending on a printer Setting items the printer does not support cannot be displayed Select Quantity with select the number of sheets with When Index is set to Off the number of sheets of the selected image When Index is set to On the number of ...

Страница 71: ...o display the index screen Press MENU The menu appears Select Print with then press Select the desired printing type with then press Cancel Select DPOF image Print Select Selects the images in order Prints all the selected images 1 Select the image you want to print with then press The mark appears on the selected image Repeat this step to print other images 2 Press MENU DPOF image Prints all the ...

Страница 72: ... not be provided depending on a printer Select Quantity with select the number of sheets with When Index is set to Off the number of sheets of the selected image When Index is set to On the number of sheets of index images Depending on the number of index images it may not be possible to arrange all of the images on a single sheet Select OK with then press The image is printed Do not disconnect th...

Страница 73: ...images you want to have printed beforehand with print marks is convenient when having images printed at a print service shop MENU Mode switch Control button You cannot mark movies When you mark images shot in Multi Burst mode all the images are printed on one sheet divided into 16 panels You cannot set the number of prints Marking print marks in single image mode Set the mode switch to Display the...

Страница 74: ...age you want to mark with then press The green mark appears on the selected image TONEXT MENU SELECT Repeat step to mark other images Press MENU Select OK with then press The mark turns white The mark setting is completed To unmark marks Select the images to be unmarked with in step then press To unmark all the marks in the folder Select All In This Folder in step then press Select Off then press ...

Страница 75: ...min Recording stops when the Memory Stick Duo is full Press the shutter button fully down again to stop recording Indicators during shooting The screen indicators are not recorded Each time you press the status of the LCD screen changes as follows Indicators off LCD backlight off Indicators on A histogram is not displayed For a detailed description of the indicators see page 122 Using the self tim...

Страница 76: ... played back During playback playback appears on the screen 00 00 03 10 30PM 2005 1 1 101_0010 10 10 101 STD 6 4 0 60min PLAY BACK NEXT VOLUME Playback bar To stop playback Press again To adjust the volume Press to adjust the volume To advance or rewind the movie Press cue or rev during playback To return to the normal playback press Indicators during viewing movies Each time you press the status ...

Страница 77: ...The message Access appears and the movie has been deleted To continue and delete other movie display the movie you want to delete with then repeat step To cancel deletion Select Exit in step or In index mode Set the mode switch to then slide index to the W side to display an index screen Press Delete Select Select with then press Select the movie you want to delete with then press The green Delete...

Страница 78: ...il messages Note that the original movie is deleted when you cut it The file numbers assigned when movies are cut The cut movies are assigned new numbers and recorded as the newest files in the selected recording folder The original movie is deleted and that number is skipped Example Cutting a movie numbered 101_0002 1 2 101_0002 101_0003 3 101_0001 1 Cutting scene A 1 2 3 A B 101_0002 Divide point ...

Страница 79: ... the cutting point use frame rewind forward and adjust the cutting point using If you want to change the cutting point select Cancel The playback of the movie starts again When you have decided on a cutting point select OK with and press Select OK with then press The movie is cut To cancel cutting Select Exit in step or The movie appears on the screen again You cannot cut the following images Stil...

Страница 80: ...e USB mode There are two modes for a USB connection when connecting with a computer Normal and PTP modes The default setting is the Normal mode This section describes the Normal mode as an example For a details on the PTP connection see page 114 Communication with your computer When your computer resumes from the suspend or sleep mode communication between your camera and your computer may not rec...

Страница 81: ...GE in that order When also using the supplied image utility software Picture Package click Picture Package The USB driver will be installed when Picture Package is installed page 87 When the computer is in use shut down all application software before you install the USB driver Click USB Driver on the title screen The InstallShield Wizard screen appears Click Next The USB driver installation start...

Страница 82: ...itch to Turn on your conputer and the camera Connect the USB cable supplied to the USB jack of the camera Connect the USB cable to your computer When using Windows XP the AutoPlay wizard automatically appears on the desktop Proceed to page 84 USB Mode MENU Switch on Normal Access indicators USB Mode Normal appears on the LCD screen of the camera When a USB connection is established for the first ti...

Страница 83: ... of copying images to the My Documents folder When the Removable Disk icon is not shown see page 84 When using Windows XP see page 84 Double click DCIM then double click the folder that the image files you want to copy are stored Right click the image file to display the menu then select Copy from the menu Double click the My Documents folder and right click on the My Documents window to display the...

Страница 84: ... pictures to a folder on my computer using Microsoft Scanner and Camera Wizard then click OK The Scanner and Camera Wizard screen appears Click Next The images stored on the Memory Stick Duo are displayed Click the checkbox of images that you do not want to copy to your computer to remove the checkmark then click Next The Picture Name and Destination screen appears Select a name and destination fo...

Страница 85: ...d with your camera are grouped as folders in the Memory Stick Duo Example when viewing folders on Windows XP Folder containing image data which was recorded using the camera not equipped with the folder creating function Folder containing image data which was recorded using your camera When not creating any folders there is only the 101MSDCF folder Folder containing movie data etc which was record...

Страница 86: ...urst mode page 57 Multi Burst mode page 58 MOV0 MPG Movie files page 75 MOV0 THM Index image files recorded simultaneously in movie mode page 75 stands for any number within the range from 0001 to 9999 The numerical portions of a movie file recorded in movie mode and its corresponding index image file are the same ...

Страница 87: ...xtension for movies is MPG Do not change the extension Copy the image file to the Memory Stick Duo folder Right click the image file then click Copy Select and double click the DCIM folder from Removable Disk or Sony MemoryStick in My Computer Right click the MSDCF folder in the DCIM folder and click Paste stands for any number within the range from 100 to 999 Installing Picture Package and ImageMix...

Страница 88: ... yet installed the USB driver page 81 do not connect the camera to the computer before you install the Picture Package software except for Windows XP Click Picture Package ImageMixer VCD2 Choose Setup Language screen appears Select the desired language then click Next This section describes the English screen Click Next The License Agreement screen appears Read the agreement carefully If you accep...

Страница 89: ... and the images copied are displayed Normally Picture Package and Date folders are created inside the My Picture folder and all of the image files recorded with the camera are copied into these folders If Picture Package cannot copy images automatically start up Picture Package Menu and check Settings in Copy automatically Using Picture Package Start up the Picture Package Menu on the desktop to us...

Страница 90: ... A CD R drive is required to store images on a CD R For further information on compatible drives see the following home page of the Pixela User Support Center http www ppackage com Creating a video CD with a menu ImageMixer VCD2 ImageMixer VCD2 is compatible with High resolution still image video CD Click Burning Video CD on the left side of the screen then click Burning Video CD in the lower righ...

Страница 91: ... and click Write the screen used for writing to a disc appears Creating a slide show Click Automatic Slideshow Producer on the left side of the screen then click Automatic Slideshow Producer in the lower right corner of the screen The screen used for creating a slide show appears Printing images Perform the procedures described under Viewing images on a computer page 90 to display the list of imag...

Страница 92: ... are not guaranteed when using a USB hub Operations are not guaranteed for all the recommended computer environments mentioned above USB mode There are two modes for a USB connection when connecting with a computer Normal and PTP modes The default setting is the Normal mode This section describes the Normal mode as an example For a details on the PTP connection see page 114 Communication with your...

Страница 93: ... your hard disk For details on the storage location of the images and file names see page 85 Viewing the images on your computer 1 Double click the hard disk icon 2 Double click the desired image file in the folder containing the copied files The image file opens Picture Package cannot be used with Macintosh Using ImageMixer VCD2 ImageMixer VCD2 is also compatible with Macintosh Mac OS X v10 1 5 or la...

Страница 94: ...s should be 1024 768 dots or higher and 32 000 colors or higher 2 Insert the CD ROM supplied into the CD ROM drive 3 Double click the CD ROM icon 4 Copy the IMXINST SIT file in the MAC folder to the hard disk icon 5 Double click the IMXINST SIT file in the copy to folder 6 Double click the ImageMixer VCD2_ Install extracted file 7 After the user information screen appears enter the desired name and p...

Страница 95: ...amera still not work properly consult your Sony dealer or local authorized Sony service facility Battery pack and power Symptom Cause Solution You cannot charge the battery pack The camera is turned on Turn the camera off page 17 The battery pack cannot be installed Install the battery pack while pushing the battery eject lever toward the front of the camera using the tip of the battery pack page ...

Страница 96: ...age 119 Replace the battery pack with a new one The battery pack runs down too quickly The battery pack is dead page 119 Replace the battery pack with a new one You have used the camera in an extremely cold location page 115 The battery terminal is dirty Clean the battery terminal with a cotton swab etc and charge the battery pack After charging the battery pack disconnect the DC plug from your ca...

Страница 97: ...switch to Smart zoom does not function Digital Zoom is set to Precision or Off on the Setup screen Set Digital Zoom to Smart pages 30 and 112 The image size is set to 4M or 3 2 Set image size to other settings except 4M and 3 2 pages 22 The smart zoom cannot be used in Multi Burst mode pages 30 and 58 The mode switch is set to Set the mode switch to The image is too dark You are shooting a subject...

Страница 98: ...ing takes a long time NR slow shutter function is activated page 39 The flash does not work The mode switch is set to other than Set the mode switch to page 27 The flash is set to No flash Set the flash to auto No indicator Forced flash or SL Slow synchro page 32 When shooting still images select the other mode than Twilight mode or Candle mode for the Scene Selection function page 39 When Landscape mo...

Страница 99: ...ear rough right after playback starts due to the image processing This condition is not a malfunction The image cannot be played back on a computer See page 100 Deleting Editing Images Symptom Cause Solution Your camera cannot delete an image The image is protected Cancel the protection page 64 You are using the Memory Stick Duo with the write protect switch and the switch is set to the LOCK posit...

Страница 100: ...board the mouse and the camera Disconnect all equipment other than the keybord and the mouse from the USB connectors page 80 The camera is not connected directly to your computer Connect the camera directly to your computer without passing through a USB hub or other device page 80 Install the USB driver page 81 Your computer does not properly recognize the device because you connected the camera a...

Страница 101: ...y Stick Duo You are inserting the Memory Stick Duo backwards Insert the Memory Stick Duo from the correct side page 21 You cannot record on a Memory Stick Duo You are using the Memory Stick Duo with the write protect switch and the switch is set to the LOCK position Set the switch to the recording position page 117 The capacity of the Memory Stick Duo is full Delete unnecessary images pages 42 and...

Страница 102: ... again Movies cannot be printed Images modified with a computer or images shot using other than this camera may not be able to be printed Printing is canceled You disconnected the USB cable before the Not disconnect USB cable mark disappears You cannot insert the date or print images in the index mode Consult with the printer manufacturer whether the printer provides date function or index print fu...

Страница 103: ...o a wall outlet wall socket page 16 The power is on but the camera does not work The built in microcomputer is not working properly Disconnect and then after one minute reconnect all power sources and turn on the camera If this does not work press the RESET button inside the battery Memory Stick Duo cover with a fine tipped object then turn the power on again This will clear the date and time setti...

Страница 104: ...et to the LOCK position Set the switch to the recording position page 117 No memory space The capacity of the Memory Stick Duo is insufficient You cannot record images Delete unnecessary images pages 42 and 77 Read only memory Your camera cannot record or delete images to this Memory Stick Duo No file in this folder No images have been recorded in this folder Folder error A folder with the same first...

Страница 105: ...o other than 640 Fine Enable printer to connect USB Connect is set to PictBridge however the camera is connected to a non PictBridge compliant device Check the device Depending on the circumstances the connection may not be established Disconnect and connect the USB cable again If an error message is indicated on the printer refer to the operating instructions supplied with the printer Connect to ...

Страница 106: ... Meaning Corrective Action Processing The printer is performing the printing stop processing Printing is not possible until this processing is completed This processing may take some time depending on the printer ...

Страница 107: ...ere is trouble with your camera s hardware Turn the power off and on again page 17 C 13 The camera cannot read or write data on the Memory Stick Duo Re insert the Memory Stick Duo several times An unformatted Memory Stick Duo is inserted Format the Memory Stick Duo page 44 The inserted Memory Stick Duo cannot be used with your camera or the data is damaged Insert a new Memory Stick Duo page 21 E 6...

Страница 108: ...5 When the number of remaining shooting images is greater than 9 999 the 9999 indicator appears on the LCD screen The table below shows the approximate number of images and recording time that can be recorded on a Memory Stick Duo that has been formatted by this camera Multi Burst Units images 16MB 32MB 64MB 128MB 256MB 512MB 1M 24 46 50 93 101 187 202 376 357 649 726 1320 Movie 16MB 32MB 64MB 128...

Страница 109: ...the white balance page 56 ISO1 5 400 200 100 Auto Selects the ISO sensitivity Select a large number when shooting in dark locations or shooting a subject moving at high speed or select a small number to obtain high image quality Note that the image tends to become noisier as the ISO sensitivity number increases P Quality 1 Fine Standard Records images with fine standard quality page 47 Mode REC Mod...

Страница 110: ... does not appear when Camera in the menu is set to other than Program 3 This does not appear when Camera in the menu is set to Auto Twilight mode Twilight portrait mode or Candle mode 4 This does not appear when Camera in the menu is set to Auto Twilight mode or Candle mode 5 The available settings are limited according to the Camera setting in the menu When the mode switch is set to Item Setting ...

Страница 111: ... compliant printer page 68 Slide Interval Image Repeat Start Cancel Sets the slide show interval page 62 Only in single image mode 3 sec 5 sec 10 sec 30 sec 1 min Sets the range of the playback images Folder All Plays back images repeatedly On Off Starts the slide show Cancels the slide show Resize 4M 3M 1M VGA Cancel Changes the recorded still image size page 66 Only in single image mode Rotate c...

Страница 112: ...uction On Off Reduces the red eye phenomenon when using a flash page 33 AF Illuminator Auto Off Selects whether to emit an AF assist light in the dark Helps when it is hard to focus on the subject under dark lighting page 33 Auto Review On Off Selects whether to automatically display the recorded image on the LCD screen immediately after shooting a still image When set to On the recorded image is d...

Страница 113: ...ing Description LCD Backlight Bright Normal Selects the brightness of the LCD backlight Selecting Bright makes the screen bright and easy to see when using the camera outdoors or in other bright locations but also uses up the battery charge faster Displayed only when you are using the camera with the battery pack Beep Shutter On Off Turns on the shutter sound when you press the shutter button Turn...

Страница 114: ... a file a number one higher than the largest number is assigned USB Connect PictBridge PTP Normal Connects the camera with a PictBridge compatible printer page 69 When a PTP connection is made the Copy Wizard automatically starts up and copies the images in the recording folder page 85 set in the camera to the computer This supports Windows XP and Mac OS X Makes a USB connection between the camera ...

Страница 115: ... battery pack Cleaning the camera surface Clean the camera surface with a soft cloth slightly moistened with water then wipe the surface with a dry cloth Do not use the following as this may damage the finish or the casing Chemical products such as thinner benzine alcohol disposable cloth insect repellent or insecticide etc Touch the camera with the above on your hand Contact with rubber or vinyl f...

Страница 116: ... the date and time Charging method Connect the camera to a wall outlet wall socket using the AC Adaptor or install a charged battery pack and leave the camera for 24 hours or more with the power off The rechargeable button battery is located inside the internal battery cover Never remove the rechargeable button battery On Memory Stick Memory Stick is a compact portable IC recording medium The type...

Страница 117: ...emory Stick Duo with your hand or a metal object Do not strike bend or drop the Memory Stick Duo Do not disassemble or modify the Memory Stick Duo Do not expose the Memory Stick Duo to water Do not leave the Memory Stick Duo within the reach of small children They might accidentally swallow it Do not use or keep the Memory Stick Duo under the following conditions High temperature locations such as...

Страница 118: ...battery packs handy for two or three times the expected shooting time and making trial shots before taking the actual shots Do not expose the battery pack to water The battery pack is not water resistant Do not leave the camera in a hot location such as inside a hot car or exposed to direct sunlight Remaining battery time indicator The power may go off although the battery remaining indicator show...

Страница 119: ... White balance Automatic Daylight Cloudy Fluorescent Incandescent File format DCF compliant Still images Exif Ver 2 2 JPEG compliant DPOF compatible Movies MPEG1 compliant Monaural Recording media Memory Stick Duo Flash Recommended distance ISO set to Auto 0 2 to 2 0 m 7 7 8 to 78 3 4 inches W 0 5 to 1 5 m 19 3 4 to 59 1 8 inches T Input and Output connectors USB jack mini B USB communication Hi S...

Страница 120: ...ing projecting parts Mass Approx 130 g 5 oz excluding power cord mains lead NP FT1 battery pack Used battery Lithium ion battery Maximum voltage DC 4 2 V Nominal voltage DC 3 6 V Capacity 2 4 Wh 680 mAh Accessories AC LS5 LS5B AC Adaptor 1 Power cord mains lead 1 NP FT1 battery pack 1 Battery case 1 TAD LA tripod adaptor 1 USB cable 1 Neck strap 1 Memory Stick Duo 16 MB 1 Memory Stick Duo Adaptor ...

Страница 121: ... 1 3 1 3 1 3 Zoom scaling indicator 30 Sharpness indicator 109 Saturation indicator 109 Contrast indicator 109 ON AF illuminator indicator 33 112 Metering mode indicator 55 Picture effect indicator 59 S AF M AF AF mode indicator 51 AF range finder frame indicator 50 4M 3 2 3M 1M VGA Image size indicator 22 FINE STD Image quality indicator 47 101 Recording folder indicator 48 Remaining Memory Stick ...

Страница 122: ... C 32 00 60min STBY 1 2 3 4 5 60min Battery remaining indicator 14 Recording mode indicator 75 White balance indicator 56 STBY REC Movie shooting indicator 1 3 Zoom scaling indicator 30 Metering mode indicator 55 Picture effect indicator 59 AF range finder frame indicator 50 FINE 6 4 0 STD 6 4 0 1 6 0 Image size indicator 75 101 Recording folder indicator 48 Remaining Memory Stick capacity indicato...

Страница 123: ...ize indicator 22 Protect indicator 65 Print DPOF mark indicator 73 Change folder indicator 60 1 3 Playback zoom scaling indicator 61 Step 12 16 Frame by frame playback indicator 64 101 0012 Folder file number 85 PictBridge connecting indicator 69 101 Recording folder indicator 48 Remaining Memory Stick capacity indicator 101 Playback folder indicator 60 12 12 Image number Number of images recorded ...

Страница 124: ...moving images 00 00 12 8 8 101 160 DPOF 60min VOL 1 2 3 4 5 101 Recording mode indicator 76 FINE 6 4 0 STD 6 4 0 1 6 0 Image size indicator 76 Playback stop indicator 76 Change folder indicator 60 VOL Volume indicator 76 Playback bar 76 101 Recording folder indicator 48 Remaining Memory Stick capacity 101 Playback folder indicator 60 8 8 Image number Number of images recorded in selected folder in...

Страница 125: ...rol button 17 Copying images to your computer 80 83 84 89 92 Cutting movies 78 D Daylight 56 DC plug 13 16 Deleting movies 77 Deleting still images 42 Digital zoom 30 Divide 78 DPOF 73 E Enlarged Icon 112 Enlarging an image 61 EV adjustment 52 Extension 85 87 F File names 85 File Number 114 File storage destinations 85 Flash Level 57 Flash mode 32 Fluorescent 56 Focus 50 Folder 48 60 Forced flash 3...

Страница 126: ...ESET button 95 Resize 66 Rotate 62 S Saturation 110 Scene Selection 36 Screen display 29 121 Self diagnosis display 107 Self timer 31 Sepia 59 Setting date and time 18 Setup 47 112 Sharpness 110 Shooting movies 75 Shooting still images 26 Single AF 51 Single screen 40 Slide show 62 Slow synchro 32 Smart zoom 30 Snow mode 36 Soft snap mode 36 Spot metering 55 Still image auto shooting Auto 27 Still...

Страница 127: ...127 Index Z Zoom 30 Zoom scale 30 ...

Страница 128: ...roduct and answers to frequently asked questions can be found at our Customer Support Website Printed on 100 recycled paper using VOC Volatile Organic Compound free vegetable oil based ink 2186445130 Sony Corporation Printed in Japan ...

Отзывы: