background image

7

GB

Getting Started

Getting Started

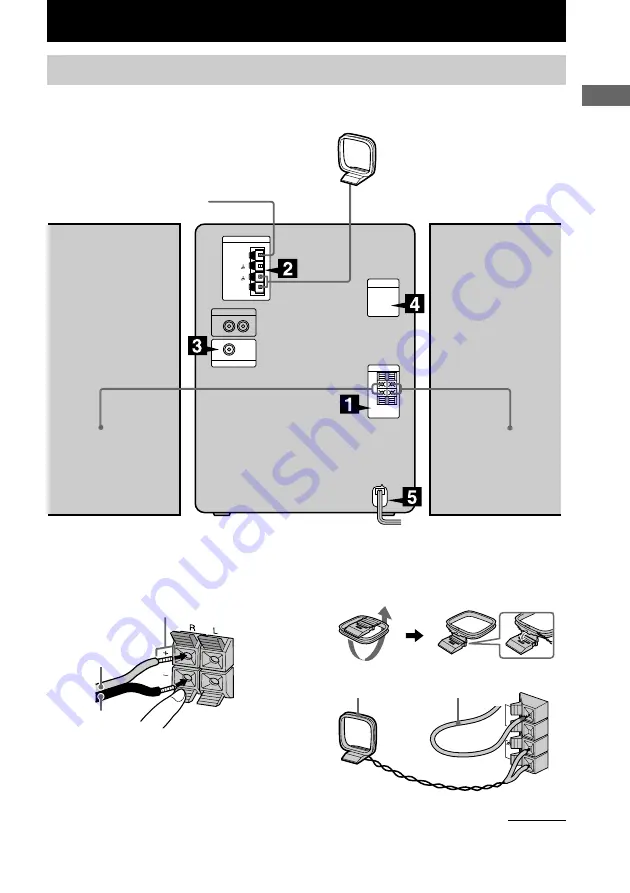
AM loop antenna

Right speaker

FM antenna

Left speaker

1

Connect the speakers.

Connect the speaker cords to the SPEAKER
terminals as the following.

Black (

#

)

Red (

3

)

Insert this portion

2

Connect the FM/AM antennas.

Set up the AM loop antenna, then connect
it.

FM

75

AM

AM loop antenna

Extend the FM lead antenna
horizontally

Hooking up the system

Perform the following procedure 

1

 to 

5

 to hook up your system using the supplied cords and

accessories.

List of Button Locations and Reference Pages/Getting Started

continued

Содержание CHC-CV40

Страница 1: ...Operating Instructions Compact Hi Fi Component System 4 241 412 12 2 2002 Sony Corporation CHC CV40 ...

Страница 2: ...ilt in cabinet This appliance is classified as a CLASS 1 LASER product This label is located on the rear exterior The following caution label is located inside the apparatus Don t throw away the battery with general house waste dispose of it correctly as chemical waste ENERGY STAR is a U S registered mark As an ENERGY STAR partner Sony Corporation has determined that this product meets the ENERGY ...

Страница 3: ...utton Locations and Reference Pages Main unit 5 Remote control 6 Getting Started Hooking up the system 7 Attaching the speaker pads 9 Inserting two R6 size AA batteries into the remote 9 Setting the clock 10 VIDEO CD CD MP3 Files Loading a disc 10 Playing a VIDEO CD Normal Play Shuffle Play Repeat Play 10 Playing a VIDEO CD with the PBC functions Ver 2 0 PBC Play 13 Playing a CD Normal Play Shuffl...

Страница 4: ...Timer Falling asleep to music Sleep Timer 28 Waking up to music Daily Timer 28 Other Features Singing along Karaoke 29 Display Turning off the display Power Saving Mode 31 Adjusting the brightness of the display back light 31 Using the display 31 Using the on screen display 32 Optional Components Hooking up optional components 34 Listening to audio from a connected component 35 Recording audio fro...

Страница 5: ...20 REC PAUSE START e 24 Remote sensor qa REPEAT FM MODE qj 12 14 18 22 SURROUND wh 26 Tape deck lid 4 23 ALPHABETICAL ORDER A G CD disc tray ql 10 CD SYNC wl 24 CD NX ea 11 14 16 DBFB wf 26 DIMMER 2 31 DISC 1 3 w 11 14 DISC 1 3 Z w 8 10 DISPLAY 3 31 Display window 5 EDIT wj 25 ENTER qf 10 15 21 25 27 EQ EDIT qk 27 FUNCTION qh 10 14 15 17 GROOVE 9 26 Illustration number r PLAY MODE qg 9 13 14 R R N...

Страница 6: ...T 1 10 25 28 DBFB qj 26 DIMMER ef 31 DISC SKIP qf 11 14 DISPLAY ed 31 ENTER wa 10 15 21 25 27 FUNCTION wk 10 14 15 17 GROOVE ws 26 KARAOKE PON MPX wl 29 KEY CONTROL 2 ql 30 M Z MD VIDEO wj 35 MUSIC MENU 9 27 NEXT wf 13 Numeric buttons eg 12 19 ON SCREEN eh 32 PICTURE EFFECT wd 12 PLAY MODE es 11 14 PREV wf 13 REPEAT ea 12 14 18 RETURN O q 13 SELECT wh 13 19 SLEEP ej 28 SPECIAL MENU 8 19 SURROUND q...

Страница 7: ...following Black Red 3 Insert this portion 2 Connect the FM AM antennas Set up the AM loop antenna then connect it FM75 AM AM loop antenna Extend the FM lead antenna horizontally Hooking up the system Perform the following procedure 1 to 5 to hook up your system using the supplied cords and accessories List of Button Locations and Reference Pages Getting Started continued ...

Страница 8: ...ding down DISC 1 until LOCK appears 4 Unplug the power cord The color system of your TV PAL AUTO NTSC Do this While holding down DISC 1 Z press 1 While holding down DISC 2 Z press 1 While holding down DISC 3 Z press 1 3 Connect the video input jack of your TV to the VIDEO OUT jack with the supplied video cable When using a TV Turn on the TV and select the video input so that you can view the pictu...

Страница 9: ...th new ones Note If you do not use the remote for a long period of time remove the batteries to avoid possible damage from battery leakage You can Turn on or off the TV Select the input source for the TV Adjust the volume of the TV Change the channel of the TV Using the remote You can control Sony TVs using the buttons below By pressing TV 1 TV VIDEO TV VOL TV CH Note Depending on the TV you may n...

Страница 10: ... Mode VIDEO CD CD MP3 Files When you play a CD single 8 cm CD place it on the inner circle of the tray Loading a disc 1 Press DISC 1 3 Z The disc tray opens 2 Place a disc with the label side up on the disc tray To load other discs press a different Z and place the disc in the disc tray 3 Press the same Z again to close the disc tray Playing a VIDEO CD Normal Play Shuffle Play Repeat Play You can ...

Страница 11: ...ng Press again to increase the search speed Each time you press the button the speed changes sequentially 1 slow t 2 normal t 3 high t 1 slow Press CD N at the desired point to stop searching ALL DISCS Normal Play All VIDEO CDs in the disc tray continuously 1 DISC ALBUM Normal Play The tracks on the VIDEO CD you have selected in original order ALL DISCS SHUFFLE Shuffle Play The tracks on all VIDEO...

Страница 12: ...ying repeatedly press REPEAT FM MODE until REPEAT or REPEAT 1 disappears Adjust the picture 1 Press PICTURE EFFECT on the remote 2 Adjust the picture using R r T tontheremote 3 Press ENTER 1 There may be some disturbance in the paused video image 2 Only when PBC function is set to off or when playing VIDEO CDs without PBC function Ver 1 1 3 You cannot select REPEAT and ALL DISCS SHUFFLE at the sam...

Страница 13: ...n its function is canceled Note Depending on the disc you cannot go to the next disc during playback even if you have selected ALL DISCS Press DISC SKIP on the remote to go to the next disc Stop play Press x Go to the next menu page or scene Press NEXT on the remote Go back to the previous menu page or scene Press PREV on the remote Go back to the previous menu Press RETURN O on the remote Cancel ...

Страница 14: ...gain to resume play Select a track Slide the knob to L to go forward or to l to go back and release it when you locate the desired track or press or on the remote Find a point in a track Lock Search function Slide and hold the knob to m or to M during play to start searching Release the knob and press CD NX at the desired point to stop searching On the remote press m or M during play to start sear...

Страница 15: ...b to l or to L or press or on the remote until the desired track number appears after step 2 The DISC 1 3 button indicator lights in orange when a disc is loaded on the tray All of the DISC 1 3 button indicators light in orange for the first time you turn on the system and then go out if the system determines that a disc is not loaded after the disc tray is closed etc Total playing time including ...

Страница 16: ...evel 1 file names must be in the 8 3 format no more than eight characters in the name no more than three characters in the extension MP3 and in capital letters Folder names can be no longer than eight characters There can be no more than eight nested folder levels Level 2 specifications allow file names and folder names up to 31 characters long Cancel Program Play Press PLAY MODE TUNING MODE repea...

Страница 17: ...lder you have selected in random order PROGRAM Program Play The files on all discs in the order you want them to be played see Programing VIDEO CD CD tracks on page 15 3 Press CD NX or CD N on the remote Press CD NX or X on the remote Press again to resume play Select a folder of MP3 files Press ALBUM after step 2 Select a file Slide the knob to L to go forward or to l to go back and release it wh...

Страница 18: ...ecorded you may encounter such problems as disabled playback sound interruptions and noise To Do this Play repeatedly Repeat Play Press REPEAT FM MODE or REPEAT on the remote during play until REPEAT or REPEAT 1 appears REPEAT 2 For all the files on the disc up to five times REPEAT 1 For a single file only To cancel playing repeatedly press REPEAT FM MODE until REPEAT or REPEAT 1 disappears 1 You ...

Страница 19: ...to enter the time in minutes for the desired section The selected elapsed time appears on the TV screen To reenter the time press CLEAR and then press the numeric buttons again 4 Press SELECT Playback starts from the selected time Locating the desired track Disc Digest You can select the desired track by viewing the first frame of each track Nine different tracks can be displayed on the TV screen ...

Страница 20: ...adio station as described in step 2 through 7 of Setting presets through manual tuning on page 21 Resuming playback from the point you stopped a VIDEO CD Resume Play The system memorizes the point where you stopped the VIDEO CD so that you can resume from that point Note that Resume Play is not available when playing an audio CD and a disc with MP3 files 1 While playing a VIDEO CD press x to stop ...

Страница 21: ...red 7 Repeat steps 1 to 6 to store other stations Other operations To Do this 4 Press TUNER MEMORY DIRECTION 5 Slide the knob to l or to L or press m or M on the remote repeatedly to select the desired preset number Preset number 6 Press ENTER Complete appears and the station is stored 7 Repeat steps 1 to 6 to store other stations VIDEO CD CD MP3 Files Tuner Tune in a station with a weak signal Fo...

Страница 22: ...tatic noise press REPEAT FM MODE repeatedly until MONO appears There will be no stereo effect but the reception will improve To tune in automatically press PLAY MODE TUNING MODE repeatedly until AUTO appears in step 2 above then slide the knob to m or to M or press m or M on the remote The frequency indication changes and scanning stops when the system tunes in a station Automatic Tuning Presettin...

Страница 23: ...ops playing Fast forward or rewind With the side you want to play facing up To remove the tape lift up the tape from the side as shown in the illustration 2 Close the lid with your hand Playing a tape You can use TYPE I normal tape 1 Press FUNCTION repeatedly to switch the function to TAPE 2 Press TUNER MEMORY DIRECTION repeatedly until g appears to play one side or h or j to play both sides 3 Pre...

Страница 24: ... deck stands by for recording When you want to record on the bottom side press TAPE nN 5 Press TUNER MEMORY DIRECTION repeatedly to select g to record on one side Select h or j to record on both sides 6 Press REC PAUSE START Press REC PAUSE START and then start playing the desired source To stop recording Press x Tips When you record on both sides be sure to start from the top side If you start fr...

Страница 25: ...to record on facing up 7 Press 1 to turn off the system continued Program Edit 1 Load a disc and load a recordable tape 2 Program the tracks following step 2 to 6 in Programing VIDEO CD CD tracks on page 15 3 Press CD SYNC The tape deck stands by to record The VIDEO CD CD player stands by for playback 4 Press TUNER MEMORY DIRECTION repeatedly to select g to record on one side Select h or j to reco...

Страница 26: ...UND appears in the display Press again to cancel SURROUND To Do this Activate check the setting Press CLOCK TIMER SELECT on the remote and press R or r on the remote to select REC SELECT then press ENTER Change the setting Start over from step 1 Cancel the timer Press CLOCK TIMER SELECT on the remote and press R or r on the remote to select TIMER OFF then press ENTER Notes When you use the recordi...

Страница 27: ... EQ EDIT LOW appears and you can adjust the low frequency band 2 Slide the knob to l or to L to adjust the level then press EQ EDIT The low frequency band is set and MID appears 3 Slide the knob to l or to L to adjust the level then press EQ EDIT The middle frequency band is set and HIGH appears 4 Slide the knob to l or to L to adjust the level 5 Press ENTER The setting is automatically stored as ...

Страница 28: ...e Programing VIDEO CD CD tracks on page 15 Tape Insert a tape Radio Tune in a station see Listening to the radio on page 22 2 Press VOL or on the remote to adjust the volume 3 Press CLOCK TIMER SET on the remote DAILY SET appears 4 Press ENTER ON appears and the hour indication flashes 5 Set the time to start playing Press R or r on the remote to set the hour then press ENTER The minute indication...

Страница 29: ...ng karaoke of multiplex CD select MPX R or MPX L 4 Start playing the music 5 Adjust the microphone volume by turning MIC LEVEL After you have finished Turn MIC LEVEL to MIN and disconnect the microphone from MIC then press KARAOKE PON MPX repeatedly until m disappears continued Activate check the setting Press CLOCK TIMER SELECT on the remote then press R or r on the remote until DAILY SELECT appe...

Страница 30: ...tion of the recorded sound signal Auto Level Control Function To Do this Use VIDEO CDs Turn on your TV and switch it to the appropriate video input Cancel karaoke mode Turn MIC LEVEL to MIN and disconnect the microphone from MIC then press KARAOKE PON MPX repeatedly until m disappears Adjust the key Press KEY CONTROL 2 to suit your vocal range You can adjust the key higher or lower in 13 halftone ...

Страница 31: ...number 21 or over 4 Only for MP3 files 5 May not appear with still images 6 Total playing time will not appear for the discs with MP3 files 7 Only for CD TEXT discs or discs with MP3 files CD TEXT will not be displayed for track number 21 or over 8 Only for MP3 files continued Display Turning off the display Power Saving Mode The demonstration display display window and buttons lighting and flashi...

Страница 32: ... respective display appears during Time Search Disc Digest ON SCREEN 1 2 display When The display shows STOP REPEAT MP3 KARAOKE PON 25 40 DISC 1 CONTINUE HAPPINESS UNDO GETAWAY NEVER IN WINTER PARADISE FUSSY YOU SPLASHDOWN LOVE OUTLINED RESUME 21 1 2 3 Using the display continued Notes Depending on the disc some information or CD TEXT characters may not appear The display contents differ depending...

Страница 33: ...op mode of a disc with MP3 files Folder name In Program Play mode Programed disc and track number During playback of a disc with MP3 files Current folder name and file name Other conditions No display When the MP3 file information includes an ID3 tag the on screen display shows the file name which may differ from the ID3 information shown on the system display When The display shows During playbac...

Страница 34: ...n analogue component Optional TV To the video input jack of a TV A MD VIDEO IN jacks Use audio cords not supplied to connect an optional component such as an MD player or VCR to these jacks You can then record or listen to analogue audio from that component through this system B VIDEO OUT jack Use the video cable supplied to connect the video input of a TV to this jack ...

Страница 35: ...s distorted or too loud when selecting VIDEO or you want to switch back to MD repeat the operation described above to switch to MD Recording audio from a connected component 1 Connect the audio cords See Hooking up optional components on page 34 2 Start recording manually See Recording to a tape on page 24 Notes Pressing FUNCTION and 1 while the power is off automatically turns the power on and VI...

Страница 36: ...st Sony dealer Problems and remedies If you have any problem using this system use the following checklist First check that the power cord is connected firmly and that the speakers are connected correctly and firmly Should any problem persist consult your nearest Sony dealer General The display window and buttons keep on or flashing even the power is turned off When the power is off press DISPLAY ...

Страница 37: ...an MPEG 1 Layer 3 will not be played Files smaller than 64 kbytes will not be played MP3 files take longer to play back than others After the unit read all files on the disc playback may take more time than usual if the number of folders or files on the disc is very large the folder and file organization structure is very complicated The folder title track title and ID3 tag do not appear correctly...

Страница 38: ...has been removed from the cassette Cover the broken tab with adhesive tape see page 41 The tape has wound to the end The tape does not record or play or there is a decrease in sound level The heads are dirty Clean them The record playback heads are magnetized Demagnetize them see page 41 The tape does not erase completely The record playback heads are magnetized Demagnetize them see page 41 There ...

Страница 39: ...sh in the display during operation VIDEO CD CD MP3 files Cannot Edit You tried to use Tape Select Edit for discs containing over 20 tracks No Disc There is no disc in any of DISC 1 3 Cannot Use You pressed an invalid button NO STEP You have cleared all the tracks you programed OVER You have reached the end of the disc while pressing M during play or pause When fast forwarding an MP3 file it comes ...

Страница 40: ...the system check that the operating voltage of your system is identical with the voltage of your local power supply On safety The unit is not disconnected from the AC power source mains as long as it is connected to the wall outlet even if the unit itself has been turned off Unplug the system from the wall outlet if it is not to be used for an extended period of time To disconnect the power cord p...

Страница 41: ... tape operations such as play stop and fast winding frequently The tape may get entangled in the tape deck To save a tape permanently To prevent a tape from being accidentally recorded over break off the cassette tab from side A or B as illustrated Tab of side B Tab of side A Side A Break off the cassette tab of side A If you later want to reuse the tape for recording cover the broken tab with adh...

Страница 42: ...aker system 2 way bass reflex type magnetically shielded type Speaker units Woofer 15 cm dia cone type Tweeter 5 cm dia cone type Nominal impedance 6 ohms Specifications Main Unit HCD CV40 Amplifier section Measured at AC 120 220 240 V 50 60 Hz DIN power output Rated 40 40 watts 6 ohms at 1 kHz DIN Continuous RMS power output Reference 50 50 watts 6 ohms at 1 kHz 10 THD Inputs MD VIDEO IN phono ja...

Страница 43: ...parts and controls Amplifier Tuner Tape CD section Approx 215 285 386 mm Speaker Approx 205 285 240 mm Mass Amplifier Tuner Tape CD section Approx 7 8 kg Speakers Approx 3 6 kg net per speaker Supplied accessories Remote 1 R6 size AA batteries 2 AM loop antenna 1 FM lead antenna 1 Speaker pads 8 Video connecting cable 1 Design and specifications are subject to change without notice ...

Страница 44: ...Sony Corporation Printed in Malaysia ...

Отзывы: