background image

© 2006 Sony Corporation

Owner’s Record

The model and serial numbers are located on the bottom of the unit.
Record the serial number in the space provided below.
Refer to these numbers whenever you call upon your Sony dealer regarding this product.

Model No. CDX-GT11W Serial No.                                        

CDX-GT11W

To cancel the demonstration (DEMO) display, see page 8.
Para cancelar la pantalla de demostración (DEMO), consulte la página 8.

Operating Instructions 

Manual de instrucciones 

2-696-856-

11

 (2)

US

ES

FM

/

AM

Compact Disc Player

Содержание CDX GT11W - Radio / CD Player

Страница 1: ...ided below Refer to these numbers whenever you call upon your Sony dealer regarding this product Model No CDX GT11W Serial No CDX GT11W To cancel the demonstration DEMO display see page 8 Para cancelar la pantalla de demostración DEMO consulte la página 8 Operating Instructions Manual de instrucciones 2 696 856 11 2 US ES FM AM Compact Disc Player ...
Страница 2: ...rgy and if not installed and used in accordance with the instructions may cause harmful interference to radio communications However there is no guarantee that interference will not occur in a particular installation If this equipment does cause harmful interference to radio or television reception which can be determined by turning the equipment off and on the user is encouraged to try to correct...

Страница 3: ... Storing manually 7 Receiving the stored stations 7 Tuning automatically 7 Other functions Changing the sound settings 8 Adjusting the balance and fader BAL FAD 8 Customizing the equalizer curve EQ lite 8 Adjusting setup items SET 8 Using optional equipment 9 Auxiliary audio equipment 9 Additional Information Precautions 10 Notes on discs 10 Maintenance 10 Removing the unit 11 Specifications 11 Tr...

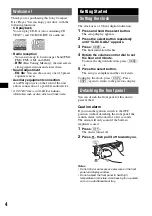
Страница 4: ... The setup display appears 2 Press the select button repeatedly until CLOCK ADJ appears 3 Press SEEK The hour indication flashes 4 Rotate the volume control dial to set the hour and minute To move the digital indication press SEEK 5 Press the select button The setup is complete and the clock starts To display the clock press DSPL Press DSPL again to return to the previous display Detaching the fro...

Страница 5: ...g the front panel Engage part A of the front panel with part B of the unit as illustrated and push the left side into position until it clicks Note Do not put anything on the inner surface of the front panel B A ...

Страница 6: ... front panel release button 4 J DSPL display DIM dimmer button To change display items press change the display brightness press and hold K SEEK buttons CD To skip tracks press skip tracks continuously press then press again within about 1 second and hold reverse fast forward a track press and hold Radio To tune in stations automatically press find a station manually press and hold L MODE button 7...

Страница 7: ...While receiving the station that you want to store press and hold a number button 1 to 6 until MEMORY appears The number button indication appears in the display Note If you try to store another station on the same number button the previously stored station will be replaced Receiving the stored stations 1 Select the band then press a number button 1 to 6 Tuning automatically 1 Select the band the...

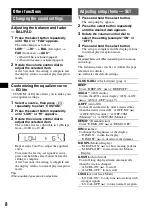
Страница 8: ... setup items SET 1 Press and hold the select button The setup display appears 2 Press the select button repeatedly until the desired item appears 3 Rotate the volume control dial to select the setting example ON or OFF 4 Press and hold the select button The setup is complete and the display returns to normal play reception mode Note Displayed items will differ depending on the source and setting T...

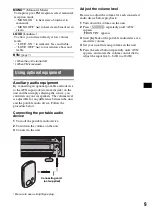
Страница 9: ...d audio device before playback 1 Turn down the volume on the unit 2 Press SOURCE repeatedly until AUX appears FRONT IN appears 3 Start playback of the portable audio device at a moderate volume 4 Set your usual listening volume on the unit 5 Press the select button repeatedly until AUX appears and rotate the volume control dial to adjust the input level 8 dB to 18 dB MONO 2 Monaural Mode To improv...

Страница 10: ... heart square star cannot be played on this unit Attempting to do so may damage the unit Do not use such discs You cannot play 8 cm 3 1 4 in CDs Before playing clean the discs with a commercially available cleaning cloth Wipe each disc from the center out Do not use solvents such as benzine thinner commercially available cleaners or antistatic spray intended for analog discs Notes on CD R CD RW di...

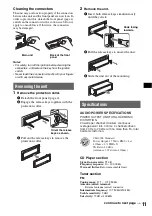
Страница 11: ...it 1Insert both release keys simultaneously until they click 2Pull the release keys to unseat the unit 3Slide the unit out of the mounting Specifications CD Player section Signal to noise ratio 95 dB Frequency response 10 20 000 Hz Wow and flutter Below measurable limit Tuner section FM Tuning range 87 5 107 9 MHz Antenna aerial terminal External antenna aerial connector Intermediate frequency 10 ...

Страница 12: ...o power is being supplied to the unit Check the connection If everything is in order check the fuse The power antenna aerial does not extend The power antenna aerial does not have a relay box No sound The volume is too low The position of the fader control FAD is not set for a 2 speaker system No beep sound The beep sound is canceled page 8 The contents of the memory have been erased The power sup...

Страница 13: ...m manual tuning During FM reception the ST indication flashes Tune in the frequency accurately The broadcast signal is too weak tSet MONO ON page 9 An FM program broadcast in stereo is heard in monaural The unit is in monaural reception mode tSet MONO OFF page 9 ERROR The disc is dirty or inserted upside down tClean or insert the disc correctly A blank disc has been inserted The disc cannot play d...

Страница 14: ...eta y automáticamente en el tiempo establecido después de apagar la unidad lo cual evita que se agote la batería Si no ajusta la función de desconexión automática mantenga presionado OFF hasta que se desactive la pantalla cada vez que apague el motor Para obtener información sobre la instalación y las conexiones consulte el manual de instalación conexiones suministrado ...

Страница 15: ...Recepción de las emisoras almacenadas 7 Sintonización automática 7 Otras funciones Cambio de los ajustes de sonido 8 Ajuste del balance y el equilibrio BAL FAD 8 Personalización de la curva de ecualizador EQ lite 8 Definición de los elementos de configuración SET 8 Uso de un equipo opcional 9 Equipo de audio auxiliar 9 Información complementaria Precauciones 10 Notas sobre los discos 10 Mantenimie...

Страница 16: ...Aparece la pantalla de ajustes 2 Presione el botón de selección varias veces hasta que aparezca CLOCK ADJ 3 Presione SEEK La indicación de la hora parpadea 4 Gire el selector de control de volumen para ajustar la hora y los minutos Para mover la indicación digital presione SEEK 5 Presione el botón de selección La configuración finaliza y el reloj se inicia Para mostrar el reloj presione DSPL Vuelv...

Страница 17: ...ije la parte A del panel frontal con la parte B de la unidad como se muestra en la ilustración y presione el lado izquierdo en su posición hasta escuchar un clic Nota No coloque nada sobre la superficie interior del panel frontal B A ...

Страница 18: ...4 J Botón DSPL pantalla DIM atenuador Para cambiar los elementos de la pantalla presionar modificar el brillo de la pantalla mantener presionado K Botones SEEK CD Para omitir pistas presionar para omitir pistas en forma continua presionar y volver a presionar antes de que transcurra 1 segundo y mantener presionado para avanzar o retroceder una pista rápidamente mantener presionado Radio Para sinto...

Страница 19: ...ientras recibe la emisora que desea almacenar mantenga presionado un botón numérico de 1 a 6 hasta que aparezca MEMORY La indicación del botón numérico aparece en pantalla Nota Si intenta almacenar otra emisora en el mismo botón numérico se reemplazará la que estaba almacenada previamente Recepción de las emisoras almacenadas 1 Seleccione la banda y a continuación presione un botón numérico de 1 a...

Страница 20: ...de los elementos de configuración SET 1 Mantenga presionado el botón de selección Aparece la pantalla de ajustes 2 Presione el botón de selección varias veces hasta que aparezca el elemento deseado 3 Gire el selector de control de volumen para seleccionar el ajuste por ejemplo ON u OFF 4 Mantenga presionado el botón de selección La configuración finaliza y la pantalla regresa al modo de reproducci...

Страница 21: ...que aparezca AUX Aparece FRONT IN 3 Inicie la reproducción en el dispositivo de audio portátil con un volumen moderado 4 Seleccione el volumen habitual en la unidad 5 Presione el botón de selección varias veces hasta que aparezca AUX y gire el selector de control de volumen para ajustar el nivel de entrada de 8 dB a 18 dB LOCAL Modo de búsqueda local LOCAL ON para que se sintonicen solamente las e...

Страница 22: ... formas no estandarizadas por ejemplo formas de corazón cuadrado o estrella Si lo intenta puede dañar la unidad No use este tipo de discos No es posible reproducir discos compactos de 8 cm Antes de reproducir los discos límpielos con un paño de limpieza disponible en el mercado Hágalo desde el centro hacia los bordes No utilice disolventes como bencina diluyentes productos de limpieza disponibles ...

Страница 23: ...ón simultáneamente hasta escuchar un clic 2Tire de las llaves de liberación para extraer la unidad 3Deslice la unidad para extraerla del marco Especificaciones Sección del reproductor de CD Relación señal ruido 95 dB Respuesta de frecuencia de 10 a 20 000 Hz Fluctuación y trémolo inferior al límite medible Sección del sintonizador FM Rango de sintonización de 87 5 a 107 9 MHz Terminal de antena Co...

Страница 24: ...na motorizada no dispone de una caja de relé No se emite el sonido El volumen es demasiado bajo La posición del control de equilibrio FAD no está ajustada para un sistema de 2 altavoces No se escuchan pitidos El sonido de los pitidos está cancelado página 8 El contenido de la memoria se borró Se desconectó el cable de fuente de alimentación o la batería El cable de fuente de alimentación no está c...

Страница 25: ...n no se detiene en una emisora Ajuste MONO ON página 9 La señal de emisión es demasiado débil tUse la sintonización manual Durante la recepción de FM la indicación ST parpadea Sintonice la frecuencia con precisión La señal de emisión es demasiado débil tAjuste MONO ON página 9 Un programa de FM emitido en estéreo se escucha en monoaural La unidad se encuentra en el modo de recepción monoaural tAju...

Страница 26: ...14 ...

Страница 27: ...15 ...

Страница 28: ...in China http www sony net If you have any questions problems regarding this product try the following 1 Read Troubleshooting in these Operating Instructions 2 Please contact U S A only Call 1 800 222 7669 URL http www SONY com ...

Отзывы: