background image

19

Almacenamiento de nombres 
de emisoras

— Memorando de emisoras

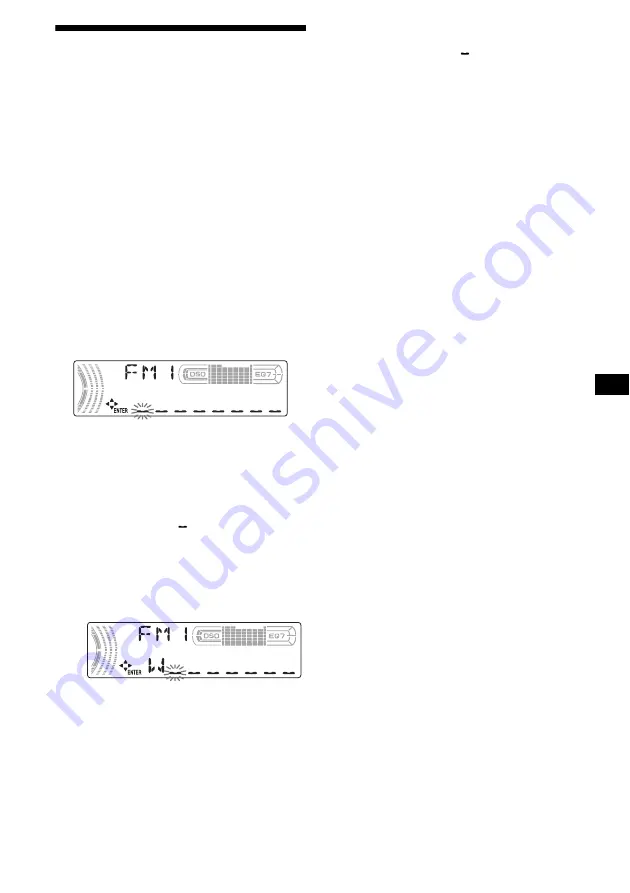
Es posible asignar un nombre a cada emisora de 
radio y almacenarlo en la memoria. El nombre de 
la emisora sintonizada aparece en la pantalla. Es 
posible asignar un nombre con un máximo de 
8 caracteres por emisora.

Almacenamiento de nombres de 
emisoras

1

Sintonice la emisora cuyo nombre 
desee almacenar.

2

Presione 

(MENU)

 y, a continuación, 

presione 

(DISC/PRESET)

 (+) o 

(DISC/PRESET)

 (–) varias veces hasta 

que aparezca “NAMEEDIT”.

3

Presione 

(ENTER)

.

4

Ingrese los caracteres.

1

Presione 

(DISC/PRESET)

 (+)

*

1

 varias 

veces para seleccionar el carácter 
deseado.

A


t


B


t


C

 ... 

t


0


t


1


t


2

 ... 

t


+


t


t


*

 ... 

t


*

2


t


A

*1

Para realizar el proceso en orden inverso, 
presione 

(DISC/PRESET)

 (–).

*2

(espacio en blanco)

2

Presione 

(SEEK)

 (+) una vez que 

haya localizado el carácter deseado.

Si presiona 

(SEEK)

 (–), podrá desplazarse 

hacia la izquierda. 

3

Repita los pasos 

1

 y 

2

 para 

ingresar el nombre completo.

5

Presione 

(ENTER)

.

La unidad vuelve al modo normal de 
recepción de radio.

Sugerencias
• Para corregir o borrar un carácter, simplemente 

sobrescríbalo o ingrese “ 

”.

• Existe otro método para comenzar a almacenar 

nombres de emisoras: Presione 

(LIST/CAT)

 durante 

2 segundos en lugar de seguir los pasos 2 y 3. 
También puede finalizar la operación presionando 

(LIST/CAT)

 durante 2 segundos en vez del paso 5.

Borrado del nombre de emisoras

1

Durante la recepción de la radio, 
presione 

(MENU)

 y, a continuación, 

(DISC/PRESET)

(+) o 

(DISC/PRESET)

(–) 

varias veces hasta que aparezca 
“NAME DEL”.

2

Presione 

(ENTER)

.

3

Presione 

(DISC/PRESET)

 (+) o 

(DISC/PRESET)

 (–) varias veces para 

seleccionar el nombre de emisora que 
desea borrar.

4

Presione 

(ENTER)

 durante 2 

segundos. 

El nombre se borra.
Si desea borrar otros nombres, repita los 
pasos 3 a 4.

5

Presione 

(MENU)

 dos veces.

La unidad vuelve al modo normal de 
recepción de radio.

Nota
Si ya ha borrado todas las emisoras, aparece “NO 
DATA” y la unidad vuelve al modo de reproducción 
normal en el paso 2 ó 4.

Содержание CDX-FW570 - Fm/am Compact Disc Player

Страница 1: ...ese numbers whenever you call upon your Sony dealer regarding this product Model No CDX FW570 Serial No CDX FW570 For installation and connections see the supplied installation connections manual Para obtener información sobre la instalación y las conexiones consulte el manual de instalación conexiones suministrado 3 262 850 21 1 US US US 2004 Sony Corporation ES FM AM Compact Disc Player ...

Страница 2: ... with the instructions may cause harmful interference to radio communications However there is no guarantee that interference will not occur in a particular installation If this equipment does cause harmful interference to radio or television reception which can be determined by turning the equipment off and on the user is encouraged to try to correct the interference by one or more of the followi...

Страница 3: ...ons automatically Best Tuning Memory BTM 15 Receiving the stored stations 16 Storing only the desired stations 16 Storing station names Station Memo 17 Tuning in a station through a list List up 18 Other Functions Using the rotary commander 18 Adjusting the sound characteristics 20 Changing the BBE MP setting 20 Quickly attenuating the sound 21 Changing the sound and display settings Menu 21 Setti...

Страница 4: ...utton 12 14 o Number buttons Radio To store stations receive stored stations CD MD 1 REP 13 2 SHUF 13 Sound 5 BBE MP 20 p OFF Stop Power off button 3 10 11 24 q COLOR button 24 To change the LCD color 1 Available only when an optional Sony portable device is connected to AUX IN terminal of the unit When you connect a Sony portable device and CD MD unit s at the same time use the AUX IN selector 2 ...

Страница 5: ... h MODE button i LIST button j DISC ALBUM PRESET buttons k ENTER button l ATT button Note If the display disappears by pressing OFF it cannot be operated with the card remote commander unless SOURCE on the unit is pressed or a disc is inserted to activate the unit first Tip For details on how to replace the battery see Replacing the lithium battery on page 25 SEEK SEEK PUSH DI A L S E L E C T S O ...

Страница 6: ... your unit that are not covered in this manual please consult your nearest Sony dealer Moisture condensation On a rainy day or in a very damp area moisture condensation may occur inside the lenses and display of the unit Should this occur the unit will not operate properly In such a case remove the disc and wait for about an hour until the moisture has evaporated To maintain high sound quality Be ...

Страница 7: ...n CDs Before playing clean the discs with a commercially available cleaning cloth Wipe each disc from the center out Do not use solvents such as benzine thinner commercially available cleaners or antistatic spray intended for analog discs Music discs encoded with copyright protection This product is designed to play back discs that conform to the Compact Disc CD standard Recently various music dis...

Страница 8: ... control area called the Lead in and end at an area called Lead out A Multi Session CD is a CD having multiple sessions with each segment from Lead in to Lead out regarded as a single session CD Extra The format which records audio audio CD data as tracks on session 1 and records data as tracks on session 2 Mixed CD In this format data is recorded as track 1 and audio audio CD data is recorded as ...

Страница 9: ...this number may become less than 300 Tip To specify a desired playback order before the folder or file name input the order by number e g 01 02 then record contents onto a disc The order differs depending on the writing software Getting Started Resetting the unit Before operating the unit for the first time or after replacing the car battery or changing the connections you must reset the unit Remo...

Страница 10: ...ar battery drain 2 Press OPEN then slide the front panel to the right and gently pull out the left end of the front panel Notes If you detach the panel while the unit is still turned on the power will turn off automatically to prevent the speakers from being damaged Do not drop or put excessive pressure on the front panel and its display window Do not subject the front panel to heat high temperatu...

Страница 11: ...age 21 CD Player CD MD Unit optional In addition to playing a CD with this unit you can also control external CD MD units Playing a disc With this unit 1 Press OPEN and insert the disc labeled side up 2 Close the front panel Playback starts automatically If a disc is already inserted press SOURCE repeatedly until CD appears to start playback Available only when an MP3 file is played To skip tracks...

Страница 12: ... an optional CD unit which is incompatible with MP3 the disc will play back with no sound Note With an optional unit connected playback of the same source will continue on to the optional CD MD unit Display items When the disc album track changes any prerecorded title 1 of the new disc album track is automatically displayed If the A SCRL Auto Scroll function is set to ON names exceeding 8 characte...

Страница 13: ...play the tracks in the current album in random order SHUF DISC to play the tracks in the current disc in random order SHUF CHGR 2 to play the tracks in the current optional CD MD changer in random order SHUF ALL 3 to play all the tracks in all connected CD MD units including this unit in random order 1 Available only when an MP3 file is played 2 Available only when one or more optional CD MD chang...

Страница 14: ... 5 You can label CDs on a unit without the CUSTOM FILE function if that unit is connected along with a CD unit that has the function The Disc Memo will be stored in the memory of the CD unit with the CUSTOM FILE function Note REP TRACK SHUF play is suspended until the Name Edit is complete Viewing the Disc Memo As a display item the Disc Memo always takes priority over any original CD TEXT informa...

Страница 15: ...he disc first press the number button then choose the disc that has not been loaded The information appears only in upper case There are also some letters which cannot be displayed Radio The unit can store up to 6 stations per band FM1 FM2 FM3 AM1 and AM2 Caution When tuning in stations while driving use Best Tuning Memory to prevent accidents Storing stations automatically Best Tuning Memory BTM ...

Страница 16: ...l reception mode see Changing the sound and display settings on page 21 The sound improves but becomes monaural ST disappears Note If interference occurs this unit will automatically narrow the reception frequency to eliminate noise IF AUTO function In such cases some FM stereo broadcasts may become monaural while in the stereo reception mode Tips To always hear FM stereo broadcasts in stereo you ...

Страница 17: ...and 2 to enter the entire name 5 Press ENTER The unit returns to normal radio reception mode Tips Simply overwrite or enter to correct or erase a character There is another way to start storing station names Press LIST CAT for 2 seconds instead of performing steps 2 and 3 You can also complete the operation by pressing LIST CAT for 2 seconds instead of step 5 Erasing the station name 1 During radi...

Страница 18: ...d optional CD MD units with a rotary commander optional Using the rotary commander First attach the appropriate label depending on how you want to mount the rotary commander The rotary commander works by pressing buttons and or rotating controls By pressing buttons Press To SOURCE Change the source Radio CD MD 1 AUX 2 Power on MODE Change operation Radio band CD unit 1 MD unit 1 ATT Attenuate the ...

Страница 19: ...ssory position on the ignition key switch after turning off the ignition be sure to press and hold OFF until the display disappears 4 Available only when an MP3 file is played When an MP3 file is played you can select an album using the rotary commander With this unit With optional unit SEEK AMS control PRESET DISC control To Do this Skip albums Album selection Push in and rotate once for each alb...

Страница 20: ...ront rear t SUB subwoofer volume 2 Rotate the volume control dial to adjust the selected item Note Adjust within 3 seconds after selecting the item Tips When adjusting with the card remote commander press SOUND repeatedly and then press SEEK or SEEK When adjusting with the rotary commander press SOUND repeatedly and then rotate the VOL control Changing the BBE MP setting The BBE MP process effecti...

Страница 21: ... DSPL Display DEMO to turn the demonstration display on or off When the unit is turned off Select ON to activate the demonstration display The demonstration starts about 10 seconds after the unit is turned off Select OFF to deactivate the demonstration display CLOCK to display the clock and the play mode at the same time ON DIM Dimmer to change the brightness of the display Select AT to dim the di...

Страница 22: ... DISC PRESET or DISC PRESET repeatedly until the desired item appears 3 Press SEEK or SEEK to select the desired setting Example ON or OFF 4 Press ENTER After the mode setting is complete the display returns to normal play mode Note The displayed item will differ depending on the source Tip You can easily switch among categories SET DSPL P M SND and EDIT by pressing DISC PRESET or DISC PRESET for ...

Страница 23: ...onds 5 Press MENU twice When the effect setting is complete the display returns to normal play mode Setting the Dynamic Soundstage Organizer DSO If your speakers are installed into the lower part of the doors the sound will come from below and may not be clear The DSO Dynamic Soundstage Organizer function creates a more ambient sound as if there were speakers above the dashboard virtual speakers Y...

Страница 24: ...you connect a Sony portable device and CD MD unit s at the same time use the AUX IN selector Selecting auxiliary equipment Press SOURCE repeatedly to select AUX Adjusting the volume level You can adjust the volume for each connected audio equipment 1 Press MENU 2 Press DISC PRESET or DISC PRESET repeatedly to select AUX LVL 3 Press ENTER 4 Press DISC PRESET or DISC PRESET repeatedly to select a de...

Страница 25: ...tion before cleaning the connectors and remove the key from the ignition switch Never touch the connectors directly with your fingers or with any metal device Replacing the lithium battery Under normal conditions battery will last approximately 1 year The service life may be shorter depending on the conditions of use When the battery becomes weak the range of the card remote commander becomes shor...

Страница 26: ...e keys together with the protection collar 3Pull out the release keys to remove the protection collar 2 Remove the unit 1Insert both release keys together until they click 2Pull the release keys to unseat the unit 3Slide the unit out of the mounting Orient the release key correctly Face the hook inwards ...

Страница 27: ...udio input or AUX IN terminal Remote controller input terminal Antenna input terminal Tone controls Bass 10 dB at 62 Hz Treble 10 dB at 16 kHz Loudness 8 dB at 100 Hz 2 dB at 10 kHz Power requirements 12 V DC car battery negative ground Dimensions Approx 178 50 177 mm 7 1 8 2 7 in w h d Mounting dimensions Approx 182 53 161 mm 7 1 4 2 1 8 6 3 8 in w h d Mass Approx 1 2 kg 2 lb 10 oz Supplied acces...

Страница 28: ...ector No power is being supplied to the unit Check the connection If everything is in order check the fuse The car does not have an ACC position tPress SOURCE or insert a disc to turn on the unit The power is continuously supplied to the unit The car does not have an ACC position The power antenna does not extend The power antenna does not have a relay box CD MD playback A disc cannot be loaded An...

Страница 29: ...and optional CD MD changers The following indications will flash for about 5 seconds and an alarm sound will be heard BLANK 1 No tracks have been recorded on an MD 2 t Play an MD with recorded tracks on it ERROR 1 A CD is dirty or inserted upside down 2 tClean or insert the CD correctly A CD MD cannot play because of some problem tInsert another CD MD FAILURE Illuminates until any button is presse...

Страница 30: ...appears in the display If these solutions do not help improve the situation consult your nearest Sony dealer RESET The CD MD unit cannot be operated because of some problem tPress the RESET button on the unit Messages L SEEK The local seek mode is on during automatic tuning page 16 or You have reached the beginning or the end of the disc and you cannot go any further ...

Страница 31: ......

Страница 32: ...P3 que contiene información sobre el nombre del álbum el nombre del artista el nombre de la pista etc 3 Un disco CD TEXT es un CD de audio que incluye información como el nombre del disco el nombre del artista y los nombres de las pistas Esta información está grabada en el disco El logotipo XM Ready indica que este producto controlará un módulo de sintonizador Sony XM se vende por separado Si dese...

Страница 33: ... automático de emisoras Memoria de la mejor sintonía BTM 17 Recepción de las emisoras almacenadas 18 Almacenamiento de las emisoras deseadas 18 Almacenamiento de nombres de emisoras Memorando de emisoras 19 Sintonización de emisoras mediante una lista Listado 20 Otras funciones Uso del mando rotatorio 20 Ajuste de las características del sonido 22 Cambio del ajuste de BBE MP 22 Atenuación rápida d...

Страница 34: ...ndicación 13 16 o Botones numéricos Radio Para almacenar emisoras y recibir emisoras almacenadas CD MD 1 REP 14 2 SHUF 15 Sonido 5 BBE MP 22 p Botón OFF detener apagar 3 10 12 26 q Botón COLOR 26 Para cambiar el color de la pantalla LCD 1 Disponible únicamente si se conecta un dispositivo portátil opcional de Sony al terminal AUX IN de la unidad Cuando conecte un dispositivo portátil de Sony y una...

Страница 35: ...otón LIST j Botones DISC ALBUM PRESET k Botón ENTER l Botón ATT Nota Si la pantalla se apaga al presionar OFF no podrá operarse con el control remoto de tarjeta a menos que se presione SOURCE en la unidad o que se inserte un disco para que dicha unidad se active primero Sugerencia Si desea obtener información adicional sobre cómo sustituir las pilas consulte Sustitución de la pila de litio en la p...

Страница 36: ...tacto con el distribuidor Sony más cercano a su domicilio Condensación de humedad En días lluviosos o en zonas muy húmedas es posible que se condense humedad dentro de las lentes y la pantalla de la unidad Si esto ocurre la unidad no funcionará en forma correcta En tal caso extraiga el disco y espere una hora aproximadamente hasta que se haya evaporado la humedad Para mantener una alta calidad de ...

Страница 37: ...ebido a que el calor contrae el engomado o la etiqueta y hace que el disco se deforme No se pueden reproducir en esta unidad discos con formas no estandarizadas formas de corazón cuadrado estrella Si lo intenta puede dañar la unidad No utilice este tipo de discos No se pueden reproducir discos compactos de 8 cm Antes de realizar la reproducción limpie los discos con un paño de limpieza disponible ...

Страница 38: ...l más utilizada para el formato lógico de archivos y carpetas en un CD ROM Existen varios niveles de especificaciones En el nivel 1 los nombres de los archivos deben ajustarse al formato de 8 3 8 caracteres como máximo en el nombre y 3 caracteres como máximo en la extensión MP3 y escribirse en mayúsculas Los nombres de las carpetas no pueden superar los 8 caracteres No se permiten más de 8 niveles...

Страница 39: ...o contiene un archivo MP3 sólo se reproducirán los archivos MP3 y los demás datos se omitirán no se reconocen los datos de CD de audio Si el disco no contiene ningún archivo MP3 aparece el mensaje NO MUSIC y no hay reproducción no se reconocen los datos de CD de audio Orden de reproducción de los archivos MP3 El orden de reproducción de las carpetas y archivos es el siguiente Notas Toda carpeta qu...

Страница 40: ...esactiva 1 Presione OFF La reproducción de CD MD o la recepción de la radio se detienen la iluminación de las teclas y la pantalla permanecen activos Si el automóvil no tiene una posición ACC accesorio en el interruptor de encendido asegúrese de apagar la unidad presionando OFF hasta que se apague la pantalla para evitar que se desgaste la batería del auto 2 Presione OPEN deslice el panel frontal ...

Страница 41: ...tar el reloj a las 10 08 1 Presione MENU y a continuación presione DISC PRESET o DISC PRESET varias veces hasta que aparezca CLOCK ADJ 1Presione ENTER La indicación de hora parpadea 2Presione DISC PRESET o DISC PRESET para ajustar la hora 3Presione SEEK La indicación de minutos parpadea 4Presione DISC PRESET o DISC PRESET para ajustar los minutos 2 Presione ENTER El reloj se pone en funcionamiento...

Страница 42: ...as es posible que la reproducción tarde más de un minuto en iniciarse Durante este tiempo aparece READ Se iniciará en forma automática la reproducción cuando finalice la lectura Según las condiciones del disco es posible que éste no se reproduzca página 7 8 Mientras se reproduce la primera o última pista del disco si presiona SEEK o SEEK la reproducción saltará a la última o a la primera pista del...

Страница 43: ...l que no es compatible con MP3 el disco se reproducirá sin sonido Nota Con una unidad opcional conectada la reproducción de la misma fuente continuará en la unidad de CD MD opcional Elementos de la pantalla Al cambiar el disco álbum pista el título pregrabado 1 del nuevo disco álbum pista aparece automáticamente Si la función A SCRL desplazamiento automático se ajusta en ON se desplazarán los nomb...

Страница 44: ...s Si la función A SCRL desplazamiento automático se ajusta en OFF y se cambia el disco álbum o pista dicho nombre o indicador ID3 no se desplaza Cuando se reproduce un archivo MP3 y se cambia el álbum aparece el número del álbum nuevo Reproducción repetida de pistas Reproducción repetida Es posible seleccionar REP TRACK para repetir la pista actual REP ALBM 1 para repetir las pistas del álbum actu...

Страница 45: ...produce las pistas en orden aleatorio entre unidades de CD y de MD Etiquetado de CD Memorando del disco cuando se conecta una unidad de CD con función CUSTOM FILE Puede etiquetar los discos con un nombre personalizado memorando del disco Puede ingresar hasta 8 caracteres por disco Si etiqueta un CD podrá localizarlo con el nombre correspondiente página 17 1 Comience a reproducir el disco que desee...

Страница 46: ...ementos en pantalla página 13 Borrado del memorando del disco 1 Presione SOURCE varias veces para seleccionar CD 2 Presione MODE varias veces para seleccionar la unidad de CD que contenga el memorando 3 Presione MENU y a continuación presione DISC PRESET o DISC PRESET varias veces hasta que aparezca NAME DEL 4 Presione ENTER Aparecerán los nombres almacenados 5 Presione DISC PRESET o DISC PRESET v...

Страница 47: ...mero el botón numérico y elija el disco que no se ha cargado La información sólo aparece en mayúsculas Hay algunas letras que no se pueden mostrar Radio La unidad puede almacenar hasta 6 emisoras por banda FM1 FM2 FM3 AM1 y AM2 Precaución Para sintonizar emisoras mientras maneje utilice la función Memoria de la mejor sintonía para evitar accidentes Almacenamiento automático de emisoras Memoria de ...

Страница 48: ...do de recepción monoaural consulte Cambio de los ajustes de sonido y la pantalla en la página 23 El sonido mejora aunque es monoaural ST desaparece Nota Si se producen interferencias esta unidad reducirá automáticamente la frecuencia de recepción para eliminar el ruido función IF AUTO En tales casos es posible que algunas emisiones de FM en estéreo se escuchen en monoaural mientras se encuentra en...

Страница 49: ...a los pasos 1 y 2 para ingresar el nombre completo 5 Presione ENTER La unidad vuelve al modo normal de recepción de radio Sugerencias Para corregir o borrar un carácter simplemente sobrescríbalo o ingrese Existe otro método para comenzar a almacenar nombres de emisoras Presione LIST CAT durante 2 segundos en lugar de seguir los pasos 2 y 3 También puede finalizar la operación presionando LIST CAT ...

Страница 50: ...ad y las unidades de CD MD opcionales con un mando rotatorio opcional Uso del mando rotatorio En primer lugar adhiera la etiqueta adecuada según cómo desee montar el mando rotatorio El mando rotatorio funciona al presionar los botones o girar los controles Presión de botones Presione Para SOURCE Cambiar la fuente Radio CD MD 1 AUX 2 Encendido MODE Cambiar el funcionamiento Banda de radio unidad de...

Страница 51: ... después de apagar el motor recuerde mantener presionado OFF hasta que se apague la pantalla 4 Disponible únicamente cuando se reproduce un archivo MP3 Cuando se reproduce un archivo MP3 puede seleccionar un álbum con el mando rotatorio Con esta unidad Con una unidad opcional Control SEEK AMS Control PRESET DISC Para Realice lo siguiente Omitir álbumes Selección de álbumes Presione y gire el contr...

Страница 52: ...ior t SUB volumen del altavoz potenciador de graves 2 Gire el selector de control de volumen para ajustar el elemento seleccionado Nota Realice el ajuste antes de que transcurran 3 segundos después de seleccionar el elemento Sugerencias Al realizar el ajuste con el control remoto de tarjeta presione SOUND varias veces y a continuación presione SEEK o SEEK Al realizar el ajuste con el mando rotator...

Страница 53: ...la columna de la dirección AUX A página 26 para encender o apagar la pantalla de fuente AUX DSPL Pantalla DEMO para activar o desactivar la pantalla de demostración Cuando la unidad está apagada Seleccione ON para activar la pantalla de demostración la demostración se inicia aproximadamente 10 segundos después de que se haya apagado la unidad Seleccione OFF para desactivar la pantalla de demostrac...

Страница 54: ...ajo Los graves y los agudos se potenciarán AUX LVL página 26 para ajustar el nivel de volumen del equipo auxiliar conectado 1 Presione MENU 2 Presione DISC PRESET o DISC PRESET varias veces hasta que aparezca el elemento deseado 3 Presione SEEK o SEEK para seleccionar el ajuste deseado Ejemplo ON u OFF 4 Presione ENTER Al finalizar el ajuste del modo la pantalla vuelve al modo de reproducción norm...

Страница 55: ...esione MENU dos veces Una vez completado el ajuste de efecto la pantalla vuelve al modo de reproducción normal Ajuste del Organizador de sonido de baja frecuencia dinámico DSO Si los altavoces están instalados en la parte inferior de las puertas el sonido se recibirá desde abajo y puede no ser nítido La función DSO Organizador de sonido de baja frecuencia dinámico crea un sonido más ambiental como...

Страница 56: ...portátil de Sony y una unidad de CD MD en forma simultánea utilice el selector AUX IN Selección del equipo auxiliar Presione SOURCE varias veces para seleccionar AUX Ajuste del nivel de volumen Puede ajustar el volumen de cada uno de los equipos de audio conectados 1 Presione MENU 2 Presione DISC PRESET o DISC PRESET varias veces para seleccionar AUX LVL 3 Presione ENTER 4 Presione DISC PRESET o D...

Страница 57: ...tor antes de limpiar los conectores y extraiga la llave del interruptor de encendido No toque nunca los conectores directamente con los dedos ni con ningún dispositivo metálico Sustitución de la pila de litio En condiciones normales las pilas duran aproximadamente 1 año La duración puede ser menor en función de las condiciones de uso El alcance del control remoto de tarjeta disminuye cuando se ago...

Страница 58: ...3Tire de las llaves de liberación para extraer el marco de protección 2 Extraiga la unidad 1Inserte las dos llaves de liberación a la vez hasta escuchar un clic 2Tire de las llaves de liberación para extraer la unidad 3Deslice la unidad para extraerla de la montura Oriente la llave de liberación en la dirección correcta Coloque el gancho hacia adentro ...

Страница 59: ...Terminal de control del amplificador de potencia Entradas Terminal de control ATT de teléfono Terminal de control de iluminación Terminal de entrada de control BUS Entrada de audio BUS o terminal AUX IN Terminal de entrada del control remoto Terminal de entrada de la antena Controles de tono Graves 10 dB a 62 Hz Agudos 10 dB a 16 kHz Sonoridad 8 dB a 100 Hz 2 dB a 10 kHz Requisitos de alimentación...

Страница 60: ...entación auxiliar del automóvil La unidad no recibe alimentación Compruebe la conexión Si todo está en orden compruebe el fusible El automóvil no dispone de una posición ACC t Presione SOURCE o inserte un disco para que se encienda la unidad La unidad recibe alimentación en forma continua El automóvil no dispone de una posición ACC La antena motorizada no se extiende La antena motorizada no dispon...

Страница 61: ... de FM Está seleccionado el modo panorámico tAjuste el modo IF en IF AUTO página 24 Indicaciones de error Para esta unidad y los cambiadores opcionales de CD MD Las siguientes indicaciones parpadean durante unos 5 segundos y se escucha una alarma BLANK 1 No hay pistas grabadas en el MD 2 t Reproduzca un MD que tenga pistas grabadas ERROR 1 El CD está sucio o insertado al revés 2 tLímpielo o insért...

Страница 62: ... más cercano OFFSET Es posible que se haya producido una falla interna tCompruebe la conexión Si el indicador de error permanece en la pantalla póngase en contacto con el distribuidor Sony más cercano RESET La unidad de CD MD no puede utilizarse debido a algún problema tPresione el botón RESET de la unidad Mensajes L SEEK El modo de búsqueda local está activado durante la sintonización automática ...

Страница 63: ......

Страница 64: ...iland Lead free solder is used for soldering certain parts Halogenated flame retardants are not used in the certain printed wiring boards Halogenated flame retardants are not used in cabinets Paper is used for the packaging cushions ...

Отзывы: