background image

2

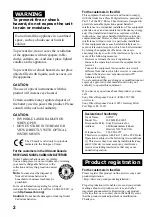
WARNING

To prevent fire or shock
hazard, do not expose the unit
to rain or moisture.

Do not install the appliance in a confined
space, such as a bookcase or built-in
cabinet.

To prevent fire, do not cover the ventilation
of the apparatus with newspapers, table-
cloths, curtains, etc. And don’t place lighted
candles on the apparatus.

To prevent fire or shock hazard, do not place
objects filled with liquids, such as vases, on
the apparatus.

CAUTION

The use of optical instruments with this
product will increase eye hazard.

Certain countries may regulate disposal of
the battery used to power this product. Please
consult with your local authority.

CAUTION

• INVISIBLE LASER RADIATION

WHEN OPEN

• DO NOT STARE INTO BEAM OR

VIEW DIRECTLY WITH OPTICAL
INSTRUMENTS

The CE mark is valid only for products
marketed in the European Union.

For the customers in the USA and Canada

RECYCLING NICKEL CADMIUM BATTERIES

Nickel Cadmium batteries are recyclable.
You can help preserve our environment by returning
your used rechargeable batteries to the
collection and recycling location nearest
you.

Note:

 In some areas the disposal of

Nickel Cadmium batteries in
household or business trash may be
prohibited.

For more information regarding recycling of
rechargeable batteries, call toll free 1-800-822-8837, or
visit 

http://www.rbrc.org/

.

Caution:

 Do not handle damaged or leaking Nickel

Cadmium batteries.

For the customers in the USA

This equipment has been tested and found to comply
with the limits for a Class B digital device, pursuant to
Part 15 of the FCC Rules. These limits are designed to
provide reasonable protection against harmful
interference in a residential installation. This equipment
generates, uses, and can radiate radio frequency energy
and, if not installed and used in accordance with the
instructions, may cause harmful interference to radio
communications. However, there is no guarantee that
interference will not occur in a particular installation.
If this equipment does cause harmful interference to
radio or television reception, which can be determined
by turning the equipment off and on, the user is
encouraged to try to correct the interference by one or
more of the following measures:
– Reorient or relocate the receiving antenna.
– Increase the separation between the equipment and

receiver.

– Connect the equipment into an outlet on a circuit

different from that to which the receiver is connected.

– Consult the dealer or an experienced radio/TV

technician for help.

You are cautioned that any changes or modifications not
expressly approved in this manual could void your
authority to operate this equipment.

If you have any questions about this product, you may
call:
Sony Direct Response Center 1-(800)-222-7669
or write to:
Sony Direct Response Center 12451 Gateway Blvd.
Fort Myers, FL 33913

Declaration of Conformity

Trade Name:

SONY

Model No.:

D-FJ401/D-FJ405

Responsible Party: Sony Electronics Inc.
Address:

680 Kinderkamack Road,
Oradell, NJ 07649 USA

Telephone No.:

201-930-6972

This device complies with Part 15 of the FCC Rules.
Operation is subject to the following two conditions:
(1) This device may not cause harmful interference,
and (2) this device must accept any interference
received, including interference that may cause
undesired operation.

Product registration

For the customers in the USA

Please register this product on line at www.sony.com/
productregistration.
<http://www.sony.com/productregistration>

Proper registration will enable us to send you periodic
mailings about new products, services, and other
important announcements. Registering your product
will also allow us to contact you in the unlikely event
that the product needs adjustment or modification.
Thank you.

Содержание CD Walkman D-FJ405

Страница 1: ... area code of your model and see Accessories supplied optional Owner s Record The model number and the serial number are located at the rear of the CD player Record these numbers in the spaces provided below Refer to them whenever you call upon your Sony dealer regarding this product Model No ____________________________ Serial No ____________________________ 3 240 299 71 1 D FJ401 D FJ405 2002 So...

Страница 2: ... not installed and used in accordance with the instructions may cause harmful interference to radio communications However there is no guarantee that interference will not occur in a particular installation If this equipment does cause harmful interference to radio or television reception which can be determined by turning the equipment off and on the user is encouraged to try to correct the inter...

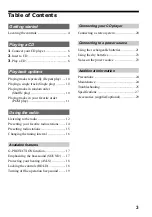
Страница 3: ...g your favorite radio stations 14 Presetting radio stations 15 Changing the tuning interval 16 Available features G PROTECTION function 17 Emphasizing the bass sound SOUND 17 Protecting your hearing AVLS 18 Locking the controls HOLD 18 Turning off the operation beep sound 19 Connecting your CD player Connecting a stereo system 20 Connecting to a power source Using the rechargeable batteries 21 Usi...

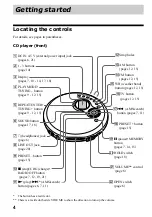
Страница 4: ...tton page 15 q x stop CHG charge RADIO OFF button pages 7 12 19 21 qa N play AMS search button pages 6 7 11 qs Strap holes qd AM button pages 12 15 qf FM button pages 12 15 qh TV button pages 12 15 qg WB weather band button pages 12 15 qj AMS search button pages 7 11 ql X pause MEMORY button pages 7 14 15 qk PRESET button page 15 w HOLD switch page 18 wa VOLUME control page 6 ws OPEN switch page 6...

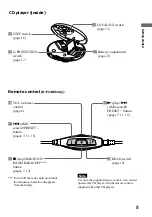
Страница 5: ...h PRESET button pages 7 11 15 Note Use only the supplied remote control You cannot operate this CD player with the remote control supplied with other CD players CD player inside wh Battery compartment page 21 wf G PROTECTION switch page 17 Getting started wd STEP switch page 16 wg LOCAL DX switch page 13 To turn off the radio hold down until the frequency indication disappears from the display ...

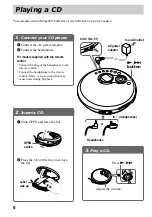
Страница 6: ... to the remote control firmly A loose connection may cause noise during playback to an AC outlet Headphones to i headphones N button to DC IN 4 5V AC power adaptor 2 Insert a CD 1 Slide OPEN and raise the lid 2 Place the CD on the tray and close the lid OPEN switch Label side up 3 Play a CD Adjust the volume Press N or Playing a CD You can also use rechargeable batteries or dry batteries as a powe...

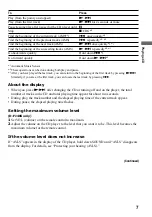
Страница 7: ...ck by pressing N Similarly if you are at the first track you can locate the last track by pressing About the display When you press N after changing the CD or turning off and on the player the total number of tracks in the CD and total playing time appear for about two seconds During play the track number and the elapsed playing time of the current track appear During pause the elapsed playing tim...

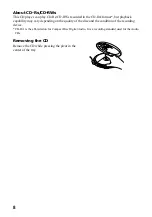
Страница 8: ...layback capability may vary depending on the quality of the disc and the condition of the recording device CD DA is the abbreviation for Compact Disc Digital Audio It is a recording standard used for the Audio CDs Removing the CD Remove the CD while pressing the pivot in the center of the tray ...

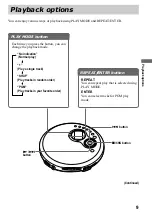
Страница 9: ...on you can change the playback mode No indication Normal play 1 Play a single track SHUF Play tracks in random order PGM Play tracks in your favorite order N button REPEAT ENTER button REPEAT You can repeat play that is selected using PLAY MODE ENTER You can select tracks for PGM play mode x CHG button button Playback options Continued ...

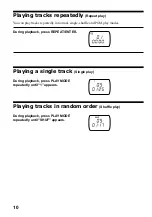
Страница 10: ... normal single shuffle and PGM play modes During playback press REPEAT ENTER Playing a single track Single play During playback press PLAY MODE repeatedly until 1 appears Playing tracks in random order Shuffle play During playback press PLAY MODE repeatedly until SHUF appears ...

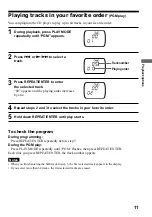
Страница 11: ...d 3 to select the tracks in your favorite order 5 Hold down REPEAT ENTER until play starts To check the program During programming Press REPEAT ENTER repeatedly before step 5 During the PGM play Press PLAY MODE repeatedly until PGM flashes then press REPEAT ENTER Each time you press REPEAT ENTER the track number appears Notes When you finish entering the 64th track in step 3 the first selected tra...

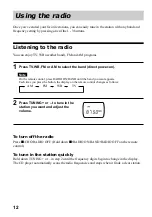
Страница 12: ...s RADIO ON BAND until the band you want appears Each time you press the button the display on the remote control changes as follows AM FM WB TV 2 Press TUNING or to tune in the station you want and adjust the volume To turn off the radio Press x CHG RADIO OFF Hold down x RADIO ON BAND RADIO OFF on the remote control To tune in the station quickly Hold down TUNING or in step 2 until the frequency d...

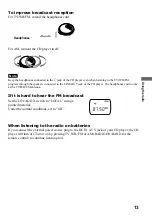
Страница 13: ...CD player The headphones cord works as the TV WB FM antenna If it is hard to hear the FM broadcast Set the LOCAL DX switch to LOCAL using a pointed material Under the normal conditions set to DX When listening to the radio on batteries If you connect the external power source plug to the DC IN 4 5 V jack of your CD player the CD player will turn off Turn it on by pressing TV WB FM or AM RADIO ON B...

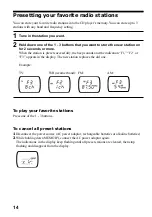
Страница 14: ...eset successfully the beep sounds and the indication F1 F2 or F3 appears in the display The new station replaces the old one Example TV WB weather band FM AM To play your favorite stations Press one of the 1 3 buttons To cancel all preset stations 1 Disconnect the power source AC power adaptor rechargeable batteries or alkaline batteries 2 While holding down MEMORY connect the AC power adaptor aga...

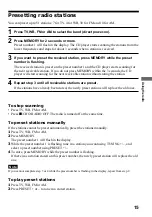
Страница 15: ...t step 3 until all receivable stations are preset If the stations have already been stored the newly preset stations will replace the old ones To stop scanning Press TV WB FM or AM Press x CHG RADIO OFF The radio is turned off at the same time To preset stations manually If the stations cannot be preset automatically preset the stations manually 1 Press TV WB FM or AM 2 Press MEMORY The preset num...

Страница 16: ... STEP switch inside the lid to 9 kHz or 10 kHz using a pointed material 9 kHz area Asia and Europe 10 kHz area the U S A Canada and South America Notes The interval will not change until you once turn off the radio and then turn it on again After changing the tuning interval you need to preset radio stations again ...

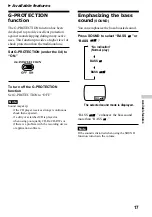
Страница 17: ...loped to provide excellent protection against sound skipping during many active uses This function provides a higher level of shock protection than the traditional one Set G PROTECTION under the lid to ON To turn off the G PROTECTION function Set G PROTECTION to OFF Note Sound may skip if the CD player receives stronger continuous shock than expected if a dirty or scratched CD is played or when us...

Страница 18: ...d when AVLS function is activated Locking the controls HOLD You can lock the controls on your CD player to prevent accidental button presses Slide HOLD in the direction of the arrow You can use the HOLD function with both the CD player and remote control You can still operate your CD player using the remote control when HOLD on the remote control is set to off To unlock the controls Slide HOLD in ...

Страница 19: ... Remove the power source AC power adaptor rechargeable batteries or dry batteries from the CD player 2 Connect the power source while pressing x CHG on the CD player or x on the remote control for about one second or more To turn on the beep sound Remove the power source and then connect the power source without pressing x CHG or x Available features ...

Страница 20: ...come completely depleted during recording Adjust the volume properly on the connected device so that the sound will not be distorted When using the connecting cord If the sound is distorted connect the device to the i jack The SOUND function does not work The output level of the i jack goes down About the G PROTECTION and SOUND functions when using the connecting cord To record high quality CD sou...

Страница 21: ...tteries by matching the 3 to the diagram in the battery compartment and close the lid until it clicks into place 3 Connect the AC power adaptor to the DC IN 4 5 V jack of your CD player and an AC outlet then press x CHG to start charging The CD player charges the batteries The indicator sections of light up in succession When the batteries are completely charged the indicator turns off If you pres...

Страница 22: ... Depending on operating conditions the indicator sections of may increase or decrease When to replace the rechargeable batteries If the battery life becomes shorter by about half replace the batteries with new rechargeable batteries Note on the rechargeable batteries If the battery is new or has not been used for a long time it may not be charged completely until you charge and discharge it severa...

Страница 23: ...ptor Use only the AC power adaptor supplied or recommended in Accessories supplied optional Do not use any other AC power adaptor It may cause a malfunction Polarity of the plug When disconnecting the AC power adaptor from the AC outlet grasp the adaptor itself Do not pull it by the cord Do not touch the AC power adaptor with wet hands On rechargeable batteries and dry batteries Do not charge the ...

Страница 24: ...handling CDs To keep the CD clean handle it by its edge Do not touch the surface Do not stick paper or tape onto the CD Do not expose the CD to direct sunlight or heat sources such as hot air ducts Do not leave the CD in a car parked under direct sunlight On headphones earphones Road safety Do not use headphones earphones while driving cycling or operating any motorized vehicle It may create a tra...

Страница 25: ...kaline batteries and not manganese batteries page 23 c Replace the batteries with new LR6 size AA alkaline batteries page 23 c Charge and discharge the rechargeable batteries several times pages 21 22 c The rechargeable batteries are used up completely Charge the batteries pages 21 22 c Replace the batteries with new LR6 size AA alkaline batteries page 23 c Use only the AC power adaptor or car bat...

Страница 26: ... c The CD player is connected to an audio device Adjust the volume using the volume control on the connected device page 20 c During stop press x CHG page 21 c The resume function is working To start playing from the first track press N for 2 seconds or more or open the lid of the CD player Or remove all power sources then insert the batteries or connect the AC power adaptor again pages 6 7 21 23 ...

Страница 27: ...ge STEP switch 9 kHz step TV 2 13 ch WB weather band 1 7 ch FM 87 5 108 0 MHz AM 531 1 710 kHz 10 kHz step TV 2 13 ch WB weather band 1 7 ch FM 87 5 108 0 MHz AM 530 1 710 kHz Antenna TV WB FM Headphones earphones cord antenna AM Built in ferrite bar antenna General Power requirements For the area code of the model you purchased check the upper left side of the bar code on the package Two Sony NC ...

Страница 28: ... Sony alkaline 47 37 70 batteries LR6 SG produced in Japan Measured value by the standard of JEITA Japan Electronics and Information Technology Industries Association Charging time varies depending on how the rechargeable battery is used Operating temperature 5 C 35 C 41 F 95 F Dimensions w h d excluding projecting parts and controls Approx 135 9 30 8 137 4 mm 5 3 8 1 1 4 5 1 2 in Mass excluding a...

Страница 29: ...ld be returned to your nearest Sony Service Center or Sony Authorized Repair Center for replacement or after warranty period it should be discarded Optional accessories AC power adaptor AC E45HG Active speaker system SRS T55 SRS Z500 Car battery cord DCC E345 Car battery cord with car connecting pack DCC E34CP Car connecting pack CPA 9C Connecting cord RK G129 RK G136 Rechargeable battery NH WM2AA...

Страница 30: ...30 ...

Страница 31: ...31 ...

Страница 32: ...Sony Corporation Printed in China This warranty is valid only in the United States ...

Отзывы: