background image

10

CT

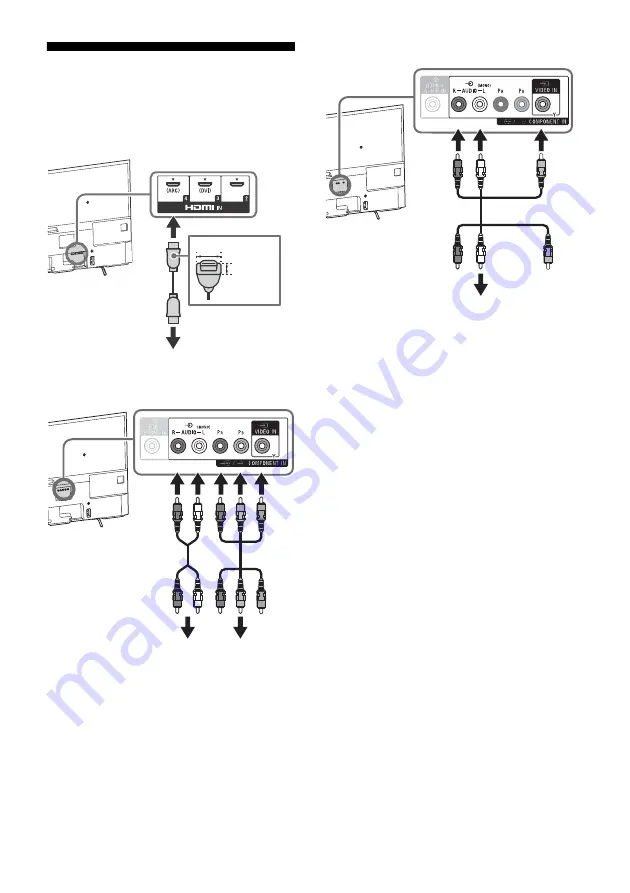
連接電視機

將連接線連接至連接線 / 天線,僅用手緊固,連接過緊可
能會損壞電視機。

以 HDMI 連接線連接

以色差纜線連接

以 AV 複合訊號線連接

至 HDMI OUT

< 21 毫米

< 12 毫米

至 AUDIO OUT

至 COMPONENT OUT 
(P

R

/P

B

/Y)

至 VIDEO OUT

Содержание BRAVIA KDL-43W800C

Страница 1: ...KDL 50W800C 43W800C Television Reference Guide GB CT ...

Страница 2: ...et up Install and use the TV set in accordance with the instructions below in order to avoid any risk of fire electrical shock or damage and or injuries Installation The TV set should be installed near an easily accessible AC power outlet mains socket Place the TV set on a stable level surface to avoid it from falling down and cause personal injury or damage to the TV Only qualified service person...

Страница 3: ...ower outlet mains socket Do not use a poor fitting AC power outlet mains socket NOTE ON AC ADAPTER Warning To reduce the risk of fire or electric shock do not expose this apparatus to rain or moisture To prevent fire or shock hazard do not place objects filled with liquids such as vases on the apparatus Do not install this equipment in a confined space such as a bookshelf or similar unit Please en...

Страница 4: ...LL MOUNT BRACKET Below information shows the correct handling of the Wall Mount Bracket Be sure to read this information thoroughly and use the Wall Mount Bracket correctly To Customers Be sure to observe the following precautions for safety to prevent a serious injury through fire electric shock the product toppling over or the product dropping Be sure to subcontract the installation to licensed ...

Страница 5: ...osal Handling and cleaning the screen surface cabinet of the TV set Be sure to unplug the AC power cord mains lead connected to the TV set from AC power outlet mains socket before cleaning To avoid material degradation or screen coating degradation observe the following precautions To remove dust from the screen surface cabinet wipe gently with a soft cloth If dust is persistent wipe with a soft c...

Страница 6: ...atus of the TV White When turning on the TV picture off mode software update etc Cyan When connecting with a mobile device wirelessly Amber Timer is set Power CH Channel Volume TV Switch to a TV channel or input from other applications Input select Display and select the input source Do not place anything near the sensor Controls and Indicators TV Ȫ ȫ Ȭ ȭ ...

Страница 7: ...nect it to HDMI IN 3 through a DVI HDMI adaptor interface not supplied and connect the device s audio out jacks sockets to HDMI 3 AUDIO IN If connecting a digital audio system that is compatible with Audio Return Channel ARC technology use HDMI IN 4 If not an additional connection with DIGITAL AUDIO OUT OPTICAL is necessary AUDIO OUT To listen to the TV s sound through the connected equipment pres...

Страница 8: ...o the previous screen or exit from the menu When an Interactive Application service is available press to exit from the service Number buttons Twin picture PIP 1 2 Display two pictures simultaneously Text Display text information Colour buttons Execute correspondent function at that time Wide mode Change the screen format TV Switch to a TV channel or input from other applications HELP Display Help...

Страница 9: ...the language for the programme currently being viewed Subtitle setting Turn subtitles on or off when the feature is available Operate media contents on TV and connected BRAVIA Sync compatible device SYNC MENU Display the BRAVIA Sync Menu FOOTBALL Turn Live Football Mode on or off when the feature is available 1 The location availability and function of remote control button may vary depending on y...

Страница 10: ...Cable Antenna input finger tighten only over tightening the connection can damage the TV To connect with an HDMI cable To connect with component cables To connect with AV composite cables To HDMI OUT 21 mm 12 mm To AUDIO OUT To COMPONENT OUT PR PB Y To VIDEO OUT ...

Страница 11: ...enna aerial cable Component cable HDMI cable Standard definition SD videos have picture signals with a vertical resolution of 480 NTSC or 576 PAL SECAM lines High definition HD videos have picture signals with a vertical resolution of 720 or 1 080 lines ...

Страница 12: ...ble Top Stand again be sure to fasten the screws previously removed to the original holes on the rear of the TV To detach the Table Top Stand from the TV Using your TV s Table Top Stand as a Wall Mount Bracket To Customers Sufficient expertise is required for installing this product Be sure to subcontract the installation to Sony dealers or licensed contractors and pay special attention to safety ...

Страница 13: ...supplied 2 Make sure that the wall has enough space for the TV and is capable of supporting a weight of at least four times that of the TV Refer to the following table on installing the TV to the wall See page 22 24 Specifications for the TV s weight A Paper Template B Wall Mount Base 1 C Stand Protector 2 D Screw PSW M8 12 2 E Spacers 2 Screen centre point ...

Страница 14: ...on the Paper Template A using an electric drill 5 Remove the Paper Template A off from the wall 6 Attach the Wall Mount Base B to the wall correctly using the screws 8 mm in diameter not supplied Model Name KDL Display dimensions Screen centre dimension Length for mounting 50W800C 1 116 654 215 552 87 43W800C 962 565 253 544 87 150 200 250 300 Scale on Paper Template A Mark for KDL 50W800C Mark fo...

Страница 15: ...Stand Protector C Confirm the Stand Protector C is firmly latched to the Stand B 2 Attach the Stand B to the TV using the supplied screws D Attach the Spacers E to the holes indicated by the triangle marks f Note You cannot use some of the terminals on the rear of the TV when using this mounting style ɹ C Pin E B D Soft cloth Soft cloth ...

Страница 16: ...Wall Mount Base B and the Spacers E touch the wall Dimensions of the hole positions on the wall Provide the following information to the licensed contractors if necessary Use screws 8 mm in diameter not supplied to install the Wall Mount Base B on the wall Be sure to use the supplied Paper Template A that shows the actual position of Wall Mount Base B for easy installation B C B B E Wall Wall 170 ...

Страница 17: ...s on WALL MOUNT BRACKET before carrying out Wall Mount Bracket installation If the Table Top Stand is attached to the TV detach the Table Top Stand beforehand Place the TV with its screen facing down on a flat and stable surface covered with a thick and soft cloth that is larger than the TV when securing the Stand or when removing the Table Top Stand from the TV to prevent damaging the surface of ...

Страница 18: ... only a flat head screwdriver to install the Wall Mount Attachment Use of another tool might result in over torqueing the Wall Mount Attachment and damaging the TV 2 Make sure that the wall has enough space for the TV and is capable of supporting a weight of at least four times that of the TV Refer to the following table on installing the TV to the wall See page 22 24 Specifications for the TV s w...

Страница 19: ...screwdriver set the torque at approximately 1 5 N m 15 kgf cm Be sure to store the unused parts in a safe place for future use Retain this manual for future reference Standard mounting Slim mounting Note You cannot use some of the terminals on the rear of the TV when using this mounting style Model Name KDL Display dimensions Screen centre dimension Length for mounting Standard mounting Slim mount...

Страница 20: ...r to 5 of Installation Guide and Installing the TV to the Wall of Operating Instructions supplied with the Wall Mount Bracket Refer to the instructions supplied with the Wall Mount Bracket for your model to install the TV on the wall Model Name KDL Hook location 50W800C 43W800C a Screw PSW 6 x 20 Pulley Screw PSW 6 x 20 Belt Spacer 20mm Soft cloth a ...

Страница 21: ...D flashes red interval time is three seconds Disconnect the AC power cord mains lead and inform your dealer or Sony service centre When the illumination LED is not flashing check the items as follows You can also refer to Troubleshooting in the Help Guide or perform self diagnosis by selecting Help Self Diagnostics If the problem persists have your TV serviced by qualified service personnel Troubl...

Страница 22: ...technology Protocol IEEE802 11a b g n Bluetooth Version 4 1 Input Output jacks Antenna aerial cable 75 ohm external terminal for VHF UHF COMPONENT IN YPBPR Component Video 1080p 50 60 Hz 1080i 50 60 Hz 720p 50 60 Hz 576p 576i 480p 480i Audio input phono pin jack VIDEO IN Video input common phono pin with Y input HDMI IN 1 2 3 4 Video 2D 1080p 30 50 60 Hz 1080 24p 1080i 50 60 Hz 720p 30 50 60 Hz 72...

Страница 23: ...C 43 inches 108 0 cm Display resolution 1 920 dots horizontal 1 080 lines vertical Power consumption KDL 50W800C 94 W KDL 43W800C 82 W Dimensions Approx w h d with Table Top Stand KDL 50W800C 1 116 691 191 mm KDL 43W800C 962 602 179 mm without Table Top Stand KDL 50W800C 1 116 654 59 mm KDL 43W800C 962 565 59 mm Mass Approx with Table Top Stand KDL 50W800C 14 6 kg KDL 43W800C 11 8 kg without Table...

Страница 24: ... DTS Inc All Rights Reserved Designed with UEI TechnologyTM Under License from Universal Electronics Inc Portions UEI 2000 2014 The Bluetooth word mark and logos are owned by the Bluetooth SIG Inc and any use of such marks by Sony Corporation is under license Other trademarks and trade names are those of their respective owners 2015 RealNetworks Inc Patents Pending All rights reserved RealNetworks...

Страница 25: ......

Страница 26: ...同 識別標籤的位置 電視機型號和電源等級的標籤位於電視機背面 AC 電源供應器型號和序號的標籤位於 AC 電源供應器的底部 警告 不可將電池曝露於如陽光 火或類似的過熱源 安裝 設定 為了避免火災 觸電或損壞及 或受傷等危險 請遵照下列指示來安 裝和使用電視機 安裝 應將電視機安裝在易於插拔的 AC 電源插座附近 將電視機擺在平穩的水平表面上 以防止傾倒而造成人員的傷害或 者損及電視機 僅可由合格的維修人員執行掛壁安裝 為了安全起見 強烈建議您使用 Sony 配件 包括 壁掛式支架 附帶 壁掛式支架 SU WL450 將掛鉤 底座 壁掛式支架安裝於電視機上時 務必要使用隨附於 壁掛式支架的螺絲 隨附螺絲如插圖所示設計從掛鉤 底座 壁 掛式支架安裝表面量起 螺絲的直徑和長度會因為壁掛式支架的型號而有所不同 使用隨附螺絲以外的螺絲可能會造成電視機內部損壞或者掉落等 等 壁掛式支架 附帶 壁掛式...

Страница 27: ...書架或類似裝置 請確保將 AC 電源插座安裝在設備附近並易於插拔 請務必使用隨附的 AC 電源供應器和 AC 電源線 否則這可能導致故 障 將 AC 電源供應器連接至易於插拔的 AC 電源插座 請勿將 AC 電源線盤繞在 AC 電源供應器上 芯線可能折斷並 或 導致電視機故障 手濕時請勿觸碰 AC 電源供應器 如果您發現 AC 電源供應器異常 立刻將 AC 電源供應器從 AC 電源插座拔下 只要本機仍然連接至 AC 電源插座 即使本 機已經關閉 AC 電源還是未切斷 由於 AC 電源供應器在長時間使用後會發熱 用手觸摸時可能會感到 熱 使用限制 請勿在下列地點 環境或情況條件下安裝 使用電視機 否則電視機 可能會發生故障並造成火災 觸電 損壞及 或受傷等危險 地點 室外 在直射的陽光中 海邊 船上或其他船艦上 車內 醫療 機構中 不穩定的場所 靠近水 雨 濕氣或煙霧的地方 如果放置電視機在...

Страница 28: ...安裝在垂直和平坦的牆上 在正確安裝電視機之後 妥當地固定纜線 不要讓 AC 電源線或連接線材受到擠壓 內 部導體可能因此裸露並導致短路或遭電擊 穿 觀賞電視 在觀看 3D 視訊影像或打立體的 3D 電玩期間 有些人可能會感到不 適 如眼睛疲勞 疲累或噁心 Sony 建議所有觀賞者在觀看 3D 視訊影像或打立體的 3D 電玩期間要定期休息 休息的長度和頻率 因人而異 由您自行決定 若您感到任何不適 請停止觀看 3D 視 訊影像或打立體的 3D 電玩 直到不適感消失 若有必要 請就醫 關於最新資訊 也請您參閱 i 用於電視機的其他設備或媒體的 使用說明書 以及 ii 我們的網站 http www sony asia com support 兒童 尤其是低於六歲 的兒童 的視力還在發育 讓兒童觀看 3D 視訊影像或打立體的 3D 電玩前 請諮詢醫師 如小兒科醫師或眼科醫師 成人應監督兒 童 確保...

Страница 29: ...問題負責 注意有關處理遠程控制 安裝電池時請注意正確的極性位置 請勿同時使用不同類型的電池或混合使用新舊電池 請以符合環境保護規定的方式來丟棄電池 特定地區可能有制訂廢 棄電池的相關規定 請向您當地的主管機關查詢 請小心拿取遙控器 請勿讓遙控器掉落或踩在遙控器上 或是讓任 何液體濺到遙控器 請勿將遙控器放置在接近熱源的地方 放置在受日光直射地方或潮 濕的房間 壁掛式支架 如果您長時間使用壁掛式支架安裝電視機 視牆壁的材料而定 位 於電視機後方或上方的牆面可能變色或壁紙失去黏性 如果拆下原來安裝在牆上的壁掛式支架 牆面上將留下螺絲孔痕 跡 請勿在容易受到振動的地方使用壁掛式支架 ...

Страница 30: ...6CT 組件及控件 遙控器感應器 光感應器 照明 LED 3D 同步發射機 照明 LED 會根據電視機的狀態而亮起或閃爍 白色 開啟電視機 關閉畫面模式 軟體更新等 時 青色 無線連接行動裝置時 琥珀色 計時器已設定 電源 CH 頻道 音量 TV 切換至一個電視頻道或從其他應用程式輸入 輸入選擇 顯示並選擇輸入來源 請勿在感應器附近放置任何物品 控件及指示燈 TV Ȫ ȫ Ȭ ȭ ...

Страница 31: ...大型 USB 裝置可能會干擾旁邊連接的其 他裝置 連接大型 USB 裝置時 請連接至 USB 1 插 座 HDMI IN 2 3 4 如果裝置擁有 DVI 插座 請透過 DVI HDMI 轉接器接口 無附帶 將其連接至 HDMI IN 3 並將裝置的音訊輸出插孔 插 座 連接至 HDMI 3 AUDIO IN 如果連接與音訊回傳信道 ARC 技術相容的 數位音訊系統 請使用 HDMI IN 4 否則 必須額外連接 DIGITAL AUDIO OUT OPTICAL AUDIO OUT 如需透過相連設備聆聽電視聲音 請按 HOME 選擇 設定 聲音設定 耳機 聲音輸出 並選擇所需的項目 HDMI IN 1 MHL 您可以使用高畫質 MHL 連接線連接 MHL 行 動高畫質連接技術 裝置 連接單聲道設備時 請連接至 L MONO 音訊插孔 輸入及輸出 ȭ ȯ Ȱ Ȫ ȫ Ȭ ȭ ȩ Ȯ ...

Страница 32: ...擇輸入來源 文字模式 保留當前頁面 電視待機 開啟或關閉電視機 待機模式 DIGITAL ANALOG 在數位及類比模式之間切換 EXIT 返回至上一個畫面 或從選單退出 如果交互 式應用服務可供使用 按下即可退出服務 數字按鈕 雙重畫面 PIP 1 2 同時顯示兩個畫面 文字 顯示文字資訊 顏色按鈕 屆時執行相應的功能 寬螢幕模式 變更螢幕格式 TV 切換至一個電視頻道或從其他應用程式輸入 HELP 顯示說明選單 遙控器組件說明 Ȫ ȩ ȫ Ȭ ȭ Ȯ ȯ ...

Страница 33: ...及選擇的上一個頻道 輸入 之間交替切換 靜音 將聲音消除 再次按下可恢復聲音 PROG 電視模式 選擇頻道 文字模式 選擇下一個 或上一個 頁面 AUDIO 變更目前觀看之節目的語言 字幕設定 開啟或關閉字幕 此功能可用時 在電視機及相連的 BRAVIA Sync 相容裝置上操 作媒體內容 SYNC MENU 顯示 BRAVIA 同步選單 FOOTBALL 開啟或關閉實況足球模式 此功能可用時 1 遙控器按鈕的位置 可用性與功能視您的國家 區域 電視機型號而可能略有不同 2 雙重畫面功能自 2015 年 7 月起提供 您將透過軟件 網絡升級自動接收雙重畫面功能 確保電視機已連接至 互聯網 如果連接網絡 您可以使用 PC 從 Sony 支援 網站下載軟件 關於如何升級的詳細資料 請瀏覽 Sony 支援網站 ...

Страница 34: ...10CT 連接電視機 註 將連接線連接至連接線 天線 僅用手緊固 連接過緊可 能會損壞電視機 以 HDMI 連接線連接 以色差纜線連接 以 AV 複合訊號線連接 至 HDMI OUT 21 毫米 12 毫米 至 AUDIO OUT 至 COMPONENT OUT PR PB Y 至 VIDEO OUT ...

Страница 35: ...11CT GB CT SD HD 圖像品質 AV 複合訊號線 天線的連接訊號線 標準清晰度 SD 視訊圖像信號的垂直解析度為 480 NTSC 或 576 PAL SECAM 條線 色差訊號線 HDMI 訊號線 高清晰度 HD 視訊圖像信號的垂直解析度為 720 或 1080 條線 ...

Страница 36: ...旦將底座頸部從底座拆下之後 務必將底座頸部和螺絲收存在安全的地方 再次安裝桌面底座時 務必將 之前取下的 螺絲鎖緊至電視機背面的原始孔 將桌面底座從電視機上拆下來 將電視機的桌面底座用作壁掛式支架 致客戶 安裝本產品需要足夠的專業技能 務必將安裝的工作委託 Sony 經銷商或授權承包商進行 並在安裝時特別注意 安全 Sony 對於任何因為錯誤操作或不當安裝 或安裝指定產品以外的任何其他產品所造成的損壞或傷害恕不 負責 您的法定權利 如有 不會受到影響 致 Sony 經銷商和承包商 安裝本產品 尤其是在確定牆壁強度是否能夠支撐電視機重量方面 需要足夠的專業知識 將本產品安裝於牆上 的工作務必要委託 Sony 經銷商或經過授權的承包商進行 而且安裝時要特別注意安全 Sony 對於任何因為錯誤 操作或不當安裝所造成的損壞或傷害恕不負責 軟布 底座頸部 底座 ...

Страница 37: ...13CT GB CT 將支架安裝在牆上 1 準備必要的項目 壁掛式支架配件 底座 用於壁掛式底座的螺絲 直徑 8 毫米 非附件 2 確保牆壁有足夠空間以及能支撐至少電視機四倍的重量 請參閱以下列表有關在牆上安裝電視機 請參閲第 22 24 頁 規格 有關電視機的重量 A 紙模板 B 壁掛式底座 1 C 底座防護器 2 D 螺絲 PSW M8 12 2 E 墊片 2 螢幕中心點 ...

Страница 38: ...A 黏在牆上 然後使用電鑽在紙模板 A 上根據編號鑽孔 5 從牆上取下紙模板 A 6 使用螺絲正確地將壁掛式底座 B 安裝在牆上 直徑 8 毫米 非附件 型號名稱 KDL 顯示幕 螢幕中心尺寸 安裝的長度 50W800C 1 116 654 215 552 87 43W800C 962 565 253 544 87 150 200 250 300 紙模板 A 上的比例 KDL 50W800C 的標記 KDL 43W800C 的標記 50 0 50 1 100 150 200 250 300 2 3 4 1 2 3 4 牆壁 A ...

Страница 39: ...15CT GB CT 準備安裝電視機 1 將針 位於底座防護器 C 上 插入底座 上的孔内 然後折起底座防護器 C 確定底座防護器 C 穩固地鎖至底座 2 使用附件的螺絲 安裝底座 D 至電視機 將墊片 E 安裝至由三角形記號 f 標記的孔内 註 若選用此安裝樣式 則無法使用電視機後面的某些端子 ɹ C 針 E B D 軟布 軟布 ...

Страница 40: ...電視機安裝在牆上 1 將電視機安裝在牆上之前 確保先連接和捆紮纜線 2 將電視機安裝在牆上 然後 確定底座防護器 C穩固地鎖入壁掛式底座 B以及墊片 E 觸及牆壁 在牆上的孔位置的尺寸 如有需要 將以下資訊提供給授權承包商 使用螺絲 直徑 8 毫米 非附件 將壁掛式底座 B 安裝在牆上 務必使用有顯示壁掛式底座 B 實際位置的附件紙模板 A 以便於安裝 B C B B E 牆壁 牆壁 B 170 毫米 37 毫米 ...

Страница 41: ...牆壁上 安裝壁掛式支架時 亦請參閱壁掛式支架附帶的使用說明書及安裝指南 註 務必將取下的螺絲存放在兒童接觸不到的安全位置 在進行壁掛式支架的安裝之前 請參閲第 2 頁 安全資訊 和第 4 頁 預先注意事項 關於壁掛式支架的資訊 如果桌面底座安裝於電視機 預先拆下桌面底座 當安裝掛鉤或從電視機拆下桌面底座時 將電視機以螢幕朝下放置在覆蓋著厚而軟布的平坦和穩固的表面上以避免損 壞液晶顯示的表面 再次安裝桌面底座時 請參閱入門指南 將螺絲 之前已取下 緊固至電視機後面的原始孔內 使用選購的壁掛式支架 安裝本產品須具備充足的專業知識 確定牆壁是否能夠承受電視重量時尤為如此 務必委託 Sony 經銷商或授權 的承包商將本產品安裝至牆壁上 並在安裝期間充分注意安全 對於因錯誤操作或安裝不當引致的任何損害 Sony 概不負責 軟布 底座頸部 底座 ...

Страница 42: ...至電視機後面 使之與牆面平行 註 使用電動螺絲刀時 請將扭力設定為約 1 5 N m 15 kgf cm 將此類設備連接至電視機時 務必將掛牆式附件固定到位 只可用平頭螺絲刀安裝掛墻式附件 用其他工具可能導致掛墻式附件過分扭矩 甚至損壞電視機 2 確保牆壁有足夠空間以及能支撐至少電視機四倍的重量 請參閱以下列表有關在牆上安裝電視 機 請參閲第 22 24 頁 規格 有關電視機的重量 軟布 1 5 N m 15 kgf cm 螢幕中心點 80 標準安裝 簡易安裝 ...

Страница 43: ...支架安裝指南之 1 檢查附件組件 註 使用電動螺絲刀時 請將扭力設定為約 1 5 N m 15 kgf cm 務必將未使用的組件存放於安全位置 以備日後使用 保管好本說明書 以供日後參考 標準安裝 簡易安裝 註 若選用此安裝樣式 則無法使用電視機後面的某些端子 型號名稱 KDL 顯示幕 螢幕中心 尺寸 安裝的長度 標準安裝 簡易安裝 50W800C 1 116 654 127 464 122 80 43W800C 962 565 173 464 122 80 滑輪 螺絲 PSW 6 x 20 墊片 60 毫米 螺絲 PSW 6 x 50 皮帶 軟布 軟布 ...

Страница 44: ...CT 4 將必要的連接線連接至電視機 註 將電視機安裝至牆壁後 無法存取任何端子 5 將電視機安裝至底座 請參閱壁掛式支架附帶的安裝指南之 5 以及使用說明書之 將電視機 安裝至牆壁 請參閱您所擁有機型之壁掛式支架附帶的說明書 將電視機安裝至牆壁 型號名稱 KDL 掛鉤位置 50W800C 43W800C a 螺絲 PSW 6 x 20 滑輪 螺絲 PSW 6 x 20 皮帶 墊片 20 毫米 軟布 a ...

Страница 45: ...AC 電源線 然後告訴您的經銷商 或 Sony 服務中心 當照明 LED 沒有閃爍 檢查以下列表中的項目 您也可參閱說明指南 中的 故障排除 或通過選擇 說明 自行診斷 以進行自行診斷 如果問 題仍然存在 請將您的電視機交給合格的維修人員 修理 故障及解決方案 沒有畫面 螢幕是黑的 也沒有聲音 檢查天線 訊號線連接 將電視機連接至 AC 電源 然後按電視機或遙控器上 的 無法調諧某些節目 檢查天線 訊號線連接 遙控器無效 更換電池 忘記 親子鎖碼 密碼 PIN 碼輸入 9999 PIN 碼 9999 總是可以接受 電視機周圍溫度升高 當長時間使用電視機時 電視機周圍溫度會升高 用手觸摸這些地方時可能會覺得很燙 停頓音訊或視訊 空白螢幕或電視機對電視或遙控 器按鈕沒有反應 拔下 AC 電源線兩分鐘之後再次連接以進行簡單的電 視機重設 在電視機上找不到 CH 和 TV 按鈕 請參閲下圖有關電視...

Страница 46: ...和 192 kHz 16 20 和 24 bits Dolby Digital 和 DTS ARC 音頻回傳信道 僅限 HDMI IN 4 MHL 與 HDMI IN 1 共用 視訊 2D 1080p 30 Hz 1080 24p 1080i 50 60 Hz 720p 30 50 60 Hz 720 24p 576p 576i 480p 480i 視訊 3D 並排 1080 24p 1080i 50 60 Hz 720p 50 60 Hz 上下格式 1080p 30 Hz 1080 24p 1080i 50 60 Hz 720p 50 60 Hz 音訊 5 1 聲道線性 PCM 32 44 1 48 88 2 96 176 4 和 192 kHz 16 20 和 24 bits Dolby Digital 和 DTS DIGITAL AUDIO OUT OPTICAL 數位光纖插孔 兩聲...

Страница 47: ...D Gracenote Video Explore Gracenote 標誌和標誌字型以及 Powered by Gracenote 標誌是 Gracenote 在美國和 或其他國家的註冊商標或商標 Opera Devices SDK from Opera Software ASA Copyright 1995 2014 Opera Software ASA All rights reserved Wi Fi Wi Fi Direct Miracast 和 Wi Fi Protected Setup 是 Wi Fi Alliance 的商標 或註冊商標 MHL Mobile High Definition Link 和 MHL 標誌是 MHL Licensing LLC 的商標或注冊 商標 有關 DTS 專利 請參閱 http patents dts com 由 DTS Inc 授權製造 ...

Страница 48: ...24CT ...

Страница 49: ......

Страница 50: ......

Страница 51: ......

Страница 52: ... 2015 Sony Corporation Printed in Malaysia 4 562 050 11 1 Customer Support and Contact 用戶支援和聯絡 ...

Отзывы: