background image

27

 GB

Usi
ng MENU

 Func

ti

ons

Set-up

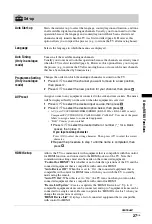
Auto Start-up

Starts the initial set-up to select the language, country/region and location, and tune 
in all available digital and analogue channels. Usually, you do not need to do this 
operation because the language and country/region will have been selected and 
channels already tuned when the TV was first installed (page 8). However, this 
option allows you to repeat the process (e.g., to retune the TV after moving house).

Language

Selects the language in which the menus are displayed.

Auto Tuning
(Only in analogue 
mode)

Tunes in all the available analogue channels.
Usually you do not need to do this operation because the channels are already tuned 
when the TV was first installed (page 8). However, this option allows you to repeat 
the process (e.g., to retune the TV after moving house, or to search for new channels 
that have been launched by broadcasters). 

Programme Sorting
(Only in analogue 
mode)

Changes the order in which the analogue channels are stored on the TV.

1

Press 

F

/

f

 to select the channel you want to move to a new position, 

then press 

g

.

2

Press 

F

/

f

 to select the new position for your channel, then press 

.

AV Preset

Assigns a name to any equipment connected to the side and rear sockets. The name 
will be displayed briefly on the screen when the equipment is selected.

1

Press 

F

/

f

 to select the desired input source, then press 

.

2

Press 

F

/

f

 to select the desired option below, then press 

.

AV1 (or AV2/AV3/HDMI1/HDMI2/HDMI3 (KDL-32S55xx, KDL-26S55xx only)/
Component/PC), VIDEO, DVD, CABLE, GAME, CAM, SAT

: Uses one of the preset 

labels to assign a name to connected equipment.

• “Edit”: Creates your own label.

1

Press 

F

/

f

 to select the desired letter or number (“_” for a blank 

space), then press 

g

.

If you input a wrong character

Press 

G

/

g

 to select the wrong character. Then, press 

F

/

f

 to select the correct 

character.

2

Repeat the procedure in step 1 until the name is completed, then 

press .

HDMI Set-up

Allows the TV to communicate with equipment that is compatible with the control 
for HDMI function, and connected to the HDMI sockets of the TV. Note that 
communication settings must also be made on the connected equipment.

“Control for HDMI”:

 Sets whether or not to link the operations of the TV and the 

connected equipment that is compatible with control for HDMI.

“Auto Devices Off”:

 When this is set to “On”, the connected equipment that is 

compatible with control for HDMI turns off when you switch the TV to standby 
mode using the remote.

“Auto TV On”:

 When this is set to “On”, the TV turns on when you turn on the 

connected equipment that is compatible with control for HDMI.

“Device List Update”: 

Creates or updates the “HDMI Device List”. Up to 11 

compatible equipment items can be connected, and up to 5 equipment items can be 
connected to a single socket. Be sure to update the “HDMI Device List” when you 
change the connections or settings.

“HDMI Device List”:

 Displays a list of connected equipment that is compatible 

with control for HDMI.

Continued

Содержание BRAVIA 4-127-735-12(1)

Страница 1: ... 2009 Sony Corporation 4 127 735 12 1 KDL 32S55xx KDL 26S55xx KDL 22S55xx KDL 19S55xx Operating Instructions LCD Digital Colour TV ...

Страница 2: ...ughly and retain it for future reference Any functions related to Digital TV will only work in countries or areas where DVB T MPEG2 digital terrestrial signals are broadcasted Please confirm with your local dealer if you can receive a DVB T signal where you live Although this TV set follows DVB T specifications compatibility with future DVB T digital terrestrial broadcasts cannot be guaranteed Som...

Страница 3: ...t 17 Connecting optional equipment 18 Viewing pictures from connected equipment 20 Playing Back Photo Music via USB 21 Using control for HDMI 22 Navigating through menus 23 Settings 24 Installing the Accessories Wall Mount Bracket 31 Specifications 34 Troubleshooting 36 Start up Guide 4 Watching TV Using Optional Equipment Using MENU Functions Additional Information Table of Contents for digital c...

Страница 4: ...uthority Handle the remote with care Do not drop or step on it or spill liquid of any kind onto it Do not place the remote in a location near a heat source a place subject to direct sunlight or a damp room 2 Attaching the stand Follow the assembling steps required to place on a TV stand 1 Take out the Table Top Stand and screws from the carton The screws are found in the accessory bag KDL 32S55xx ...

Страница 5: ... KDL 19S55xx If an electric screw driver is used set the torque to tighten at approximately 1 5 N m 15 kgf cm 3 Connecting an aerial VCR DVD recorder This product has been tested and found to compliant with the limits set out in the EMC Directive for using connection cables not longer than 3 meters 9 8 feet AV1 outputs available only for analogue TV AV2 outputs to the current screen except PC HDMI...

Страница 6: ...e screw and a nut 3 Tie the wood screw and the machine screw with a strong cord z An optional Sonysupport belt kit is used to secure the TV Contact your nearest Sony Service Centre to purchase a kit Have your TV model name ready for reference 5 Bundling the cables You can bundle the connecting cables as illustrated below Do not bundle the mains lead with other connecting cables 1 IN 2 Connecting a...

Страница 7: ...n which you will operate the TV then press If the country region which you want to use on the TV does not appear in the list select instead of a country region 5 Press F f to select the location type in which you will operate the TV then press In Shop mode some settings will be periodically reset for Shop usage This option selects the initial picture mode appropriate for the typical lighting condi...

Страница 8: ...g again 3 When the Programme Sorting menu appears on the screen follow the steps of Programme Sorting page 27 If you do not change the order in which the analogue channels are stored on the TV go to next step 4 When the Eco Preset menu appears on the screen if you press Yes the Eco settings are changed to recommended values to reduce power consumption 5 Press MENU to exit The TV has now tuned in a...

Страница 9: ...lied may result in internal damage to the TV set or cause it to fall etc Transporting Before transporting the TV set disconnect all cables Two or more people are needed to transport a large TV set When transporting the TV set by hand hold it as shown below Do not put stress on the LCD panel and the frame around the screen When lifting or moving the TV set hold it firmly from the bottom When transp...

Страница 10: ...ehicle in medical institutions unstable locations near water rain moisture or smoke Environment Places that are hot humid or excessively dusty where insects may enter where it might be exposed to mechanical vibration near flammable objects candles etc The TV set shall not be exposed to dripping or splashing and no objects filled with liquids such as vases shall be placed on the TV Situation Do not...

Страница 11: ...om the TV set Otherwise picture distortion and or noisy sound may occur Disposal of the TV set Disposal of Old Electrical Electronic Equipment Applicable in the European Union and other European countries with separate collection systems This symbol on the product or on its packaging indicates that this product shall not be treated as household waste Instead it shall be handed over to the applicab...

Страница 12: ... the second and third digit in quick succession In Text mode Enters the three digit page number to select the page 0 Digital Favourite list Press to display the Digital Favourite list that you have specified page 17 qa Previous channel Returns to the previous channel watched qs PROG In TV mode Selects the next or previous channel In Text mode page 15 Selects the next or previous page qd 2 Volume q...

Страница 13: ... page 20 In TV menu Selects the menu or option and confirms the setting 5 page 23 6 Remote control sensor Receives IR signals from the remote Do not put anything over the sensor as its function may be affected 7 Picture Off Sleep Timer indicator Lights up in green when the picture is switched off page 26 Lights up in orange when the sleep timer is set page 26 8 1 Standby indicator Lights up in red...

Страница 14: ... see page 16 In digital mode An information banner appears briefly The following icons may be indicated on the banner Additional operations RETURN PROG TOOLS GUIDE MENU AUDIO SCENE ANALOG DIGITAL 3 2 2 3 Interactive service is available MHEG Digital Text Interactive service MHEG Digital Text is currently disabled Radio service Scrambled Subscription service Multiple audio languages available Subti...

Страница 15: ...ts of the top and bottom of the picture may be cut off Depending on the signal some screen formats may not be selectable Some characters and or letters at the top and the bottom of the picture may not be visible in Smart z You can adjust the vertical position of the picture when selecting Smart Zoom 14 9 or Subtitle Press F f to move up or down e g to read subtitles Using the Tools menu Press TOOL...

Страница 16: ...lected a message asking for a PIN code will appear on the screen For details see Parental Lock on page 29 Digital Electronic Programme Guide EPG Select Tune Options Today Previous Next 1 day 15 30 16 00 16 30 17 00 BBC ONE BBC TWO ITV 1 Channel 4 five ITV 2 BBC THREE Teletext BBC FOUR Sky Travel UKTV History More 4 001 002 003 004 005 006 007 009 010 011 012 013 Fri 3 Nov 15 39 To Do this Watch a ...

Страница 17: ... your Favourite list for the first time 1 Press to select Yes 2 Press the yellow button to select the Favourite list 3 Press F f G g to select the channel you want to add then press Channels that are stored in the Favourite list are indicated by a symbol 4 Press RETURN to finish setting up Watch a channel 1 Press the yellow button to navigate through your Favourite lists 2 Press F f to select the ...

Страница 18: ...IN AV2 AV1 1 IN 2 PC IN G H D E I J K L F A B C Video game equipment DVC camcorder Headphones DVD player with component output DVD recorder Decoder VCR Video game equipment DVD player Decoder PC PC HDMI output Blu ray disc player Digital video camera DVD player Hi Fi audio equipment CAM card PC Digital video camera KDL 32S55xx KDL 26S55xx Digital video camera Digital camera USB storage ...

Страница 19: ...nt DVC camcorder Headphones DVD player with component output DVD recorder Decoder VCR Video game equipment DVD player Decoder PC PC HDMI output Blu ray disc player Digital video camera DVD player Hi Fi audio equipment CAM card PC Digital video camera KDL 22S55xx KDL 19S55xx Digital video camera Digital camera USB storage ...

Страница 20: ... 2 socket through a DVI HDMI adaptor interface not supplied and connect the equipment s audio out sockets to the audio in sockets in the HDMI IN 2 sockets Connect to the HDMI IN 3 socket to view photographs or screen images from a PC or digital video camera For KDL 22S55xx KDL 19S55xx HDMI1 or HDMI2 HDMI IN 1 or HDMI IN 2 To see the equipment connected to M or N Digital video and audio signals are...

Страница 21: ...nformation about USB connection mode refer to the instructions supplied with your digital camera USB playback is supported for the following music file formats MP3 files with the extension mp3 that have not been copyrighted USB Photo Viewer supports FAT16 and FAT32 file systems Depending on the exact file specifications some files including those modified on a PC cannot be played even if the file ...

Страница 22: ...uipment correctly and make the necessary settings To make the control for HDMI settings The control for HDMI settings must be set on both the TV side and connected equipment side See HDMI Set up on page 27 for the TV side settings For settings on the connected equipment refer to the operating instructions for that equipment Control for HDMI functions Turns the connected equipment off interlocked w...

Страница 23: ...uts Selects equipment connected to your TV To watch the desired external input select the input source then press 6 Photo Music Displays the Photo Music menu page 21 7 Settings Displays the Settings menu where most of the advanced settings and adjustments are performed 1 Press F f to select a menu icon then press 2 Press F f G g to select an option or adjust a setting then press For details about ...

Страница 24: ...e contrast Brightness Brightens or darkens the picture Colour Increases or decreases colour intensity Hue Increases or decreases the green tones and red tones z Hue can only be adjusted for an NTSC colour signal e g U S A video tapes Sharpness Sharpens or softens the picture Colour Tone Adjusts the whiteness of the picture Cool Gives the white colours a blue tint Neutral Gives the white colours a ...

Страница 25: ...or normal stereo or mono reception Treble Adjusts higher pitched sounds Bass Adjusts lower pitched sounds Balance Emphasizes left or right speaker balance Reset Resets all the Sound Adjustment settings to the factory settings Dual Sound Selects the sound from the speaker for a stereo or bilingual broadcast Stereo Mono For a stereo broadcast A B Mono For a bilingual broadcast select A for sound cha...

Страница 26: ...he picture to fill the display area RGB Centre Adjusts the horizontal picture position so that the picture is in the middle of the screen z This option is only available if an RGB source has been connected to the Scarts connectors AV1 or AV2 on the rear of the TV PC Adjustment Customizes the TV screen as a PC monitor z This option is only available if a PC signal is received Phase Adjusts the scre...

Страница 27: ...F f to select the desired option below then press AV1 or AV2 AV3 HDMI1 HDMI2 HDMI3 KDL 32S55xx KDL 26S55xx only Component PC VIDEO DVD CABLE GAME CAM SAT Uses one of the preset labels to assign a name to connected equipment Edit Creates your own label 1 Press F f to select the desired letter or number _ for a blank space then press g If you input a wrong character Press G g to select the wrong cha...

Страница 28: ...earch will stop To continue searching press F f If you know the channel number frequency Press the number buttons to enter the channel number of the broadcast you want or your VCR channel number 4 Press to jump to Confirm then press Repeat the procedure above to preset other channels manually Label Assigns a name of your choice up to five letters or numbers to the selected channel AFT Allows you t...

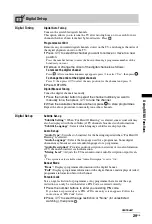
Страница 29: ...s Digital Set up Subtitle Set up Subtitle Setting When For Hard Of Hearing is selected some visual aids may also be displayed with the subtitles if TV channels broadcast such information Subtitle Language Selects which language subtitles are displayed in Audio Set up Audio Type Switches to broadcast for the hearing impaired when For Hard Of Hearing is selected Audio Language Selects the language u...

Страница 30: ...ends that this option is set to On at all times If you do not want your software to be updated set this option to Off System Information Displays the current software version and the signal level Time Zone Allows you to manually select the time zone you are in if it is not the same as the default time zone setting for your country region Auto DST Sets whether or not to automatically switch between...

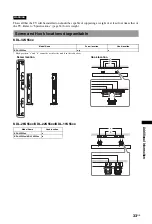
Страница 31: ...e installation Refer to Detaching the Table Top Stand from the TV page 8 Refer to TV installation dimensions table page 32 Refer to Screw and Hook locations diagram table page 33 Place the TV on the Table Top Stand when securing the Mounting Hook SU WL500 for KDL 32S55xx SU WL100 for KDL 26S55xx KDL 22S55xx KDL 19S55xx Sufficient expertise is required for installing this product especially to dete...

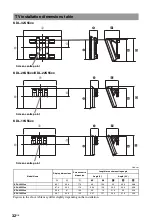
Страница 32: ...Model Name Display dimensions Screen centre dimension Length for each mounting angle Angle 0 Angle 20 A B C D E F G H KDL 32S55xx 80 7 50 8 17 2 43 15 4 30 48 5 46 6 KDL 26S55xx 67 9 43 5 11 4 33 4 15 4 25 2 40 9 33 8 KDL 22S55xx 55 8 37 13 3 33 14 21 9 35 32 9 KDL 19S55xx 48 7 32 8 12 2 29 7 12 7 20 4 31 3 29 4 Screen centre point Screen centre point Screen centre point ...

Страница 33: ...ecifications page 34 for its weight KDL 32S55xx Hook position a and b cannot be used for the model in the table above KDL 26S55xx KDL 22S55xx KDL 19S55xx Screw and Hook locations diagram table Model Name Screw location Hook location KDL 32S55xx e g c Model Name Hook location KDL 26S55xx a KDL 22S55xx KDL 19S55xx b WARNING Screw location Hook location b a c b a ...

Страница 34: ...6p 576i 480p 480i Audio Two channel linear PCM 32 44 1 and 48 kHz 16 20 and 24 bits PC see page 35 Analogue audio minijack HDMI2 only KDL 32S55xx KDL 26S55xx Analogue audio minijack HDMI1 only KDL 22S55xx KDL 19S55xx AV3 Video input phono jack AV3 Audio input phono jacks Audio output Left Right phono jacks PC IN PC Input 15 Dsub see page 35 G 0 7 Vp p 75 ohms non Sync on Green B 0 7 Vp p 75 ohms R...

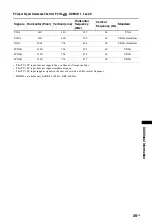
Страница 35: ... This TV s PC input supports signals in the above chart with a 60 Hz vertical frequency HDMI3 is available only for KDL 32S55xx KDL 26S55xx Signals Horizontal Pixel Vertical Line Horizontal frequency kHz Vertical frequency Hz Standard VGA 640 480 31 5 60 VGA SVGA 800 600 37 9 60 VESA Guidelines XGA 1024 768 48 4 60 VESA Guidelines WXGA 1280 768 47 4 60 VESA WXGA 1280 768 47 8 60 VESA WXGA 1360 768...

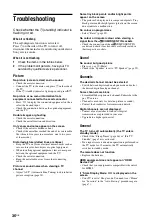
Страница 36: ... AFT Automatic Fine Tuning to obtain better picture reception page 28 Some tiny black points and or bright points appear on the screen The picture of a display unit is composed of pixels Tiny black points and or bright points pixels on the screen do not indicate a malfunction No colour on programmes Select Reset page 25 No colour or irregular colour when viewing a signal from the COMPONENT IN sock...

Страница 37: ...37 GB Additional Information ...

Страница 38: ...38 GB ...

Страница 39: ...39 GB Additional Information ...

Страница 40: ...40 GB ...

Страница 41: ...41 GB Additional Information ...

Страница 42: ...42 GB ...

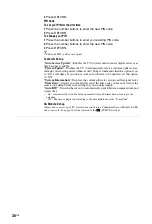
Страница 43: ...ngs then press 3 Press F f to select Set up then press 4 Press F f to select Digital Set up then press 5 Press F f to select Digital Tuning and then press 6 Press F f to select Digital Auto Tuning and then press 7 Press to start Digital Auto Tuning 8 Follow the on screen instructions ...

Страница 44: ...l information about Sony products Instructions on Installing the Wall Mount Bracket are not supplied in the form of a separate leaflet with this TV These installation instructions are included within this TV s instructions manual ...

Отзывы: