background image

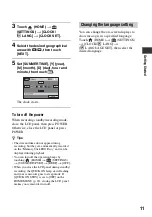
10

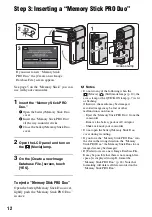
Step 2: Turning the power on, and setting the 
date and time

1

Open the LCD panel.

Your camcorder turns on.

To turn on your camcorder when the 
LCD panel is opened, close it and open 
it again, or press POWER with the LCD 
panel opened.

To adjust the LCD panel, open the LCD 
panel 90 degrees to the camcorder (

1

), 

then rotate it to the best angle to record 
or play (

2

). You can rotate the LCD 

panel 270 degrees to the lens side (

2

to record in mirror mode.

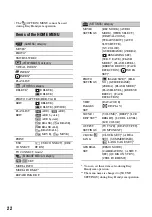
2

Slide the 

 (Movie)/

 (Still) 

select switch repeatedly in the 
direction of the arrow until the 
respective lamp lights up.

(Movie):

 To record movies

(Still):

 To record still images

Go to step 

4

 when you turn on your 

camcorder for the first time.

• When you turn on 

 (Still) lamp, the 

screen aspect ratio is changed to 4:3 
automatically (the default setting).

When using the camcorder for 
the first time, the [CLOCK 
SET] screen appears on the 
LCD screen.

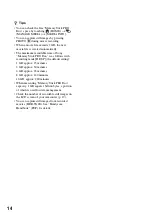
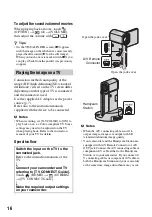
Touch the button on the LCD screen.

 (Movie) /

 (Still) 

select switch

 (HOME)

POWER button

1

90 degrees 

to the 
camcorder

2

270 degrees (max.)

Содержание 3-288-523-13(1)

Страница 1: ...3 288 523 13 1 2008 Sony Corporation Digital HD Video Camera Recorder Operating Guide HDR TG1E TG3E For details on the advanced operations please refer to Handycam Handbook PDF ...

Страница 2: ...ion or disconnect and connect the communication cable USB etc again Disposal of Old Electrical Electronic Equipment Applicable in the European Union and other European countries with separate collection systems This symbol on the product or on its packaging indicates that this product shall not be treated as household waste Instead it shall be handed over to the applicable collection point for the...

Страница 3: ...rs please refer to the addresses given in separate service or guarantee documents If you have any questions about this product you may call Sony Customer Information Center 1 800 222 SONY 7669 The number below is for the FCC related matters only Regulatory Information Notes HDR TG1E is to be used with the Handycam Station Model DCRA C230 and AC Adaptor Model AC L200 L200B CAUTION You are cautioned...

Страница 4: ...vice complies with Part 15 of the FCC Rules Operation is subject to the following two conditions 1 This device may not cause harmful interference and 2 this device must accept any interference received including interference that may cause undesired operation This Class B digital apparatus complies with Canadian ICES 003 Supplied items The numbers in are the supplied quantity Memory Stick PRO Duo ...

Страница 5: ...ase save your images on some type of external media first and then perform MEDIA FORMAT p 24 The LCD screen is manufactured using extremely high precision technology so over 99 99 of the pixels are operational for effective use However there may be some tiny black points and or bright points white red blue or green in color that appear constantly on the LCD screen These points are normal results o...

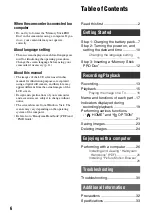
Страница 6: ...without notice The screenshots are from Windows Vista The scenes may vary depending on the operating system of the computer Refer also to Handycam Handbook PDF and PMB Guide Table of Contents Read this first 2 Step 1 Charging the battery pack 7 Step 2 Turning the power on and setting the date and time 10 Changing the language setting 11 Step 3 Inserting a Memory Stick PRO Duo 12 Recording 13 Playb...

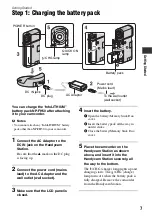
Страница 7: ...l socket 3 Make sure that the LCD panel is closed 4 Insert the battery 1 Open the battery Memory Stick Duo cover 2 Insert the battery pack all the way in until it clicks 3 Close the battery Memory Stick Duo cover 5 Place the camcorder on the Handycam Station as shown above and insert it into the Handycam Station securely all the way to the bottom The CHG charge lamp lights up and charging starts T...

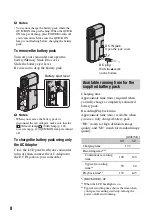
Страница 8: ...panel with your camcorder turns off then connect the AC Adaptor to the DC IN jack on your camcorder Charging time Approximate time min required when you fully charge a completely exhausted battery pack Recording Playback time Approximate time min available when you use a fully charged battery pack HD stands for high definition image quality and SD stands for standard image quality Unit min Battery...

Страница 9: ...onditions under which you use your camcorder On the AC Adaptor Use the nearby wall outlet wall socket when using the AC Adaptor Disconnect the AC Adaptor from the wall outlet wall socket immediately if any malfunction occurs while using your camcorder Do not use the AC Adaptor placed in a narrow space such as between a wall and furniture Do not short circuit the DC plug of the AC Adaptor or batter...

Страница 10: ...s to the lens side 2 to record in mirror mode 2 Slide the Movie Still select switch repeatedly in the direction of the arrow until the respective lamp lights up Movie To record movies Still To record still images Go to step 4 when you turn on your camcorder for the first time When you turn on Still lamp the screen aspect ratio is changed to 4 3 automatically the default setting When using the camc...

Страница 11: ...they are automatically recorded on the Memory Stick PRO Duo and can be displayed during playback You can turn off the operation beeps by touching HOME t SETTINGS t SOUND DISP SET t BEEP t OFF When you close the LCD panel during standby recording the QUICK ON lamp starts flashing and your camcorder goes to sleep mode If QUICK ON STBY is set to OFF on the HOME MENU p 22 closing the LCD panel makes y...

Страница 12: ...QUICK ON lamp p 7 is lit or flashing Otherwise the media may be damaged recorded images may be lost or other malfunctions could occur Eject the Memory Stick PRO Duo from the camcorder Remove the battery pack or AC Adaptor Shake or knock your camcorder Do not open the battery Memory Stick Duo cover during recording If you force the Memory Stick PRO Duo into the slot in the wrong direction the Memor...

Страница 13: ...press START STOP A again See Handycam Handbook PDF to display the image of SD standard definition image quality Press PHOTO B lightly to adjust the focus A a beep sounds then press it fully B a shutter click sounds appears beside When disappears the image has been recorded b Notes If you close the LCD panel during recording the recording will be stopped Flashing t Lights up Movie Still select swit...

Страница 14: ...y Stick PRO Duo is as follows with recording mode HD SP the default setting 1 GB approx 15 minutes 2 GB approx 30 minutes 4 GB approx 65 minutes 8 GB approx 140 minutes 16 GB approx 280 minutes When measuring Memory Stick PRO Duo capacity 1 GB equals 1 billion bytes a portion of which is used for data management Check the number of recordable still images on the LCD screen of your camcorder p 19 Y...

Страница 15: ...oll Index screen 2 Goes to the Face Index screen 3 Goes to HOME 4 Previous 6 images 5 Next 6 images 6 Returns to the recording screen VIEW IMAGES 7 Displays movies with HD high definition image quality 8 Displays still images 9 Searches for images by date 0 OPTION appears when you select the movie with SD standard definition image quality Movies Beginning of the scene previous scene Toggles Play o...

Страница 16: ... settings may need to be adjusted on the TV when playing back Refer to the instruction manual of your TV for details Operation flow b Notes When the A V connecting cable is used to output images images are output with SD standard definition image quality Your camcorder and the Handycam Station are equipped with A V Remote Connector or A V OUT jack Connect the A V connecting cable or component A V ...

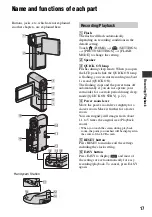
Страница 17: ...he power turns off automatically if you do not operate your camcorder for a certain period during sleep mode QUICK ON STBY p 22 D Power zoom lever Move the power zoom lever slightly for a slower zoom Move it further for a faster zoom You can magnify still images from about 1 1 to 5 times the original size Playback zoom When you touch the screen during playback zoom the point you touched will be di...

Страница 18: ... optional to the tripod receptacle using a tripod screw optional the length of the screw must be less than 5 5 mm 7 32 in O Hook for wrist strap Bottom surface Attach the strap and place your hand through the loop to prevent the camcorder from damage by being dropped K HDMI OUT jack Connect with the HDMI cable optional L A V Remote Connector A V OUT jack Connect with the component A V cable or A V...

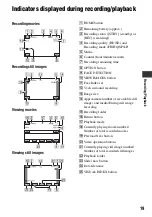
Страница 19: ...rding remaining time H OPTION button I FACE DETECTION J VIEW IMAGES button K Face Index set L 5 1ch surround recording M Image size N Approximate number of recordable still images and media During still image recording O Recording folder P Return button Q Playback mode R Currently playing movie number Number of total recorded movies S Previous Next button T Video operation buttons U Currently play...

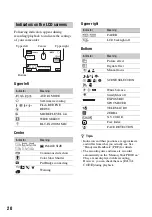
Страница 20: ...ile recording However you can check them as DATA CODE during playback Indicators on the LCD screens Indicator Meaning AUDIO MODE Self timer recording Flash REDEYE REDUC MICREF LEVEL low WIDE SELECT BLT IN ZOOM MIC Indicator Meaning IMAGE SIZE Continuous slide show Color Slow Shutter PictBridge connecting E Warning Upper left Upper right Bottom Center Indicator Meaning FADER LCD backlight off Indic...

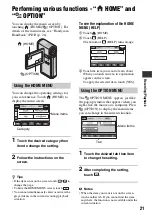
Страница 21: ...ation To see the explanation of the HOME MENU HELP 1 Touch HOME 2 Touch HELP The bottom of HELP turns orange 3 Touch the item you want to learn about When you touch an item its explanation appears on the screen To apply the selected item touch YES The OPTION MENU appears just like the pop up window that appears when you right click the mouse on a computer Press OPTION to display the menu items you...

Страница 22: ...OVIE SETTINGS REC MODE AUDIO MODE WIDE SELECT DIGITAL ZOOM STEADYSHOT AUTO SLW SHUTTR X V COLOR GUIDEFRAME ZEBRA REMAINING SET SUB T DATE FLASH MODE FLASH LEVEL REDEYE REDUC FACE DETECTION INDEX SET PHOTO SETTINGS IMAGE SIZE FILE NO GUIDEFRAME ZEBRA FLASH MODE FLASH LEVEL REDEYE REDUC FACE DETECTION VIEW IMAGES SET DATA CODE DISPLAY SOUND DISP SET VOLUME BEEP LCD BRIGHT LCD BL LEVEL LCD COLOR OUTP...

Страница 23: ...scribed below By using Picture Motion Browser on the supplied CD ROM you can save the images recorded on your camcorder with HD high definition image quality or SD standard definition image quality For details see PMB Guide p 28 Creating a disc with One Touch One Touch Disc Burn You can save images recorded on the camcorder directly to a disc with ease by pressing the DISC BURN button Saving image...

Страница 24: ...n touch the movie to be deleted The selected movie is marked with 4 Touch t YES t To delete all movies at one time In step 3 touch DELETE ALL DELETE ALL t YES t YES t To delete still images 1 In step 2 touch DELETE 2 Touch DELETE then touch the still image to be deleted The selected still image is marked with 3 Touch t YES t z Tips To delete all still images at one time in step 2 touch DELETE ALL ...

Страница 25: ...25 Recording Playback b Notes Formatting will delete all data recorded on the Memory Stick PRO Duo ...

Страница 26: ... language and the model name of your Handycam then click Handycam Handbook PDF Installation starts When the installation is completed the short cut icon of Handycam Handbook PDF appears on the desktop of your computer The model name of your Handycam is printed on the lower side of its side surface 5 Click Exit t Exit then remove the CD ROM from the disc drive of your computer To view Handycam Hand...

Страница 27: ...e DVD player recorder may fail to eject the media and may erase its contents without warning DVD media containing AVCHD footage may be played on a compatible Blu ray Disc player recorder or other compatible device b Notes You can read images recorded on a Memory Stick PRO Duo in a Memory Stick slot of a computer However in the following cases do not use the Memory Stick slot of the computer but co...

Страница 28: ... CONNECT on the USB SELECT screen of your camcorder 7 Click Continue 8 Read License Agreement select I accept the terms of the license agreement if you agree then click Next 9 Confirm the installation settings then click Install 0 Follow the on screen instructions to install the software Depending on the computer you may need to install third party software If the installation screen appears follo...

Страница 29: ...puter b Notes If you close the LCD panel when your camcorder is connected to other devices with the USB cable the recorded images may be lost z Tips If the USB SELECT screen does not appear touch HOME t OTHERS t USB CONNECT ...

Страница 30: ... Turn on the power again Use the AC Adaptor Charge the battery pack p 7 Pressing START STOP or PHOTO does not record images Slide the Movie Still select switch to turn on the Movie lamp or Still lamp p 13 You cannot record images in sleep mode Open the LCD panel Your camcorder is recording the image you have just shot on the Memory Stick PRO Duo You cannot make new recording during this period The...

Страница 31: ...ower is low The temperature of your camcorder is getting high Turn off your camcorder and leave it in a cool place When the indicator flashes slowly free space for recording images are running out For the type of Memory Stick you can use with your camcorder see page 5 No Memory Stick PRO Duo is inserted p 12 When the indicator flashes quickly there are not enough free space for recording images De...

Страница 32: ...ith a towel for example and operate it Doing so might cause heat to build up inside When disconnecting the power cord mains lead pull it by the plug and not the cord lead Do not damage the power cord mains lead such as by placing anything heavy on it Keep metal contacts clean If the battery electrolytic liquid has leaked consult your local authorized Sony service facility wash off any liquid that ...

Страница 33: ...ptor and leave it with the power turned off for more than 24 hours Specifications System Video compression format AVCHD HD MPEG2 SD JPEG Still images Audio compression format Dolby Digital 2 5 1ch Dolby Digital 5 1 Creator Video signal PAL color CCIR standards 1080 50i specification Recording format Movie HD AVCHD 1080 50i Movie SD MPEG2 PS Still image Exif Ver 2 2 1 Image device 3 6 mm 1 5 type C...

Страница 34: ...hargeable battery pack and a Memory Stick PRO Duo Handycam Station DCRA C230 Input Output connectors A V OUT jack Component video and audio output jack USB jack mini B HDR TG3E output only Dedicated USB Terminal Adaptor Input Output connectors USB jack mini B HDR TG3E output only AC Adaptor AC L200 L200B Power requirements AC 100 V 240 V 50 60 Hz Current consumption 0 35 0 18 A Power consumption 1...

Страница 35: ...go and High Definition Multimedia Interface are trademarks or registered trademarks of HDMI Licensing LLC Microsoft Windows Windows Media Windows Vista and DirectX are either registered trademarks or trademarks of Microsoft Corporation in the United States and or other countries Macintosh and Mac OS are registered trademarks of Apple Inc in the U S and other countries Intel Intel Core and Pentium ...

Страница 36: ...ecycled paper using VOC Volatile Organic Compound free vegetable oil based ink Printed in Japan GB Additional information on this product and answers to frequently asked questions can be found at our Customer Support Website ...

Отзывы: