background image

14

Getting started

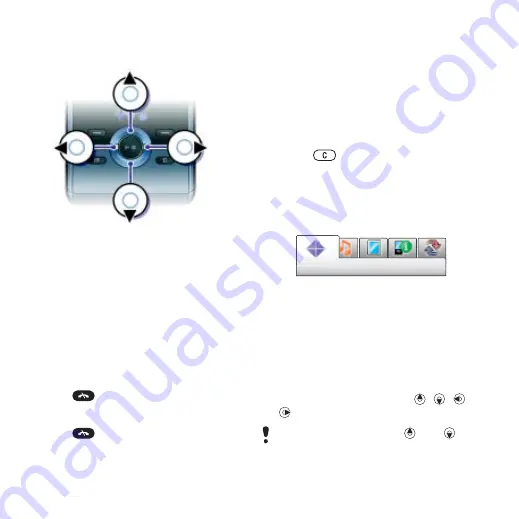
Navigation 

To navigate the phone menus 

1

From Homescreen select 

Menu

.

2

Use the navigation key to move 
through the menus.

To select actions on the screen

Press the left, centre or right selection 
key.

To view options for an item

Select 

Options

 to, for example, edit.

To end a function

Press .

To return to Homescreen

Press .

To navigate your media

1

From Homescreen select 

Menu

 > 

Media

.

2

Scroll to a menu item and press the 
navigation key right.

3

To go back, press the navigation key 
left.

To delete items

Press 

 to delete items such as 

numbers, letters, pictures and sounds.

Tabs

Tabs may be available. For example, 

Settings

 have tabs.

To scroll between tabs

Press the navigation key left or right.

Shortcuts

You can use keypad shortcuts to go 
directly to functions.

To use navigation key shortcuts

From Homescreen press 

 or 

 to go directly to a function.

Navigation key shortcuts 

 and 

 are 

only available if Homescreen is set to 
Sony Ericsson.

This is the Internet version of the User guide. © Print only for private use.

Содержание W595s

Страница 1: ...the phone 24 Sending content to another phone 25 Transferring content to and from a computer 25 Using the USB cable 26 Phone name 27 Using Bluetooth wireless technology 27 Backing up and restoring 29...

Страница 2: ...Web feeds 53 Synchronising 55 Synchronising using a computer 55 Synchronising using an Internet service 56 More features 57 Flight mode 57 Update service 57 Location services 58 Alarms 59 Calendar 60...

Страница 3: ...Under no circumstances will Sony Ericsson be liable in any way for your improper use of additional content or other third party content Smart Fit Rendering is a trademark or a registered trademark of...

Страница 4: ...IIS and Thomson Java JavaScript and Java based trademarks and logos are trademarks or registered trademarks of Sun Microsystems Inc in the U S and other countries End user license agreement for Sun J...

Страница 5: ...User guide Note Tip Warning A service or function is network or subscription dependent Contact Orange for details Use a selection or navigation key to scroll and select See Navigation on page 14 This...

Страница 6: ...he SIM card 1 Remove the battery cover 2 Slide the SIM card into its holder with the gold coloured contacts facing down To insert the battery 1 Insert the battery with the label side up and the connec...

Страница 7: ...phone please contact Orange PIN You may need a PIN Personal Identification Number to activate the services and functions in your phone Your PIN is supplied by Orange Each PIN digit appears as unless...

Страница 8: ...nfo appears under Options To view the phone demonstration From Homescreen select Menu Entertainment Demo tour To view the phone status From Homescreen press the volume key up Phone memory and battery...

Страница 9: ...keys 4 Call key 5 Multitasking key 6 Selection key Walkman player control 7 Volume key 8 Walkman key 9 End key On off key 10 C key Clear 11 Navigation key Walkman player control 12 Silent key This is...

Страница 10: ...10 Getting started 13 Camera lens 14 Speaker 15 Connector for charger handsfree and USB cable 16 Strap holder This is the Internet version of the User guide Print only for private use...

Страница 11: ...From Homescreen select Menu Settings the General tab Homescreen Sony Ericsson Today New appointment Alarms Time date Address Book New contact Key contacts Call History Missed Answered Dialled Write me...

Страница 12: ...deoDJ PhotoDJ MusicDJ Remote control Record sound Demo tour Media Messaging Orange World Write message Inbox Messenger Email Drafts Outbox Sent messages Saved messages Call Answer Phone Templates Mana...

Страница 13: ...sound Display Wallpaper Main menu layout Theme Screen saver Clock size Brightness Calls Speed dial Smart search Divert calls Manage calls Time cost Show hide my no Handsfree Open to answer Close to e...

Страница 14: ...a menu item and press the navigation key right 3 To go back press the navigation key left To delete items Press to delete items such as numbers letters pictures and sounds Tabs Tabs may be available F...

Страница 15: ...SIM card Pictures and music are saved on the memory card if a memory card is inserted If not or if the memory card is full they are saved in the phone memory Messages and contacts are saved in the pho...

Страница 16: ...own To remove a memory card Open the cover and remove the memory card To view memory card options 1 From Homescreen select Menu Organiser Media Album the On memory card tab 2 Select Options Phone lang...

Страница 17: ...xt Input 1 From Homescreen select for example Menu Messaging Write message Text message 2 If is not displayed press and hold down to change to T9 Text Input 3 Press each key only once even if the lett...

Страница 18: ...ager to transfer content to and from your phone See Transferring content to and from a computer on page 25 for more information Stereo portable handsfree To use the handsfree Connect the portable hand...

Страница 19: ...and rewind Press and hold down or To move between tracks Press or To minimise the player When music is playing press To return to the player Press Shake control To switch track When music is playing...

Страница 20: ...re than one playlist Deleting a playlist or a track from a playlist does not delete the track from the memory just the reference to the track To create a playlist 1 From Homescreen select Menu Media M...

Страница 21: ...displayed as dots on a map with two axes You can create a playlist by selecting an area of tracks To create a playlist by mood 1 From Homescreen select Menu Media My music 2 Scroll to SensMe and sele...

Страница 22: ...ou cannot use the Internet see Troubleshooting on page 67 To select a data account for streaming 1 From Homescreen select Menu Settings the Connectivity tab Streaming settings Connect using 2 Select t...

Страница 23: ...oll to a position and select Insert To select saved channels 1 Select Options Channels 2 Select a radio channel To switch between saved channels Press or MusicDJ You can compose and edit your own melo...

Страница 24: ...um to handle content saved in the phone memory or on a memory card Tabs and icons in Media Album show where the content is saved If the memory is full delete some content to create space To view memor...

Страница 25: ...content between your phone and a computer When you move or copy content from a computer to your phone unrecognised content is saved in the Other folder in the Media Album Required operating systems Y...

Страница 26: ...chronise transfer and back up phone content and use your phone as a modem For more information go to www sonyericsson com support to read Getting started guides Before you use the USB cable See Requir...

Страница 27: ...n select Menu Settings the Connectivity tab Phone name 2 Enter the phone name and select OK Using Bluetooth wireless technology The Bluetooth function makes wireless connection to other Bluetooth devi...

Страница 28: ...Select a device 3 Enter a passcode if required Power saving You can save battery power with the Power save function In Power save mode you can only connect with a single Bluetooth device If you want t...

Страница 29: ...w the instructions in the Sony Ericsson PC Suite for how to connect 3 Phone Select Phone mode 4 Computer Go to the backup and restore section in the Sony Ericsson PC Suite and make a backup To restore...

Страница 30: ...ll 1 From Homescreen enter a phone number with international country code and area code if applicable 2 Press To end a call Press To make international calls 1 From Homescreen press and hold down unti...

Страница 31: ...ings the Connectivity tab Mobile networks GSM 3G networks 2 Select an option Emergency calls Your phone supports international emergency numbers for example 112 and 911 You can normally use these numb...

Страница 32: ...Address Book You can save names phone numbers and personal information in Address Book Information can be saved in the phone memory or on the SIM card Default contacts You can choose which contact inf...

Страница 33: ...r corresponding letters are shown in a list 2 Scroll to a contact or a phone number and press To turn Smart search on or off 1 From Homescreen select Menu Settings the Calls tab Smart search 2 Select...

Страница 34: ...ion and add more information if available 6 Select Save To call a SIM contact 1 From Homescreen select Menu Address Book 2 Scroll to a contact and press Deleting contacts To delete all contacts 1 From...

Страница 35: ...calls on page 39 To create a group of numbers and email addresses 1 From Homescreen select Menu Address Book 2 Scroll to New contact and select Options Groups 3 Scroll to New group and select Add 4 En...

Страница 36: ...ssaging Settings Answer Phone no 2 Enter the number and select OK To call your answer phone service From Homescreen press and hold down Voice control By creating voice commands you can Voice dial call...

Страница 37: ...a new recording 4 Follow the instructions that appear and select Cont Wait for the tone and say Busy or say any other word of your choosing 5 Select Yes to accept or No for a new recording 6 Follow t...

Страница 38: ...lect Options Add call 3 Enter the number to call and press To answer a second call During the call press This puts the ongoing call on hold To reject a second call During the call press and continue w...

Страница 39: ...contact and select Options Special numbers My numbers 3 Select an option Accept calls You can choose to receive calls from certain phone numbers only To add numbers to the accepted callers list 1 Fro...

Страница 40: ...s Book 2 Scroll to New contact and select Options Special numbers Fixed dialling Activate 3 Enter your PIN2 and select OK 4 Select OK again to confirm To save a fixed number 1 From Homescreen select M...

Страница 41: ...l you can delete messages or save them on the SIM card To save a message on a memory card From Homescreen select Menu Messaging Settings General Save to Memory card To save a message on the SIM card 1...

Страница 42: ...msg length Max available Multimedia messages Multimedia messages can contain text pictures slides sound recordings video clips signatures and attachments You can send multimedia messages to a mobile p...

Страница 43: ...ia message 2 Scroll to an option and select Edit To set options for a specific message 1 When the message is ready and a recipient is selected select Options Advanced 2 Scroll to an option and select...

Страница 44: ...ounts 2 Scroll to New account and select Add To write and send an email message 1 From Homescreen select Menu Messaging Email Write message 2 Select Add Enter email address Enter the email address and...

Страница 45: ...en you view the message select Options Attachments Use Save Active email account If you have several email accounts you can change which one is active To change the active email account 1 From Homescr...

Страница 46: ...ger the Contacts tab 2 Scroll to a contact and select Send IM 3 Write the message and select Send My Status You can show your status as for example Online Busy or Appear Offline To set your status 1 F...

Страница 47: ...to Reception and select Edit On Imaging You can take pictures and record video clips to view save or send You find saved pictures and video clips in Media and in Media Album Viewfinder and camera key...

Страница 48: ...tem More camera features You can improve an underexposed picture with Photo fix Camera icons and settings Icons on the screen inform what the current setting is More camera settings are available in O...

Страница 49: ...con 7 To tag the picture press the centre selection key To tag pictures 1 From Homescreen select Menu Media Photo Camera album 2 Select a month 3 Scroll to a picture and select View 4 Press and scroll...

Страница 50: ...the picture 6 Select Options Save picture To edit and save a video clip 1 From Homescreen select Menu Organiser Media Album Camera album 2 Scroll to a video clip and select Options Edit in VideoDJ 3 E...

Страница 51: ...een select Menu Orange World 2 Select Options Go to 3 Select an option To exit the browser When you browse the Internet select Options Exit browser Bookmarks You can create and edit bookmarks as quick...

Страница 52: ...Find on page 2 Enter text and press Find To send a link 1 When you browse the Internet select Options Tools Send link 2 Select a transfer method Internet keypad shortcuts You can use the keypad to go...

Страница 53: ...via feeds 1 From Homescreen select Menu Media Web feeds 2 Scroll to an updated feed and select View or 3 Select a heading to expand 4 Select an icon depending on content to open a Web page to download...

Страница 54: ...ect Go to Podcasts Podcasts are files for example radio programs or video content you can download and play You subscribe to and download podcasts using Web feeds To access audio podcasts From Homescr...

Страница 55: ...rts automatically and the installation window opens 2 Select a language and click OK 3 Click Install Sony Ericsson PC suite and follow the instructions on the screen To synchronise using the Sony Eric...

Страница 56: ...SyncML 3 Enter a name for the new account and select Cont 4 Select Server address Enter the required information and select OK 5 Enter Username and Password if required 6 Scroll to the Applications ta...

Страница 57: ...ganiser Synchronisation 2 Scroll to an account and select Start More features Flight mode In Flight mode the network and radio transceivers are turned off to prevent disturbance to sensitive equipment...

Страница 58: ...our phone using the provided USB cable and an Internet connected PC To use Update service using a PC Go to www sonyericsson com support Location services You can get help to find your way and save you...

Страница 59: ...t 3 Scroll to the tab 4 Scroll to Alarm signal and select Edit 5 Find and select an alarm signal Select Save To silence the alarm When the alarm sounds press any key To repeat the alarm select Snooze...

Страница 60: ...m Homescreen select Menu Organiser Calendar 2 Select a date 3 Scroll to New appointment and select Add 4 Enter the information and confirm each entry 5 Select Save To view an appointment 1 From Homesc...

Страница 61: ...tasks or reuse existing tasks To add a task 1 From Homescreen select Menu Organiser Tasks 2 Select New task and select Add 3 Select an option 4 Enter details and confirm each entry To view a task 1 Fr...

Страница 62: ...Settings the General tab Time date My time zone 2 Select the time zone you are in Theme You can change the appearance of the screen through items such as colours and wallpaper You can also create new...

Страница 63: ...e orientation change when you rotate the phone To change screen orientation in Media 1 From Homescreen select Menu Media Settings Orientation 2 Select an option Games Your phone contains preloaded gam...

Страница 64: ...tion vendor To set the screen size for a Java application 1 From Homescreen select Menu Organiser My applications 2 Scroll to an application and select Options Screen size 3 Select an option 4 Press a...

Страница 65: ...ard is blocked and you need to enter your PUK Personal Unblocking Key Your PIN and PUK are supplied by your network operator To unblock the SIM card 1 When PIN blocked appears enter your PUK and selec...

Страница 66: ...he code and select OK Keypad lock You can set this lock to avoid accidental dialling Incoming calls can be answered without unlocking the keypad To use the automatic keylock 1 From Homescreen select M...

Страница 67: ...acity or the phone is working slowly Restart your phone every day to free memory or do a Master reset Master reset If you select Reset settings the changes that you have made to settings will be delet...

Страница 68: ...mber is shown if it is saved on the SIM card 2 If there is no number shown select Edit 3 Scroll to New ServiceCentre and select Add 4 Enter the number including the international sign and country code...

Страница 69: ...ise or transfer content between my phone and my computer when using the USB cable The cable or software that came with your phone has not been properly installed Go to www sonyericsson com support to...

Страница 70: ...lect Yes See PIN on page 6 PIN blocked or PIN2 blocked You have entered your PIN or PIN2 code incorrectly three times in a row To unblock see SIM card lock on page 65 Codes do not match Codes that you...

Страница 71: ...support You have access to a portfolio of exclusive service advantages such as Global and local Web sites providing support A global network of call centers An extensive network of Sony Ericsson servi...

Страница 72: ...onyericsson com India 39011111 questions IN support sonyericsson com Indonesia 021 2701388 questions ID support sonyericsson com Ireland 1850 545 888 questions IE support sonyericsson com Italia 06 48...

Страница 73: ...dical devices or equipment Discontinue use of electronic devices or disable the radio transmitting functionality of the device where required or requested to do so Do not use where a potentially explo...

Страница 74: ...s Only Sony Ericsson service partners should remove or replace built in batteries Use of batteries that are not Sony Ericsson branded may pose increased safety risks Replace the battery only with anot...

Страница 75: ...network the actual SAR level can be well below this value There is no proof of difference in safety based on difference in SAR value Products with radio transmitters sold in the US must be certified b...

Страница 76: ...le with the handset purchased but may not be compatible with other devices or the capabilities of their memory cards Check other devices for compatibility before purchase or use If your product is equ...

Страница 77: ...the Device with which you received the Software provided the third party agrees in writing to be bound by the terms of this License This license exists throughout the useful life of this Device It can...

Страница 78: ...e remaining time of the original warranty period or for ninety 90 days from the date of repair whichever is longer Repair or replacement may involve the use of functionally equivalent reconditioned un...

Страница 79: ...ovided that an identical Product is sold in such country by an authorised Sony Ericsson distributor To find out if your Product is sold in the country you are in please call the local Sony Ericsson Ca...

Страница 80: ...ds client via GPRS to download the Content is incremental and not included in the approximate price quoted in the phone display Cancellation and withdrawal Once you have accepted the price quoted in t...

Страница 81: ...mitation Sony Ericsson may change modify or withdraw access to Downloads at any time including its services without prior notice and without any liability whatsoever Sony Ericsson is not liable for th...

Страница 82: ...eiver is connected Consult the dealer or an experienced radio TV technician for help Industry Canada Statement This Class B digital apparatus complies with Canadian ICES 003 Cet appareil num rique de...

Страница 83: ...umbers in message 42 call time 40 caller specific ringtones 33 calls accepting 39 answering and rejecting 31 emergency 31 handling two calls 38 international 30 making and receiving 30 putting on hold...

Страница 84: ...66 Internet bookmarks 51 security and certificates 53 K keypad lock 66 automatic 66 keys 9 L language 16 location services 58 lock keypad 66 phone 66 SIM card 65 M master reset 67 Media Album 24 Media...

Страница 85: ...s 48 PIN code changing 65 playlists 20 podcasts 54 power saving 28 profiles 61 PUK 65 push email 45 R radio 23 recording listen to 24 restricted dialling 39 ringtones 63 S safety guidelines 73 screen...

Страница 86: ...lock 66 phone lock 66 SIM lock protection 65 U Update service 57 USB cable 26 V video editing 50 video player 22 video recorder 47 VideoDJ 50 voice answering 37 voice commands 36 voice control 36 voi...

Отзывы: