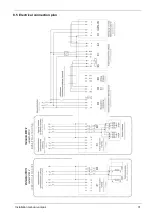
8 Electrical connection
n
Use a bus cable with this specification:
–
Cable length up to 100 m: 2x2x0.22 mm²
Cable length 100 m to 200 m: 2X2x0.34 mm²
(e.g. Lapp Unitronic Bus Can, No. 2170263)
–
AWG22, STP (=Shielded Twisted Pair)
–
Nominal resistance: 120 Ohm
–
Line capacitance per metre: < 60 pF/m
–
Loop resistance: < 160 Ohm/km
n
Connect the shield of the bus cable to the ground
(GND
⏊
) of each electronic module (see the
images in the following chapter
Bus terminating
resistor
).
n
If there are several bus participants, the following
applies: The bus wiring must run from one bus-
participant to the next. The order of the par-
ticipants does not matter.
Abb. 2-43: Bus topology
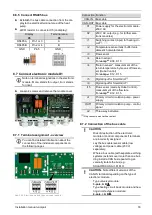
8.7.3 Bus terminating resistor
–
CAN (Controller Area Network) is a 2-wire bus
system. The bus must be equipped at each end
with a 120Ω terminating resistor (to avoid reflec-
tions).
–
Two connections for the CAN bus -
CAN-IN
and
CAN-OUT
- are located on the electronic module.
The terminating resistor is pre-installed to
CAN-
OUT
at the factory.
–
If only one electronic module is connected to the
heat pump, the terminating resistor for this must
be left on the
CAN-OUT
plug.
If several modules
are connected, then the terminating resistor
may only be installed on the last module in
the chain
(the terminating resistor must be
removed from the remaining modules). See the
following image(s).
Heat pump vamp
air
A 120 Ohm resistor is permanently installed in the display.
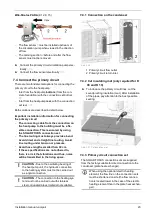
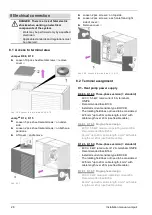
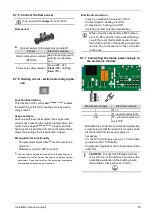
8.7.4 Connect the primary circuit circulation
pump
►
Connect pump to the electronic module D1
Wilo-Para
(K 08, K 10)
Wire
Electronic module
Power cable
L
o1
– L
N
o1
- neutral conductor N
PE
o1
– protective earth conductor
PE
Control
cable
blue
OUT1
- ground
⏊
brown
OUT1
- O
black
OUT1
- I
Wilo-Stratos PARA
(K 12, K 15)
Wire
Electronic module
Power cable
L
o1
– L
N
o1
- neutral conductor N
PE
o1
- protective earth conductor
PE
Control
cable
brown
OUT1
- ground
⏊
white
OUT1
- O
34
Installation manual
vampair
Содержание Vampair
Страница 31: ...8 Electrical connection Installation manual vampair 31 8 5 Electrical connection plan ...
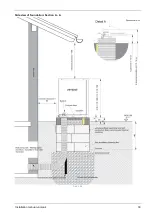
Страница 39: ...10 Foundation plan Installation manual vampair 39 Side view of foundation Section A A Abb 2 48 ...
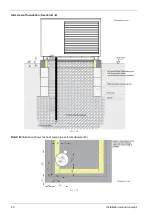
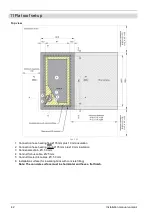
Страница 44: ...Front view of foundation Section B B Abb 2 55 11 Flat roof set up 44 Installation manual vampair ...
Страница 51: ...12 Plant schematic Installation manual vampair 51 ...


