

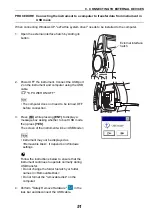

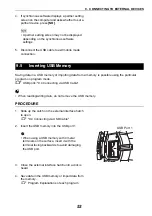


63
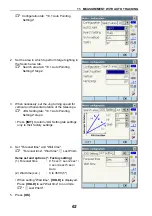
11. MEASUREMENT WITH AUTO TRACKING
PROCEDURE
1. Use the sighting collimator to aim the objective
lens in the general direction of the target. (The
vertical and horizontal Jogs can be used for
precise adjustments of the instrument and
telescope.)
C
JOG Setting tab: "10.1 Auto Pointing
Settings" step 4
2. Select
[MEAS]
,
[RC Cont]
, or
[SRCH]
in any
Observation mode screen. The telescope and top
half of the instrument rotate and target auto-
search begins. When the target is found, the
target is aligned in the field-of-view and Auto
Tracking starts.
3. Press
[TRK Off]
in a Observation mode screen to
stop Auto Tracking.
• When
[STOP]
is pressed, distance
measurement will stop but Auto Tracking will
remain active.
&
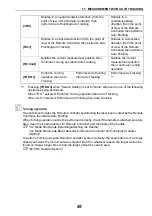
Lost Prism
In the event that an obstacle prevents the instrument sighting the target during Auto Tracking,
the instrument will predict the direction in which the target will travel and continue Auto Tracking
based on this prediction for the time period set in "Forecast time". If the instrument re-acquires
the target in this predicted direction, Auto Tracking continues without change. If the target is not
re-acquired however, the target is considered "lost" ("Target lost" status) and the instrument
starts "horizontal search", "Prism wait" and "re-search" in order. If the instrument re-acquires the
target in this process , Auto Tracking continues.
"Prism wait" will continue for the time period set in "Wait time".
If the target is not re-acquired after "re-search", sighting terminates. Start Auto Tracking
procedure again from step 1.
"Wait time" being set to "HOLD" (no limits), Auto Tracking procedure is as follows. The telescope
does not move and keeps "Prism wait" status and when the prism comes into the field of view,
the instrument starts Auto Tracking.
C
"Forecast time" (duration of search in predicted direction) and "Wait time" settings:
"10.1 Auto Pointing Settings" step 4
11.2
Measurement with Auto Tracking (Option)