background image

Chapter 9 – Stowing and Transporting

38 

S2770RT IS – 0102094

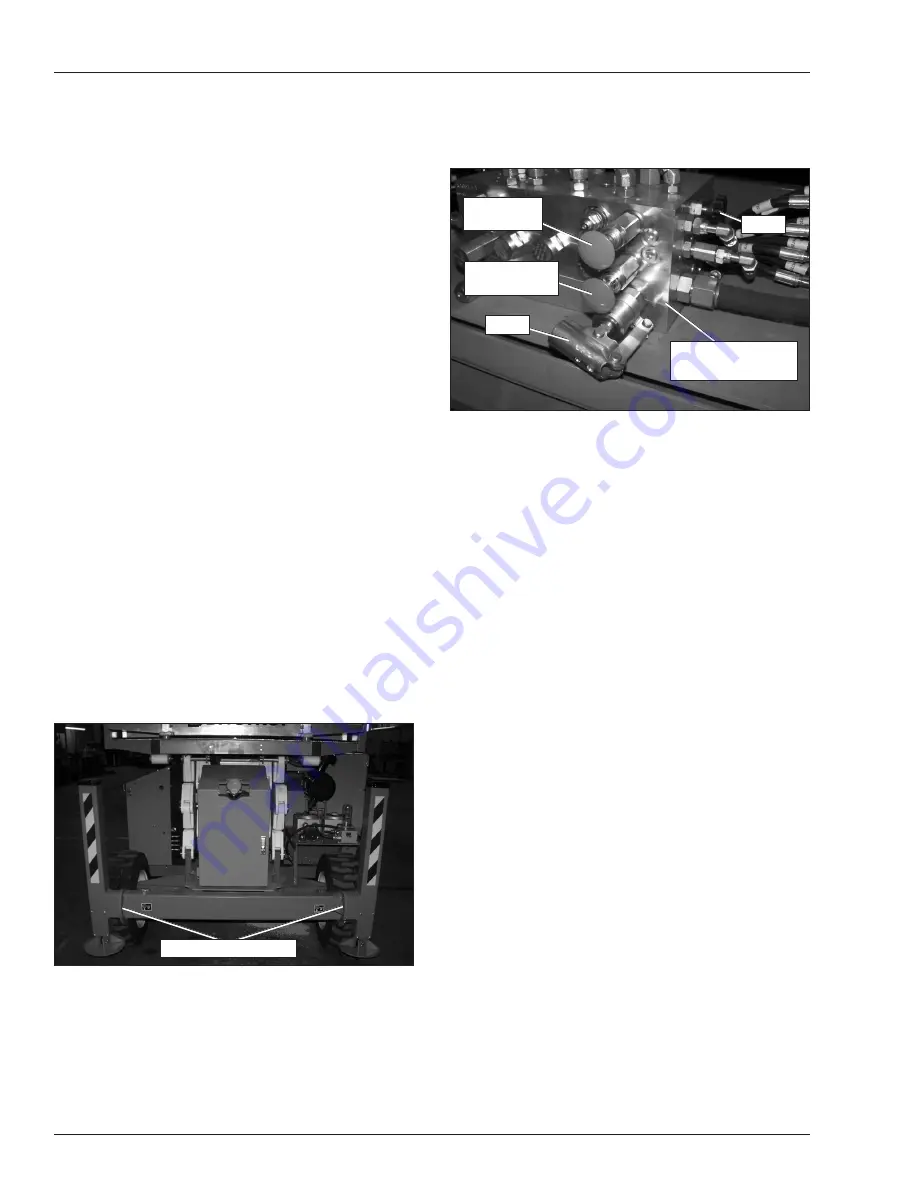
  7. Open the door on the right side of the chassis to 

access the manual emergency lowering pump (refer 

to Figure 9.2).

Figure 9.2 – Manual Emergency Lowering Pump

  8.  The pump handle is mounted next to the lower con-

trols. Insert the handle into the pump (refer to Figure 

9.2).

  9.  Pull the brake knob outward and twist to lock in po-

sition.

10.  Fully turn the valve counterclockwise until loose.

11.  Pump the handle several times until pressurized then 

stow the handle.

12. Remove the wheel chocks and use the winch to 

position the aerial platform on the transport vehicle.

A

Warning

The aerial platform is free to move when the brakes 

are released. Death or serious injury could result. 

Re-enable  the  brakes  before  operating  the  aerial 

platform.

12.  After moving the aerial platform, fully turn the valve 

clockwise until tight and twist to unlock the brake 

knob.

13.  After unloading the aerial platform from the transport 

vehicle, verify that the drive system and brakes op-

erate properly before operating the aerial platform.

Hoisting

Use a four point sling arrangement attached to the lifting 

lugs when hoisting the aerial platform. Machine damage 

can occur if the sling is attached anywhere else.

A

Warning

The potential for an accident increases when the 

aerial platform is lifted using improper equipment 

and/or lifting techniques. Death or serious injury 

A

Danger

Lifting the aerial platform with the forklift forks posi-

tioned improperly can produce enough force to dam-

age machine components. When lifting the machine 

from the side, place the forklift forks directly under 

the designated lift points.

  3.  To lift the machine from the side, place the forklift forks 

directly under the designated points under the chassis.

  4.  Do not raise the aerial platform higher than necessary 

to transport it. Drive the forklift slowly and carefully 

when transporting the aerial platform.

Winching

Use the following procedure to winch the aerial platform 

onto the transport vehicle:

  1.  Position the transport vehicle so the aerial platform 

will not roll forward after it is loaded.

  2.  Remove tools, materials, or other loose objects from 

the platform.

  3. Drive the machine to the foot of the loading ramp 

with the front wheels nearest the ramp. Make sure 

the machine is centered with the ramps and that the 

steering wheels are straight.

  4.  Properly stow the aerial platform.

  5.  Chock the wheels to prevent uncontrolled motion of 

the aerial platform.

  6.  Attach the winch to the tie-down lugs (refer to Figure 

9.1) on the front of the chassis.

Figure 9.1 – Front Tie-Down/Lifting Lugs

A

Warning

The aerial platform is free to move when the brakes 

are released. Death or serious injury could result. 

Re-enable  the  brakes  before  operating  the  aerial 

platform.

Tie-Down/Lifting Lugs

Pump

Main Control

Valve Assembly

Brake

Release Knob

Scissor

Lower Knob

Valve

Содержание S2770RT

Страница 1: ...November 2017 Part Number 0102094 MANUAL OPERATOR S Model S2770RT IS Intrinsically Safe...

Страница 2: ...t creating an electrical shock hazard resulting in death or serious injury If an aerial platform is in contact with an energized conductor the platform operator must warn ground personnel in the vicin...

Страница 3: ...Filter Gauge 13 Hydraulic Fluid Level Gauge 13 Bubble Levels 13 Chapter 6 Controls Outrigger Controls 15 Lower Controls 15 Emergency Stop Button 15 Control Selector 15 Ground Operation Button 15 Platf...

Страница 4: ...ardrails 35 Platform Extension Deck 36 Chapter 9 Stowing and Transporting Stowing 37 Transporting 37 Driving 37 Lifting With a Forklift 37 Winching 38 Hoisting 38 Securing for Transport 39 Chapter 10...

Страница 5: ...the likelihood of personal injury and property damage The terms danger warning and caution indicate varying degrees of personal injury or property damage that can result if the instruction is not foll...

Страница 6: ...bilities All owners and users of the aerial platform must read understand and comply with all applicable regulations Ultimate compliance to OSHA regulations is the respon sibility of the user and thei...

Страница 7: ...Controls Operator s Manual Chassis Upper Controls Front Rear Entry Gate Tie Down Lifting Lugs Engine Compartment Engine Hydraulic Pump Hydraulic Compartment Hydraulic Reservoir Hydraulic Fluid Filter...

Страница 8: ...2 mm Rated work load Deck retracted 1 275 lbs 580 kg Deck extended Main deck 1 015 lbs 460 kg Extension 265 lbs 120 kg Maximum number of occupants 4 people Function Speed Platform raise 26 seconds Pla...

Страница 9: ...nents and is not insulated Regard all conductors as energized Do not operate outside during a thunderstorm Minimum Safe Approach Distance Minimum safe approach distances to energized power lines and t...

Страница 10: ...s injury will result from becoming trapped between components buildings structures or other obstacles Make sure there is sufficient clearance around the machine before moving the chassis or platform A...

Страница 11: ...the aerial platform from trucks trailers rail way cars floating vessels scaffolds or similar equipment unless the application is approved in writing by Snorkel Do not use the aerial platform as a cran...

Страница 12: ...ed cap without proper venting may result in pressurization of the tank Never use fuel for cleaning purposes Use the correct fuel grade for the operating season Placards and Decals The aerial platform...

Страница 13: ...sed to operate the aerial platform y y Push the emergency stop button inward to disconnect power to all control circuits y y Pull the button outward to restore power At the upper controls the emergenc...

Страница 14: ...ers Four outriggers one on each corner of the machine are used to level the chassis before raising the platform The machine should not be driven unless the outriggers are completely raised Bubble Leve...

Страница 15: ...on The horn button may be used to warn personnel on the ground The horn button is located on the left side of the upper control panel Safety Prop The safety prop refer to Figure 4 8 is used to support...

Страница 16: ...Chapter 4 Safety Devices 12 S2770RT IS 0102094...

Страница 17: ...servoir The res ervoir is behind the door on the left side of the turntable y y During high pump flow situations the gauge indicates the condition of the filter y y When the needle on the gauge is in...

Страница 18: ...Chapter 5 Gauges and Displays 14 S2770RT IS 0102094...

Страница 19: ...n Release the buttons when the desired height is reached Chapter 6 Controls ADanger Pinch points may exist between moving components Death or serious injury will result from becoming trapped between c...

Страница 20: ...right position to steer to the right Note The steering wheels are not self centering Set the steer ing wheels straight ahead after completing a turn Drive Speed Handle The drive range handle has two p...

Страница 21: ...The steering and drive functions may be operated separately or simultaneously Horn Button The horn button is located on the left side of the upper control panel Press the button to sound the horn Pla...

Страница 22: ...Chapter 6 Controls 18 S2770RT IS 0102094...

Страница 23: ...inspect the engine and its components with the engine off The engine is located behind the doors on the left side of the chassis Operator s Manual Holder Chapter 7 Prestart Inspection To inspect the...

Страница 24: ...assis The pump is mounted on the engine Fluid Level To inspect the fluid level 1 Place the aerial platform on a level surface with the platform fully stowed 2 Open the doors on the right side of the c...

Страница 25: ...lower controls Figure 7 5 Hoses Tubes and Fittings 2 Make sure the hoses are properly routed to avoid sharp edges kinking and scuffing 3 Inspect the tubes for dents or other damage that may restrict f...

Страница 26: ...ing procedure to test the emergency low ering system 1 Use the lower controls to raise the platform a few feet 2 Turn the engine off Danger Pinch points may exist between moving components Death or se...

Страница 27: ...d that they are securely fastened to the platform floor Entry Gate Top Rail Toeboard Mid Rail Figure 7 10 Front of Platform 2 Raise the platform from the lower controls and visu ally inspect the slide...

Страница 28: ...s the extension deck to the main platform deck ACaution The extension deck is free to move when the exten sion handle locks are disengaged Personal injury may result from accidentally extending or ret...

Страница 29: ...ersonnel in the area Placards and Decals To inspect the placards and decals 1 Inspect all safety and operational placards and decals Make certain they are in place in good con dition and are legible 2...

Страница 30: ...eath DO NOT let an untrained or unauthorized person use this machine When you leave the machine unattended remove the key or turn off the battery switch on the base of the machine and lock the battery...

Страница 31: ...TION OF THIS DEVICE AND HHHH YOU KNOW AND FOLLOW THE SAFETY AND OPERATING RECOMMENDATIONS CONTAINED IN THE MANUFACTURER S MANUALS YOUR EMPLOYER S WORK RULES AND APPLI CABLE GOVERNMENTAL REGULATIONS HH...

Страница 32: ...Chapter 7 Prestart Inspection 28 S2770RT IS 0102094...

Страница 33: ...mergency stop Shuts off lower controls proper operation Outriggers Operating controls Proper operation Bubble levels In place no deformation or damage Manual Emergency Lowering Pump Proper operation S...

Страница 34: ...Chapter 7 Prestart Inspection 30 S2770RT IS 0102094...

Страница 35: ...ons encountered Hydraulic System Cold Weather Warm Up Cold thick hydraulic oil does not flow well and may cause delay in response to control movement Cold hydraulic oil may also cause cavitation and p...

Страница 36: ...ward while operating the outrigger controls 3 Hold an outrigger handle upward to raise the outrigger leg Repeat until all four outriggers have been fully raised Operating with Outriggers Lowered on S...

Страница 37: ...it warm to operating tempera ture ADanger Pinch points exist on the elevating assembly Death or serious injury will result if the platform lowers onto personnel Stand clear while raising and lowering...

Страница 38: ...the joystick is moved the faster the platform raises There is only one lowering speed Use the following procedure to raise the platform 1 Move the aerial platform to a firm flat level sur face 2 Place...

Страница 39: ...elected y y To avoid a sudden speed change from high to low always bring the machine to a stop before raising the platform from the stowed position AWarning The potential for an accident increases whe...

Страница 40: ...Hardware ACaution The extension deck is free to move when the exten sion handle locks are disengaged Personal injury may result from accidentally extending or retracting the deck Make certain both ext...

Страница 41: ...pter 2 to determine the approximate weight of the aerial platform The user assumes all responsibility for y y Choosing the proper method of transportation y y Choosing the proper selection and use of...

Страница 42: ...roper equipment and or lifting techniques Death or serious injury ADanger Lifting the aerial platform with the forklift forks posi tioned improperly can produce enough force to dam age machine compone...

Страница 43: ...t have latching mechanisms to prevent them from falling out under a slack line condition may also be used Do not run the sling cable through the lifting lugs y y Cable damage and or failure can result...

Страница 44: ...Chapter 9 Stowing and Transporting 40 S2770RT IS 0102094...

Страница 45: ...Open the door on the right side of the chassis to access the manual emergency lowering pump 2 The pump handle is mounted next to the lower con trols Insert the handle into the pump refer to Figure 10...

Страница 46: ...Chapter 10 Emergency Operation 42 S2770RT IS 0102094...

Страница 47: ...ntrols is in the lower control position Platform foot valve not engaged Hydraulic oil is cold and thick Hydraulic system malfunction Load capacity exceeded Machine on too steep a grade Drive range han...

Страница 48: ...sure fluid return to res ervoir caused by kinked or twisted hose Hydraulic system component failure Failure of hose tube fitting seal etc Corrective Action Lower the booms and drive to a level surface...

Страница 49: ...oach Distance the minimum safe distance that electrical conductors may be approached when using the aerial platform Also called M S A D operation the performance of any aerial platform functions withi...

Страница 50: ......

Страница 51: ...been properly completed and returned to the Snorkel Warranty department within fifteen 15 days after delivery of the Snorkel product to the Customer or Dealer s demonstration rental fleet Snorkel must...

Страница 52: ...SSC are covered under warranty for a period of 12 twelve months from the date of invoice provided that those parts have been subject to appropriate storage to prevent damage and deterioration conditio...

Страница 53: ...ydraulic fluid filters and lubrication paint and decals engine tune up brake adjust ments etc Snorkel will not cover leaks from fittings hoses and any other connection points after the unit has been i...

Страница 54: ...ving the rejection or adjustment notice The appeal should be grounded on express reasons and supported by relevant evidence Appeals received outside of this time limit will not be considered SNORKEL W...

Страница 55: ......

Страница 56: ...l Distributore locale EUROPE MIDDLE EAST AFRICA ASIA PHONE 44 0 845 1550 058 FAX 44 0 845 1557 756 NORTH SOUTH AMERICA PHONE 1 785 989 3000 TOLL FREE 1 800 255 0317 FAX 1 785 989 3070 AUSTRALIA PHONE...

Отзывы: