Page 9 of 18
some glue onto any screw before fixing it. Make sure that the
length of cable on the roof is sufficient to do proper cable work.
This is your last chance to do so.
g)
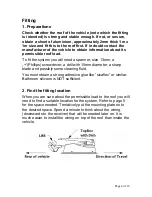
Now double check that the Oyster is in a proper position with
the LNB-arm pointing to the back of the vehicle, that the cables
are plugged into the TopBox and that the cable work on the roof
is nice and clean. If all is perfect you can fix the TopBox with the
4 nuts and you can tighten the plastic ring on the aluminium
elbow. The ring has a size of 27mm, but can easily be tightened
by hand.
Ensure that all work you have done is nice and clean and
that the roof is fully waterproof.
Содержание OYSTER DIGITAL CI
Страница 1: ...Version 1 2008 Installation Instructions OYSTER DIGITAL CI...
Страница 13: ...Page 13 of 18 9 Interconnection...


