SmartSat OYSTER DIGITAL CI Скачать руководство пользователя страница 15

Page 15 of 18 

11. Adjust TV set and receiver


You have two possibilities to interconnect the receiver and the 
display (TV set). It is enough to do only ONE of either the coax 
connection or SCART connection. 

Coax connection 

First, you need to connect the coax cable on both sides (TV and 
receiver) then you will have to tune in your TV to the proper 
channel. To do so the Oyster just needs to be powered up. Refer 
to your TV set manual how to operate your TV to tune in 
correctly. 

SCART connection 

This way needs no tuning of the TV set and will typically give a 
better picture quality, therefore it is to be preferred. Simply 
connect the SCART cable into the receptacle named “TV scart” 
on the receiver side and into the matching one on the TV side. 

Almost any TV will auto detect the receiver when switched on 
and will automatically change over to SCART input. If not, you 
need to refer to the TV manual to find how to get the TV into the 
CART (AV) mode. 


Once the connection of the TV is OK you should see at least 
some Onscreen Display menu coming from the Oyster receiver. 

Press the red button on the Oyster remote again to retract the 
dish. With the dish retracted the Oyster should switch to Standby 
immediately. 


Содержание OYSTER DIGITAL CI

Страница 1: ...Version 1 2008 Installation Instructions OYSTER DIGITAL CI...

Страница 2: ...never you use your new system Please read each topic in this manual carefully before performing the work described there Go through the topics step by step Attention Highly sensitive device Never appl...

Страница 3: ...e from TopBox to Receiver 3 pin power supply strip RED 12V BROWN GND Black Ignition TV coaxial cable SCART cable Operating instructions Fitting instructions this document 6 screws for the mounting pla...

Страница 4: ...Phillips screwdriver a drill with 15mm diameter a sharp blade and possibly some cleaning fluid You must obtain a strong adhesive glue like sicaflex or similar Bathroom silicone is NOT sufficient 2 Fin...

Страница 5: ...install the receiver in any hidden location inside your vehicle just the remote eye should be visible to the owner It is a good idea to place the eye close to the TV or flat display When hiding the r...

Страница 6: ...tem with the LNB pointing to the back of the vehicle This diagram shows you the space required for fitting With the dish in folded down position there is a free space of about 135mm 5 inches between t...

Страница 7: ...If not done already remove the 4 nuts fixing the TopBox onto the mounting plate Take away the TopBox for the moment The mounting plate is glued onto the roof first and fixed with 6 screws afterwards B...

Страница 8: ...location of the hole wisely to avoid any extra work inside the vehicle b Place the elbow on its intended position above the hole Do the necessary cable work on the roof Push or pull the cable through...

Страница 9: ...tion with the LNB arm pointing to the back of the vehicle that the cables are plugged into the TopBox and that the cable work on the roof is nice and clean If all is perfect you can fix the TopBox wit...

Страница 10: ...iver Make sure that the receiver s main switch is in OFF or 0 position You have to extend the 3 short pieces of wire to connect it to the matching terminals inside the vehicle Refer to page 9 for the...

Страница 11: ...y connect the system to the vehicle s battery If you find existing power lines in the vehicles note that they are most often NOT sufficient to supply the Oyster Never ever connect the Oyster to lines...

Страница 12: ...e automatic retraction will avoid any damage to the system if the owner accidentally forgets to switch the system off properly before starting to travel You must connect the brown line to the vehicle...

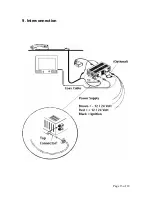
Страница 13: ...Page 13 of 18 9 Interconnection...

Страница 14: ...sat mouse If you see a moving bar the antenna will go up If you just see a small dot press the red button on the remote to get it up If you see two bars for more than 5 seconds then something may be...

Страница 15: ...eds no tuning of the TV set and will typically give a better picture quality therefore it is to be preferred Simply connect the SCART cable into the receptacle named TV scart on the receiver side and...

Страница 16: ...just switch on again and wait about a minute while the system will locate the satellite and will lock onto its transmission Any details about the operation of the Oyster can be found in the OYSTER DI...

Страница 17: ...neously for a short moment to get the system up Everything else will go on automatically from now on until you will see a picture on your screen The Oyster will typically move to the position where a...

Страница 18: ...any questions about the fitting of the OYSTER DIGITAL satellite system you can call our hotline under Telephone 07 5540 6850 Fax 07 5546 7044 Office hours Monday Friday 8 00am 5 00pm Or check the web...

Отзывы: