C H A P T E R 2
Installing your SMART Audio system
14
|
1012080 Rev A1
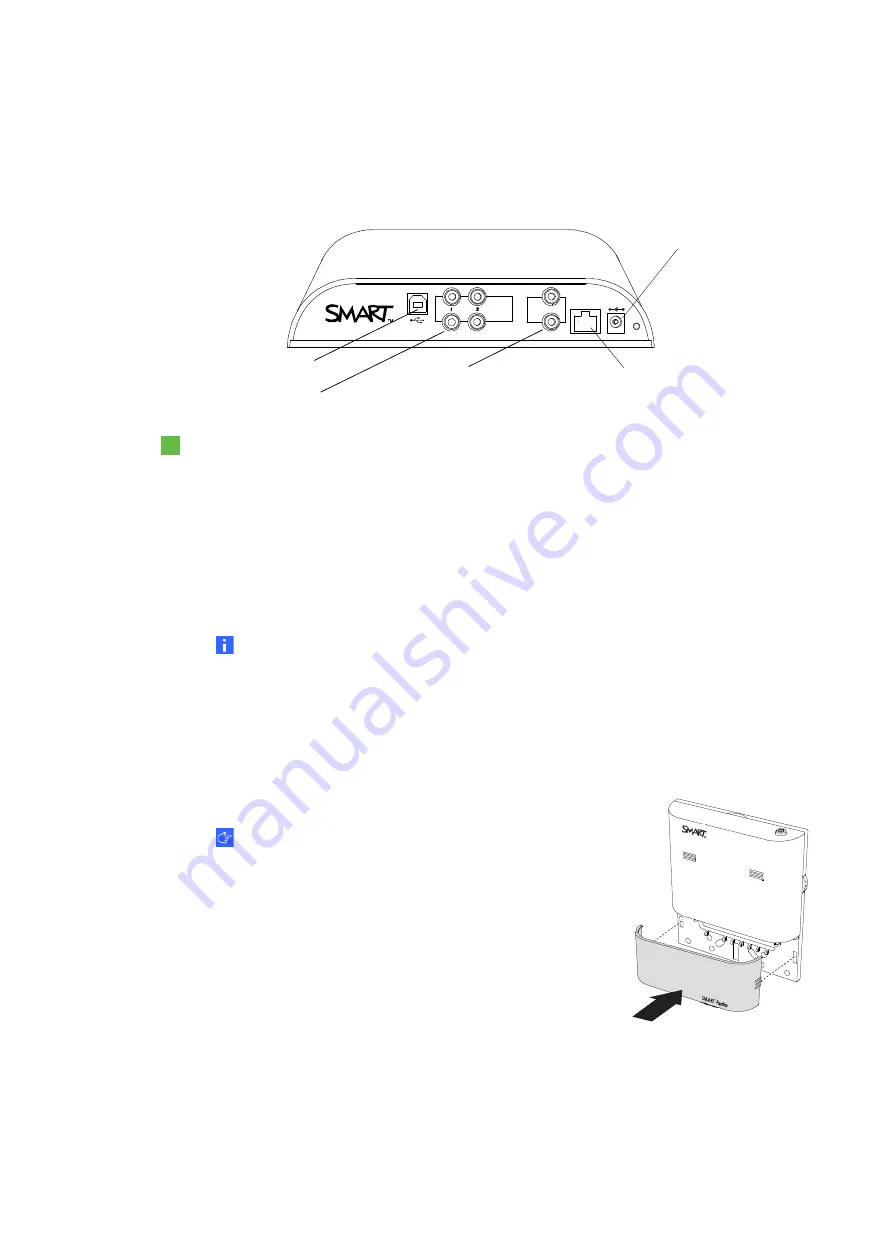
Attaching cables to the control unit
For more information, see the
SMART Audio system cabling diagram
Control unit connectors
To connect cables to the control unit
1.
Connect the Cat 5e cable from the room module to the room module connector on the
control unit.
2.
Connect the control unit to a power outlet with the included power cable.
3.
Connect the included USB cable from the control unit to your computer.
4.
If you have a SMART Board interactive whiteboard system, connect the RCA cable (with
two connectors on each end) from your projector to the
Aux In 1
connectors.
NOTE
The
Aux In 1
input is a mono input, not a stereo input.
5.
If you have a secondary audio device like a CD player, connect the RCA cable from the
device to the
Aux In 2
connectors.
6.
Connect a recording feed or an assistive listening device to the
Line out / ALS out
connector.
7.
Attach the cable cover to the mounting plate.
IMPORTANT
If you connect cables that run from outside of the wall,
snap and remove the break-away plate at the bottom of
the cable cover so you can connect the cables to the
control unit.
A ux In
Out
To R M
19 V DC
RESET
Line out / ALS out
Room module connector
USB B receptacle
Auxiliary inputs
Power input receptacle
Содержание Adio 340
Страница 1: ...SMART Audio 340 Classroom amplification system Installation guide...
Страница 4: ...ii 1012080 Rev A1...
Страница 22: ...CHAPTER 2 Installing your SMART Audio system 18 1012080 Rev A1...
Страница 26: ......
Страница 27: ......
Страница 28: ...SMART Technologies smarttech com support smarttech com contactsupport 1012080 Rev A1...


